5Setting Up Additional Integrations
Setting Up Contractor Integration
This topic describes how to import and activate integration settings that enable you to validate contractor information against data from the contractor licensing body.
Oracle provides pre-built integrations with specific contractor licensing bodies. To set up this integration, download the integration files from My Oracle Support and then import them into Oracle Autonomous Integration Cloud (OIC). To use an integration after you set it up, use the Contractor License Options page. For more information, see . Setting Up Contractor License Options.
To set up contractor integration:
Go to My Oracle Support (MOS) and access Doc ID 2672514.1.
Follow the instructions on the MOS page, and save the .iar integration file for your contractor licensing body.
Access the main console in OIC.
Click Integrations in the left frame.
Click the Import button at the top of the Integrations page.
Select the integration file for your licensing body, then click the Import button.
Click Connections in the left frame.
Test the Generic REST Trigger connection:
Access the detail page for the Generic REST Trigger connection..
Click the Test button.
When the test is 100% complete, click Save and then Close.
Test the integration for the imported licensing body:
Access the detail page for the licensing body connection.
Click the Test button.
When the test is 100% complete, click Save and then Close.
Click Integrations in the left frame to return to the Integrations page.
Turn on the activation switch for the new licensing body integration.
In the Activate Integration window that appears, click the Activate button.
Setting Up a Proxy Role and User for Integrated Voice Response
Set up a proxy user in the Oracle Security Console to give your Integrated Voice Response (IVR) system access to PSCR.
The IVR system accesses permit information via REST, using the proxy user credentials. During a call, a public user provides the IVR system with both a permit number and their personal IVR code. The IVR system sends that code along with any request to access the permit information in the PSCR system. PSCR verifies that the code matches the IVR code that’s stored in the permit owner’s account. If the code matches, the request is honored.
In this procedure you will use the Security Console to:
Create a custom role for the IVR access.
Assign a delivered duty role to the custom role.
Create the IVR proxy user.
Assign the custom IVR role to the IVR proxy user.
For more information about using the Security Console, see: Using the Security Console.
Creating the IVR Custom Role
To create the PSC IVR Proxy User role:
Navigate to the Security Console.
To navigate to the Security Console, you have these options:
In Functional Setup Manager, click the task: Create Integrated Voice Response Proxy User.
Click Setup and Maintenance on the Agency Springboard, and on the Fusion Applications home page, select
Select the Roles tab.
Click Create Role.
On the Create Role: Basic Information page enter the following:
Page Element
Value
Role Name
PSC IVR Proxy User
Role Code
CUSTOM_PSCR_IVR_PROXY_USER
Role Category
Financials — Job Roles
Click the Role Hierarchy step, and add the following duty role: PSC Interactive Voice Recognition Proxy User (ORA_PSC_IVR_PROXY_USER_DUTY).
Click the Summary step and click Save and Close.
Creating the IVR User
To create the IVR proxy user:
In the Security Console, click the Users tab.
On the User Accounts page, click Add User Account.
On the Add User Account page in the User Information section, enter a Last Name and User Name of your choice.
Note: The name given for the proxy user should be generic, such as IVR Proxy User.Enter a Password of your choice and confirm it.
Click Add Role for the Roles grid, and assign this role to your proxy user:
Role Name: PSC IVR Proxy User
Role Code: CUSTOM_PSCR_IVR_PROXY_USER
Click Save and Close.
Setting Up Oracle Search Cloud Service
This topic describes how to enable Oracle Search Cloud Service (OSCS) for use with Public Sector Compliance and Regulation offerings.
Using Search Cloud Service for the Parcel Page Overview
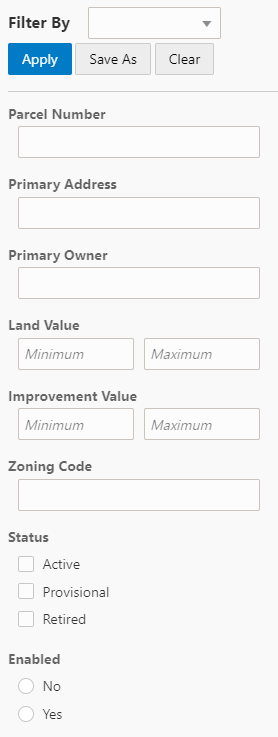
You can enable Search Cloud Service for the Parcel page. With Search Cloud Service enabled and the search index populated, when you click Filter By for the Parcel page, you can use an enhanced set of search criteria to run more flexible searches.
This example illustrates the search criteria displayed for the Parcel page when Search Cloud Service has been enabled and configured. Details are in the surrounding text.
Enabling Search Cloud Service
You opt in to the Search Cloud Service feature using the Functional Setup Manager.
To enable Search Cloud Service:
Access the Functional Setup Manager.
Select your Public Sector Compliance and Regulation offering.
Click Change Feature Opt in.
For System Administration, click the edit icon in the Features column.
Select the Enable check box for Search Cloud Service.
Click Done.
Configuring Security
To setup access to resources required for running jobs to populate indexes, make sure that the following role has been added to the PSC System Administrator job role (ORA_PSC_SYSTEM_ADMINISTRATOR_JOB): Application Administrator (ORA_FND_APPLICATION_ADMINISTRATOR_JOB).
Enabling Search Framework Extensions
To enable search framework extensions:
From the Fusion Applications homepage, navigate to Manage Applications Core Administrator Profile Values.
In the Profile Option Code field enter ORA_FND_SEARCH_EXT_ENABLED.
In the Profile Values grid, set Site to Yes.
For more information on profile values, see Profile Options in Oracle Applications Cloud: Implementing Applications.
Creating the Parcel Search Index
Before you can use the Oracle Search Service features, you need to create and populate the parcel index by running an Enterprise Scheduler Service job.
To populate the search index:
From the Fusion Applications homepage, select
Click Schedule New Process.
On the Schedule New Process page, search for and select this process: ESS job to create index definition and perform initial ingest to OSCS.
Click OK.
On the Process Details dialog box, for the Index Name to Reingest field, enter fa-psc-apo-parcel to create and populate the parcel index.