8Setting Up Inspections
Setting Up Inspection Statuses
Oracle delivers inspection statuses for use during the inspection process. You review the statuses on the Inspection Status page.
You review inspection statuses during permit setup on the Inspection Status page. You cannot delete the system-defined statuses or add new statuses, but you can modify the associated inspection status names and descriptions.
Modifying Inspection Statuses
Select .
Select the Inspections tab.
You can review the delivered inspection statuses in the System Status column:
Pending
Requested
Scheduled
Completed
Canceled
Deleted
Select the row for the inspection status that you want to modify.
On the Inspection Status Details page you can edit the inspection status name and description.
The status name is used as the display status for the inspection in the permit application.
Click Save to save any changes.
Inspection Evaluation Overview
The inspector evaluates a building site for adherence to codes and regulations required for a permit. The example here provides information about an inspection set up to use automatic score calculation with the bottom up scoring method.
A permit might require one or more inspections, each inspection might have one or more checklists, and each checklist might have checklist items or not, depending on the inspection configuration. The inspector performs an inspection by assessing the checklist items, if any, then checklists, and up to the inspection level. The evaluation results that the inspector enters are rolled up to the next level until a final inspection score is calculated if scoring is used.
Scoring is not required. The score is the rolled up to the next level automatically only if scoring used. Otherwise, you specify the result manually on each level.
The following example describes the setup and results of performing an inspection using the bottom up method of scoring. Scoring bottom to top indicates that the inspector starts with a zero score and adds points for each criterion that is met.
Example: Using the Bottom Up Scoring Method
Before you begin, set up the assessment type, rating method, passing rule, scoring method, and checklist, which includes the checklist items. In this case, you don’t need to set up the checklist group, because checklist and checklist group are mutually exclusive of each other.
This example illustrates setup for an inspection on the Inspection Type Details page. Details are in the surrounding text.
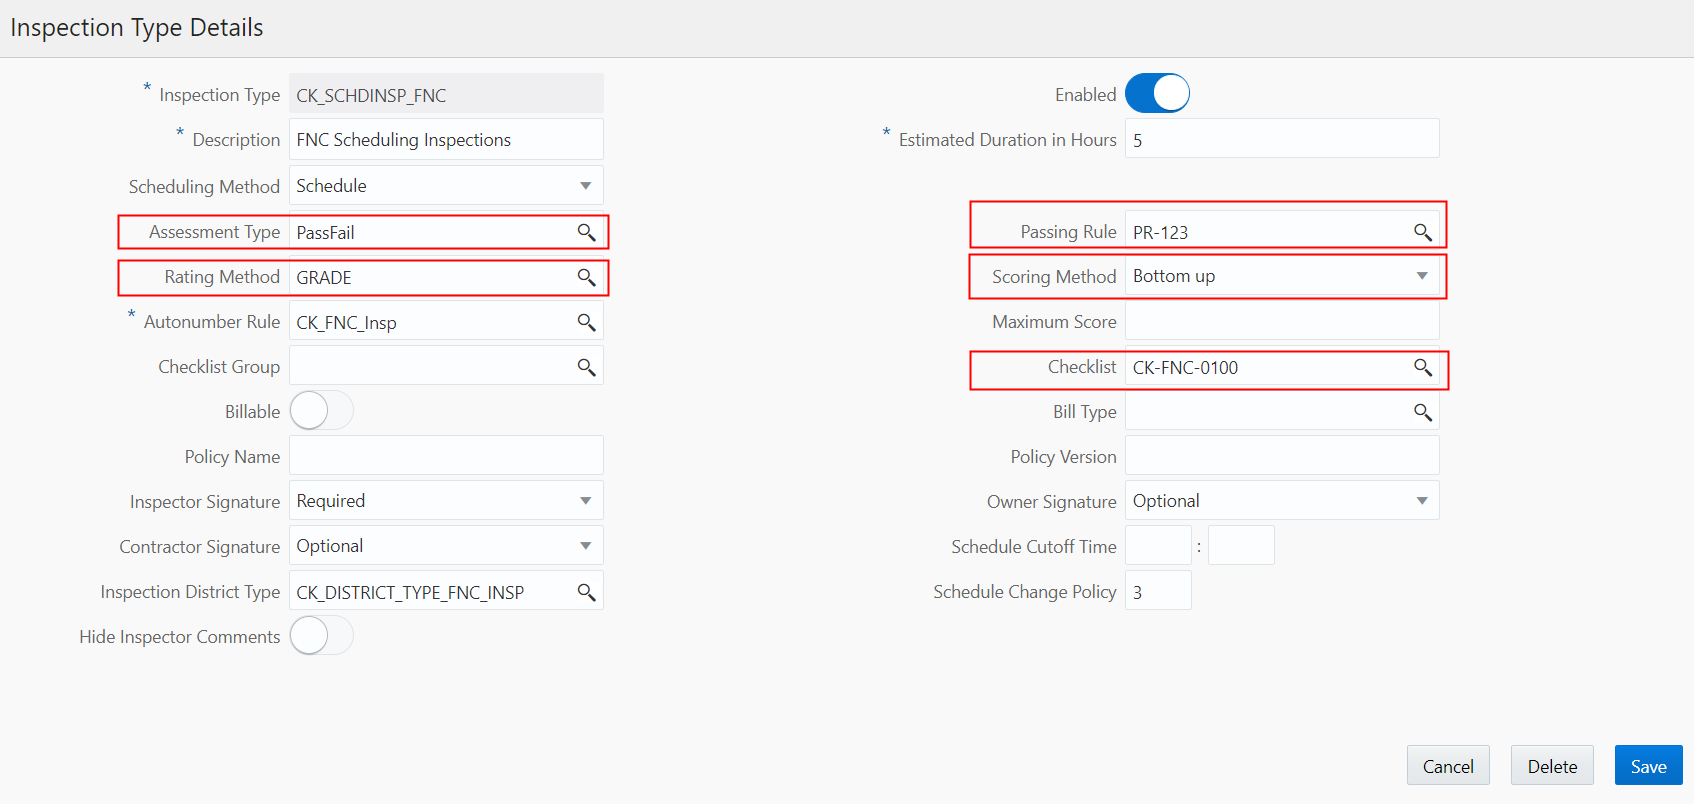
The setup includes the following:
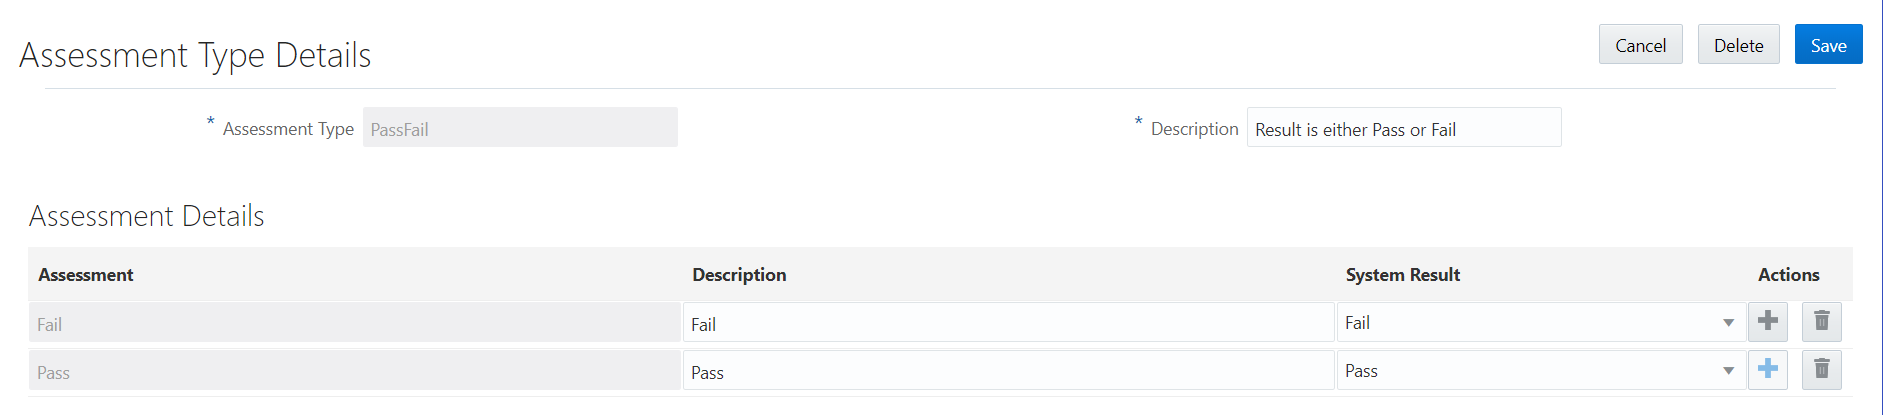
Assessment Method
The assessment method is defined on the assessment type page and used in the inspection type definition. During the inspection, the inspector selects an available assessment which is associated with a system result. The system result determines the scoring calculation as follows:
Displayed Assessment
System Result
Scoring Calculation
Pass
Pass
Score = All Points
Corrected on Site
Corrected
Score = All Points
Fail
Fail
Score = No Points
NA (not applicable)
Other
Score = No Points
Note: Only the displayed assessment value is configurable by the agency. The available system results are Pass, Fail, Corrected, and Other. You must have one assessment with a system result of Pass and one assessment with a system result of Fail. You can define multiple assessments with system results of Corrected and Other.Inspection Scoring Method
The scoring method is defined on the inspection type. In this example, the scoring method is Bottom Up.
Rating Method
When you use a scoring method, you also must set up a rating method. The rating method defines the range of scores used at the inspection type level.
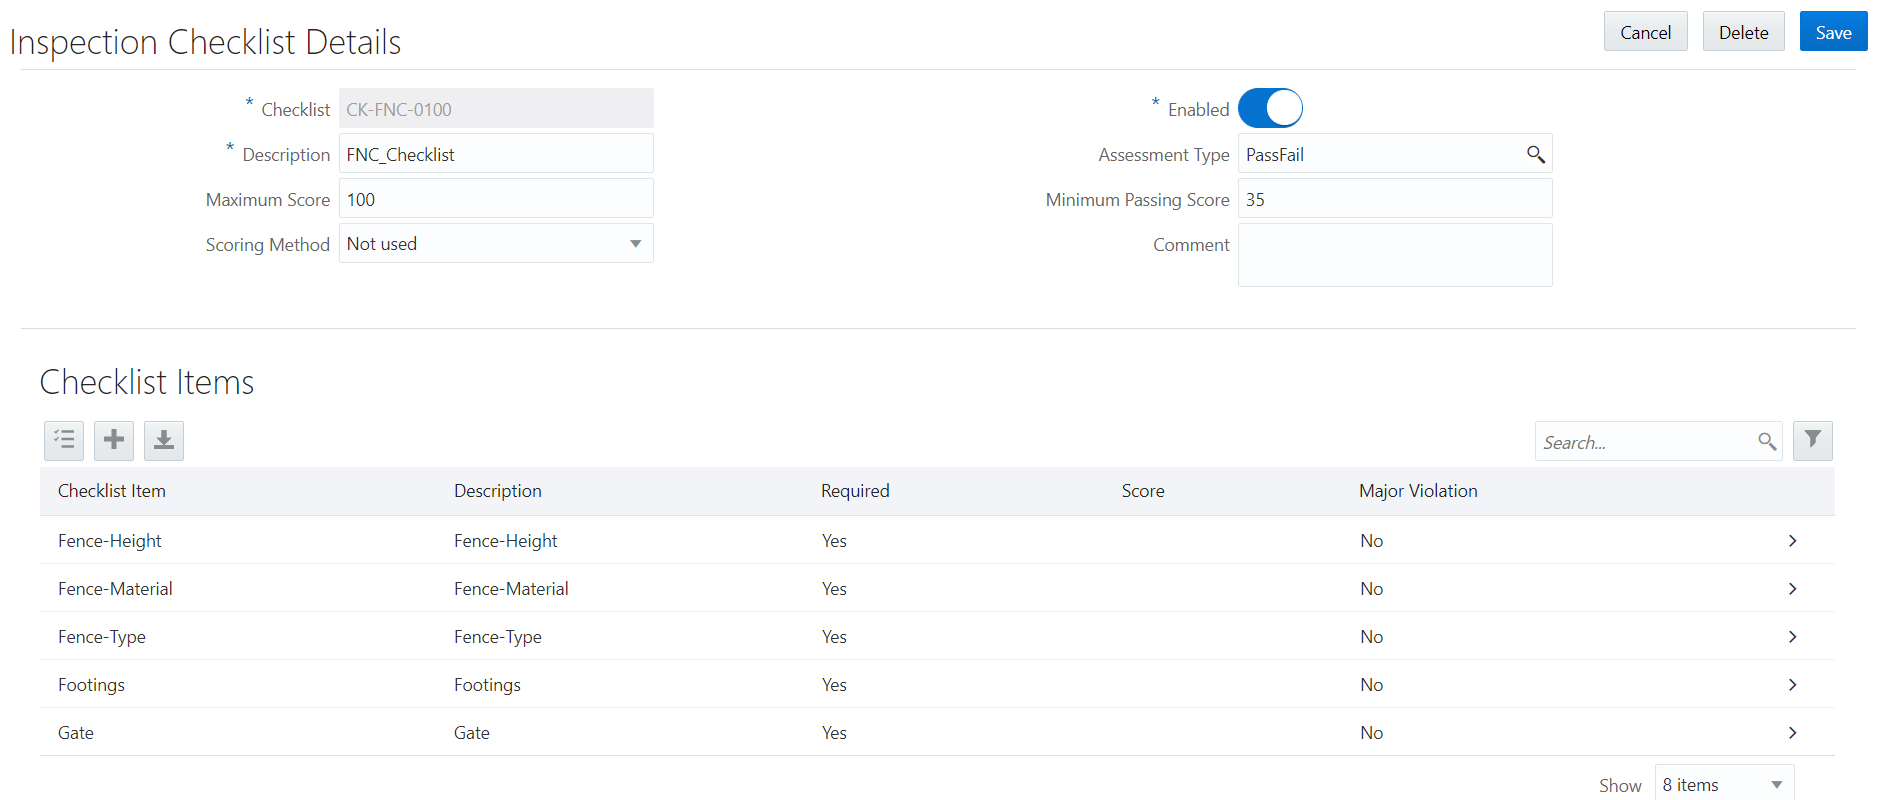
Checklist
The checklist used in the inspection is defined on the inspection type. For example, the checklist could be Electrical for a residential addition. For multiple checklists, you enter a checklist group name. A checklist group can have different inspection checklists, such as both Electrical and Plumbing for a residential addition.
Checklist Item
The inspection score is defined in the inspection checklist details. In this example, each checklist item is set up with a possible score of 25. The inspector’s assessment determines how many points are applied to the checklist. When the inspection result is Pass, the item receives the complete score.
See checklist details in Setting Up Inspection Checklists.
Based on the setup, an example inspection evaluation might look like this:
| Checklist Item |
Possible Score |
Inspector’s Checklist Item Result (Assessment) |
Assessment System Status |
Calculated Score |
Checklist Total Score |
|---|---|---|---|---|---|
| 1 |
25 |
Pass |
Pass |
25 |
Item 1 = 25 |
| 2 |
25 |
Pass |
Pass |
25 |
Item 1 + Item 2 = 50 |
| 3 |
25 |
Corrected on Site |
Corrected |
25 |
Item 1 + Item 2 + Item 3 = 75 |
| 4 |
25 |
Fail |
Fail |
0 |
Item 1 + Item 2 + Item 3 + Item 4 = 75 |
For multiple checklists, the sum of the checklist scores determines the inspection score.
Setting Up Inspection Assessment Types
Assessment types identify the results available for assessing an inspection, for example, Pass and Fail. You add, modify, or delete assessment types and codes for inspections on the Assessment Type pages.
An assessment type includes one or more assessment codes, which identify the possible results for the inspection type. Assessment types are also used for inspection checklist and checklist item results.
Assessment types function independently of the scoring method, maximum score, and minimum score, for example:
If the system result is Pass or Corrected, the full score is assigned.
If the system result is Other or Fail, the score is 0.
Scoring for each system result is predefined in the system for inspections.
This example illustrates the Assessment Type Details page containing the field values described in the following table.
Adding Inspection Assessment Types
Select .
On the Assessment Type page, click Add to add an assessment type.
On the Assessment Type Details page, enter an assessment type name and description.
In the Assessment Details section, click Add in the assessment code row.
Enter values in the fields of the assessment code row:
Page Element
Description
Assessment
Enter a code name.
Description
Enter descriptive text for the code.
System Result
Select the system-defined result value that you want to set for this assessment code:
Other
Pass
Fail
Corrected
You must map each assessment code to a system result value. Each assessment type must include a system result of Pass and a system result of Fail. The default value is Other.
Note: You must assign Fail to only one code. Likewise, you must assign Pass to only one code.The system result is used in the inspection result processing. If scoring is used, the system result of Pass and Corrected receive the maximum score. The system results Other and Fail receive no score.
The system result is also used to determine whether an inspection result is pass (system result Pass) or fail (system result Fail). For example, the Inspection Summary report includes violation information when a checklist or checklist item result is associated with the system result Fail.
Click the Add icon at the end of the row to add another assessment code row.
Click Save.
Modifying Inspection Assessment Type Details
Select .
Select the row for the assessment type you want to modify.
In the header fields on the Assessment Type Details page, you can only modify the assessment type description. You cannot change the name.
In the Assessment Details section, you can:
Change the description of an assessment code. You cannot change the code name.
Select a new value in the System Result column. Available values are Pass, Fail, Corrected, or Other. Each assessment code must be mapped to a system-defined result value. The default value is Other. You can only use Pass and Fail once.
If you made any changes, click Save.
Deleting Inspection Assessment Types
Select .
On the Assessment Type page, click the Edit icon.
Select one or more check boxes for the assessment type rows you would like to delete.
Note: When you delete an assessment type, you also delete the associated details.Click the Delete icon.
Deleting Inspection Assessment Type Details
Select .
On the Assessment Type page, select the row for the assessment type you are working with.
On the Assessment Type Details page, click the Delete icon at the end of the assessment code row you would like to delete. You delete details one row at a time.
Click the Save button.
Setting Up Rating Methods
A inspection rating method may have one or more rating ranges, which an inspector uses to evaluate the object of an inspection. You add, modify, or delete rating methods and rating details for inspections on the Rating Method page.
If you are using scoring for inspections, you must also set up rating methods. Rating methods are used at the inspection type level and are not required at the checklist or checklist item levels.
Adding Rating Methods
You add an inspection rating method by setting up the rating method code with a description and rating details. For example, an agency might use GRADES as the rating method code, with a description of Standard Grades. The rating details might include grades such as A (high) to F (low), and provide a range of scores to each rating. If the rating for an A grade is defined by 90-100 points, an inspection score of 95 would receive an A.
Select .
On the Rating Method page, click Add to add a rating method.
On the Rating Method Details page, enter a rating method name and description. The description is a user-friendly name for the inspection rating method.
To add rating method values, click the Add button for the first row in the detail grid, and the Add icon for the next rows.
Enter values for the rating method:
Page Element
Description
Rating
Enter a short name for the rating.
Minimum Score and Maximum Score
Enter minimum and maximum numerical values to specify the range for this rating. Do not use decimals.
The range for this rating cannot overlap the range for another rating.
Click Save.
For example, if your rating method uses grades A through F, you specify the rating range for each grade in the Rating Method Values table. The range for each rating cannot overlap the range for another rating.
| Rating |
Minimum Score |
Maximum Score |
|---|---|---|
| A |
91 |
100 |
| B |
81 |
90 |
| C |
71 |
80 |
| D |
61 |
70 |
| F |
0 |
60 |
Modifying Rating Methods
Select .
On the Rating Method page, select the row for the rating method you want to modify.
In the header fields on the Rating Method Details page, you can only modify the rating method description. You cannot change the name of the rating method.
Click Save.
Modifying Rating Method Values
You can change the minimum and maximum scores for a rating on the Rating Method Details page.
Select .
On the Rating Method page, select the row for the rating method you want to modify.
On the Rating Method Details page, select the rating row in the values grid that you want to modify.
Change the values in the Minimum Score or Maximum Score fields for this rating on the Rating Method Value Details page. You can use the arrow icons to increase or decrease the score values. The range for this rating cannot overlap the range for another rating. You cannot change the name of the rating.
Click Save.
Deleting Rating Methods
Select .
On the Rating Method page, select the row for the rating method you want to delete.
On the Rating Method Details page, click Delete.
Note: When you delete a rating method, all associated rating details are also deleted.To delete multiple rating methods, click the Edit icon on the Rating Method page.
Select the check boxes for the rating methods you want to delete.
Click the Delete icon.
Note: When you delete multiple rating methods, all associated rating details are also deleted.Click Save.
Deleting Rating Method Values
Select .
On the Rating Method page, select the row for the rating method you want to modify.
On the Rating Method Details page, select the ratings row in the value grid that you want to delete.
On the detail page for the individual rating, click Delete.
To delete multiple rating method values, click the Edit icon in the Rating Method Values section.
Select the check boxes for the rating method values you want to delete.
Click the Delete icon.
Click Save.
Setting Up Passing Rules
A passing rule identifies the different ways an inspection can be scored. You add, modify, and delete passing rules for inspections on the Passing Rule page.
Passing rule definitions provide the criteria for determining whether an inspection passes or fails. If the scoring method is not used in the inspection type definition, a passing rule is not required.
Adding Passing Rules
A passing rule may have one or more scoring ranges that you specify in the passing rule details.
Select .
On the Passing Rule page, click Add to add a new passing rule.
On the Passing Rule Details page, enter a unique code for the passing rule and a description.
To add scoring ranges, click Add in the Passing Rule Criteria section.
Enter values in the fields on the rule details page:
Page Element
Description
Description
Enter a description for the scoring range.
Minimum Score and Maximum Score
Enter minimum and maximum numerical values to specify the scoring range. You cannot use decimals.
Number of Major Violations
Enter a value for the maximum number of major violations allowed.
Pass
Turn on the Pass switch if the specified scoring range combined with the number of violations results in a passing inspection. If the specified range and violations do not result in a passing inspection, leave the option disabled.
Note: For passing inspections that are based on a passing rule with the Pass switch on, the inspection result displays the assessment name that is defined with the system status Pass. If the Pass switch is off, the inspection result displays the assessment name that is defined with the system status Fail. The system uses the assessment type that is associated with the inspection type.Click Save.
Modifying Passing Rules
Select .
On the Passing Rule page, select the row for the passing rule you want to modify.
In the header fields on the Passing Rule Details page, you can only modify the passing rule description. You cannot modify the passing rule code.
Click Save.
Modifying Passing Rule Details
You can change the scoring range for a passing rule on the Passing Rule Details page.
Select .
On the Passing Rule page, select the row for the passing rule you want to modify.
On the Passing Rule Details page, select the scoring row in the details grid that you want to modify.
You can change the following scoring details:
Description of the scoring range.
Minimum and maximum scores to update the scoring range. Use the arrow icons to increase or decrease the score values.
Number of major violations allowed.
You can also indicate that the specified scoring range combined with the number of violations can result in a passing inspection, by clicking the Pass slider. Turn off the option using the slider if the scoring range combined with the violations does not result in passing an inspection,
Click Save.
Deleting Passing Rules
When you delete a passing rule, all associated passing rule criteria are also deleted.
Select .
On the Passing Rule page, select the row for the passing rule you want to delete.
On the Passing Rule Details page, click Delete.
If you want to delete multiple passing rules, you can delete them from the Passing Rule page:
Click the Edit icon.
Select the check boxes for the passing rule rows to delete.
Click the Delete icon.
Deleting Passing Rule Criteria
Select .
On the Passing Rule page, select the row for the passing rule with the passing rule criteria you want to delete.
In the Passing Rule Criteria section, select the row for the passing rule criteria you want to delete.
On the Passing Rule Criteria Details page, click the Delete button.
If you want to delete multiple scoring ranges, you can delete them from the Passing Rule Details page:
Click the Edit icon.
Select the check boxes for the passing rule criteria rows to delete.
Click the Delete icon.
Setting Up Inspection Checklist Categories
Use checklist categories and subcategories organize the various types of checklists items for inspections.
You set up inspection checklist categories and subcategories on the Inspection Checklist Category page.
Use the checklist categories and subcategories for categorizing checklist items when you set up inspection checklists on the Inspection Checklist Item Details page. See Setting Up Inspection Checklists.
Adding Checklist Item Categories
Select .
On the Checklist Category page, click Add to add a checklist category.
On the Checklist Category Details page, enter a category ID and description.
If you want to add a subcategory, click the Add button to add the first subcategory in the Checklist Subcategory section. Click the Add icon for additional subcategories.
On the Checklist Subcategory Details page, enter a subcategory ID and a description.
Click Save.
Modifying Checklist Item Categories
Select .
On the Checklist Category page, select the row for the category that you want to modify.
On the Checklist Category Details page, you can only modify the category description. You cannot change the category ID.
Click Save.
Modifying Checklist Item Subcategories
Select .
On the Checklist Category page, select the row for the category with the subcategory that you want to modify.
Select the subcategory that you want to modify in the Checklist Subcategory section.
You can only change the description on the Checklist Subcategory Details page.
Click Save.
Deleting Checklist Item Categories
When you delete a checklist category, all associated subcategories are also deleted.
Select .
On the Checklist Category page, select the row for the category that you want to delete.
On the Checklist Category Details page, click Delete.
If you want to delete multiple checklist categories, you can delete them on the Checklist Category page:
Click the Edit icon.
Select the check boxes for the category rows to delete.
Click the Delete icon.
Deleting Checklist Subcategories
Select .
On the Checklist Category page, select the row for the category with the subcategory that you want to delete.
On the Checklist Category Details page, select the row for the subcategory that you want to delete.
Click the Delete button on the Checklist Subcategory Details page.
If you want to delete multiple subcategories, you can delete them on the Checklist Category Details page:
Click the Edit icon.
Select the check boxes for the subcategory rows to delete.
Click the Delete icon.
Setting Up Inspection Checklists
Inspection checklists identify all the items that the inspector must assess during an inspection. You set up inspection checklists and checklist items on the Inspection Checklist pages.
Before adding inspection checklists, you set up:
Inspection assessment types for your agency, if you want to associate a checklist with an assessment type.
Inspection checklist categories and subcategories, if you want to categorize your checklist items.
You add, modify, and delete checklists and checklist items in the inspection setup pages. The checklist and checklist items are copied to the inspection when the inspection schedule is created, and appear on the Inspection Checklist page, the Checklist Items page, and the Checklist Item Result page.
You identify the checklist or checklist group to use for an inspection on the Inspection Type page. To set up a checklist group after setting up checklists, see Setting Up Inspection Checklist Groups.
This example illustrates the Inspection Checklist Details page containing the field values described in the preceding table.
Adding Inspection Checklists
Select .
On the Inspection Checklist page, click Add to add a checklist.
On the Inspection Checklist Details page, enter a checklist ID and description.
Verify that the Enabled switch is turned on. The switch is turned on by default for new checklists.
You can also enter values for these fields:
Page Element
Description
Assessment Type
Enter an assessment type.
The system determines a passing result based on the assessment type defined for the checklist. The assessment that is defined with system status Pass is used for the passing result. Otherwise, the assessment that is defined with the system status Fail is used.
Assessment types function independently of the scoring method, maximum score, and minimum score.
Maximum Score
Enter the maximum score possible for the checklist. This value is required if the scoring method is Top down, which will be available in a future release.
Minimum Passing Score
Enter a minimum score for a passing grade. This value is required for the scoring method Bottom up.
If the total score for the checklist is equal to or greater than the minimum passing score, the checklist receives a passing result.
Scoring Method
Select a scoring method to be used for the checklist:
Bottom up: Scoring from the bottom up indicates that the scoring starts with zero and the inspector adds points for the criteria that are met.
Not used: This is the default value and indicates that no scoring method is used for this checklist. You must specify the result manually for each level: checklist item, checklist, and inspection.
If you don’t use the scoring method you can’t use the passing rule and rating method. This also means that results are not automatically calculated starting with the checklist items to the checklist to the inspection level.
Note: The scoring method specified for the checklist should match the scoring method in the Inspection Type definition.Comment
Enter any additional information.
Click Save.
Adding Inspection Checklist Items
Select .
On the Inspection Checklist page, select the row for the checklist to which you want to add checklist items.
On the Inspection Checklist Details page, click the Add button in the Checklist Items section to add the first checklist item. Click the Add icon for additional checklists.
Enter values for fields on the Checklist Item Details page. Required fields include the checklist item ID and description.
Page Element
Description
Checklist Item and Description
Enter an ID and description for the checklist item.
Score
Enter the score the item receives if it passes the inspection.
Major Violation
Turn on the switch to indicate that this checklist item is considered a major violation if it does not pass inspection.
Category and Subcategory
Enter a category and subcategory for the checklist item. See Setting Up Inspection Checklist Categories.
Instructions
Click the Add button in the Instructions section to add instructions for inspecting the checklist item.
Add instructions on the Instruction Details page, including an instructions ID and the instructional text.
The Required switch is turned on by default to indicate that the inspection of the item is required. The inspector can’t submit the inspection result until all required checklist item and checklist results are complete.
If the checklist item is not required, you can turn off the switch.
Click Save.
Modifying or Deleting Checklists
Select .
On the Inspection Checklist page, select the row for the checklist you want to modify.
On the Inspection Checklist Details page, you can change the values for all fields except for the checklist ID.
If you made any changes, click Save.
If you want to delete the checklist, click Delete.
Note: When you delete a checklist, all associated checklist items are also deleted.If you want to delete multiple checklists, you can delete them from the Inspection Checklist page:
Click the Edit icon.
Select the check boxes for the checklist rows to delete.
Click the Delete icon.
Modifying or Deleting Checklist Items
Select .
On the Inspection Checklist page, select the checklist row associated with the checklist item.
On the Inspection Checklist Details page, select the row for the checklist item in the Checklist Items section.
On the Checklist Item Details page, you can change the values for all fields except for the checklist item ID.
If you made any changes, click Save.
If you want to delete the checklist item, click Delete.
If you want to delete multiple checklist items, you can delete them from the Inspection Checklist Details page using the Edit and Delete icons.
Click Save.
Modifying or Deleting Checklist Item Instructions
Select .
On the Inspection Checklist page, select the checklist row.
On the Inspection Checklist Details page, select the row for the checklist item that contains the instructions.
On the Checklist Item Details page, select the row for the instructions that you want to modify or delete.
Change the instructional text on the Instruction Details page. You can’t change the instructions ID.
If you made any changes, click Save.
If you want to delete the instructions, click Delete.
If you want to delete multiple instructions, you can delete them from the Checklist Item Details page using the Edit and Delete icons.
Click Save.
Setting Up Inspection Checklist Groups
A checklist group comprises inspection checklists that you can associate with a permit. You define a checklist group by selecting one or more inspection checklists.
You set up inspection checklist groups on the Checklist Group page.
Before setting up inspection checklist groups, you must set up your checklists on the Inspection Checklist page. See Setting Up Inspection Checklists.
Adding Inspection Checklist Groups
Select .
On the Checklist Group page, click Add to add a checklist group.
On the Checklist Group Details page, enter a name and a description for the group of inspection checklists.
Click Save.
To add an inspection checklist to the group, click Add in the Checklists section.
On the Checklist Details page, enter the ID for an existing checklist in the Checklist field.
The description for the checklist ID you entered appears in the Description field.
Click Save.
Modifying Inspection Checklist Groups
You can modify or delete checklist groups and lines on the Inspection Checklist Group page.
Select .
On the Checklist Group page, select the row for the checklist group that you want to modify.
On the Checklist Group Details page, you can only modify the checklist group description. You cannot change the group name.
Click Save to save any changes.
Deleting Inspection Checklist Groups
Select .
On the Checklist Group page, select the row for the checklist group that you want to delete.
On the Checklist Group Details page, click Delete.
If you want to delete multiple checklist groups, you can delete them from the Checklist Group page:
Click the Edit icon.
Select the check boxes for the checklist group rows to delete.
Click the Delete icon.
Removing Inspection Checklist from an Inspection Checklist Group
Select .
On the Inspection Checklist Group page, select the row for the checklist group from which you want to remove one or more inspection checklists.
On the Inspection Checklist Group Details page, select the row for the inspection checklist that you want to remove from the group.
On the Inspection Checklist Details page, click Delete.
If you want to remove multiple inspection checklists from the group, you can delete them from the Inspection Checklist Group Details page:
Click Edit in the Inspection Checklists section.
Select the check boxes for the inspection checklist rows to delete.
Click Bulk Delete.
Click Save.
Setting Up Inspection Types
Define inspection types used by your agency to identify the requirements and options for different types of inspections. You set up information such as scheduling, assessments, checklists, billing, signatures required, and comments on the Inspection Type pages.
The inspection type is associated with the permit for the scheduled inspection and defines the different attributes for performing the inspection.
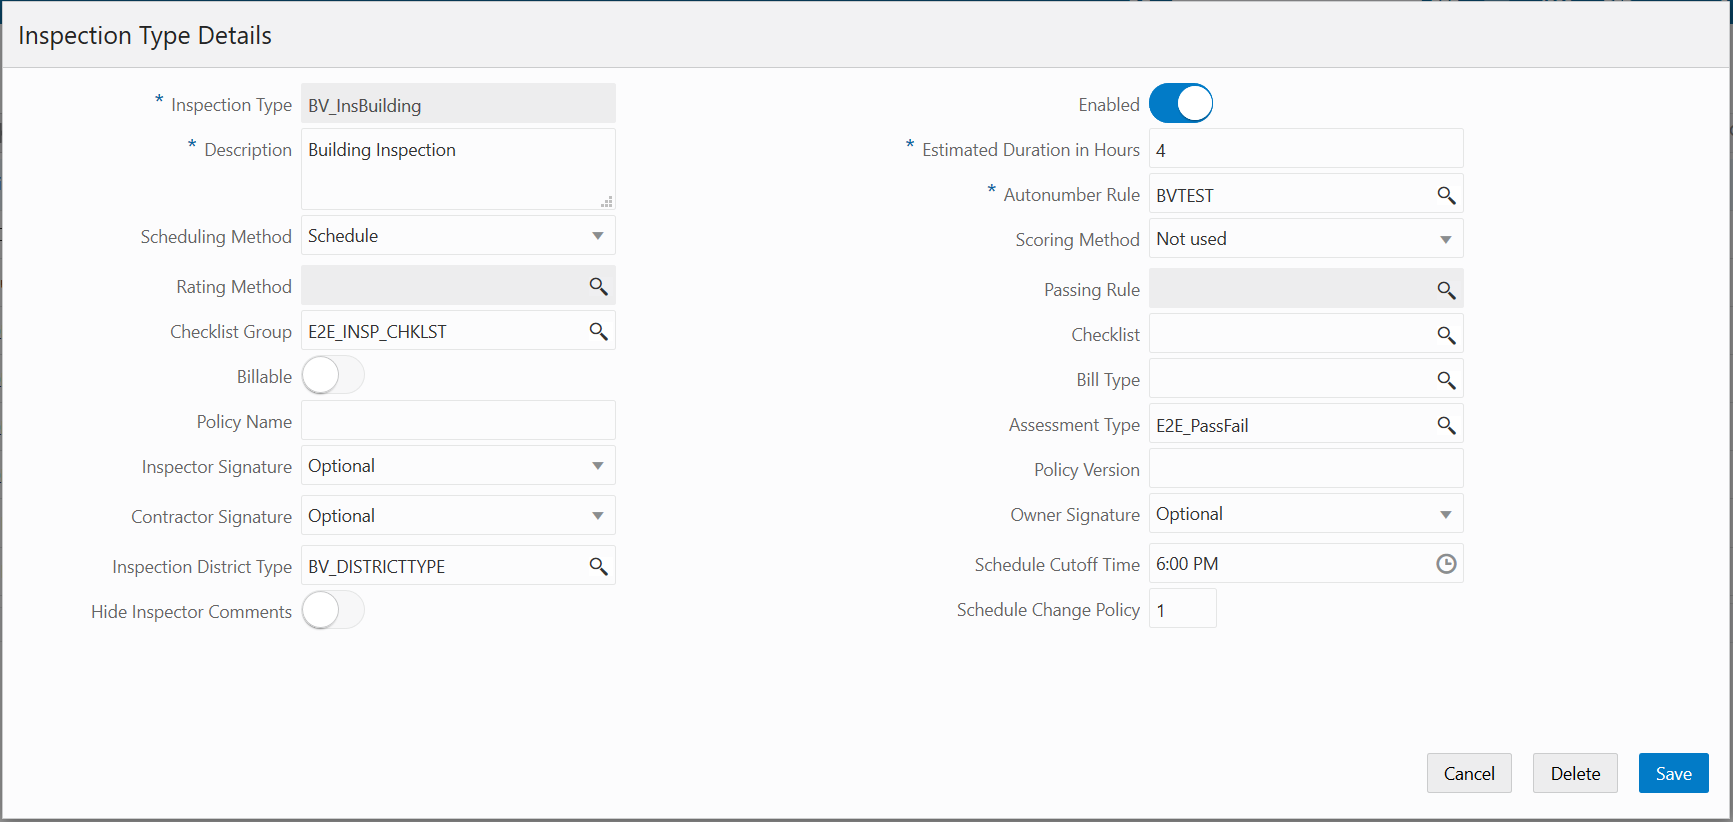
This example illustrates the Inspection Type Details page containing the field values described in the following table.
Adding Inspection Types
You add inspection types for your agency on the Inspection Type page. You must set up the attributes for the inspection type before you begin.
Select .
On the Inspection Type page, click Add New to add a new inspection type.
Enter values for fields on the Inspection Type Details page. Required fields include Inspection Type and Description, Estimated Duration in Hours, and Autonumber Rule.
Page Element
Description
Inspection Type and Description
Enter a unique ID and description for the inspection type.
Estimated Duration in Hours
Enter the estimated number of hours this type of inspection will take.
This field is required for scheduling. For more information, see Setting Up Inspection Scheduling.
Scheduling Method
Select the scheduling method for inspections associated with this inspection type.
Select Ready to enable applicants to indicate the date and time when the site is ready to be inspected. Inspections with this scheduling method are assigned and scheduled by inspection supervisors using the supervisor calendar.
Select Schedule to enable applicants to select a date and time when requesting inspections.
Select Request to enable applicants to select a preferred date and time range for requested inspections. Inspections with this scheduling method are assigned and scheduled by inspection supervisors using the supervisor calendar.
For more information on inspection scheduling, see Setting Up Inspection Scheduling and Assigning Inspections Using the Supervisor Calendar.
Assessment Type
Enter an assessment type, which is used in the inspection result processing.
For more information, see Setting Up Inspection Assessment Types.
Passing Rule
Enter a passing rule, which defines the criteria for determining whether an inspection passes or fails.
For more information, see Setting Up Passing Rules.
Rating Method
Enter a rating method, which defines the scoring ranges used by the passing rule to determine whether an inspection passes or fails.
You must set up a rating method if you are using scoring. For more information, see Setting Up Rating Methods.
Scoring Method
Select a scoring method from these options:
Bottom up: Scoring bottom to top indicates that the inspector starts with zero and adds points for each criterion that is met. You must set up a passing rule for bottom up scoring.
Not used: This is the default value and indicates that no scoring method is used for this inspection. You must specify the result manually for each level: checklist item, checklist, and inspection.
If you don’t use the scoring method you can’t use the passing rule and rating method. This also means that results are not automatically calculated starting with the checklist items to the checklist to the inspection level.
Note: The scoring method specified for the checklist should match the scoring method in the Inspection Type definition.Autonumber Rule
Enter the ID for the automatic numbering rule to use for generating the inspection transaction key.
For more information, see Setting Up Autonumbering.
Checklist Group
You can enter a checklist group. If you enter a checklist group, you cannot also enter a checklist ID.
For more information, see Setting Up Inspection Checklist Groups.
Checklist
You can enter the ID for a single checklist. You cannot enter both a checklist group and a checklist ID.
For more information, see Setting Up Inspection Checklists.
Billable
Click this slider if this inspection type is billable. When you turn on this switch, the Bill Type field becomes required.
Bill Type
Enter a bill type. This field is required if the Billable switch is turned on.
For more information, see Setting Up Bill Types.
Policy Name and Policy Version
Enter the name of the template and version number the Oracle Intelligent Advisor policy.
For more information, see Overview of Oracle Intelligent Advisor Configuration.
Inspector Signature
Owner Signature
Contractor Signature
Select a signature option for the inspector, owner, and contractor associated with the inspection type:
Required: The signature field appears on the Inspection Results page.
Note: Inspectors can’t submit a completed inspection if required signatures are missing.Not Required: The signature field does not appear on the Inspection Results page.
Optional: A signature is optional for this inspection type.
The default value for the Inspector Signature is Required.
The default value for the Owner Signature and Contractor Signature is Optional.
Schedule Cutoff Time
Enter the time after which applicants and non-supervisor agency staff can no longer schedule inspections for the current day or the next day using the Scheduling modal page. For example, if the cut off is 3:00 PM and the current time is 4:30 PM, the inspection can’t be scheduled for today or tomorrow. The inspection must be scheduled for the day after tomorrow.
Note: This field does not affect an inspection supervisor’s ability to override inspection assignment times through the Scheduling modal page. It also does not affect automatic batch assignment.Inspection District Type
Enter the inspection district type for this inspection, for example a building, electrical, or plumbing inspection district. When the inspection with this inspection type is scheduled, the system finds the inspector who is assigned to a district belonging to the inspection district type defined on the inspection type.
This field is required for scheduling. For more information, see Setting Up Inspection Scheduling.
Schedule Change Policy
Enter the acceptable number of hours prior to the inspection that the user can change the schedule or cancel an inspection.
For more information, see Setting Up Inspection Scheduling.
Hide Inspector Comments
Turn on this switch if you want to hide inspector comments from public users. The default value for this switch is off so that inspector comments are visible.
Verify that the Enabled switch is turned on if you want to enable this inspection type when you save it. The switch is turned on by default for a new inspection type.
Click Save.
Modifying or Deleting Inspection Types
You can modify or delete inspection types on the Inspection Type page.
Select .
On the Inspection Type page, select the row for the inspection type you want to modify.
On the Inspection Type Details page, you can change the values for all fields except for the inspection type code.
If you made any changes, click Save.
To delete the inspection type, click Delete.
If you want to delete multiple inspection types, you can delete them from the Inspection Type page:
Click the Edit icon.
Select the check boxes for the inspection type rows to delete.
Click the Delete icon.
Setting Up Inspection Groups
An inspection group identifies a group of inspection types associated with a permit. You can set up inspection groups on the Inspection Group page.
The inspection group includes one or more inspection types. You can define inspection groups separately from permit type definitions.
Before setting up inspection groups, you must set up inspection types for your agency on the Inspection Type page. See Setting Up Inspection Types.
Adding Inspection Groups
Select .
On the Inspection Group page, click Add to add a new inspection group.
On the Inspection Group Details page, enter a name and a description for the inspection group.
Click the Enabled switch to enable the new inspection group.
To add inspection types to include in the group, click Add in the Inspection Types section.
Enter values in the columns of the inspection type row:
Inspection Type: Enter an existing inspection type.
The description for the inspection type you entered will appear in the Description field.
Required: Click the switch if the inspection type is required for the inspection group.
Note: Even if an inspection type is not required, it may become required based on business rules during processing.Final Inspection: Click the switch if this inspection type is the final inspection. One and only one row must be set as the final inspection.
Click the Add icon to add another type; otherwise, click Save.
On the Inspection Group Details page, click Save.
Modifying or Deleting Inspection Groups
You can modify or delete inspection groups on the Inspection Group page.
Select .
On the Inspection Group page, select the inspection group that you want to modify.
On the Inspection Group Details page, you can only modify the inspection group description. You cannot change the group name.
Click the Enabled switch to enable or disable the inspection group.
If you want to delete the inspection group, click Delete on the Inspection Group Details page.
Click Save to save any changes.
If you want to delete multiple inspection groups, you can delete them from the Inspection Group page:
Click Edit.
Select the check boxes for the inspection group rows to delete.
Click Delete.
In the inspection types grid, you can:
Click the Required switch to enable or disable an inspection type.
Click the Final Inspection switch to set an inspection type as the final inspection. One and only one row must be set as the final inspection.
Click Add to add a new inspection type row.
Click the Delete icon at the end of the row to remove an inspection type from the group.
Note: You cannot change the inspection type ID or description, but you can remove an inspection type and add another.Click Save to save any changes.
If you want to remove an inspection type from the group, click Delete.
If you want to remove multiple inspection types from the group, you can delete the rows from the Inspection Group Details page:
Click Edit.
Select the check boxes for the inspection type rows to delete.
Click Delete.
Click Save.
Setting Up Inspection Calendars
Inspection calendars establish the days of the week and daily hours that are available for scheduling specific types of inspections.
Administrators add, modify, and delete inspection calendars on the Inspection Calendar page.
Adding an Inspection Calendar
Select .
On the Inspection Calendar page, click Add.
On the Inspection Calendar Details page, enter values for the following fields:
Page Element
Description
Calendar ID
Enter a unique ID for the calendar.
Inspection Type
Select the type of inspection to which this calendar applies.
For more information on inspections types, see Setting Up Inspection Types.
Inspection District
Select the district to which this calendar applies.
Note: A small municipality may have only one defined district ID that includes its entire inspection area. A large municipality may have multiple defined district ID. This enables you to create inspection calendars for different areas to optimize your distribution of resources.For more information on districts, see Setting Up Districts.
Description
Enter a description for the calendar. For example, you might enter Final fence inspection calendar.
Start Date
Enter the first day of the calendar.
End Date
Enter the last date of the calendar. You can leave this field blank to give the calendar an open end date.
Start Time and End Time
Enter the start and end time for the calendar. For example, you might enter a start time of 09:00 and an end time of 16:00.
Recurrence
Select whether the calendar reoccurs weekly. If you select Weekly recurrence, enter the number of weeks between occurrence in the Weeks Between Occurrences field.
Weeks Between Occurrences
Enter how many weeks are between each occurrence. For example, if you select a recurrence of Weekly with 1 week between occurrences, the calendar repeats every week.
Note: When the recurrence frequency for an inspection calendar is greater than 1, the first week of scheduling is the week that contains the start date, where Sunday is considered the first day of the week. Therefore, it is recommended that you set the start date to the Sunday of the first week in which you want to schedule inspections.For example, you create an inspection calendar for Mondays and Fridays where the recurrence frequency is 2, alternating weeks. Setting the calendar start date to January 1, 2019 causes January 4, 2018 to be available for scheduling but not December 31, because it is before the start date. Also, January 7 and 11 are in the alternate week, so the next days available for scheduling are January 14 and 18. If you set the start date to January 5, which is still part of the first week that the calendar is active, the system considers this same week as the start week, but no days are available until January 14 and 18.Inspection Days
Select the days of the week that are available for inspection scheduling.
Click Save.
Modifying an Inspection Calendar
Select .
Click a row on the Inspection Calendar page.
On the Inspection Calendar Details page you can:
Update the inspection calendar field values.
Note: You cannot edit the Calendar ID.Delete the calendar. You will be prompted to confirm the permanent deletion.
Click Save.
Deleting Inspection Calendars
Select .
Click Edit.
Select the check boxes next to all the inspection calendars you want to delete.
Click Delete. You will be prompted to confirm the permanent deletion.
Setting Up Inspection Scheduling
When agency users and registered public users schedule an inspection, the system is actually determining which inspectors are available and qualified to perform the inspection. Therefore, to schedule inspections, it is necessary to define all of the appropriate employee data for inspectors.
Inspectors are considered qualified if they have been assigned the inspection type and district associated with the inspection. The availability of inspectors is based on their work schedules and whether they have been assigned to other inspections previously.
In addition, the time slots that are available for scheduling are impacted by inspection calendars and holiday calendars, which define when inspections can and can’t be performed, respectively.
The system determines which inspectors can be scheduled to perform an inspection based on two sets of criteria.
Qualifications: To be qualified to perform an inspection, agency staff must be defined as inspectors, and assigned to inspection types, districts and work schedules.
Availability: Agency holidays and inspection calendars, inspector work schedules, and existing inspector assignments determine the availability of inspectors.
The following table lists the different types of data that need to be defined so that the system can determine inspector qualifications and availability. The Frequency column lists how many instances of the data type can be defined. The Required column lists whether a data type is required for time slots to appear on the Scheduling modal page during inspection scheduling.
For more information on inspection requests see Requesting Inspections.
| Criteria Type |
Data Type |
Frequency |
Required |
Impact of Missing Data |
|---|---|---|---|---|
| Qualification |
Inspection Type |
One per inspection |
Yes |
Only defined inspection types are available to select when requesting inspections. The Select a Time button is not available if the inspection type’s scheduling method is not Schedule. |
| Qualification |
District |
One per inspection Note that the address selected for the inspection needs to be associated to a property for which there is an assigned inspection district. |
Yes |
No scheduling times are available on the Scheduling modal page. Note that the inspection type and a property associated with the permit must have the same district type. If they don’t, the Select a Time button is unavailable for the inspection request. |
| Qualification |
Inspectors |
One per employee who performs inspections |
Yes |
No scheduling times are available on the Scheduling modal page. |
| Qualification |
Assigned Inspection Type |
One or more per inspector |
Yes |
No scheduling times are available on the Scheduling modal page. |
| Qualification |
Assigned Inspection District |
One or more per inspector |
Yes |
No scheduling times are available on the Scheduling modal page. Note that the assigned inspection district and the property associated with the permit must have the same district type. If they don’t, the Select a Time button is unavailable for the inspection request. |
| Availability |
Work Schedule |
One or more for each period of the day inspectors work; may include one break |
Yes |
No scheduling times are available on the Scheduling modal page. |
| Availability |
Assigned Work Schedule |
One or more per inspector |
Yes |
No scheduling times are available on the Scheduling modal page. |
| Availability |
Inspection Calendar |
One or more for each combination of inspection type and district |
No |
The inspection can be scheduled at any time of day (or whenever inspectors are available). |
| Availability |
Assigned Inspection |
Automatically created when an inspection is assigned |
No |
No time slots are unavailable for scheduling due to previously assigned inspections. |
| Availability |
Holiday Calendar |
One per agency |
No |
No days are unavailable for scheduling due to holidays or other agency non-working days. |
Inspection Types
You define inspection types using the Inspection Type page. The system uses the estimated duration to determine whether an inspector is available for the entire time required to complete an inspection. The inspection district type is a pre-defined district type with the category of Inspection.
For more information on inspection types, see Setting Up Inspection Types.
Inspection Districts
You must create an inspection district and assign it to inspectors to enable qualified inspectors and make time slots available when scheduling inspections. The district for the inspection is based on the district type assigned to the inspection type. The system uses this district type to determine the district ID associated with the property for which an inspection is being scheduled. A property may have more than one district type associated with it, but only one of them has a district type category of Inspection.
The system determines the property for the inspection based on the inspection address. The address for a new inspection defaults to the primary address associated with the permit for which you are scheduling an inspection. You may select other addresses that are associated with the permit. If no address is associated with an inspection, the system can’t determine the district for the inspection so the Select a Time and Select a Different Time buttons are disabled.
For more information on district types, districts, parcels, and addresses see:
Work Schedules
You must create work schedules and assign them to inspectors to make the inspectors available for inspection scheduling.
For more information on work schedules, see Setting Up Work Schedules.
Inspectors
To make inspectors available for inspection scheduling, you must perform the following steps on the Agency Staff page:
Assign the ORA_BUILDING_INSPECTOR job function to the inspector.
Assign inspection types to the inspector by adding job attributes to the ORA_BUILDING_INSPECTOR job function.
Assign inspection districts to the inspector by adding job attributes to the ORA_BUILDING_INSPECTOR job function.
Assign work schedules to the inspector by adding job attributes to the ORA_BUILDING_INSPECTOR job function.
For more information on assigning job functions and job attributes to agency staff, see Setting Up Agency Staff.
Inspection Calendars
Setting up inspection calendars is optional for scheduling inspections. Without inspection calendars, however, the system can potentially allow inspections to be scheduled for any time during a 24 hour period, if there are work schedules that comprise all 24 hours.
You define inspection calendars for a specific combination of inspection type and district. You can define more than one calendar for the same inspection type and district.
For more information on inspection calendars, see Setting Up Inspection Calendars.
Holiday Calendar
Setting up holiday calendars is optional for scheduling inspections. Holiday calendars establish the days that agency offices are closed and no field service operations are offered. The dates established as events on the holiday calendar are not available for inspection scheduling regardless of how the inspection calendars or work schedules are defined.
For more information on holiday calendars, see Setting Up Holiday Calendars.