6Setting Up Public Users
Setting Up Public Users
Public user setup includes configuration options related to public user registration and account management.
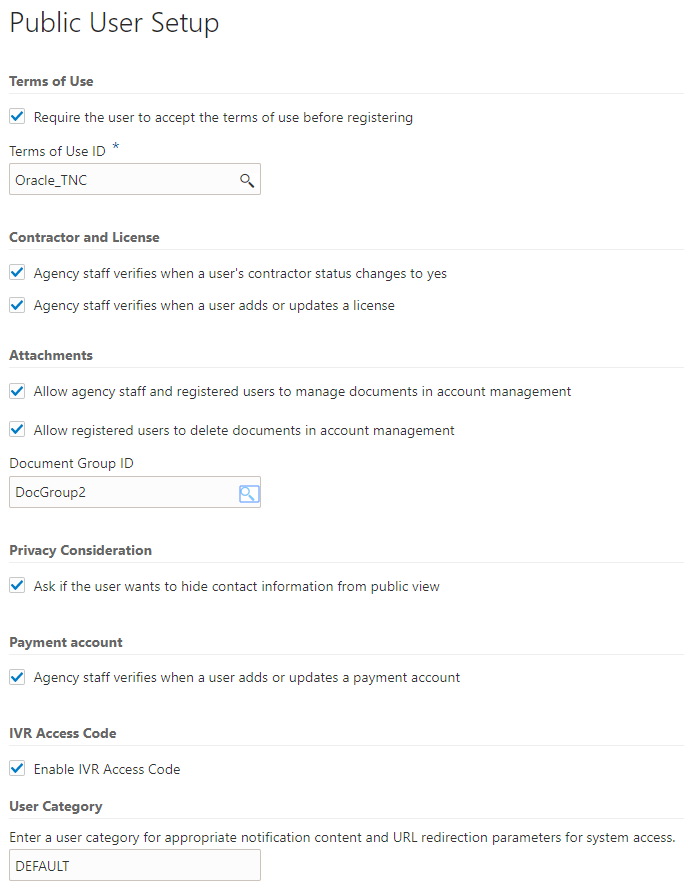
This image illustrates the Public User Setup page.
To set up public users:
Select
In the Terms of Use section of the page, configure these options:
Page Element
Description
Require the user to accept the terms of use before registering
Select this check box if public users must accept your terms of use as part of the registration process.
Terms of Use ID
If you require public users to accept your terms of use during registration, select the terms of use definition for the registration process.
This field is visible only if the Require the user to accept the terms of use before registering check box is selected.
Note: If you change the Terms of Use ID, users who have already registered are required to accept the new terms the next time they sign in. In this scenario, a window with the new terms opens as soon as the public user signs in. The user must select the agreement check box in order to continue.In the Contractor and License section of the page, configure these options:
Page Element
Description
Agency staff verifies when a user’s contractor status changes to yes
Select this check box if agency staff must verify the contractor status of a public user who self-identifies as a contractor.
Agency staff verifies when a user adds or updates a license
Select this check box if agency staff must verify all licenses that are added to a user profile. Public users can add one license during the registration process. Public users and agency staff can add additional licenses using account management functionality.
In the Attachments section of the page, configure these options:
Page Element
Description
Allow agency staff and registered users to manage documents in account management
Select this check box to enable attachments in user accounts. When you enable attachments, both users and agency staff can add attachments to user accounts and modify information about existing attachments.
Agency staff can also delete attachments, but public users can’t delete attachments unless you also select the “Allow registered users to delete documents in account management” check box on this page.
Allow registered users to delete documents in account management
Select this check box to allow public users to delete attachments that are associated with their account. This setting does not affect agency staff, who can always delete account attachments.
This check box is visible only if you enable attachments by selecting the “Allow agency staff and registered users to manage documents in account management” check box.
Document Group ID
If you want to enable document categories and subcategories for public user account and profile attachments, select the document group with the appropriate categories. A document group consists of a set of related categories.
If you leave this field blank, the public user attachment pages won’t have fields for identifying attachment categories and subcategories.
This field is visible only if you enable attachments by selecting the “Allow agency staff and registered users to manage documents in account management” check box.
In the Privacy Consideration section of the page, configure these options:
Page Element
Description
Ask if the user wants to hide contact information from public view
Select this check box to give public users the option to mask their name and contact information when a member of the public views the user’s applications.
If this check box is selected, the initial registration page gives users the opportunity to mask their information. Help text explains that the public can still view the property address even if the user’s information is masked.
After a user registers, either the user or agency staff can update this preference using Account Management functionality.
In the Payment Account section of the page, configure this option:
Page Element
Description
Agency staff verifies when a user adds or updates a payment account
Select this check box if agency staff must verify all payment accounts (also called trust accounts) that are added to a user profile. Public users and agency staff can add payment accounts using account management functionality.
In the IVR Access Code section of the page, configure this option:
Page Element
Description
Enable IVR Access Code (Enable Interactive Voice Response Code)
Select this check box to enable an IVR Access Code field for public user accounts. Use the field to maintain a 4-digit code that gives the public user access to the schedule for permit inspections using interactive voice response. When users dial in, they are asked to enter their 4 digit code before accessing the inspection records.
In the User Category section of the page, configure this option:
Page Element
Description
Enter a user category for appropriate notification content and URL redirection parameters for system access
Enter the user category to be assigned to registered public users. Typically you should use the delivered category DEFAULT.
The user category that you specify will be associated with user accounts that are created by the public user registration process.
The category controls the templates for account-related notifications such as emails for first-time registration and for resetting the account password. The category also controls URL redirection so that when users set or reset their password in the Oracle Applications Cloud, they are immediately transferred to the public sector system.
For more information about user categories, see Managing Users in Public Sector Compliance and Regulation and Setting the Next URL for the Default User Category.
Click Save.
Setting Up Public User Roles
To ensure that registered public users have appropriate system access, you must define which role is assigned to the user IDs that are created during the registration process.
When a public user registers, the Oracle system assigns a single role to the new user. Because the user is assigned just one role, access to different areas of the system is established through a role hierarchy. In this hierarchy, the various roles that provide access to different areas of the system are all children of a single parent role that you create.
Setting up public user roles involves these steps:
Use the Security Console to create a specific set of roles for public user:
This step is explained in detail in the topic Creating Custom Roles for Public Sector Compliance and Regulation. It consists of these tasks:
Create custom roles that provide access to permit-related functionality.
Create the single role assigned during user registration, and set up its role hierarchy.
In the hierarchy, the child roles include the delivered PSC Registered Public User role as well as the additional roles that you created for permit access.
Note: Do not use the delivered PSC Registered Public User as your single role for registered public users. This role does not provide access to permit-related functionality.
Use the Public User Roles page to identify the role to be assigned during user registration.
Identifying the Single Role to be Assigned During Public User Registration
To identify the single role to be assigned during public user registration:
Select
If the Public User Roles page already lists a role, delete it before you add the new role.
The button for adding a role is hidden if a row already exists. You cannot modify the existing row, so you must instead delete it and then add a new one.
To delete the existing row:
Click the row to access the Role Details page.
Click Delete.
On the Public User Roles page, click Add.
On the Role Details page, use the Role ID field to select the single role to be assigned during the public user registration process.
The Role ID is the only enterable field on the Role Details page. To select a role based on the descriptive role name rather than the numerical role ID, use the prompt button for the Role ID field, then expand the Search Criteria section of the lookup page so you can search by role name.
Note: If you correctly followed the instructions for creating the single role to be assigned to registered public users, the role name is PSC Custom Registered Public User and the role code is CUSTOM_PSC_REGISTERED_PUBLIC_USER.Click Save.
Setting Up Terms of Use
The Terms of Use page stores rules and guidelines to which user must agree as a condition of using a service. The terms act as a legal contract. They are also known as Terms and Conditions or Terms of Service. When you set up a terms of use definition, you also specify the contexts where the definition is available. For example, you can specify that certain terms can be used for public user registration but not for permit applications or planning and zoning applications.
You add, modify, and delete terms of use definitions on the Terms of Use page.
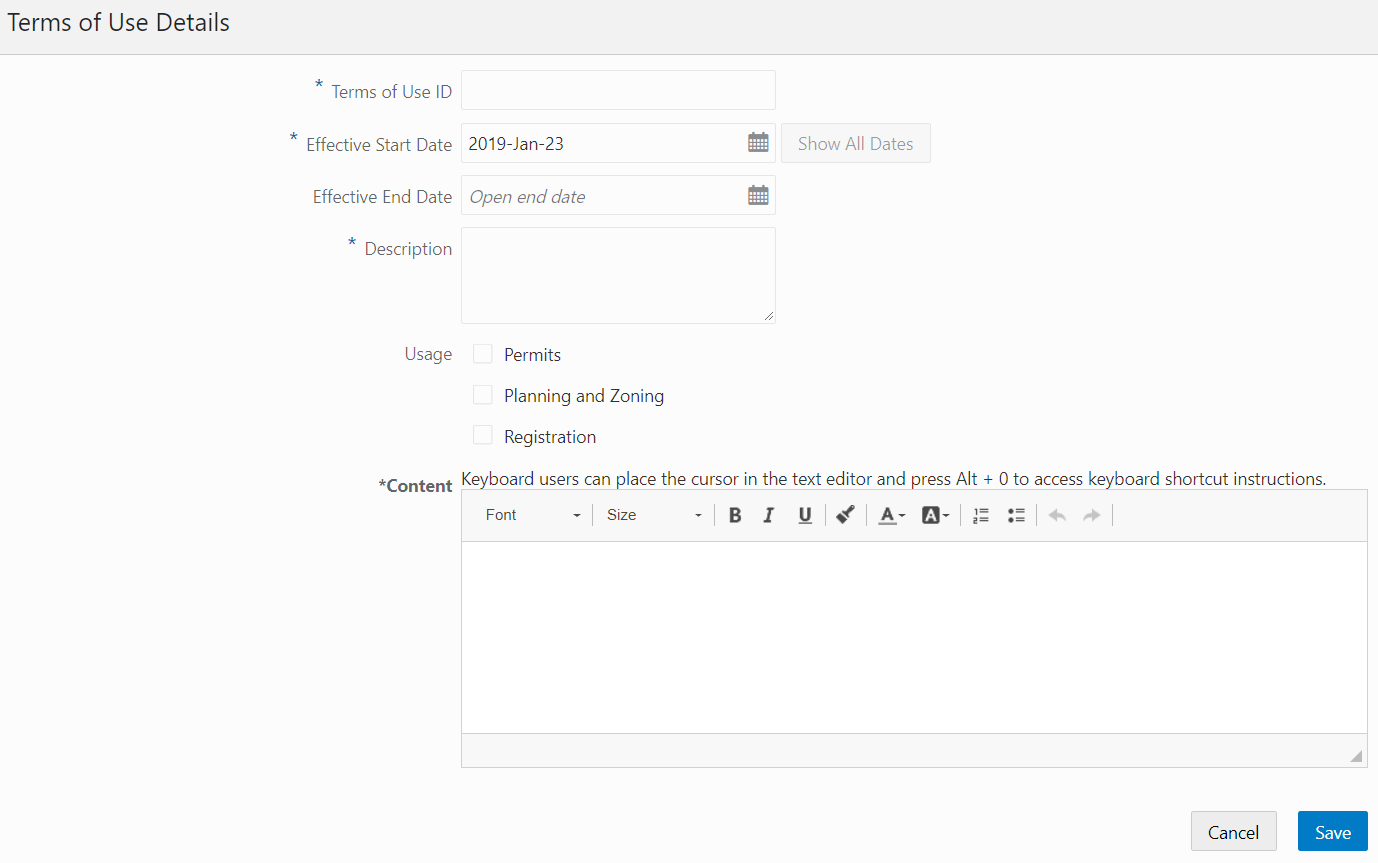
This example illustrates the Terms of Use Details page.
Adding Terms of Use
Select
On the Terms of Use page, click Add.
On the Terms of Use Details page, enter values for the following fields.
Page Element
Description
Terms of Use ID
Enter an identifier for the terms of use definition.
If a definition changes over time, create multiple definitions with the same ID and new effective dates. The effective dates of the different versions must not have gaps or overlap.
Effective Start Date
Enter the first day that the definition is valid.
Effective End Date
Enter the date, if any, when the definition will no longer be valid. To keep the definition valid indefinitely, do not enter a date. If no date is specified, the field displays the text Open end date.
After a definition is saved, the end date becomes read-only. Although you can’t make manual changes, the system can still update the end date to accommodate new effective-dated entries. For example, if the currently effective definition has an open end date, and you create a new definition with a later start date, the original definition’s end date changes to the day before the new definition goes into effect.
Show All Dates
Click this button to access the effective-dated history of the definition. This button is not available during the creation of a new definition.
On the page that displays this history, use the Add button to add a new effective-dated entry for the definition. The new entry inherits the same Terms of Use ID. You provide the new effective start date and other details for the definition.
The system provides logic to prevent gaps or overlaps in the effective-dated history.
Description
Enter a description of the terms of use. This is not part of the Terms of Use text that public users see.
Usage
Select the Permits check box to make this terms of use definition available for permits applications. This option makes the definition available to the Terms of Use ID field on the Permit Type page. Note that it is also necessary to add the Terms of Use element to the permit form.
Select the Planning and Zoning check box to make this terms of use definition available for planning applications. This option makes the definition available to the Terms of Use ID field on the Planning Application Type page. Note that it is also necessary to add the Terms of Use element to the planning application form.
Select the Registration check box to make this terms of use available for registration functionality. This option makes the definition available to the Terms of Use ID field on the Public User Setup page. See Setting Up Public Users.
You must select at least one check box.
Content
Enter and format the detailed content of the terms to which a user must agree. This is the text that users see when they are asked to agree to the terms.
Click Save.
Modifying Terms of Use
Select
Click a row on the Terms of Use page.
On the Terms of Use Details page, you can update the description, usage and content.
Click Save.
Managing Effective-Dated Terms of Use Definitions
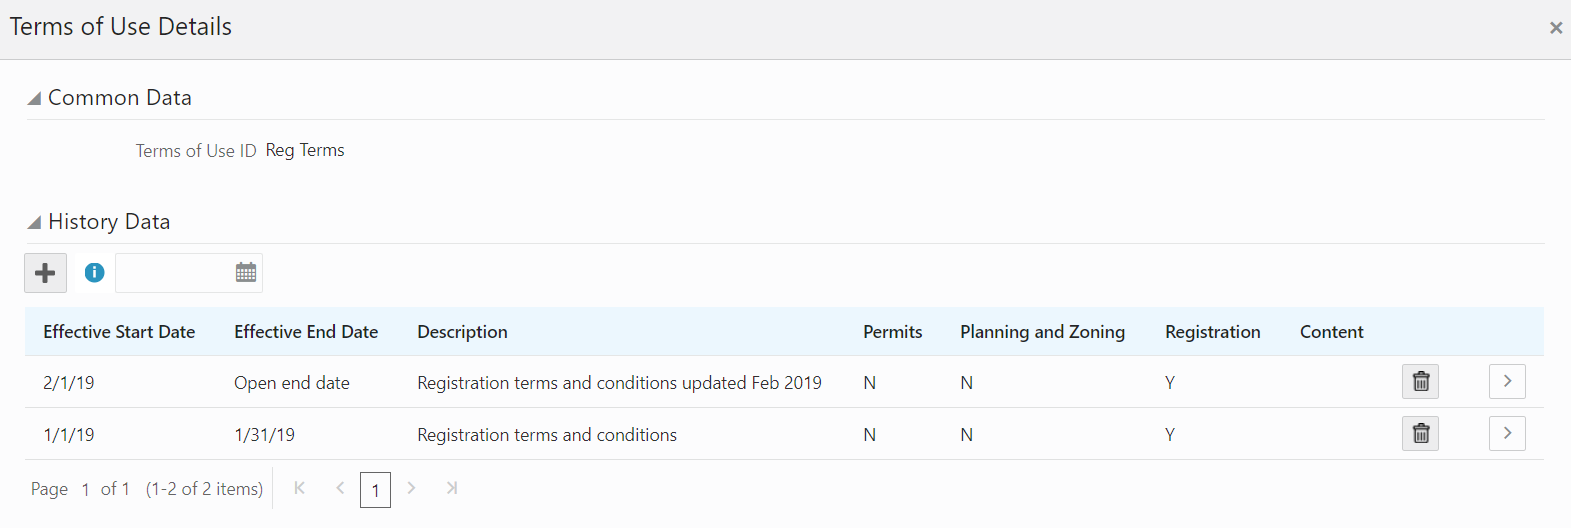
This example illustrates the Terms of Use Details modal page that displays the effective-dated history of a terms of use definition.
Select .
Click a row on the Terms of Use page to open the Terms of Use Details page.
Click the Show All Dates button to view the effective-dated history of the definition you opened.
Expand the Common Data section to see the Terms of Use ID.
Expand the History section to see a list of all versions of this terms of use definition.
Click a history row to open the Terms of Use Details page for the specific row.
Click the Add button in the History section to create a new version of the definition.
In the new definition, you can modify any of the data except for the Terms of Use ID. An error message appears if the new effective dates create gaps or overlaps in the definition history.
Deleting Terms of Use
Select
Click a row on the Terms of Use page.
On the Terms of Use Details page, click Delete.
You are prompted to confirm the permanent deletion.