10Using Oracle Inspector
Overview of Mobile Oracle Inspector for Permits
Use the Oracle Inspector mobile application to manage a variety of property inspections for permits on a daily basis.
Oracle Inspector provides government field staff the ability to enforce code compliance using productivity tools to perform and report on inspections from a mobile device.
Before you begin, you must download the Oracle Inspector application for your mobile device from the iOS App Store for Apple iOS devices or Google Play for Android devices. For information about installing the application and configuring the agency’s host URL, see Installing and Configuring Oracle Inspector.
Installing and Configuring Oracle Inspector
You must install and configure the Oracle Inspector to use the mobile inspections application in the field.
Oracle Public Sector Compliance and Regulation provides a mobile inspections application for agency staff to download and install on their mobile devices. The Oracle Inspector mobile application is not intended for use by the public. Although the Oracle Inspector mobile application is intended mainly for phones, you can download the application to other mobile devices, such as tablets.
Before You Begin
Before you begin installing and configuring the Oracle Inspector mobile application, you must have:
An agency staff profile
Make sure that you have an agency staff profile to log into the mobile application. Because the application package configuration is secure, you must enter your login credentials before the environment begins to download. Agency administrators set up the agency staff profiles.
Appropriate security
Agency administrators must explicitly grant mobile application access to you. You can open the application but need the proper credentials. The only roles that have access to the mobile application are building inspector and inspector supervisor.
For more information for agency system administrators setting up profiles and security, see Setting Up Users for Oracle Mobile Applications.
Installing Oracle Inspector
You must install the Oracle Inspector mobile application on your mobile device from the iOS App Store for Apple iOS devices or Google Play for Android devices. Follow the instructions for installing Oracle Inspector provided by the application store.
Configuring the Oracle Inspector Environment
On your mobile device, access the email that you have received from your administrator and click the Mobile Application Activation link.
Click the Agree button on the End User License Agreement page the first time you open Oracle Inspector or when you reinstall the mobile application.
You must agree to proceed to the next step.
The confirmation page appears with the Application Host URL automatically populated. Click the Get Started button.
Because the application package configuration is secure, you must enter your login credentials before the environment begins to download. Enter your user ID and password.
Select the Save user ID check box, if desired. The next time you return after logging out, you don’t have to reenter your user ID.
After your login credentials are successfully authenticated, the setup page appears with a progress bar displaying the progress of the package download.
After installation completes, the application home page – Inspection Tasks – appears for the current day.
For more information about inspection tasks in Oracle Inspector, see Viewing Inspection Tasks.
Resetting the Application Host URL
If the agency administrators want you to use a new URL, you can reset the URL through the application.
To change the host URL:
Log in to Oracle Inspector.
Click the global navigation button in the upper left corner of the application.
When you click the button, you’ll see a list of menu items.
Click the Reset Application URL link in the menu to open the Reset Application URL page.
Enter the desired application host URL in the field.
Click the Update button.
Log back into Oracle Inspector using your login credentials.
Viewing Inspection Tasks
When you log into the Oracle Inspector mobile application, you see a list of your assigned inspections for the day. As an inspection supervisor, you can also view today’s inspections and the assigned inspectors. The calendar provides access to the inspections scheduled for a specific date. By selecting an inspection, you access the pages for performing the tasks associated with the inspection.
On the Inspection Tasks page, inspectors can:
View the daily job list for inspections assigned to them on a calendar or map.
View property address, inspection type, permit type, and permit ID for each inspection.
View the inspection status and results for completed inspections.
Identify inspections with conditions or restrictions.
Access inspection details and checklists for performing the inspection.
Inspection supervisors can also view all inspections they are responsible for based on the inspection type and inspection district attributes associated with their job function.
This example illustrates the inspection supervisor’s view of the Inspection Tasks page containing the field values described in the following table. There is no inspection result, rating, or score for the scheduled inspections, because the inspector has not entered results. The inspection isn’t complete until the inspector submits the inspection results with required signatures.
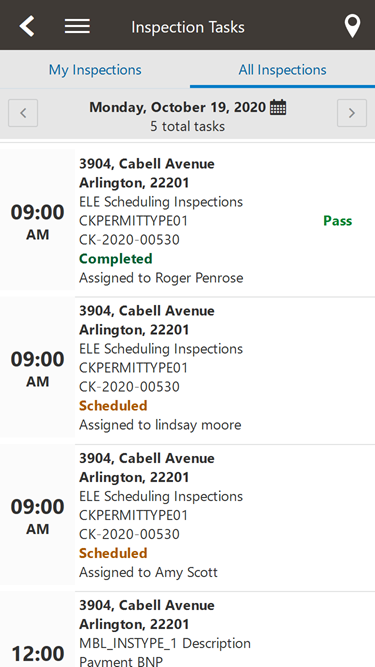
The Inspection Tasks page, which includes the My Inspections and All Inspections tabs for supervisors, provides a daily calendar view with inspections organized by scheduled time.
If inspector supervisors want to see inspection tasks assigned to other inspectors in the All Inspections tab, the agency must specify a value for the inspection district and inspection type job attributes. For more information about the inspection job functions, see Setting Up Agency Staff.
| Left Column |
Middle Column |
Right Column |
|---|---|---|
| Time using 12-hour clock AM or PM |
Summary of Assigned Inspection:
Inspection Status – For example, Scheduled, Completed, or Canceled. |
Results for Completed Inspection:
Note: Values for inspection results are configured by the agency.
|
To update your estimated time of arrival at the property, swipe an inspection from left to right. Click the Update ETA button. A notification with the updated time of arrival is sent to the contact for the inspection.
You can also use the action icons in the calendar to navigate to inspections for a specific date:
| Page Element |
Description |
|---|---|
 |
Click to open a calendar where you can navigate to a specific date to see the inspections scheduled for the day. |
  |
Click the icons to navigate to the previous day and next day, where you can see the inspections scheduled for the day. |
Opening the Map View
Use the map icon on the My Inspection Tasks page to view the locations of inspections scheduled for the day.
The map view icon looks like this:  .
.
In addition to an interactive map, the map view includes the inspection name, inspection number, property address, and scheduled date and time of the inspection.
You can also view a map of the selected property from the Inspection Detail page.
Managing Scheduled Inspections
In the Oracle Inspector mobile application, inspector supervisors and building inspectors can add inspections for a permit as well as update and cancel scheduled inspections while they’re in the field.
If you're assigned to an inspection for a permit, you can create a new inspection for the same permit. Note that if a condition is applied to the permit that prevents inspection scheduling, you won't be able to add the inspection.
You can manage inspections regardless of the schedule change policy and scheduling cut-off times defined by your agency in the mobile application only.
The mobile application can be online or offline when you add, update, or cancel an inspection. For more information about working offline, see Performing Offline Mobile Inspections.
Adding an Inspection in Oracle Inspector
You can use the Add Inspection action to create an inspection for a permit from any inspection assigned to you.
Here’s how to add an inspection:
Select an inspection in the calendar to open the Inspection Details page.
The inspection can have any status, including Scheduled, Completed, or Canceled.
Click the three-dot Actions menu at the bottom of the page.
Click the Add Inspection link.
The Request page opens, displaying the same permit and permit type as for the original inspection.
Click the Show All Inspection Types check box to view the agency’s available inspection types. You can select any inspection type, including those that aren’t in the inspection group for the permit type.
Select an inspection type from the drop-down list.
Click Continue.
Add comments and update other available fields. This is optional.
Assign the inspection to yourself by turning on the Assign to me switch. Your supervisor assigns the inspection using the Supervisor Calendar if you don't assign the inspection to yourself. When this option isn't active, you are required to be the assigned inspector. The setting is based on the scheduling method your agency sets up for the inspection type.
Enter values in the date and time fields.
Depending on the scheduling method set up by your agency, you must enter either the Preferred Date and Preferred Time or the Ready By Date and Ready By Time. Inspections with these dates and times are scheduled by inspection supervisors using the supervisor calendar.
If the Assigned to me switch isn't available, you are required to be the assigned inspector and you must enter the date and time of the new inspection.
Click Submit.
If the inspection is assigned to you, you'll see the new inspection on your calendar.
When you're working offline, you won't be able to access the inspection details until you're back online, the data is passed to the agency server, and the new inspection ID is generated.
For more information about scheduling methods used in mobile inspections, see Setting Up Inspection Types.
Viewing or Updating an Inspection Schedule in Oracle Inspector
You can update an inspection, regardless of the schedule change policy and scheduled cutoff time. The assigned inspector and inspection supervisor are the only people who can update the inspection schedule without these restrictions. If the inspection has a Canceled or Completed status, you can still view the schedule details.
Here's how to view or update an inspection schedule:
Select an inspection in the calendar to open the Inspection Details page.
You can only update inspections with a Scheduled status.
Click the three-dot Actions menu.
Click the View Schedule link.
The Inspection page opens, where you can update information such as the inspection location, location contact, contact method, and comments.
-
Select a new date and time to reschedule the inspection.
-
Click the Cancel Inspection button to cancel the inspection permanently.
See how to cancel an inspection in the next section of this topic, "Canceling an Inspection."
-
Click Submit.
The updated inspection appears on the Inspection Detail page and on the inspection in the calendar.
Canceling an Inspection in Oracle Inspector
Inspection supervisors and the assigned inspector can cancel inspections with a Scheduled status. When you cancel an inspection, you can't restore it; the cancellation is permanent. However, you can add a new inspection for the same permit or view the inspection schedule details for the canceled inspection.
Here's how to cancel an inspection.
Select an inspection in the calendar to open the Inspection Details page.
Click the three-dot Actions menu.
-
Click the Cancel Inspection link.
You can also cancel the inspection by clicking the View Schedule link then clicking the Cancel Inspection button on the Inspection page.
-
On the Cancel Inspection page, enter a cancellation reason.
-
Click Continue.
The canceled status appears on the Inspection Detail page and on the inspection in the calendar.
Working with Inspection Details
In the Oracle Inspector mobile application, you view inspection details, such as inspection number, location, and description, and initiate actions for performing inspections on the Inspection Detail page. You can also view and update inspection scheduling information, cancel the inspection, or add a new one.
Access the Inspection Detail page by selecting an inspection from the list on the Inspection Tasks page. On the detail page, you can:
Access permit details associated with the inspection.
Locate the inspection site on a map.
Review inspection status, rating, score, and number of major violations of completed inspections.
Identify the inspector and location contact.
Read requester comments and special location instructions.
Update your estimated time of arrival at the property.
View and update, add, or cancel an inspection.
View the inspection summary report.
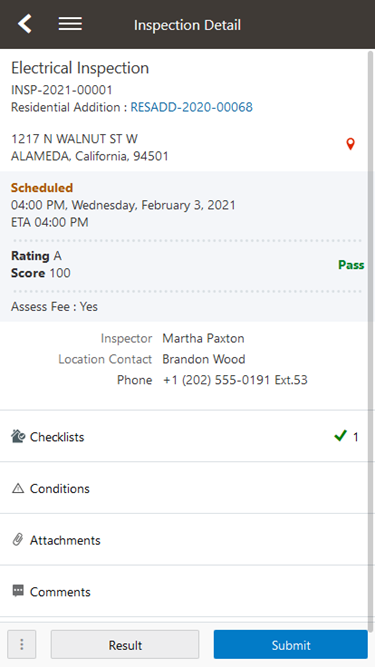
This example illustrates the Inspection Detail page containing the field values described in the following table. The inspection results have been calculated, but the inspection isn't submitted yet.
You can also perform these actions on the Inspection Detail page:
| Page Element |
Description |
|---|---|
| Permit number |
Click the permit number link to access permit details. |
 |
Click the map icon to view the location of the property on a map. |
| Checklists |
View the number of checklists to complete for the inspection. Click to open the Inspection Checklist page. |
| Conditions |
View the number of conditions applied to the permit. Click to open the Conditions page, where you can view the conditions applied to the permit and condition details, as well as apply conditions. At the top of the Inspection Detail page, you can click the link next to the conditions severity icon to view the condition summary. For more information about conditions on permits, see Applying Conditions to Applications. |
| Attachments |
View the number of documents attached to the inspection. Click to open the Attachments page, where you can review or upload attachments or documents related to the inspection, such as videos or annotated photos. On the Attachments page, you can also search for, filter, and sort attachments and select which inspection attachments you want to view. You can choose to view all documents, documents attached at the inspection level, or documents for checklists and checklist items. |
| Comments |
Click to open the Comments page. Review or add comments related to the inspection. Inspector comments are visible to the public unless the agency selects an option to hide them. Go to the Inspection Checklist and Checklist Items pages to view the comments made for checklists and checklist items. |
| Time Reporting |
Click to open the Time Reporting page, where you can view and filter time entries associated with the inspection. From here, you can add entries to record the amount of time you spend on various activities. For more information, see Reporting Inspection Time. |
| Actions |
Click the three-dot Actions icon at the bottom of the page to do the following:
For more information about the View Schedule, Cancel Inspection, and Add Inspection actions, see Managing Scheduled Inspections. |
| Result |
Click this button to open the Inspection Result page, where you can view the overall inspection results. You can also add comments, attachments, and required signatures before submitting the results. Turn on the Assess Fee switch to charge a fee for the inspection. For more information about assessing fees, see Submitting Inspection Results. |
| Submit |
Click this button to submit the result, which changes the inspection status to completed. After an inspection is submitted, you can select the action to view the summary report from the Inspection Detail page. |
Viewing the Mobile Permit Summary
You view a permit summary in the Oracle Inspector mobile application on the Overview page, where you get a snapshot of information regarding a permit with links to more detail.
For more information about the Overview page and its functionality on a laptop or desktop computer, see Viewing the Permit Summary.
To open the Overview page in the inspection app, click the permit ID link under the inspection type on the Inspection Details page. When you access the Overview page, you can:
Review a summary of property, applicant, workflow, and inspections information.
Add or update an expiration date for the permit.
Add or update a description of the permit.
-
Print the building permit.
Access project and fee details.
If the permit application is associated with a project or there are fees and payments, you can click the information that is displayed on the Overview page to access details. You can also access project and fee details by using the navigation menu located on the page title.
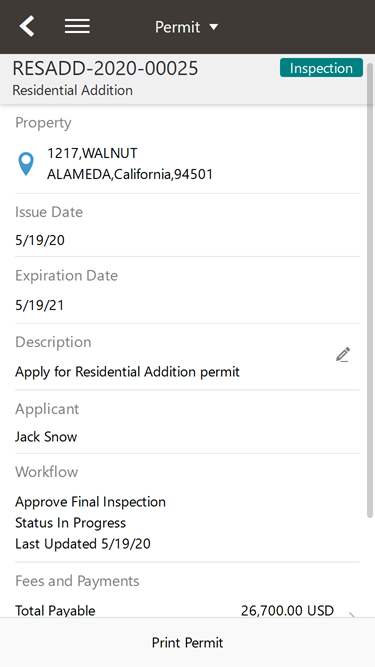
This example illustrates the Permit Overview page in the Oracle Inspector.
Working with Conditions
You can view, apply, and resolve conditions on permits in the Oracle Inspector mobile application on the Conditions page.
When you access the Conditions page by clicking the Conditions button on the Inspection Details page in the mobile application, you can:
Review existing conditions applied to the permit.
Review condition details.
Resolve existing conditions.
Apply new conditions.
If conditions have been applied to a permit, an icon appears on various pages to indicate the type of condition, such as lock, hold, or notice. If there are multiple conditions applied to the permit, the most severe condition is displayed. You can see which conditions have been applied in the condition details.
For more information about conditions, see Applying Conditions to Applications.
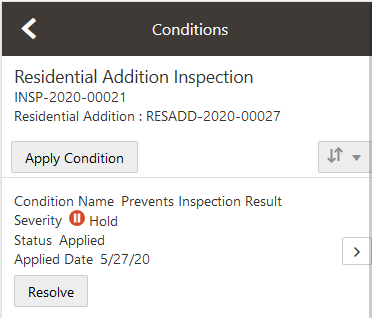
A permit condition can prevent an inspector from submitting the inspection results. In that case, a message indicates details about the condition that was applied.
This example illustrates the Conditions page containing the field values described in the following table.
| Page Element |
Description |
|---|---|
| Apply Condition |
Click this button to add a new restriction to the permit. |
| Resolve |
Click this button to resolve the restriction that was applied to the permit. |
 |
Click the detail icon next to the condition in the list to access condition details. You can resolve the condition on the details page. |
Reporting Inspection Time
You can record the time that you spend working on inspections for the purposes of billing and reporting on the Time Reporting pages in the Oracle Inspector mobile application.
Access the Time Reporting pages by clicking the Time Reporting button on the Inspection Details page. Here you can:
View and sort time entries for an inspection.
View time entry details.
Enter time for an activity.
Delete time entries.
When you add a time entry on the Time Details page, you record the duration of the activity, whether the time is billable, and comments.
For more information about time reporting, see Adding Time Entries.
Using Inspection Checklists
An inspection can have one or more checklists that cover the scope of the codes and requirements. Depending on the permit requirements, an inspection may have checklists with one or more checklist items, or none at all. You work through the checklists and provide inspection results on the checklist pages in the Oracle Inspector mobile application.
To access the checklists, click the Checklist button on the Inspection Detail page. When you’re performing an inspection, you can do the following at the checklist level:
View results progress, if the inspection has checklist items.
Access checklist items.
Provide a result for the checklist.
Review or add checklist attachments.
Review or add checklist comments.
This example illustrates the Inspection Checklist page containing the field values described in the following table. The inspection is scheduled with no results provided yet.
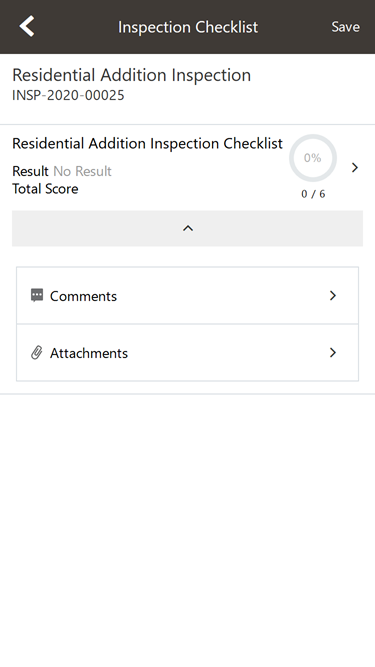
| Page Elements |
Description |
|---|---|
| Checklist |
Click the checklist row to open the Checklist Items page. |
| Result |
Displays No Result, Pass, or Fail after calculating the entered checklist results, where No Result is the default value if the checklist results have not been added. Results are defined by the agency. Common results are Pass, Fail, Corrected on Site, Not Applicable, and Not Observed. If the inspection was set up by the agency to use scoring, the system automatically populates the result based on the scoring method. If scoring is not used, the inspector must manually add the result.
Caution: You can’t update the inspection result on the checklist items, checklists, and inspection when a condition to prevent the inspection result has been applied. You must resolve the issue first and when necessary, reschedule the inspection.
|
| Progress indicator |
Displays percentage in a progress ring and count how many of the checklist items have been evaluated. |
| Comments |
Click to open the Comments page for the checklist level. Review or add comments related to the checklist. |
| Attachments |
View the number of documents attached to the inspection. Click to open the Attachments page, where you can review or upload attachments or documents related to the inspection, such as videos or annotated photos. On the Attachments page, you can also search for, filter, and sort attachments and select which inspection attachments you want to view. You can choose to view all documents, documents attached at the inspection level, or documents for checklists and checklist items. |
Working with Checklist Items
To drill down to checklist items, select a checklist on the Inspection Checklist page. On the Checklist Items page, you can:
View a list of checklist items.
Enter a result for each checklist item.
Click a checklist item to access the Checklist Item Results page.
This example illustrates the Checklist Items page described in the surrounding text. There are no results entered for the checklist items.
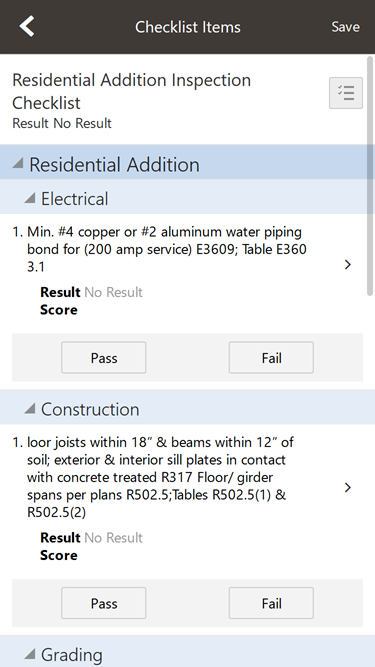
Select a result for each checklist item. When you choose a failing result for a checklist item, the Inspection Result Items page opens so that you can add comments and attachments as support documents for the failing result. For information about comments and attachments, see the information about comments and attachments at the inspection and checklist levels.
You can also select a result for multiple checklist items by using the Edit button. In this case you must assign the same result to all of the selected items.
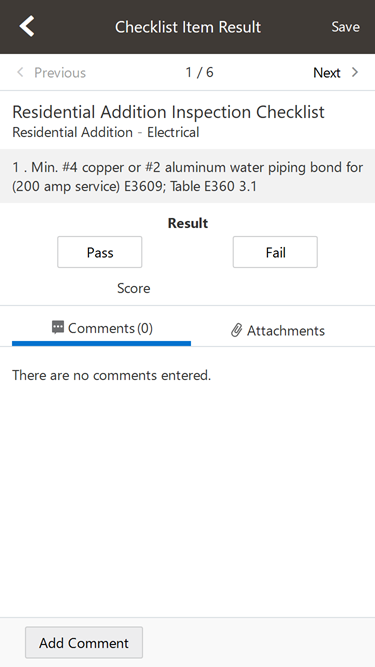
Click the checklist item row to open the Checklist Item Result page.
On the Checklist Item Result page, you can:
Review or add checklist attachments.
Review or add checklist comments.
Scroll through the item results.
This example illustrates the Checklist Item Result page described in the surrounding text. No results have been entered for this checklist item.
Submitting Inspection Results
You submit inspection results to complete an assigned inspection on the Inspection Result page in the Oracle Inspector mobile application.
To finalize the inspection, click the Result button on the Inspection Detail page. On the Inspection Result page, you can:
Review calculated inspection results.
Indicate a fee should be assessed for the inspection.
Capture the inspector, contractor, and property owner signatures.
Add inspection comments and attachments as support documents.
Submit the inspection.
This example illustrates the Inspection Result page, which is described in the surrounding text. The inspection results are complete with the required signature, but not submitted. The option to assess a fee is active.
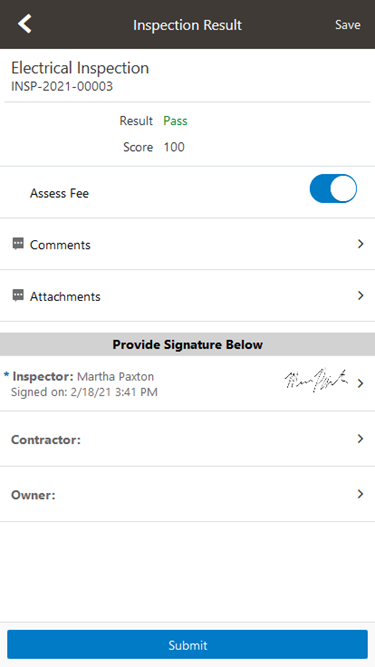
Adding Signatures
The agency determines which signatures are required during the implementation of Oracle Public Sector Permits. Click the row for Inspector, Contractor, or Property Owner to access the field for adding a signature. Click Save to submit the signature.
Assessing Fees
Your agency may enable you to indicate that a fee should be assessed based on the inspection results. For example, if you fail a plumbing inspection and a reinspection is required, you may want a fee to be assessed for that inspection.
Turn on the Assess Fee switch and add comments or attach documentation before you click Submit. The system determines whether to assess the fee then calculates the fee and charges it back to the permit applicant.
Fee assessment indicators appear on the Inspection Detail page in the mobile application and on the Inspection Detail page in the permit details on a desktop.
Sending Notifications
When you complete an assigned inspection and submit inspection results, the applicant or agency staff receive a notification that the inspection is complete, regardless of the inspection results. The communication includes an overview of the inspection status change and the result of the inspection. Your agency determines whether the notification is sent by email or online notification when the user logs into the permits service.
When you submit the final inspection for a permit with a passing result, the permit technician or applicant receives a notification or email, depending on the communication template setup.
Performing Offline Mobile Inspections
You can perform mobile inspections using offline functionality in locations where you don’t have access to the agency's servers.
When you don't have Internet access while using Oracle Inspector, you still can perform many of your inspection-related tasks. When the Internet connection is restored, your data is synchronized with permits in your agency’s system.
The mobile service for Oracle Inspector downloads data to your mobile device for use offline. When your Internet connection is restored, the mobile service sends data about all the performed actions to your agency’s Permits Cloud and updates the data in the server. The actions performed offline are transferred, and the changes you made in the offline mode are updated with the changes in the permit application. This way, data in your mobile device browser is synchronized with the permits data.
Notifications on the Inspection Tasks home page let you know the offline status of Oracle Inspector. These are the icons displayed in the global header when the offline mode is enabled.
| Icon |
Description |
|---|---|
 |
Download in Progress |
 |
Download Error |
 |
Synchronization in Progress |
 |
Synchronization Error |
Before You Begin
Your agency determines whether you can work offline. You can also enable or disable the offline mode on your mobile device in Offline Settings found in the application menu.
Data Is Downloaded to Your Device
While you’re working online, your inspections for the day are downloaded to your device. The Download in Progress icon notifies you when the mobile service is downloading the data from the agency’s server to your mobile device. You must wait for the icon to disappear, indicating the download is complete, before performing actions. Keep the application in the foreground while downloading data to ensure all of the data is downloaded. Don’t minimize the application or open another application while data is downloading.
If there’s an interruption in network connectivity, the mobile service automatically restarts downloading the data when the network is available again until the download is complete.
Downloaded data is stored for an amount of time determined by your agency. After this time the data will be refreshed, which means more recent data is downloaded the next time you use the application online. Use the Refresh Data button to refresh your data if the data has changed since it was last downloaded.
Perform Inspections While You’re Offline
You can view, create, and edit inspection records in the offline mode, and then the mobile service will sync them once the network connection is restored. This includes comments, supporting documents, and required signatures.
If you can’t add results, check with your administrator to see if your agency is using a different scoring method. You can also view the permit record and details when you’re online to see if a condition has been placed on the permit. Once any issues are resolved and all of the required results and signatures are complete, you can submit the inspection. All of the actions you perform are sent to the agency’s server when you’re back online.
Offline Updates Are Saved
When you are working offline, you can see all of the data that was saved onto the device while you were online. The changes you make are synchronized to the server when you’re back online.
When the application is in offline mode, you can’t view any updates that were made by other inspectors or the agency to the inspection data since the application changed to offline mode, because of the absence of a network connection. You can view those data updates only after refreshing the data that is cached.
Offline Data Is Synchronized
Your data synchronizes automatically every 5 minutes when the device detects a network connection and goes online. You’ll see the Synchronization in Progress icon during the sync process.
Resolve Synchronization Errors
If there are problems synchronizing the data, the Synchronization Errors icon appears. Tap the icon to view the Sync Errors page. You can also find a list of inspections that have synchronization issues by accessing the mobile menu item Offline Sync Status.
Either you or the inspections supervisor can then go to the Offline Sync Management navigation menu accessed through a desktop or laptop to troubleshoot errors for a particular inspection. The error description indicates the problem, which you can fix while online on your desktop or laptop.
For example, you may need to resolve a condition placed on a permit while you were offline, causing a synchronization error. After you’ve fixed the problem, you can manually synchronize with your mobile device and refresh the data from the error management page.
If you are online and the synchronization is causing errors, you can disable the offline mode on your mobile device in Offline Settings found in the mobile application menu, and continue to work online. You’ll lose any new work you performed if you disable the offline mode while offline. Check with your system administrator if you receive persistent errors.
Enable Logging
If you are experiencing issues with offline inspections, your agency’s help desk may request that you submit a log file with your help ticket. The log files will provide information to aid the help desk in identifying and troubleshooting any potential issues with the offline processing. You can enable logging in Offline Settings. Check the Log Files grid in the Offline Settings for the generated log files, which you can view and download to send to your help desk.