Requesting Inspections
Agency users can request inspections for permits to ensure that they are in compliance.
You request, modify, and cancel inspection requests on the Inspection page.
Requesting an Inspection
Click the Add Inspection button from one of the following locations:
Inspection List page of the permit details, which you can access by clicking Permits on the Agency Springboard. See Managing Inspections for a Permit.
Inspections page, which you can access by clicking Inspections on the Agency Springboard. See Managing Inspections for an Agency.
Note: The button is also available to registered public users on the Inspection List page, which they access from the registered user public landing page by clicking Inspections or by selecting Schedule an Inspection from the I Want To field.
On the Inspection modal page, select the Permit for which you want to request an inspection.
Note: If you are requesting an inspection from the Inspection List page for a specific permit, the Permit is already selected on the modal page.Select the check box next to each Inspection Type that you want to add. The inspection types available to select on the modal page are determined by the inspection group that is associated with the permit type. You can't select multiple inspections in small form factor, or through the Oracle Inspector mobile application.
Note: Agency staff can select the Show All Inspection Types check box to make all inspection types available for selection. This check box is not available to public users.Select the Pending check box to set the status of the inspections to Pending. This check box is available only if the Enable Pending Inspections switch is turned on for the agency. For more information, see Setting Up Agency-Level Options for Permits.
Note: This switch is not available to registered public users.Click Continue to access the Inspection page. If you selected more than one inspection type, they are all displayed in the Selected Inspections grid.
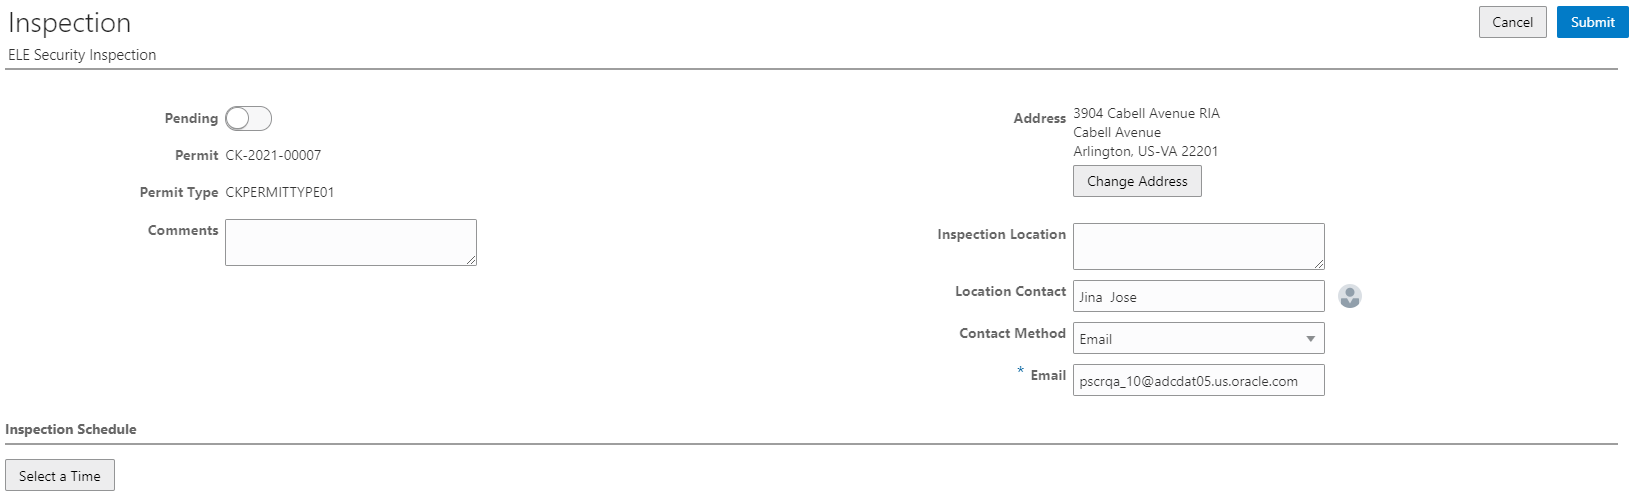
Note: If you selected a permit for which a condition has been applied that prevents inspection scheduling, you will receive an error when you click Continue and you won’t be allowed to request the inspections. For more information on applying and resolving conditions, see Applying Conditions to Applications.This example shows the Inspection page for a single inspection.
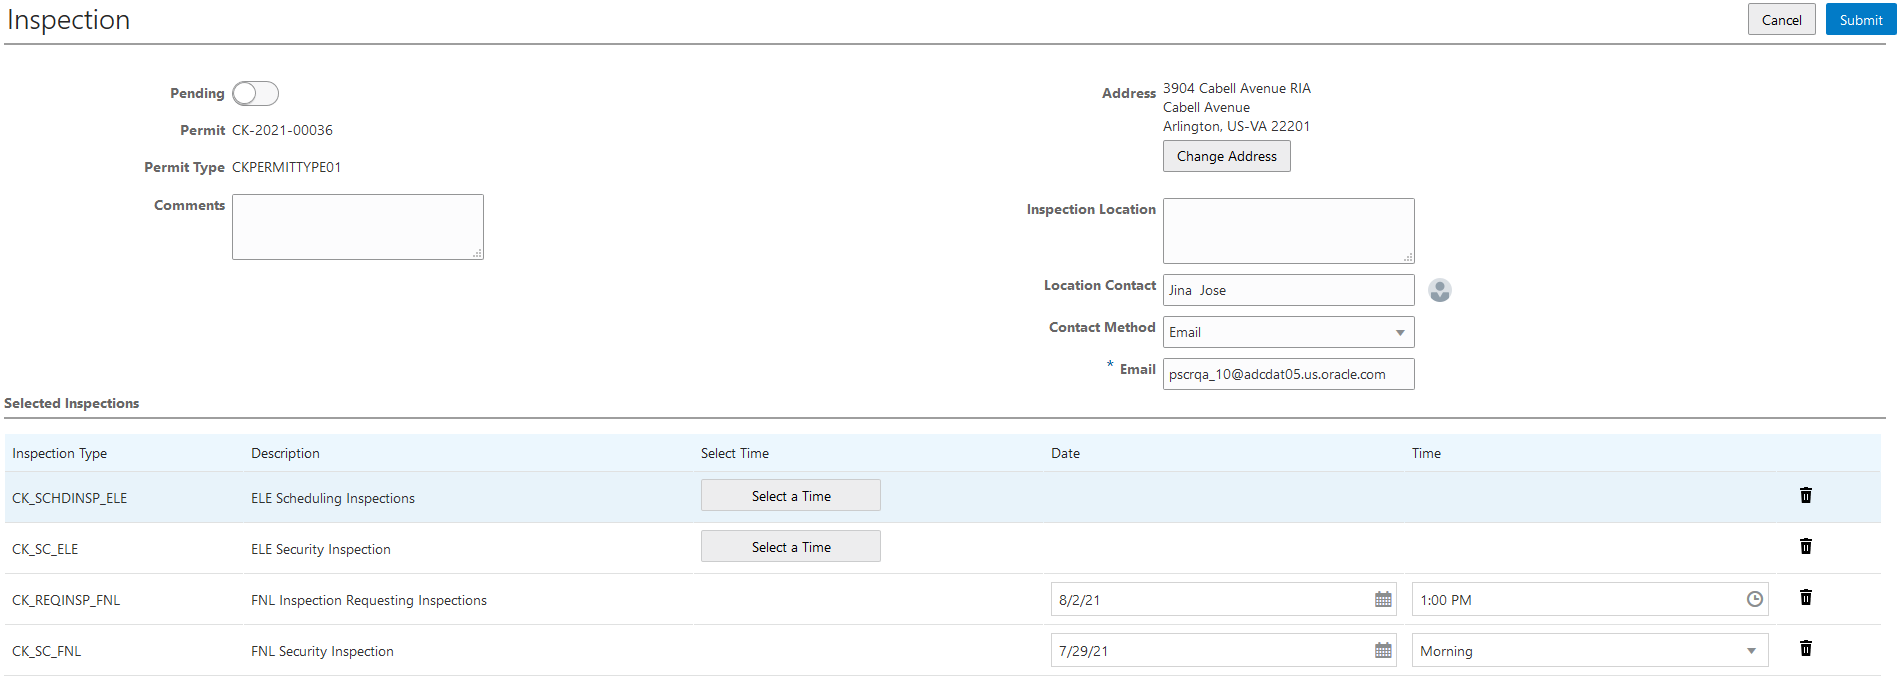
This example shows the Inspection page for multiple inspections.
On the Inspection page, enter values using the following fields:
Elements on the Inspection page
Page Element
Description
Pending
Select the Pending switch to set the status of the inspections to Pending. This status indicates that the inspections are required for the permit, but aren't ready to be scheduled yet.
This switch appears only when adding new inspections. When it's turned on, Date, Time, and Select a Time are unavailable on the page.
This switch is available only if the Enable Pending Inspections switch is turned on for the agency. For more information, see Setting Up Agency-Level Options for Permits.
Note: This switch is not available to registered public users.Date and Time
For inspection types with a Scheduling Method of Ready, enter the date and time by which the permit will be ready for the inspection.
For inspection types with a Scheduling Method of Request, select the preferred date and time period for the inspection. You can select one of the next 21 calendar days allowed by the inspection calendar, holiday calendar, and schedule cutoff time. Select a time period from the available values.
Ready by Date and Ready by Time
Enter the date and time by which the permit will be ready for the inspection you are requesting.
Note: These fields appear only for single inspections with a Scheduling Method of Ready.Preferred Date and Preferred Time
Select a preferred date and time period for the inspection. You can select one of the next 21 calendar days allowed by the inspection calendar, holiday calendar, and schedule cutoff time. Select a time period from the available values.
Note: These fields appear only for single inspections with a Scheduling Method of Request.See Setting Up Inspection Types.Comments
Enter any comments for the inspections.
Address
Displays the address associated with the inspections. For new inspection requests, this field displays the default address associated with the permit record. The default address is the primary address for the primary parcel associated with the permit record.
For more information on parcel addresses, see Setting Up Property Addresses
Change Address
Click to associate the inspections with another address that is already defined for the permit record.
Note: This button appears only if multiple addresses have been defined for the permit record.Inspection Location
Enter location information associated with the inspections.
Location Contact
By default, the system populates this field with the primary contact associated with the permit. Click the Change Location Contact icon to select a different contact name on the Change Location Contact modal page.
Note: When you change the location contact, the Contact Method, Email, and Phone fields are populated with the new contact’s information.Contact Method, Email, and Phone
Select a contact method from the following values:
None
Email
When you select this value, the Email field becomes available. Use it to enter the contact’s email address.
Phone
When you select this value, the Phone field becomes available. Use it to enter the contact’s phone number.
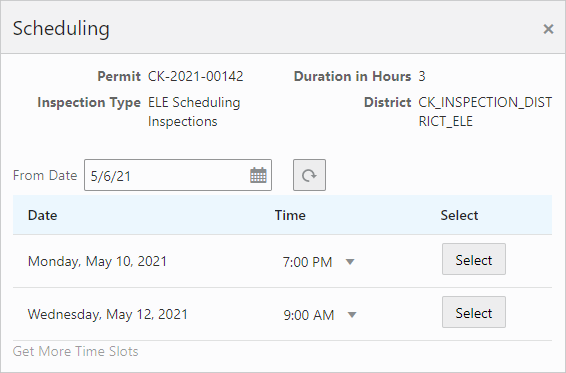
Note: By default, the value of the Contact Method is Phone, and the phone number of the applicant for the permit associated with the inspection request is displayed in the Phone field. If a phone number is not entered for an applicant, the default value of Contact Method is Email and the email address of the applicant is displayed in the Email field. If neither a phone number nor an email address are defined for the applicant, the default value of Contact Method is None and the Phone and Email fields are not displayed.Click Select a Time to access the Scheduling modal page where you can select a date and time for the inspection.
This example shows the Scheduling modal page
 Note: Inspections supervisors have additional options available on this page. For more information on scheduling inspections as a supervisor, see Assigning Inspections Using the Supervisor Calendar.
The dates and times that are available for inspection scheduling are based on the following factors:
Type of inspection and when the inspection can be performed.
District of the parcel.
Inspectors assigned to the district and inspection type.
Availability of the inspectors according to work and holiday schedules.
For more information, see Setting Up Inspection Scheduling.
Note: The Select a Time button appears only for inspection types with a Scheduling Method of Schedule.(Optional) Click the Delete button to remove any inspection types that you don't want to include in your inspection request.
Click Submit.
If the Inspection Requested communication event is configured, the system can automatically create an email notification to the permit technician that an inspection request has been created. For more information, see Delivered Communication Events.
Modifying an Inspection Request
Select the View Request action for an inspection from one of the following locations:
Inspection List page of the permit details, which you can access by clicking Permits on the Agency Springboard. See Managing Inspections for a Permit.
Inspections page, which you can access by clicking Inspections on the Agency Springboard. See Managing Inspections for an Agency.
Note: The action is also available to registered public users on the Inspection List page, which they access from the registered public user landing page by clicking Inspections or by selecting Schedule an Inspection from the I Want To field.
Update the field values on the Inspection page.
Note: You can’t edit the Inspection Type field. In addition, you can’t edit any fields on this page if the status of the inspection is Canceled or Completed.If an inspection time has already been selected, you can click Select a Different Time to select a different inspection date and time on the Scheduling modal page.
Note: The Select a Different Time button appears only for inspection types with a Scheduling Method of Schedule. The button is not available if the status of the inspection is Canceled or Completed. In addition, the button is not available once the time to the scheduled inspection is less than the number of hours defined in the Schedule Change Policy field for the inspection type. For more information on inspection types, see Setting Up Inspection Types.Click Save.
When you or the applicant reschedule an inspection, the applicant, inspection contact, inspector, and inspection supervisor can receive a notification, depending on the communication template setup.
Canceling an Inspection Request
Select the Cancel Inspection action for an inspection from one of the following locations:
Inspection List page of the permit details, which you can access by clicking Permits on the Agency Springboard. See Managing Inspections for a Permit.
Inspections page, which you can access by clicking Inspections on the Agency Springboard. See Managing Inspections for an Agency.
Note: The action is also available to registered public users on the Inspection List page, which they access from the registered public user landing page by clicking Inspections or by selecting Schedule an Inspection from the I Want To field.The Cancel Inspection action doesn't appear for inspections with a status of Canceled or Completed. In addition, the action isn't available once the time to the scheduled inspection is less than the number of hours defined in the Schedule Change Policy field for the inspection type. For more information on inspection types, see Setting Up Inspection Types.
Enter a Cancellation Reason on the Cancel Inspection modal page.
Click Confirm.
When you or the applicant cancel an inspection, the applicant, inspection contact, inspector, and inspection supervisor can receive a notification, depending on the communication template setup.
Interactive Voice Response Inspection Requests
When interactive voice response (IVR) is enabled for your agency, registered public users can request inspections over the phone. IVR is compatible with the Request and Schedule scheduling methods. Regardless of which of these two scheduling methods is associated with an IVR inspection request, a user chooses a preferred date and time period (morning or afternoon). For inspections with a Request scheduling method, the selected date and time period are recorded as the Preferred Date and Preferred Time. For inspections with a Schedule scheduling method, the system uses the selected date and time period to automatically assign a specific time slot and inspector.
For more information on IVR, see Setting Up Agency-Level Options for Permits.