Creating Free-Form Footers
This topic describes how you can incorporate custom HTML to define your own footer that will display instead of the fixed-form footer.
Footer Configuration Overview
By default, the Oracle Permitting and Licensing application does not deliver a footer. Oracle Permitting and Licensing does provide a fixed-form global footer, populated with various links and widgets that you can implement by applying a solution package.
This is an example of a fixed-form footer similar to that provided by a solution package, displaying links to Linked In, Facebook, Twitter, Help, plus copyright text.

You can also insert your own items into the footer area by adding menu links to the Footer Widgets menu folder, which is delivered empty. For more information on footers, see Configuring Header and Footer Navigation Features, and for more information on adding menu links, see Configuring Menu Structure.
If your organization prefers to use its own footer design, you can add free-form footers with the Configure Footers page. You can create these footer definitions:
Default: Displays for the default application, accessed through the browser.
Mobile: Displays for the mobile application, such as Oracle Inspector.
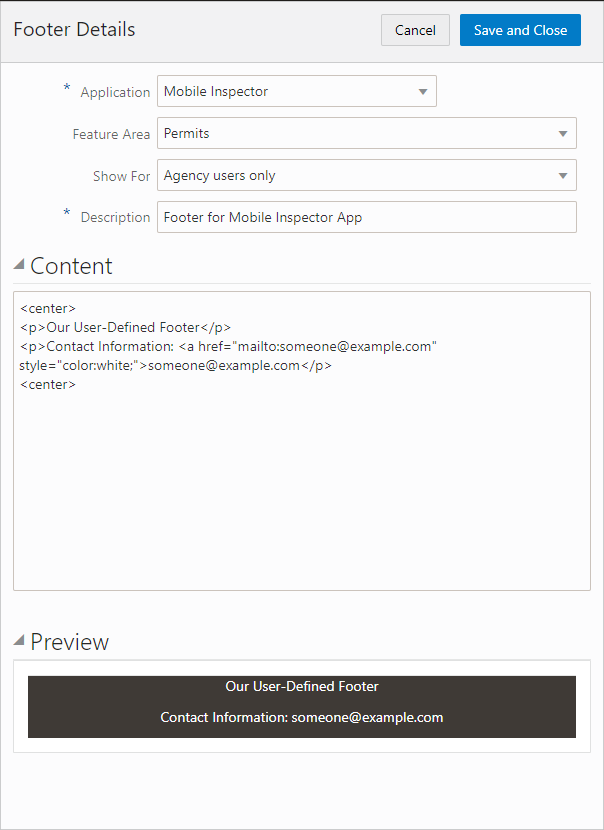
Creating a Free-Form Footer
To create a free-form footer:
Select .
On the Configure Footers page click Add.
This launches the Footer Details page.
For Application, select how the user accesses the page where the footer will be displayed, as in through the browser or by a mobile application. Options are:
Default: Displays for any user accessing the website from a browser, which could be running on a desktop, laptop, or mobile device. The user enters a URL or clicks a link to access the site.
Mobile Inspector: Displays for any user accessing the website using the Oracle Inspector mobile application installed on a mobile device.
Mobile Code Officer: Displays for any user accessing the website using the Code Officer mobile application installed on a mobile device.
Code Enforcement: Displays for any user accessing the Code Enforcement offering.
Note: You can define only one footer for each application.For Feature Area, select the main feature to which the footer applies, such as Permits, Business Licenses, and so on.
For Description, enter text to describe to other members of the implementation team the purpose of the footer definition.
In the Content edit box, add your footer HTML.
Your HTML needs to include all the required HTML elements with the proper links to images, CSS styles, and so on. Any content you enter will be displayed as is inside the <footer> element at the bottom of the page. It is assumed you already have the required HTML and styles in your agency website that you can copy into the Content edit box.
Note: If you add any JavaScript to the footer content in addition to HTML and CSS, the Oracle Permitting and Licensing application will run the JavaScript. Make sure you have addressed any JavaScript security issues related to any content you enter. Using any of the delivered CSS or JavaScript APIs is not supported.After adding your HTML content, tab out of the Content field and click Preview to display a preview of your footer.
Click Save and Close.
Note: As soon as you click Save and Close, your footer becomes the new footer for the current site. Make sure to use the preview feature as much as possible while you add the HTML for your footer.
Example: Free-Form Footer Example
This example illustrates how you use the Footer Details page to select where your free-form footer appears, add custom HTML, and preview the footer.