Working with Inspection Details
In the Oracle Inspector web application for mobile devices featuring the Redwood Experience, you view the inspection overview panel and initiate actions for performing inspections on the inspection detail panels, including working with checklists, comments, attachments, signatures, and time recording.
Access the inspection overview and detail panels by clicking the inspection type link for an inspection on the Inspection Tasks page. In the inspection overview panel, you can:
-
Review the inspection number, type, and its status.
-
Access application details associated with the inspection.
-
Review the description of the application.
-
Locate the inspection site on a map.
-
Review inspection status, rating, score, and number of major violations of completed inspections.
-
Identify the inspector, location contact, and contact information.
-
Read requester comments and special location instructions.
-
Claim an inspection assigned to another inspector.
-
Access the conditions applied to the application.
-
Update your estimated time of arrival at the property.
-
View and update, add, or cancel an inspection.
-
View the cancellation reason for canceled inspections.
-
Reschedule or postpone an inspection.
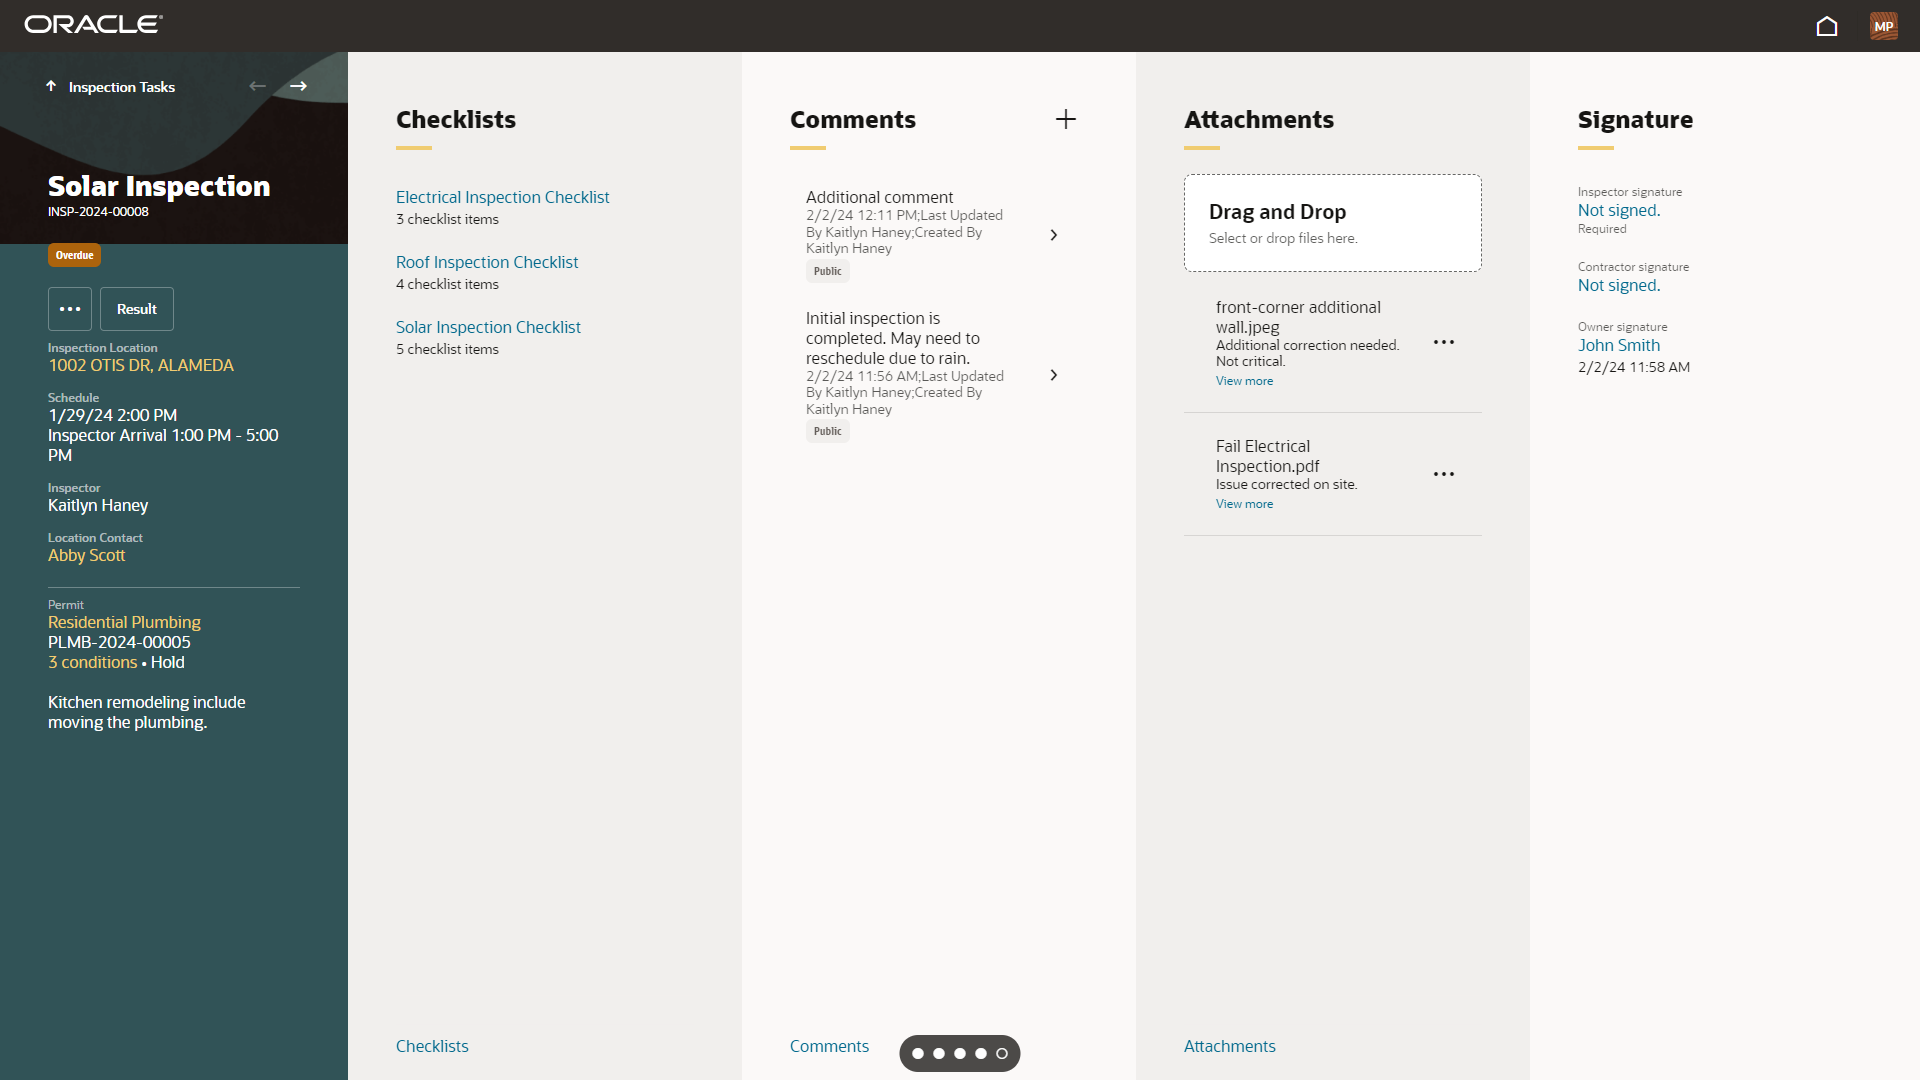
This example illustrates the inspection panels for a permit inspection containing the field values described in the surrounding text. The panels in the carousel include inspection overview information, checklists, comments, attachments, and signatures. The time recording panel appears after the signatures when you rotate the carousel.
You can view this information and take these actions on the inspection overview panel:
|
Page Element |
Description |
|---|---|
|
Inspection type, number, and status |
View the inspection type, inspection number, and inspection status. The status badge can be Scheduled, Canceled, or Completed. An Overdue badge indicates that the inspection was not completed on the scheduled day. |
|
Click the Actions menu button in the inspection header information panel to perform these actions:
For more information about these actions, see Managing Scheduled Inspections. |
|
|
Result |
Click the button to result the inspection on the Inspection Result page. For more information, see Submitting Inspection Results. The selected results appear in the inspection header information panel. |
|
Inspection Location |
Click the address link to view the inspection location on a map. |
|
Schedule |
Displays the scheduled date or date and time, depending on the inspection type's schedule method set up by the agency; the ETA or estimated time of arrival, if provided; and the inspector arrival. Depending on the agency setup, inspector arrival can be a specific time, time range, or date only. |
|
Inspection Result |
Displays the result provided on the Inspection Result page. Depending on the scoring method, you may see Total Score, the number of Major Violations, and Grading information. |
|
Assess Fee |
Displays Yes or No depending on the Assess Fee selection on the Inspection Result page. |
|
Inspector |
Displays the name of the assigned inspector. |
|
Location Contact |
Click the name of the location contact for preferred contact information such as phone number, and email address or text message.. |
|
Permit or Business License |
Displays the application type, application number, the number of conditions applied to the application, and the level of the most severe condition. Here's how you can access more information:
If available, the application description is displayed. |
Working with the Inspection Detail Panels
You work with different aspects of the inspection using the inspection detail panels. Here's information about the panels:
|
Panel Name |
Description |
|---|---|
|
Checklists |
Displays the checklists set up by the agency for the inspection type, including the checklist name, the number of items in each checklist, and the number of checklist comments and attachments, if any. This panel is unavailable if the inspection type isn't set up to use checklists. Click the name of the checklist to open the Checklists page. From here you have access to the inspection checklist items. See Using Inspection Checklists. Note: You can't work with checklists if
there's a condition on the application that prevents the final inspection or
prevents inspection results.
Click the Checklists link to open the checklists page. For more information, see Using Inspection Checklists. |
|
Comments |
Displays the inspection comments. Checklist comments are available only on the Checklists page. Click the Add Comment (+) button to add an inspection comment. For each comment listed in the panel, you can do this:
Click the Comments link to open the comments page, where you can also search comments. For more information about comments, see Working with Comments. |
|
Attachments |
Displays a list of inspection attachments. Use the Drag and Drop region to add attachments or documents related to the inspection, such as videos or annotated photos. Click the region to select a local file or drag a file into the region to upload the file. For each attachment listed in the panel, you can do this:
Click the Attachments link to open the attachments page. For more information about attachments, see Working with Attachments. |
|
Signature |
Displays signature information for the inspection, including inspector, contractor, and owner signatures, depending on agency setup. Each type of signature may be designated as Required. This panel is unavailable if all of the inspections are not required for the inspection type. Click the Not signed link to open the signature drawer and sign in the fields provided. After saving, the signee's name appears as a link to view the signature. A date and time shows when the inspection was signed. |
|
Time Recording |
Displays time entries for the inspection. Available for permit inspections only. Click the Add Time (+) button to record the amount of time you spend on an activity. For each time entry listed in the panel, you can do this:
Click the Time Recording link to open the time recording page. For more information about adding and working with time entries for inspections, see Reporting Inspection Time. |