Use Message Converter Service for Outbound Flows
You can now enable outbound flows such as ASN Outbound and PO Outbound to use the Message Converter Service when a message definition is configured in mapping file mode. The service retrieves the source payload using the appropriate REST API resource, converts it to XML using configurable JSON mapping files and associated JavaScript function files, and then routes the transformed XML through your existing delivery flows.
This enhancement streamlines outbound processing for mapping file-based transformations by eliminating intermediate XSL and SOAP or composite dependencies and instead using the Message Converter Service to retrieve source payloads directly via REST APIs.
Steps to enable and configure
You can access this functionality by enabling the feature Simplify Configuration and Processing for B2B Messaging.
Perform the following high-level tasks to set up your documents:
- Define your provider.
- Configure your delivery method.
- Create connections.
- Assign connections to your documents.
- Duplicate a message definition (Mapping file mode).
- Add messaging properties.
Define Your Provider
- Select Connections from the in-app navigation bar.
- Select the Providers tab to add a new provider.
- Select Submit after you've added the details for the new provider.
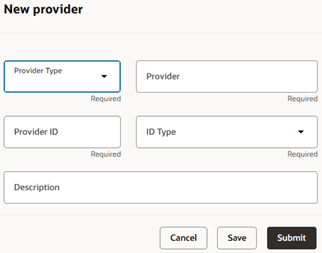
Add a Provider
Configure a Delivery Method
- Select Connections from the in-app navigation bar.
- Select the Delivery Methods tab and add a new delivery method. Enter details for the delivery method.
- Delivery methods that are associated with a provider can only be used for that provider when creating connections. You don’t need to create delivery methods for B2B Adapter or Business Event. When you’re creating connections, you can select one of the values below for these delivery method types:
- ORA_B2BAdapter
- ORA_BusinessEvent
- Select Submit.

Add a New Delivery Method
Create Connections
- Select Connections from the in-app navigation bar.
- Select the Connections tab.
- Select Add to add a new connection and enter the details.
- Advance Ship Notice – Outbound and Purchase Order – Outbound are two outbound documents that support the Mapping file transformation mode:
- When Transformation Mode is set to Mapping file, the Message Definition filter shows only the messages available for that mode.
- Set the status to Active and select Submit.
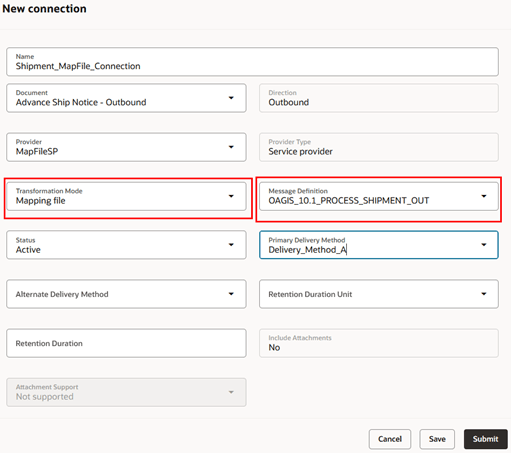
Add a Connection
Assign Connections to Documents
- Select Documents from the in-app navigation bar.
- Select the document that the mapping file connection was created for and set Enabled to Yes.
- Select Assign Connections.
- On the Assign Connections page, set the appropriate connection for the document and enable it.
- Select Submit.
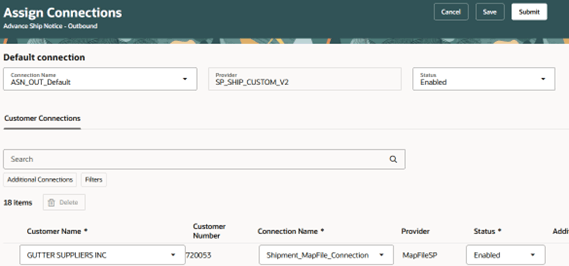
Assign Connections – Default and Customer Connections

Assign Connections – Default and Supplier Connections
Duplicate a Mapping File Message Definition
- You can include additional attributes in your messages:
- Select Definitions from the in-app navigation bar.
- On the Collaboration Message Definitions tab, search for the predefined message definition you want to customize, and make sure it uses Mapping file mode. For example, OAGIS_10.1_PROCESS_SHIPMENT_OUT.
- From the More Actions menu, select Export Transformation Package. The transformation package has 3 folders: mappingFile, mappingFunctionFile, and payloadTemplate.
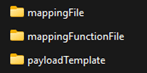
Transformation Package
-
- Edit the mapping file to include the additional attributes.
- Edit the mapping function file to edit or create business functions used by the mapping file.
- Select the predefined message definition you updated with your custom mappings, then select Duplicate from the More Actions menu. Enter a name and upload your modified mapping file(s).
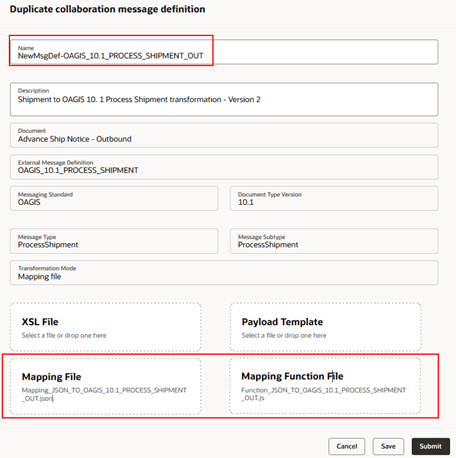
Duplicate a Message Definition
- Create a new connection using the newly duplicated message definition.
- Select Connections from the in-app navigation bar.
- Select the Connections tab.
- Select Add and Submit after you've added the details for the new connection.
- Assign this new connection to your documents.
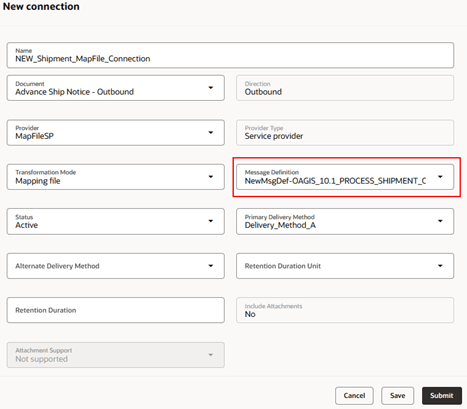
New Connection – Duplicated Message Definition
Add Messaging Properties
Define messaging properties for the following use cases:
- Associate domain value maps.
- When a service provider is used, that is, when the provider type isn’t Direct.
Here’s how you add messaging properties:
- Select Partners from the in-app navigation bar.
- Depending on the document, select Add on the Customer Messaging Properties tab or the Supplier Messaging Properties tab.
- Enter the details in the respective Properties drawer. Note that if the provider type isn’t Direct, you must provide the Partner ID and Partner ID Type.
- Select Save.

Add Customer Messaging Properties
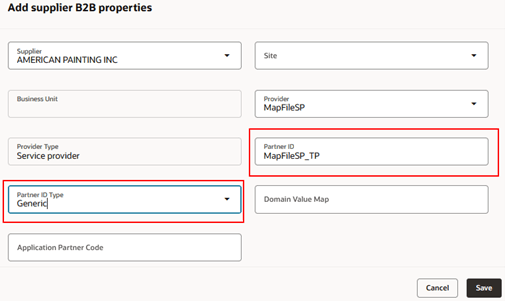
Add Supplier Messaging Properties
Tips and considerations
- Partner ID from payload (XPath-based):
- For these converter-based flows (for example, ASN Outbound in mapping file mode), the Partner identification from payload document property is not supported because the source input is JSON and not XML. Hence, the XPath can't be evaluated.
- Configure the partner explicitly in the messaging properties (for example, Partner ID and Partner ID Type) instead of relying on payload-based derivation.
- Original Message payload display (Messaging History page):
- For these mapping-based flows, the original message payload shown in Message Details represents the event and processing configuration and not the full source document.
- The full source payload is retrieved on demand from the Integration REST API by the Message Converter Service.
- Source payload:
- The source payload is persisted in the message log table as Source Document (JSON) for mapping-based flows.
- Payload downloads (Messaging History page):
- When you download payloads for these mapping-based flows, the download includes:
- Original (event/config “original” record)
- Transformed (the output XML)
- Input JSON (the fetched source JSON payload)
- When you download payloads for these mapping-based flows, the download includes:
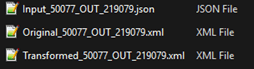
Payload Downloads
- Reprocess and Resubmit behavior (Messaging History page):
- For these mapping-based flows, reprocess and resubmit always return the source payload from the REST API and rerun the mapping transformation.
- Error handling and troubleshooting
- If payload retrieval fails (REST API error) or the transformation fails, the message is logged as No output from transformation.
- Details are captured in Error Description.
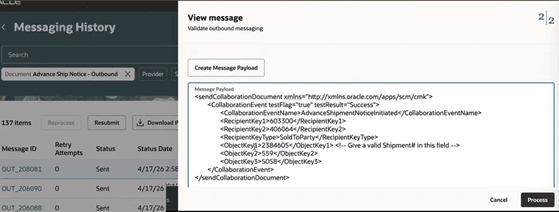
- Validate Outbound Messaging payload content:
- For Validate Outbound, the system seeds only a minimal payload (the event) containing the key information needed to retrieve the full document.
- Example: ObjectKey1 contains the Shipment number, which is used to query the REST APIs and fetch the correct source payload.
- For Validate Outbound, the system seeds only a minimal payload (the event) containing the key information needed to retrieve the full document.
Validate Outbound Payload
- Mapping files:
- The mapping file contains the attribute mappings and may utilize functions defined in the JavaScript file when necessary. It also includes direct JSON-to-XML mappings for attributes that do not require further processing.
- The mapping function file contains all the functions used by the mapping file. It encapsulates the business logic necessary to perform the mapping operations.
Access requirements
Users who are assigned a configured job role that contains these privileges can access this feature:
- Manage Collaboration Message Definitions by Web Service (CMK_MANAGE_COLLAB_MESG_DEFINITION_WEB_SERVICE_PRIV)
- View Collaboration Message Definitions by Web Service (CMK_VIEW_COLLAB_MESG_DEFINITION_WEB_SERVICE_PRIV)
These privileges were available prior to this update.