Redwood Experience for Messages Page
The Messages page has been moved to the Redwood toolkit, giving the page the look of Redwood, along with the backend functionality that Redwood has to offer. With this new page you can quickly view and manage error, warning, and information messages from payroll processes.
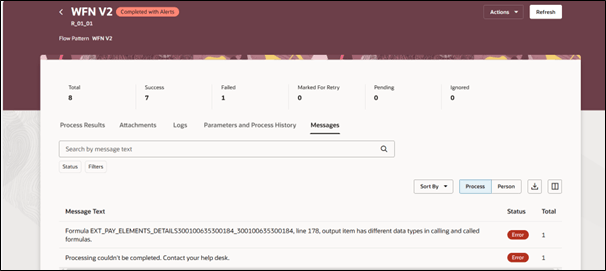
You can access the Messages page by using the Messages tab on the Process Results Details page.
You can also use the View Messages option from the Actions menu on a task or flow on the Process Results Summary or Checklists pages. The page display messages for either a process or persons included in the process.
The process messages include message text and a number to indicate the number of times that message appears for that process.
The person messages display the details of the person, such as person name, person number, assignment number, and payroll relationship number.
Messages Page
- Use the Person or Process switcher option to view either of these messages:
- Messages specific to a person such as John Smith's record is in error status and related message.
- Messages specific to a process such as a process errors and fails to complete processing.
- Use the Status option to view either the Warning or Error messages.
- Use the search option to search for a message by a word or text.
- Use the export option to export the messages to an MS Excel or CSV file.
Use the Messages page to review and monitor process or person-specific error and warning messages from payroll processes.
Steps to Enable
The Messages page is not enabled by default and is controlled by the Redwood Payroll Activity Enabled profile option. The profile option is set to No by default.
In case this page isn’t enabled, use these steps to enable it:
- Navigate to the Setup and Maintenance area and search for the Manage Administrator Profile Values task.
- On the Manage Administrator Profile Values page, search for and select the Redwood Payroll Activity Enabled profile option. The code for this profile option is ORA_PAY_PAYROLL_ACTIVITY_REDWOOD_ ENABLED.
- In the Profile Values section, click Add.
- Specify the level at which the profile value is to be set. Select Site.
- Click Save and Close.
Note: The ORA_HCM_VBCS_PWA_ENABLED central profile option must also be enabled.