 OCI Identity and Access Management Integration
This feature enables enterprise grade identity and access management capabilities based on integration with Oracle Cloud Infrastructure Identity and Access Management (OCI IAM), allowing for greater control with who has access to your cloud resources. You can control what type of access a group of users have, and to which specific permissions and roles they have access to. This will allow all of your users to have one access point to all production and test environments for the Financial Aid Administration UI and Student/Parent Self-Service (Portal). This centralized approach provides enhanced security and simplifies the enforcement of credentials for your end users.
The new capabilities moves user identity management out of the Student Financial Aid (SFA) application and into the OCI Cloud Console.
- You will manage SFA specific configurations with the SFA application and then use OCI to manage users, identity providers, etc.
- Secure and scalable capabilities of OCI will be utilized to authorize users based on group membership in OCI IAM
- Your existing IDP solution can still be leveraged and integrated to OCI IAM using OCI Cloud Console
The following identity management tasks will be now managed either in the SFA application or the OCI Cloud Console:
| Task | Where |
|---|---|
| User Authorization Management - Role Creation and Permission Assignment | SFA |
| User Authorization Management - Assigning Group(s) to Role(s) | SFA |
| User Authorization Management - Group creation | SFA or OCI Cloud Console |
| User Authorization Management - Group Membership and Management | OCI Cloud Console |
| User Account Management | OCI Cloud Console |
| Guest User Account and Notifications Management | SFA or OCI Cloud Console |
| Bulk Management of User Accounts and Groups | OCI Cloud Console |
| Enhanced Security Capability Management - External Identity Providers | OCI Cloud Console |
| Enhanced Security Capability Management - Password Policies | OCI Cloud Console |
| Enhanced Security Capability Management - Session Settings | OCI Cloud Console |
| Custom IAM Interface Branding Management | OCI Cloud Console |
|
Custom Notification Management |
OCI Cloud Console |
|
User Self-Service Password Management |
OCI Cloud Console |
| Authentication and Authorization Audit Reports | OCI Cloud Console |
MANAGE AUTHENTICATION FOR ADMINISTRATORS AND NON-ADMINISTRATORS
After having provisioned your production and non-production environments, you can access your identity domain through cloud.oracle.com and log in using the same credentials you used during the provisioning of the Student Financial Aid (SFA) environments.
Note that:
- The OCI identity domain selected during the provisioning of your production SFA environment will be used for all your SFA environments.
- You'll need to know the OCI Cloud Account name and the OCI compartment and identity domain (if you're not using the values we suggested) that were selected during the provisioning process.
For each production and non-production environment, two Oracle Cloud Service applications are created: one for the administration UI and the APIs, and one for the Student/Parent Self-Service Portal. These applications serve as the integration point between your OCI identity domain and your SFA environments and enable SSO.
Production and Non-Production Environment URLs
| Production Environment URLs | Non-Production URLs |
|---|---|
| Financial Aid System (Admin):
https://sfp.ocs.oraclecloud.com/<customer_shortname>/vm-ui/ui-auth |
Financial Aid System (Admin):
https://sfp.ocs.oc-test.com/<customer_shortname-test>/vm-ui/ui-auth |
| Student/Parent Self-Service (Portal):
https://sfp.ocs.oraclecloud.com/<customer_shortname>/portal/ui-auth |
Student/Parent Self-Service (Portal):
https://sfp.ocs.oc-test.com/<customer_shortname-test>/portal/ui-auth |
Once fully opted in, legacy UI endpoints (/portal/login - /portal/saml and vm-ui/login - vm-ui/saml) will redirect to new IAM endpoints (/portal/ui-auth and /vm-ui/ui-auth).
Authentication for Administrators
If these groups haven't already been created, SFA creates two default SFA global administrator groups in your OCI identity domain. The user that initiated the provisioning of the SFA environments is also added to these groups.
- Admin. This group gives default administrator permissions to all your Student/Parent Self-Service Portal environments.
- SYS_ADMIN. This group gives default administrator permissions to all your administration UI environments.
To manage these groups, from the OCI console's navigation menu, go to Identity & Security > Domains, then select your identity domain, and then groups.
Users that are members of these groups can use the production and non-production environment URLs to authenticate themselves and access the administration UI and the APIs, and one for the Student/Parent Self-Service Portal.
Authentication for Non-Administrators
When you assign the application to the groups, members of the groups are authenticated via OCI IAM. This means that to successfully log in and access SFA, these conditions must be true:" to be "To successfully log in and access SFA, these conditions must be true:
- The user is a member of an identity domain group.
- The group must have a role in SFA. You assign this role in SFA itself.
- The role must have at least one permission assigned in SFA.
When you view role and group mappings in the administration UI and Student/Parent Self-Service Portal, you'll see all the groups in the identity domain that's integrated with your SFA environments. These groups can be those created by OCI, SFA, or the ones you created yourself. To avoid confusion, we recommend adopting a naming convention for all the groups you create that meets your organization's requirements. Here's an example of a naming convention: <environment>-<workload>-<purpose> (oracletest-portal-generaladmin).
MANAGE USERS AND GROUPS IN OCI IAM
For users to access the administration UI and Student/Parent Self-Service portal, they must exist in your OCI identity domain.
Manage Users
If you're going to use OCI IAM as your primary identity provider, we recommend reviewing these documentation.
- Creating a User
- Importing and Exporting Users, Groups, and AppRoles
- Editing a User
- Deleting a User
- Adding a User to a Group
- Removing Users from Groups
OCI Cloud Console provides you with the ability to bulk manage user accounts and groups via the OCI IAM API or CLI.
- Examples of using the API can be found in OCI documentation:
- The CLI reference can be found in OCI documentation: Identity Domains
- (CLI version 3.50.1 at time of creation)
Manage Federated Users
If you're going to use an external identity provider, the user accounts must still exist in OCI IAM with the federated attribute set to true so that they don't have a local OCI console password. If you use an external identity provider, you can assign the Oracle Cloud Service application directly to the identity provider policy. For information, see Adding Apps to the Policy.
To use an external IDP, we recommend you set up a SAML external IDP for authentication and authorization while using the System for Cross-Domain Identity Management (SCIM) protocol for user life cycle management. Review this documentation as well:
- Adding a SAML Identity Provider
- Creating an Identity Provider Policy
- To provision other IDPs into your identity domain, you can set up a confidential application within the identity domain, and then configure the integration on your IDP's side. Consult your IDP support team as needed.
If your IDP supports sending the studentID attribute as a string array data type, another option is to use just-in-time provisioning with a SAML IDP.
If you'll be using just-in-time provisioning for scenarios where only one value is in the studentID attribute in the SAML assertion from your IDP, then take one of these actions:
- Open a service request with Oracle Support to enable support of this scenario:
- Product: Identity Cloud Service (IDCS)
- Category: Applications
- Subcategory: SAML Federation
- Make a request to have this feature enabled on the identity domain saml.jit.user.attribute.provisioning to support Student Financial Aid's custom schema attribute - studentID (string array) - in scenarios where only one value is sent in a SAML assertion.
- Modify the assertion sent to OCI IAM such that the studentID value is enclosed in brackets
[12345]- For example:
<saml:Attribute Name="studentID"> <saml:AttributeValue xsi:type="xs:string">["123456789"]</saml:AttributeValue> </saml:Attribute>
- For example:
When configuring just-in-time provisioning in the OCI Console, the assertion attribute from your IDP must be mapped to urn:ietf:params:scim:schemas:idcs:extension:custom:User:studentID. You'd need to manually enter and then select this value.
We recommend reviewing the following documentation for just-in-time provisioning:
If you don't use SCIM or just-in-time provisioning to automate user account creation, you'll be responsible for creating the accounts in OCI. If you use a combination of external identity providers and OCI IAM users, you'll need to create the OCI IAM users before the users sign in.
You can bulk create the OCI IAM users via OCI tools. You can also bulk create the OCI IAM federated users and set the federated attribute value to true, then set up SCIM or just-in-time provisioning so that the accounts are updated going forward.
Manage Groups
Groups must exist in OCI prior to assigning a user to the group either natively in OCI IAM or via just-in-time provisioning. Review the following documentation for more information:
- Creating a Group
- Importing and Exporting Users, Groups, and AppRoles
- Deleting Groups
- Adding Users to a Group
- Removing Users from a Group
MANAGING ROLES, PERMISSION AND GROUPS IN SFA
For users to access the administration UI and Student/Parent Self-Service portal, their associated groups must have defined role with permissions in SFA.
Manage Roles and Permissions
In the SFA application you will continue to create roles and manage permissions. There are no changes to the creation of a role or the permission mapping itself, the action is still completed within the SFA Application.
Roles cannot be assigned to users via the SFA Application or via a SAML assertion attribute from a configured external identity provider, as this assignment will be done in OCI IAM
- Within "User Management" in the Administration UI, the roles associated to a user will become read only
- Within "Manage Users" in the Self-Service (Portal) the associated roles will no longer be available to select or view
- If a Role is deleted within the SFA application, the association to the Group is removed.
Manage Groups
Groups can also be created from within the SFA Administration UI and Self-Service (Portal).
- Within the SFA Administration UI, users with the existing "Administration" and "Roles Permissions Management" permissions will be able to manage the groups on the existing Roles Management UI, within new "Group Mappings" tab
- Within the Self-Service (Portal), users with the existing "Manage Self Service Permissions" permission will be able to manage the groups in the Roles Permission Section in the Settings UI, within there will be a new "Groups" section
The new group management UIs will contain a list of groups queried directly from OCI IAM.
- By default, the following Groups will be present
- OCI IAM created groups
- All Domain Users
- Domain_Administrators
- SFA created groups
- Admin (Default administrator credentials for the Self-Service (Portal))
- SYS_ADMIN (Default administrator credentials for the Administration UI)
- Membership in these groups gives a user administrator rights to all corresponding Admin UI or Portal instances in all of your SFA environments
- OCI IAM created groups
- Any new groups you create will be listed here
The Groups UIs will show all groups defined across all of your SFA environments (ie. Test vs Production) and SFA applications (ie. Administration UI and Self-Service (Portal)). For this reason, we suggest that your group naming convention includes the environment and application.
- If there is a discrepancy between the mapping due to the user being associated to a different environment or a group belonging to a different application, the user will be presented an error message upon attempting to log in.
You will also have the ability to assign Group(s) to Roles. This can be done in a one-to-many relationship where roles can be assigned to multiple groups, and groups can be assigned to multiple roles.
- Users associated to a Group with multiple Roles will have a union of the Permissions from each Role.
SFA will complete group synchronization to ensure that groups created with OCI IAM or SFA are aligned. This will be completed upon a new login session to the Administration UI or Self-Service (Portal), and checked daily at midnight
- SFA will detect if a Group was deleted in OCI Cloud Console but was mapped to a Role in SFA
-
If a conflict occurs in this scenario, the role is highlighted in RED within the respective new group management UIs (within SFA Administration UI or Self-Service (Portal)) to prompt the SFA Administrator to address the issue by mapping the Role to an existing or new OCI IAM Group
- If not addressed, a user is only assigned the Role in question and attempts to log into the SFA application prior to it being fixed, they will be presented with the following error "An issue has occurred while signing in, please reach out to the financial aid office for assistance."
- Within the Administration UI, a new Sync Groups button will allow you to perform this synchronization on demand
Customer created groups cannot be deleted from within the SFA application, you will need to do this from the OCI Console.
Manage Users
User management can no longer be done via the SFA application or via a SAML assertion attribute from a configured external identity provider
- Within "User Management" in the Administration UI, user attributes will become read only
- Within "Manage Users" in the Self-Service (Portal), user attributes will become read only
Note, if a user account is deleted via OCI IAM, the user account record will still exist in the SFA Application for audit and compliance enablement.
MANAGING GUEST USER ACCOUNTS AND NOTIFICATIONS
Additional setup is required to manage Guest User accounts.
Within the Self-Service (Portal), users with the existing "Manage Proxy Access" permission will now be updated to have the "Manage Guest Access" permission, which will allow them to update the Guest Authentication Mode within the Settings UI. The "Guest and Student Authentication Mode" section will be replaced with a new "Guest Authentication Mode"
The following options previously available within "Guest and Student Authentication Mode" section will no longer be applicable
- "Guest and Student Local Authentication"
- "Guest and Student SAML Authentication"
- "Guest Local Authentication and Student SAML Authentication"
Within the new "Guest Authentication Mode" section (available to users with the "Manage Guest Access" permission), you will have the following options
- "Enable External IDP Authentication"
- if you select "Enable External IDP Authentication" and Save, your external identity provider will need to be configured to support these user accounts for authentication (See SAML Attributes Required for Authentication section below)
- By default, this option is not selected, and OCI IAM will be used to manage Guest User Accounts
- When using OCI IAM for Guest accounts, when a Student adds a user, SFA will query the OCI IAM Identity Domain to see if the user exists
- If the user exists, update the studentID attribute to include the additional student ID
- If the user does not exist, the user will be created with the email address provided by the student
- When using OCI IAM for Guest accounts, when a Student adds a user, SFA will query the OCI IAM Identity Domain to see if the user exists
- With the 25A release, a single Guest user account can be used to access information for multiple student accounts (where authorized and applicable)
- See Enhancing Parent Access within Self Service Feature for further details
Notification Management
The "Email Communication Preference" section (previously available for users with "Manage Self Service UI Settings" permission) within the Settings UI in Self-Service (Portal) will be removed as all notification management will be done on OCI Cloud Console
- See Customizing Notification Management to control what notifications are sent to the user from OCI in relation to the new or updated user account
To make it easier for guest users to authenticate and access Student Financial Aid, you can create a direct link that redirects guest users to the application.
- By default, when a new OCI IAM user account is created, the user receives an email notification to activate their account. The link in the email takes the user to the OCI Cloud Console and, when complete, redirects the user to the OCI Cloud Console My Apps page.
- On the My Apps page, you can add a link that lets guest users immediately access Financial Aid System (administrative interface) or the Self-Service Portal. To do this, see Adding an Enterprise Application. Make sure you select the checkbox Display in My Apps.
- To control who can see this link, you'll have to manage the groups that are assigned to this application. For information, see Assigning Applications to a Group.
AUTHORIZATION FLOW FOR ACCESSING APPLICATIONS
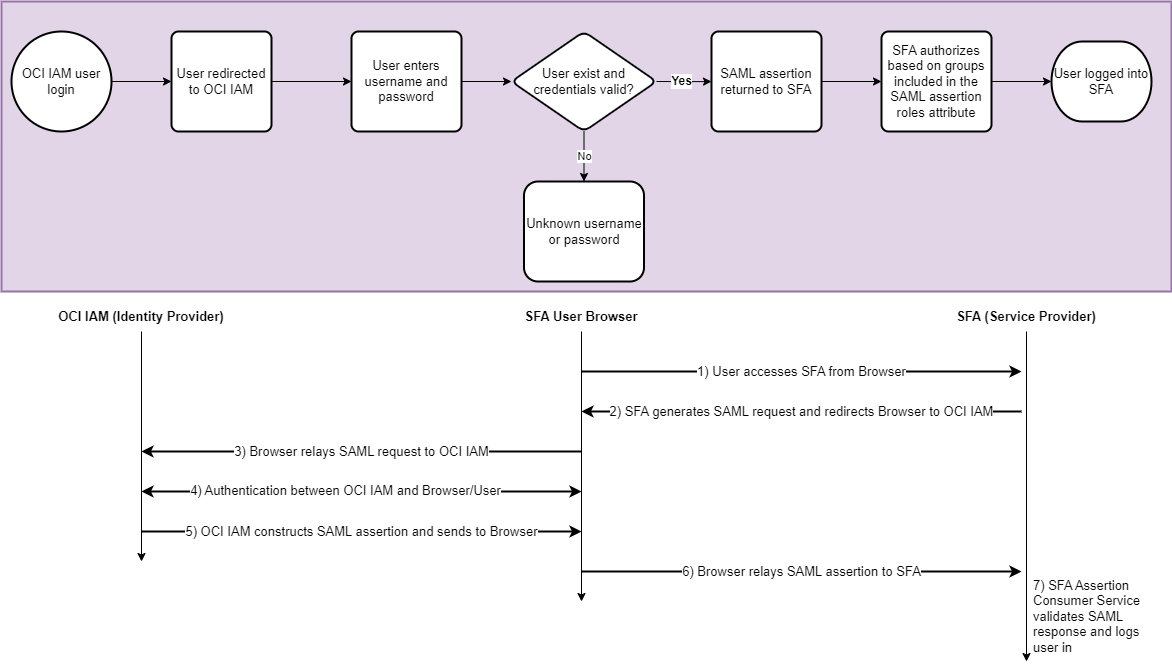
Users accessing the Financial Aid Administration UI or Student/Parent Self-Service (Portal) via the /ui-auth endpoint are redirected to OCI IAM (SAML).
If the environment does not utilize an external identity provider, OCI IAM will authenticate the user. SFA will authorize the user based on group(s) included in the SAML assertion where the group(s) match groups assigned to roles within the Administration UI or Self-Service (Portal)
If the environment utilizes an external identity provider that is applicable to the user, OCI IAM will redirect the user to the external IDP. The external IDP will authenticate the user, the user redirected to OCI IAM and then to SFA. SFA will authorize the user based on group(s) included in the SAML assertion where the group(s) match groups assigned to roles within the Administration UI or Self-Service (Portal).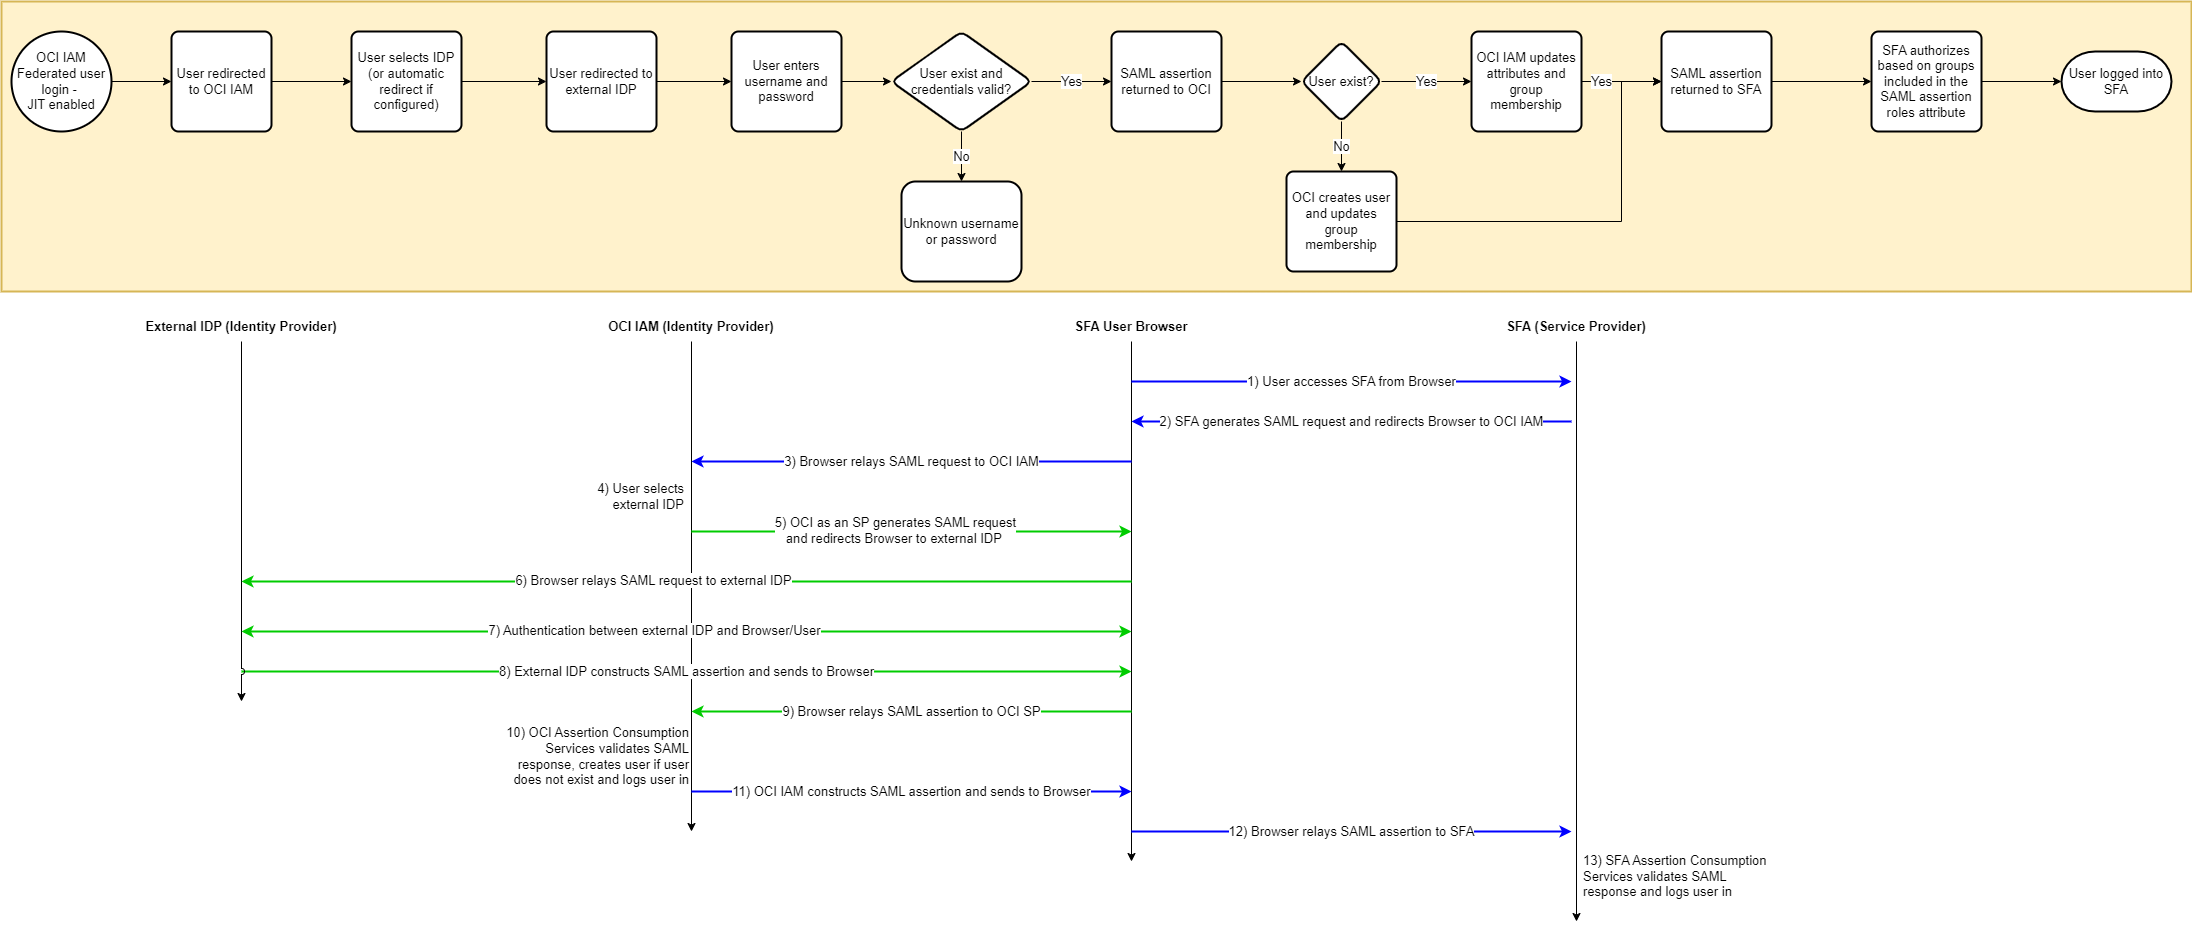
SAML ATTRIBUTES REQUIRED FOR AUTHENTICATION
When users log in to Student Financial Aid (SFA), OCI IAM sends attributes in the SAML assertion to authenticate users.
If you're using an external identity provider, you would need to populate these attributes so that users can log in.
This table lists the attributes that OCI IAM sends in the SAML assertion to authenticate users accessing the administration UI.
OCI IAM attributes sent in the SAML assertion for the administration UI
| Name | Format | Type | Type Value | Condition |
|---|---|---|---|---|
| firstName | Basic | User Attribute | First name | None |
| lastName | Basic | User Attribute | Last name | None |
| emailAddress | Basic | User Attribute | Primary email | None |
| roles | Basic | User Attribute | Group membership | All groups |
This table lists the attributes that OCI IAM sends in the SAML assertion to authenticate users accessing the Student/Parent Self-Service Portal.
OCI IAM attributes sent in the SAML assertion for the Student/Parent Self-Service Portal
| Name | Format | Type | Type Value | Condition |
|---|---|---|---|---|
| studentID | Basic | Expression/Literal | urn:ietf:params:scim:schemas:idcs:extension:custom:User:studentID | None |
| firstName | Basic | User Attribute | First name | None |
| lastName | Basic | User Attribute | Last name | None |
| roles | Basic | User Attribute | Group membership | All groups |
| emailAddress | Basic | User Attribute | Primary email | None |
The studentID attribute is a custom schema attribute that SFA adds to your identity domain schema when you provision the SFA environment for the first time. Make sure that this attribute:
- Is populated with a student’s ID so that a student can successfully log in to Student Portal.
- Is populated with at least one student ID so that a guest user can successfully log in.
- Is of type String Array and must be of this type when included in the assertion from an IDP.
- Is presented in a comma-separated format: <studentID1>,<studentID2>,. . . and so on.
INCREASED API SECURITY ACCESS
The Oracle Cloud Service applications are used for API authentication and authorization. The applications add controls that enable you to issue tokens with READ (GET as an example) and ADMIN (POST as an example).
In OCI IAM, the controls are referred to as scopes. These scopes are available for each Student Financial Aid (SFA) environment:
- /audit.admin
- /audit.readonly
- /mpg.admin
- /mpg.readonly
- /ui.admin
- /ui.readonly
- /vug.admin
- /vug.readonly
Here are examples of when to use the different scopes:
- When you need to make a READ (GET) call to the Vocado US Department of Education Gateway (VUG) API, you would request a token with only the /vug.readonly scope for the corresponding SFA environment.
- When you need to make an ADMIN (POST) call to the Message Processing Gateway (MPG) API, you would request a token with only the /mpg.admin scope for the corresponding SFA environment.
Environment URLs and Endpoints
Here's the list of production and test environments as well as the endpoints.
Production and Test Environment Formats
| Production Environment | Test Environment |
|---|---|
|
Format: https://sfp.ocs.oraclecloud.com/<environment>/<endpoint> Example: |
Format: https://sfp.ocs.oc-test.com/<environment>/<endpoint> Example: |
These are the endpoints in the production and test environments:
- API
- /audit/v2
- /mpg/v2
- /portal/info
- /vm-ui/rest
- /vug/v2
- Financial Aid System and Self-Service Portal
- /vm-ui/ui-auth
- /portal/ui-auth
Add a Confidential Application
To access the APIs for all your SFA environments, you need to create a Confidential Application for which you can regenerate the credentials on an ongoing basis, and control who has access to it.
For the complete instructions, see Adding a Confidential Application. The steps outlined below provide some recommendations as you add a new application.
- From OCI's navigation menu, go to Identity & Security > Domains > <your OCI identity domain> > Integrated applications.
- Add a new application.
- Select Confidential Application.
- Enter the required information.
- Select Enforce grants as authorization.
- On the Configure OAuth pane, select Configure this application as a client now.
- Select Client Credentials.
- Select Add resources.
- Expand the . . ._ADMIN app that corresponds to the SFA environment you want to interact with via REST API.
- Select the corresponding scope for the activity.
- You can select the checkbox next to all . . ._ADMIN apps that correspond to your SFA environments to add all scopes for those environments. But it's good practice to include only the SFA environments and specific scopes in the "Resources" of the Integrated application that are needed at the time, and to keep the "Resources" empty when not in use.
- By default, any scopes for newly provisioned SFA environments will not be included in "Resources."
- Select Add.
- Select Add app roles.
- Select Signin.
- Select Add.
- Finish creating the app. You don't need the other options.
- Activate the application.
Request a Token
To access the REST APIs, you also need to request a token. A user accessing an API endpoint will retrieve an OAuth token using their own, named account and present the token via a CURL command (or third-party tool). SFA will validate the token against OCI and then authorize the user based on role and then group membership. This token can't be shared, but you can configure when the token expires. This period depends on your organization's requirements and whether you're comfortable allowing a token to be used for a certain period.
- From OCI's navigation menu, go to Identity & Security > Domains > <your OCI identity domain> > Integrated applications.
- Browse to the confidential application you created, then select it.
- Select OAuth Configuration
- Locate the Client ID and Client secret
- We recommend routinely regenerating the Client Secret for the confidential application you created because this allows for READ and ADMIN access to the APIs for your SFA environments.
- We also recommend restricting who has access to the Client ID and Client Secret within OCI IAM.
- Encode the values to Base64
- Here's an example in Windows Powershell:
$stringToEncode = "id:secret"$bytes = [System.Text.Encoding]::UTF8.GetBytes($stringToEncode)$encodedString = [System.Convert]::ToBase64String($bytes)$encodedString
- Make sure to note the value for use in token requests
- Here's an example in Windows Powershell:
- In your preferred software client, make an API call to request and retrieve a token:
- When you need to make a READ (GET) call to the MPG API, you would request a token with only the /mpg.readonly scope for the SFA environment you need to interact with
- Example scope:
curl -H "Authorization: Basic <base64 string created from client id and client secret" -H "Content-Type: application/x-www-form-urlencoded;charset=UTF-8" --request POST https://<identity domain url>/oauth2/v1/token-d "grant_type=client_credentials&scope=https://sfp.ocs.oc-test.com/oracletest/mpg.readonly"
- Example scope:
- When you need to make an ADMIN (POST) call to the VUG API you would request a token with only the /vug.admin scope for the SFA environment you need to interact with.
- Example scope:
curl -H "Authorization: Basic <base64 string created from client id and client secret" -H "Content-Type: application/x-www-form-urlencoded;charset=UTF-8" --request POST https://<identity domain url>/oauth2/v1/token -d "grant_type=client_credentials&scope=https://sfp.ocs.oc-test.com/oracletest/mpg.readonly"
- Example scope:
- When you need to make a READ (GET) call to the MPG API, you would request a token with only the /mpg.readonly scope for the SFA environment you need to interact with
- To make an API call to interact with an SFA environment, use the token retrieved in the previous step.
curl -kv -X POST -H "Authorization: Bearer <token value>" -F "file=@demotest.dat" https://sfp.ocs.oc-test.com/oracletest/vug/v2/in/publish
- Locate the Client ID and Client secret
ENHANCED IAM CAPABILITIES
The following security capabilities are provided in the OCI Cloud Console and outlined further within OCI documentation
- Adaptive Security
- Custom IDP policies
- Custom sign-in policies
- Custom terms of use documents
- End user Account recovery, MFA setup
- External SAML Identity Providers
- Multi-factor Authentication (MFA)
- Network perimeters
- Passwordless Authentication
- Session timeout controls
Note, you will no longer manage your Password Policy within the SFA Application and instead this will be done within the OCI Cloud Console
- The "Password Policy Configuration" section (previously available for users with " Update Password Policy" permission) within the Settings UI in Self-Service (Portal) will be removed.
- The "Password Policy" page within the Security Management UIs within the Administration UI will be removed.
- See OCI documentation for more details for how you will manage these settings with OCI IAM: Password Policy
Custom Notification Management
- Within the OCI Cloud Console, you can manage custom notifications
- An extensive list of email notifications (including Welcome, Password Recovery, etc.) can be sent to:
- Users
- Administrators
- Customizations that can be made include:
- Language
- Encoding
- Sender
- Subject
- Email body
- See OCI documentation for more details:
Custom IAM Interface Branding Management
- The following branding capabilities are provided in OCI Cloud Console
- Add a background image on the sign-in page
- Customize the text that users see on the sign-in page
- Choose the language that users see on the sign-in page
- Add a custom logo on the sign-in page
- Add branding to notification templates
- See OCI documentation for more details:
User Self-Service Password Management
- OCI Cloud Console provides users with the ability to change their password or reset a forgotten password.
- See OCI documentation for further information:
Audit Logging and Reporting
- Oracle Identity and Access Management (IAM) is provides a robust reporting and audit logging suite.
- These will help you maintain security and compliance by providing detailed information about who is accessing your Student Financial Aid applications and when, and triage login issues.
- Successful and Failed Logins
- Notification delivery statuses
- Sign-on and Sign out activity
- Access stats to IAM
- Diagnostic Data
- These will help you maintain security and compliance by providing detailed information about who is accessing your Student Financial Aid applications and when, and triage login issues.
- Audit logging can be used to identify potential security breaches, ensure your SSO standards meet the compliance requirements of your school and can provide visibility into trends and user activity.
- Generate reports of users' activities
- Capture historical user data
- Analyze Application Usage
- Reports and Audit Logs can be run within the IAM console and viewed in an interactive browser, downloaded as a CSV and run utilizing service REST APIs.
- Not all reports are available via the interactive browser, there are reports only available via REST APIs (See Documentation)
- Refer to the following Oracle Identity and Access Management documentation:
OCI Identity and Access Management provides secure and centralized access to all of your SFA environments.
Here's the demo of these capabilities (Please note that the setup steps shown in demo have been updated since recording):
Steps to Enable
Use the Opt In UI to enable this feature. For instructions, refer to the Optional Uptake of New Features section of this document.
Offering: Student Financial Aid No Longer Optional From: Update 25C
Once delivered in the 25A release, all new customers (that do not have any current environments provisioned), will have all their environments provisioned with OCI IAM integration and will not need to migrate or opt into this feature.
For existing customers, the following modes will be supported to ease the uptake of OCI IAM
Prior to opting in, the existing functionality will remain unchanged
- URLs and endpoints
- Permission, role, and user management
- Endpoints used for accessing SFA and SFA API's
- /vm-ui/saml (if configured)
- /vm-ui/login
- /portal/saml (if configured)
- /portal/login
- /admin
- /audit
- /mpg
- /vug
- User login
- Users accessing the Administration UI or Self-Service (Portal) via the /login endpoint are authenticated via the SFA application, then authorized based on roles assigned from within the SFA application
- Users accessing the Administration UI or Self-Service (Portal) via the /saml endpoint is redirected and authenticated against a customer's external identity provider (using SAML), then authorized based on the role attribute included in the SAML assertion returned from the external identity provider
- API access is done via CURL commands (or via third-party tools) using dedicated accounts and basic authentication
Hybrid Mode
When opting into the feature, you will first activate a Hybrid mode that will allow you to leverage new OCI IAM integration for users utilizing the new endpoints, while continuing to manage user access via legacy functionality.
Prerequisites for Hybrid Mode
Additional configuration is required to grant access to SFA environments. These tasks are a one-time required setup to provision your first SFA environment.
Note the following:
- The identity domain you select is used for all future SFA environments and can't be changed.
- To filter the permissions that SFA has in the identity domain you select, the domain must be in a compartment or sub-compartment under the root compartment of your tenancy.
If you want to make changes to the identity domain you created for integration with SFA, see Managing Identity Domains for more information.
- Create a compartment.
- We suggest using SFA-Resources as the name of the compartment.
- Create an identity domain.
- We suggest using SFA-Domain as the name and selecting Free as the domain type. SFA will upgrade the domain type to Oracle Apps.
- Note the following:
- Make sure the selected region is US East (Ashburn) or US West (Phoenix).
- Must be created in the Compartment created in the previous step (SFA-Resources).
- Under Remote region disaster recovery, you must Enable remote region disaster recovery.
- Note the following:
- Create a group in the Identity Domain you selected
- This group will be granted permissions to manage the provisioning of SFA environments in a later step.
- Suggested name: SFA-OCI-App-Mgmt
- Create an identity policy to grant SFA access to integrate with your selected identity domain. For information on identity policies, see How Policies Work.
- The following policies are required.
- Allow service sfpprodiam to manage domains in compartment SFA-Resources
- Allow group SFA-Domain/SFA-OCI-App-Mgmt to read subscriptions in tenancy
- Allow group SFA-Domain/SFA-OCI-App-Mgmt to read app-listing-environments in tenancy
- Allow group SFA-Domain/SFA-OCI-App-Mgmt to read metrics in tenancy
- Allow group SFA-Domain/SFA-OCI-App-Mgmt to read domains in tenancy
- Allow group SFA-Domain/SFA-OCI-App-Mgmt to read announcements in tenancy
- Allow group SFA-Domain/SFA-OCI-App-Mgmt to manage organizations-family in tenancy
- Allow group SFA-Domain/SFA-OCI-App-Mgmt to manage OSFPCS-environment-family in tenancy
- The following policies are required.
NOTE: If you used a different compartment name, use that instead of SFA-Resources. If you selected a different group name earlier in the process, use that name here instead of SFA-OCI-App-Mgmt
- In the identity domain you created:
- Allow clients to access the signing certificate for the identity domain in IAM without logging in to an identity domain. For instructions, see Viewing SAML Certificate Metadata.
- Verify that a primary email address is required to create user accounts in an identity domain in IAM. For instructions, see Requiring User's Email Address for Account Creation.
- Create the user account that becomes the default global administrator for your SFA environments. For instructions, see Creating a User.
You'll be able to change this later. - Enable the user account to also manage SFA environment provisioning. To do so, add the user to the group created earlier. Suggested name: SFA-OCI-App-Mgmt. Note that if you used a different group name earlier in the process, use that name here instead of SFA-OCI-App-Mgmt. For instructions, see Add users to a group
Enable Hybrid Mode
Once the prerequisite tasks have been completed, Hybrid mode can be enabled per environment by submitting a SR. In the SR include the following
- Requested environment along with 3 convenient dates and times, so that to an enablement time can be coordinated with you.
- Identity Domain OCID and URL
- Tenancy OCID
- Email address for default global admin
By 25B, any environments not in Hybrid mode will be automatically enabled during a scheduled maintenance window with proper notifications prior.
Hybrid Mode Functionality
The following functionality can be used within Hybrid mode
| Functionality | Hybrid Mode |
|---|---|
| SFA Endpoints | Both existing legacy and new endpoints can be leveraged |
| Login Process | Both existing legacy and new login process leveraging new endpoints can be leveraged |
| User Authorization Management - Role Creation and Permission Assignment | Continues to work as it does prior to opting in |
| User Authorization Management - Assigning Group(s) to Role(s) |
For users accessing SFA via the legacy endpoints, Groups has no impact. Continue to create/manage roles as you currently do and then assign to users via SFA or SAML assertion. For users accessing SFA via the new endpoints, a User MUST be in a Group in OCI IAM, that Group MUST have Role assigned in the SFA Application and the Role MUST have at least one Permission assigned in the SFA Application Existing Roles that were created prior to opting into the feature, can be modified to assign a Group to it. This Role can then be used for users accessing SFA via the Legacy endpoints and new endpoints. New Roles can be created and applied to users logging in via the legacy endpoints and/or new endpoints |
| User Authorization Management - Group creation |
Default Groups will be created and displayed within the new group management UIs in SFA applications, however no roles will be associated to those groups. You can create new Groups in either the SFA applications or OCI Cloud Console, and can delete groups from OCI Cloud Console |
| User Authorization Management - Group Membership and Management | You can assign users who are using the new endpoints to Groups within OCI Cloud Console. |
| User Account Management |
You can to create users using the new endpoints within OCI Cloud Console. You can either manually re-create your existing users, or use Just-in-time provisioning. Please note that if you create an existing user using the new endpoint, you will see 2 user accounts for the same user within the user list and SFA will leverage the new endpoint for log in. For users using the legacy endpoints with a User Type of "External (SAML)" or "Internal" the User Management capabilities with the Administration UI and Self-Service UI can still be used. |
| Guest User Account and Notifications Management |
You will continue to manage guest user accounts using "Guest and Student Authentication Mode" settings on the Self-Service (Portal) regardless of endpoints. |
| Bulk Management of User Accounts and Groups | Can be managed within OCI Cloud Console, but will only be applicable for users leveraging new endpoints |
| Enhanced Security Capability Management - External Identity Providers | Can be setup and managed within OCI Cloud Console, but will only be applicable for users leveraging new endpoints |
| Enhanced Security Capability Management - Just-in-time provisioning | Can be setup and managed within OCI Cloud Console, but will only be applicable for users leveraging new endpoints |
| Enhanced Security Capability Management - Password Policies |
For users leveraging new endpoints, you will need to set up your password policies on OCI Cloud Console. For users leveraging legacy endpoints, you can still manage your password policy via the password policy capabilities within the SFA Application |
| Enhanced Security Capability Management - Session settings | Can be setup and managed within OCI Cloud Console, but will only be applicable for users leveraging new endpoints |
| Custom IAM Interface Branding Management | For users leveraging new endpoints, you will need to set up your desired branding |
|
Custom Notification Management |
Can be setup and managed within OCI Cloud Console, but will only be applicable for users leveraging new endpoints For existing users using legacy endpoints, you can use the existing "Email Communication Preference" settings on the Self-Service (Portal). |
|
User Self-Service Password Management |
Can be setup within OCI Cloud Console, but will only be applicable for users leveraging new endpoints |
| Authentication and Authorization Audit Reports |
Can be accessed within OCI Cloud Console, but will only be applicable for users leveraging new endpoints OAS Audit reports will still be available for all users regardless of the endpoints being used. |
| SFA API Access |
Both existing legacy and new endpoints can be leveraged |
Testing Hybrid Mode
During Hybrid mode, you need to complete end to end user experience testing, adjust internal documentation as needed, etc.
- Any third-party integration services accessing SFA or the SFA APIs need to be setup to use the new endpoints.
- Examples include Oracle Integration Cloud
Migrated Mode
Once you have fully completed your testing and are ready to migrate, you can disable the legacy and hybrid functionality resulting in the new SFA and OCI IAM integrated capabilities being available.
Prerequisites for Migrated Mode
Prior to enabling Migrated mode, complete end to end user experience testing, adjust internal documentation as needed, etc.
- Any third-party integration services accessing SFA APIs need to be setup to use the new endpoints.
- Please refer to the "Increased API Security Access" section, for further information on how to set this up.
- If you are using Oracle's Campus Solutions, ensure that you have fully tested API integrations prior to opting into Migrated mode.
- In order to obtain the POC which enhances CS to account for the new API endpoints, you should be current on CS/SFP integration related fixes through PI34.
- Refer to Doc ID 3080631.1 for more details
Enable Migrated Mode
Once the prerequisite tasks have been completed, Migrated mode can be enabled per environment by submitting a SR. In the SR include the following
- Requested environment along with 3 convenient dates and times, so that to an enablement time can be coordinated with you.
- Note that as there is possible BIP reporting service downtime, this should be done during off hours.
Note that we encourage testing Migrated mode in your non production environment prior to migrating in production.
By 25C, any environments not in Migrated mode will be automatically enabled during a scheduled maintenance window with proper notifications prior. User accounts that are not administered in IAM, including accounts with ‘local’ or ‘external’ authentication, will no longer work.
Migrated Mode Functionality
In addition to the functionality outlined in Hybrid mode, you will need to set up Guest User Accounts
- Within the new "Guest Authentication Mode" section (available to users with the "Manage Guest Access" permission), you will need to either
- Select "Enable External IDP Authentication" to allow for your external identity provider to be configured to support these user accounts for authentication
- Or leave this selection unchecked and manage Guest User Accounts via OCI IAM.
The following legacy functionality will no longer be applicable:
- Legacy SFA Admin UI and Portal HTTP/S will redirect to the new /ui-auth endpoints
- Legacy API endpoints will no longer be accessible
- Note there are no changes in this release to the following API endpoints:
- /vm-ui/rest/....
- /portal/info/....
- Note there are no changes in this release to the following API endpoints:
- Roles cannot be assigned to users via the SFA Application or via a SAML assertion attribute from a configured external identity provider (/saml endpoints)
- Within "User Management" in the Administration UI, the roles associated to a user will become read only
- Within "Manage Users" in the Self-Service (Portal) the associated roles will no longer be available to select or view
- The User Management capabilities within the SFA Application are now read only
- Within "User Management" in the Administration UI, user attributes will become read only
- Within "Manage Users" in the Self-Service (Portal), user attributes will become read only
- The Password Policy capabilities within the SFA Application are now read only
- The "Password Policy Configuration" section (previously available for users with " Update Password Policy" permission) within the Settings UI in Self-Service (Portal) will be removed.
- The "Password Policy" page within the Security Management UIs within the Administration UI will be removed.
- Guest accounts are no longer managed via the SFA Application
- "Guest and Student Authentication Mode" section in Self-Service (Portal) will be replaced with a new "Guest Authentication Mode"
- Email notifications are no longer managed via the SFA application
- Emails sent upon account activation will not be sent via SFA application
- The "Email Communication Preference" section (previously available for users with "Manage Self Service UI Settings" permission) within the Settings UI in Self-Service (Portal) will be removed
- Email to reset passwords will no longer be sent via SFA application
Tips And Considerations
OCI IAM by default will send email notifications to new OCI IAM users and OCI IAM federated users in a variety of scenarios.
- Please modify templates, deactivate notifications, etc. as needed.
- When a new OCI IAM user account is created, by default, the user will receive an email notification to activate their account.
- The link in the email will take the user to the OCI Cloud Console and, when complete, redirect the user to the OCI Cloud Console My Apps page.
- You can add link(s) to this page to let customers directly click to proceed to the Admin UI or Portal by creating an "Enterprise Application" within your Identity Domain
- See OCI documentation for Adding an Enterprise Application for more information
- Note: Make sure to select "Display in My Apps"
- Group and User assignment on the created Enterprise Application can control who sees a given link
- In the Admin UI and Portal when working work Roles and Groups Mappings:
- All groups in the OCI Identity Domain integrated with your SFA environments are displayed
- This means default groups created by OCI, SFA and all groups you have created are listed
- To avoid confusion, please adopt a naming convention for all groups you create that meets your organization's requirements.
- A sample naming convention is:
- <environment>-<workload>-<purpose>
- Example: oracletest-portal-generaladmin
- Membership of the default groups created by SFA (Admin and SYS_ADMIN) in the OCI Identity Domain integrated with your SFA Environments gives a user administrator rights to all corresponding Admin UI or Portal instances in all of your SFA environments
- During initial setup, it is recommended to create new groups for administrator rights per SFA environment and use these default groups as break glass access for restricted global admin access
- All groups in the OCI Identity Domain integrated with your SFA environments are displayed
- At this time, SFA is only supporting integration of SAML external identity providers in the OCI Cloud Console
- The OCI Identity Domain you select to use with your first environment when opting into Hybrid mode will be used for all of your SFA environments
- For customers provisioned after 25A, the OCI Identity Domain of the user logged into the OCI Cloud Console to instantiate the creation of your first SFA environment will be used for all of your SFA environments
- To maintain OCI IAM's enhanced API security, for the Integrated App you created for API Access, you should:
- Routinely regenerate the Client secret as this allows for READ and ADMIN access to the APIs for your SFA environments
- Restrict who has access to the Client ID and Client secret
Key Resources
- See:
- Refer to the following OCI Cloud Console and Oracle Identity and Access Management documentation:
- Get to Know the Console
- OCI IAM Lifecycle for Managing Users documentation
- Managing Groups
- Bulk Manage User Accounts
- Security Capabilities
- Network perimeters
- Custom terms of use documents
- Adaptive Security
- Multi-factor Authentication (MFA)
- Passwordless Authentication
- Session timeout controls
- End user Account recovery, MFA setup
- External SAML Identity Providers
- Custom IDP policies
- Custom sign-in policies
- Just-in-time provisioning
- Password Policy
- Branding the IAM Interface
- Changing Your Password
- Oracle Identity and Access Management Reports
- Accessing Audit and User Reports Using Identity Cloud Service REST APIs
- For more information on the associated Customer Ideas, see these resources:
- Idea 527396 - Deleting users from the Admin UI
- Idea 560154 - Enhance SSO to allow SFA to assign/manage roles to external SAML
- Idea 626665 - Maintenance of System Accounts
- Idea 527395 - Setting passwords in the Admin UI
- Idea 688162 - Refactor Administrative Passwords/Credentials Reset away from using Email
- Idea 670811 - SAML role - Enable the 'Yes' or 'N'
- Idea 646967 - API Incorrect Credential Lockout
- Idea 545523 - Bulk Loading User Accounts
- Idea 623982 - Update Proxy message to indicate that student needs to register in SFA within Audit Logging
- Idea 581182 - Enable Student Portal proxy SSO authentication to provide only the username in
- Idea 584110 - Student Portal user account lock
- Idea 573355 - Ability to customize guest access account activation email
- Idea 538706 - Audit Logs: User Access to High or Restricted Data
- Idea 538691 - Audit Logs: Authorization Failures
- Idea 664462 - BI Publisher Audit Logs