Receive Expense Destination Items on Inbound Orders
Inbound orders destined for stocking locations or specific requestors outside of a warehouse, should be received in WMS and be delivered to the respective locations or requestor. With this release, purchase order and transfer orders that are meant for expensed destinations will be available for receipt in Cloud WMS and immediately be consumed upon receipt.
For example, the Healthcare industry deals with consumable items like syringes, cottons, and medicines that are often received at the warehouse and then distributed to respective locations such as operation theatres, stores, or pharmacies. In these scenarios, warehouses may require a mechanism to receive and consume these expensed inventories periodically for every PO detail marked with the expensed flag.
In 24C, to distinguish an expensed PO sent from Inventory Management, a new flag called “Expensed destination” is introduced at the PO detail level. If this flag is checked, it implies that the corresponding PO detail is meant for an expensed destination and is treated for auto consumption upon receipt. The corresponding inventories will not be considered or accounted to the warehouse inventory.
EXPENSED DESTINATION PURCHASE ORDER AND ASN CONFIGURATIONS
Purchase Order
- A new flag Expensed destination is introduced at the Purchase Order Details UI.
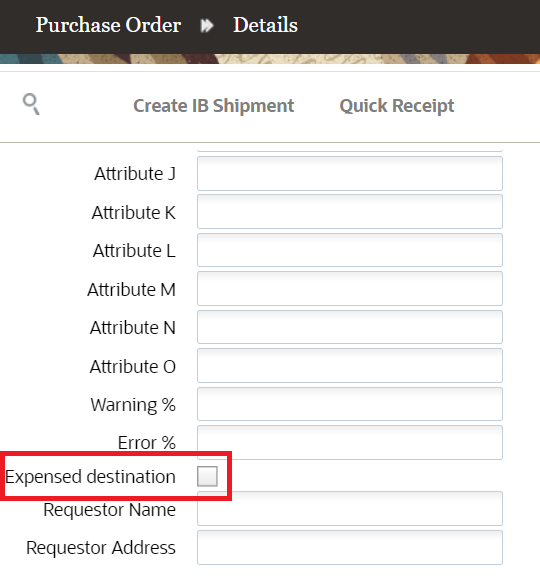
Expensed Destination flag
NOTE: Any ASN created from the POs with the flag (enabled/disabled) will replicate the value on the ASN.
- This new flag is added to the filter option of the Purchase Order header UI (PurchaseOrderHdrView) UI screen search criteria with Yes and No options. On selecting yes, the system filters all the POs that has at least one detail with the Expensed destination flag checked.
- When Inventory Management sends expensed item to a specific location or requestor, the system requires a name and address to deliver the expensed items soon after performing expense destination receipt. To distinguish expensed inventory, following two fields are introduced to the Purchase Order detail UI:
- Requestor Name : Supports 250 Chars
- Requestor Address: Support 250 Chars
- These columns are available on the ASN details Receiving UI, ASN detail flat view UI grid field, and IBLPN Label Designer UI. However, if the ASN has the PO reference or a PO detail is fully or partially converted to an ASN, then the values are fetched from the PO detail. The "requestor_name" field is available on the PO detail UI, ASN detail UI, and ASN detail flat view search fields.
NOTE: These fields can be edited in the PO detail only via UI and JSON format. These fields are not exposed in the existing PO interface formats (XML, CSV, PSV)
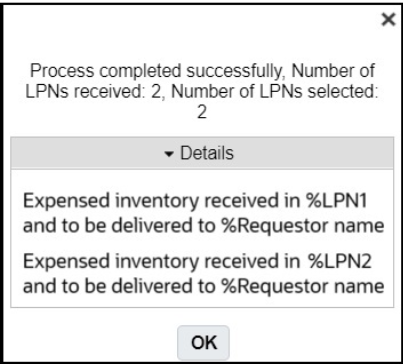
- On performing expensed destination via UI and RF based Receiving (PO, ASN, Single SKU, and Load), a receipt confirmation message is displayed with the requestor name, “Expensed inventory received in %LPN and to be delivered to %Requestor name”.
-
This helps you to deliver the expensed inventory to the right point of contact. The above message is displayed only when the destination type is expensed.
NOTE: If there are multiple requestor names received in a single expensed LPN or the Requestor name is not populated on the expensed detail, then system displays “Expensed inventory received and consumed in LPN: %LPN_NBR" for a PO UI based UI based receipt, and Received LPNs are consumed to expensed destination for UI and RF based receipt.
ADVANCED SHIPMENT NOTICE (ASN)
WMS auto consumes inventories on receiving expensed destination PO from Inventory Management. You can create ASN from such PO details and perform IB shipment receipts. Now, to identify such ASNs and auto consume from UI, RF, or API, we have introduced 'Expensed destination' column on the ASN detail (ASNDetailView) and Perform Detailed Receiving UI screen.
On creating an ASN from the UI for an expensed PO detail, the Expensed destination column on the ASN detail UI screen is marked as Yes.
While performing Mass Update Pallet Number with multiple ASN details with mixed Expensed destination flag status or if a SKU has multiple details that are both expensed and non-expensed, a new warning message “Cannot mix both expensed and non-expensed inventories in a single Pallet ” displayed.
On performing Cartonize per SKU action button with a SKU having multiple details that are both expensed and non-expensed, following new error message is displayed “Cannot cartonize all SKUs. Some SKUs have a mix of expensed and non-expensed details.”
GET API SUPPORT FOR EXPENSED DESTINED RECEIPTS
Warehouse Management introduces the JSON format for interfacing purchase order via API and loading the stage tables accordingly. A new API “purchase_order” is introduced to load the purchase order entity related stage table in JSON format.
POST .../wms/lgfapi/v10/stage/purchase_order
NOTE: The Expensed destination flag will be introduced only for JSON format and will not be exposed on the existing PO interface in XML, CSV, PSV formats.
The Expensed destination flag cannot be modified from the API using JSON format, if a PO detail has a corresponding ASN which is in greater than created status (PO detail has received qty more than 0). On proceeding to modify, the system displays message "Cannot update expensed destination, %PO-% is in invalid status".
UPDATES IN GET APIS
The following entities are updated with the Expensed destination flag, Requestor_Name and Requestor_Address:
- purchase_order_dtl entity
- inbound_shipment_dtl entity
NOTE: If the Get API method doesn't have any values in Requestor_Name and Requestor_Address columns for any of the above entities, the field is left blank in API.
PURCHASE ORDER DETAIL RECEIVING
In 24C, we’ve introduced two new action “Perform Expensed Destination Receipt” button that helps you to receive PO details record from the PO Detail screen. By default, this action button is disabled. On selecting one or multiple PO details with the Expensed Destination flag set to Yes, the system enables the “Perform Expensed Destination receipt” action button.
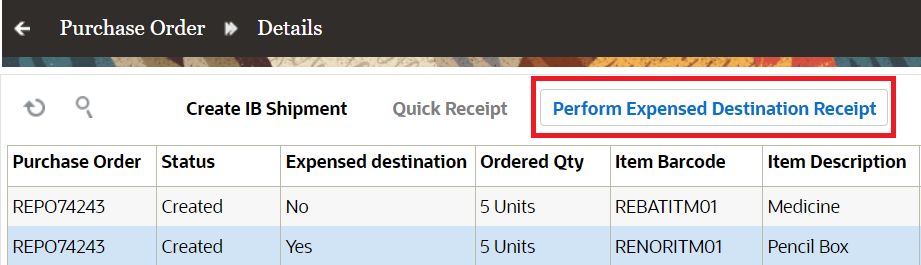
Perform Expensed Destination Receipt
NOTE: The PO details UI screen lists all the POs with Expensed destination flag enabled and disabled. The action button will be enabled only if either type of PO details is selected, otherwise, on choosing both the PO details at the same time will disable both the action button.
PERFORM EXPENSED DESTINATION RECEIPT
You can now multi-select PO details that are enabled with the Expensed destination flag and can perform the Expensed destination receipt from the PO detail UI screen. This action is enabled only for receiving expensed destination PO details.
NOTE: The Perform Expensed Destination Receipt action button is access controlled and requires enabling the permission “purchase order hdr/Allow Expensed Destination Receipt” to perform the transaction.
All the inventories of the expensed PO details received via this action button are auto consumed and these inventories are not reflected in the inventory stock report at warehouse. On proceeding, the system auto generates an ASN and an LPN number per receipt based on the Sequence counter configurations of Blind LPNs and Blind Receiving Inbound Shipment respectively. On successful receipt, the IHT-1-LPN Received and IHT-2-Container Consumed are captured. To distinguish IHTs generated from expense destination handling when IHT-2 is generated, the system populates REF_CODE_18 column (value =Yes) with the code EXD (expensed destination). If the IHT 2- LPN consumed is generated from any transaction other than an expensed destination receipt, the Ref value populates as 'No'.
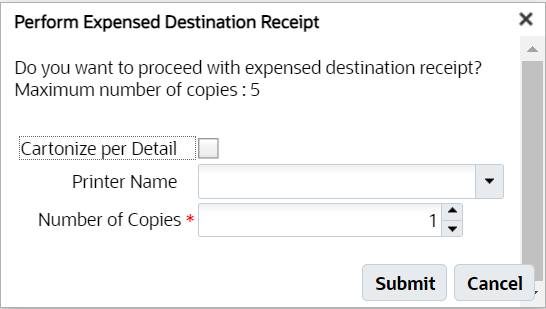
When you perform an Expensed Destination Receipt, the system prompts you with a Confirmation pop-up “Do you want to proceed with Expensed Destination Receipt” providing you with an option to create LPN per details, into a single LPN per receipt and print labels with following new fields:
- Cartonize per Dtl: Enabling this checkbox allows you to create one LPN per PO detail. Disable/uncheck will create a single LPN per receipt (all selected PO details go into single LPN). However, the auto-generated LPN are auto consumed.
Perform Expensed Destination Receipt
- Printer Name: Select the printer’s name to print the LPN labels after receipt.
Here, the LPN will be received first, followed by LPN label generation, and then auto consumption.
- Number of Copies: Enter the number of copies.
These fields are non-mandatory. You can proceed with receiving without providing the values in the above fields.
On successful receiving and if the LPN has multiple requestor_name, a confirmation message “Expensed inventory received in LPN% and consumed: %LPN_NBR" confirmation of receipt and auto consumption.
NOTE: Quick receipt and Expense Destination receipt is performed for the entire PO detail. You cannot partially receive a PO detail via Quick receipt and Expense Destination.
If requestor_name is populated at LPN level, the system displays “Expensed inventory received in %LPN and to be delivered to %Requestor name”.
NOTE: When one of the selected PO details is marked with the 'Stop receiving flag' as yes and on hitting the expensed receipt action button, the system displays message “PO has Stop Receiving Flag enabled for one or more PO details”.
IHT UPDATES
With expensed destination receipts, WMS generates IHT-1 LPN received and IHT-2 LPN Consumed.
ENABLE AUTO-CONSUMPTION OF INVENTORY FROM ASN DETAIL RECEIVING
Cloud WMS now has an ability to perform detailed receiving from the ASN header where warehouse can perform quick receipt. In 24C, we have introduced the ability to allow auto consume non-cartonized expensed ASN line from the following ASN UI receipt flows:
- Perform Detailed Receiving
- Receive Entire Shipment
- Receive LPN
NOTE: In Purchase order detail, the Expensed destination flag can be updated until the PO detail is subjected to receiving (has 0 as the receive qty). Therefore, when an ASN is converted from the PO detail, the system updates the latest status of the Expensed destination flag on the corresponding PO detail to proceed with auto consumption.
PERFORM DETAILED RECEIVING
The new Expensed destination column is introduced on the Perform Detailed Receiving UI screen. You can auto consume ASN details that are marked with expensed flag as yes via Detailed Receiving UI. On successfully consuming the LPN, the system writes appropriate IHT records.
On providing same LPN number for receiving both expensed and non-expensed details, the system displays error “Failed to receive LPN”.
Introducing Locate LPN in ASN Details UI
A new functionality Locate LPN is introduced on the Perform Detail Receiving UI. This field locates the LPNs generated from detail receiving.
NOTE: The locate LPN feature is dedicated to the regular detail receiving flow. The locate feature is disabled for detail receiving that has the expensed destination column as Yes.
You can perform quick receipt by providing the LPN and qty for a detail. This screen also encourages you to perform manual putaway and captures new introduced IHT trigger point upon LPN putaway from the detail receiving screen system.
You cannot perform putaway of LPNs that are in receiving status (LPN not ended). Hence, the Locate LPN must be enabled only when the 'End LPN' is checked.
NOTE: The system will not auto end LPNs carrying expensed inventories. The auto consumption of expensed LPNs will be done only on marking the End LPN flag.
RECEIVE ENTIRE SHIPMENT AND RECEIVE INBOUND LPN FOR EXPENSED INVENTORY
You can auto consume inventories through Receive Entire Shipment and Receive LPN transaction if a cartonized ASN line is marked with the Expensed destination flag as Yes.
On receiving expensed LPN for ASN line, the system marks the LPN as consumed and writes the IHT records (IHT-1-LPN received, IHT-2-Container Consumed).
When performing UI based ASN receiving, if you try to mix expensed and non-expensed details in a single IBLPN, the system displays an error “Cannot mix both expensed and non-expensed inventories in a single LPN'.
ASN RF RECEIVING
Cloud WMS to allow auto consumption of expensed inventories for following RF receiving flows.
RF ASN RECEIVING And RF LOAD RECEIVING
WMS can auto consume ASN details marked with the expensed flag via the following RF receiving transactions:
- RF ASN Receiving
- RF PO Receiving
- RF Load Receiving
On performing RF Receiving- ASN/Load, or PO, the system restricts mixing of expensed or non-expensed inventories in a single IBLPN.
The system auto consumes before the corresponding LPNs are picked by flowthrough or Xdock in case there is a matching order available. When LPNs are received and consumed for expensed details, the system displays new message “LPN % received and consumed to expensed destination”. If requestor_name is populated at LPN level, the system displays “Expensed inventory received in %LPN and to be delivered to %Requestor name”.
NOTE: You cannot mix both expensed and non-expensed inventories in a single LPN.
When an ASN has multiple details of the same SKU but contains conflicting expensed destination (i.e., both expensed and non-expensed detail with same SKU) and PO prompt-po-seq-line parameter is disabled, then system displays hard error “Conflicting expensed type records found. Please enable PO sequence/line prompt" message, by default.
RF SCREENS AND LOCK CODES
When performing expensed destination receipt, the corresponding LPNs are auto consumed. In such scenarios, the following screens are held suppressed for the auto consumed LPNs:
- Location prompt
- Xdock
- Flowthrough
- Next Screen to Launch- only Quality Check flow is allowed
ASN - SORT AND RECEIVE
We enhanced the RF Sort and Receive transaction by applying restrictions on mixing expensed and non-expensed inventories in a single IBLPN. If you proceed to sort and receive expensed and non-expensed LPNs, the system displays error “Cannot mix both expensed and non-expensed inventories in a single LPN' message. In case the PO prompt is disabled and an ASN has multiple details of the same SKU but contains conflicting expensed destination (i.e., both expensed and non-expensed detail with same SKU), then system displays error “Conflicting expensed type records found. Please enable PO sequence/line prompt" message.
ASN SINGLE SKU RECEIVING
The RF Single SKU Receiving transaction now allows you to auto consume ASN details marked with expensed. During the transaction if the LPN count is defined and the consumed, the system displays 'Received LPNs are consumed to expensed destination' message. On successfully consuming the LPN, the system writes IHT records (IHT-1-LPN received, IHT-2-Container Consumed). If requestor_name is populated at LPN level, the system displays “Expensed inventory received in %LPN and to be delivered to %Requestor name”.
In case Multiple LPNs are received at once, the destination type is an expensed type and the corresponding details has a requestor name populated, the system displays the following message, Expensed inventory received in %LPN_count(s) LPNs and to be delivered to %Requestor name. ASN/PO header level tolerance is considered for auto consumption and the excess quantity is auto consumed as well.
ASN SUPPORT AUTO CONSUMPTION VIA REST API
You now have the option to auto consume ASN details marked with expensed flag for all the receiving flow via following APIs:
| Modules | REST API |
|---|---|
|
Receive entire shipment API |
|
|
Receive IBLPN API |
|
On success, the IHT Trigger Point captures IHT-1-LPN received, IHT-2-Container Consumed once an LPN is getting consumed.
- On providing same LPN number to receive quantities from both expensed and non-expensed details, the system displays 'Cannot mix both expensed and non-expensed inventories in a single LPN%' error message.
- If a purchase order detail has the 'Stop Receiving Flag' set to yes, the system restricts proceeding with expensed receiving and displays following error message "PO has Stop Receiving Flag enabled for one or more PO details".
QUALITY CHECK ON EXPENSED INVENTORY
Expensed destined receipts are supported for auto consumption of expensed inventories via IB shipment receiving for both UI and RF transactions. For non-expensed IBLPNs, inventories are received only after QC approval. Similarly, we’ve enhanced our system to auto consume an expensed IBLPN only after QC approval. On success, the expensed IBLPN status is changed to Consume.
This mechanism of auto consuming the expensed IBLPN after QC approval is trigged from the following trigger points:
- IB Shipment UI- Approve action button
- RF QC Approve transaction
- Quality Check API - (entity/iblpn/{id}/qc_approve)
After the LPN is consumed, the system writes the IHT-73-LPN QC accepted, IHT-2-Container Consumed.
NOTE: LPNs rejected are not considered for auto consumption and the corresponding IHT-74 LPN QC Rejected is written.
SPLIT CONTAINER DURING QUALITY CHECK
You can now perform split IBLPN in a Quality check status via the rf.inbound.cwrfsplitcntr module by enabling the parameter “allow-split-for-qc-lpns”.
To prevent such instance during QC, we’ve restricted any possible scenarios of mixing expensed and non-expensed inventories in a single IBLPN during RF IB container split of QC marked LPNs.
The system allows you to split the container only on following conditions:
- If the LPN contains expensed details marked for QC and the destination LPN (qc marked) containing expensed detail.
- If the LPN contains non-expensed details marked for QC and destination LPN (qc marked) containing non-expensed detail.
NOTE: If you try to mix an expense and a non-expensed detail in a single LPN, the system displays 'Cannot mix both expensed and non-expensed inventories in a single LPN%' error message.
Steps to Enable
Enable Expense Destination Receipt
- Go to Purchase Order PurchaseOrderHdrView > Purchase order Details UI.
- Click Create/edit icon.
- Check the Expensed destination checkbox
- Requestor Name (Optional): Enter the requestor name.
- Requestor Address (Optional): Enter the requestor’s address.
- Click Save.
To perform expensed destination receipt, complete the following steps:
- Navigate to Purchase Order > Purchase Order Details UI.
NOTE: The Perform Expensed Destination Receipt action button is access controlled and requires enabling the permission “permission “purchase order hdr/Allow Expensed Destination Receipt” to perform the transaction”.
- Select the PO details with expensed destination flag = Yes, to perform Expense Destination receipt.
- A Perform Expensed destination receipt window pops-up, enter information for following fields:
- Cartonize per Detail
- Printer Name
- Number of Copies
- Location
NOTE: These fields are non-mandatory. You can proceed with receiving without providing the values in the above fields.
- Click Submit.