 Try the New Redwood Experience
Redwood is the new user interface for Oracle Transportation and Global Trade Management. The 26C "Try the New Redwood Experience" extends the Redwood Experience by adding an additional set of UIs that have been migrated to the modern look and unified user interface provided by Redwood. In addition, the 26C "Try the New Redwood Experience" includes the explore everything Product Map navigation view as well as incorporating Help and Export into the Redwood experience.
For tasks where both the legacy and Redwood UIs are available, we strongly encourage you to take advantage of the new Redwood experience so you can benefit from the more intuitive, modern, and efficient UIs. Your feedback is always welcome to help us further improve your experience.
The Redwood Experience for 26C has been extended to include the addition of 39 Profile Managers and 8 Dynamic Managers. This is in addition to the areas converted previously:
- Welcome Page
- Ask Oracle
- Suggestions
- Qualifiers
- Profiles:
- Equipment Type Manager
- Restricted Party Screening
- Public Enhanced Workbenches to demonstrate the Smart Search capabilities. See Smart Search
You can initiate the Redwood Experience by navigating to User (Settings and Actions) drop-down in the Unified Header. The "Try the New Redwood Experience" link is located at the top of the Settings and Actions menu as shown below.
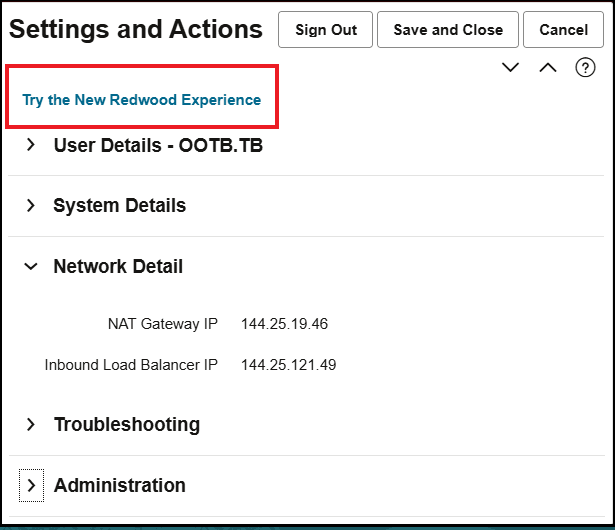
Settings and Actions Try the New Redwood Experience
Welcome Page
After selecting the "Try the New Redwood Experience" link the Welcome Page will be displayed.
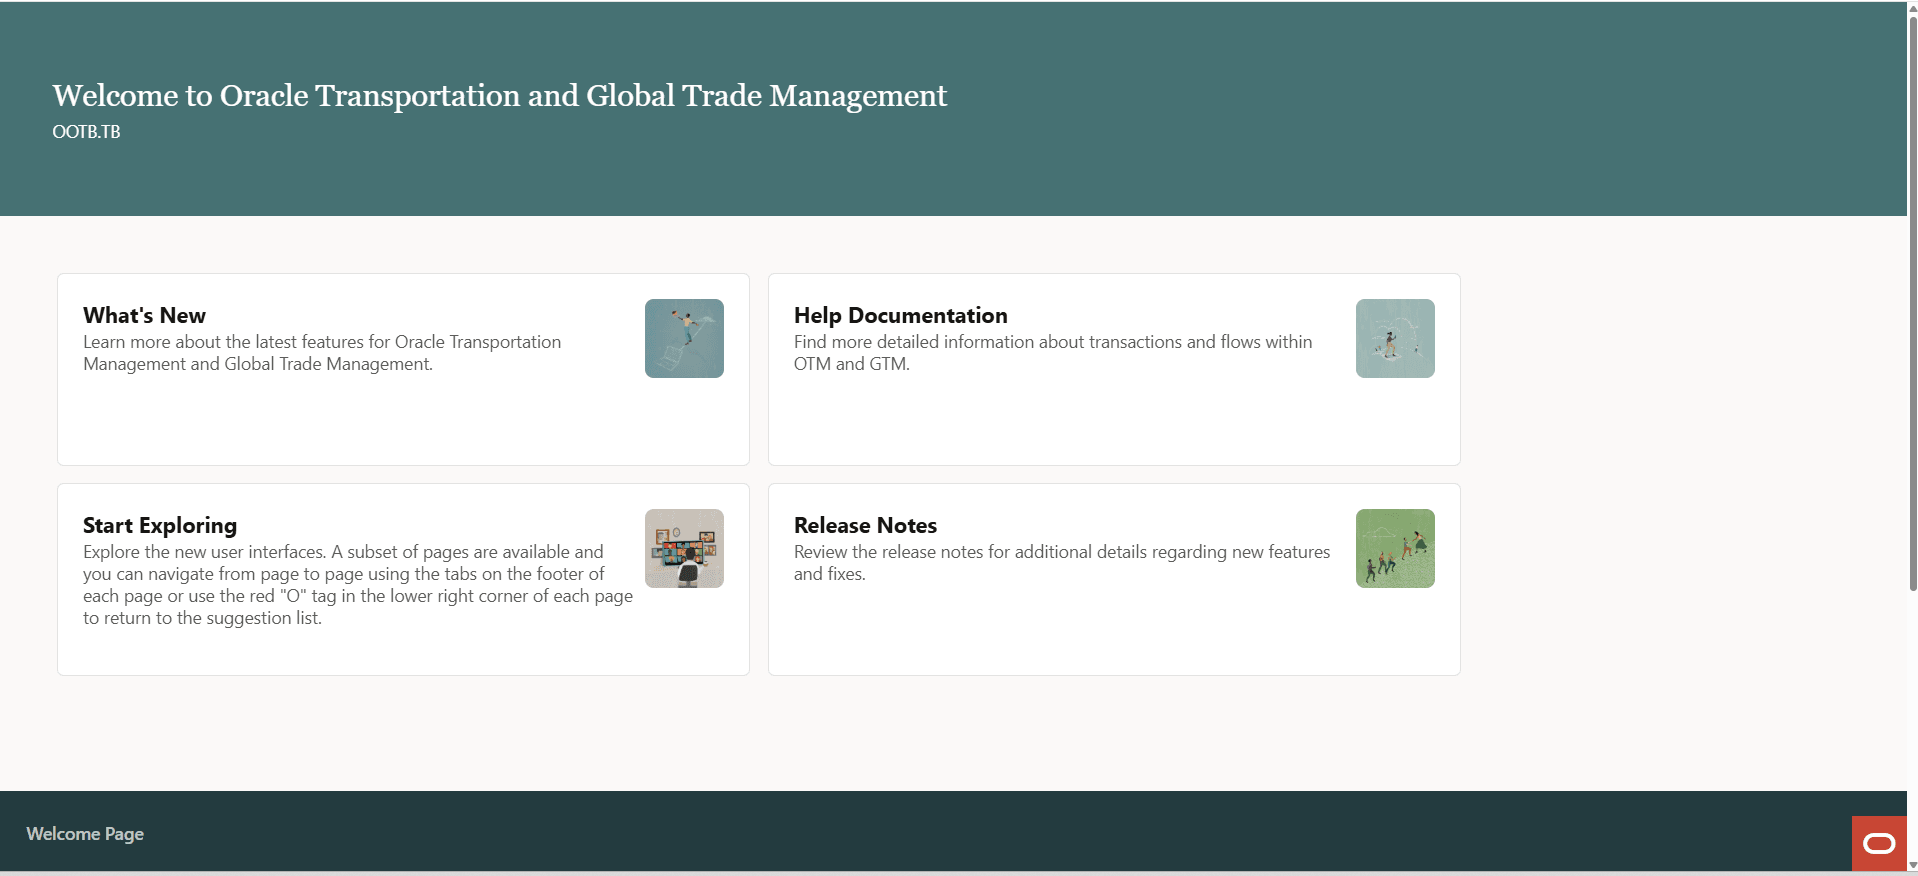
Welcome Page
The Welcome Page provides access to the following information:
- What's New: Go to the latest version of the Oracle Logistics What's New documentation on the Oracle Help Center.
- Start Exploring: View the Ask Oracle page with the Suggestions shown.
- Help Documentation: View the About the Redwood Experience help topic and learn more about Redwood in Oracle Transportation and Global Trade Management.
- Release Notes: Go to the latest version of the Oracle Logistics Release Notes on the Oracle Help Center.
You can start the Redwood Experience by selecting the "Start Exploring" box or by selecting the O-tag in the lower right corner of the screen.
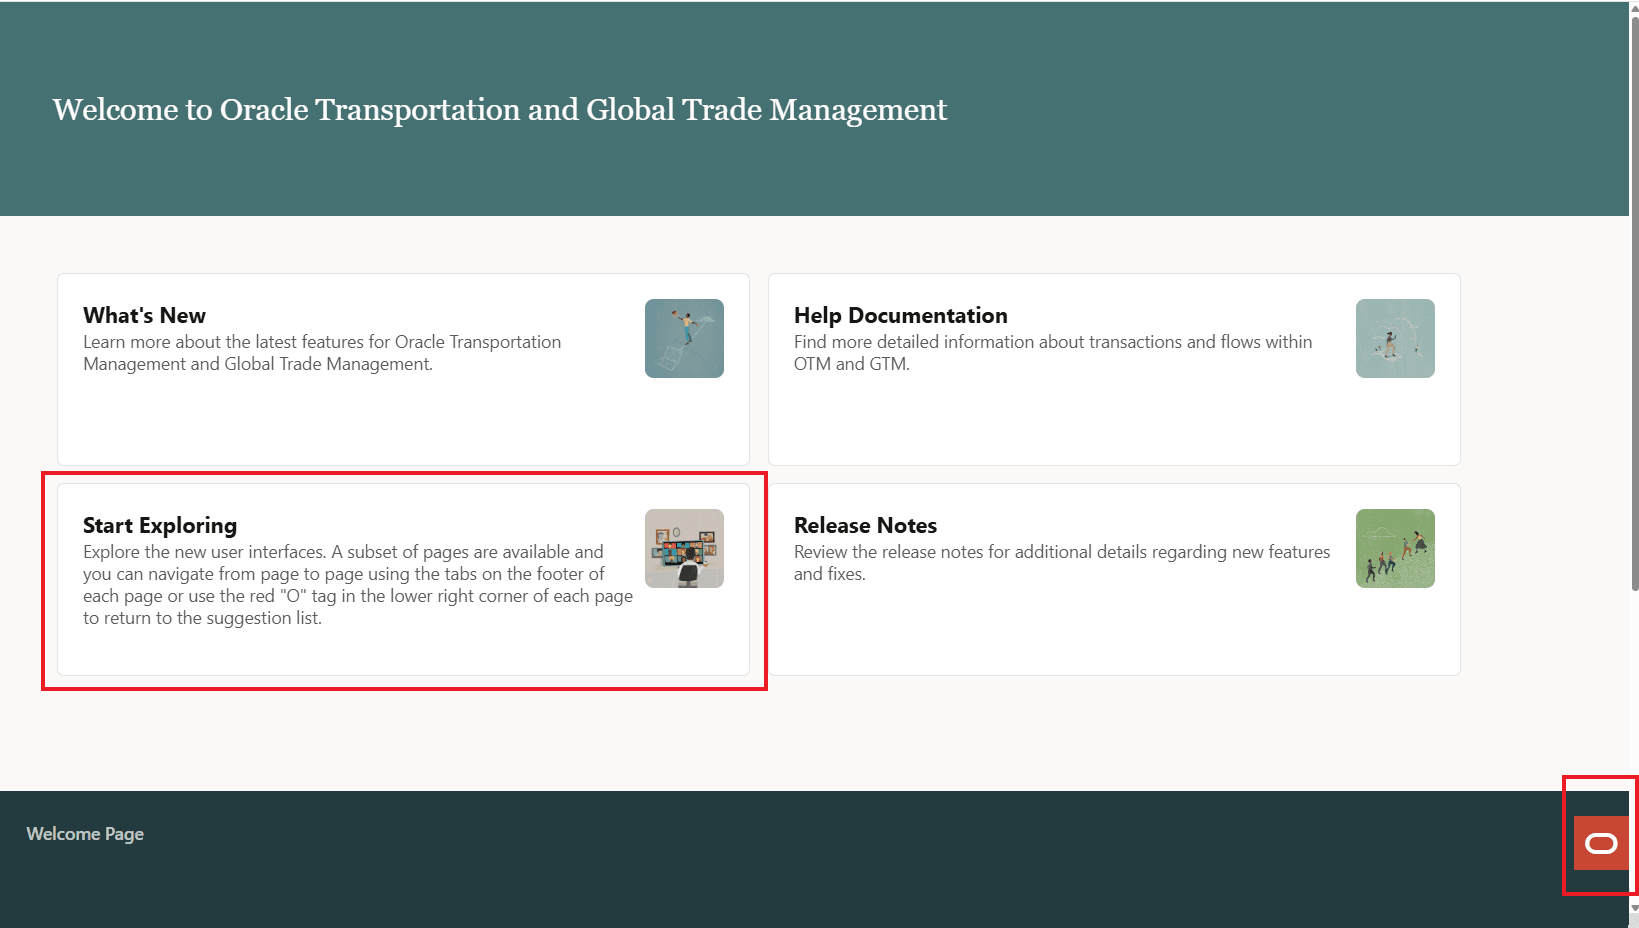
Welcome Page Start the Redwood Experience
Suggestions
The starting point for the Redwood Experience is the "Suggestions" view shown below. Suggestions provides you with a view into your frequently visited UIs making the UIs you use to complete your task immediately available. The "Suggestions" view is designed to provide direct access to the areas of the application you use most often. You can click on any of the suggestions provided in the list to go to the Redwood UI for the listed areas.
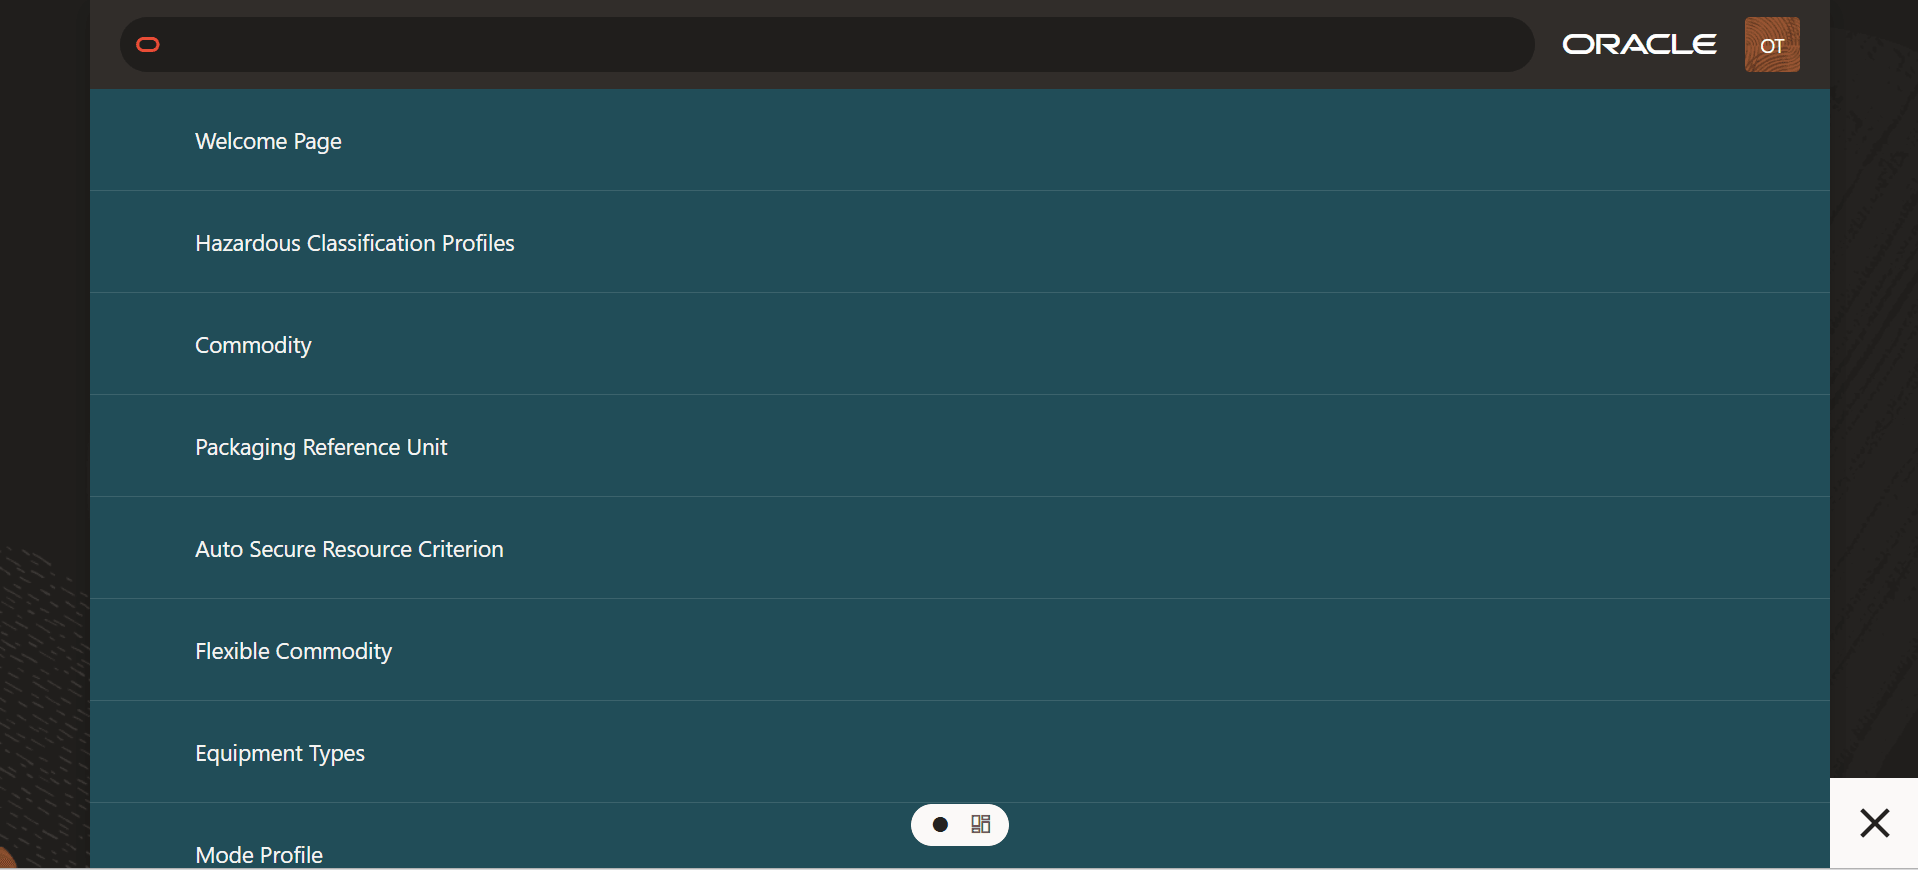
Suggestions View
Ask Oracle Filtered Suggestion Listed
Product Map
Redwood provides you with two complementary navigation experiences, Suggestions, released previously for review, and the Product Map - added in 26C. The two navigation approaches provide you with two different ways to navigate through the application and are designed to provide you with either the focused suggestions view to help you complete a task or the Product Map, which provides a navigation path to all of the functionality available to you within the application.
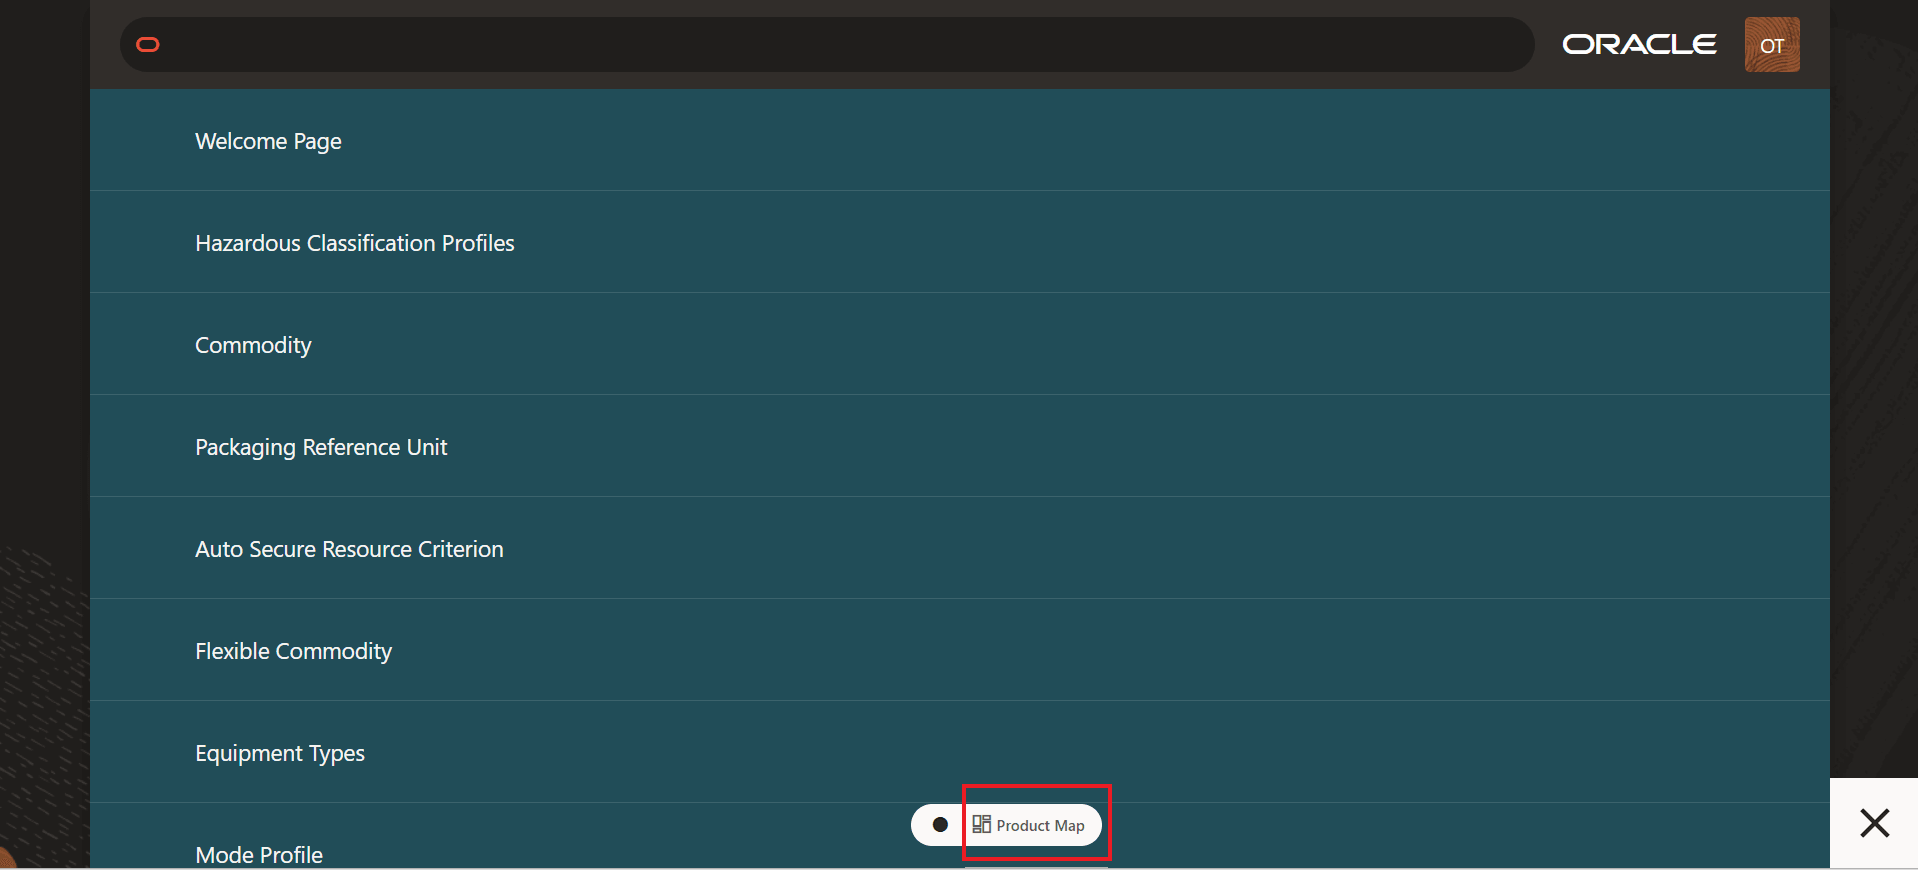
You can easily switch between the Suggestions and Product Map view using the toggle icon provided at the bottom of your screen - as shown below.
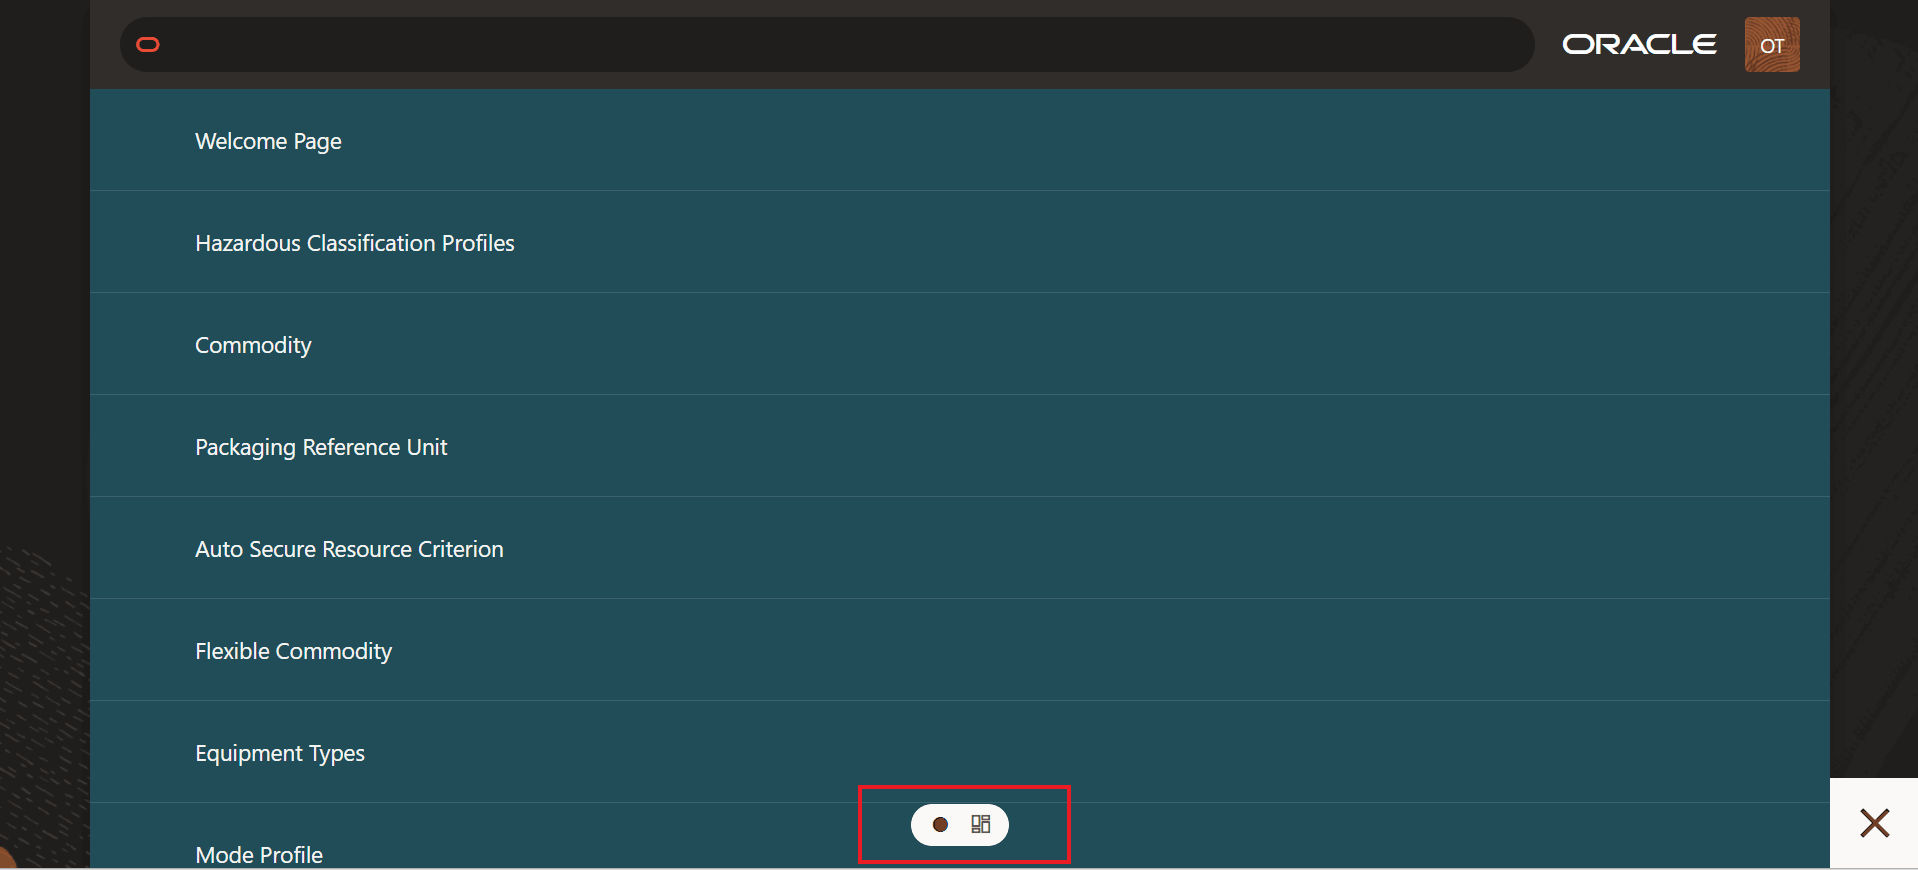
Toggle Icon Switch Between Suggestions and Product Map
Switching between the Suggestions view to the Product Map view is accomplished by selecting the toggle icon, the current view is identified with the dot, the to view is represented by the view's icon. In the example below, the view is being switched from the Suggestions view to the Product Map view.
Product Map
The Product Map provides you with a map view to all of areas of the application you have access to in a structured hierarchical view.
- Product Map = “Let me explore everything available.”
They are not competing views—they solve different user needs.
1. Suggestions View
Purpose: Personalized, task-oriented guidance
What it is
Suggestions is a context-aware, role-based navigation layer that surfaces:
- Recommended tasks
- Frequently used actions
- AI-driven or system-driven prompts
- Contextual next steps
When customers should use it
- Daily operational work
- When users are less familiar with the system
- When they want to move quickly without searching
- For guided workflows (e.g., approvals, transactions, follow-ups)
Benefits
- Reduces cognitive load — no need to remember where things are
- Improves efficiency — surfaces the right task at the right time
- Personalized experience — tailored to role, history, and context
- Faster onboarding — new users can be productive sooner
Positioning statement
“Suggestions helps you focus on what matters now—it brings the work to you.”
2. Product Map View
Purpose: Structured, comprehensive navigation of the application
What it is
The Product Map is a full, hierarchical view of the Fusion application, showing:
- All modules and functional areas
- Organized product structure
- Complete set of capabilities
When customers should use it
- Exploring the system
- Learning application capabilities
- Performing less frequent or specialized tasks
- When users know what they’re looking for
- For administrators, power users, and implementers
Benefits
- Full visibility — nothing is hidden
- Predictable structure — aligns with product architecture
- Supports discovery — helps users learn what exists
- Great for training and documentation alignment
Positioning statement
“Product Map gives you the full picture—it shows everything the system can do.”
How They Work Together
A helpful way to explain this to customers:
- Start with Suggestions for day-to-day productivity
- Use Product Map when you need to explore, learn, or go beyond the basics
Executive-Level Framing
If you’re speaking to decision-makers:
- Suggestions drives adoption and productivity
- Product Map ensures transparency and completeness
Together, they balance:
- Ease of use (consumer-like experience)
with - Enterprise-grade depth and control
The product map provides a two-level navigation view
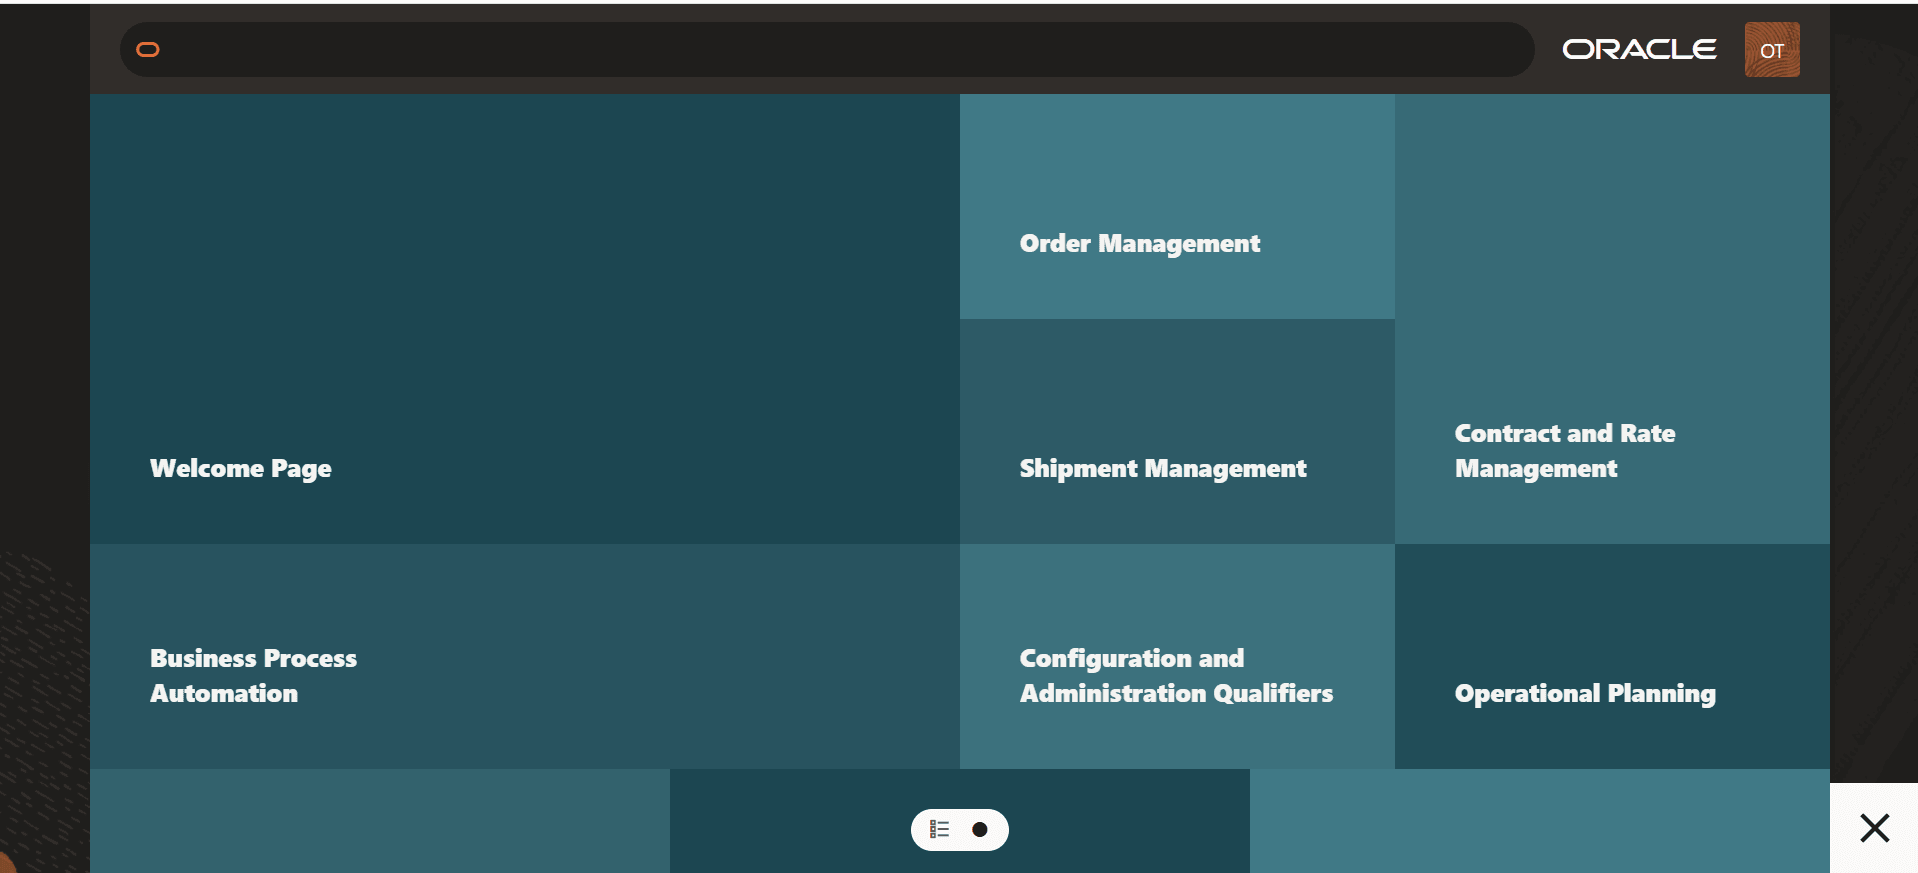
Product Map View
Ask Oracle
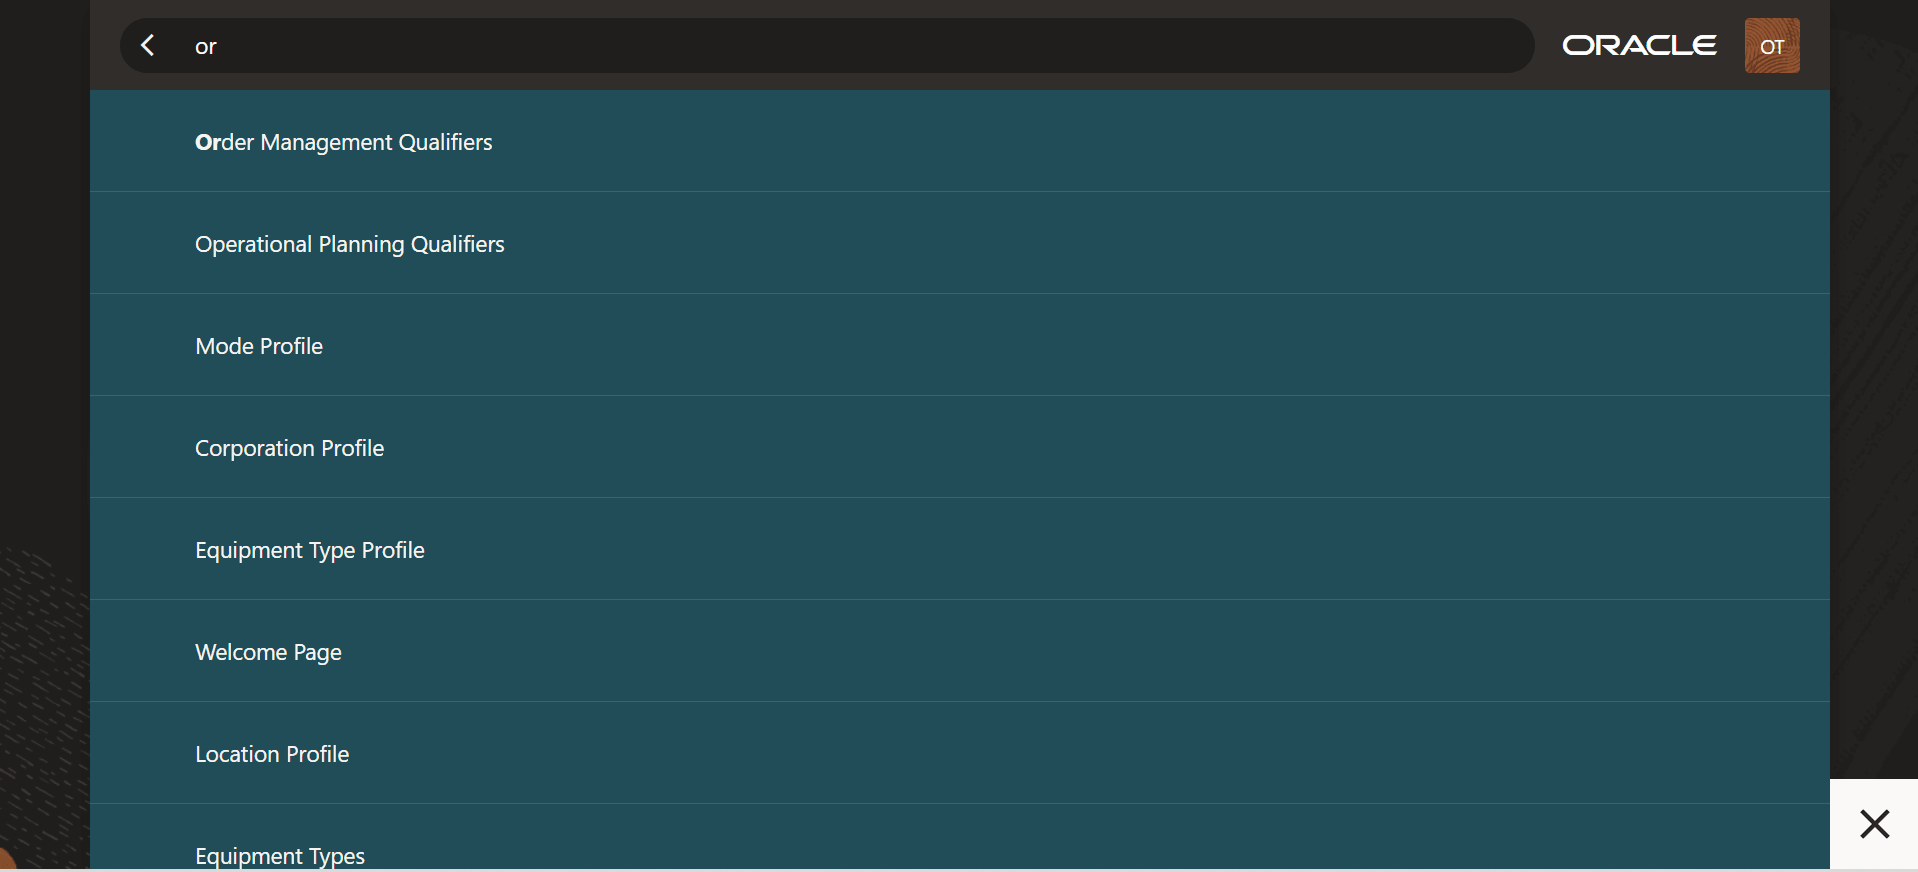
The "Ask Oracle" search bar allows you to quickly filter the list displayed to the areas you are interested in. In the example below, the suggestions have been filtered to only those areas starting with "e".
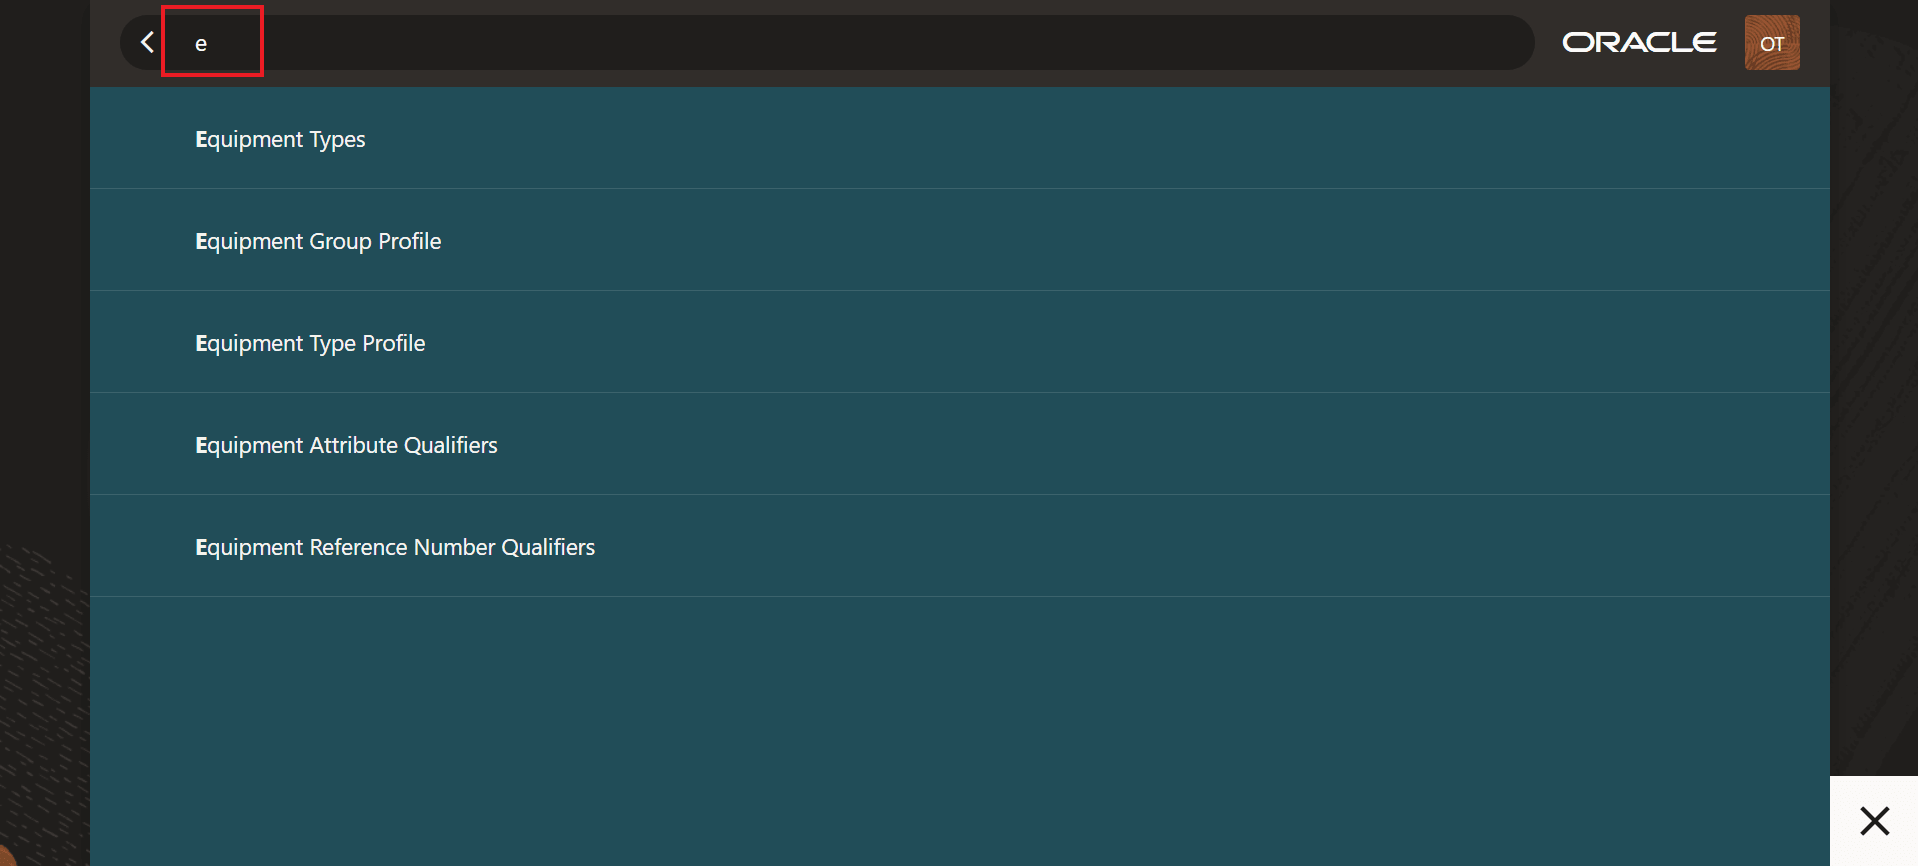
Ask Oracle Filtered Suggestion Listed
Help
Help is now accessible from the Redwood UIs. The Help icon "?" is now located to the right of the UI name - as shown below.
Help Access
Most of the introductory Redwood UIs focus on Power Data UIs, the UIs that fall into the setup/static data category. These Redwood UIs fall into two types of setup UIs - Qualifiers and Profiles. In addition to these setup type UIs, several more complex manager screens, like Rate Distance, Service Preference Parameters, and Equipment Type Manager, have also been provided to provide you with a glimpse into how the more complex managers - with child data/grids etc. will look once they move to Redwood.
Qualifiers
To demonstrate the Redwood UIs for Qualifiers, the "Order Management Qualifiers" option will be used to demonstrate the Redwood UIs.
Suggestions - Select Order Management Qualifiers
Selecting the Order Management Qualifiers option from the suggestions list above brings up the UI below. The lower portion of the UI provides access to all of the other Qualifiers available for other objects. Where spaces is available a direct link is provided, the "..." on the lower right of the UI provides the list of additional Qualifier UIs that could not be displayed across the bottom of the UI.

Order Management Qualifiers
To start working with a particular Order Management Qualifier - you will need to "Select an option" from the dropdown list. The dropdown list provides all of the Order Management Qualifiers that have been moved to Redwood.
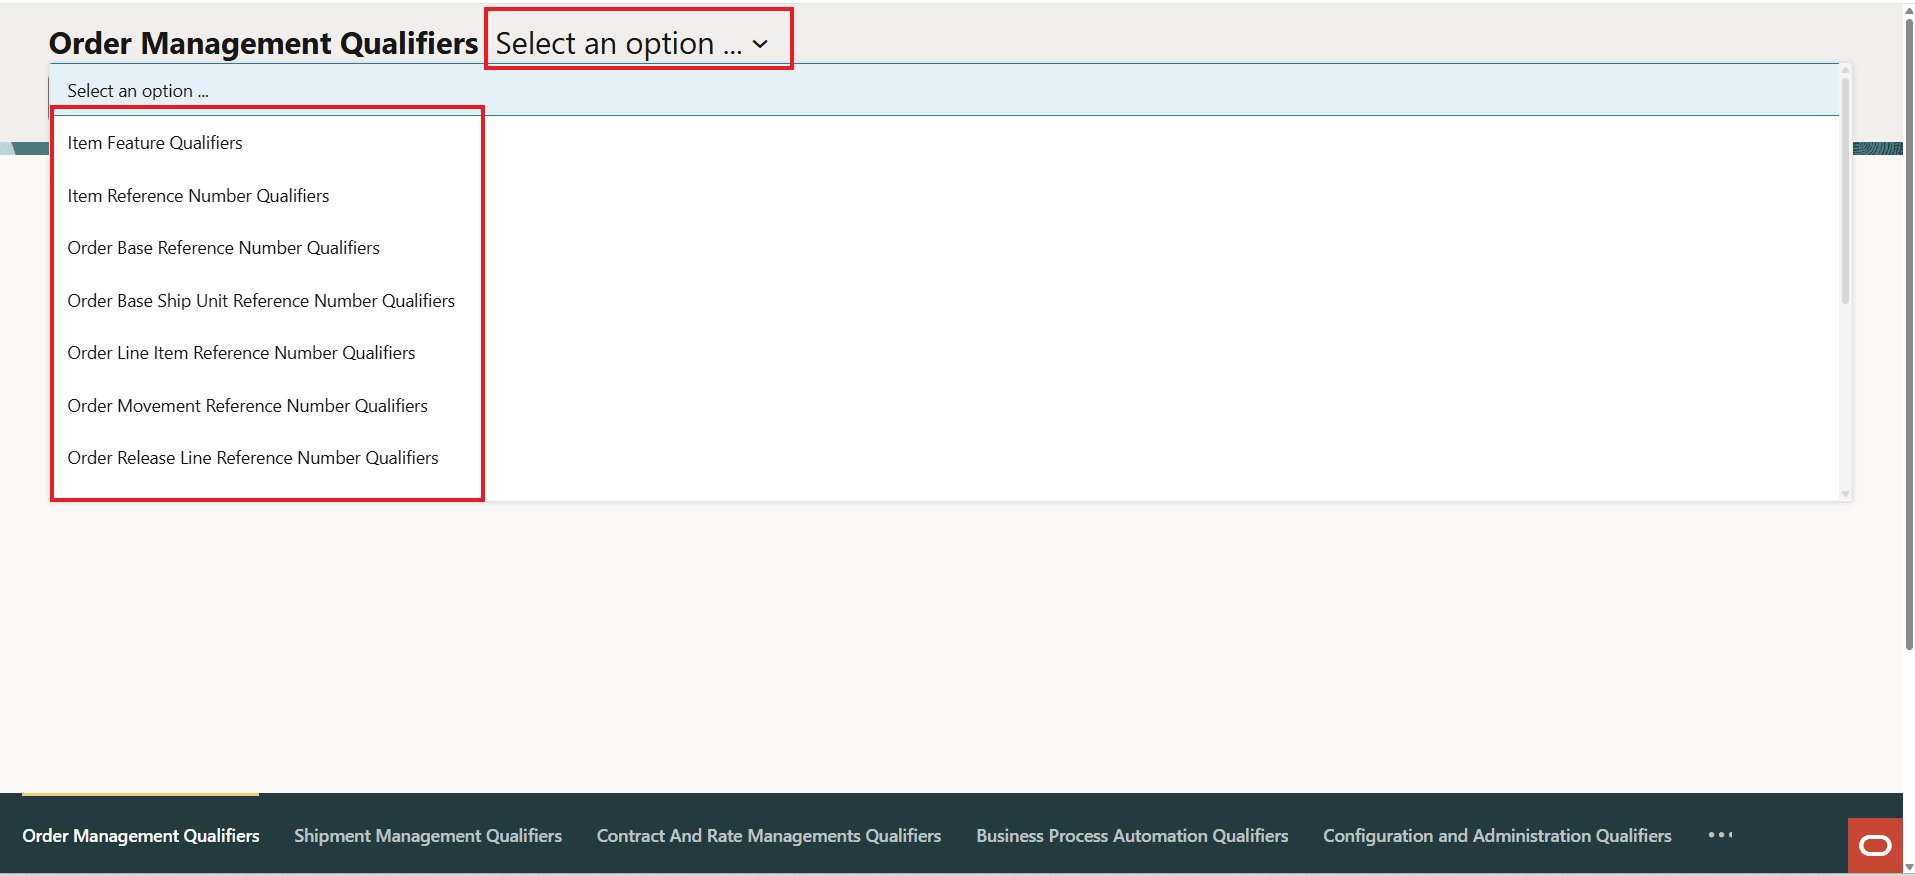
Use "Select an option" to Select the Order Management Qualifier
For this example, the Order Release Reference Number Qualifier has been selected.
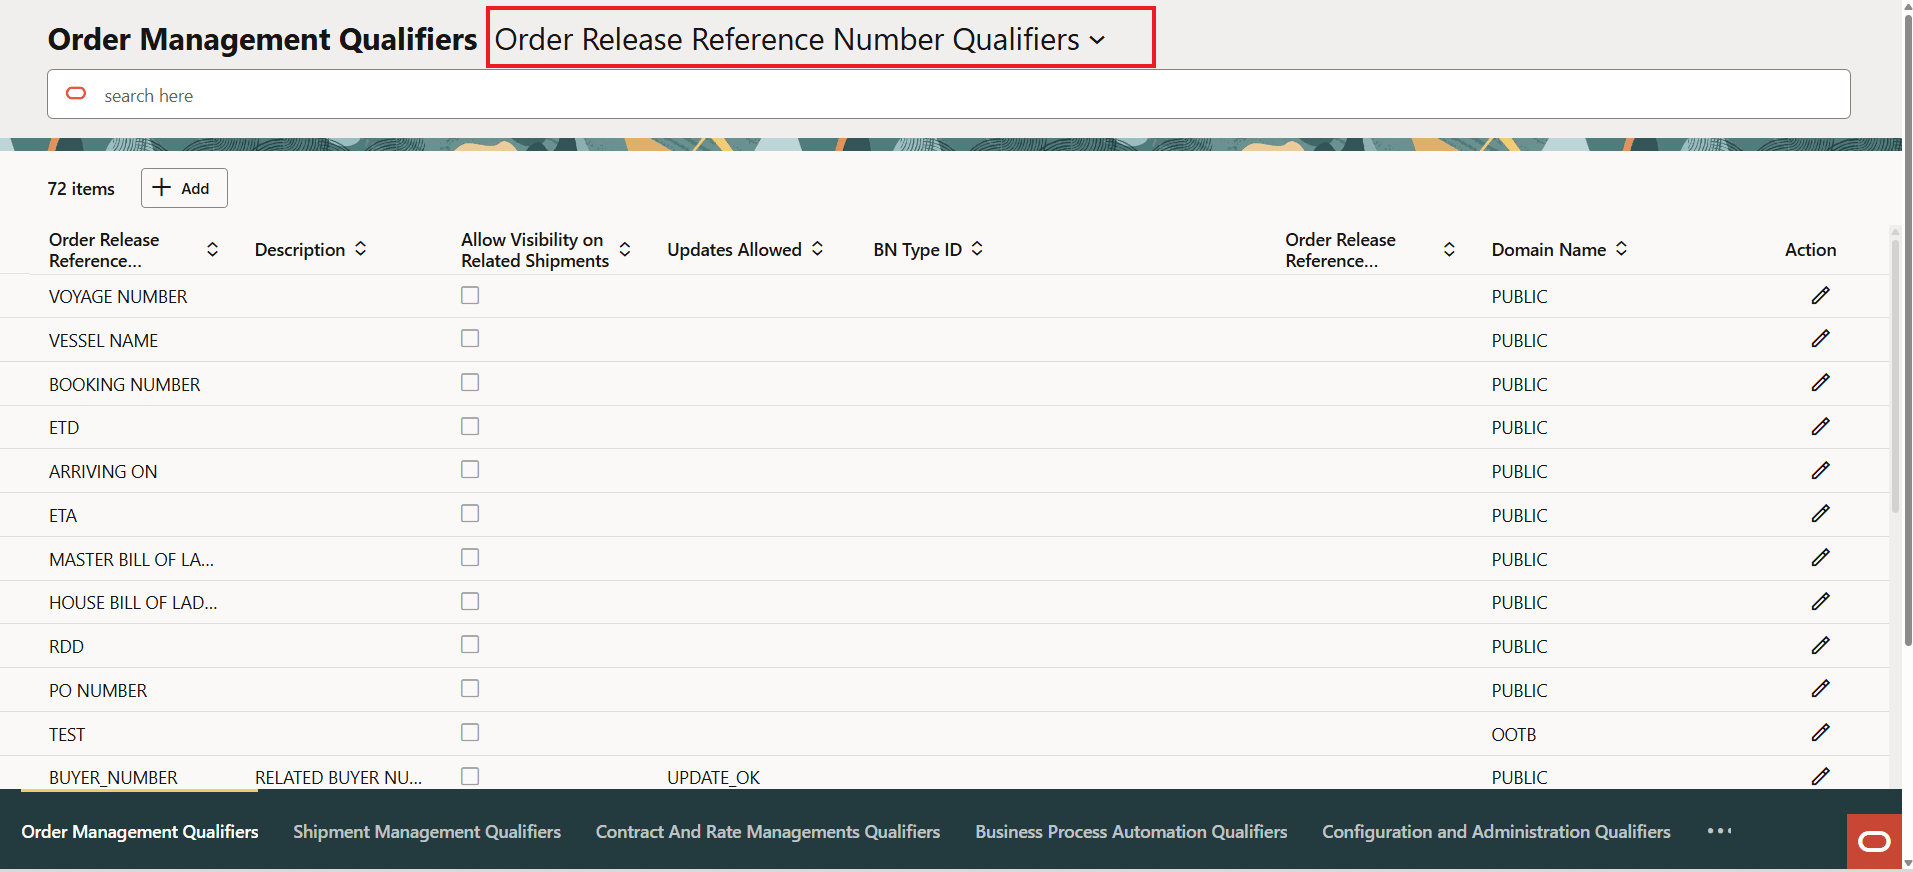
Order Release Reference Number Qualifier
In the example below, the option to Add is shown. Note that the Add is done in line with the results versus taking you to a new screen to add the details. The Actions provided for the Add allow you to Save your changes or Cancel.
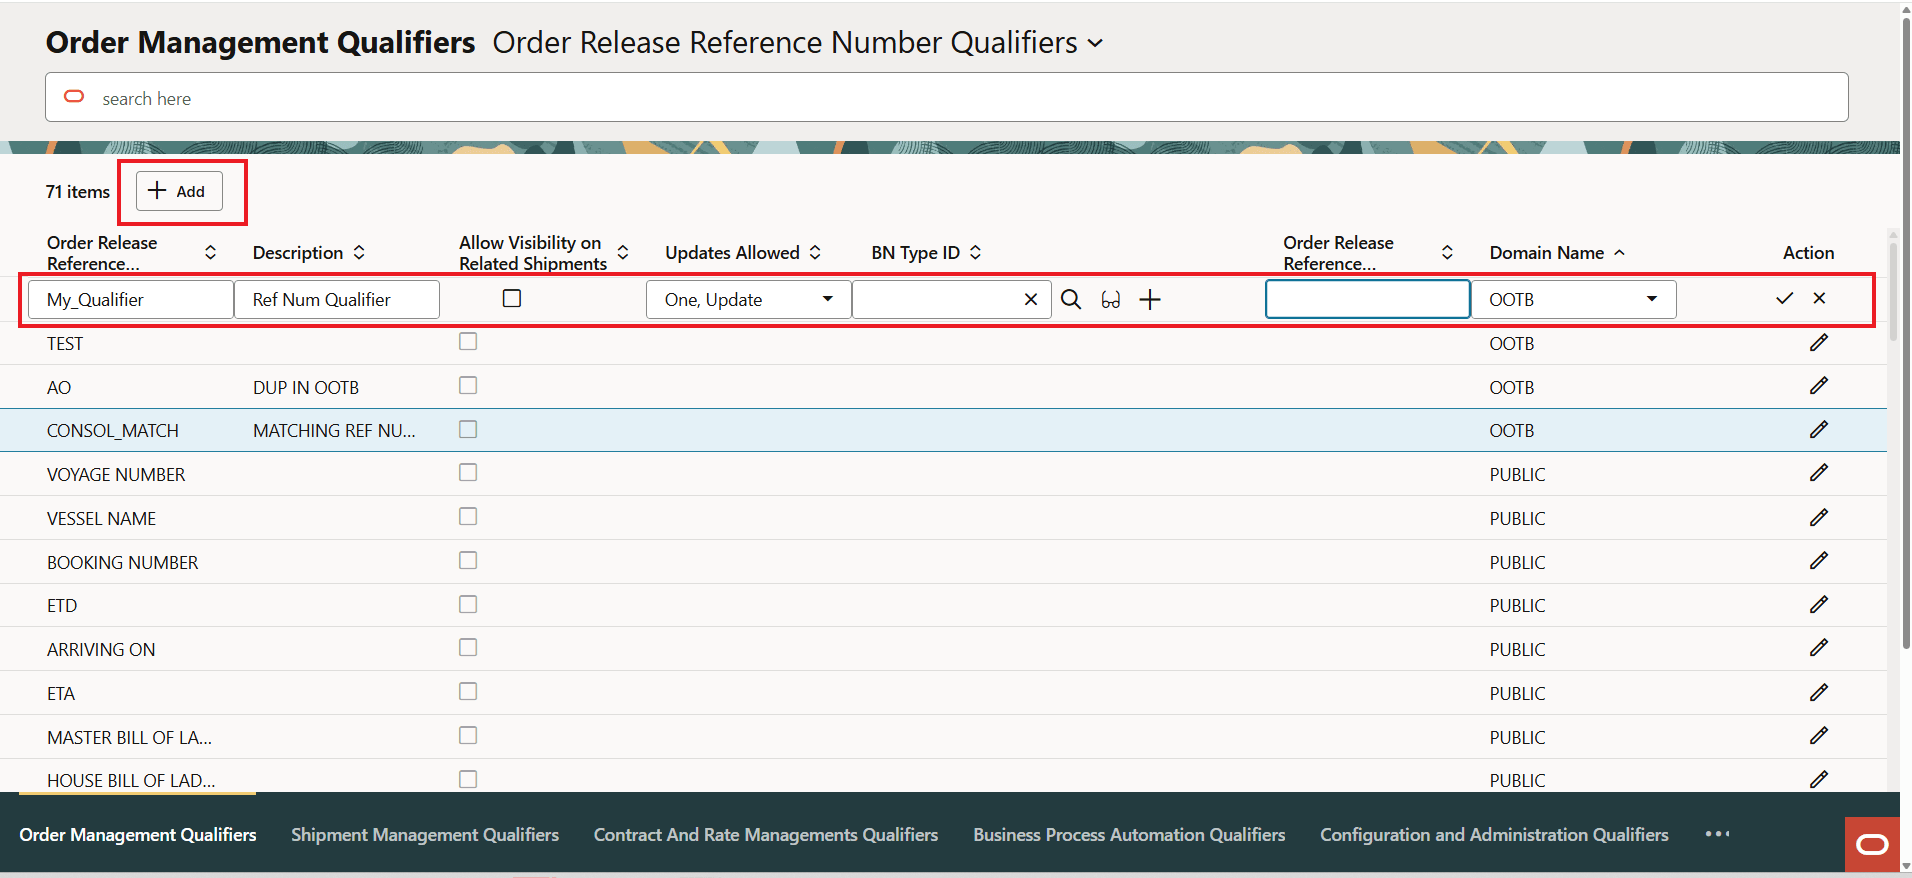
Add
When you initiate the Save Action, the following confirmation message is displayed allowing you, again, to Save or Cancel.
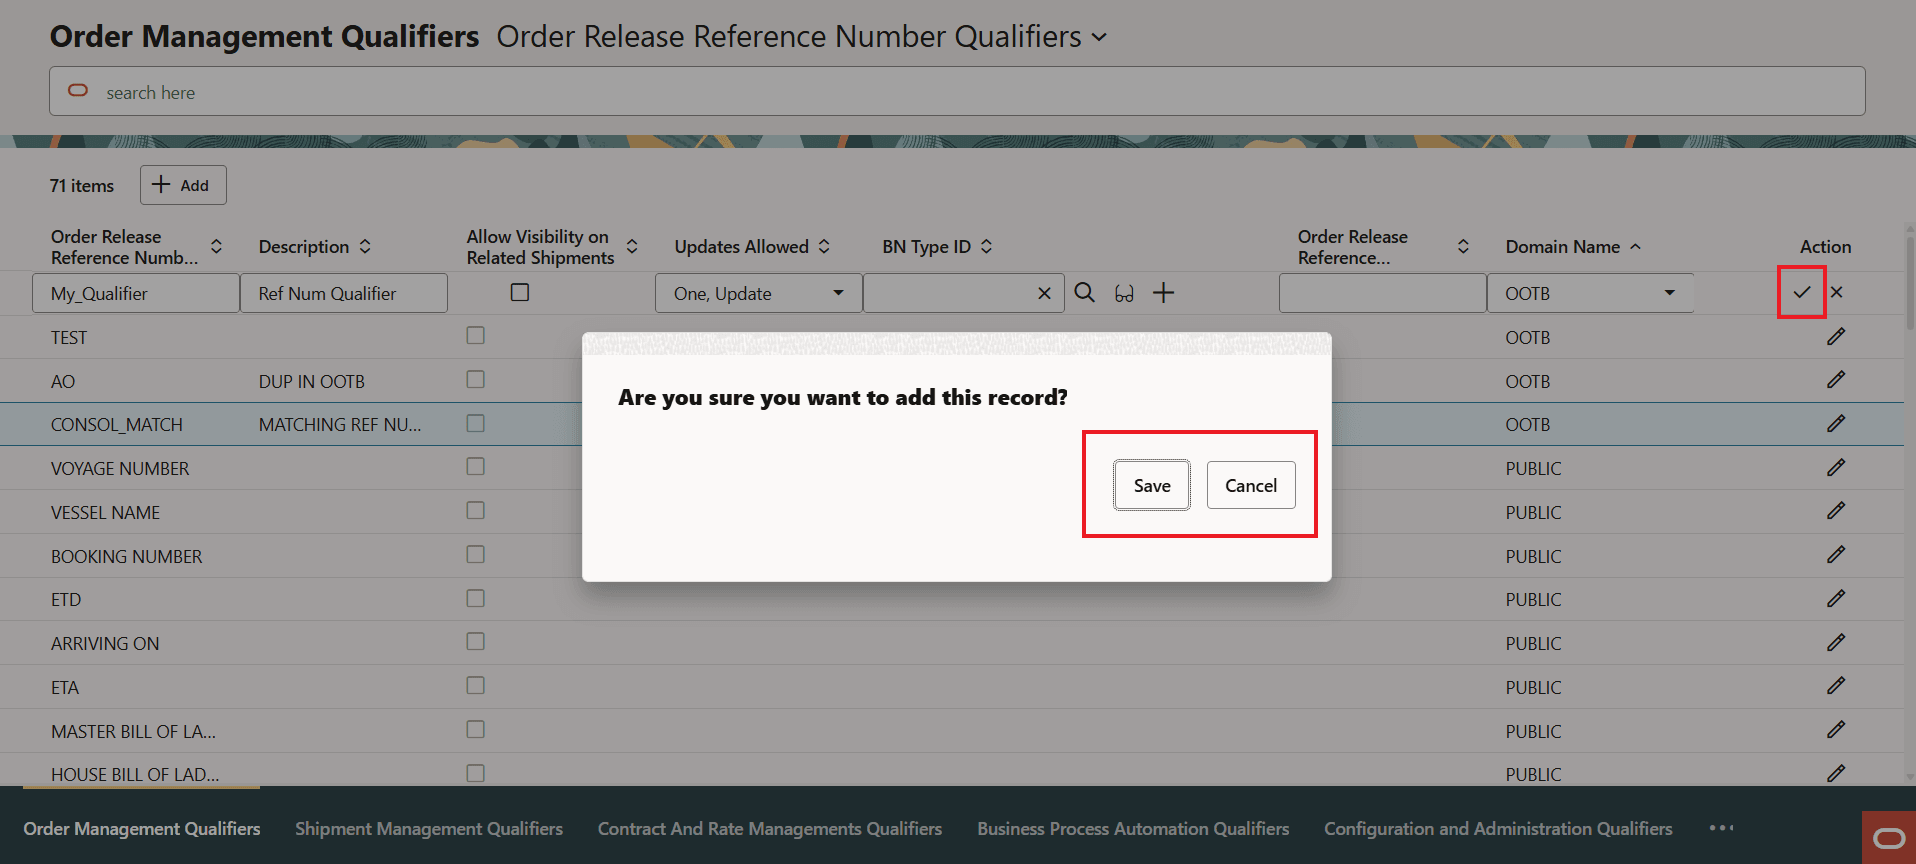
Add - Save or Cancel
You will receive notification about the Action - in this case the addition was successful, if there had been an issue you will receive an error message related to the issue. Note that these message boxes will auto-close so you do not need to click them to close.
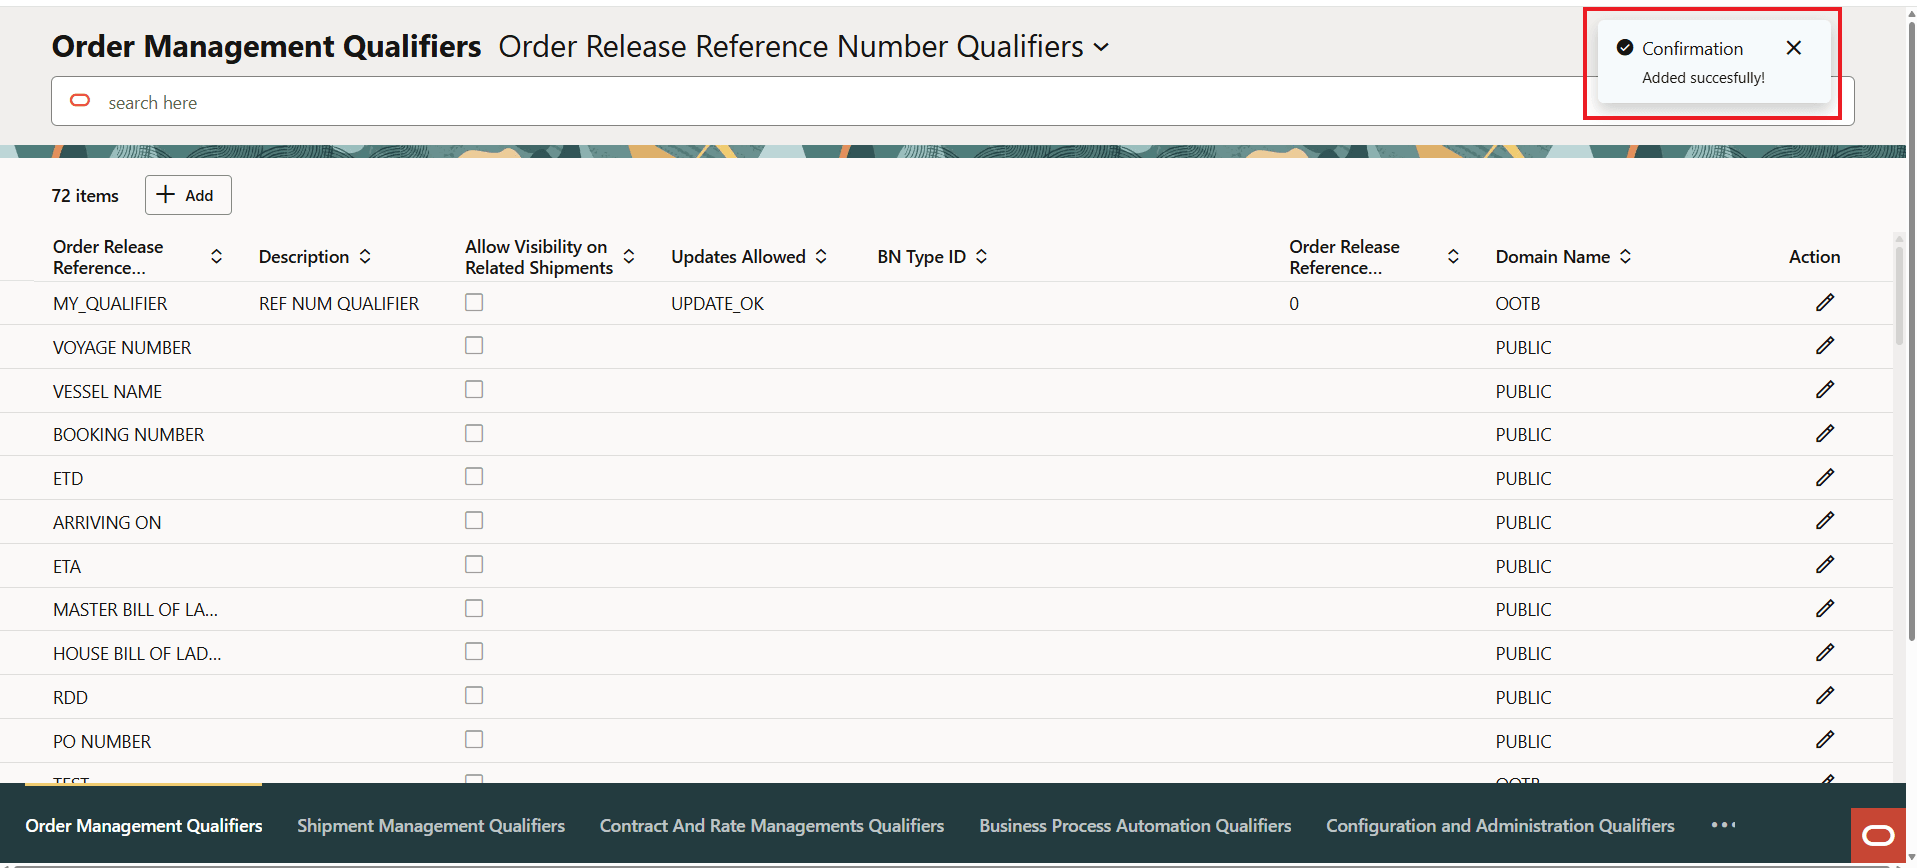
Confirmation Message
Below is the newly added Order Management Reference Number Qualifier. The expanded Action menu is shown. For the selected item, the "Check" icon will allow you to modify the entry, the "X" icon closes the Action menu, and the "Trash Can" icon will delete the entry.

Added Qualifier and Actions
Profiles
The Profile UIs provide an expanded view into the Redwood capabilities by including some additional Redwood features including Smart Search. For this release the following Profile UIs have been provided. The Equipment Type will be used to highlight the enhancements provided with the Redwood UI.
Profiles UIs:
- Mode
- Location
- Equipment Group
- Corporation
- Equipment Type
- Service Provider
- Equipment Types (discussed below)
The Mode Profile will be used to showcase the Redwood Profile UIs. The first item to note - which is slightly different from the Qualifier UIs above, is that the Search is now a field level search versus a filtering that is available for the simpler Qualifier UIs. The Quick Search fields provided, by default, are the Search fields configured for on the First Table of the related Screen Set. In this case the four fields highlighted below.
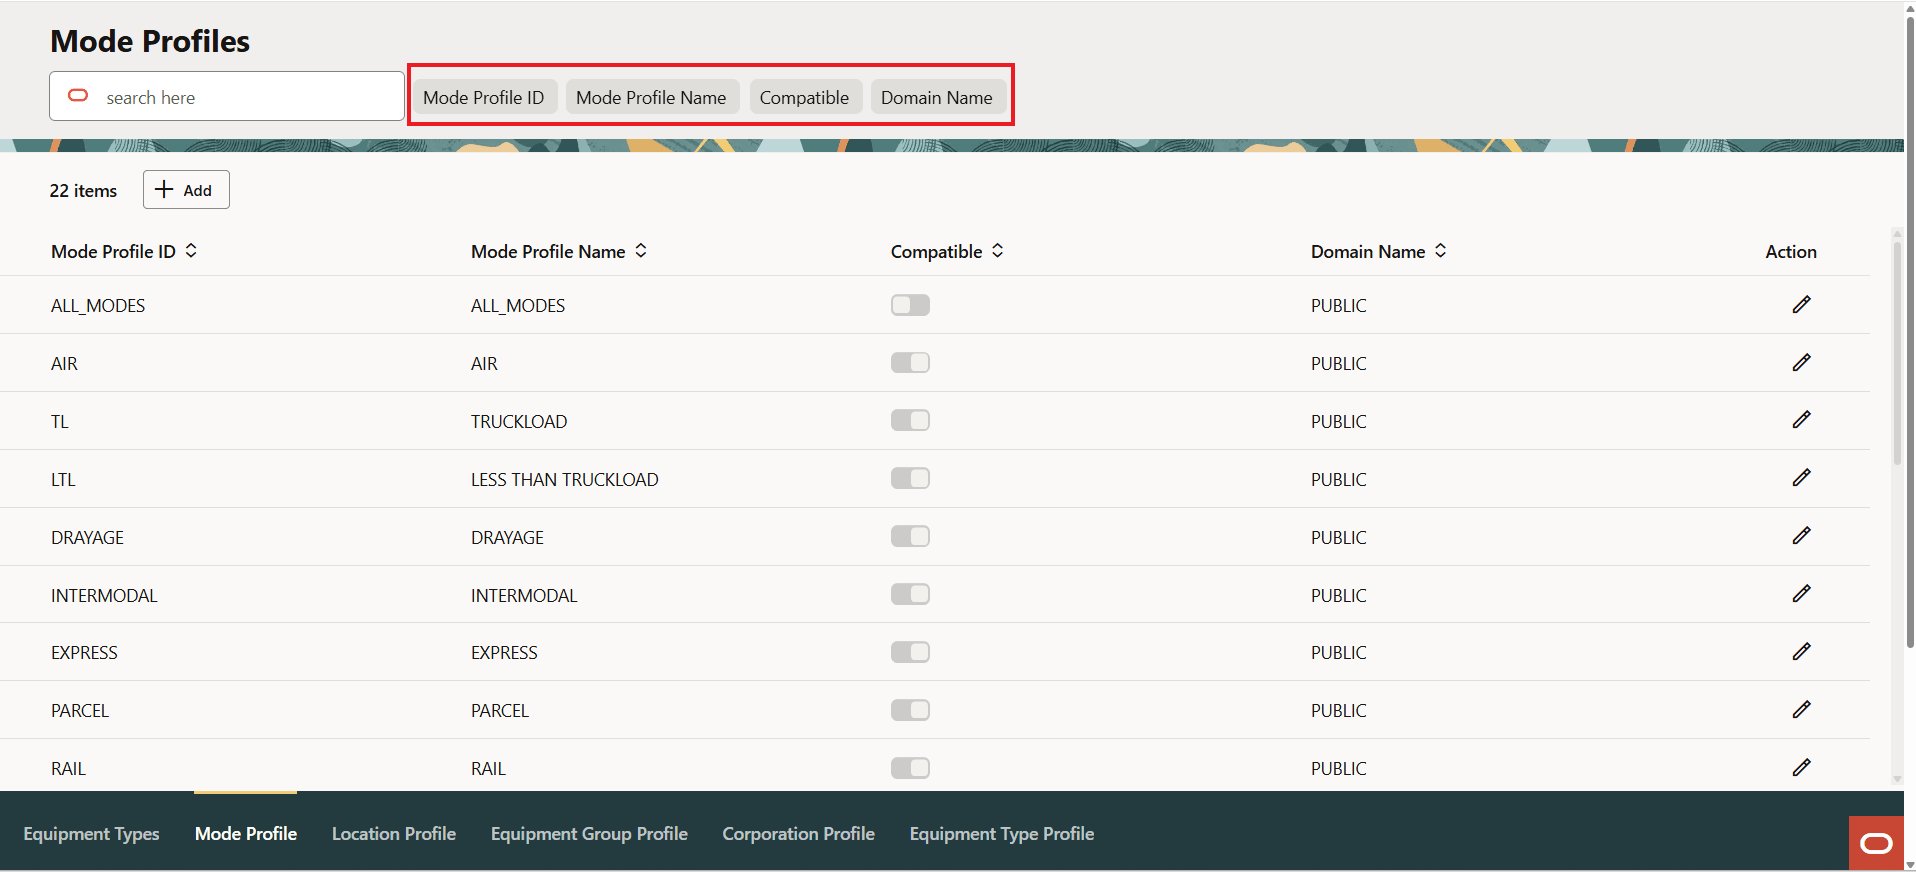
Mode Profile
The Mode Profile Screen Set Search tab is shown below, the four fields on the Screen Set Search tab are the fields provided for searching above.
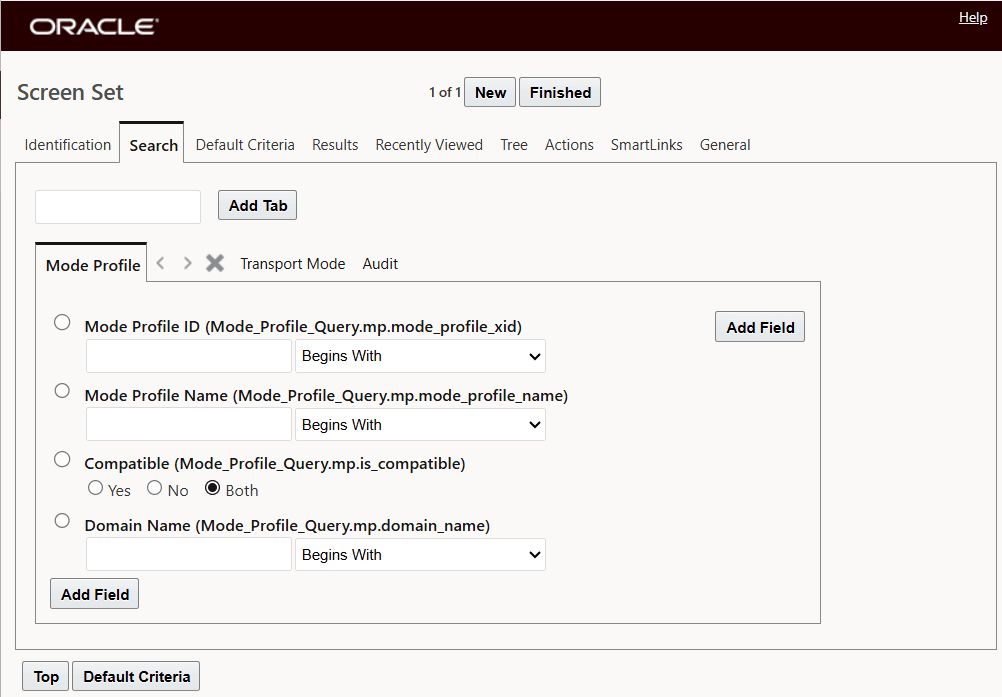
Mode Profile Screen Set Search Tab
Note: If the Mode Profile has a previously defined Saved Search, the Smart Search menu will include the Saved Searches as an additional search option, as shown below.
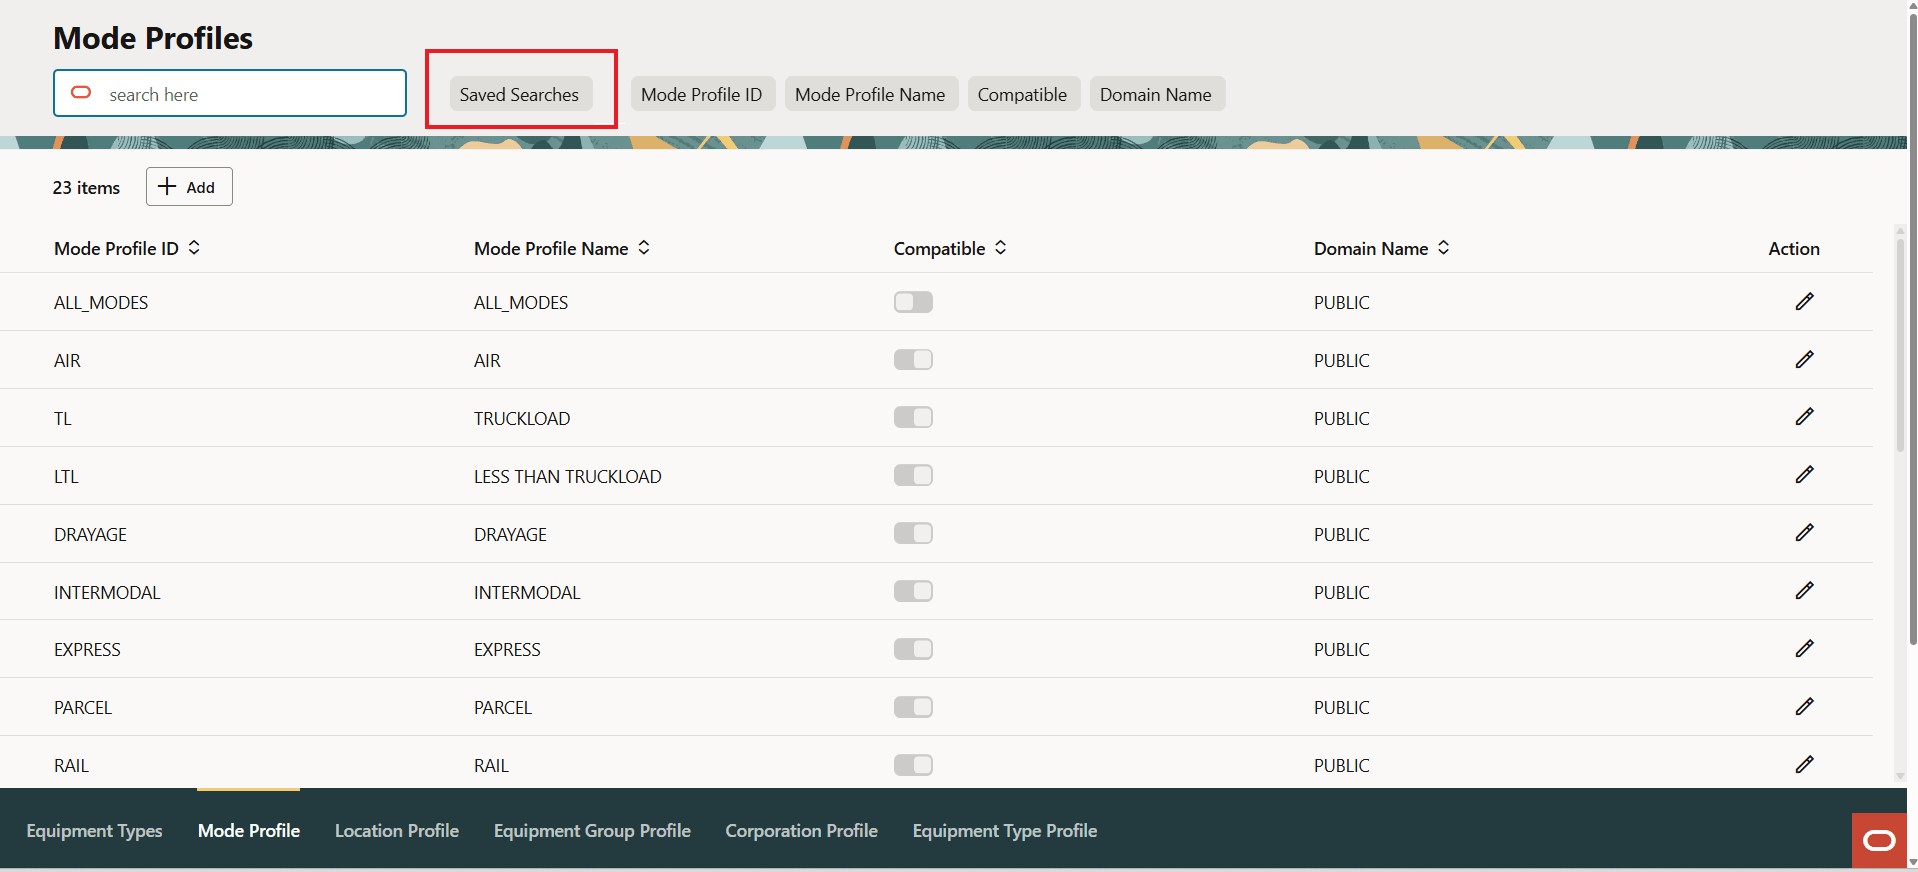
Smart Search With Saved Searches
To use the available Saved Searches, select the Saved Searches option and then select the Saved Search you want to use from the drop down - as shown below. You can either search for records using your Saved Searches, or you can search based on the set of fields provided, you cannot use your Saved Searches with the field level searches.
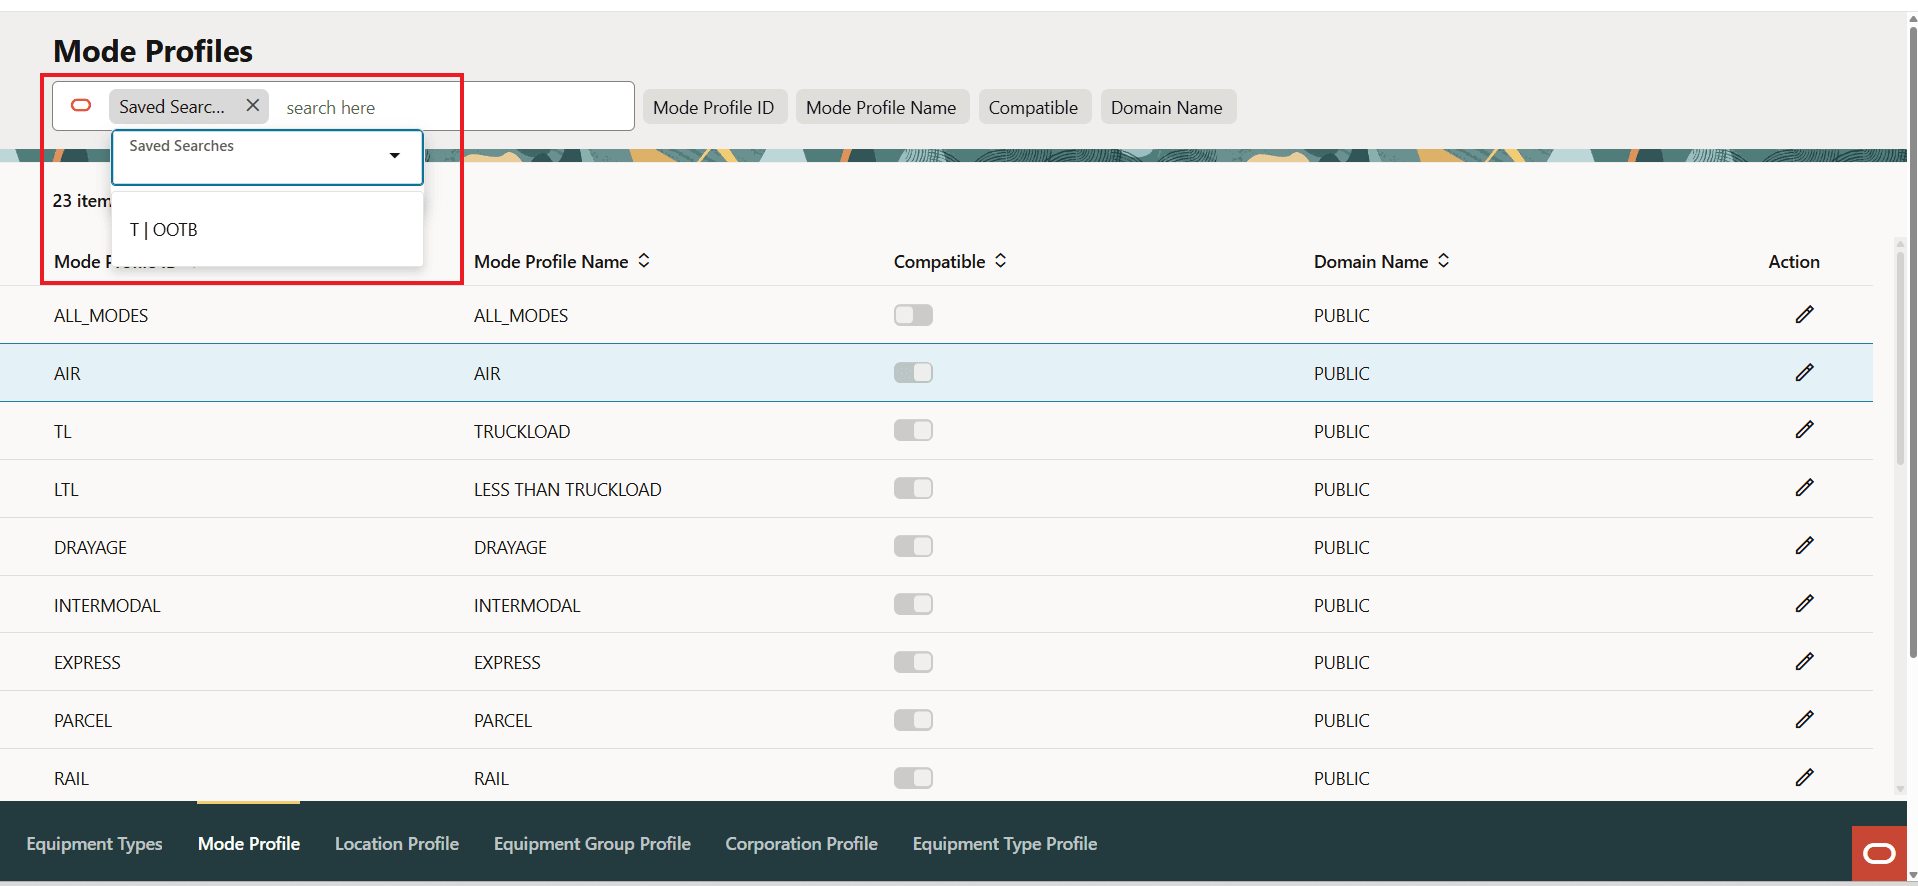
Saved Searches Dropdown
Adding a record for the Profile UIs follows the pattern below.
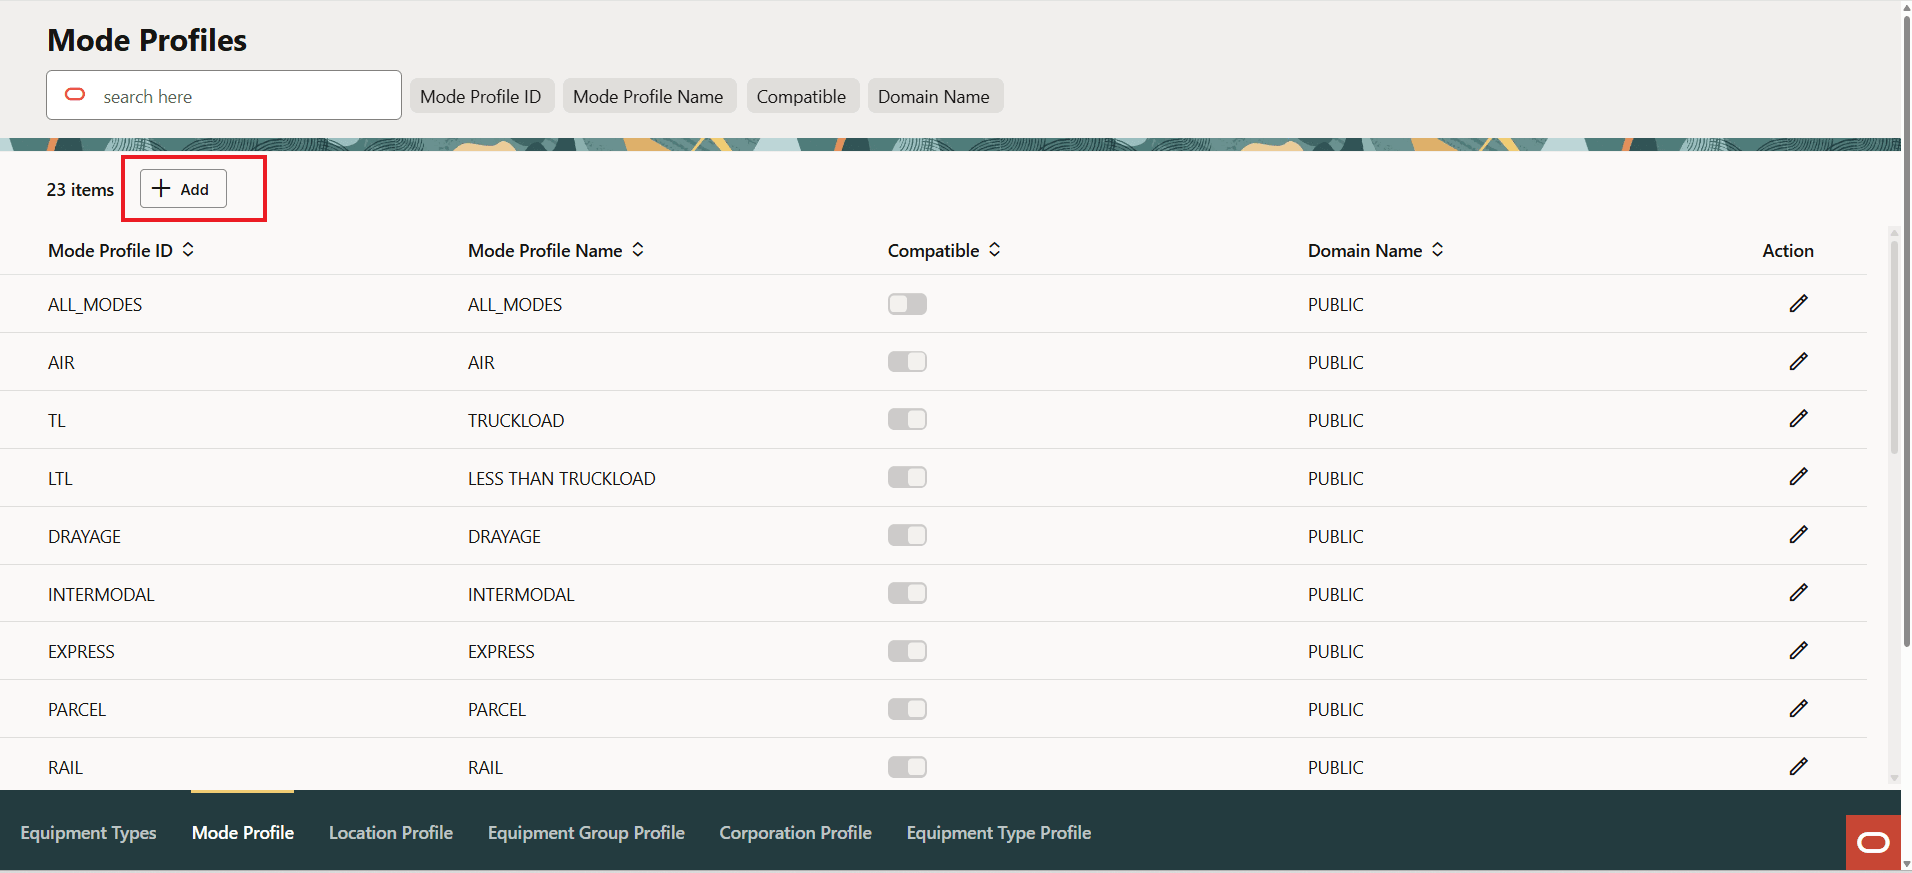
Mode Profile Add
When you select the Add option the UI appears as below.
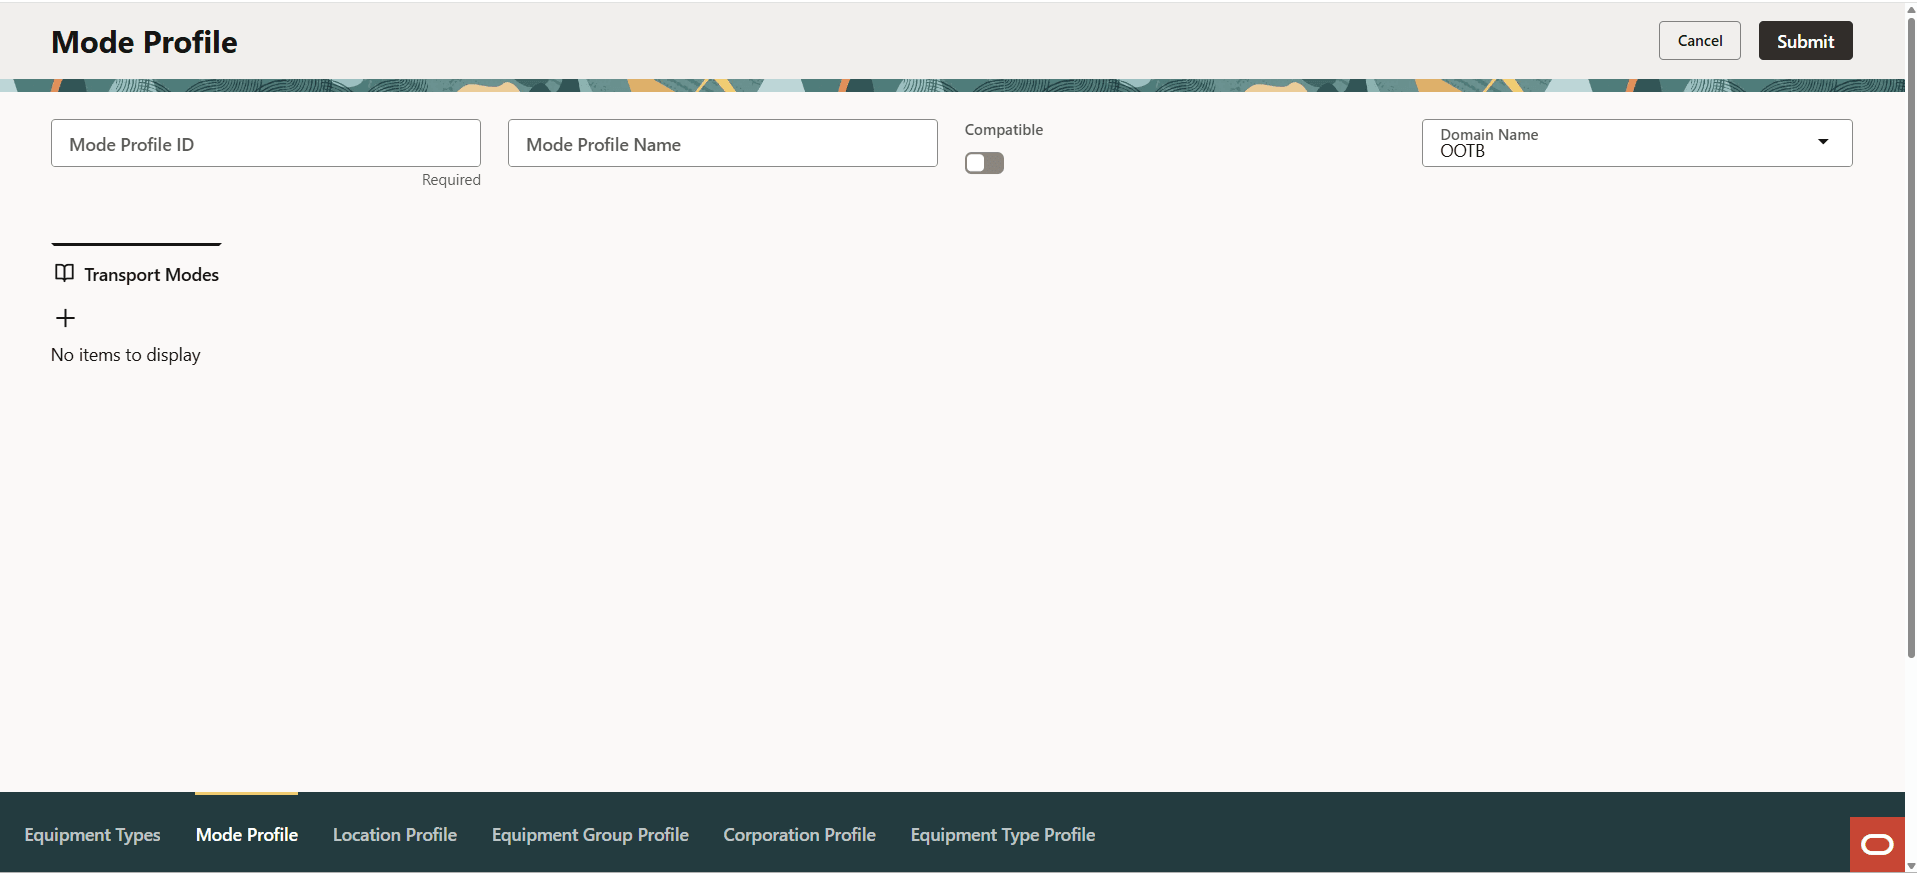
Add New Profile Record
In the example below the Mode Id and Name have been provided along with the Compatibility designation for the details to be added to the Profile. Selecting the "+" open up the file drawer on the right-hand side of the screen where the elements of the profile - in this case the different modes - can be added.
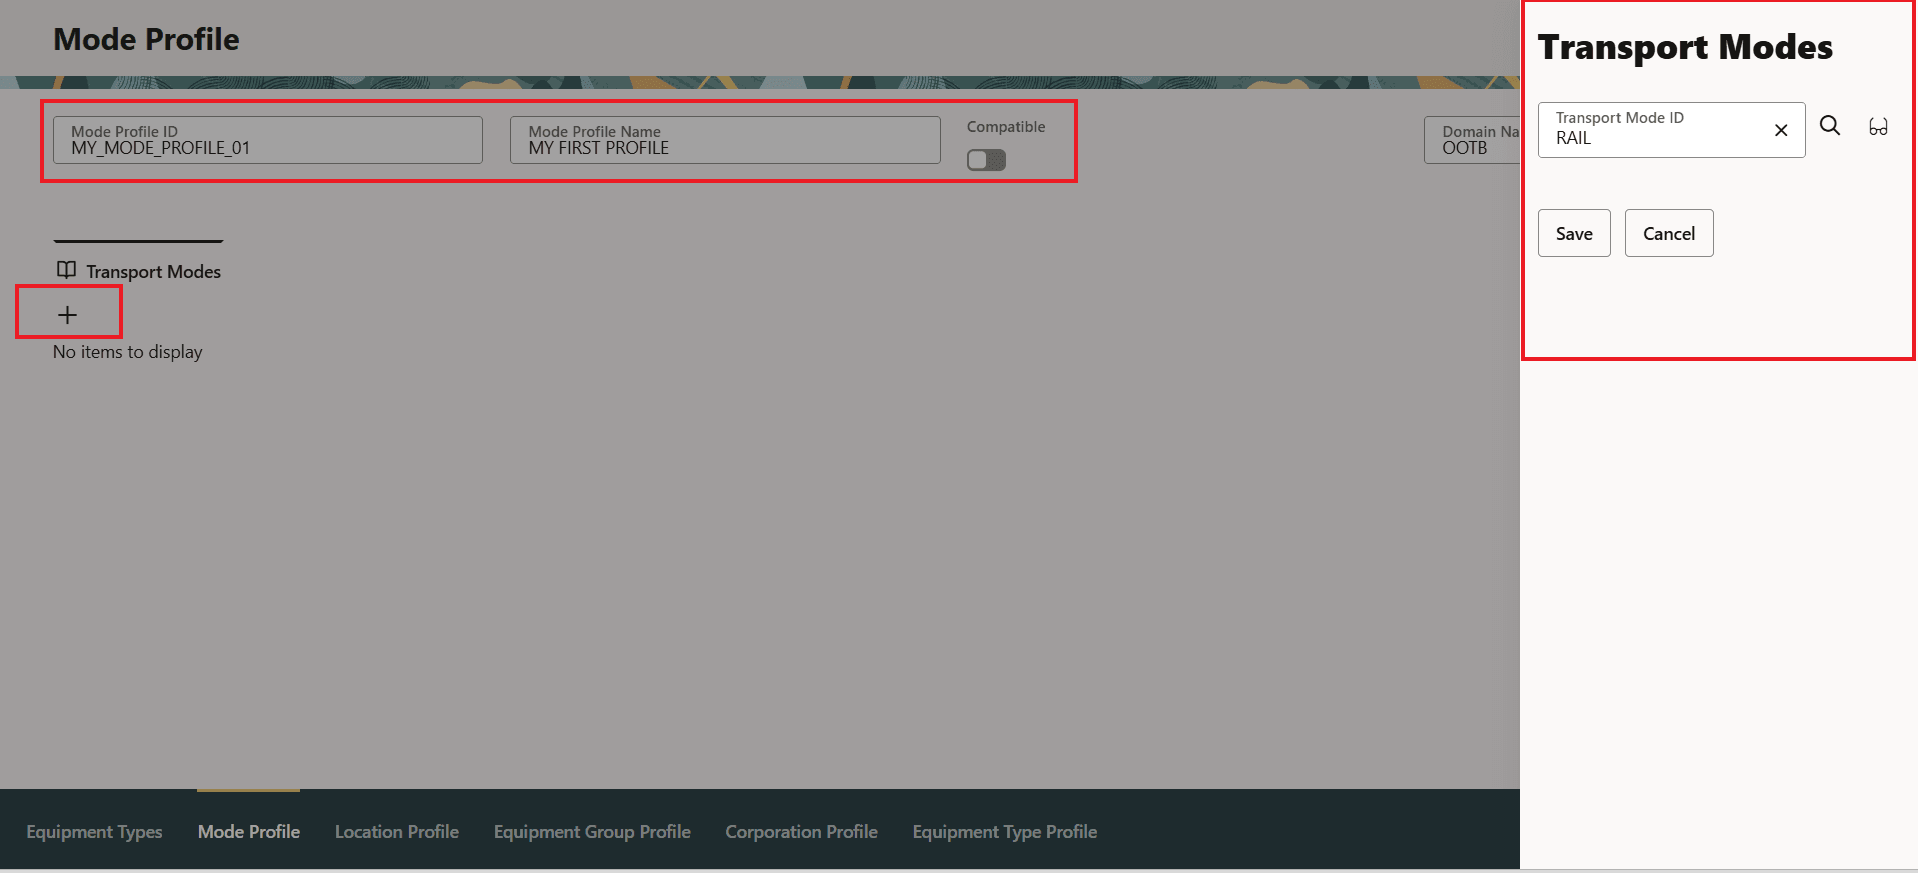
New Profile With Profile Details Defined
In edit mode, the compatible/Incompatible indicator provides an additional color indication(shown in blue) to differentiate between compatible and incompatible. When you are not in edit mode (such as in the Finder Results) right means compatible and left means incompatible.
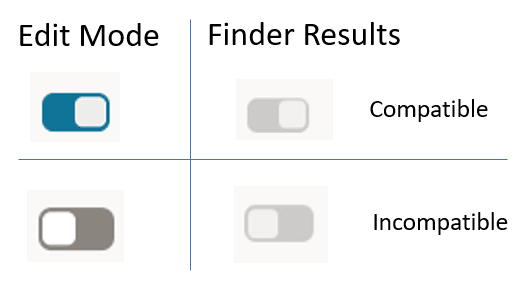
Edit Finder Results Compatible/Incompatible
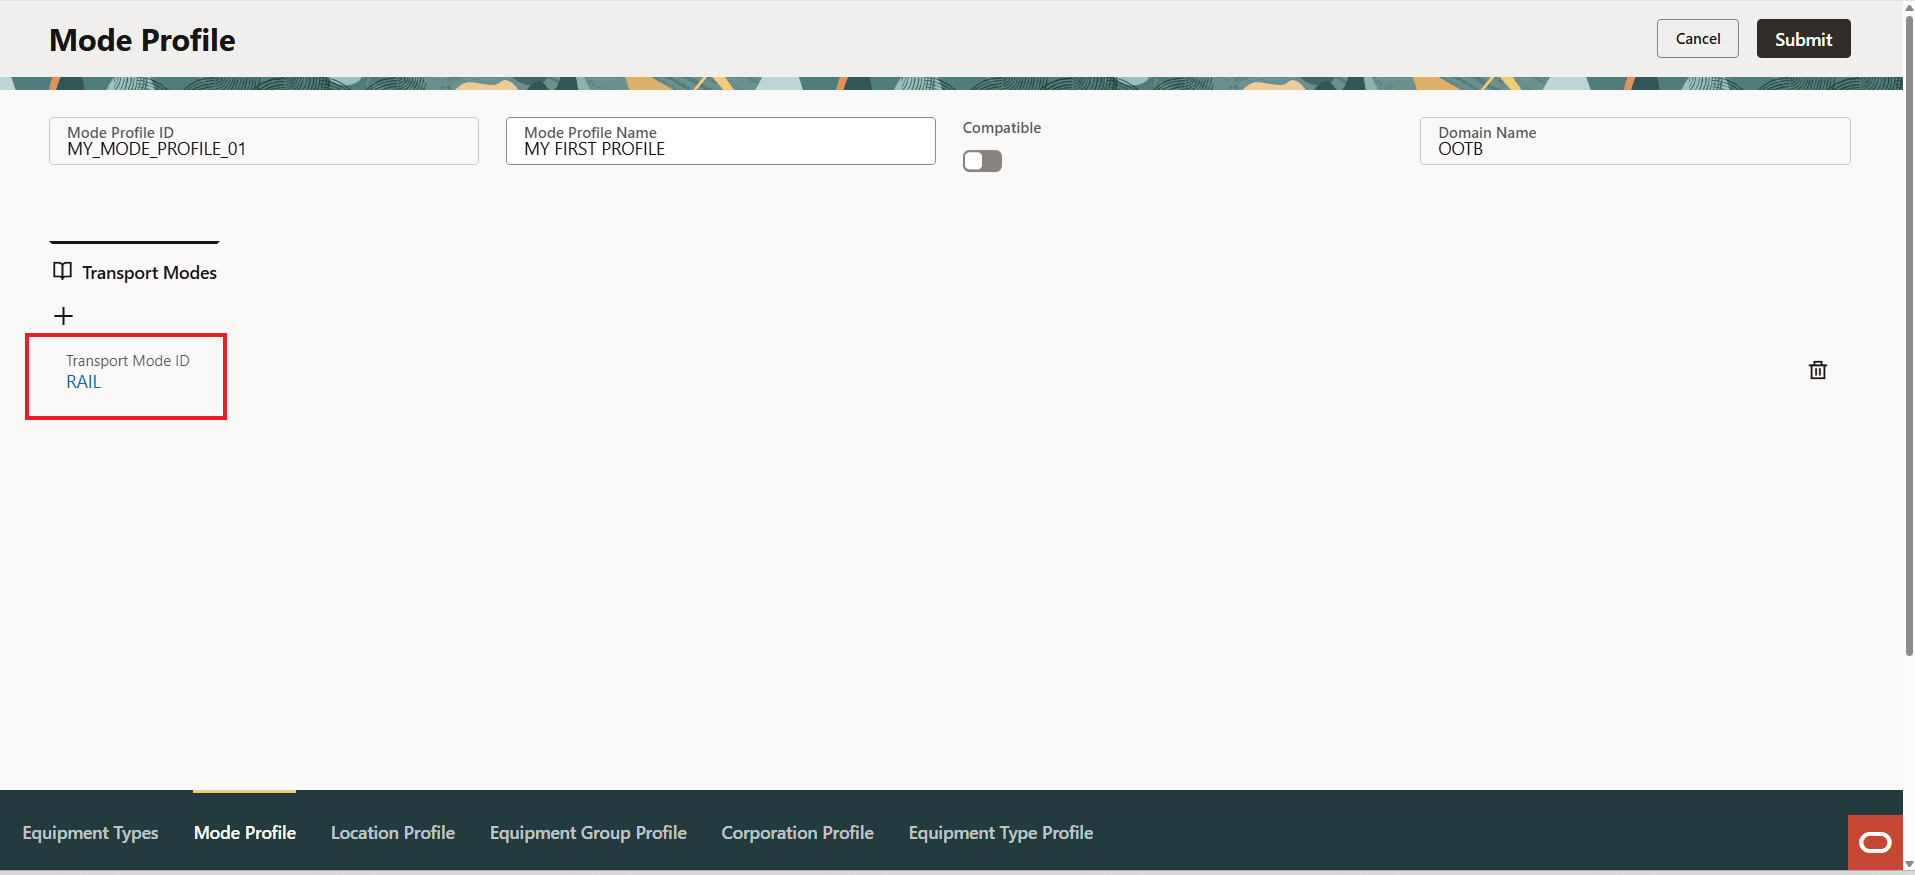
In the example above, selecting Save for the Transport Modes adds the entered record to the Profile. In this case the Mode Profile now has Rail as one of the Incompatible Modes for this Profile.

Profile With Detail Added
Repeating the steps above, the Mode Profile with three incompatible modes is below.
Mode Profile With Three Incompatible Modes
The available Actions for the Profile Records - View, Edit and Delete.
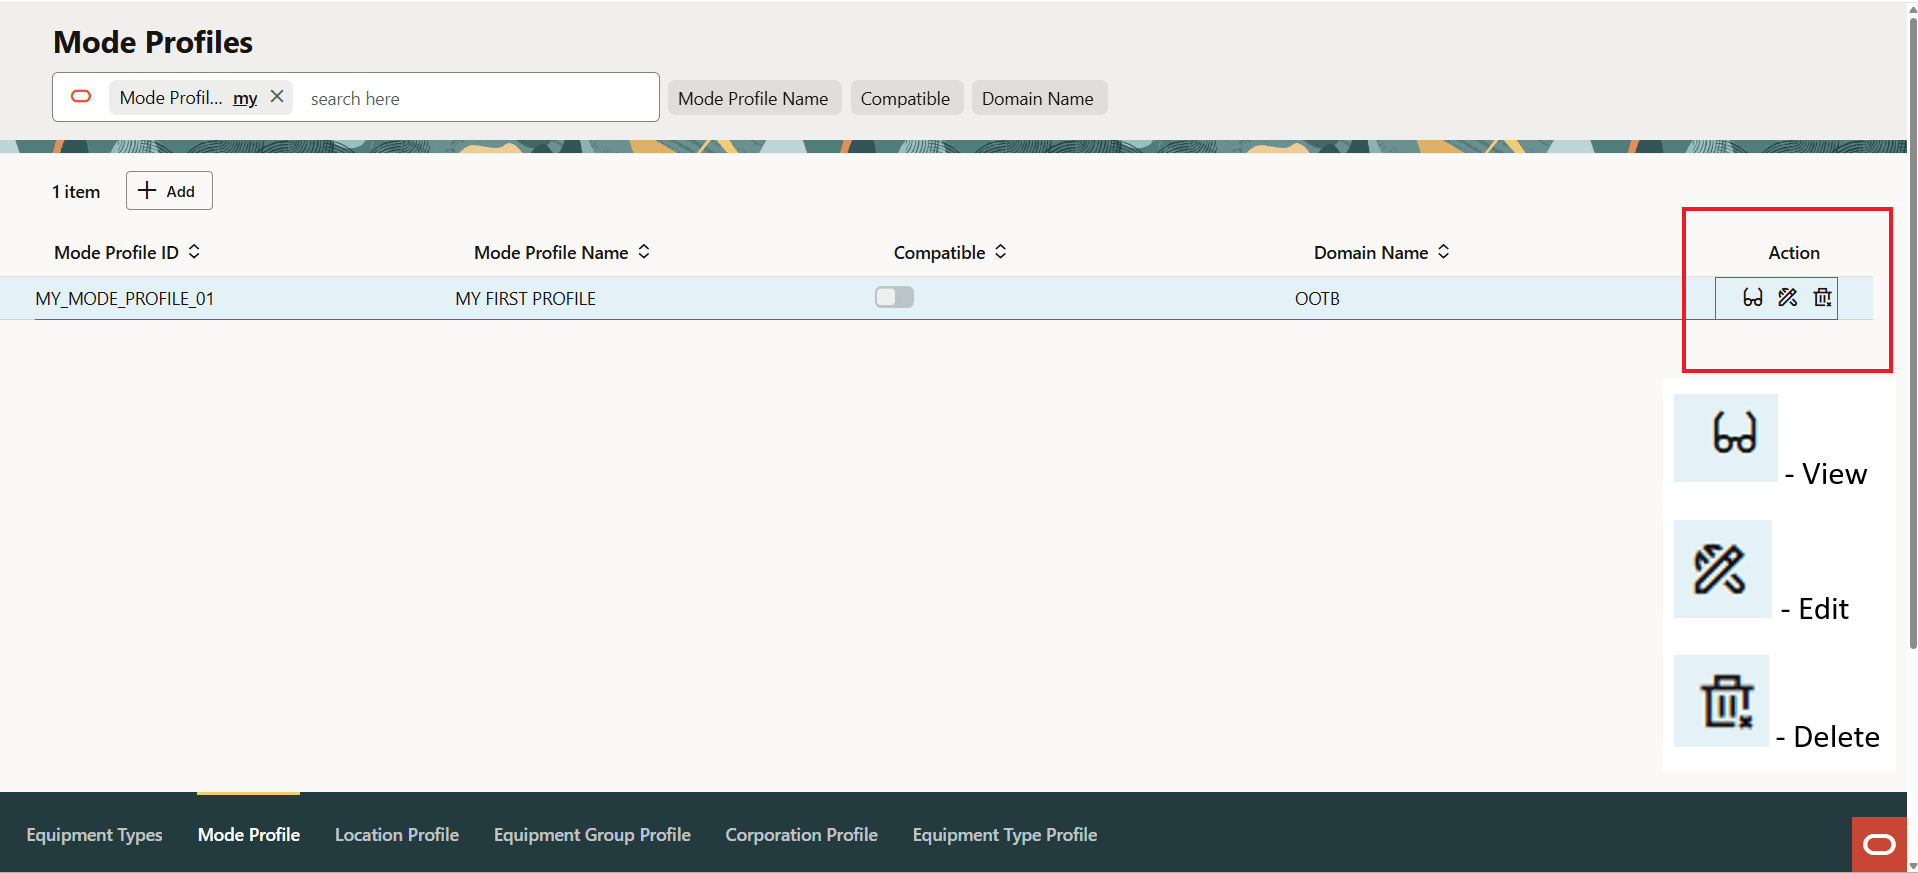
Actions
Dynamic Manager - Equipment Types
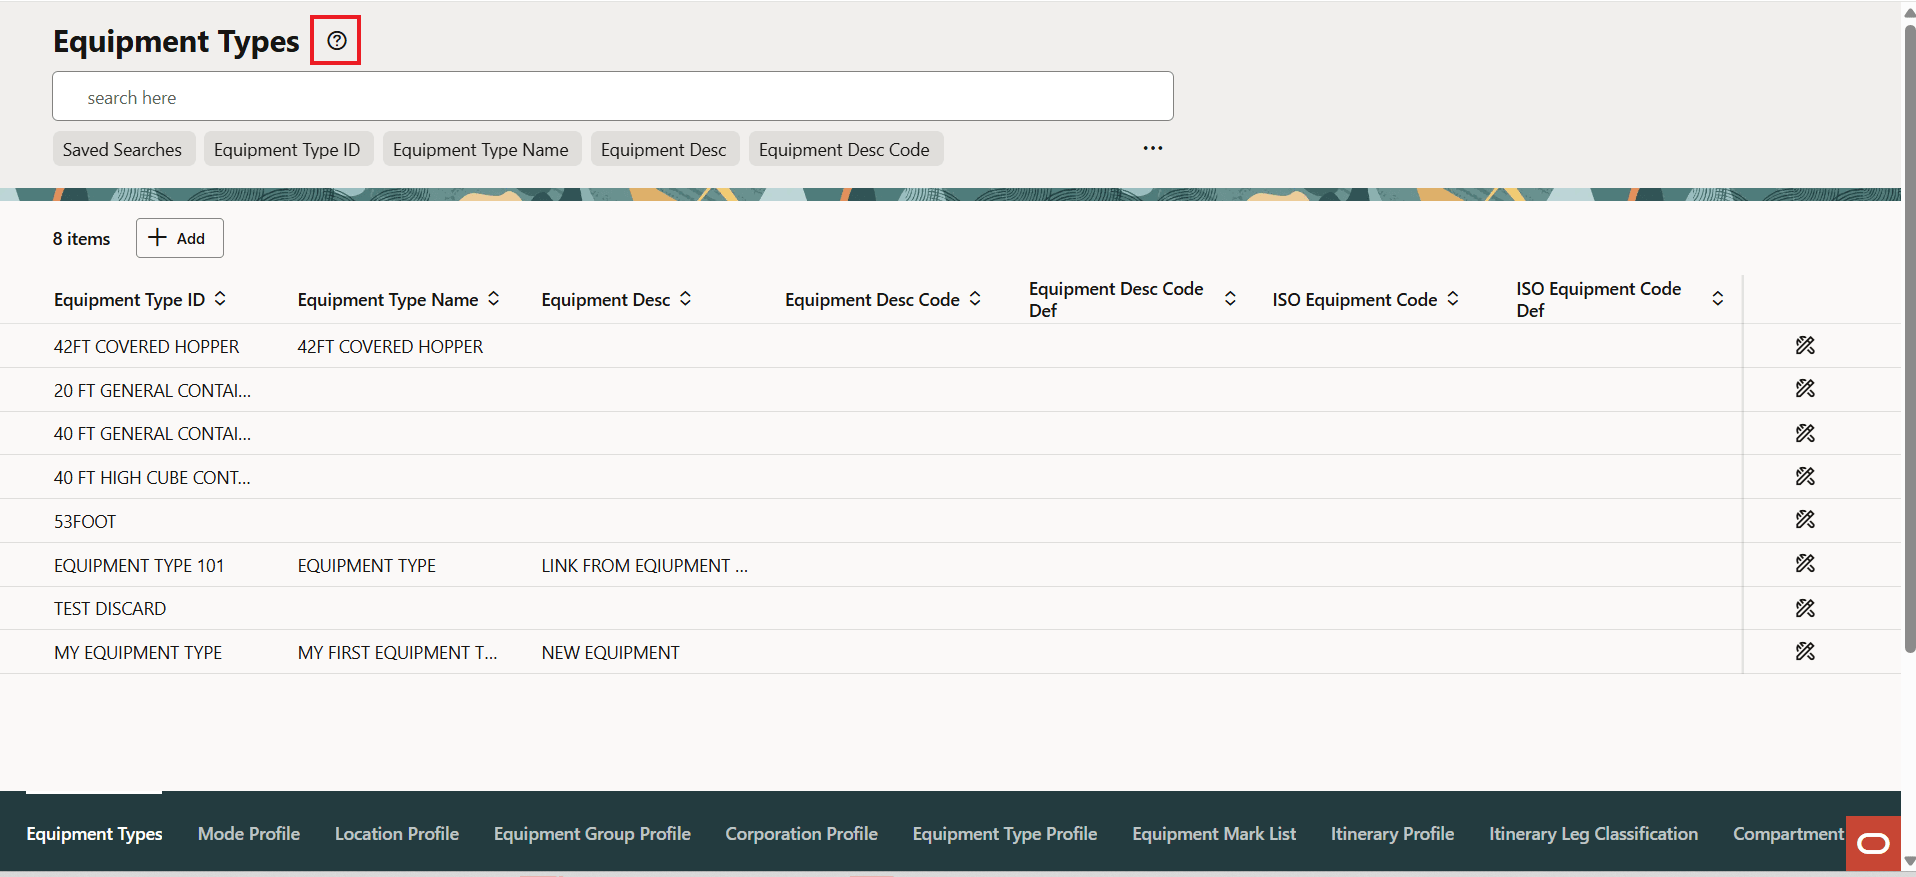
Navigating to the Equipment Types Manager provides the UI below. The Equipment Types manager is a slightly more complicated manager and demonstrates some of the additional UI patterns that will be standard in the Redwood UIs.
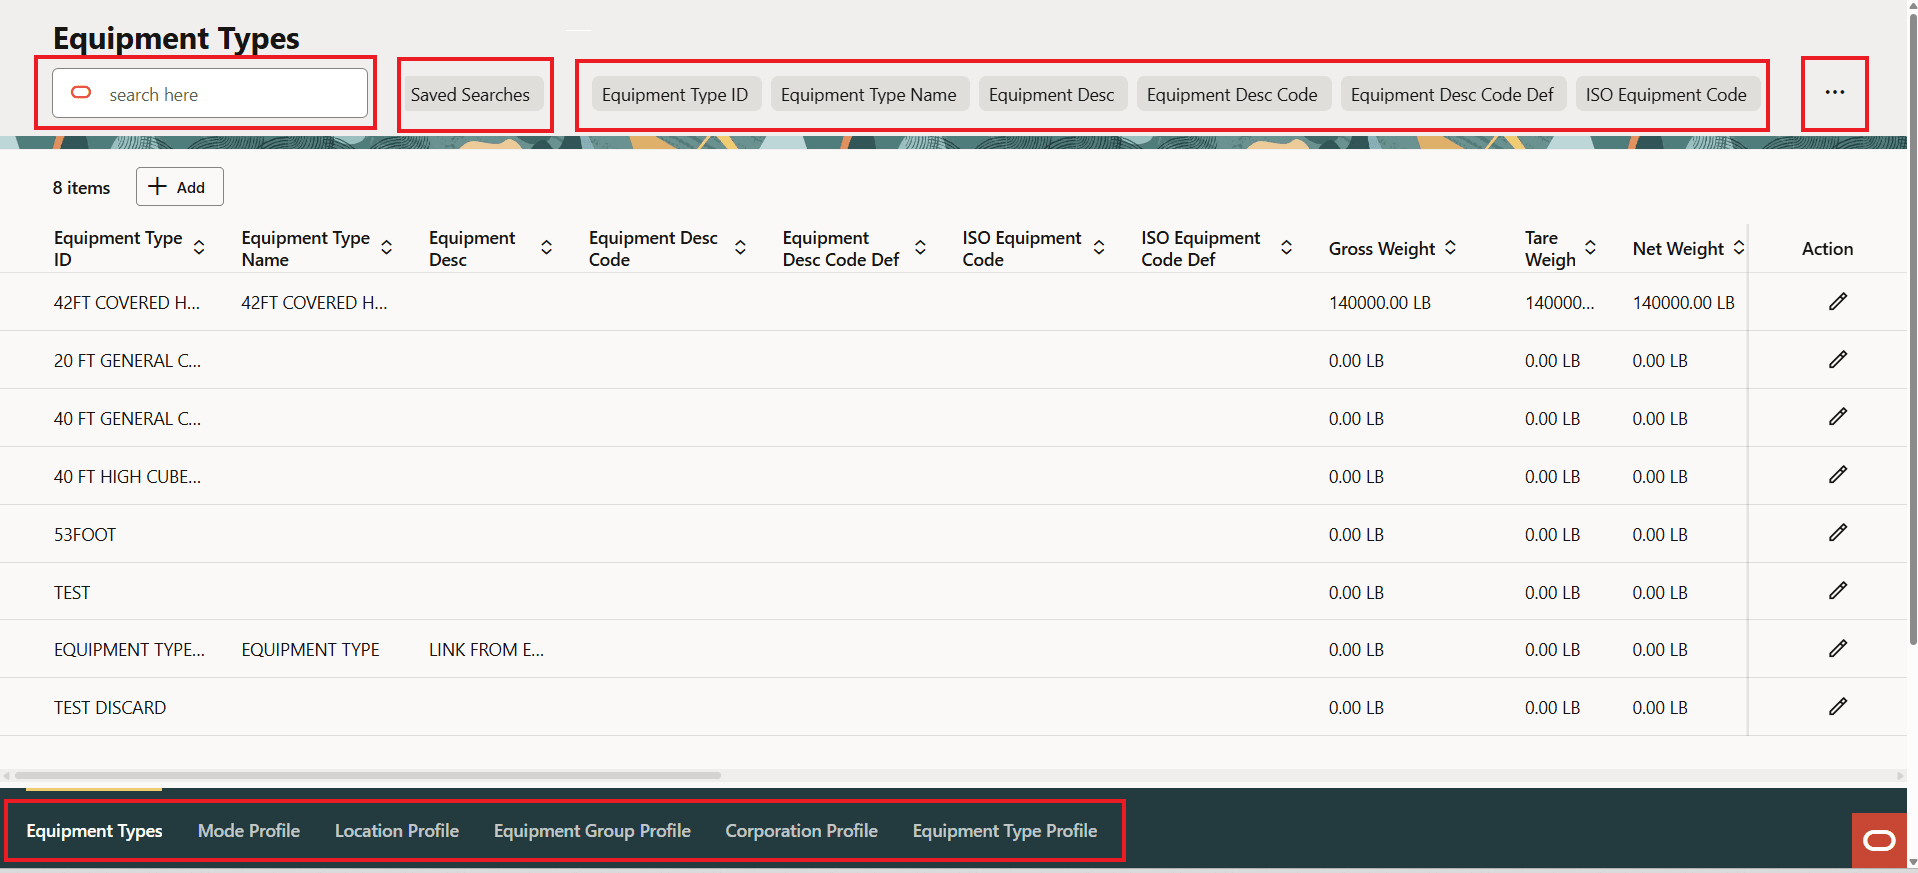
Profiles - Equipment Type Manager
In addition to the inclusion of the Saved Search, the Equipment Types Manager also demonstrates how child records can be added across multiple tabs, in this case, Special Services, Equipment Groups and Remarks.
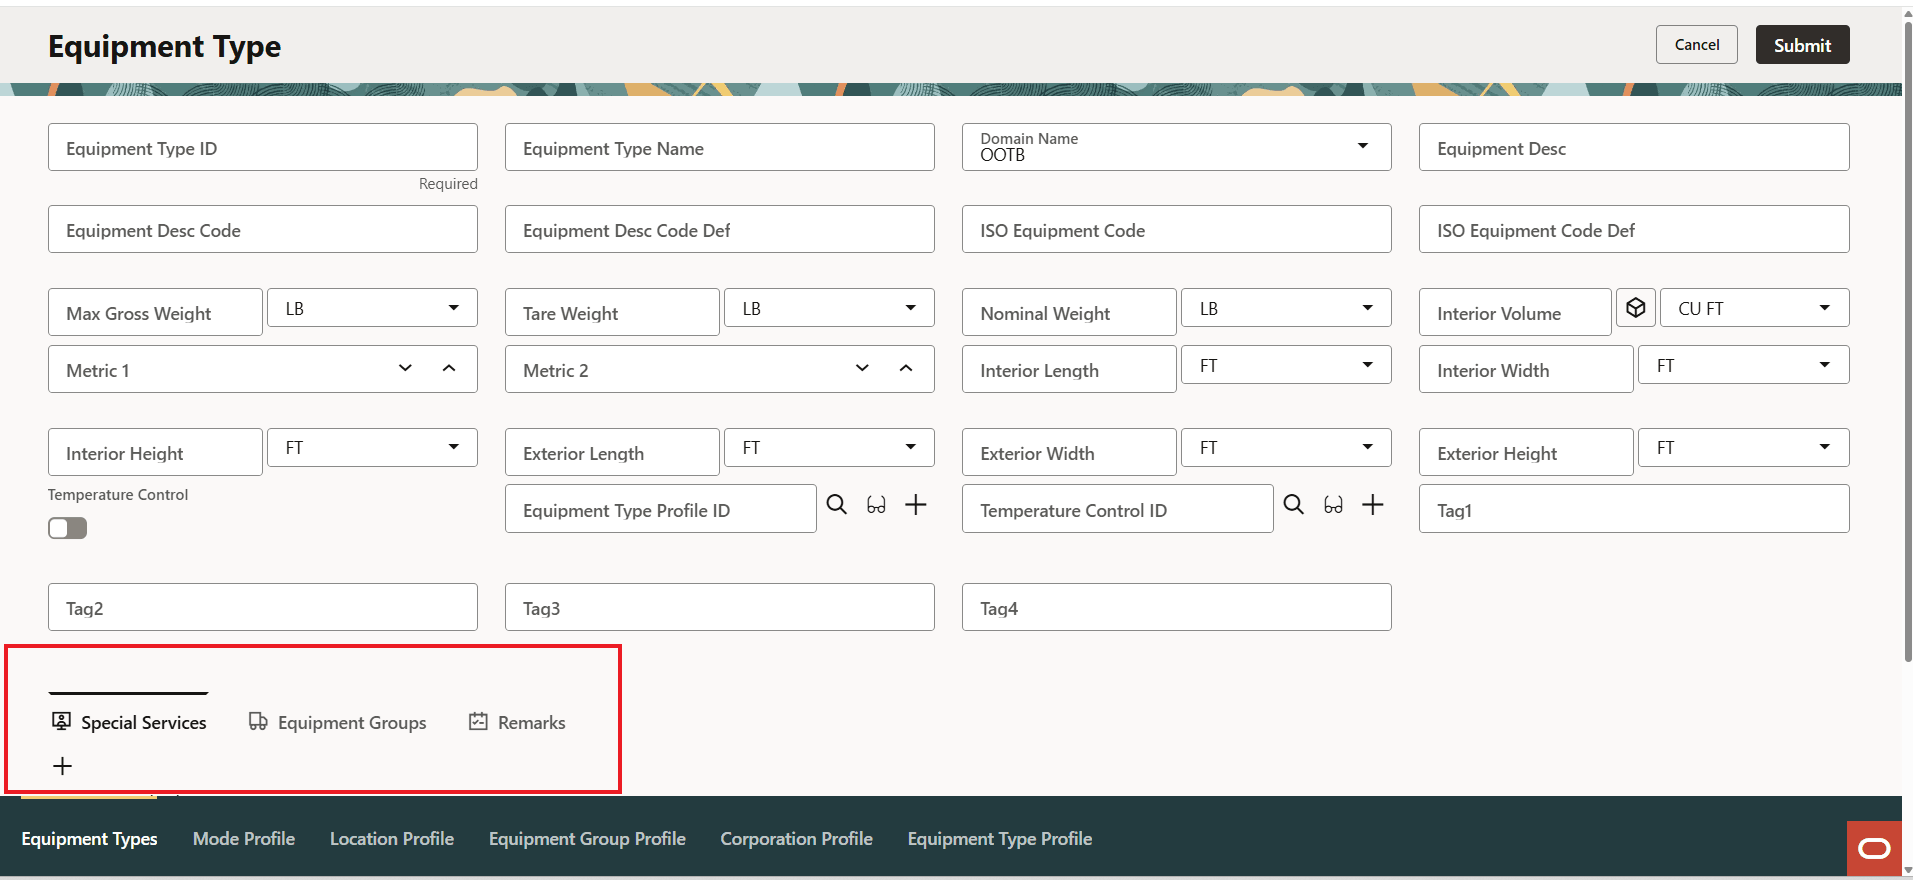
Add Child Records Across Multiple Tabs
Like the Profile UIs discussed above, the records added for Special Services, Equipment Group and Remarks are accomplished with via the file drawer, as shown below for Equipment Groups - which is the second tab in.
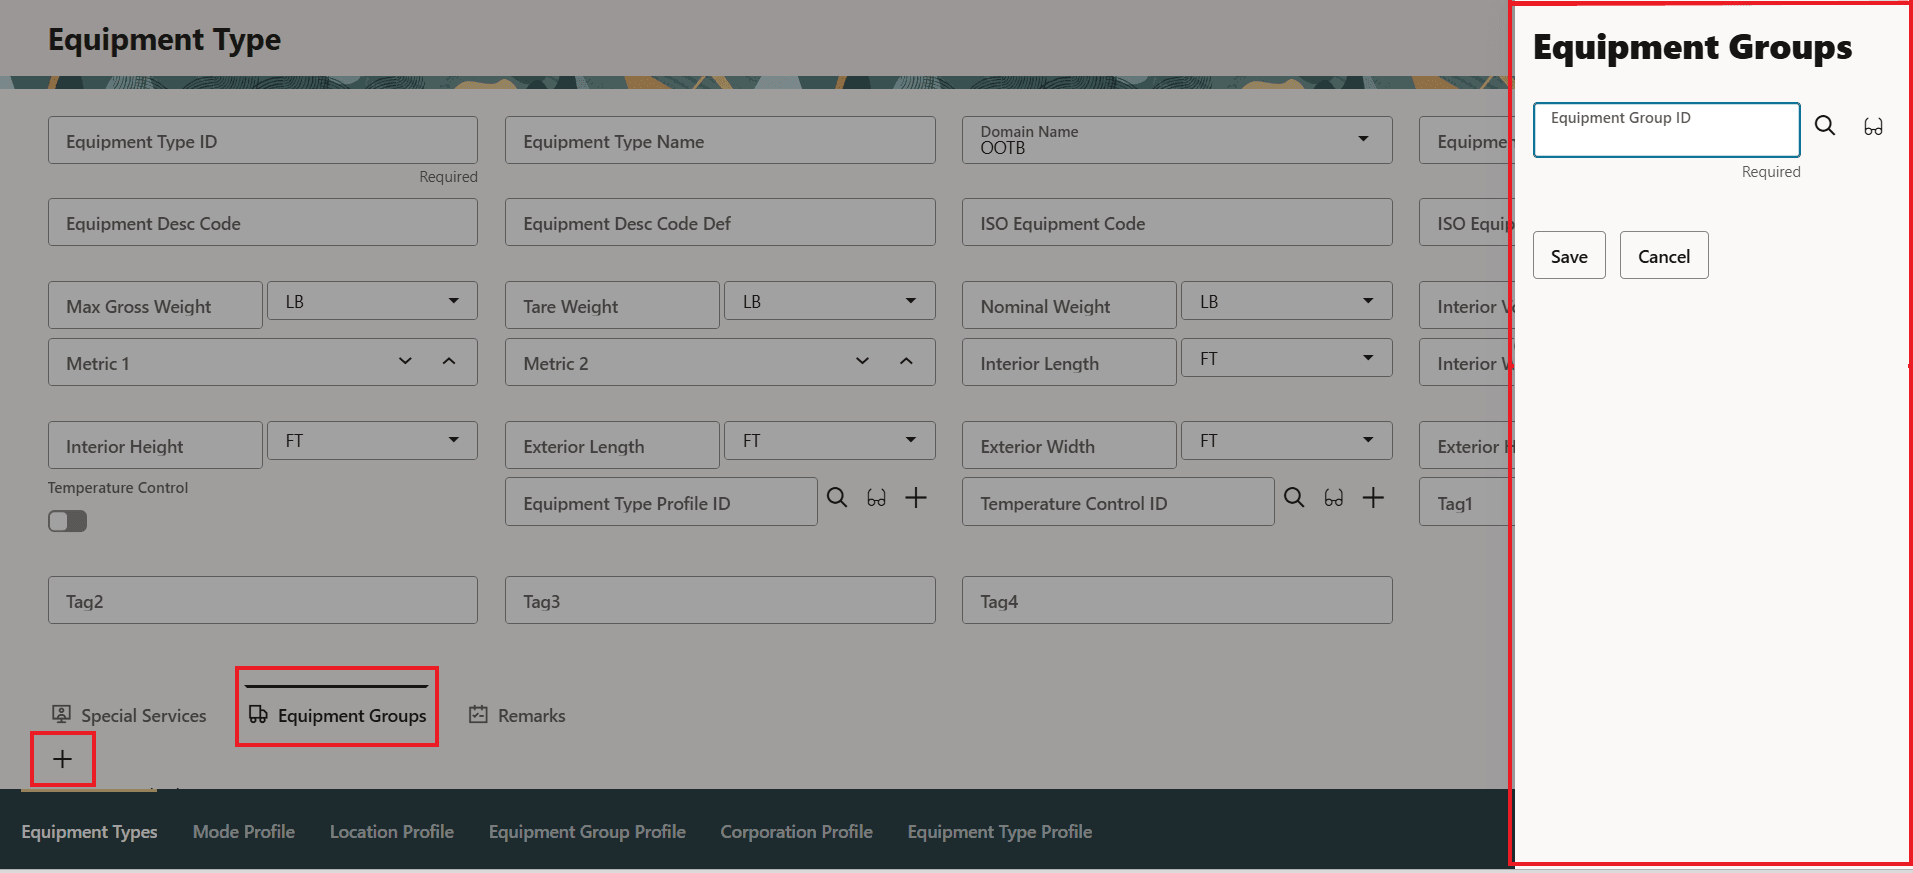
Add Child Records Across Multiple Tabs - Equipment Groups
After adding a set of Equipment Groups, when you select the tab, the records entered are shown.
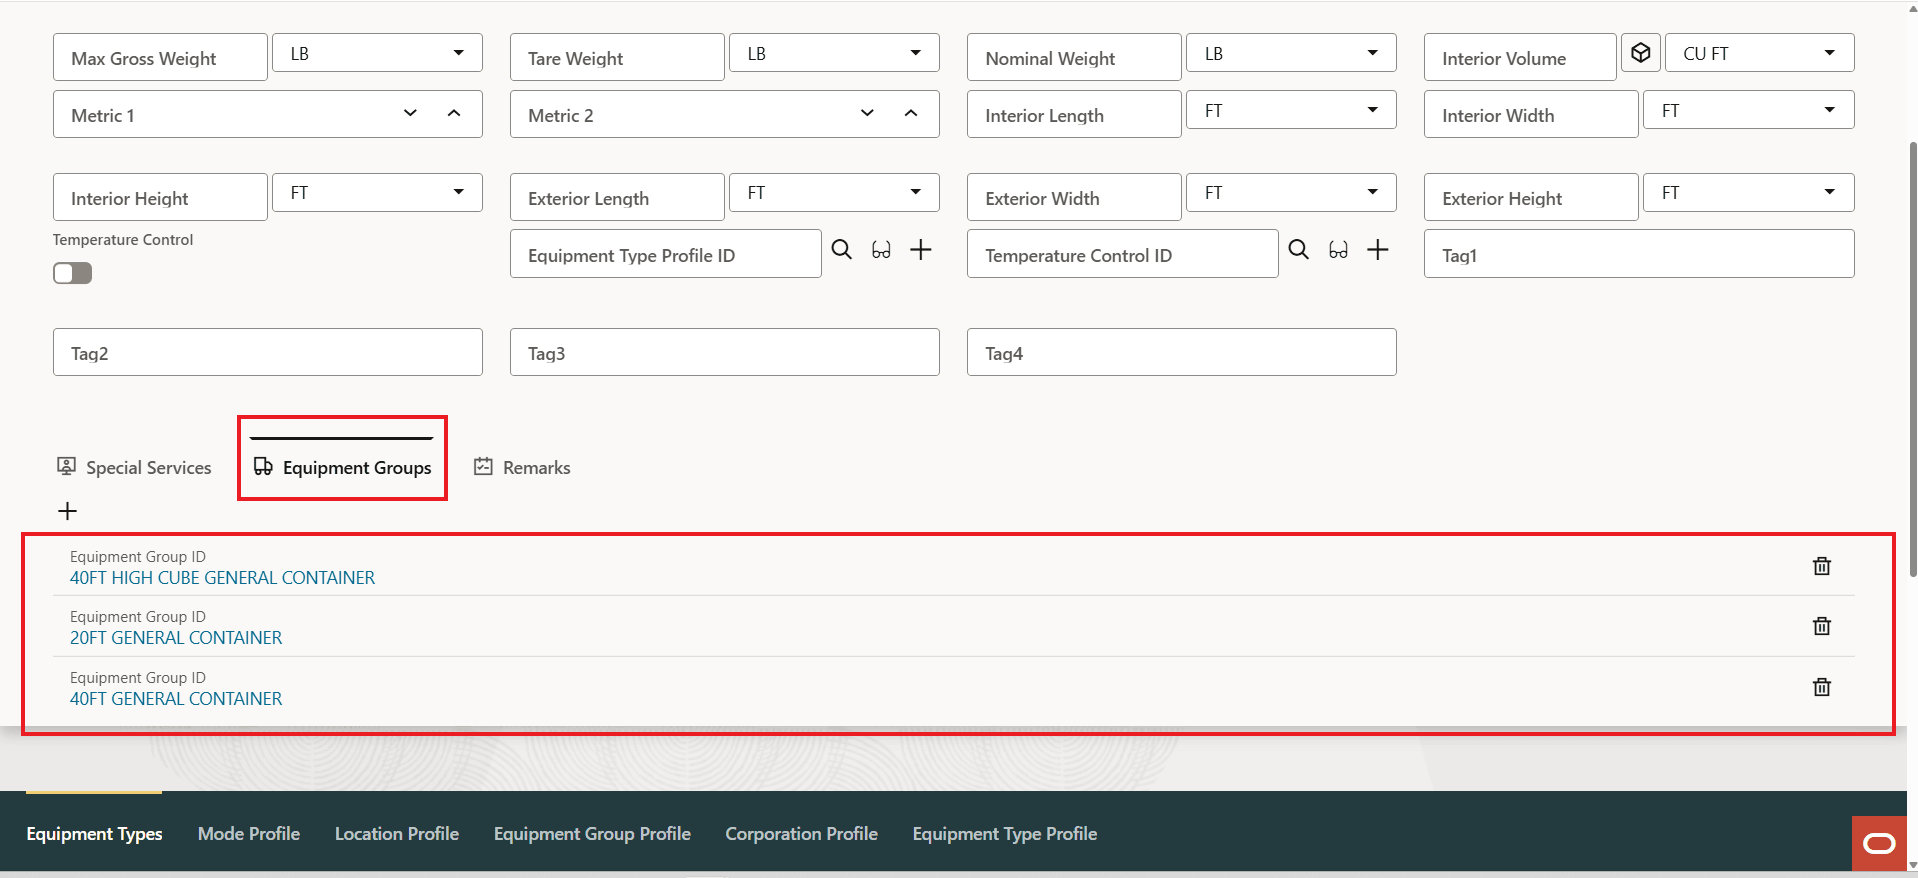
Equipment Types - Child Records Added
The same actions are available for the Equipment Types - as shown below.
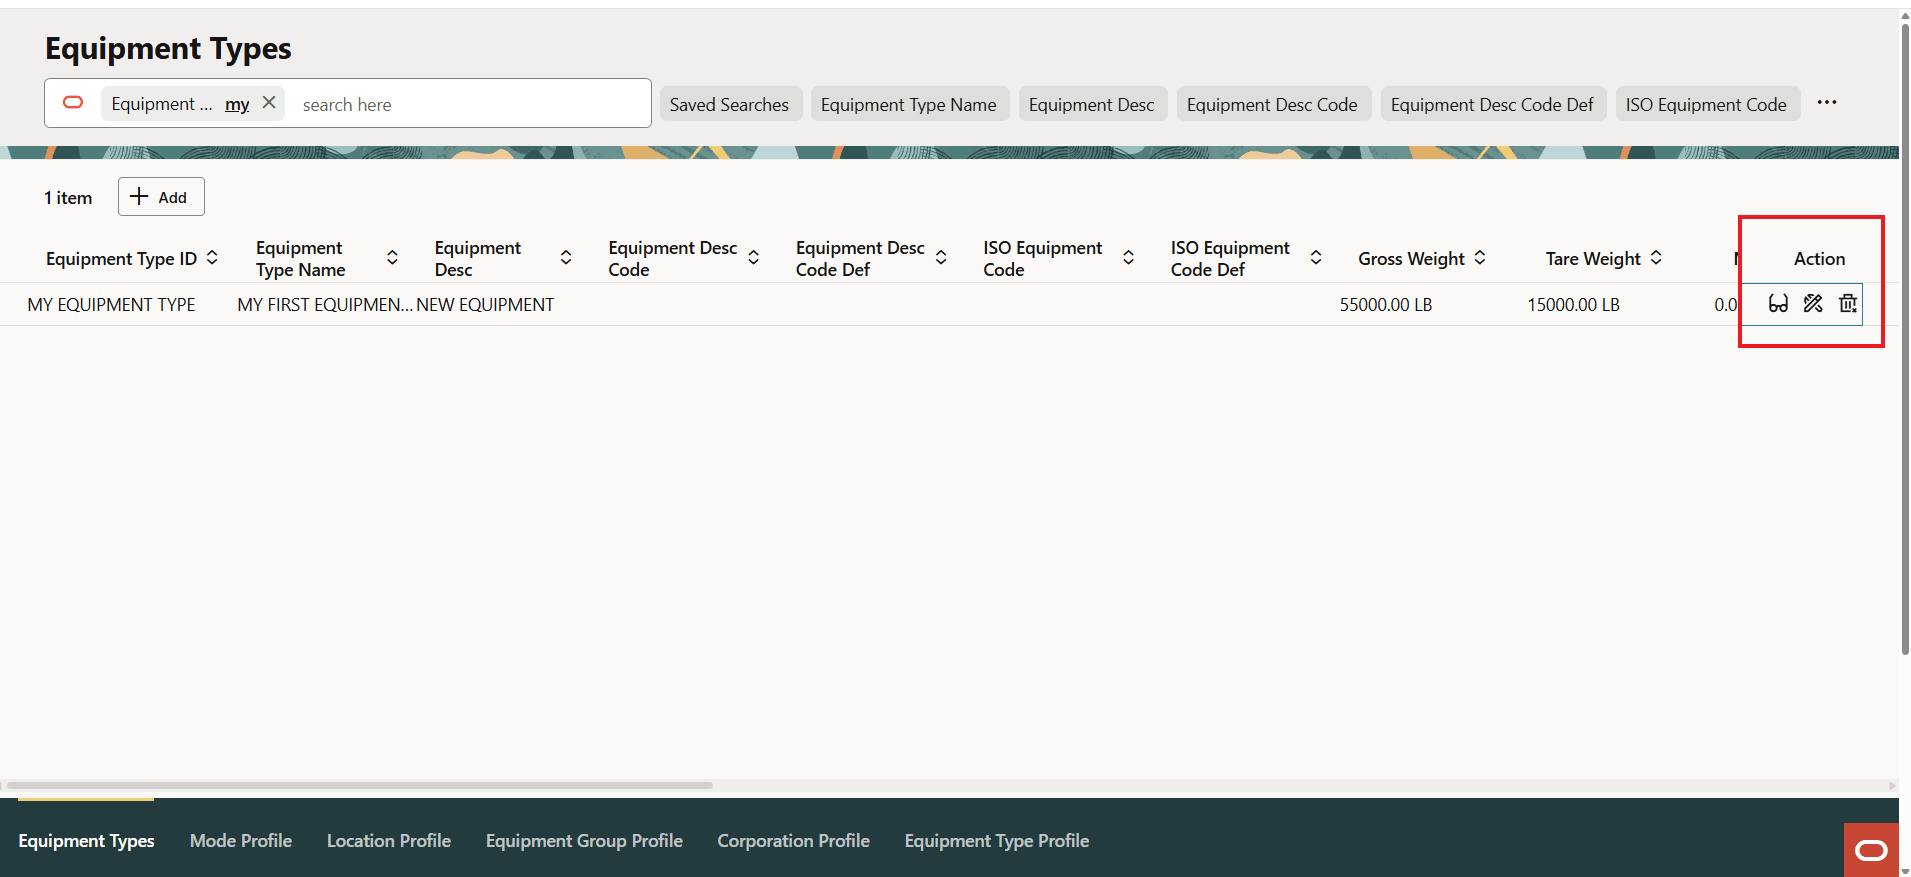
Actions
Restricted Party Screening
The Redwood Restricted Party Screening, for Ad Hoc Screening, has also been provided. Like the legacy ad hoc Restricted Party Screening UI, the Restricted Party Screening UI allows you to screen your party information without creating a party in GTM. The Redwood UI provides a cleaner more natural data entry UI for performing the screening.
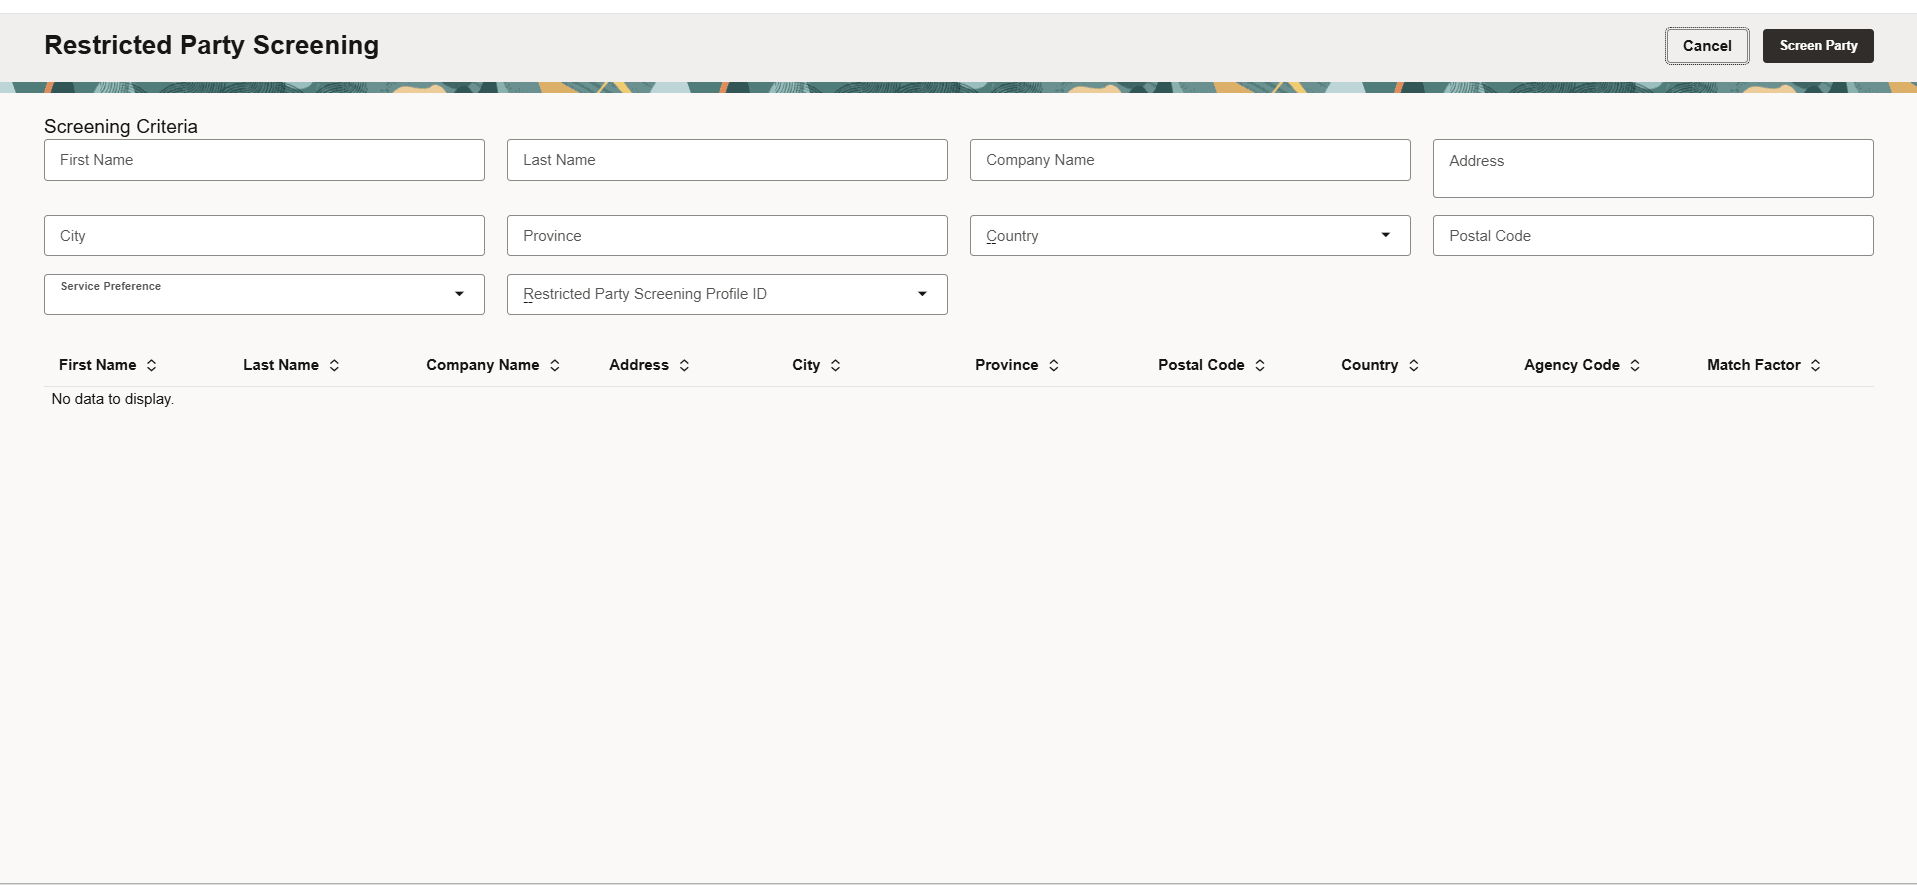
Redwood Restricted Party Screening
Business Benefit: The Redwood UI is designed to provide a modern, intuitive, and consistent user interface across Oracle applications, providing you with improved productivity, reduced training time, and fewer UI related input errors.
Steps to enable and configure
You don't need to do anything to enable this feature.
Tips and considerations
Redwood User Experience Modernization
We encourage all users to explore the new Redwood Experience as it becomes available and to begin using Redwood pages for their daily tasks whenever possible.
The Redwood initiative is a significant modernization of the OTM and GTM user experience, delivering a more intuitive, streamlined, and consistent interface aligned with Oracle's Redwood design standards. As new Redwood pages are introduced, users will benefit from improved usability, modern visual design, and enhanced productivity features.
While the initial Redwood releases focus on delivering key functionality and workflows, additional enhancements to page layouts, screen configuration, and personalization capabilities are planned as the Redwood Experience continues to evolve.
Planned Redwood Rollout
26X Releases
Redwood for Administrators
-
Administrators can access the Try the New Redwood Experience option.
-
Provides access to Redwood-enabled menus and screens available in the current release.
-
Allows organizations to evaluate and prepare for the new experience.
Redwood for All Users
-
The Try the New Redwood Experience option becomes available to all users.
-
Users can access Redwood-enabled pages while continuing to work within their existing menu structure.
-
Additional Redwood screens and workflows will be introduced throughout the release cycle.
27X Releases
Redwood as the Default Experience
-
Redwood menus and screens become the default user experience.
-
An initial transition period will provide an option to return to the legacy experience if required.
Continued Redwood Expansion
-
Additional screens and workflows will be converted to Redwood.
Full Redwood Adoption
-
Redwood becomes the standard user experience with the legacy UI retirement process beginning.
What Remains Familiar
Although Redwood introduces a modernized look and feel, several foundational elements of the OTM and GTM user experience will continue to be used. This approach helps preserve existing user knowledge and minimizes disruption during the transition.
Key areas that remain familiar include:
-
Screen Sets will continue to serve as the foundation for Finders and data presentation.
-
Navigation patterns that users rely on today will remain familiar during the transition, including the existing Springboard, Navigator, and Global Header infrastructure.
-
Existing menu structures and navigation concepts will continue to guide users to their business processes and workflows.
-
You can access Redwood-enabled pages while continuing to use legacy navigation.
What's New
In addition to the Redwood visual redesign, we are introducing enhanced configuration capabilities for Redwood pages:
-
A new screen configuration framework will provide significantly improved usability and flexibility.
-
The new capabilities will offer functionality similar to Manager Layouts while delivering a more streamlined and intuitive configuration experience.
-
Future releases will continue to expand personalization and layout optimization options.
Our goal is to modernize the user experience while preserving the proven navigation and application concepts that users already know, making the transition to Redwood both familiar and productive.