Oracle CPQ Supports OAuth 2.0 for DocuSign Integration
The DocuSign eSignature integration allows the CPQ application to prepare documents, assign signers, and create envelopes in DocuSign. When a sales agent sends a document out for signature the CPQ application makes a web service call to DocuSign. In 24B Oracle CPQ replaces the previous authentication mechanism with a new OAuth-based flow to authenticate the web service call which creates the envelope in DocuSign. To support this new security mechanism, we have updated the DocuSign eSignature Connector in the Integration Center to allow administrators to manage the new connection details, the certificate, and the token key.
When upgrading to Oracle CPQ 24B, existing DocuSign eSignature integrations are supported and continue to function using their existing connection information. We recommend moving to the new OAuth-based flow promptly as the legacy authentication mechanism is deprecated by DocuSign and is no longer supported. Once you have upgraded to 24B existing connections using the old pattern will no longer be able to be modified. You must delete the old integration and recreate the connection using the updated Connector.
Steps to Enable
To create a DocuSign eSignature integration type, administrators with permissions can complete the following steps:
- Click Integration Center in the Integration Platform section of the Admin Home page.
- Click Create Integration.
- Select eSignature from the Type drop-down.
- Select DocuSign from the Vendor drop-down. The DocuSign Integration field entries display.
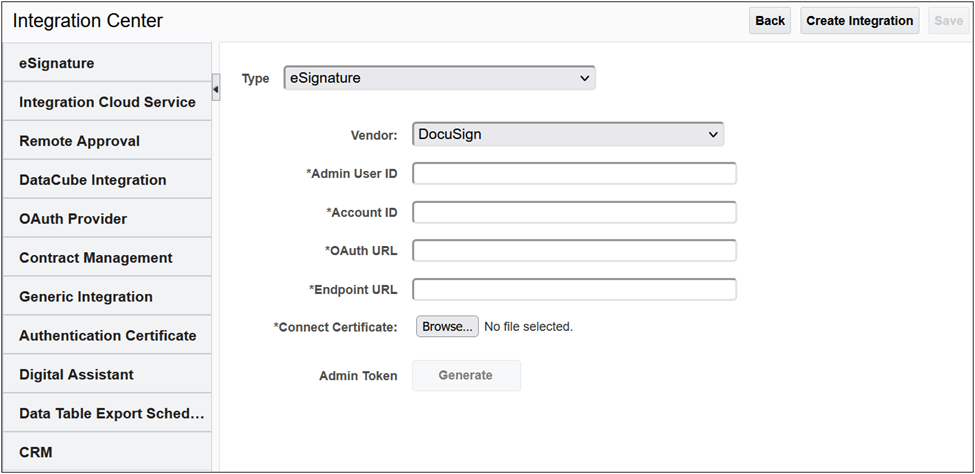
- Enter the Admin User ID. Refer to the procedure below for retrieving this information.
- Enter the Account ID. Refer to the procedure below for retrieving this information.
- Enter https://account.docusign.com for the OAuth URL.
- Enter the Endpoint URL. This includes the DocuSign Account Base URI with the restapi version information appended (for example, https://prodsite.docusign.net/restapi/v2). Refer to the procedure below for retrieving this information.
IMPORTANT: This URL must be included in the allow list of approved domains.
- To add the connect certificate, click Choose File and navigate to a valid certificate (for example, a.crt file) on your hard drive. This certificate must be the same as the one created in the DocuSign environment.
IMPORTANT:
-
It is essential that the certificate in DocuSign and Oracle CPQ match.
-
When the DocuSign eSignature integration is saved, the certificate is stored and available for download. Also the Last Modified date associated with the certificate is automatically populated.
- Click Save to save the integration details along with the connection certificate.
- Select Generate to generate the Admin Token. If this is the first time you are setting up the OAuth-based integration, DocuSign consent must be verified. A warning displays indicating that consent from DocuSign is required.

- Click Give Consent to close the Consent warning box. If required, you may need to log in to DocuSign.
A new DocuSign tab opens indicating Oracle CPQ is requesting access to DocuSign.
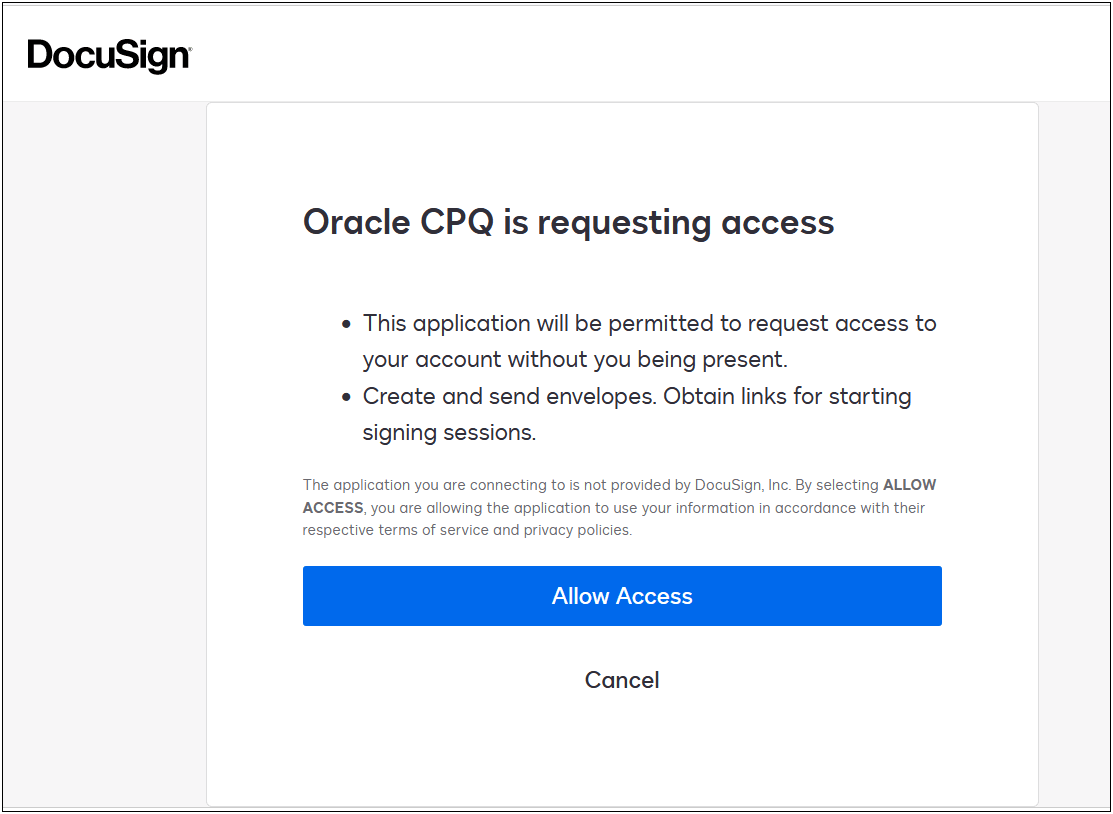
- Click Allow Access to allow Oracle CPQ access.
- Navigate to the Oracle CPQ DocuSign eSignature Integration Center page and click Generate.
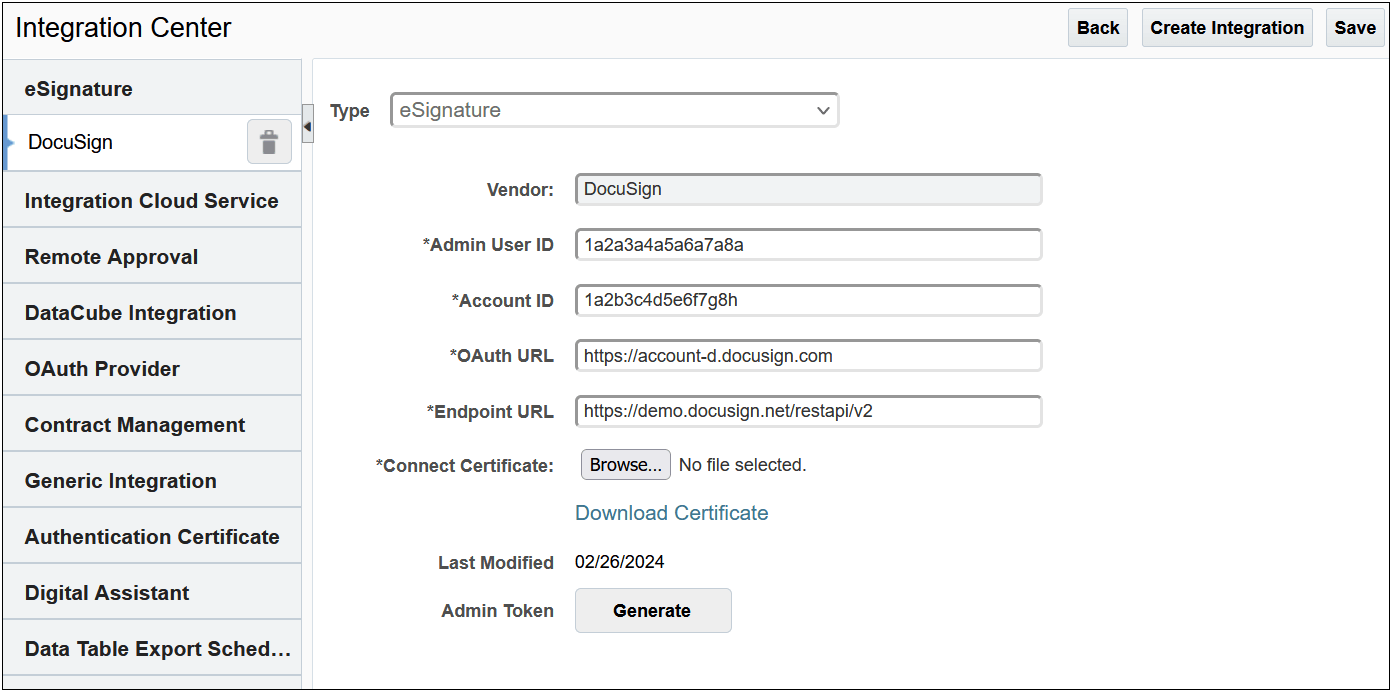
The Oracle CPQ DocuSign eSignature Integration Center page displays the Revoke button for the Admin Token instead of a Generate button. This indicates the access was granted and the integration connection is established.
To set up the Oracle CPQ DocuSign eSignature Integration, the administrator must retrieve necessary field data from DocuSign. The following provides an overview of the steps to locate the DocuSign fields and the corresponding DocuSign to Oracle CPQ field names.
- Log into DocuSign.
- Navigate to the Integration section within the Settings tab.
- Click Apps and Keys from within the Integration section. The Apps and Keys page displays.
- Within the My Account Information section, note the following field values. These values must be entered in the corresponding field for the Oracle CPQ DocuSign eSignature Integration.
| DocuSign App and Key Field | Oracle CPQ DocuSign Integration Field |
|---|---|
| User ID | Admin User ID |
| API Account ID | Account ID |
| Acount Base URI |
Endpoint URL Enter the Account Base URI with the REST API version information appended (for example, https://prodsite.docusign.net/restapi/v2) |
The Oracle CPQ User Integration page is used to maintain user login credentials and to generate or revoke the user’s OAuth tokens. To manage the tokens for user access, perform the following steps.
- Navigate to the User Integration page as follows:
- As a user, click the My Profile icon in the Navigation menu to open the My Profile page then click User Integration at the bottom of the page.
- As an administrator, click Internal Users from the Admin Home page. Click on the user login link to open the User Administration page then click User Integration at the bottom of the page.
The eSignature tab displays.
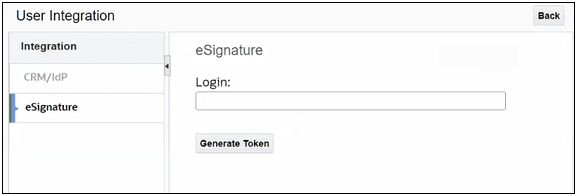
- Enter the user login in the Login field.
IMPORTANT:
-
If a token exists, the Revoke Token button displays. Clicking this button deletes the user token from the database and clears the login field.
-
If a token doesn’t exist, the Generate Token button displays. Clicking this button generates a valid token and returns to the Oracle CPQ User Integration page where the presence of the Revoke Token button indicates a token exists. Note that if it is the first time a user is generating a token, they will be asked to give consent.
- Click Back.
Tips And Considerations
DocuSign consent is required the first time the Oracle CPQ DocuSign OAuth-based integration is set up. To revoke consent, go to the DocuSign Connected Apps page.