Redwood: Create and Manage Sales Orders
Use redesigned pages to create and manage sales orders. Set up a page so it works just the way you like it. Use extensible flexfields in the same way that you use predefined attributes. Bring the attributes that you use most to the forefront and modify more than one order line at a time.
Check out these highlights:
- Use hands-on keyboard entry. Let your fingers do the walking and let your mouse take a rest.
- Simplify order entry. Use Visual Builder Studio to set up the page so you can focus on the data that's most important for your business.
- Set default values and cascade attribute values from header to line.
- Do mass actions across orders and lines.
- Add and remove holds on more than one line at a time.
- Cancel more than one line in a single action.
- Use Generative AI to determine changes and automatically populate comments.
- Use Generative AI to create and modify a confirmation email that you send to your customer.
- Set up extensible flexfields so they display in the same way that predefined attributes do on the order header or order line.
- Enter or override shipping tolerances directly on the order line.
- For items that use dual units of measure, use the ordered quantity or enter the secondary quantity and let Order Management automatically convert to the ordered quantity.
- Select the sales agreement. If more than one agreement line applies, then select one of them.
- Override schedule dates.
- Do a credit check.
- Manage the customer relationship on the sales order.
- Send to trade compliance and see the result.
- Select a revision reason and enter a comment.
- Add a return to an outbound sales order.
- Use Guided Journeys to guide your users while they enter data in the sales order.
- Start your sales order on the classic Create Order page and bring it over to the new, redesigned Sales Orders page.
Reduce clicks:
- Reduce 50% of your clicks when you create a sales order.
- Reduce 75% of your order header clicks and 80% of your order line clicks when your revise a sales order.
- Reduce 50% of your clicks when you cancel a sales order.
Create Sales Orders
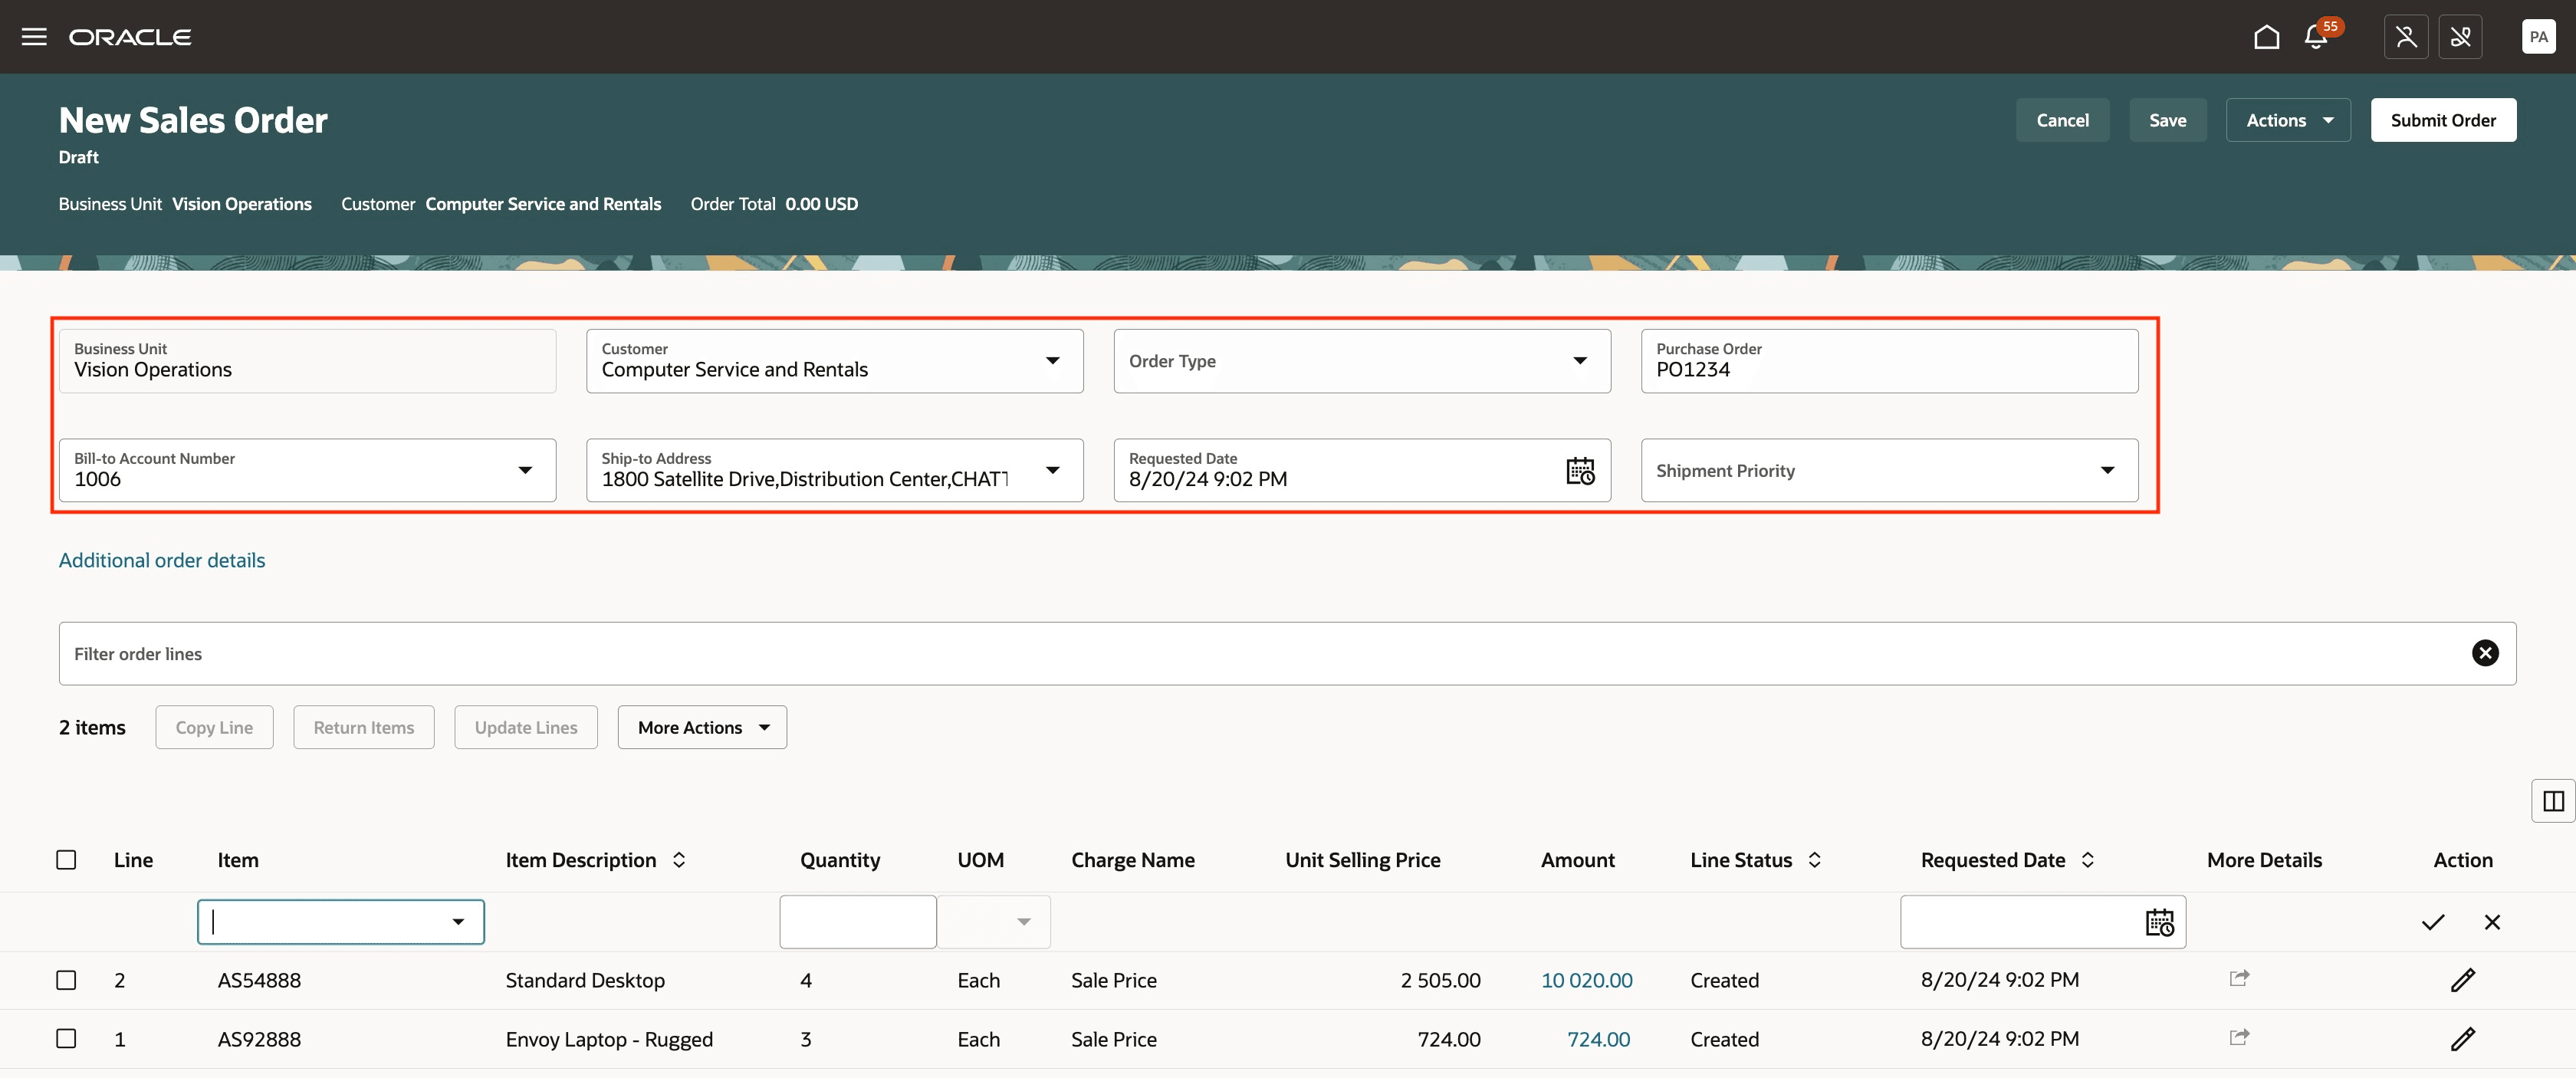
You typically only need to set a few attributes on the order header. You can use Visual Builder Studio to hide and show only the attributes that you use most of the time, and then quickly tab through them to set their values when you create the order. In this screenshot, we show how we have added four additional attributes to the order header (Order Type, Purchase Order, Requested Date, Shipment Priority)
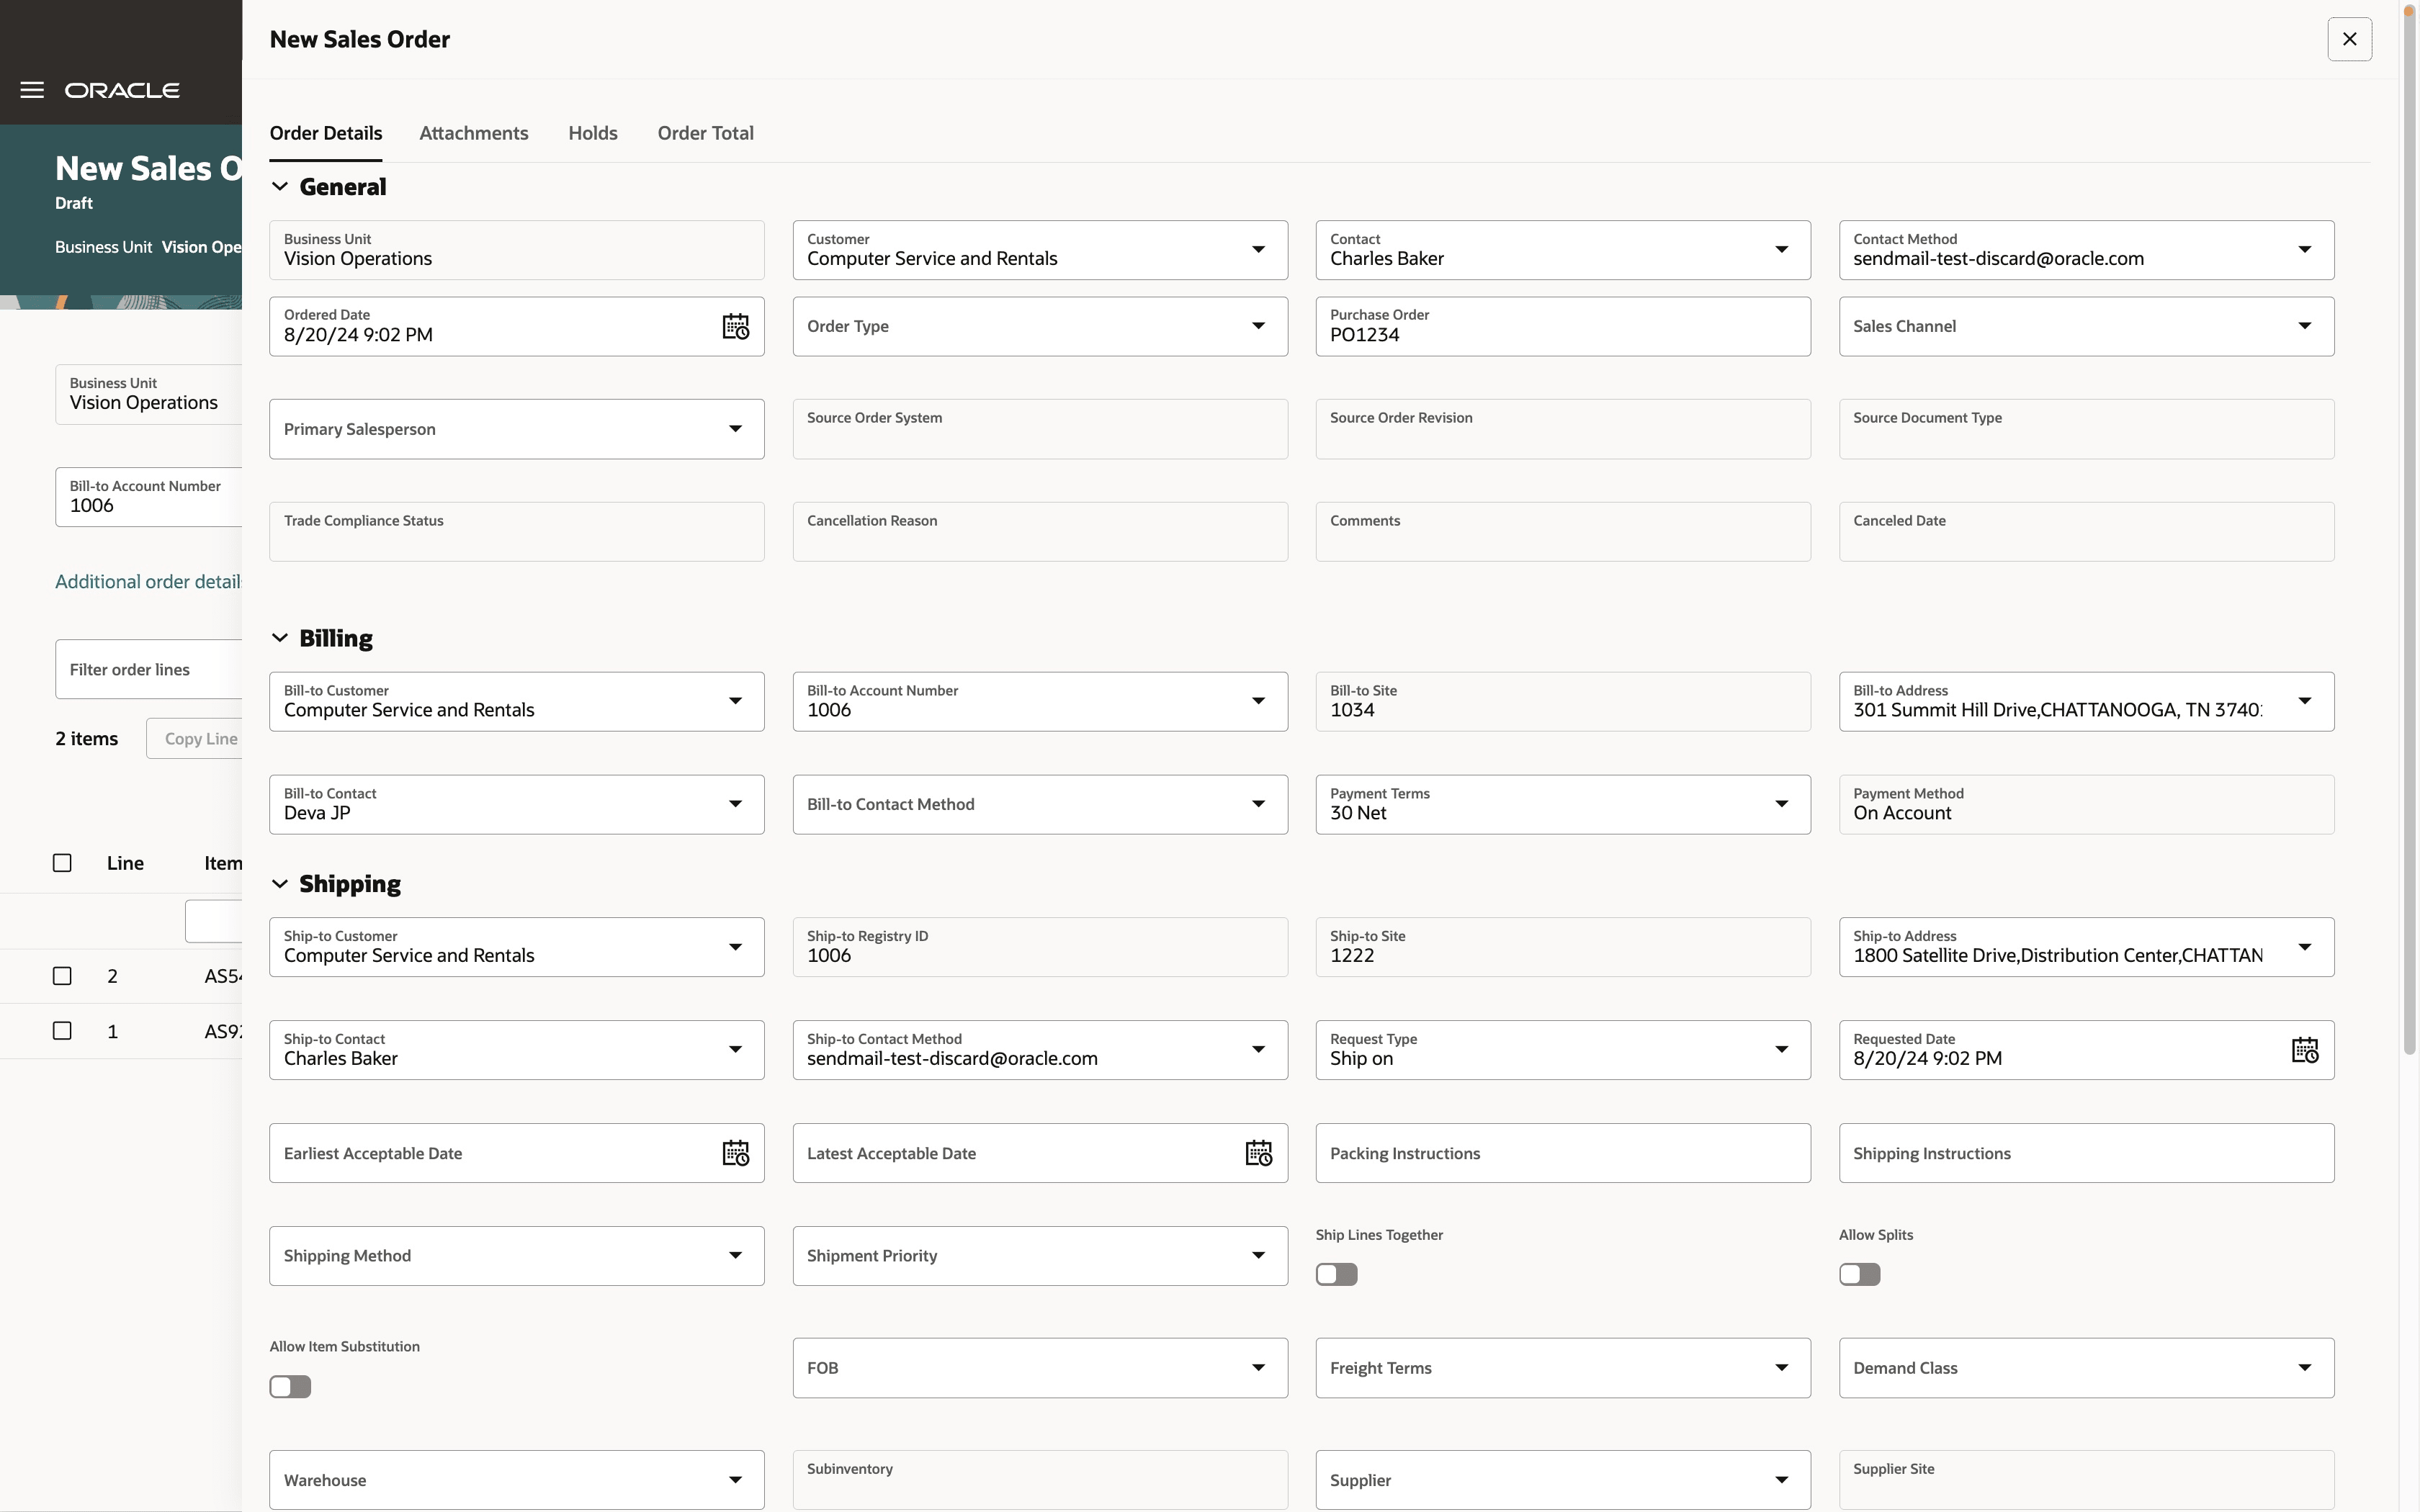
Click Additional Order Details to get the full picture:
Cascade Attribute Values
Use the new Cascade Order Header Values to Order Lines order management parameter to specify how you want Order Management to cascade values that you change on the order header to the order line when you save the order.
Charge Breakdown and Manual Price Adjustments
- Click the link in the amount column to get the charge breakdown and to add a manual price adjustment.
- You can now use the Default Adjustment Reason (ORA_FOM_DEFAULT_ADJ_REASON) profile to set the default value for the Adjustment Reason code.
- Use the Show Margin in Price Breakdown (ORA_FOM_SHOW_MARGIN) profile to view margins in the price breakdown.
Attachments
Continue to attach documents and URLs on the order header or order line. You'll need to put a text note into a document first, and then attach the document.
Approvals
You can now see the entire history for each approval.
Copy Sales Orders and Order Lines
Here's what's new:
- Copy an entire sales order even while you're still editing it.
- Copy attachments and extensible flexfields on order lines.
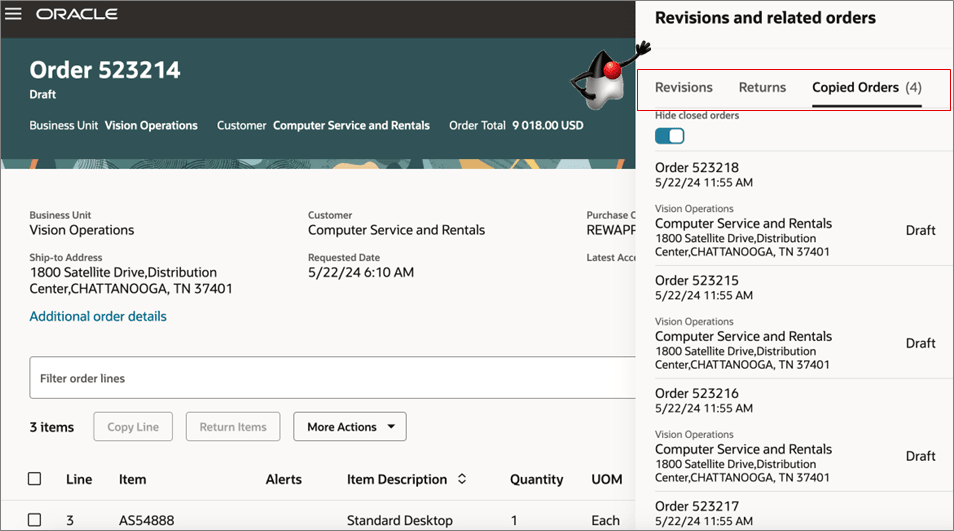
Copy a sales order, and then click Actions > View Revisions and Related Orders on the original order to see a reference to that order. Notice that the Revisions and Related Orders dialog in this example has three copied orders:
Customer Relationships
- Select data only for related customers. In earlier releases, you could select data for a single customer or for all customers, but not only for related customers.
- Control how Order Management displays customer details on sales orders, such as ship-to address, bill-to address, contacts, and payment terms.
Dual Units of Measure
You can now enter the secondary quantity on the order line when you have an item that uses dual units of measure. Enter the secondary quantity, and Order Management will use the UOM conversions that you have set up for the item to convert the ordered quantity from the secondary quantity, and will do it in the unit of measure that's on the line. Order Management sets the default value for the secondary unit of measure from the item. You can't override this value on the sales order.
Fulfillment Details
You no longer have to go to a separate page to get fulfillment details. Get them directly from the order line by clicking the Fulfillment details link:
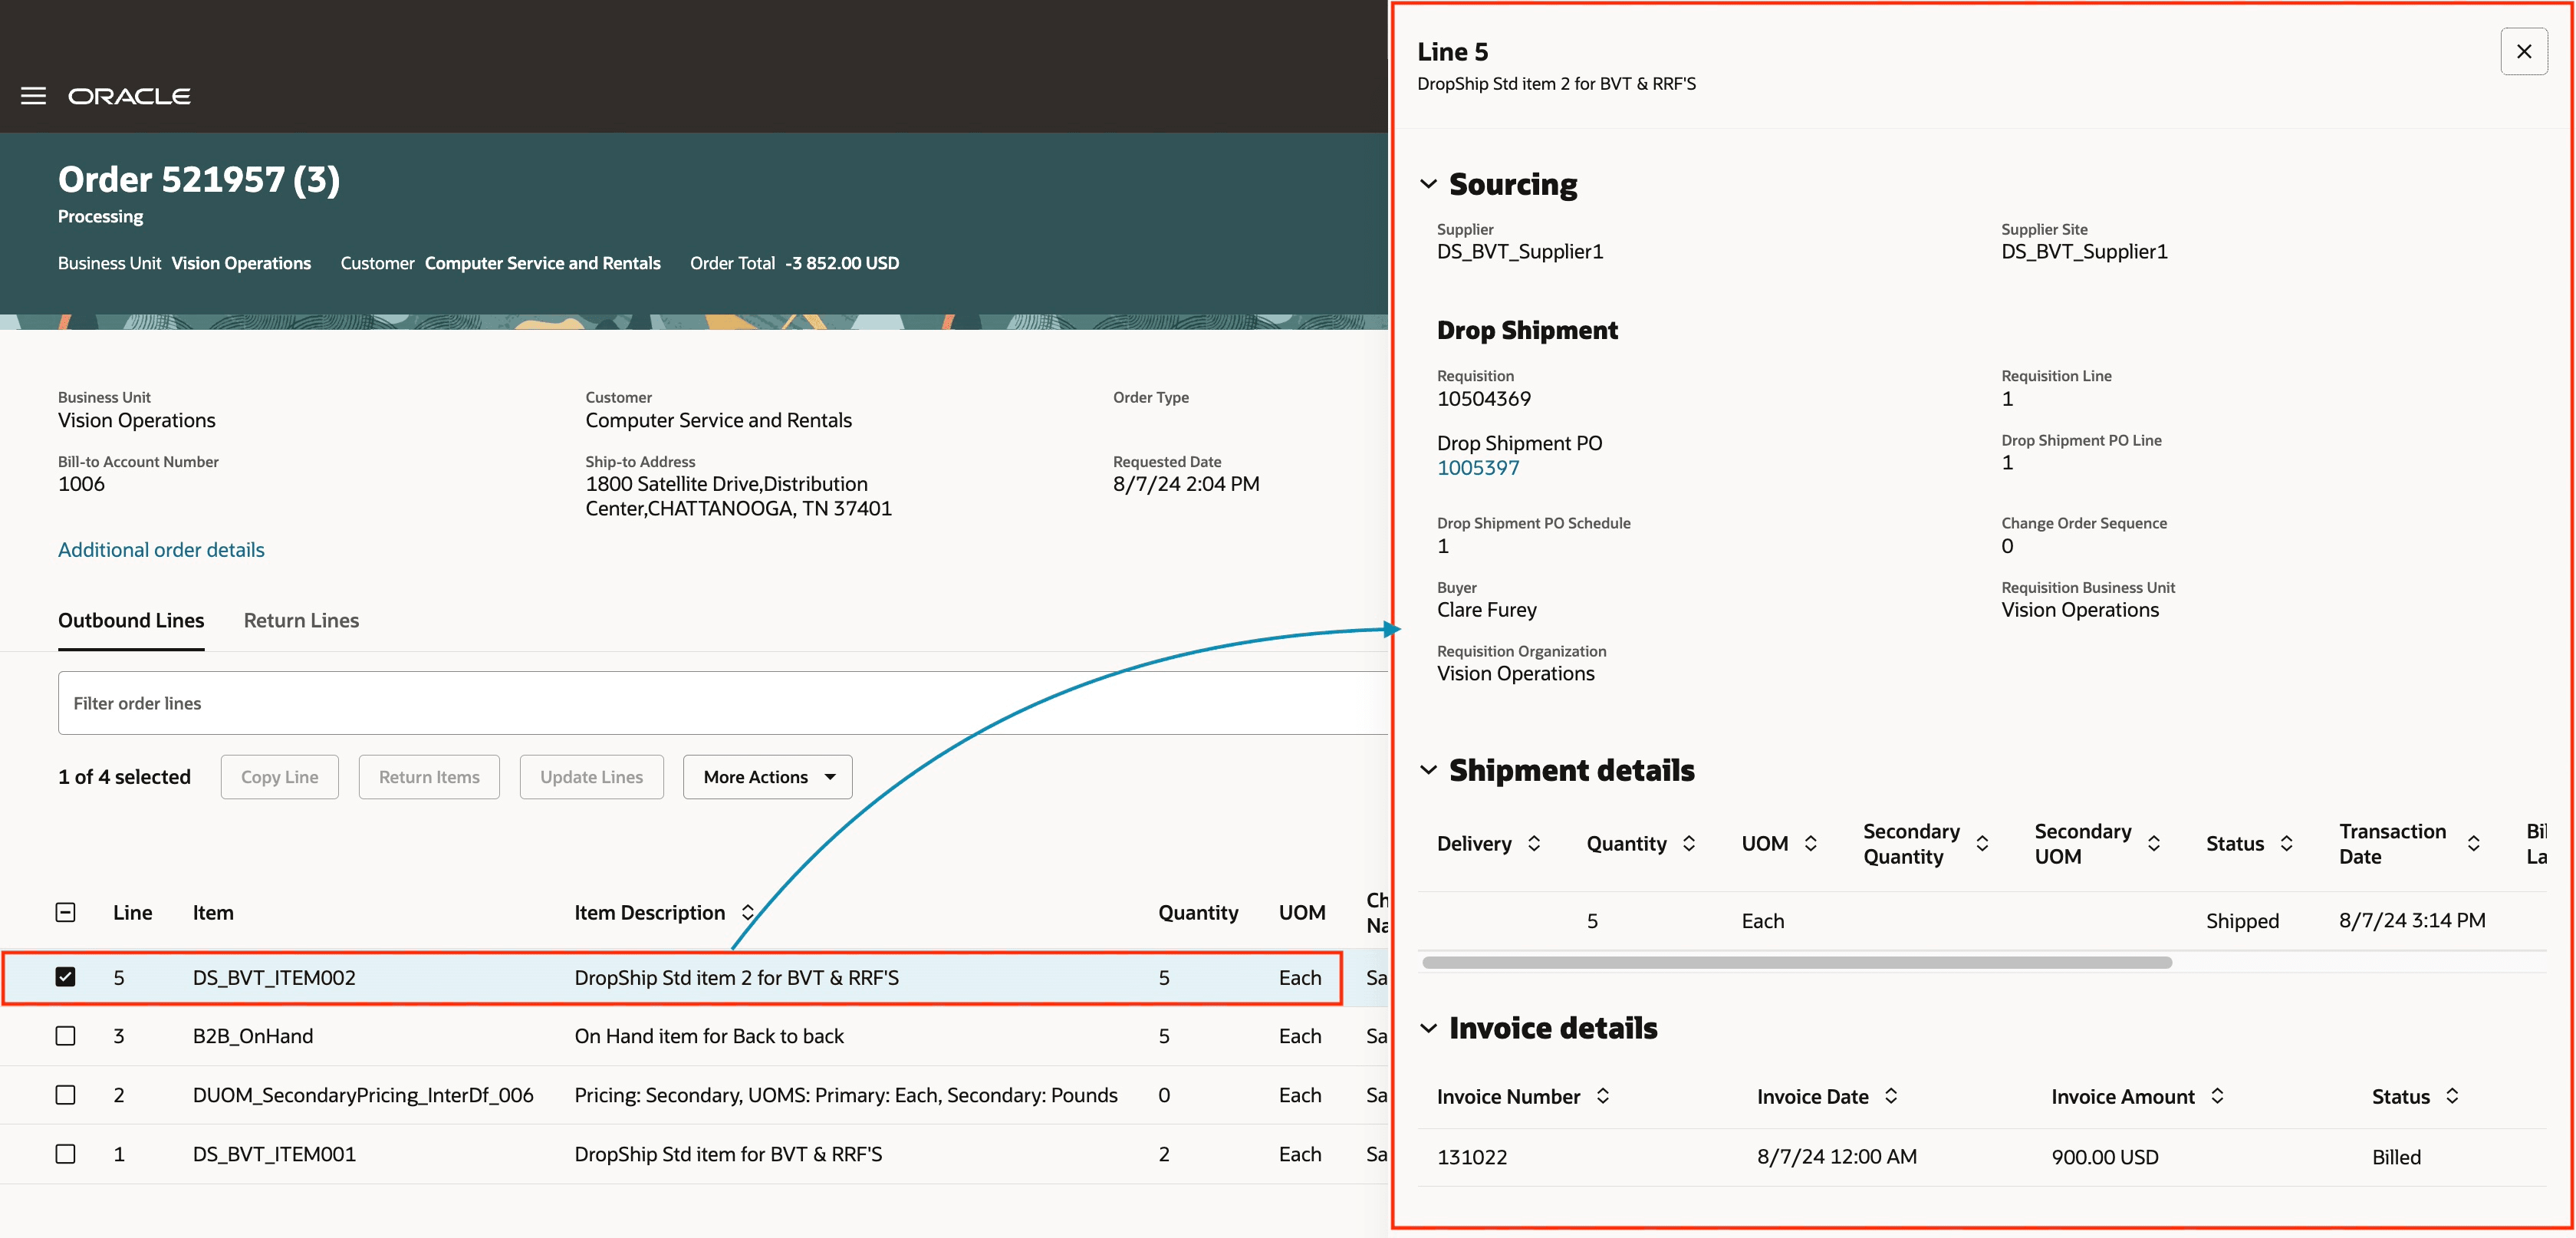
Get fulfillment details about:
- Sourcing rules
- Back-to-back flows
- Shipments
- Shipment costs
- Drop shipments
- Lot and serial details
- Quantity canceled from shipping
- Invoices
- Receipts
- Trade compliance
You can also use this dialog when you search for sales orders.
Return an Order
You can use the Return Lines tab to quickly toggle between outbound lines and return lines. If there are no return lines on the order, but you would like to add an unreferenced return, click Actions > Enable Returns:
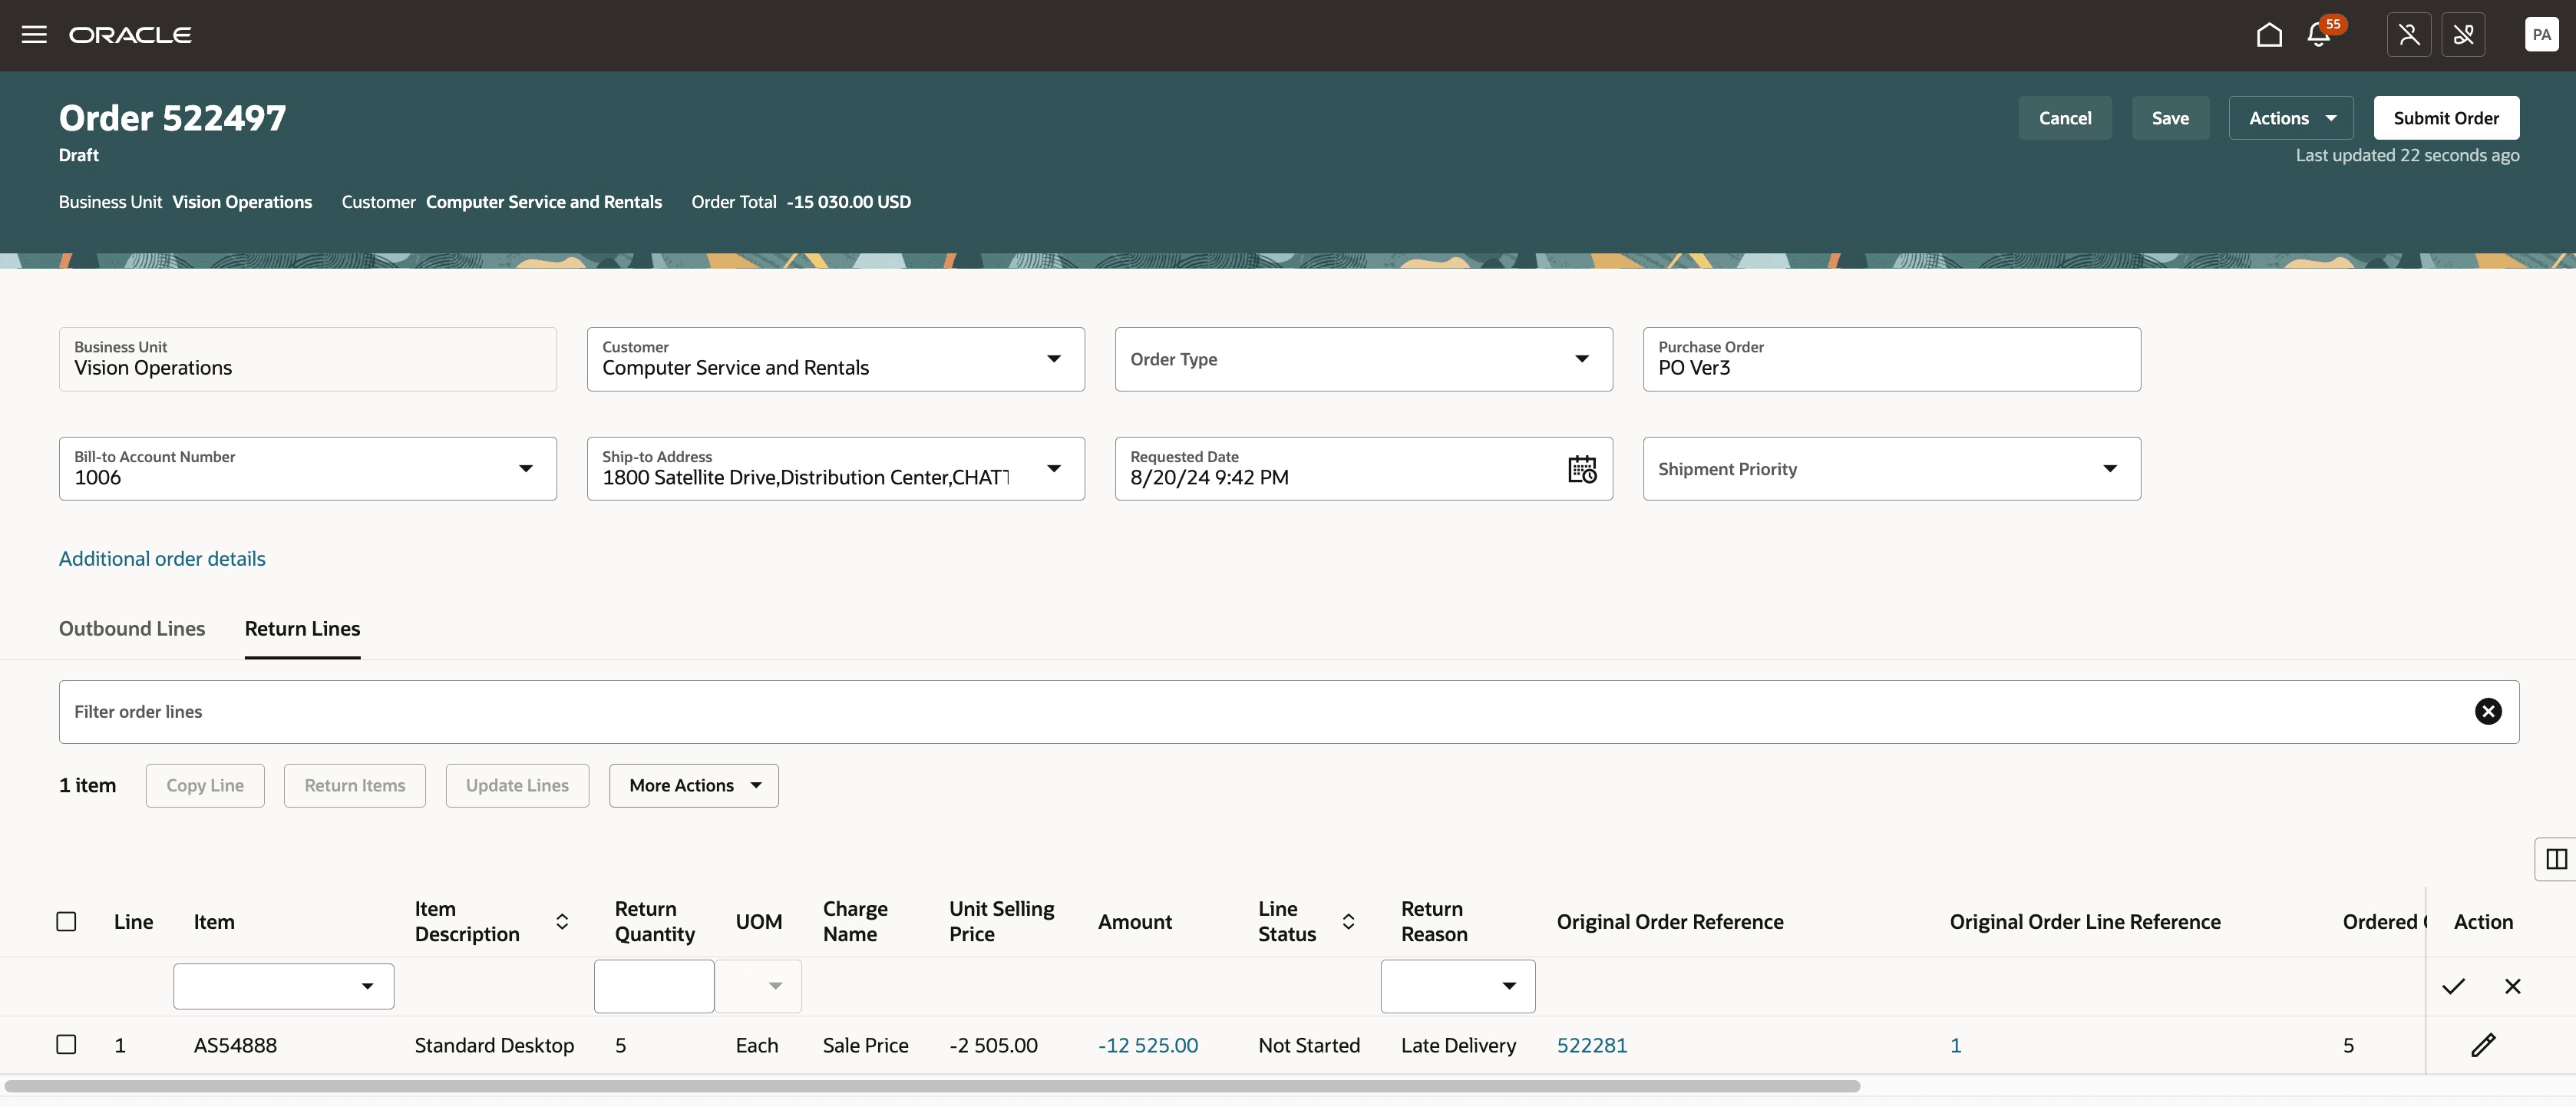
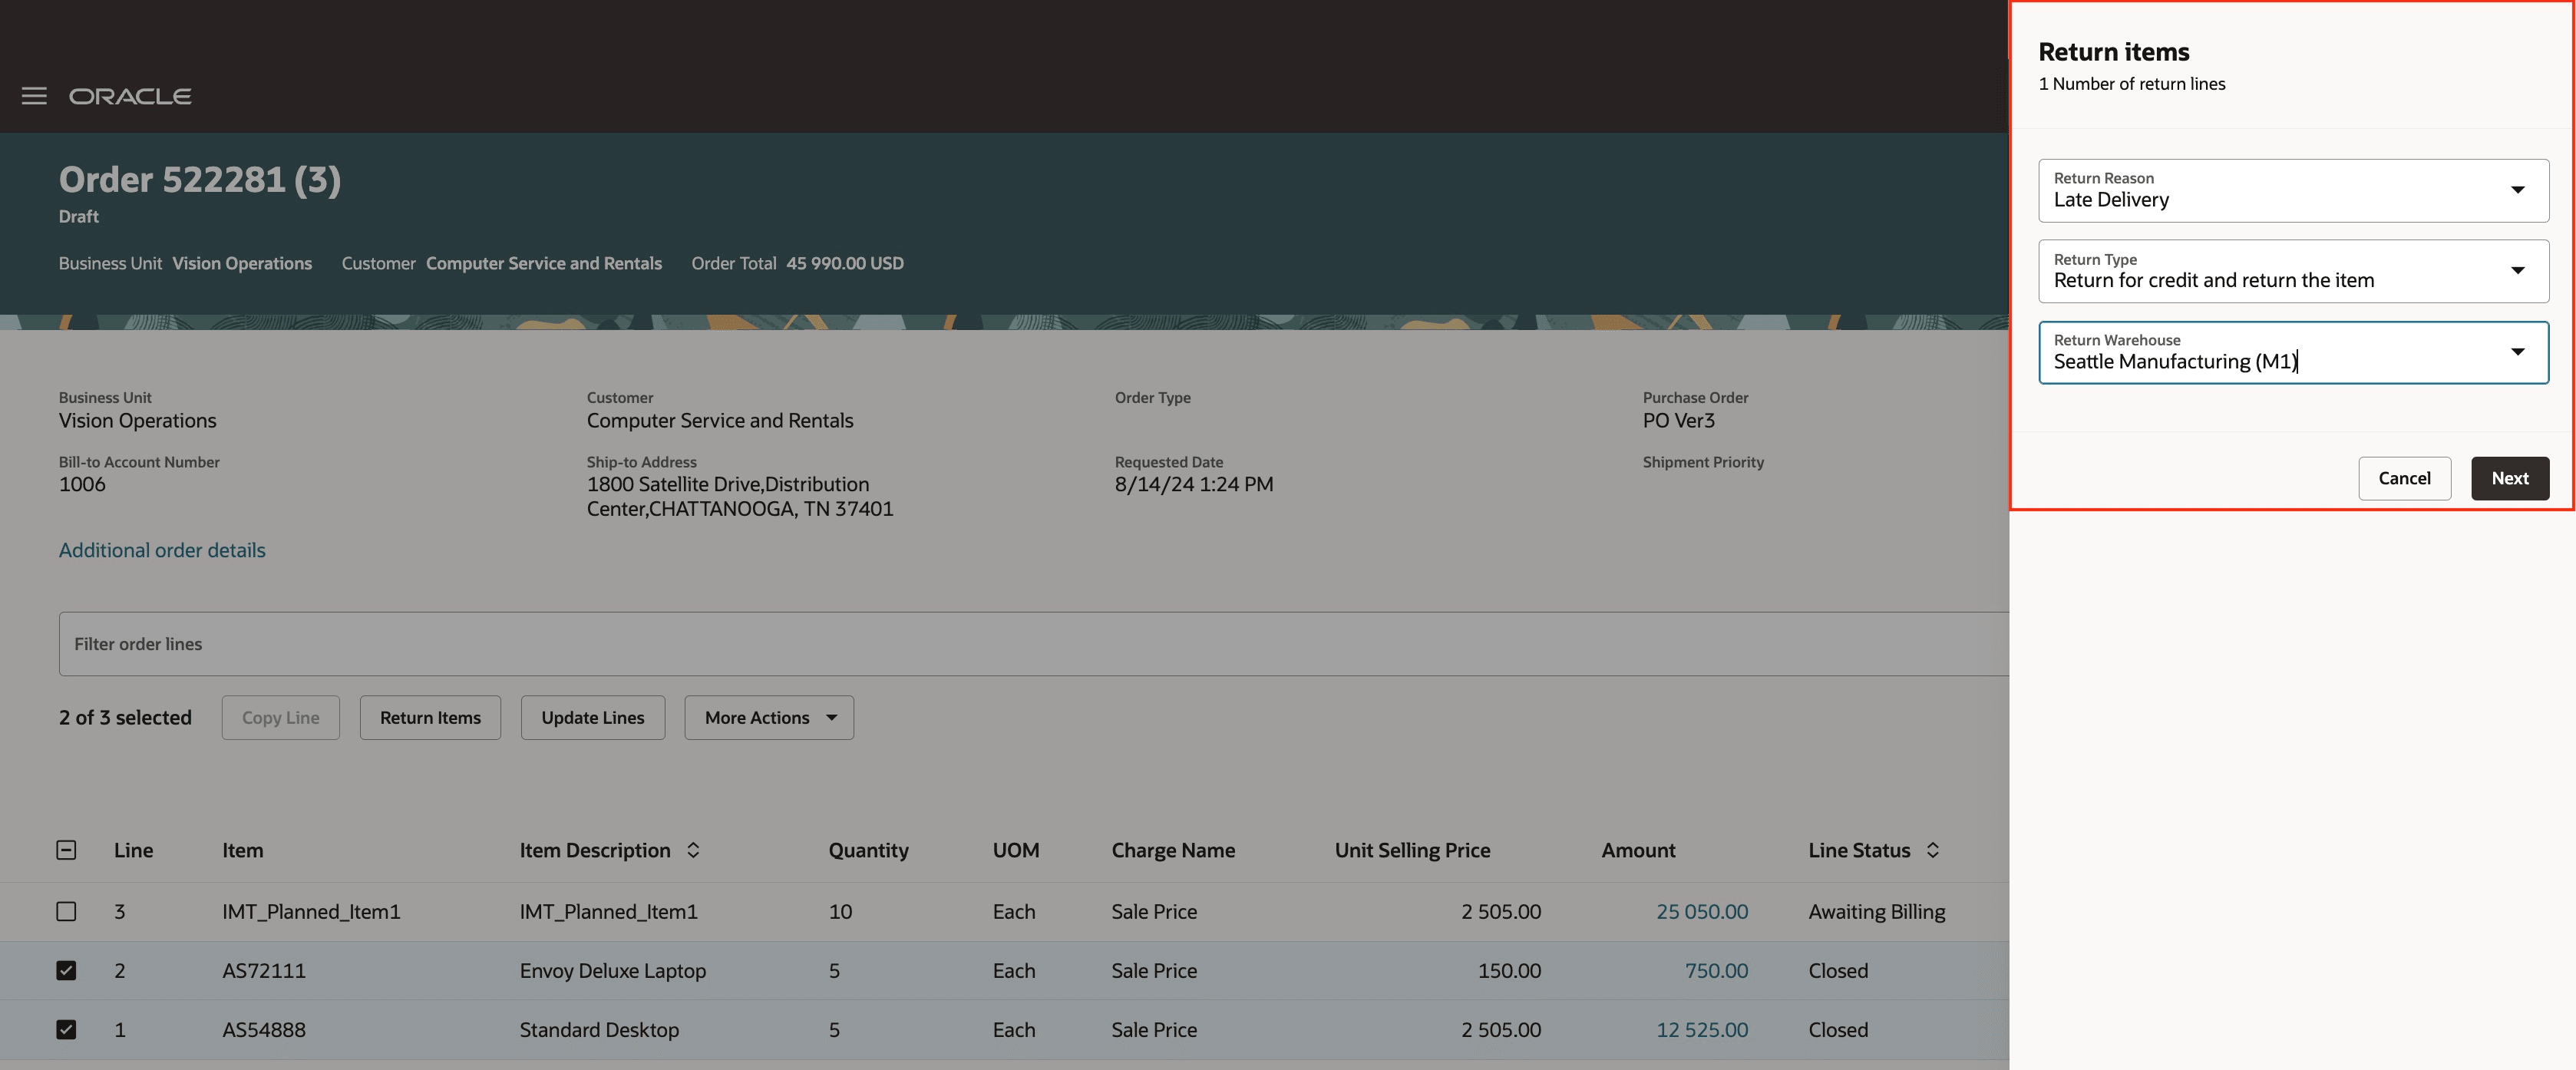
If you create a referenced return, then Order Management displays a dialog that you can use to set the return reason, return type, and return warehouse for all of the order lines that you selected:
Revise an Order
Here's a summary of what's new:
- Select more than one line and cancel them with a single action.
- Click Actions > Cancel Order on the order header to cancel the remaining open lines.
- Specify a revision reason and provide comments for the entire sales order or on each order line before you submit the revision. This behavior comes predefined as optional but you can create a business rule in Visual Builder Studio that makes it required before you can submit. The values in the Revision Reason attribute come from the ORA_FOM_REVISION_REASON lookup code. You can add your own values to that lookup to meet your specific needs.
- Add up to 4,000 characters in the comment. If you create more than one revision, then the revision reason and comments include only the reason and comments that you added during the most recent revision. You can't retrieve reasons and comments from earlier revisions.
- Order Management doesn't automatically cascade reasons and comments from the order header to order lines. If you need them on the lines, you must add them directly on the lines.
- If another user is revising an order that's in Draft status, and if you open that order in Processing status, then Order Management displays a message to let you know someone is editing it.
Try it:
- Search for a sales order that's in Processing status, then click Create Revision.
- Click Additional Order Information.
- Specify the revision reason and comments.
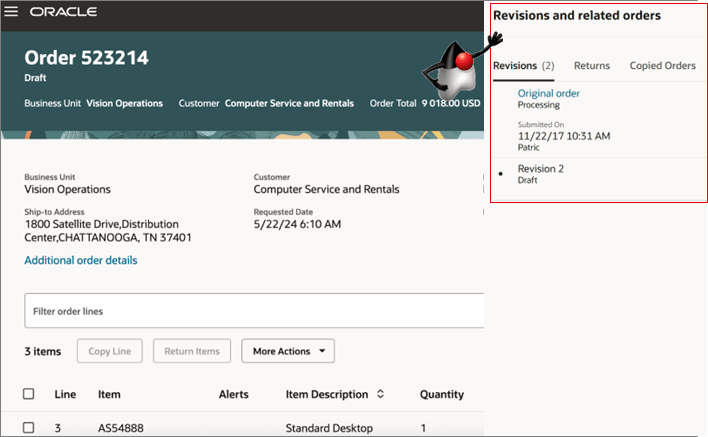
You can now see all your revisions side-by-side with the sales order. Click More Actions > View Revisions and Related Orders:
image
The dot indicates the version that the page is currently displaying.
Apply, Release, and Manage Holds
You can now select more than one line and then apply or release a hold on all of the lines that you selected. If there's a hold on the header or line, then you will see a banner at the top of that page that has some detail about the hold:
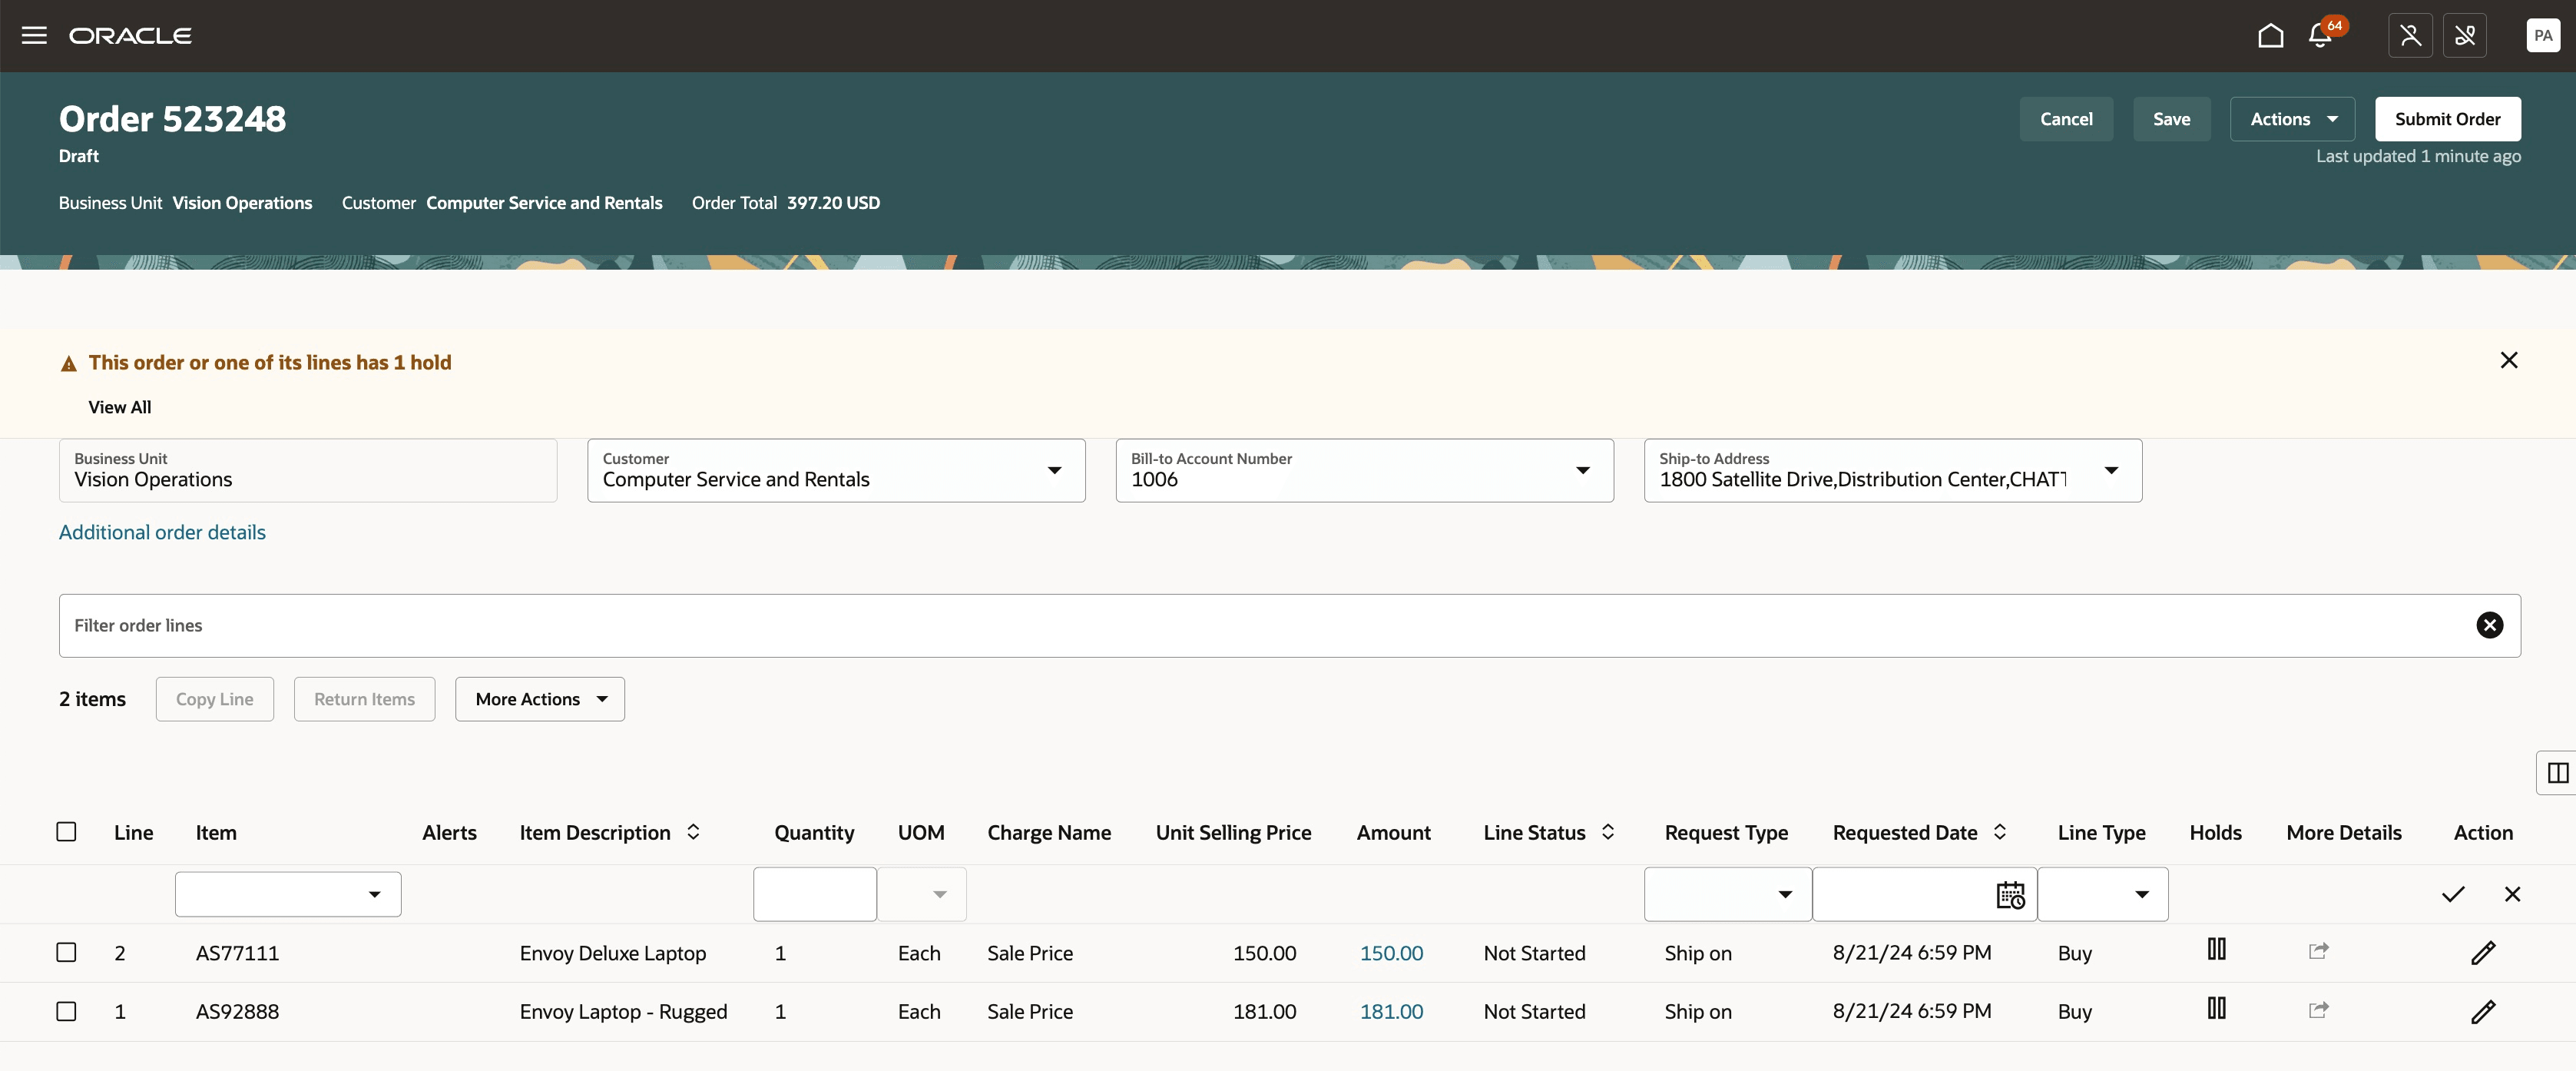
Click View All on the banner to get details about the holds:
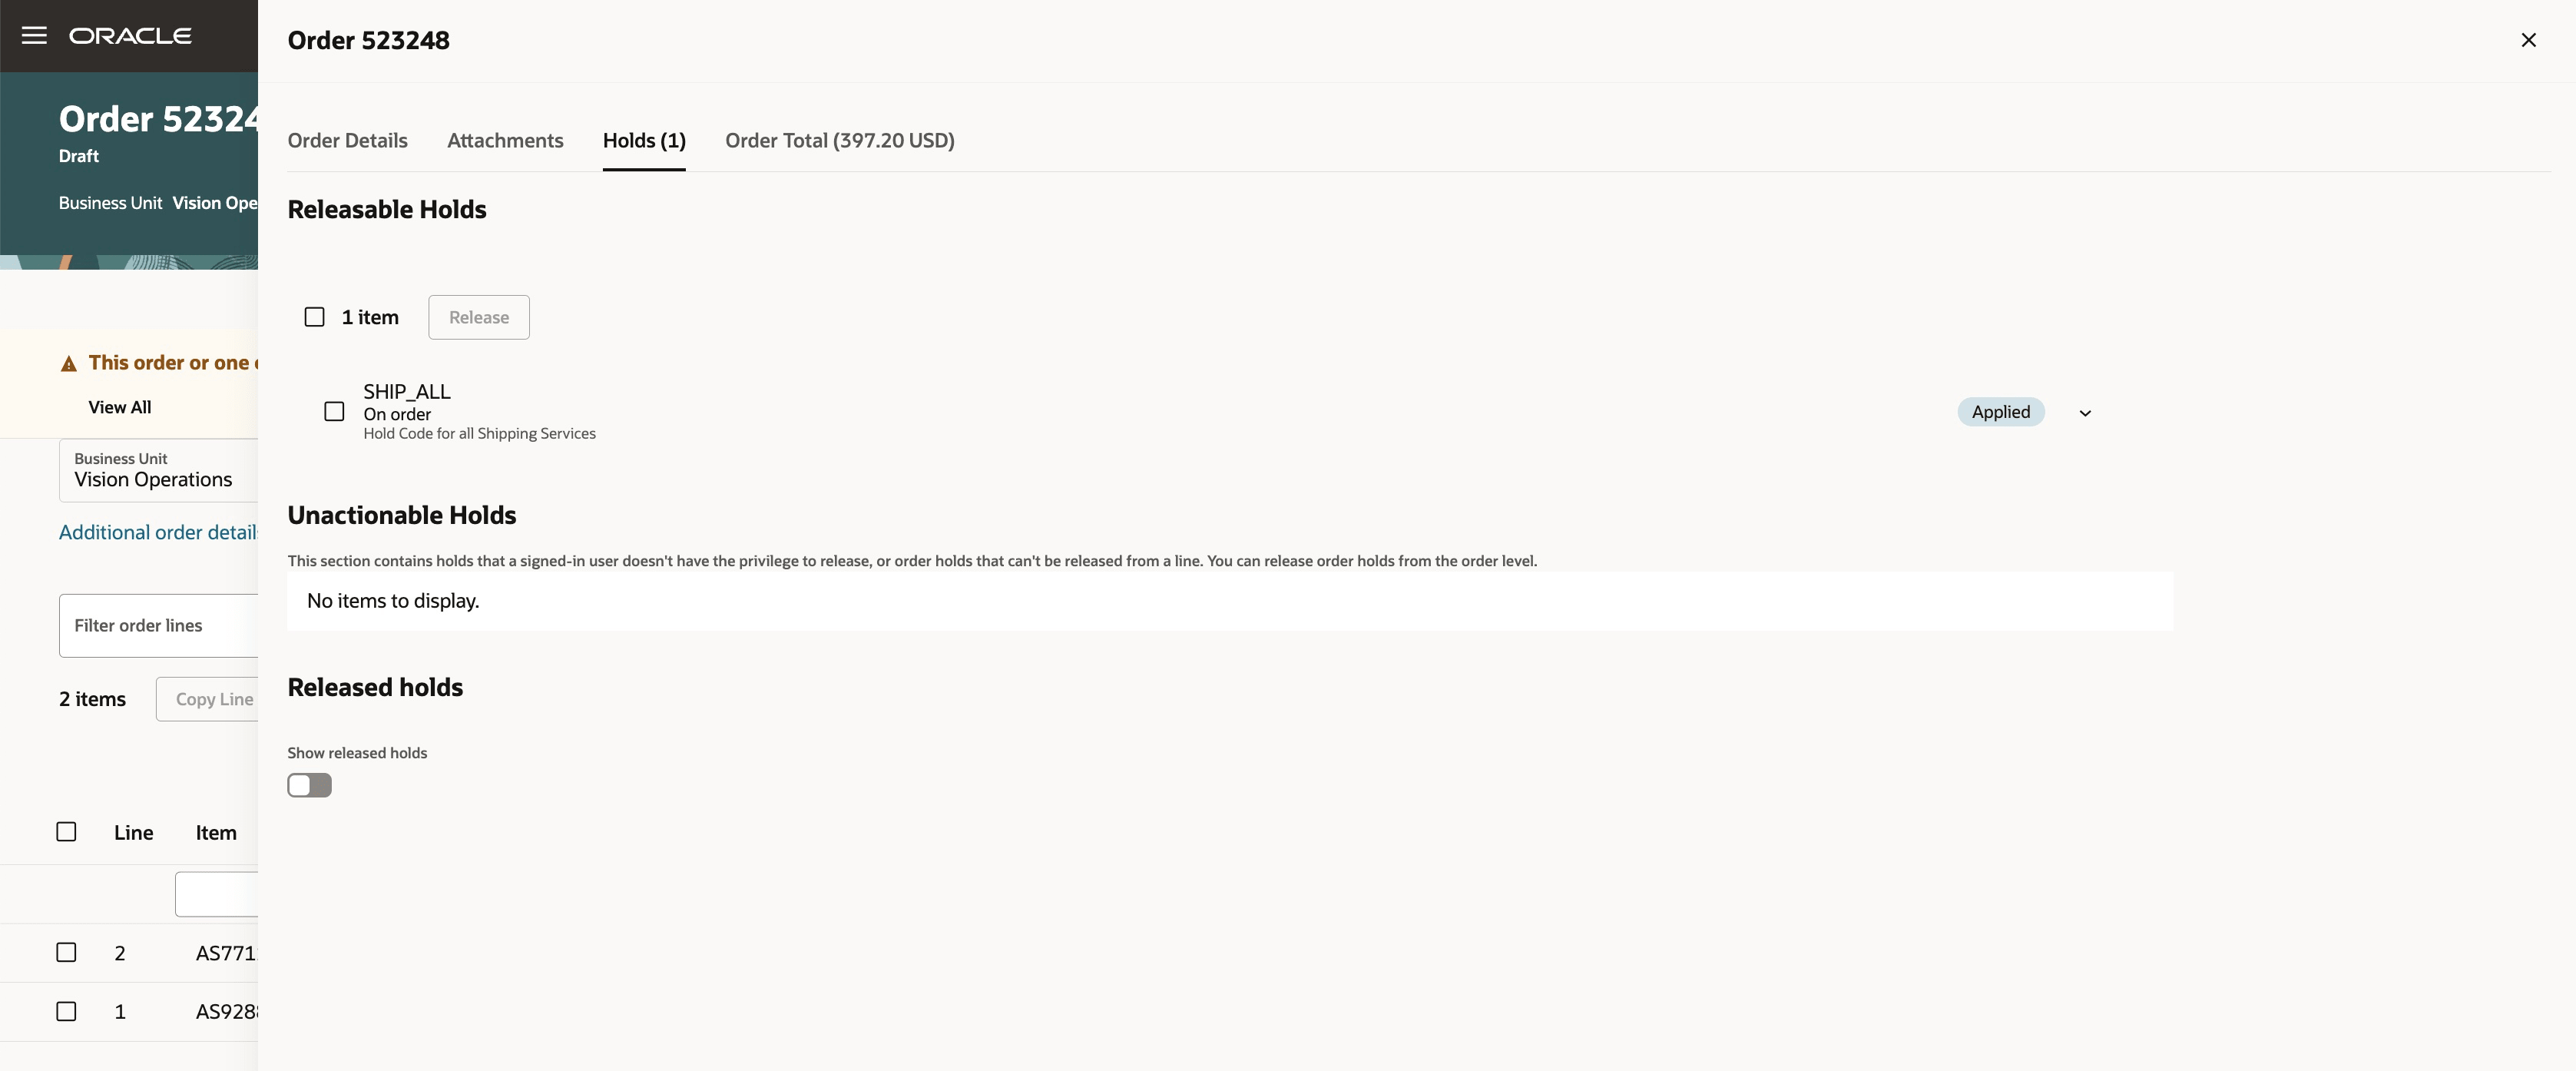
The type means:
| Type of Hold | Description |
|---|---|
|
Releasable |
Holds that you can release. To release a hold, select it in the dialog then click Release. You can also go back to the Order page, select one or more lines, then click More Actions > Release Hold. |
|
Unactionable |
System holds or holds that you can't release depending on how you set up and administer holds in Order Management. |
|
Released |
Holds that Order Management already released. |
The status means:
| Status |
Order Management Has |
|---|---|
|
Applied |
Applied the hold but is not holding at the current step in the orchestration process. |
|
Active |
Applied the hold and is holding at the current step in the orchestration process. |
|
Released |
Released the hold from the sales order. |
Use Generative AI
Use generative AI to help you automatically create text when you revise a sales order.
Summarize Your Changes
Use generative AI to help you create a comment when you revise a sales order. Consider this example where you make a change that affects the order amount. Make your change and then click AI Assist to automatically create text that summarizes what you changed:
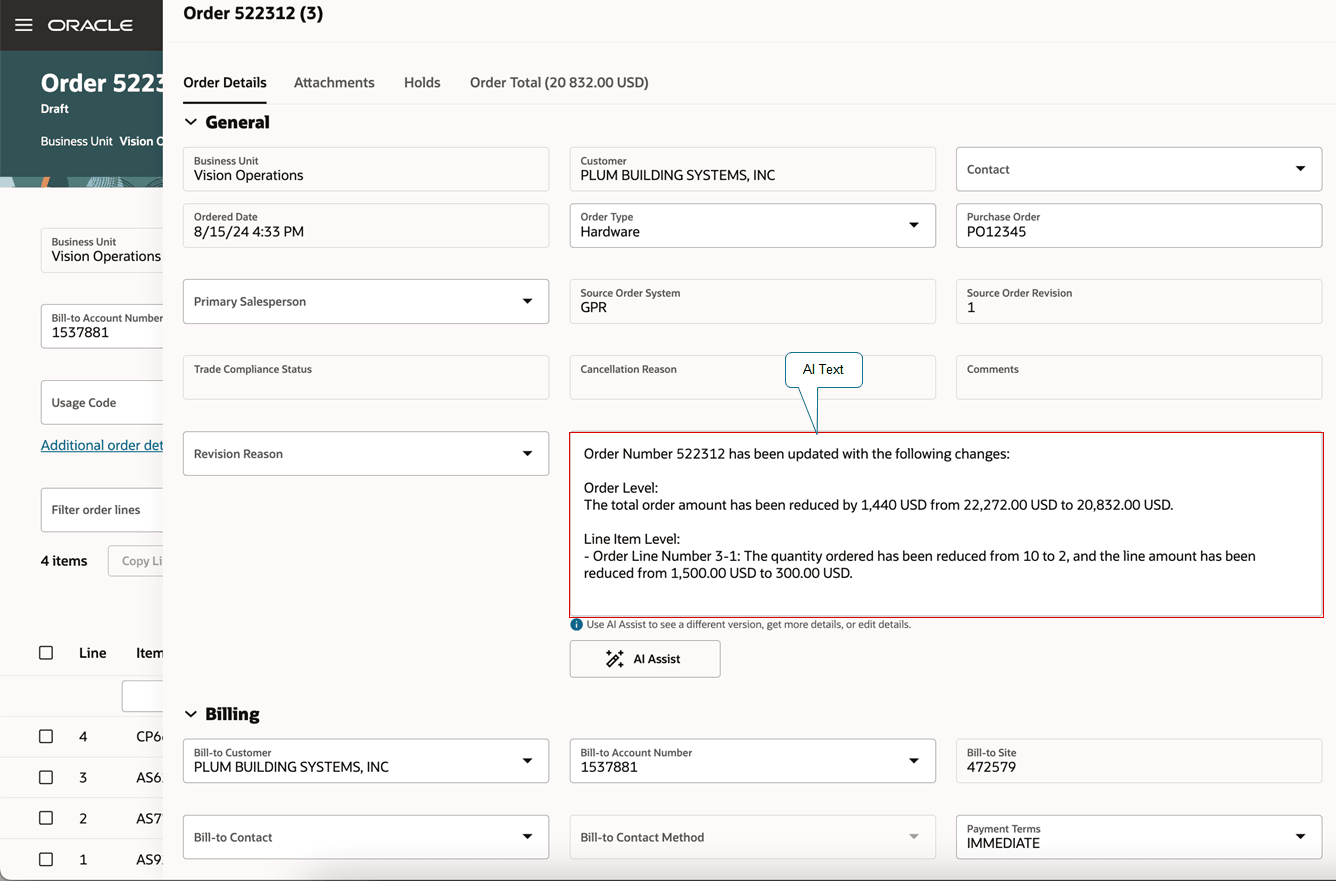
Use this feature when you create or edit a revision. Order Management will save your text when you save the revision that you're working on. Don't like the text? Click AI Assist and get a different summary.
You can create a simple business rule in Visual Builder Studio to display a dialog that you can use to select a revision and reason and add a comment:
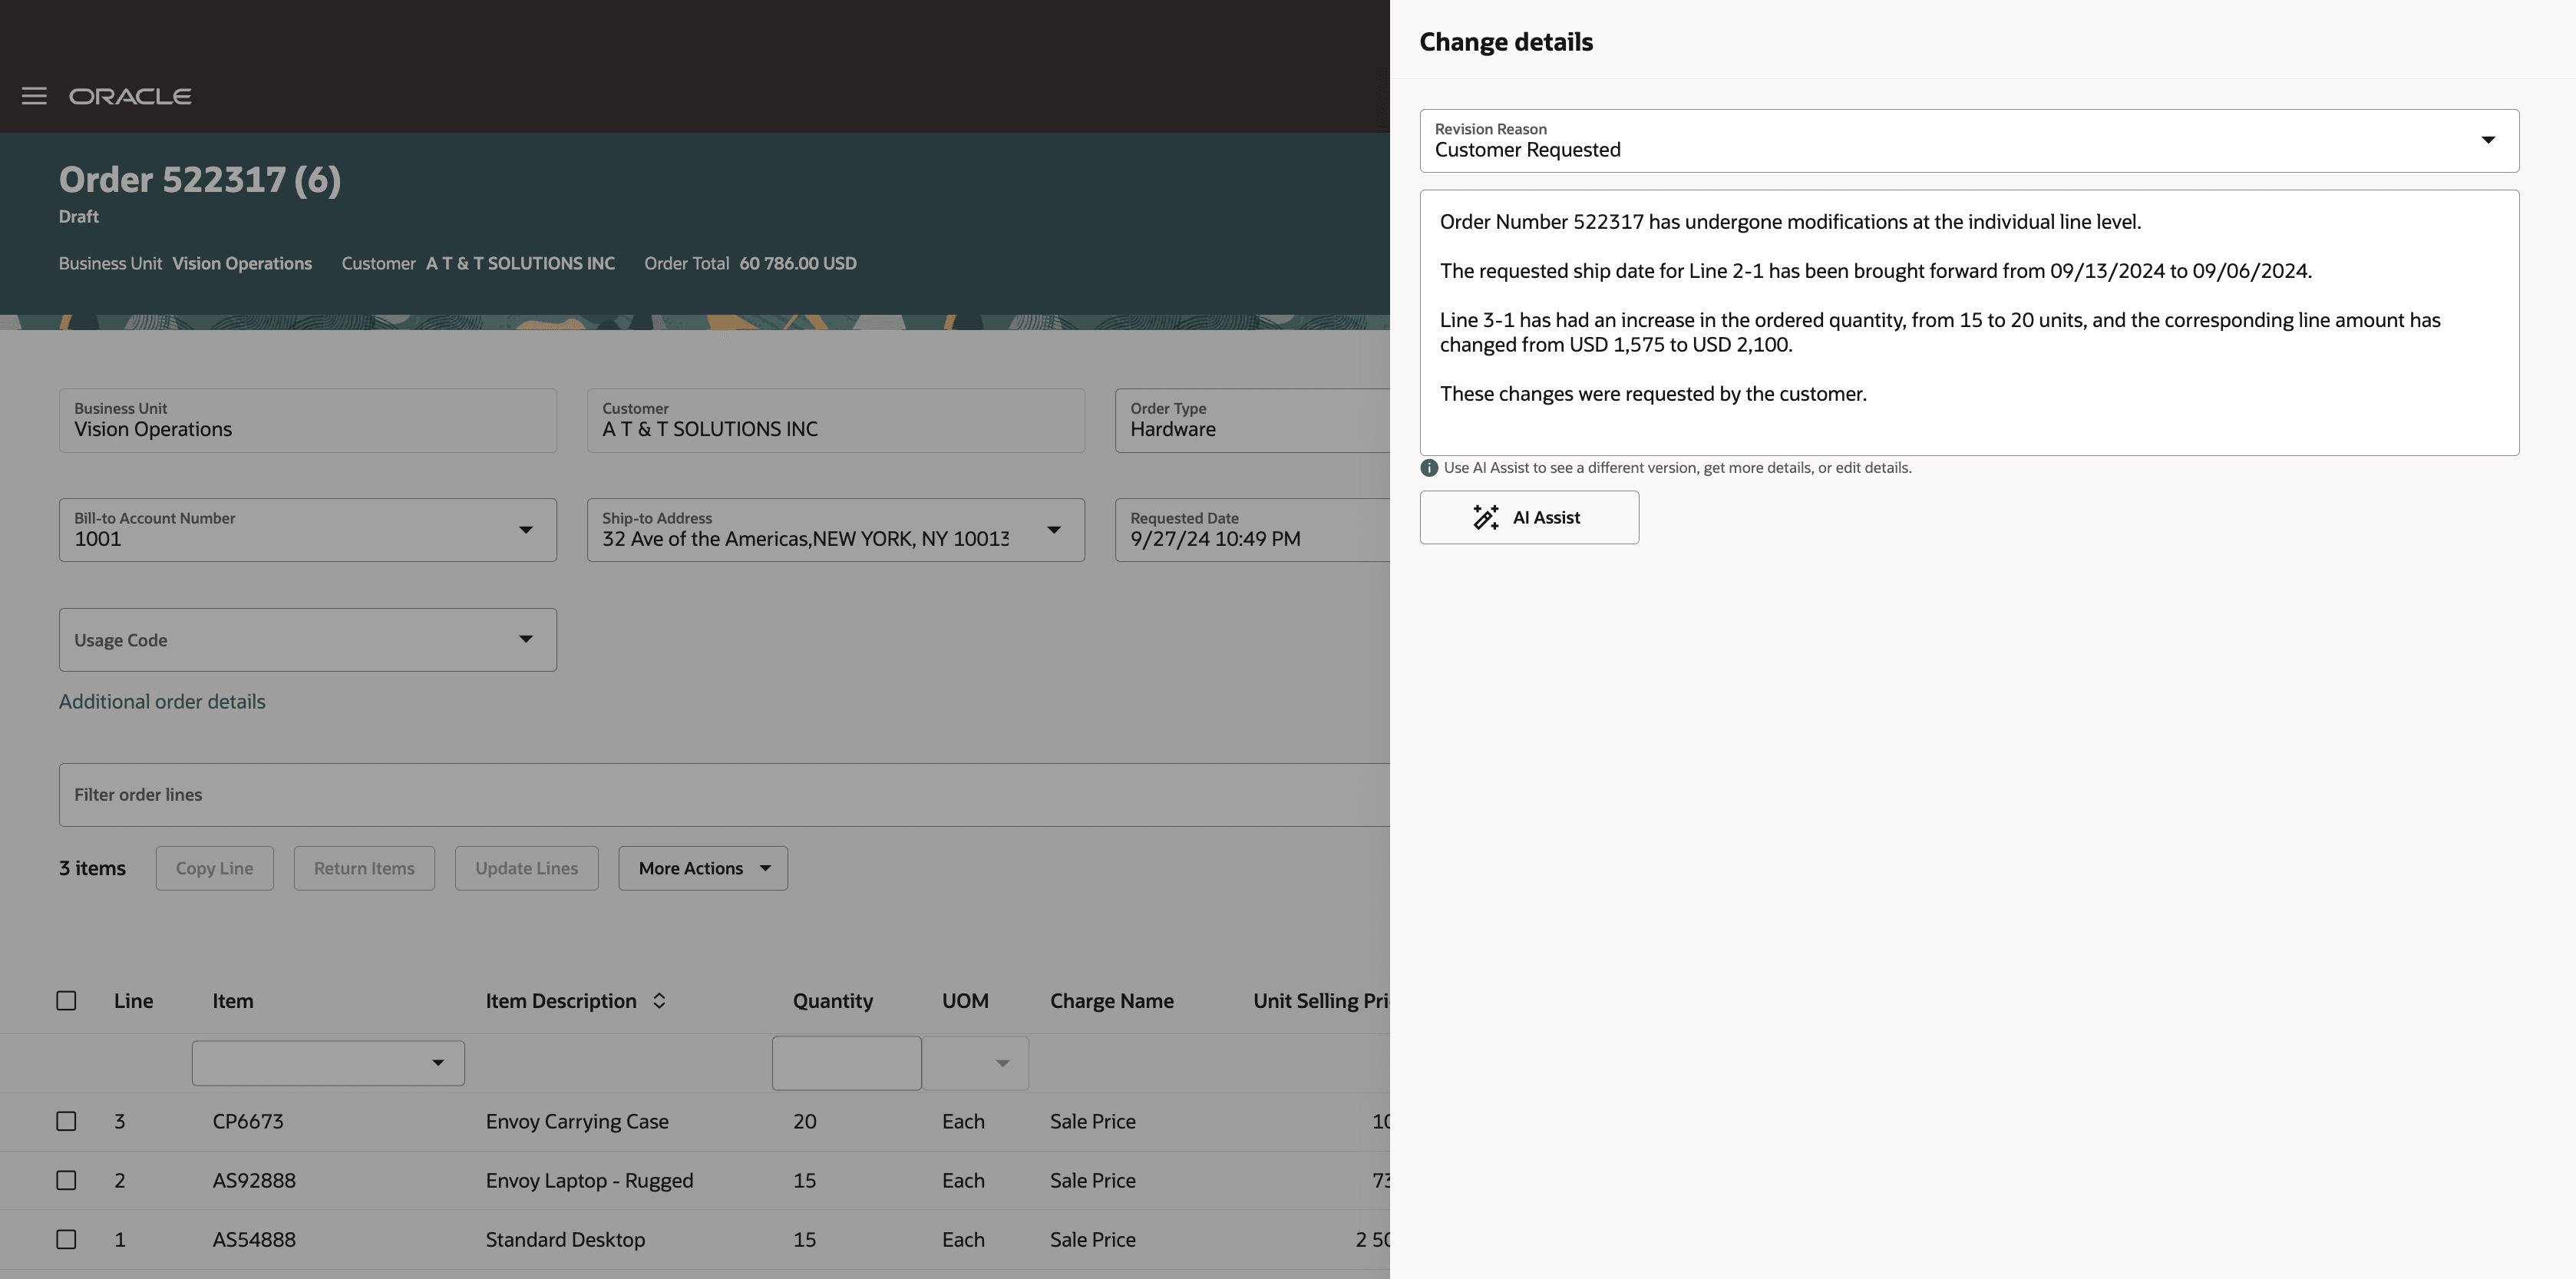
Use the rule to set the showChangeDetailsAISuggestionDrawer property to True.
Set it to True, and Order Management will display the dialog any time that you modify one of these attributes or entities:
|
Accounting Rule Added Item Allow Splits Allow Substitution AR Transaction Type Bill-to Site Cancel Item Cancel Order Comments Customer PO Demand Class Earliest Acceptable Date FOB |
Freight Term Invoicing Rule Latest Acceptable Arrival Date Latest Acceptable Date Amount Type Order Line Ordered Quantity Packing Instructions Payment Term Primary Salesperson Product Number |
Requested Arrival Date Requested Ship Date Sales Channel Shipment Method Shipment Priority Shipment Set Shipping Instructions Ship-to Site Status Supplier Supplier Site Transaction Type Warehouse |
Order Management will also display the dialog any time that you or Order Management modify one of these attributes on the order header:
- Order Total
- Comments
- Sales Channel
- Order Type
Confirm Change Orders
Notice that Order Management used generative AI to automatically create an email message that summarizes what you changed. You can send this text to your customer to confirm the change. Click Review and Email Change Order so you can edit it:
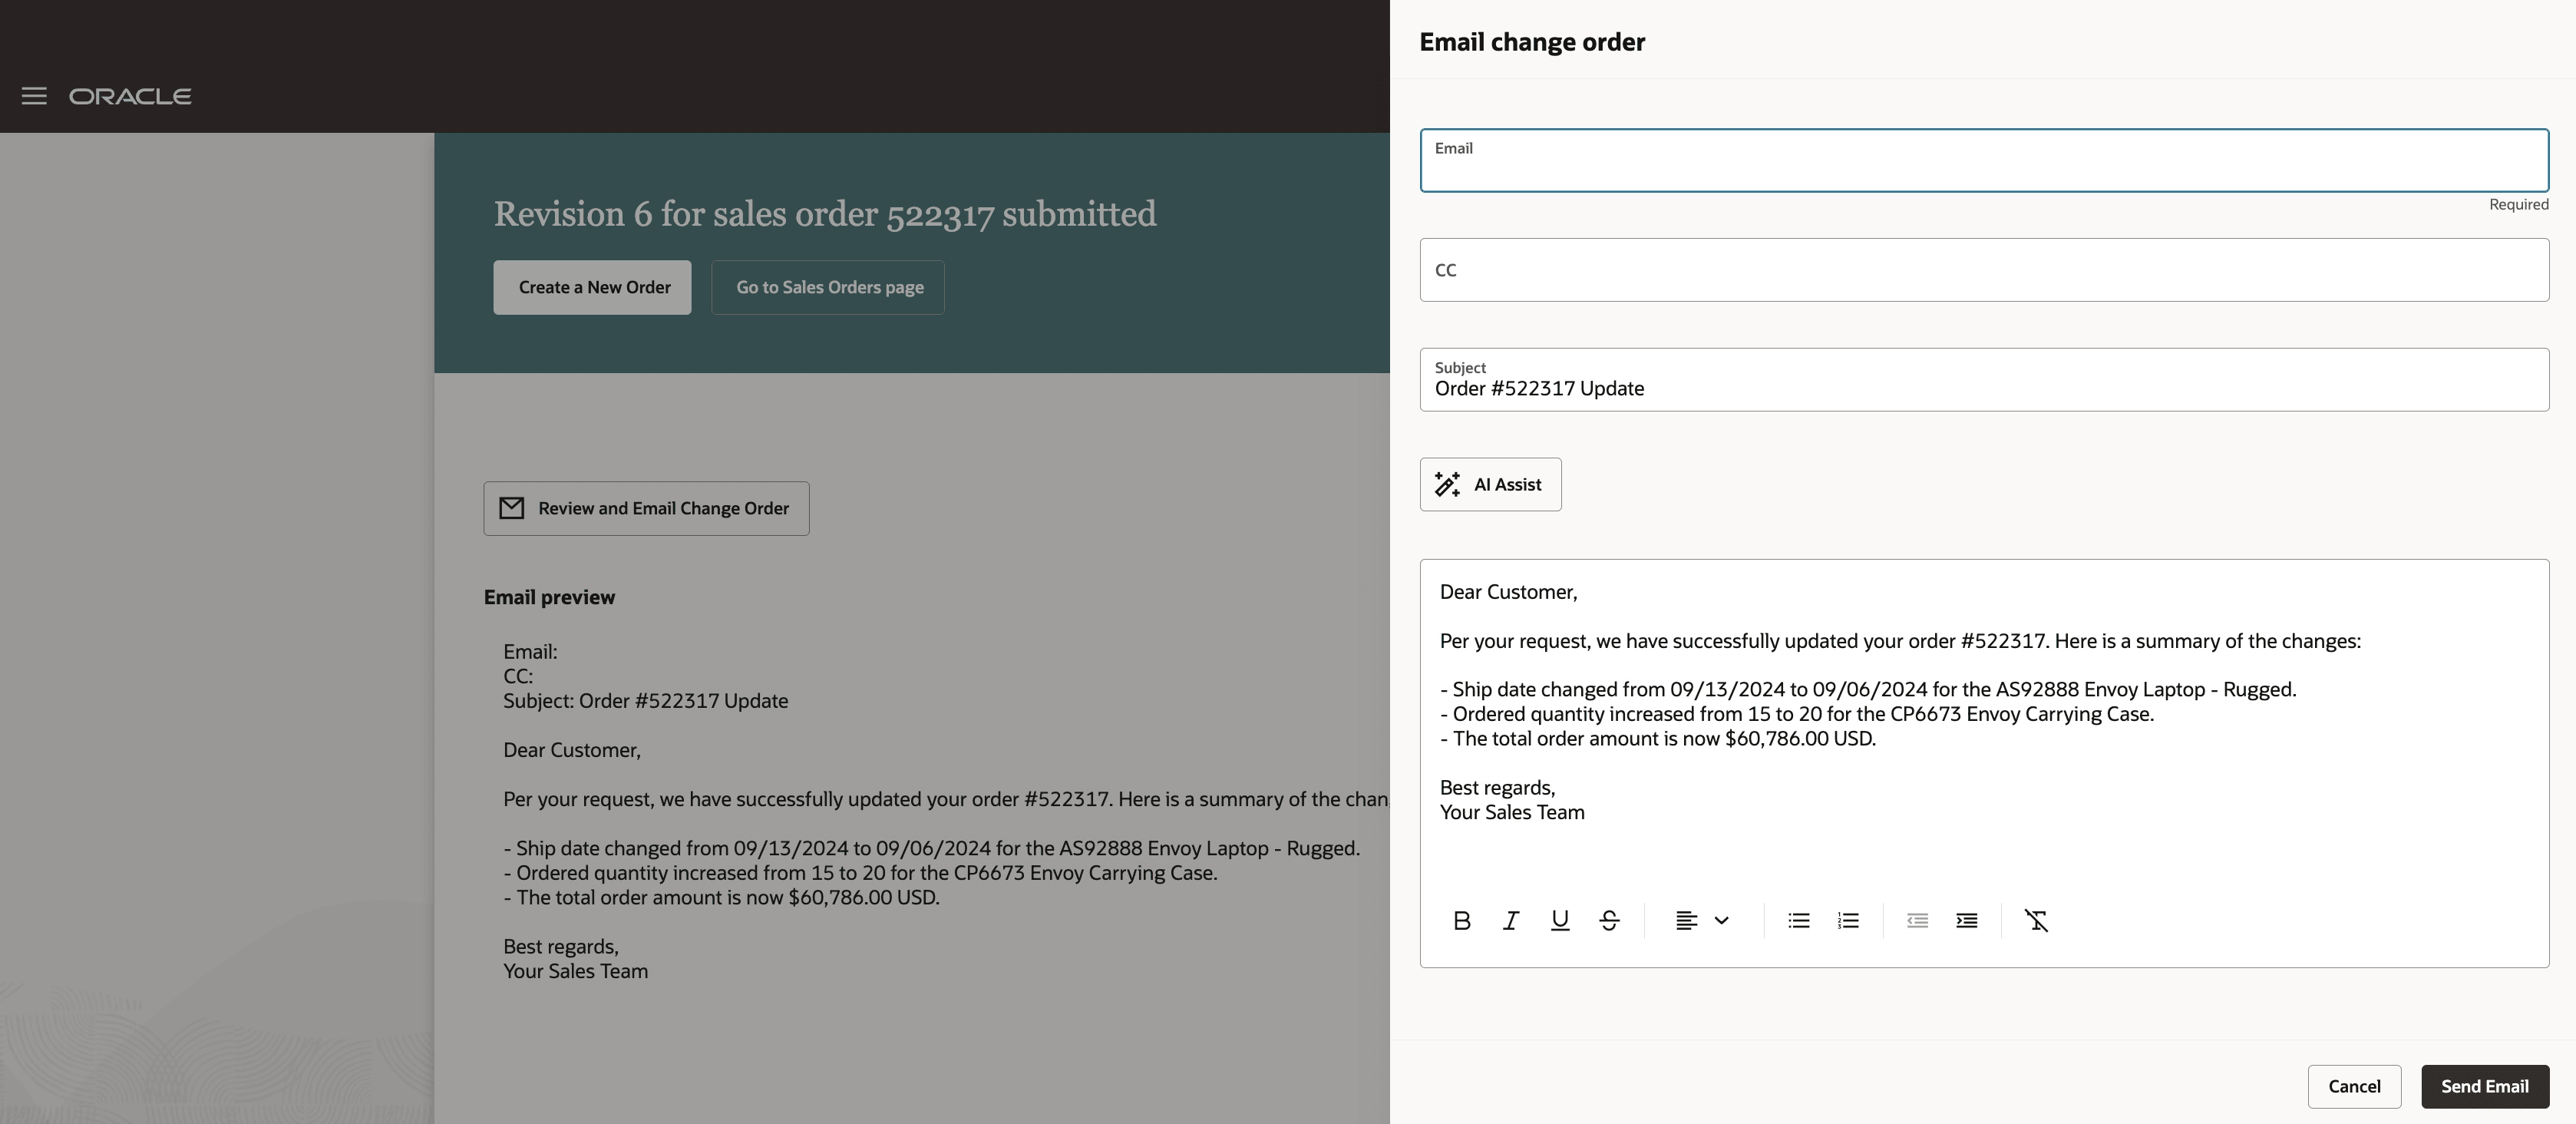
Edit the text as necessary, select a recipient in the Email attribute, such as the Bill-to Contact, then click Send Email.
You can use this feature any time you modify one of these attributes on the fulfillment line:
|
Added Item Bill-to Site Cancel Item Cancel Order Customer PO Earliest Acceptable Date |
FOB Freight Term Latest Acceptable Arrival Date Latest Acceptable Date Ordered Quantity Payment Term |
Requested Arrival Date Requested Ship Date Shipment Method Shipment Priority Shipment Set Ship-to Site |
You can also use this feature any time that you or Order Management modify one of these attributes on the order header:
- Order Total
- Order Status
- Order Type
If you want to implement this flow, use Visual Builder Studio to set the enableChangeEmailConfirmationAISuggestionPage property to True.
Confirm New Sales Orders
You can send a confirmation email right after you submit a new sales order. For example, submit your sales order, then click Review and Email Order Document:
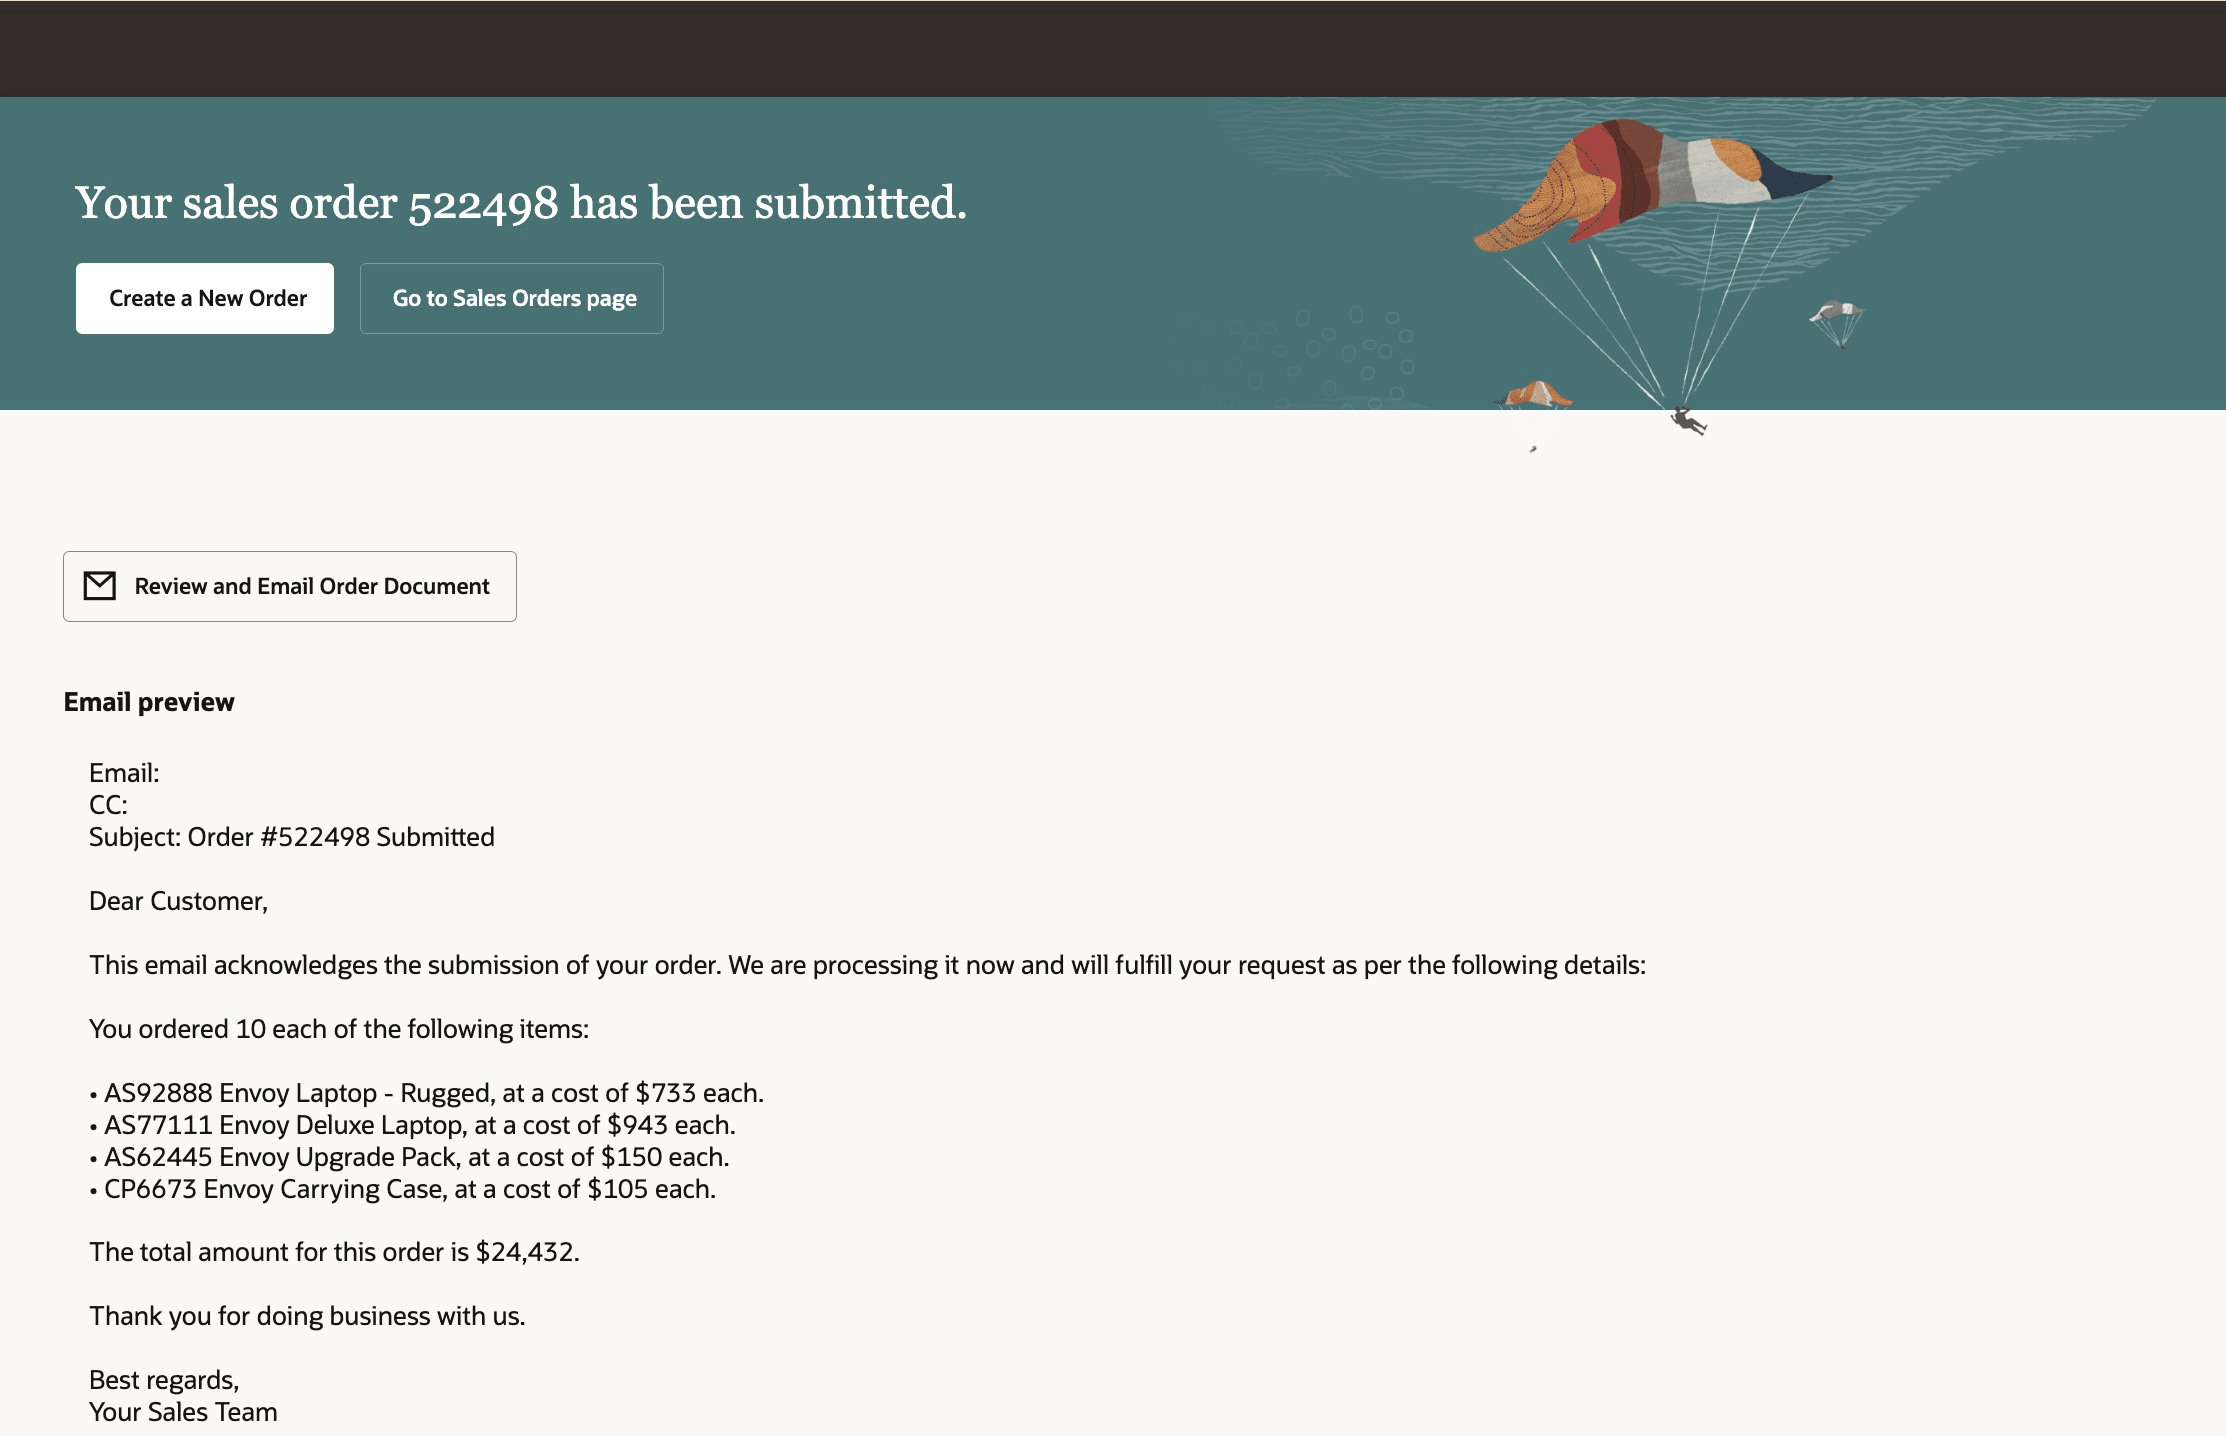
Use the Email Order Document dialog to revise and send an email to your customer:
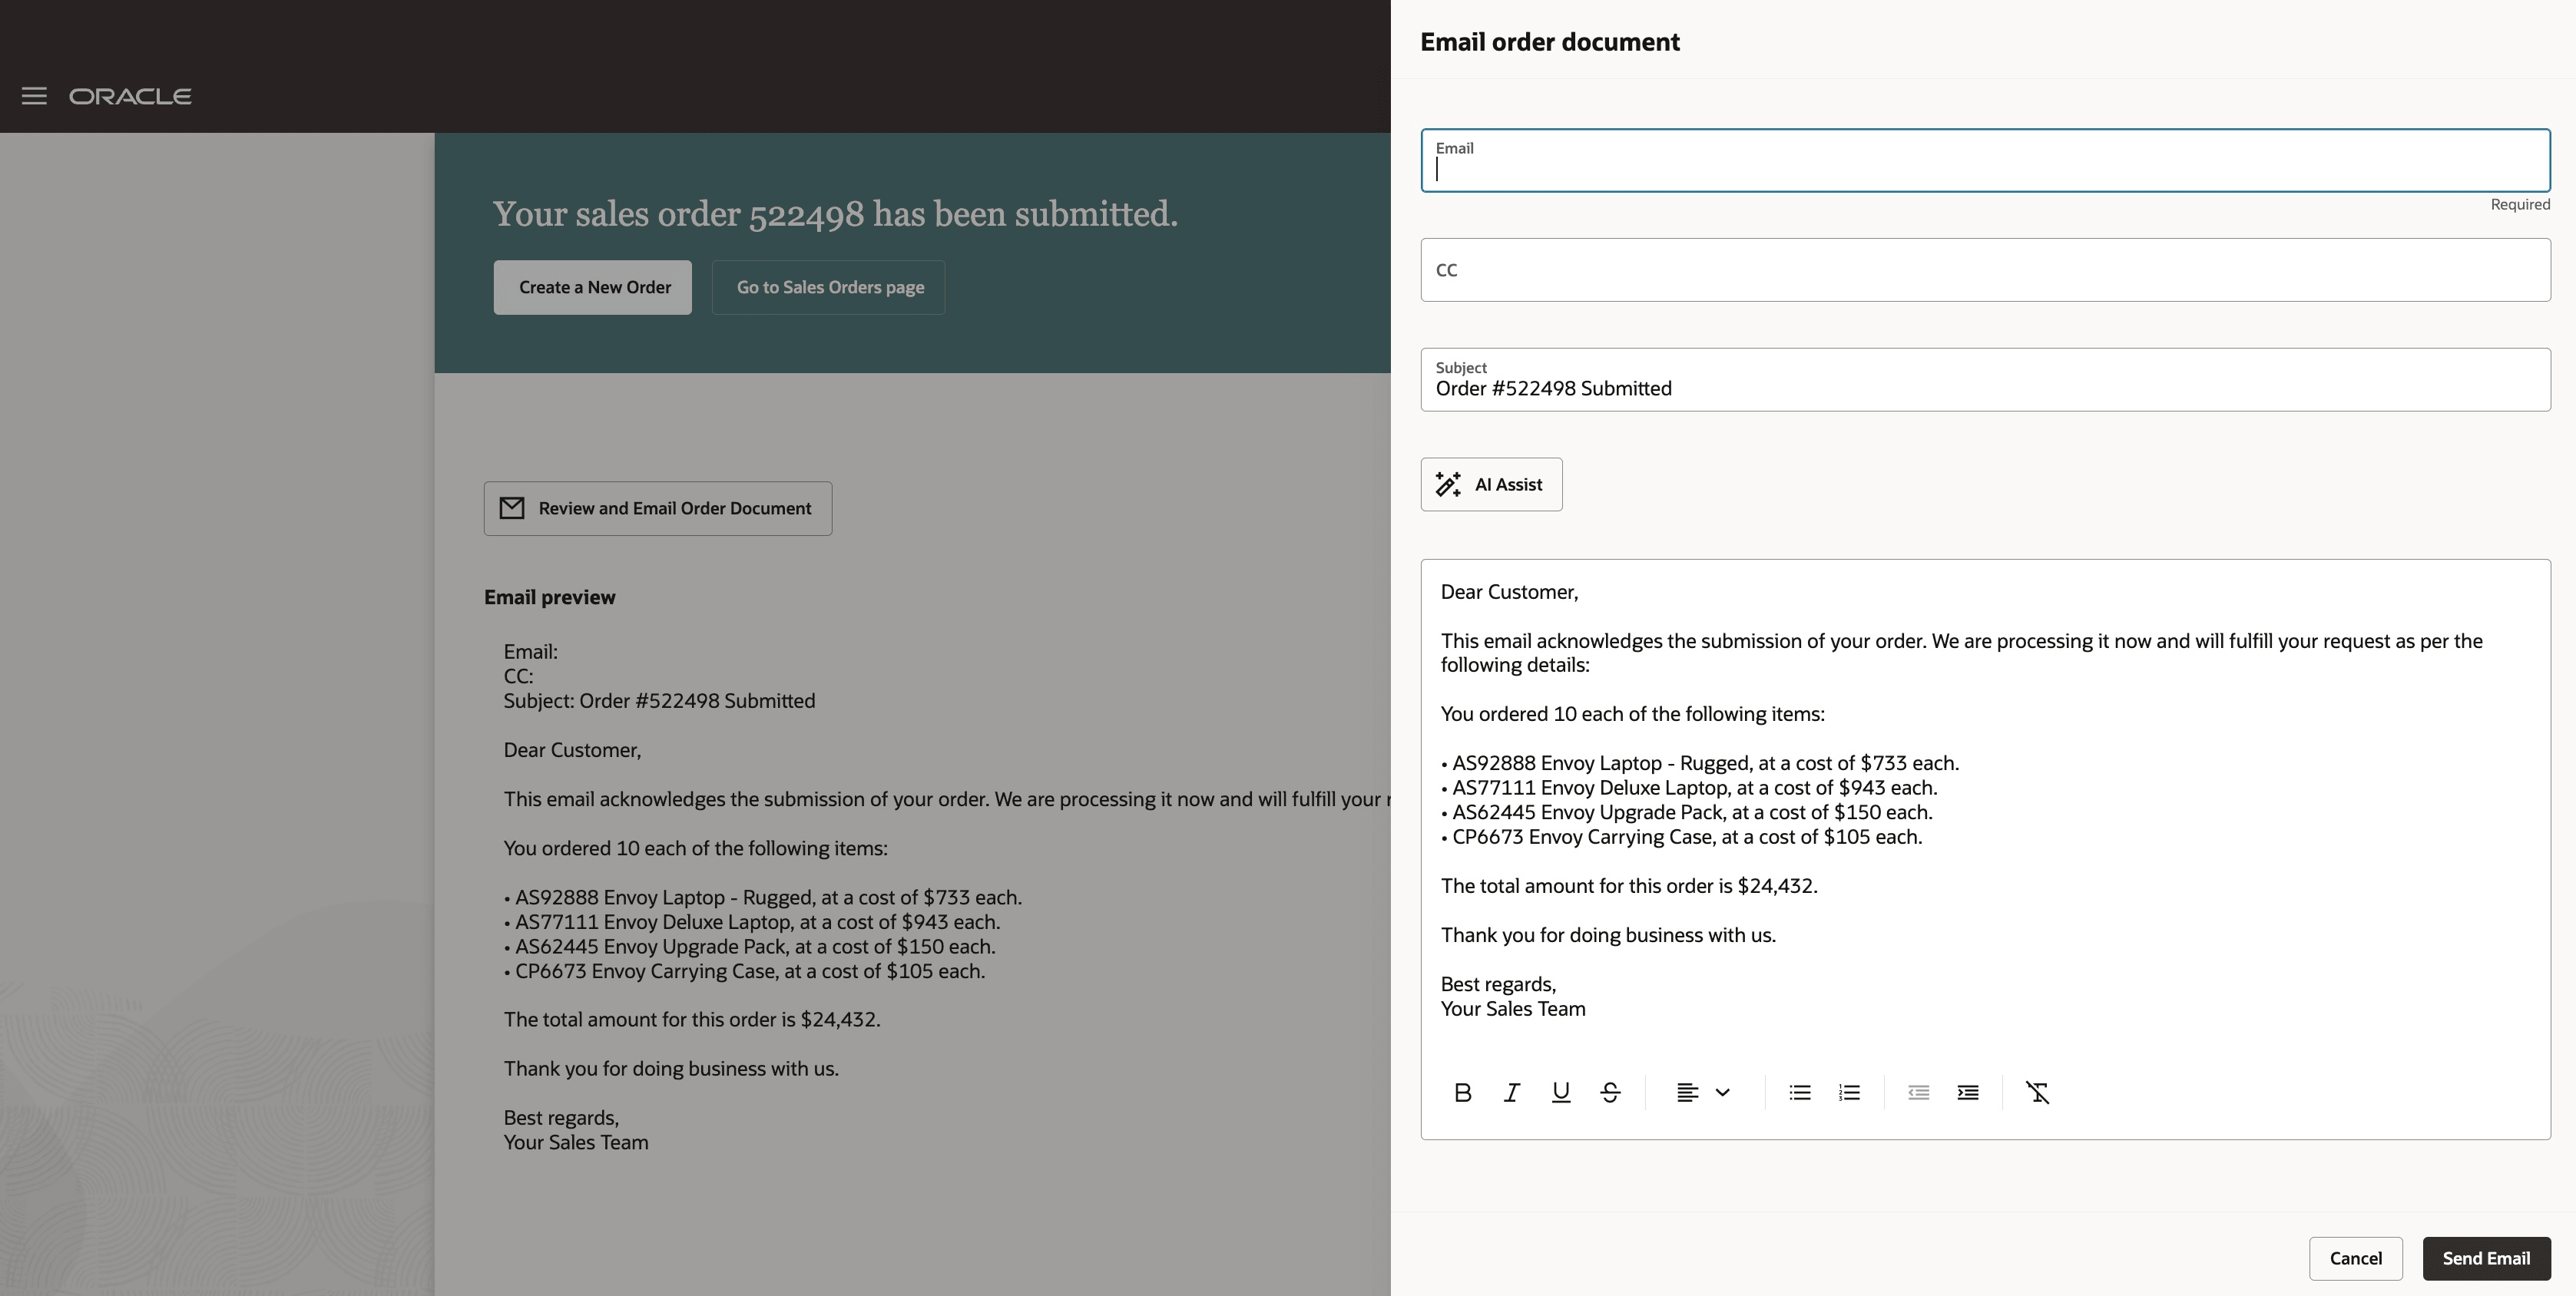
Another way to get here is to click Actions > Email Order Document.
Generative AI uses these attributes in the text to summarize the sales order:
|
Amount Order Amount Order Date Order Line |
Order Product Number Requested Arrival Date |
Requested Ship Date Status Transaction Type |
Generative AI also uses these attributes from the order header:
- Order Total
- Order Number
- Ordered Date
- Order Status
- Order Type
You can use the text box as an AI prompt. If the text doesn't have everything you want, then enter one of the attributes into the text box and click AI Assist. Generative AI will revise the text for you. For example, to include the ship date, enter Requested Ship Date into the text box, then click AI Assist.
If you want to implement this flow, use Visual Builder Studio to set the enableSalesOrderAcknowledgementAISuggestionPage property to True.
Add Guided Journeys
You can add a guided journey to provide instructional help and tips that assist you when you create a sales order. For details, see Create Guided Journeys for Redwood Pages.
Use Other Attributes
Sales Credits
You can manage all sales credits for the sales order and order line in one dialog. Go to Actions > Manage Sales Credits:
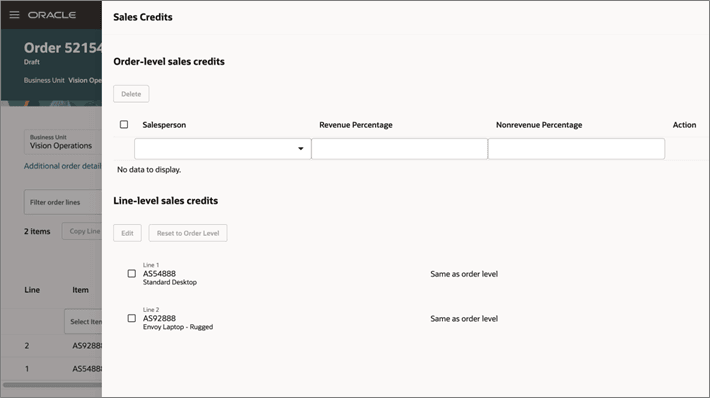
You can add a salesperson on the order header. You can also select one or more lines and override that value on the order line.
Shipping Tolerances
Enter a shipping tolerance on the order line instead of having to use a defaulting rule, validation organization, or order management extension to set it. You can't set the tolerance after you submit the sales order.
Shipment Sets
Select more than one order line and add them to a shipment set or remove lines from a shipment set. You can also modify attribute values and apply them to all lines in the set.
Override Scheduled Dates
Specify scheduled dates on an order line:
- Specify the Scheduled Ship Date or the Scheduled Arrival Date, or both. If you specify only one, then Oracle Global Order Promising schedules the other date.
- Specify the scheduled dates on a new order line or on an existing line that's on a draft order.
- Revise an order and override the scheduled dates on an order line.
Note
- Order Management sets the Override Schedule attribute to Yes when you specify at least one of the scheduled dates.
- If you set the Override Schedule attribute to Yes on an order line, then you must provide at least one of the scheduled dates on the line.
- If you set the Override Schedule attribute to Yes and then remove both of the scheduled dates, then Order Management sets the Override Schedule attribute back to its default No value, and Global Order Promising sets the dates when it schedules the line.
- You'll need the DOO_MODIFY_ORCHESTRATION_ORDER_FULFILLMENT_LINE_SCHEDULE_DATE_PRIV privilege to do these overrides.
Sales Agreements
If only one sales agreement line is valid for an item and UOM on the order line, then Order Management will set that line as the default on the order line when you select the sales agreement. If more than one agreement line is valid, then you must manually select that line.
Demonstration
Steps to Enable
Use the Opt In UI to enable this feature. For instructions, refer to the Optional Uptake of New Features section of this document.
Offering: Order Management
Use this sequence:
- Opt in to the Redwood: Search and Apply Actions on Multiple Sales Orders feature.
- Opt in to the Redwood: Create and Manage Sales Orders feature. Once you opt in, you can't opt out.
- Do the set up described in the Redwood: Search and Apply Actions on Multiple Sales Orders topic.
Set up the Item Attribute (Required)
You use the Item attribute to pick the item that you want to add on the order line. Do this procedure to make sure you can pick items that are in the View Item class or the View Item Basic class. For background, see Set Up Data Security for Item Classes.
You need to set up an index, set up security, and grant privileges.
To get started, set up an index:
- Start at your Home page, then click Product Management > Manage Commercial Items.
- On the Manage Commercial Items tab, click Tasks > Configure Index.
- On the Index Management page, click Item.
- On the Item page, add these attributes:
- Customer Orders Enabled
- Customer Ordered
- Structure Item Type
- Pick Components
- Autocreated Configuration
- Sale Product Type
- Returnable
- Click Update.
- Click Actions > Rebuild, select the Now option, then click Rebuild.
If you don't see the Configure Index task on the Manage Commercial Items tab, then do this:
- Go to the Setup and Maintenance work area, then select the Product Management offering.
- Click Change Feature Opt-In.
- On the row that has Items in the Name column, click the pencil.
- Add a check mark to the Search Items Using the New User Interface feature, then click Done.
Set up data security on your items:
- Go to the Setup and Maintenance work area, then click Tasks > Search.
- Search for, then open the Manage Item Classes task.
- In the search results, click Root Item Class.
- On the Edit Item Class page, click Security.
- Click Actions > Add Row, then set the values.
Attribute
Value
Principal
Group
Name
Order Entry Specialist
Organization
Select your business unit.
Start Date
End Date
Specify when you want this access start and end.
- In the Actions section, add these actions.
Action
Data Level
View Item Basic
Item
View Item Attribute
Item
- Click Save and Close, pick a time in the dialog that displays, then click OK.
Get the privilege that you need so you can set default values for attributes on the order line, such as quantity, UOM, and so on:
- Go to the Security Console then click Create Role.
- On the Create Role page, set vales, then click Next.
Attribute
Value
Role Name
Enter any value.
Role Code
FOM_GET_ITEM_REST
Yes, it's REST API. No need to worry, you don't need to do any other setup for REST API. Order Management uses it internally to help implement redesigned pages.
Role Category
SCM-Discretionary Roles
- Click Add Functional Security Policy, then, in the dialog that displays, search for
GET Item REST. - Click Add Privilege to Role, then click Cancel to get out of the dialog.
- At the top of page, click the Users train stop.
- On the Create Role page, click Add User.
- In the dialog that displays, search for Order Entry Specialist, click Add User to Role, then click Cancel.
- Click Next > Save and Close.
- Repeat this procedure to add other roles as needed, such as the Order Manager.
- Monitor the ESS Job to Create Index Definition and Perform Initial Ingest to OSCS scheduled process and make sure it finishes successfully.
- Verify that you can use the item picker.
Set up Your Business Rules (Optional)
Use Visual Builder Studio to create business rules that:
- Display or hide attributes on the order header and order line to meet your specific needs.
- Implement flows that you use with generative AI.
This example turns on the enableChangeEmailConfirmationAISuggestionPage property so you can use generative AI when you want to send a confirmation to your customer for a change order:
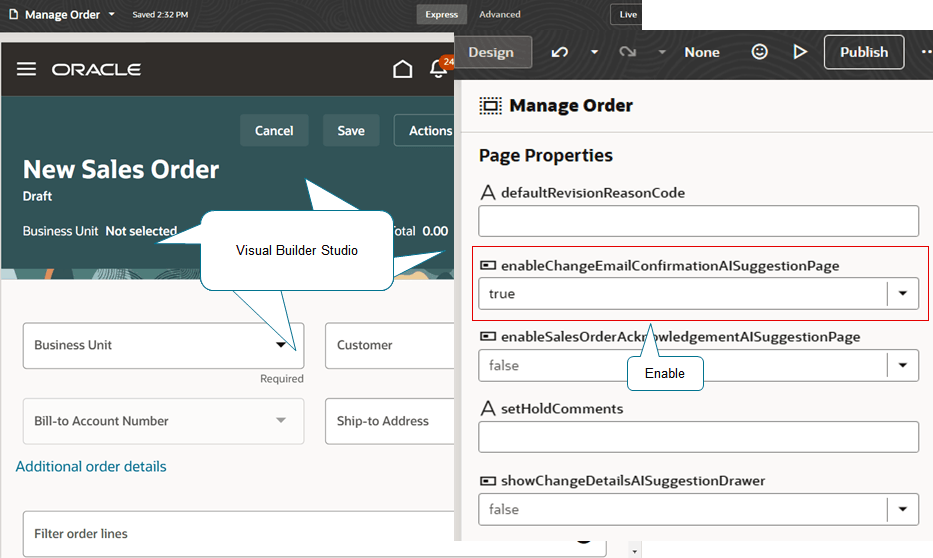
For details, see Redwood: Search and Apply Actions on Multiple Sales Orders.
Cascade Attribute Values (Optional)
Order Management can now cascade values that you change on the order header to the order line when you save the order.
Set the new Cascade Order Header Values to Order Lines order management parameter to:
- All Lines. Cascade any modification that you make on the order header to all eligible order lines.
- Lines Not Overridden. Cascade values only to attributes that you haven't overridden on the order lines. Assume the Bill-to Address attribute on the order header and on the order line each currently contain 100 Oracle Parkway. If you set it to 300 Oracle Parkway on the header, then Order Management will set it to 300 Oracle Parkway on the line. If at some earlier time you manually set it to 200 Oracle Parkway on the order line, then Order Management won't cascade the value.
- Don’t Cascade. Don't cascade any value that you modify on the order header to the order line.
You must save the sales order at least one time before you can cascade.
Set the Default Business Unit (Optional)
Save your users time so they don't have to manually set the Business Unit attribute on the sales order. Use the ORA_FOM_DEFAULT_BUSINESS_UNIT profile option to specify the value that you want Order Management to set for the Business Unit attribute on the order header, by default. See Use Order Profiles to Control Order Management Behavior.
Set Up Customer Relationships (Optional)
Set up Order Management so your users can filter data according customer relationships. For details, see the Set Up Customer Relationships attachment at Technical Reference for Oracle Order Management (Doc ID 2051639.1).
Note that your users can filter customer data differently depending on the channel that you use.
|
Channel |
Filter Data to Display Only Related Customers |
|
Classic pages in the Order Management work area, such as Create Order or Manage Order. |
No |
|
Redesigned pages in the Order Management work area, such as the Sales Orders page. |
Yes |
|
REST API |
Yes |
|
File Based Data Import (FBDI) with REST API |
Yes |
Tips And Considerations
You can't use the redesigned pages to create a sales order that includes a configured item, kit, coverage, or subscription in this update. These capabilities will be available in a future update.
How Order Management Prepares Your Sales Orders
You can manage a sales order that you create in other channels on the redesigned Sales Orders page, but only if the order meets these criteria:
- Order line must not contain a configured item, kit, coverage, or subscription.
- Sales order must not use a credit card as the payment method.
- Order line must not be associated with a project.
- Item on the order line must not have an inventory transaction.
- Sales order or order line must not have a manual sales incentive.
Order Management has to prepare each sales order that you create in other channels so it can display them on the redesigned Sales Orders page. It determines whether each sales order is eligible to display on that page according to the criteria. If it's eligible, then Order Management will:
- Populate cross reference attributes that are required on the redesigned page. If Order Management can't determine a cross reference, then it will display a warning message on the order stating that it can't find the cross reference values.
- Migrate holds that are on the order line to the fulfillment line.
- Set some attributes on the sales order that indicate whether the sales order is eligible.
Order Management does this preparation when you opt in to the Redwood: Create and Manage Sales Orders feature.
If the order isn't eligible, then Order Management moves on to the next sales order. If you search for that sales order on the redesigned page, your search will return it, but if you open it from the search result, then Order Management will display it on the classic Create Order page.
Processing Constraints
Order Management applies constraints that constrain an attribute only when you submit the sales order. It applies constraints that constrain a sales order only when you revise the order.
Key Resources
Access Requirements
To opt in to this feature, you must be assigned a configured job role that includes this existing privilege:
- Administer Tasks for Opt-in Features (DOO_ADMINISTER_TASKS_FOR_OPTIN_FEATURES_PRIV)
The following privileges are associated with using this feature:
|
Privilege |
Comments |
|
FOM_VIEW_ORDERS_PRIV Display Name: View Orders Description: Allows the end user to view orders. |
Users with this privilege can view order details on the Redesigned pages Order page |
|
FOM_REVISE_ORDER_PRIV Display Name: Revise Order Description: Allows the end user to change an existing order. |
Users with this privilege can revise orders on the Redesigned pages Order page |
|
FOM_CANCEL_ORDER_PRIV Display Name: Cancel Order Description: Allows the end user to cancel an order. |
Users with this privilege can cancel orders on the Redesigned pages Order page |
|
FOM_PREPARE_SALES_ORDERS_FOR_REDESIGNED_PAGES_PRIV Display Name: Prepare Sales Orders for Redesigned Pages Description: Allows you to run a scheduled process that prepares sales orders so you can display and manage them on redesigned pages. |
Required to run the Prepare Sales Orders for Redesigned Pages scheduled process |
|
DOO_MODIFY_ORCHESTRATION_ORDER_FULFILLMENT_LINE_SCHEDULE_DATE_PRIV Display Name: Modify Orchestration Order Fulfillment Line Schedule Date Description: Allows modification of orchestration order fulfillment line schedule date. |
Required to override the schedule dates on the order lines. |
|
PO_VIEW_PURCHASE_ORDER_PRIV Display Name: View Purchase Order Description: Allows a user to review a purchase order. |
Required to view the Purchase Order number as a hyperlink in the Fulfillment Details drawer. With this privilege, the user can click on the Purchase Order number hyperlink to navigate to the "View Purchase Order" redesigned pages page in Fusion Purchasing. Data security: Additionally, the user must have the "PO_VIEW_PO_DOC_TXN_DATA" data security privileges to view the details on the purchase order page. |
|
RCV_VIEW_RECEIPT_SUMMARY_TXN_HISTORY_PWA_PRIV Display Name: View Receipt Summary and Transaction History using Responsive Receiving Description: Privilege to view receipt summary and transaction history using responsive receiving. |
Required to view the Receipt number as a hyperlink in the Fulfillment Details drawer. With this privilege, the user can click on the Receipt number hyperlink to navigate to the "Receipt details" redesigned pages page in Fusion Receiving |
|
WSH_VIEW_SHIPMENT_USING_RESPONSIVE_SHIPPING_PWA Display Name: View Shipment Using Responsive Shipping Description: Allows viewing shipment details by using a shipment number. This privilege can't be used as a standalone privilege to view shipments. |
Required to view the Delivery Name as a hyperlink in the Fulfillment Details drawer. With this privilege, the user can click on the Delivery number hyperlink to navigate to the "Shipment details" redesigned pages page in Fusion Shipping Data security : Additionally, the user must have the "WSH_MANAGE_DELIVERY_DATA" data security privileges to view the details on the shipment details page. |
|
DOS_VIEW_SUPPLY_ORDERS_PRIV Display Name: View Supply Orders Description: Allows viewing of supply orders. |
Required to view the Supply Order Number as a hyperlink in the Fulfillment Details drawer. With this privilege, the user can click on the Supply Order number hyperlink to navigate to the "Supply details" redesigned pages page in Fusion Supply Chain Orchestration. |