Redwood: Perform Inventory Transactions Directly from Item Quantities
Viewing item quantities within organizations is central to assessing the availability of your items and helping you understand if you have the right quantity of an item in the right location to run operations efficiently. In instances where you find that you're lacking the right quantity in the right location, you need the ability to perform specific actions to remedy the deficiency. In update 24D, we released the ability to view your item quantities in the Redwood experience using the Item Quantities page. Now you can perform transactions directly from the Item Quantities page to quickly move items within and issue items out of your organization.
You can perform these transactions from the Item Quantities page:
- Create transfer order
- Create miscellaneous transactions
- Request cycle count
- Create movement request issue
- Create movement request transfer
- Change material status
- Create subinventory transfer
- Create interorganization transfer
- Create project transfer
- Change lot grade
In Redwood you must use the Item Quantities page to perform these transactions:
- Subinventory transfer
- Interorganization transfer
- Project transfer

Item Quantities Actions
Transaction Processing
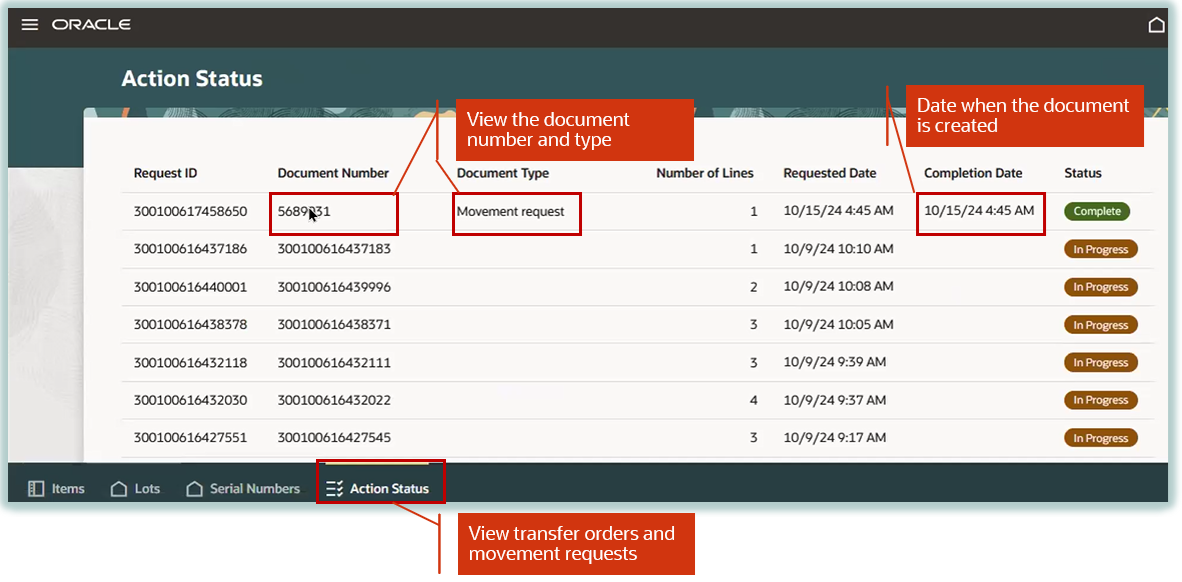
After submitting a transaction from the Item Quantities page, a confirmation message displays. If your transactions are set to be processed in Concurrent or Background Processing modes, instead of an Online Processing mode, you can view the request status from the Action Status tab until the transaction is processed.
Create Transfer Order
To create a transfer order from the Item Quantities page, select your on-hand records and then click the Create Transfer Order action.

Create Transfer Order Action
Here are some key features of the Create Transfer Order action:
- Defaults these attributes onto the My Supply Requests page when the Create Transfer Order action is initiated for on-hand records:
- Destination organization
- Destination subinventory
- Project
- Task
- Allows you to view the document number created as a result of initiating a document-based action from the Item Quantities page.
- You can view the Transfer Order Number and Movement Request Number on the Action Status page as a result of an action initiated from the Item Quantities page.
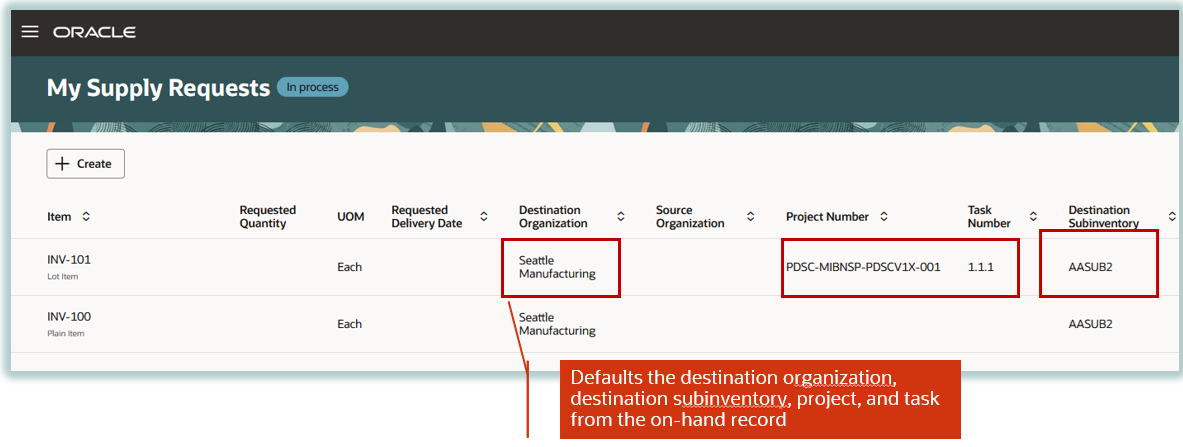
Defaulting of Destination Organization and Destination Subinventory on Supply Request Page
Create Miscellaneous Transactions
You can perform both miscellaneous issue and miscellaneous receipt transactions. The issue transaction performs material issue from the subinventory and locator associated to the on-hand record. Likewise, the receipt transaction performs the material receipt at the subinventory and locator associated to the on-hand record.
Here are some key features of the Create Miscellaneous Transactions action:
- Allows you to perform miscellaneous transactions for a new item that wasn't selected on the Item Quantities page.
- Allows you to create a miscellaneous receipt for an item with 0 on-hand quantity.
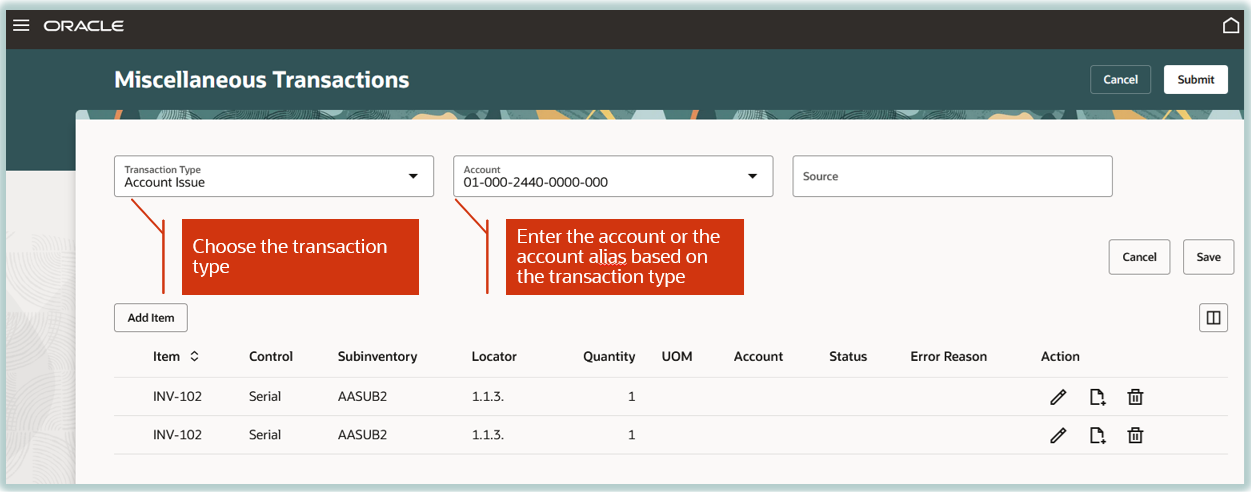
- After choosing the transaction type, such as Account Issue, Account Alias Issue, Account Receipt, or Account Alias Receipt, you're prompted to choose either the account or the account alias. Click Save to cascade the transaction type to all the item lines if you have multiple line records. The save action freezes the transaction type associated with the lines.
- Enter the subinventory, locator, project, lot, and serial information when you choose to initiate the Miscellaneous Transactions action from the Organization view. You can enter the subinventory, locator, project, task, country of origin, lot, and serial details using the panel drawer.
- Choose the Record Lot and Serial Number icon to enter multiple lots or serial numbers which aren't in a range or when you need to enter additional DFF information corresponding to the lot or serial number.
- Submission of the transaction navigates you back to the Item Quantities page.
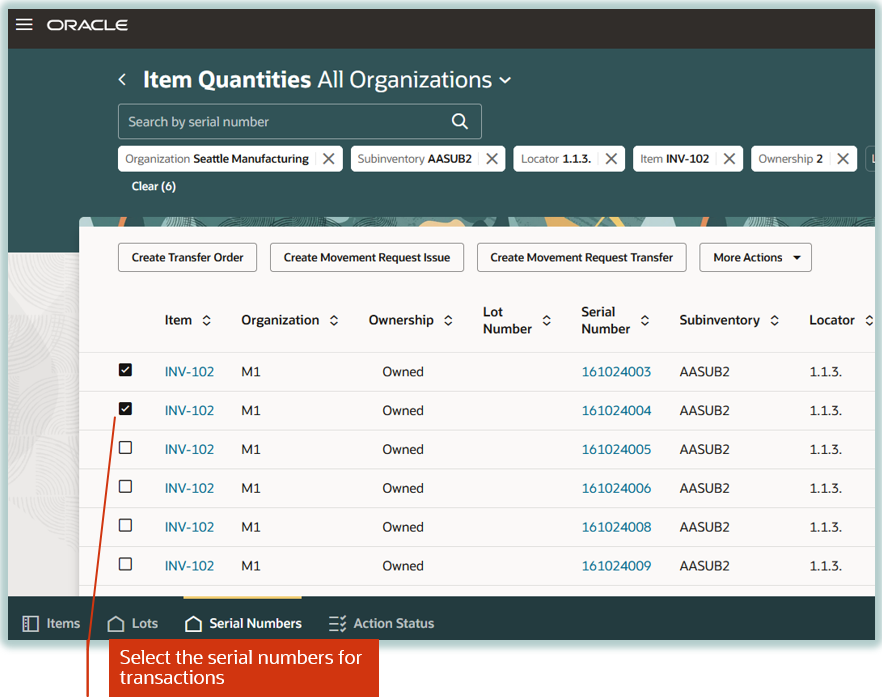
Select Serial Numbers for Miscellaneous Transactions
The initiation of transactions from the Serial Numbers tab defaults the subinventory and locator onto the Miscellaneous Transactions page.
Miscellaneous Transactions
The initiation of transactions from the Serial Numbers tab also defaults the subinventory and locator onto the Edit Line Details panel drawer which displays these attributes along with the serial number.
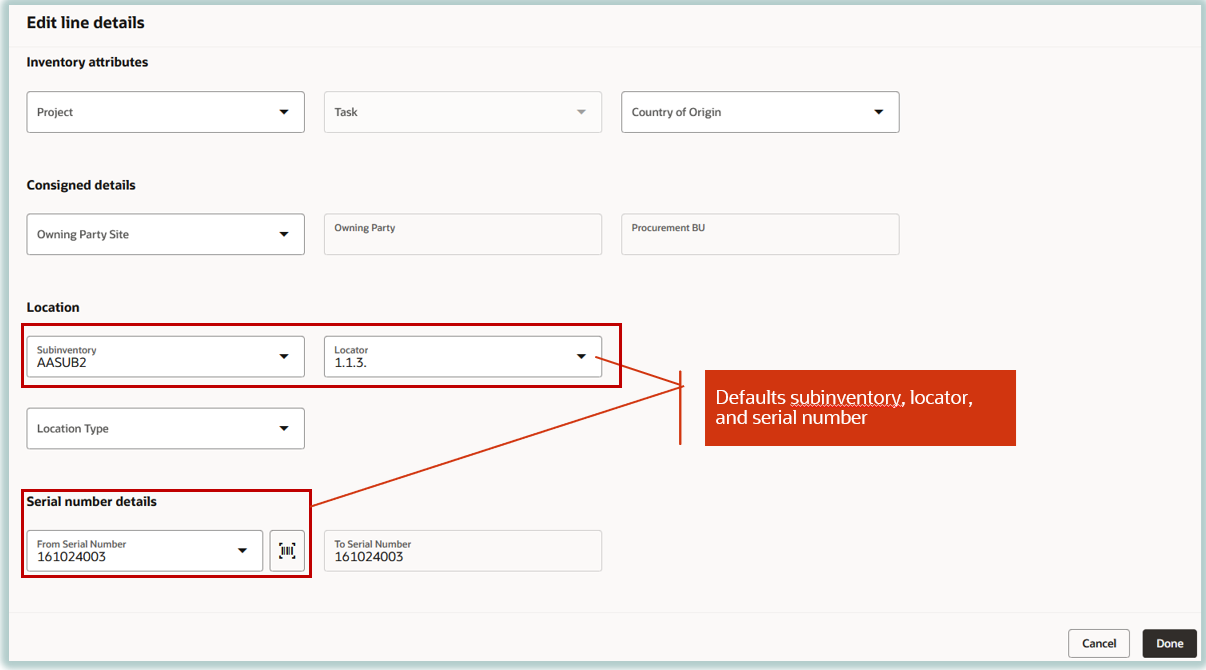
Miscellaneous Transaction Details in Drawer
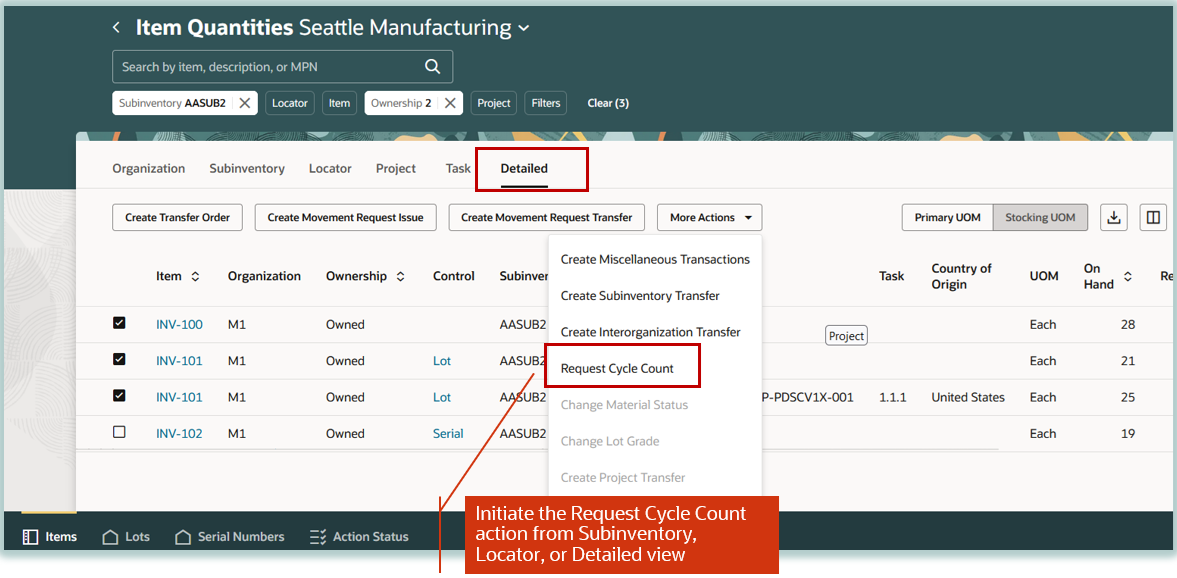
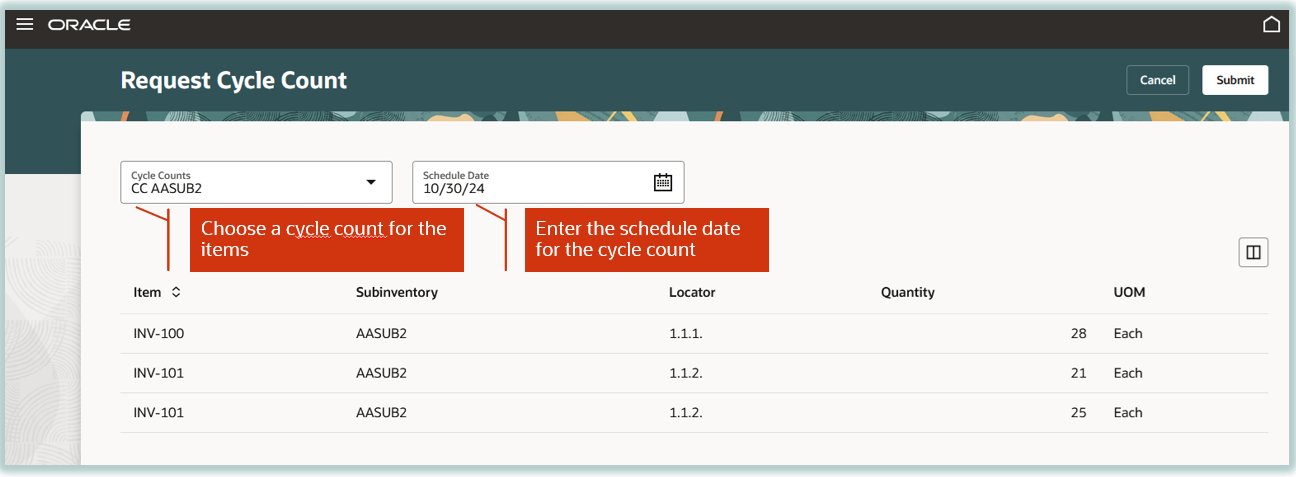
Request Cycle Count
You can initiate the Request Cycle Count action from the Subinventory, Locator, or Detailed views.
Initiate Cycle Count
Choose a cycle count to associate to all selected items. You’ll receive a count sequence confirmation message when the items are scheduled for cycle counting.
Choose Cycle Count
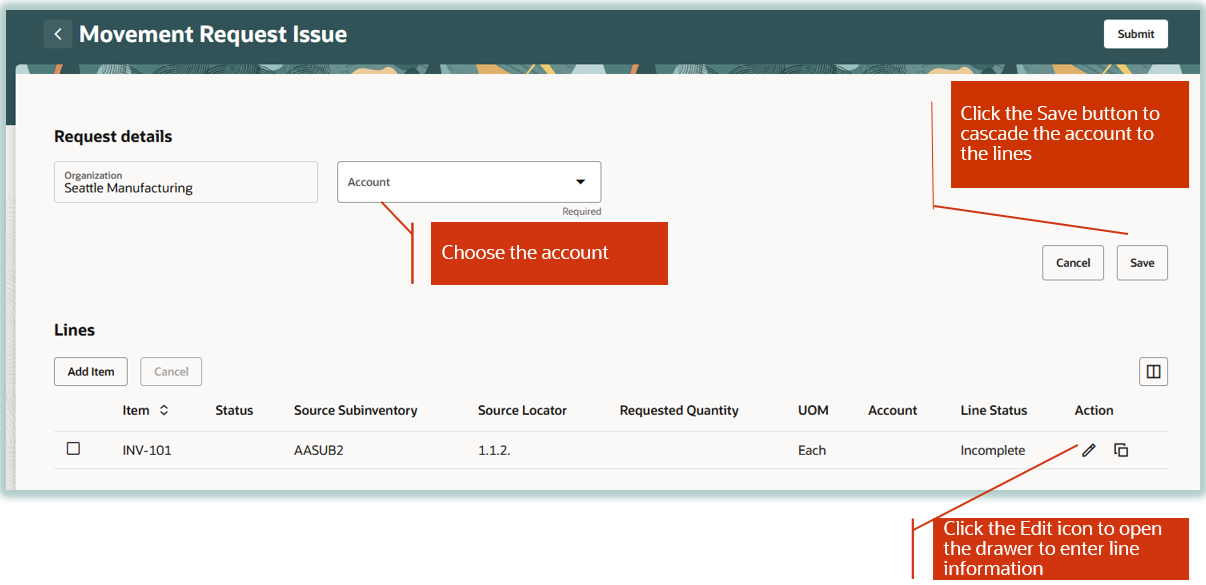
Create Movement Request Issue
You can select one or more items on the Item Quantites page and initiate the Create Movement Request Issue action to issue items from a subinventory using the movement request. This takes you to the Movement Request Issue page with movement request lines already created for the items that you selected on the Item Quantities page.
Here are some key features of the Create Movement Request Issue action:
- The movement request is created for the organization associated to the on-hand record when you initiate the Create Movement Request Issue action from the All Organizations context. When you are logged in with a specific organization context, the movement request is created for the selected organization.
- Enter the Account on the header of the Movement Request Issue page when you have multiple lines. Click the Save button on the Movement request header to cascade the account to the movement request lines.
- Click Add Item to create a movement request line for an item which wasn't selected on the Item Quantities page.
- Click Edit to open the Edit Line Details drawer to enter the requested quantity for the movement request line.
- Click the Update button on the drawer to navigate back to the Movement Request Issue page.
- On the Movement Request Issue page, click the Submit button to create the movement request. You'll receive a confirmation message on the creation of the movement request.
- You can navigate to the Action Status tab to view the movement request number.
Movement Request Issue Action
Use the Action Status tab to view the movement request number.
Action Status Tab
Create Movement Request Transfer
You can select one or more items on the Item Quantities page and initiate the Create Movement Request Transfer action to transfer items from one subinventory to another. This takes you to the Movement Request Transfer page with movement request lines already created for the items that you selected on the Item Quantities page.
Here are some key features of the Create Movement Request Transfer action:
- The movement request is created for the organization associated to the on-hand record when you initiate the Create Movement Request Transfer action from the All Organizations context. When you are logged in with a specific organization context, the movement request is created for the selected organization.
- Enter the Destination Subinventory and Destination Locator fields on the Movement Request Transfer page when you have multiple lines. Click Save to cascade the destination subinventory and destination locator to the movement request lines.
- Click Add Item to create a movement request line for an item which wasn't selected on the Item Quantities page.
- Click Edit to open the Edit Line Details drawer to enter the requested quantity for the movement request line.
- Click the Update button on the drawer to navigate back to the Movement Request Transfer page.
- On the Movement Request Transfer page, click Submit to create a movement request. You'll receive a confirmation message on the creation of the movement request.
- You can navigate to the Action Status tab to view the movement request number.
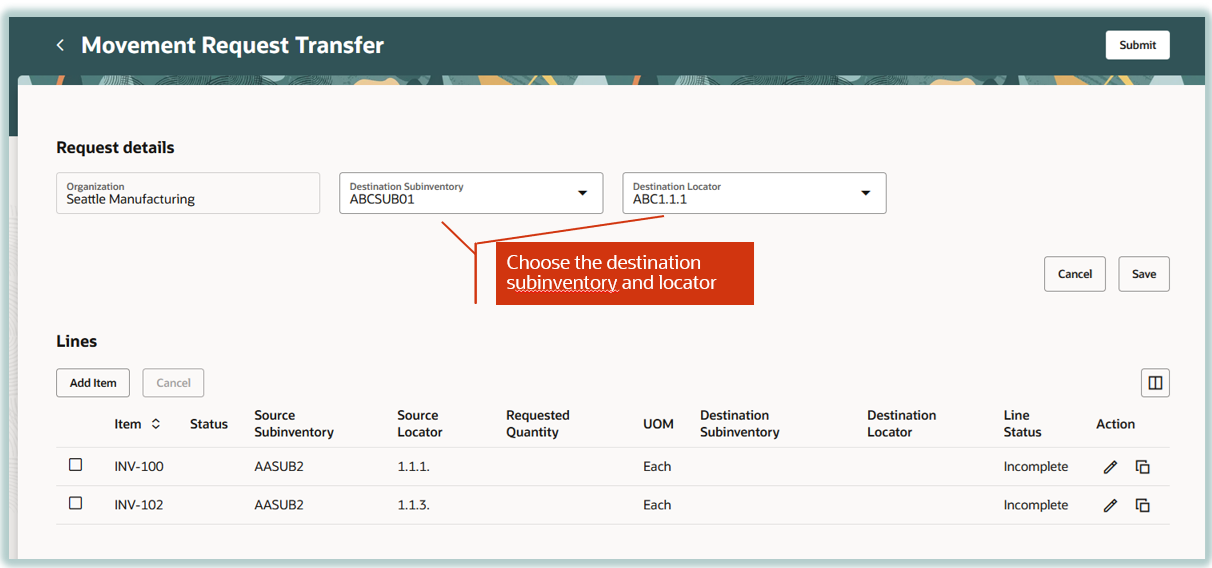
Movement Request Transfer Action
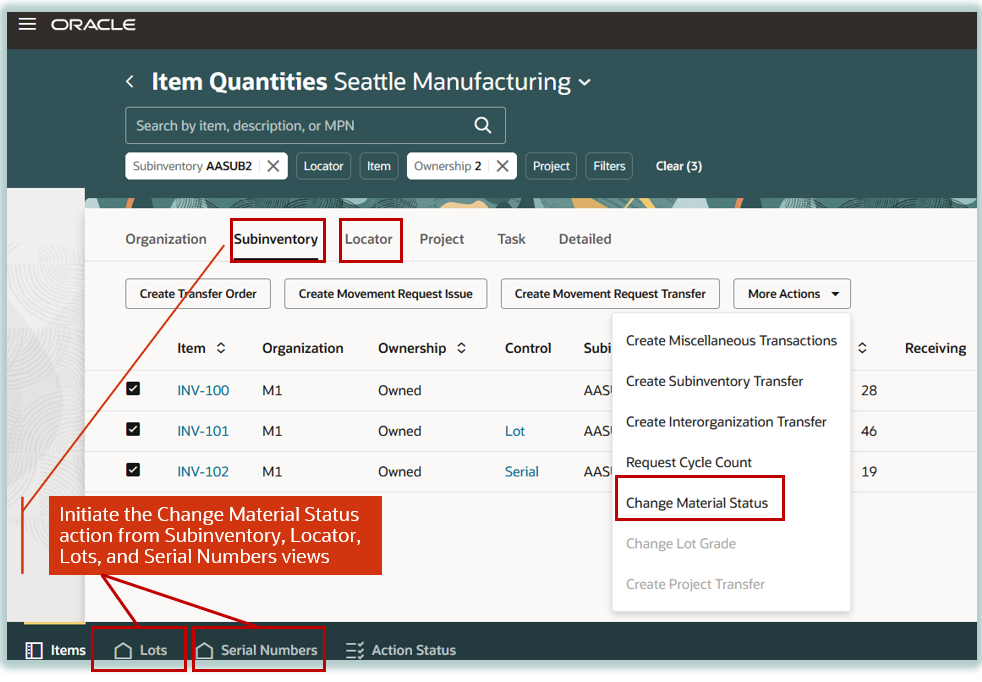
Change Material Status
You can update the material status for a subinventory, locator, lot, or serial number. You can initiate the Change Material Status action from the Subinventory or Locator view on the Items tab to update the status for a subinventory or locator respectively. Use the Lots tab to update the material status for lots for an item enabled for Lot Status control and use the Serial Numbers tab to update the material status for serial numbers for an item enabled for Serial Status control.
Here are some key features of the Change Material Status action:
- Select the item records on the Item Quantities pages for the subinventories which require material status change. Navigate to the Subinventory view on the Items tab to update the material status for subinventories and choose the Change Material Status action. This opens the Change Material Status page with the selected subinventories. Choose values for the New Status and Reason fields and click Save to cascade the new material status to multiple subinventories. Click the Information icon in the Transaction Types column to view the transaction types allowed corresponding to the new material status. Click Submit to update the material status for the selected subinventories. You'll receive a confirmation message when the material status is updated for the selected subinventories.
- Select the lot records on the Lots tab for the lots which require material status change and choose the Change Material Status action. This opens the Change Material Status page for the selected lots. Choose values for the New Status and Reason fields and click Save to cascade the new material status to multiple lots. Click Submit to update the material status for the selected lots. You'll receive a confirmation message when the material status is updated for the selected lots.
- Select the serial records on the Serial Numbers tab for the serial numbers which require material status change and choose the Change Material Status action. This brings up the Change Material Status page with the selected serial numbers. Choose values for the New Status and Reason fields and click Save to cascade the new material status to multiple serial numbers. Click Submit to update the material status for the selected serial numbers.
Initiate Material Status Change
On the Change Material Status page, choose values for the New Status and Reason fields and click Save to cascade the new material status to multiple subinventories, lots, or serial numbers. Click Submit to update the material status.
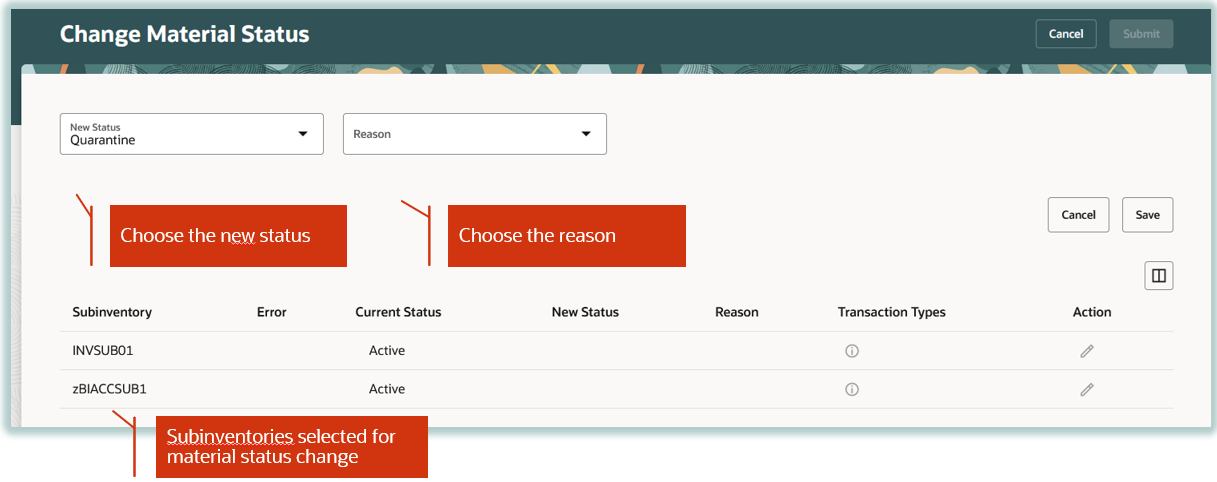
Change Material Status for Subinventories
Create Subinventory Transfer
You must use the Item Quantites page to initiate subinventory transfer transactions in Redwood.
Select the records from the Organization, Subinventory, Locator, Project, Task, or Detailed views on the Items tab and choose the Create Subinventory Transfer action to initiate material movement from one subinventory to another for the selected records. You can also initiate a subinventory transfer from the Lots and Serial Numbers tabs.
The Create Subinventory Transfer action navigates you to the Subinventory Transfer page where the selected item records default onto the lines. Enter values for the Destination Subinventory and Destination Locator fields on the subinventory transfer header page and click Save to cascade these attributes to the lines. The source subinventory, source locator, project, task, lot, and serial numbers default from the on-hand record.
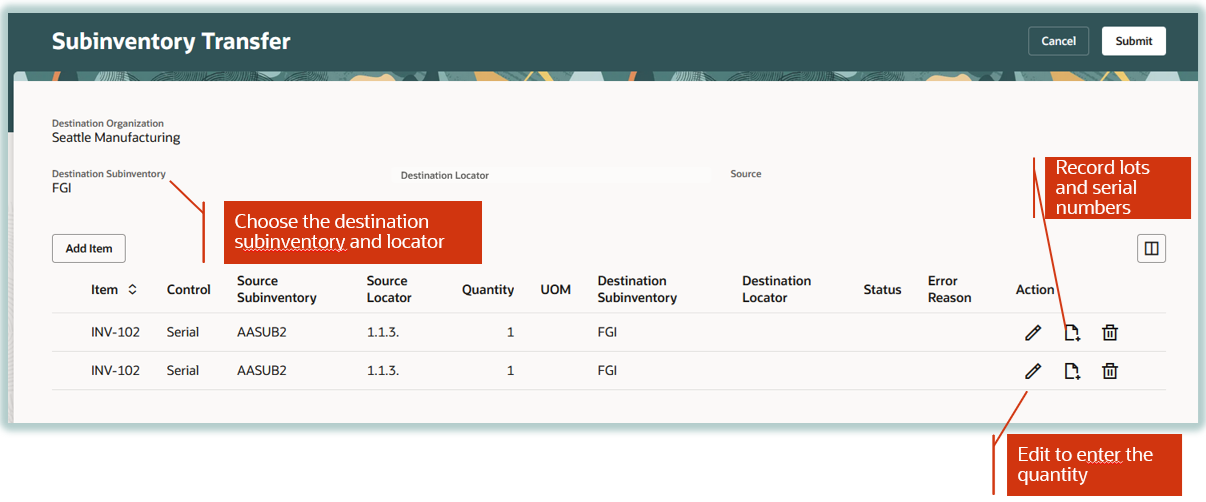
Subinventory Transfer Action
Click the Edit icon to open the Edit Line Details drawer. The Destination Subinventory and Destination Locator default on the drawer if these were provided on the Subinventory Transfer page. The Transaction Date defaults to the current date which you can update. You can enter the Quantity and the Secondary Quantity information in the drawer. Click Done to navigate back to the Subinventory Transfer page and click Submit to process the subinventory transfer transactions.
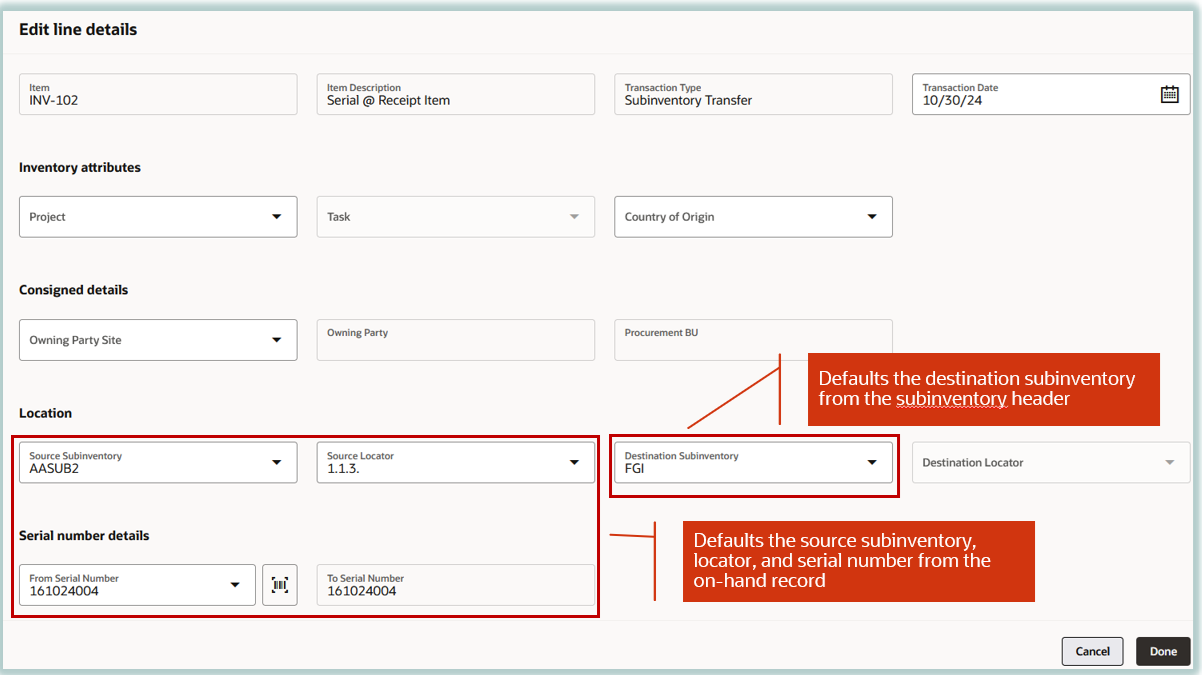
Subinventory Transfer Edit Lines Drawer
Create Interorganization Transfer
You must use the Item Quantites page to initiate interorganization transfer transactions in Redwood.
Select the records from the Organization, Subinventory, Locator, Project, Task, or Detailed views on the Items tab and choose the Create Interorganization Transfer action to initiate material movement from one organization to another organization for the selected records. You can also initiate an interorganization transfer from the Lots and Serial Numbers tabs.
The Create Interorganization Transfer action navigates you to the Interorganization Transfer page where the selected item records default onto the lines.
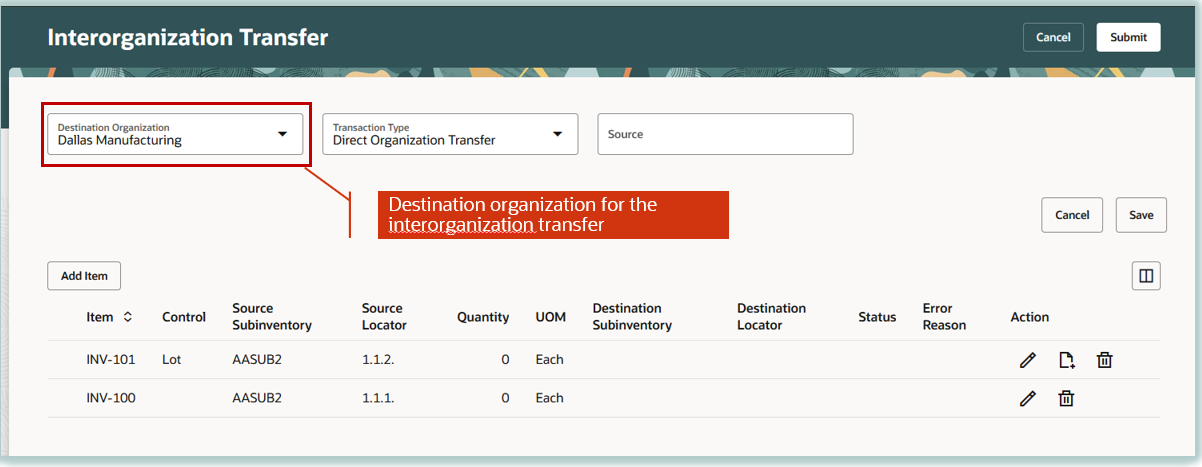
Direct Interorganization Transfer
Whether the transfer type between the organizations is Direct or In Transit, you'll specify the destination organization and the applicable transaction type on the Interorganization Transfer page. The source subinventory, source locator, project, task, lot, and serial numbers default at the line level from the on-hand record.
Click the Edit icon to open the Edit Line Details drawer where you can specify the destination subinventory and destination locator corresponding to a record on the Interorganization Transfer page. The Transaction Date defaults to the current date which you can update. You can enter the Quantity and Secondary Quantity information in the drawer. Click Done to navigate back to the Interorganization Transfer page and click Submit to process the interorganization transfer transactions.
For In-Transit shipment transaction types, you can specify additional details like the transaction date, tracking number, carrier, number of packing units, expected receipt date, and shipment. Click Generate Shipment Number to autogenerate the shipment number. You can also enter the shipment number manually.
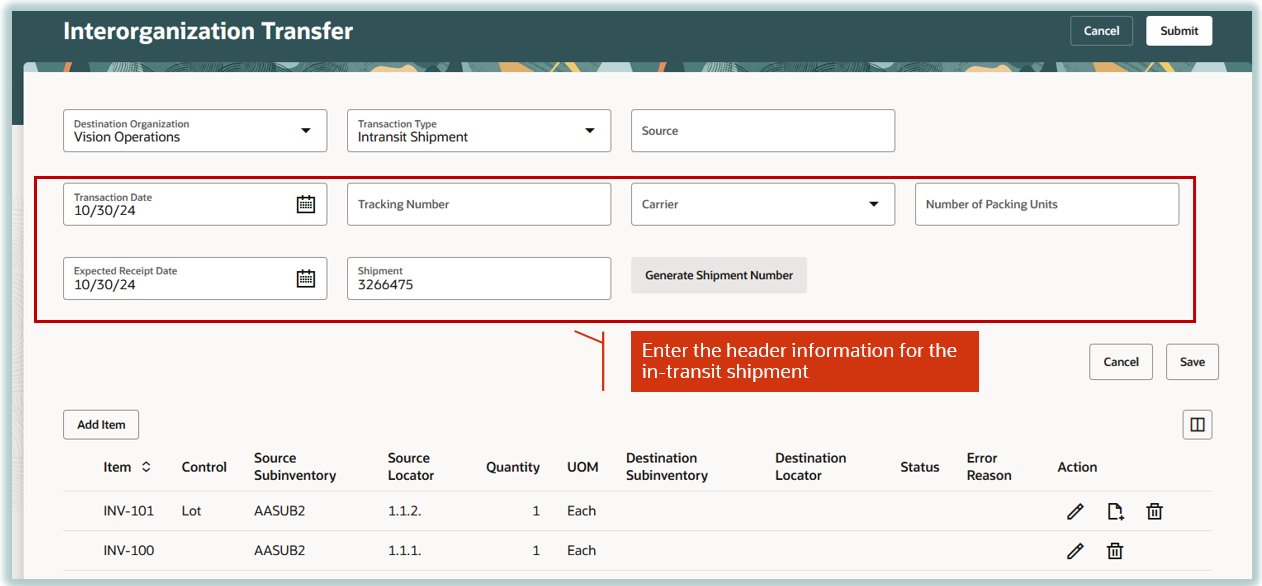
In-Transit Interorganization Transfer
Create Project Transfer
You must use the Item Quantities page to initiate project transfer transactions in Redwood.
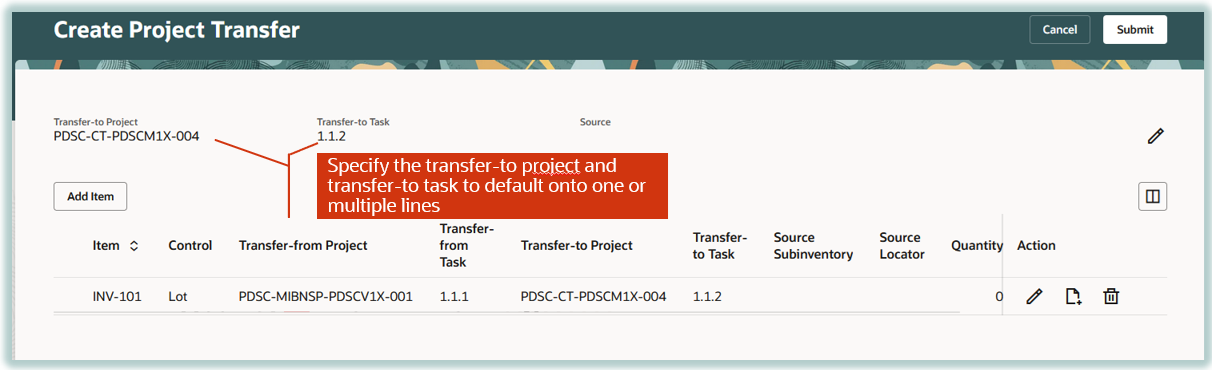
Select the records from the Organization, Subinventory, Locator, Project, Task, or Detailed views on the Items tab and choose the Create Project Transfer action to transfer on-hand inventory from one project and task combination to another, one project and task to common inventory, or one project and task combination to another task within the same project. You can also initiate project transfers from the Lots and Serial Numbers tabs.
The Create Project Transfer action navigates you to the Project Transfer page where the selected item records default onto the lines.
Specify values for the Transfer-to Project and Transfer-to Task fields on the Create Project Transfer page header to default onto the lines if the project transfer transactions need to be executed for multiple items in a project and task. The Transfer-from Project and Transfer-from Task are derived based on the on-hand record.
Create Project Transfer Action
The source subinventory, source locator, project, task, lot, and serial numbers default at the line level from the on-hand record. The Transaction Date defaults to the current date which you can update. You can enter the Quantity and Secondary Quantity information in the drawer. Click Done to navigate back to the Project Transfer page and click Submit to process the project transfer transactions.
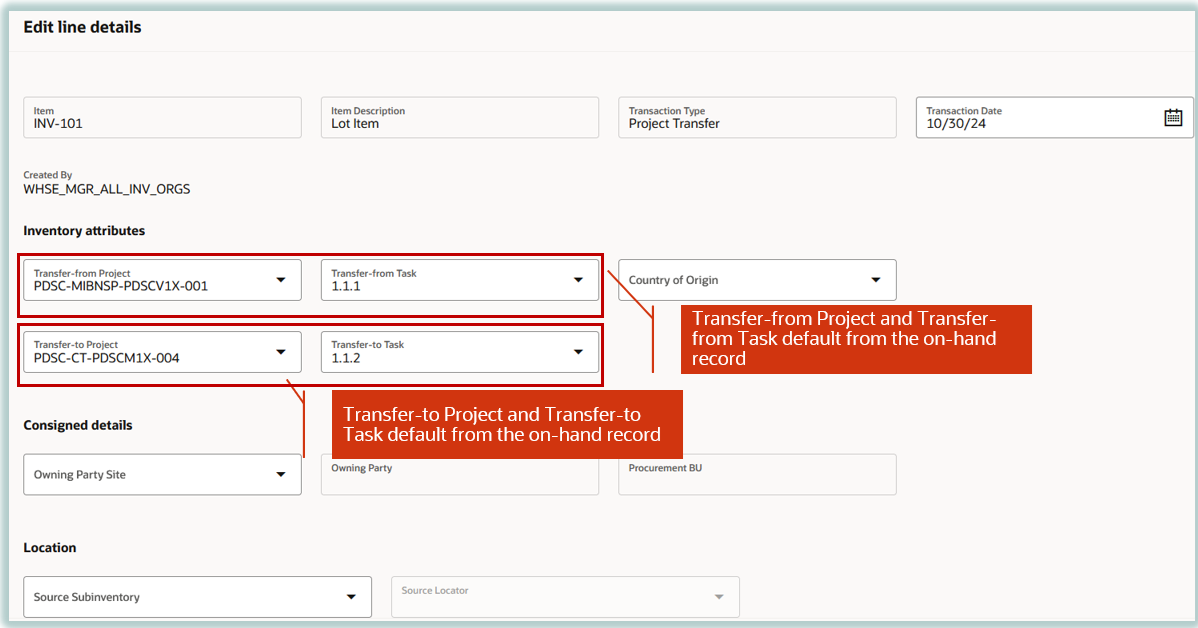
Create Project Transfer Edit Line Details Drawer
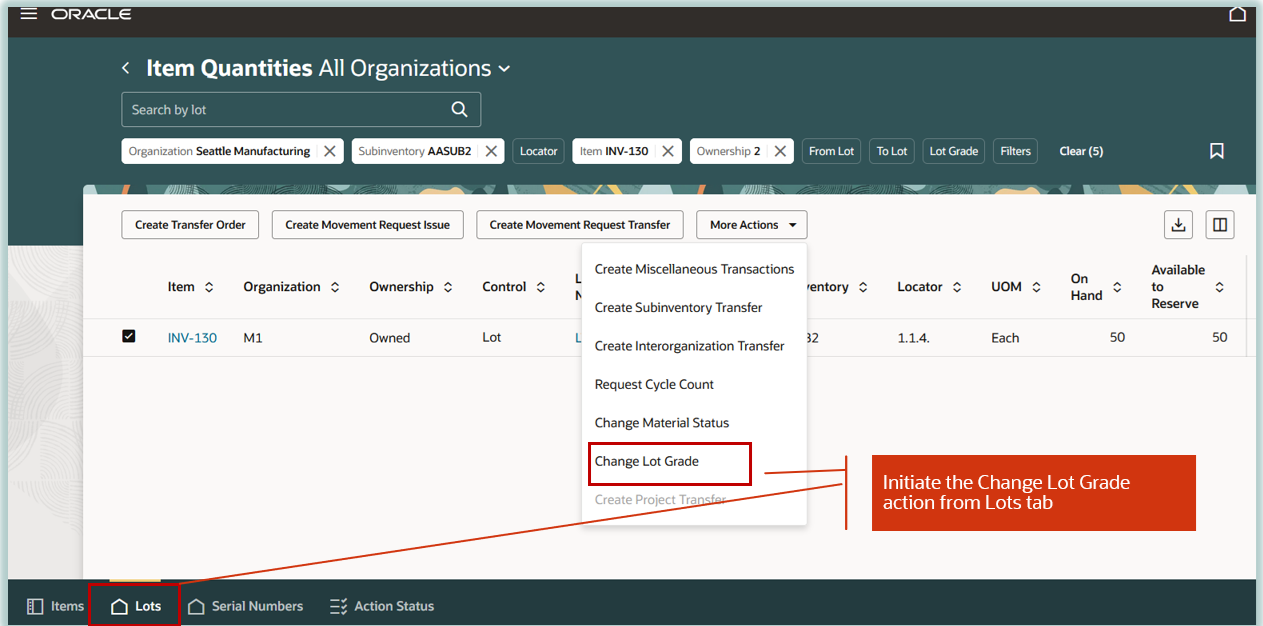
Change Lot Grade
Select the lot records on the Lots tab for lots that require a material lot grade change and select the Change Lot Grade action. This opens the Change Lot Grade page for the selected lots.
Initiate Change Lot Grade Action
On the Change Lot Grade page, select values for the Change to Grade and Reason fields and click Save to cascade the changed lot grade to multiple lot records. Click Submit to update the changed lot grade for the selected lots. You’ll receive a confirmation message when the material status is updated for the selected lots.

Change Lot Grade and Reason
Default Logic for Views
Here's the logic to default the attributes for the transactions based on each view:
- The initiation of the transactions for an item from the Organization view has the following impact on transactions:
- Requires you to enter the subinventory, locator, project, task, country of origin, lots, or serial numbers.
- Defaults the destination organization for a transfer order.
- The initiation of transactions from the Subinventory view has the following impact on transactions:
- Defaults the subinventory for Miscellaneous Transactions.
- Defaults the source subinventory for Movement Request Issue, Movement Request Transfer, Subinventory Transfer, and Interorganization Transfer transactions.
- Defaults the destination subinventory for Transfer Order transactions.
- Defaults the subinventory for Project Transfer transactions.
- The initiation of transactions from the Locator view has the following impact on transactions:
- Defaults the subinventory and locator for Miscellaneous Transactions.
- Defaults the source subinventory and source locator for Movement Request Transfer, Movement Request Issue, Subinventory Transfer, and Interorganization Transfer transactions.
- Defaults the destination subinventory and destination locator for Transfer Order transactions.
- Defaults the subinventory and locator for Project Transfer transactions.
- The initiation of the transaction from the Project view, defaults the transfer-from project for Project Transfer transactions.
- The initiation of the transaction from the Task view, defaults the transfer-from project and transfer-from task for Project Transfer transactions.
- The initiation of the transaction from the Detailed view has the following impact on transactions:
- Defaults the subinventory, locator, project, and task for Miscellaneous Transactions.
- Defaults the source subinventory and source locator for Movement Request Issue, Movement Request Transfer, Subinventory Transfer, and Interorganization Transfer transactions.
- Defaults the destination subinventory, destination locator, project, and task for Transfer Order transactions.
- Defaults the subinventory, locator, transfer-from project and transfer-from task for Project Transfer transactions.
- Defaults the country of origin for Miscellaneous Issue Transactions, Subinventory Transfer, and Interorganization Transfer transactions.
- The initiation of the transaction from the Serial Numbers tab has the following impact on transactions:
- Defaults the subinventory, locator, project, task, country of origin, and serial number for Miscellaneous Transactions.
- Defaults the source subinventory, source locator, and serial mumber for Movement Request Issue and Movement Request Transfer transactions.
- Defaults the source subinventory, source locator, project, task, and serial number for Movement Request Transfer and Movement Request Issue transactions.
- Defaults the source subinventory, source locator, project, task, country of origin, and serial number for Subinventory Transfer and Interorganization Transfer transactions.
- Defaults the destination subinventory, destination locator, project, and task for Transfer Order transactions.
- Defaults the subinventory, locator, transfer-from project, transfer-from task, and serial number for Project Transfer transactions.
- Defaults the country of origin for Miscellaneous Issue, Subinventory Transfer, and Interorganization Transfer transactions.
- The initiation of the transaction from the Lots tab has the following impact on transactions:
- Defaults the subinventory, locator, project, task, country of origin, and lot for Miscellaneous Transactions.
- Defaults the source subinventory, source locator, and lot for Movement Request Issue transactions.
- Defaults the source subinventory, source locator, project, task, and lot for Movement Request Transfer transactions.
- Defaults the source subinventory, source locator, project, task, country of origin, and lot for Subinventory Transfer and Interorganization Transfer transactions.
- Defaults the destination subinventory, destination locator, project and task for Transfer Order transactions.
- Defaults the subinventory, locator, transfer-from project, transfer-from task, and lot for Project Transfer transactions.
- Defaults the country of origin for Miscellaneous Issue, Subinventory Transfer, and Interorganization Transfer transactions.
This feature provides you to ability to perform inventory transactions from the Item Quantities page. The initiation of these actions from the Item Quantities page enables you to perform transactions more efficiently by defaulting the subinventory, locator, project, task, country of origin, lots, and serial numbers onto the transactions from the on-hand record.
Here's the demo of these capabilities:
Steps to Enable
Follow these steps to enable or disable this feature:
- In the Setup and Maintenance work area, search for and select the Manage Administrator Profile Values task.
- On the Manage Administrator Profile Values page:
- To use the Redwood Item Quantities page, search for and select the ORA_INV_VIEW_ITEM_QUANTITIES_REDWOOD_ENABLED profile option code.
- To use the Redwood Subinventory Transfer page, search for and select the ORA_INV_SUBINVENTORY_TRANSFER_REDWOOD_ENABLED profile option code.
- To use the Redwood Interorganization Transfer page, search for and select the ORA_INV_INTERORGANIZATION_TRANSFER_REDWOOD_ENABLED profile option code.
- To use the Redwood Project Transfer page, search for and select the ORA_INV_PROJECT_TRANSFER_REDWOOD_ENABLED profile option code.
- To use the Redwood Miscellaneous Transactions page, search for and select the ORA_INV_MISCELLANEOUS_TRANSACTIONS_REDWOOD_ENABLED profile option code.
- In the Profile Values section, set the Site level to Yes or No. The default value is No.
- Yes = enables the feature
- No = disables the feature
- Click Save and Close. Changes in the profile value will affect users the next time they sign in.
Tips And Considerations
- Transactions are performed in the stocking UOM for an item when the stocking UOM is setup for a subinventory or organization.
- Transactions are processed in online, background, or concurrent modes based on the value of the Transaction Processing Mode profile option.
- Initiate the transactions from a view to default the attribute values from the on-hand record and minimize data entry.
- These are the new actions that were added to the Redwood Item Quantities page:
- Create Subinventory Transfer
- Create Interorganization Transfer
- Create Project Transfer
- You can perform transactions for multiple organizations while staying in the All Organization context. For example, you can perform miscellaneous transactions for an on-hand record in the M1 organization and follow it by a transaction for a record in the M2 organization without having to change the organization to perform transactions.
Key Resources
- Oracle Fusion Cloud SCM: Using Inventory Management guide, available on the Oracle Help Center.
Access Requirements
Users who are assigned a configured job role that contains these duty roles can access this feature:
- Inventory Balances Management Duty (ORA_INV_INVENTORY_BALANCES_MANAGEMENT_DUTY)
- Warehouse Transaction Maintenance Duty (ORA_INV_WAREHOUSE_TRANSACTION_MAINTENANCE_DUTY)
These duty roles were available prior to this update.