Redwood: Manage a Build Plan Using a New User Experience
Supply chains can be complex, with multiple layers of distribution, manufacturing and suppliers in the mix. The build plan facilitates end-to-end analysis of supply and demand across the supply plan. You can now use a Redwood build plan page to quickly narrow down the items, components, resources, and suppliers of interest and to understand the root cause of issues across the supply chain.
This initial release of build plan contains the core capabilities needed to configure and view a build plan. Other functionality available in the classic (non-Redwood) version of build plan, such as editing measures and viewing planning attributes within the build plan, is planned for transition to Redwood in the near future.
Changes have been made in the Redwood version of build plan to simplify how a build plan is configured. The biggest difference from the classic version of build plan is regarding how you select items, resources, and components.
Build Plan Overview
When you open a page that contains build plan, you’ll see something like the following image. The example shows a Build Plan table on a page called the CB Build Plan Page.
How you select plans, execute page-level actions, and create pages is covered in another feature (refer to the Key Resources section). This feature description focuses specifically on build plan.
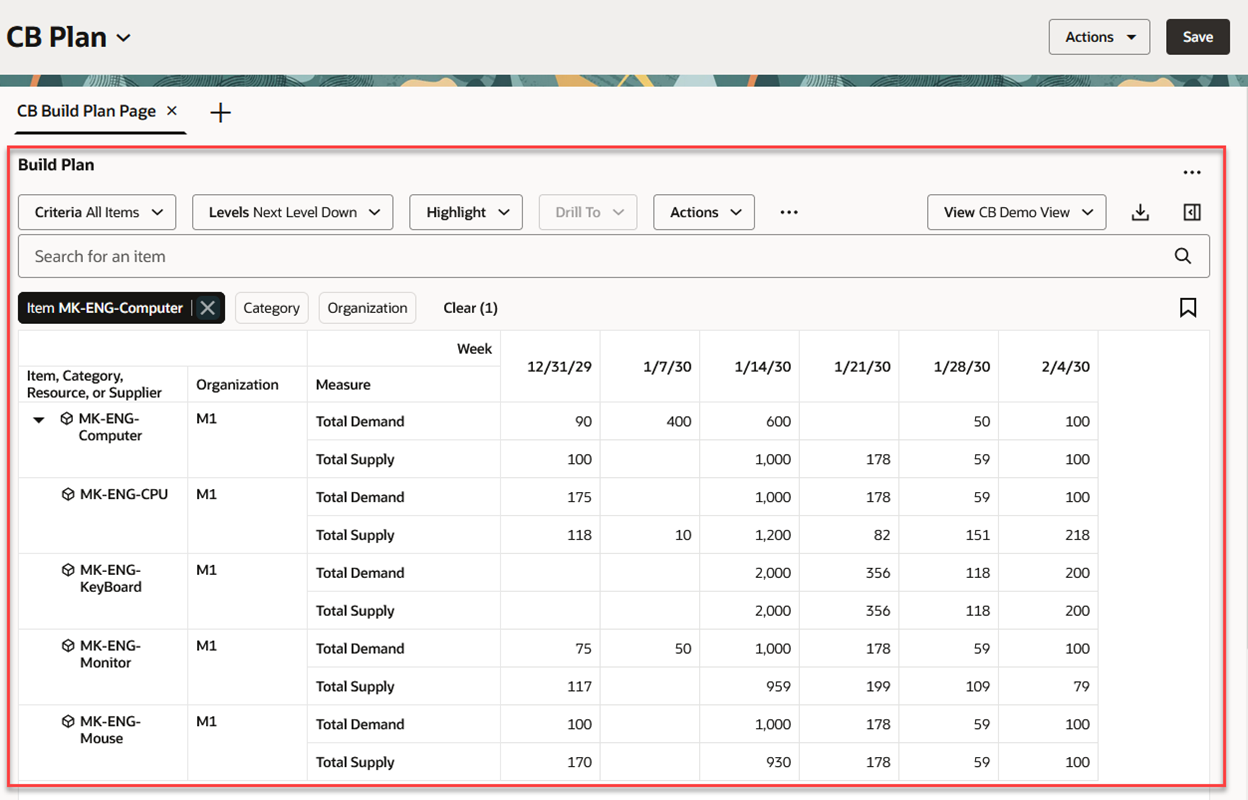
Build Plan Table
Let’s look more closely at the Build Plan table.
Build Plan Toolbar
The following is an image showing the Build Plan toolbar.

Build Plan Toolbar
If you’re familiar with the classic version of build plan, many of the actions on the toolbar will be familiar to you. One thing to be aware of is that the functionality of criteria in Redwood build plan is different from the functionality of criteria in the classic version. This will be explained in detail in the Configuring Criteria section.
The actions on the Build Plan toolbar are as follows:
- Criteria. The option selected on the Criteria menu drives what child items, resources, and suppliers are displayed in the Build Plan table. Unlike the classic version of build plan, Criteria isn’t used to select the root items. The root items are selected using the search component described in the next section of this document. The All Items criteria is the system default, however, you can create a new criteria and use that as your default.
- Levels. The Levels menu determines how far down (or up) in the item structure build plan traverses to retrieve child items, resources, and suppliers. When you select an option from the Criteria menu, the Levels menu is populated with the default level from the selected criteria. You can select a different value to broaden or narrow the levels that are displayed. In the preceding image, Next Level Down was selected automatically when the All Items criteria option was applied. To see all items at all levels of the item structure, you would simply select All Levels Down from the Levels menu.
- Highlight. The Highlight menu assists in diagnosing key exception conditions, such as inventory shortages or resource capacity overloads. To use the highlight feature, you select one or more cells and then select the desired condition you want to highlight from the Highlight menu. The cells related to the condition you select are highlighted using a yellow background. The highlight functionality works exactly like in the classic version of build plan.
- Drill To. You can pass context to another visualization (table or graph) by selecting one or more cells and then choosing a page or visualization from the Drill To menu. This will open the visualization or page. To add more drill-to actions, select the Manage Links action from the Actions (…) menu in the upper-right corner of Build Plan or any other visualization.
- Actions. Use this menu to manage criteria or to save, restore, or delete views. Views are the Redwood counterpart to Layouts in the classic version of build plan.
- More Actions (…). The More Actions menu currently contains a single action, called Show empty rows. By default, empty rows are hidden in the Build Plan table. Select the Show empty rows action to display the empty rows.
- View. Use the View menu to select a view. The view controls the measures, time level, and the number of time buckets to display.
- Export. Exports the Build Plan table to an Excel spreadsheet. The table is exported based on the current view, meaning that the exported spreadsheet contains only the measures and columns that are in the current view.
- Edit View. Opens the Edit view drawer where you specify the measures, the time level, and the number of time buckets to display. Changes you make in the View drawer are temporary until you save the view using the Save View action from the Actions menu.
Selecting Items to Display in Build Plan
Supply Chain Planning uses a common Redwood component to ensure consistent search behavior across all Supply Chain Planning applications. The search component in build plan is responsible for selection of the root items. Later in this feature description we’ll discuss how child items (for example, components), resources, and suppliers are selected.
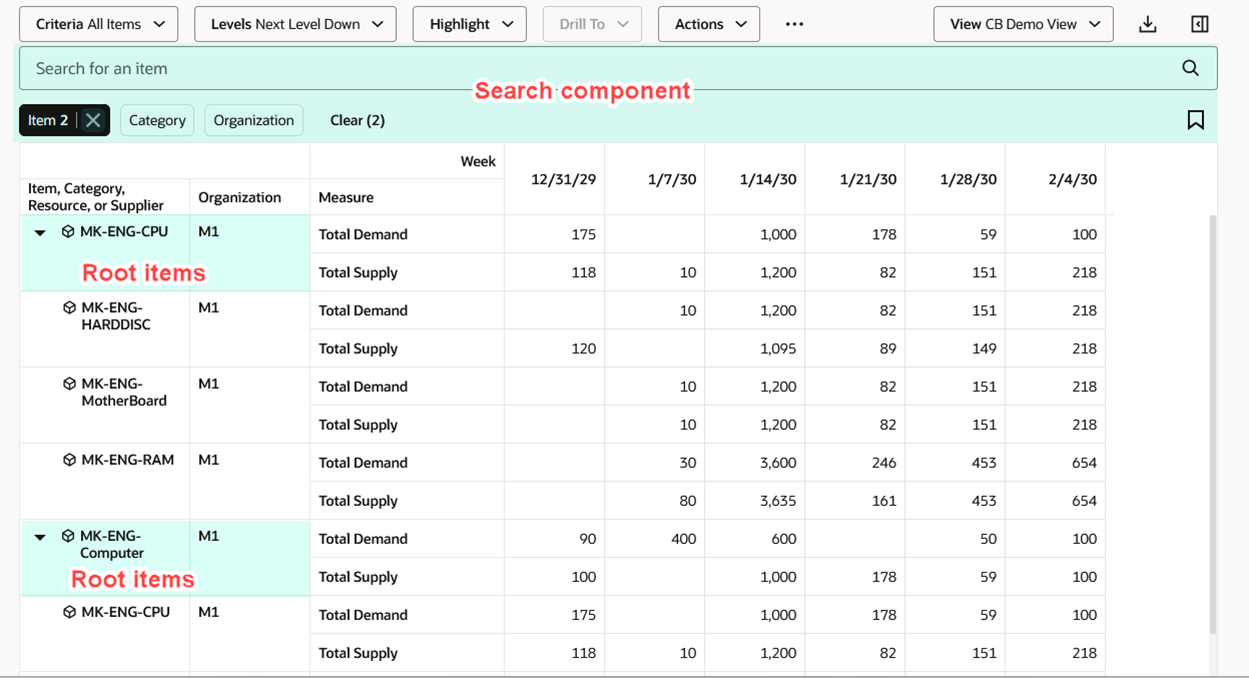
Search Component Determines the Root Items
The following is an image of the search component in build plan.

Build Plan Search Component
- Keyword Search. In build plan the keyword search searches over only the Item column using the contains operator. For example, if you type the text “eng” into the keyword search and press Enter, a build plan is displayed for all items containing “eng,” such as “MK-ENG-Monitor,” “MK-ENG-CPU,” and “MK-ENG-COMPUTER.” Keyword search is case insensitive, making it easy to find the items you’re interested in.
- Filter Chips. You use filter chips to enter column-specific filter criteria. When you press Enter or click outside of the filter chip, the table is updated to show only the rows that meet the selected values.
- Saved Searches. The Saved Searches icon allows you to save the current keyword search and filter chip values under a named saved search. You can also use this action to select an existing saved search, which refreshes the keyword search and filter chip values based on the saved search you select.
When you open the Build Plan visualization without any context, a message is displayed asking you to search for one or more items, or a category of items. You must enter values into the keyword search, or select items or a category before you’ll see any results in a Build Plan table.
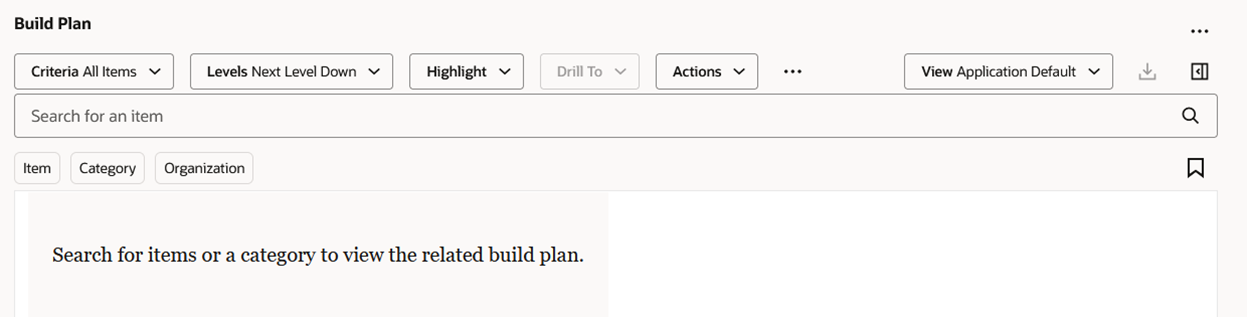
Build Plan Empty State
You can specify the items for which you want to see the build plan in the following ways:
- Use the keyword search to display the build plan for each item matching the keyword search.
- Select one or more items using the Item filter chip.
- Select a category of items. A build plan will be displayed for each item within the category.
- Selecting a saved search, which populates the keyword search or filter chips with saved values.
- Drilling into build plan with context.
Optionally, you can further refine what root items are displayed by using the Organization filter chip.
Once you’ve provided the required search information, a build plan is displayed for each of the qualifying item and organization combinations. In the following image, a build plan is displayed for the item specified in the Item filter chip, item MK-ENG-Computer. The child items, resources, and suppliers that are displayed are those that match the criteria specified in the selected criteria option All Items.
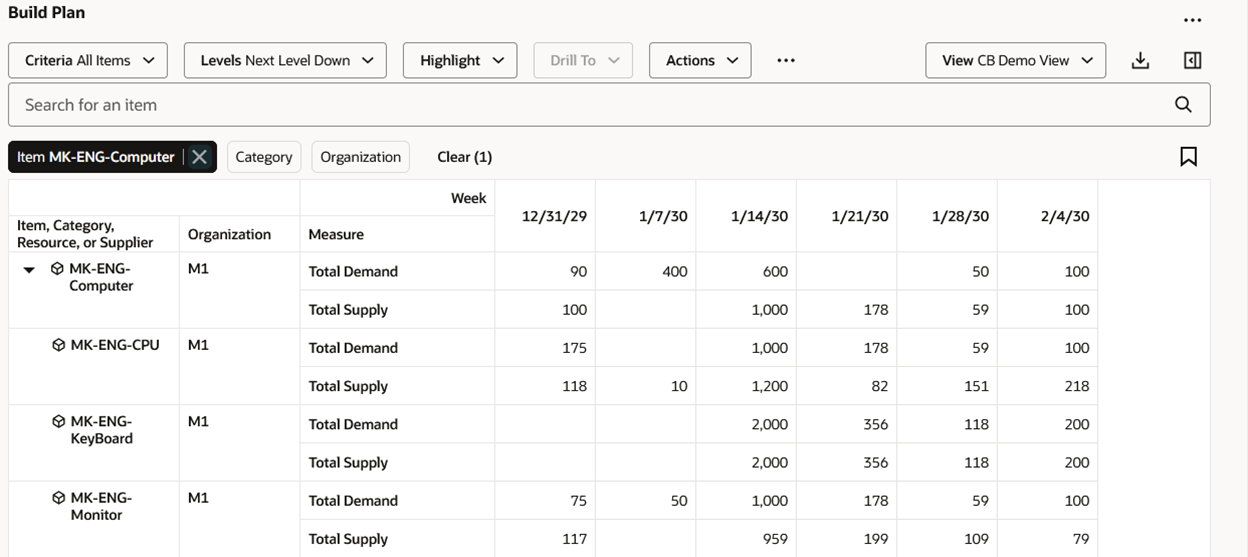
Example Build Plan for a Single Item
Configuring Criteria
Criteria can be created to define the child items (for example, components), resources, and suppliers that appear in the build plan. In the following image, the All Items criteria, in combination with the selected level of Next Level Down, determine the child rows that are shown under the parent item.
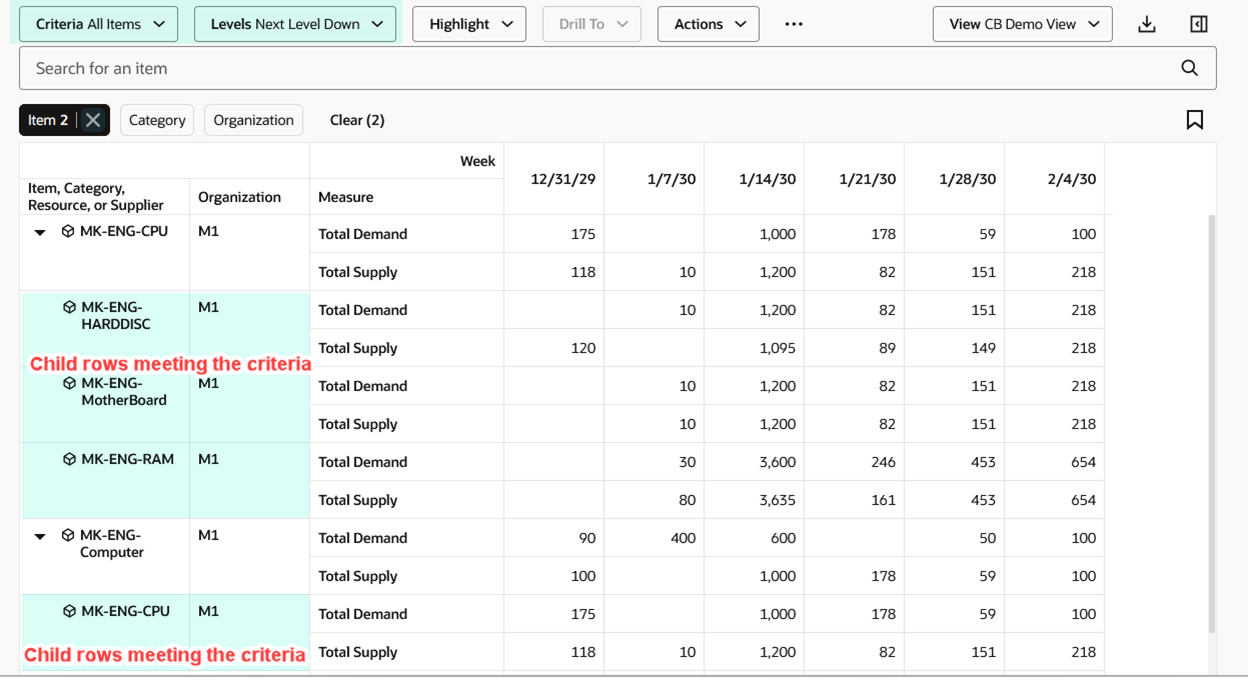
Criteria and Levels Determine the Child Rows
To create new criteria, edit existing criteria, or delete criteria, select Criteria from the Actions menu.
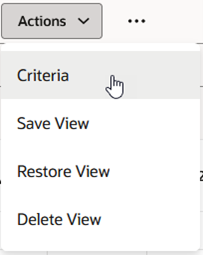
Actions Menu Showing Criteria Action
The Criteria drawer opens and displays the available criteria. In the following image, only the seeded All Items criteria exists. Click the Create button to create a new, named criteria.
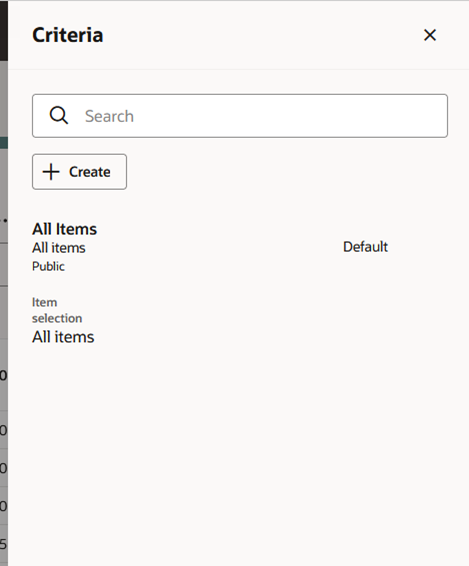
Criteria Drawer Showing the Existing All Items Criteria
After clicking the Create button the New criteria drawer opens.
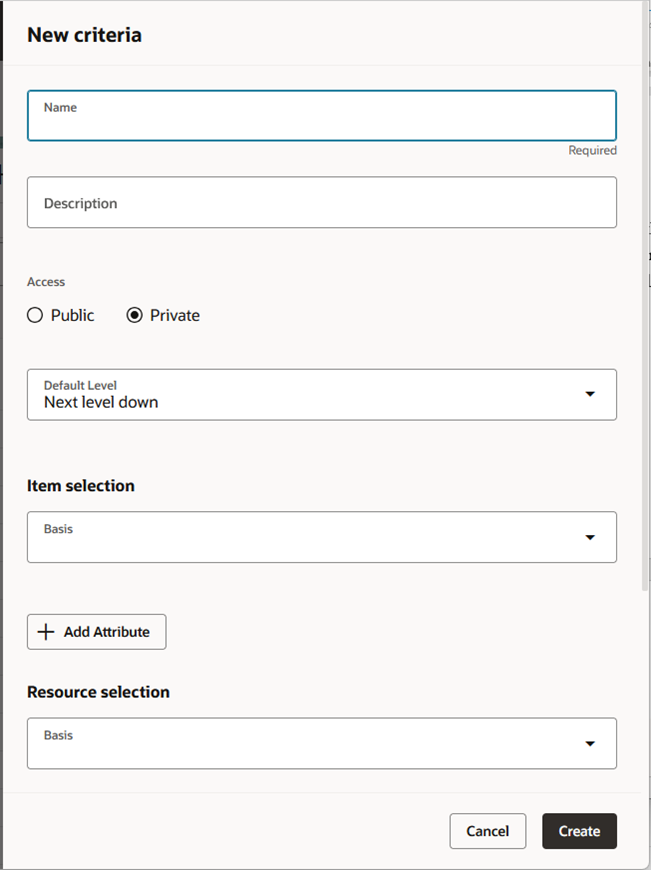
New Criteria Drawer
When creating a new, named criteria, enter the following information:
- Name. Specify a unique name for your criteria.
- Description. Optionally, you can provide a description specifying what the criteria is used for.
- Access. If Public is selected, then anyone can see and use your criteria. If Private is selected, then only you can see the criteria.
- Default Level. Specify the level that’s automatically selected when selecting the criteria. You can override this value when displaying build plan results by using the Levels button in the toolbar.
- Item selection. Specify the criteria used to determine what child items are displayed.
- Resource selection. Specify the criteria used to determine what resources are displayed.
- Supplier selection (not shown). Specify the criteria used to determine what suppliers are displayed.
- Set as default (not shown). Specify to use this criteria as your default anytime you open or drill into build plan. This option is user-specific, so your default can be different from another user’s.
Let’s look at the item, resource, and supplier sections of build plan criteria in greater detail.
Item Selection
The following image shows the available basis values for item selection.
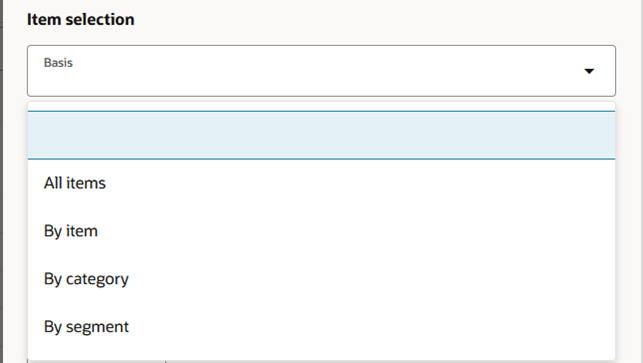
Item Selection Basis Values
The valid values are:
- All items. Select this value for basis if you want to include all items encountered when traversing item structures.
- By item. Select one or more items for inclusion in the build plan. When traversing item structures, if any of these items are encountered, they’ll be included in the build plan.
- By category. Select a category of items for inclusion in the build plan. When category is selected, you’ll need to specify both a catalog and a category. As item structures are traversed, only items that belong to the category are displayed in the build plan.
- By segment. Select segments within a segment group for inclusion in the build plan. When traversing item structures, only the item and organization combinations that are members of the segment are displayed in the build plan.
In addition to using basis for item selection, you can also specify item attribute values. For example, you can specify that the build plan displays only items that are critical components or items that are substitute components. You can also specify dynamic attributes that change each time a plan is run. For example, to show only items that have a late supply or a shortage based on the last plan run.
The following image shows the item attributes that can be included in the criteria. The valid values are: Critical Component, Late Supply, Shortage, and Substitute Component.

Available Attributes for Item Selection
If you select All Items as the basis for item selection, then you can’t specify any item attribute values. All other basis values can be used in combination with item attributes. For example, you can specify that build plan displays only the critical components that belong to the Laptop category which have a late supply. When defining selection criteria using a combination of basis and one or more attributes, all conditions must be met for the item to appear in build plan.
Resource Selection
The following image shows the available basis values for resource selection.
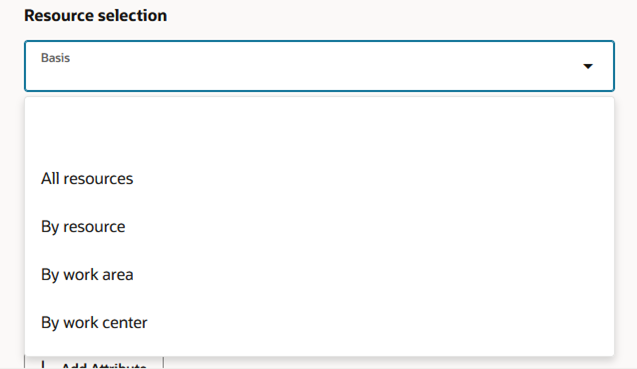
Resource Selection Basis Values
The valid values are:
- All resources. Select this value for basis if you want to include all resources encountered when analyzing an item structure’s associated work definition.
- By resource. Select one or more resources for inclusion in the build plan. When analyzing an item structure’s associated work definition, if any of these resources are encountered, they’ll be included in the build plan.
- By work area. Select this value for basis to include all resources within the selected work areas encountered when analyzing an item structure’s associated work definition.
- By work center. Select this value for basis to include all resources within the selected work centers that are encountered when analyzing an item structure’s associated work definition.
In addition to using basis for resource selection, you can also specify resource attribute values. For example, you can specify that build plan displays only resources that are bottleneck resources or resources that are alternate resources. You can also specify dynamic attributes that change each time a plan is run. For example, to show only resources that are overloaded based on the latest plan run.
The following image shows the resource attributes that can be included in the build plan criteria. Valid values are: Alternate Resource, Bottleneck, and Overload.
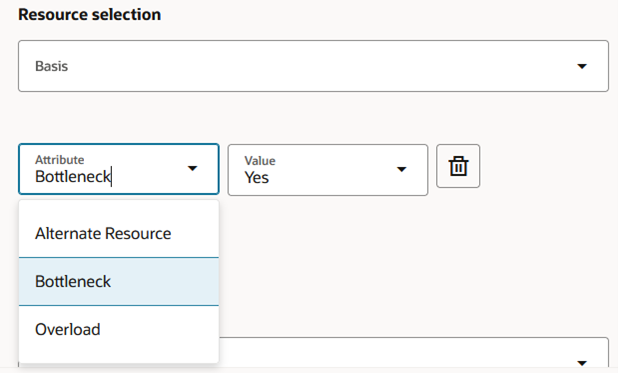
Available Attributes for Resource Selection
If you select All resources as the basis for resource selection, then you can’t specify any resource attribute values. All other basis values can be used in combination with resource attributes. When defining selection criteria using a combination of basis and one or more attributes, all conditions must be met for the resource to appear in build plan.
Supplier Selection
The following image shows the available basis values for supplier selection.
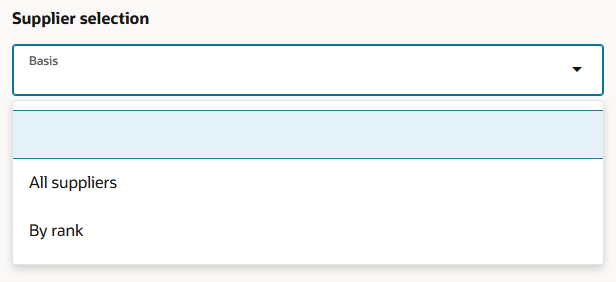
Supplier Selection Basis Values
The valid values are:
- All suppliers. Select this value for basis if you want to include all suppliers that have orders for buy items encountered when traversing item structures.
- By rank. Select one or more suppliers with the specified rank for inclusion in the build plan. Only suppliers with the selected rank that have orders for items encountered when traversing item structures are included.
In addition to using basis for supplier selection, you can also specify supplier attribute values. These attributes are dynamic, meaning the value is determined each time a plan is run. For example, you can show only suppliers who have a late supply, or you can show only suppliers whose capacity is overloaded.
The following image shows the supplier attributes that can be included in the build plan criteria. Valid values are Late Supply and Overload.
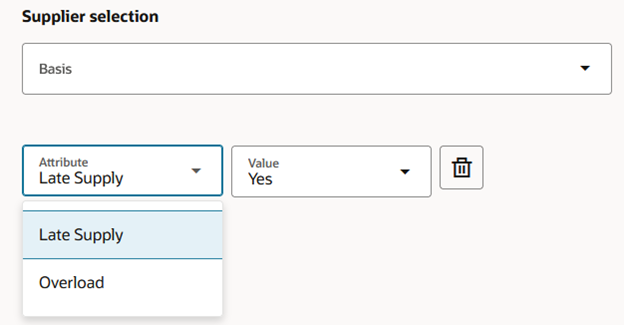
Available Attributes for Supplier Selection
If you select All suppliers as the basis for supplier selection, then you can’t specify any supplier attribute values. All other basis values can be used in combination with supplier attributes. When defining selection criteria using a combination of basis and one or more attributes, all conditions must be met for the supplier to appear in build plan.
Once you’ve created your criteria, you can see it listed in the Criteria drawer. You can also view and search for any public criteria created by other users. You can edit or delete a criteria only if you’re the owner of the criteria. These actions are accessed from the Actions menu next to a named criteria in the Criteria drawer.
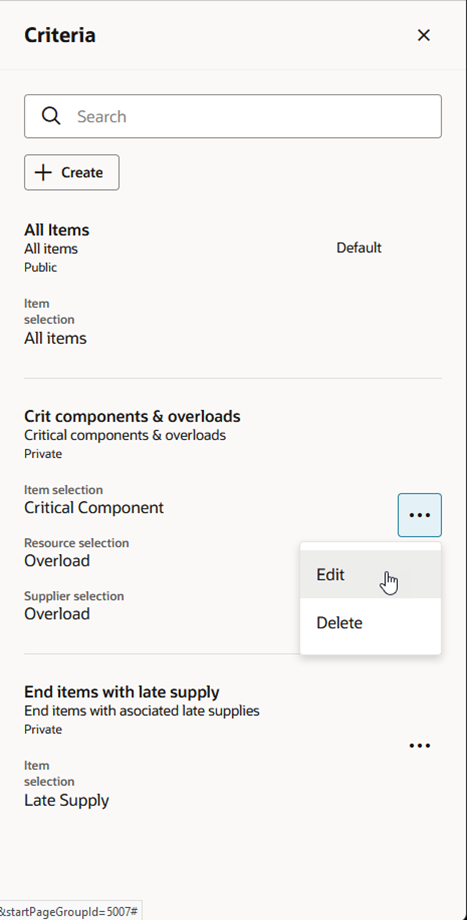
Criteria Actions Menu
Let’s look at a couple of typical examples of build plan criteria.
Example 1: Critical components and overloaded resources and suppliers
In this example, the criteria named Crit components & overloads has been configured to show only the critical components at any level down in the item structure. In addition, only overloaded resources and suppliers that are relevant to the build plan are displayed. This type of criteria is useful to spot problems that exist in the supply chain.
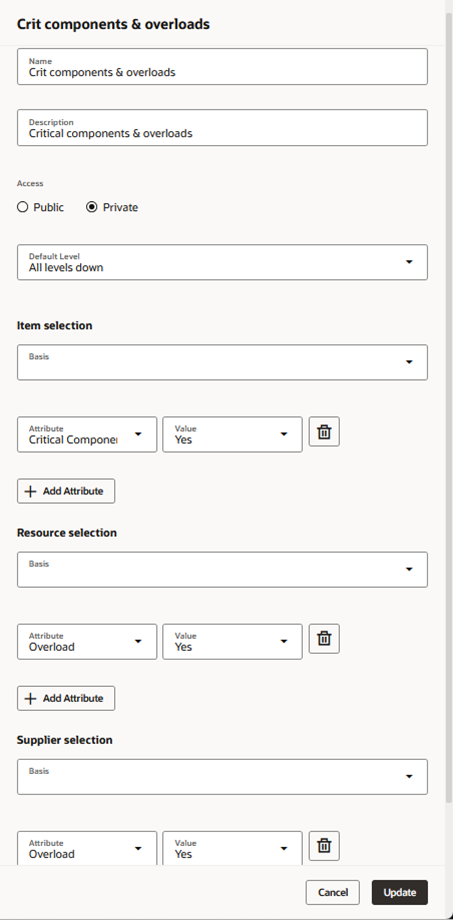
Critical Components and Overloads
The following image shows the build plan for an end item, MK-ENG-Computer, when the Crit components & overloads criteria is selected. The build plan shows two overloaded resources, MK-COMP-R3 and MK-COMP-R4, and one critical component, MK-ENG-RAM.
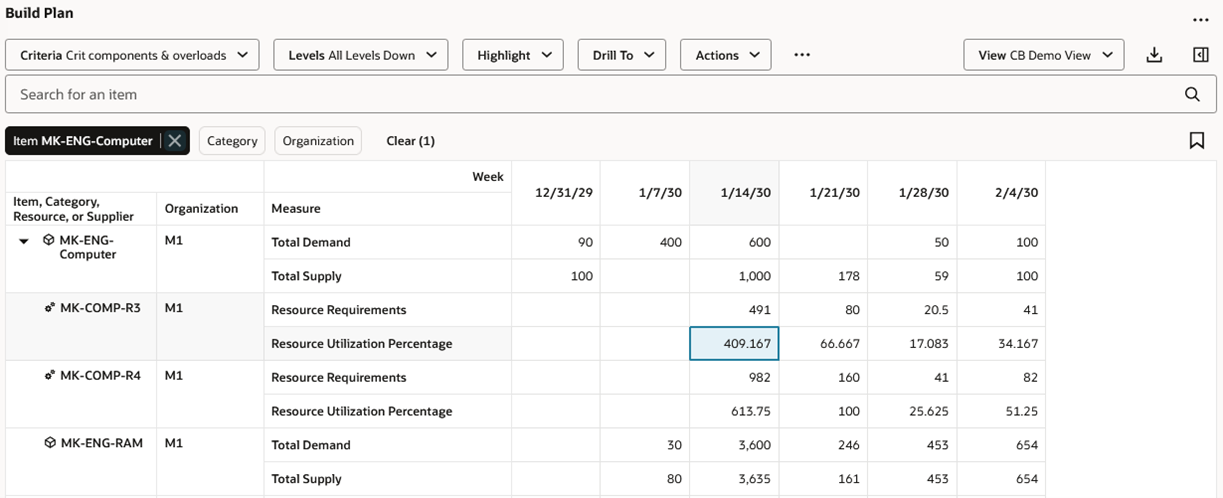
Example Build Plan Using End Item with Critical Components and Overloads Criteria
Example 2: End items with an associated late supply
In this example, only the end items that have at least one associated late supply are shown in the build plan. The resource and supplier criteria have been left blank, which means the build plan won’t include any resources or suppliers. This type of criteria is useful to understand the impact supply issues have on end items.
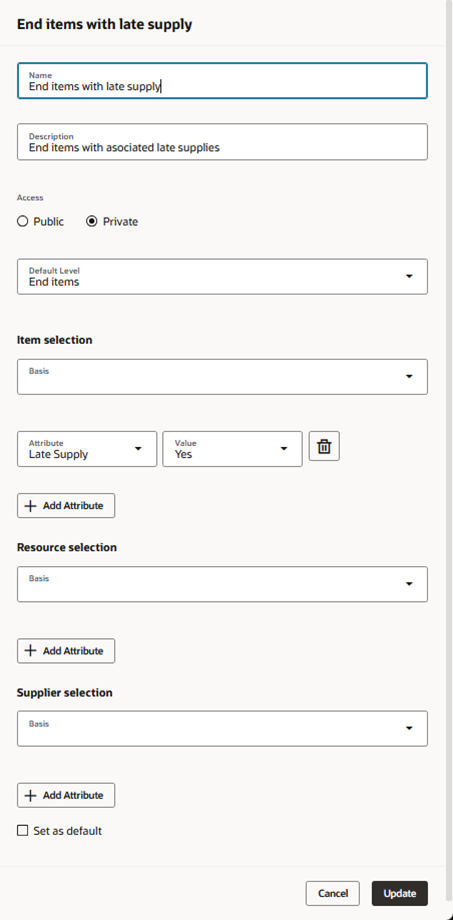
End Items with Associated Late Supplies
The following image shows the build plan for a component item, MK-ENG-RAM, when the End items with late supply criteria is selected. The build plan shows that two end items, MK-ENG-CPU and MK-ENG-Computer, have an associated (also known as pegged) late supply. Using these results, you can spot problems, such as weeks when the projected available balance is negative.
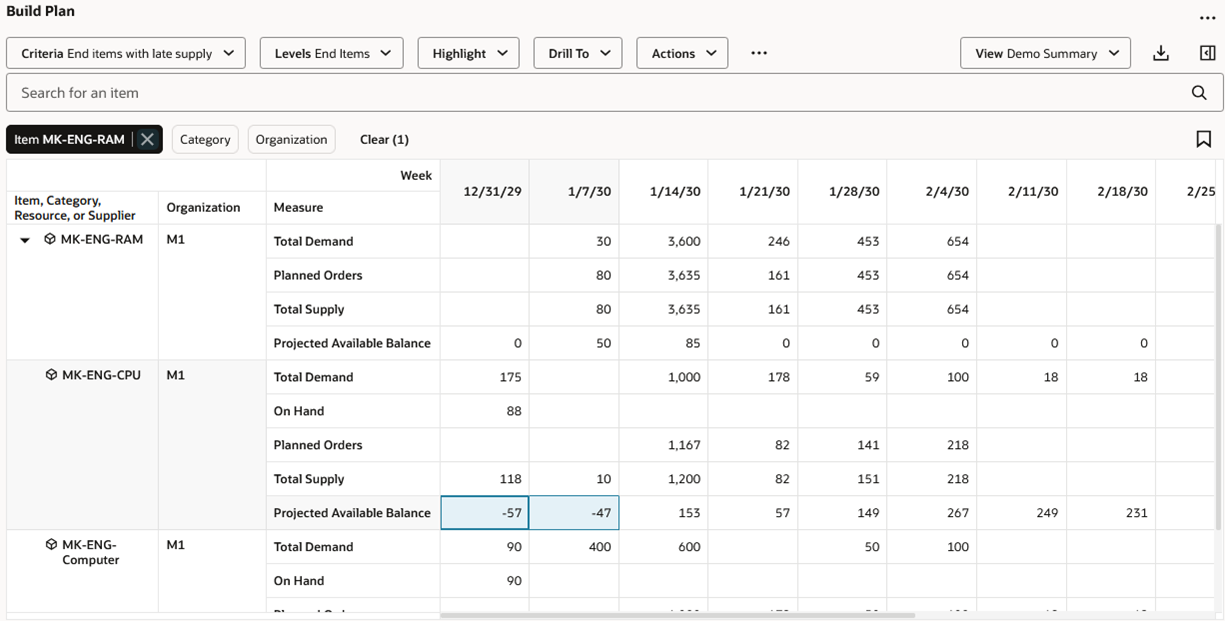
Example Build Plan Using End Items with Late Supply Criteria
In addition to configuring criteria to select items, resources, and suppliers, you’ll also want to configure the data that’s displayed when viewing the items, resources, and suppliers. This is done using views.
Working with Views
Views control the measures, time level, and the number of time buckets displayed in a build plan. You can switch between views to see the data needed for the type of analysis being performed.
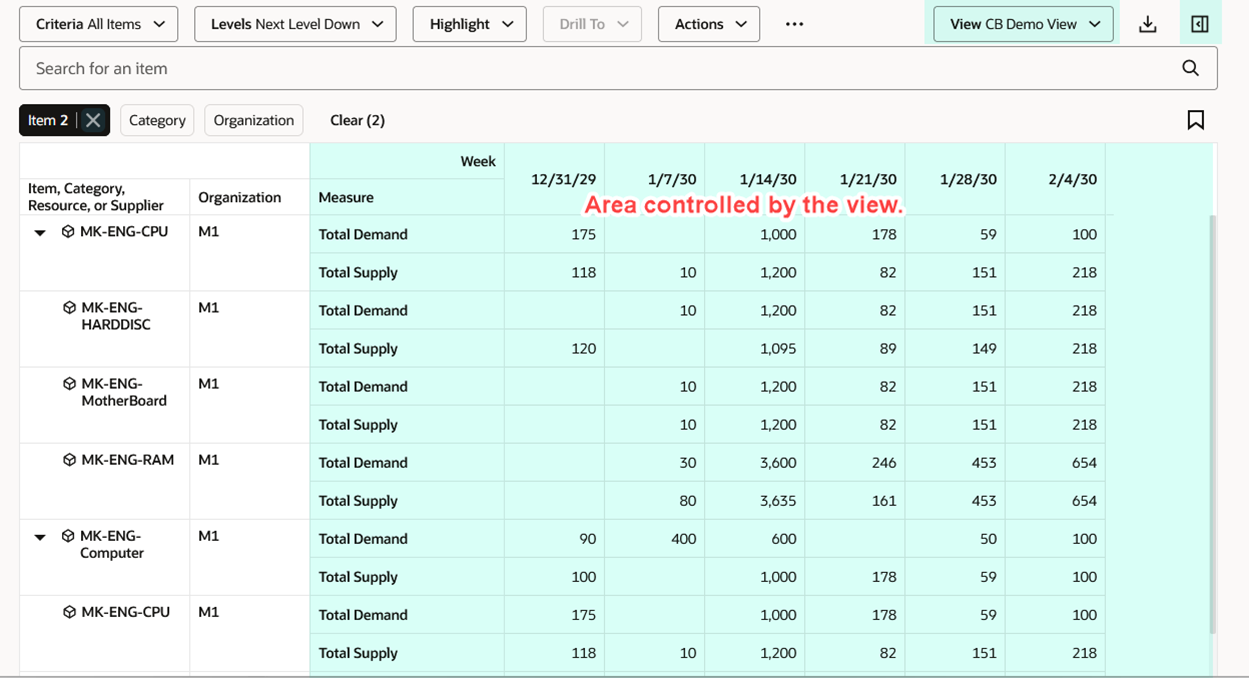
Build Plan Cells Controlled by Views
The Edit View icon in the upper-right corner of the page is used to make changes to the current view.
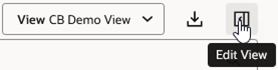
Edit View Icon
The Measures tab in the View drawer is used to specify the measures that will be visible in the build plan. Items, resources, and suppliers each have their own set of measures that are available for display.
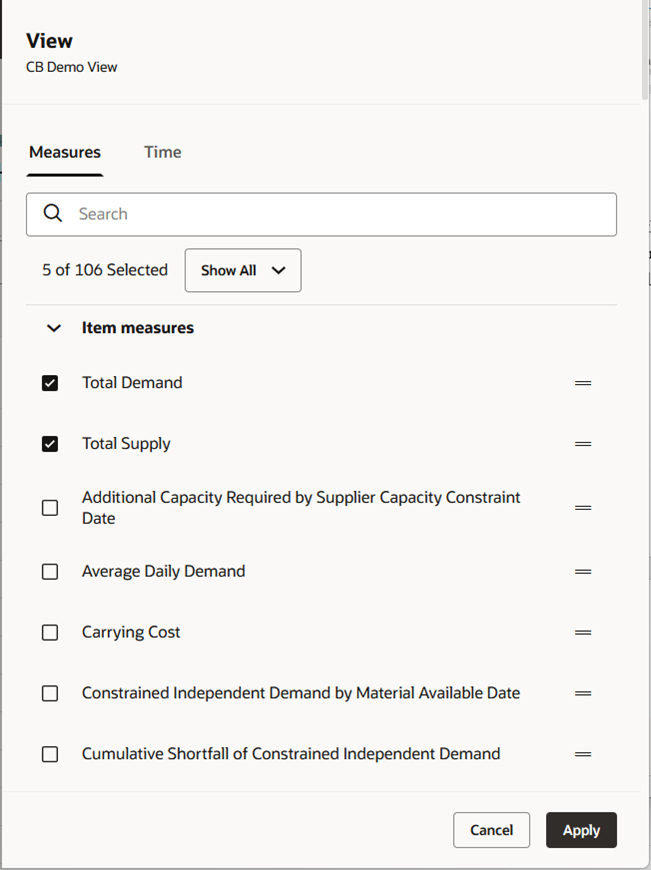
View Drawer Showing Measures Tab
Only measures that conform to the required dimensions are displayed in the View drawer.
- Item measures must conform to item, organization, and time dimensions.
- Resource measures must conform to item, organization, resource, and time dimensions.
- Supplier measures must conform to item, organization, supplier, and time dimensions.
When creating a user-defined measure for use in build plan, the measure’s definition must include at least the required dimensions listed.
The Time tab in the View drawer is used to specify time bucket level displayed in build plan. If you select Supply planning calendar for the time bucket level, the Supply Planning Calendar and Supply Planning Buckets settings from plan options are used when displaying the build plan.
Optionally, you can specify how many time buckets, starting from the plan start date, to display. If left empty, the build plan is displayed for the entire planning horizon. Limiting the number of time buckets to display can reduce the wait time before build plan results are displayed.
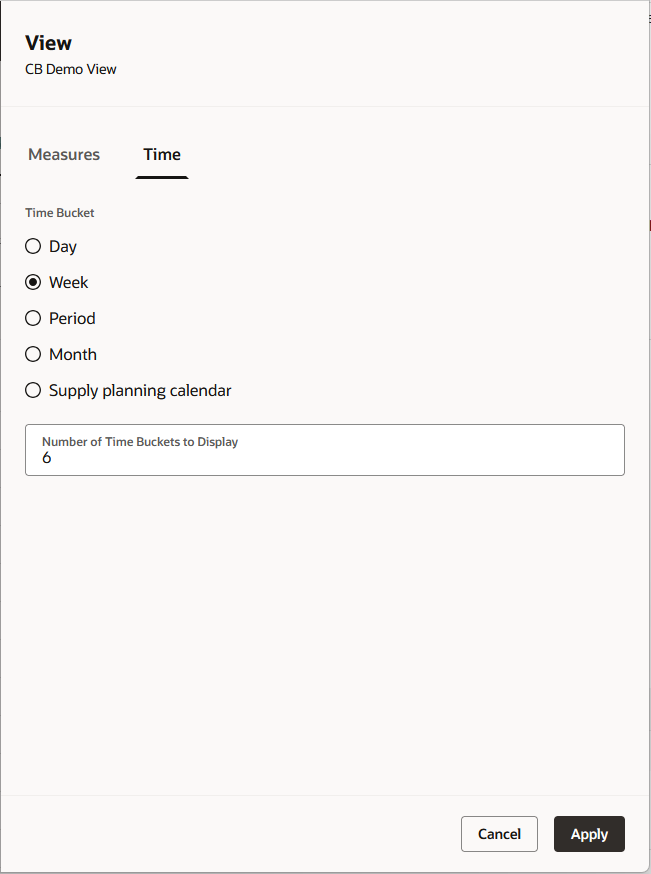
View Drawer Showing Time Tab
When you click Apply on the View drawer, the build plan results are automatically refreshed to reflect your latest choices. Any changes you’ve made to the view are temporary. To make those changes permanent, you’ll need to save the view by selecting Save View from the Actions menu
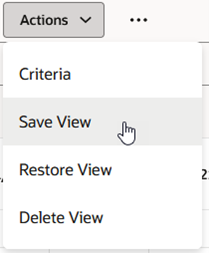
Save View Action
From the View drawer, you can either update the current view by selecting the Save as existing option, or you can create a new view by selecting the Save as new option.
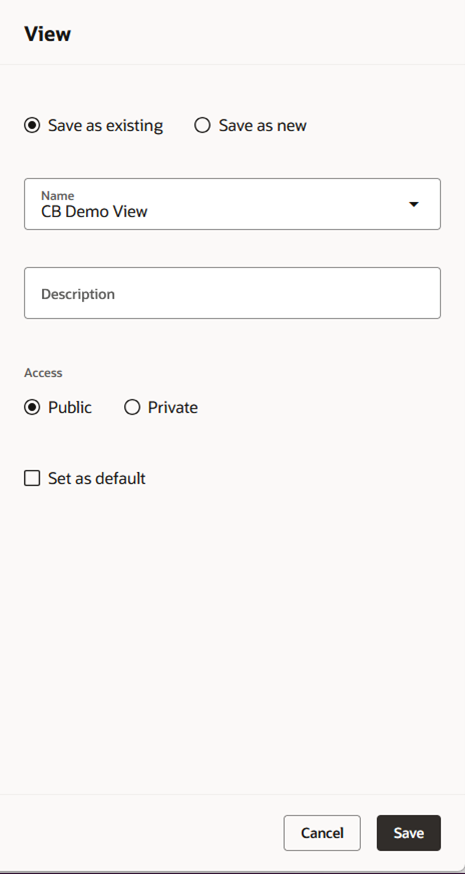
Save View Drawer
When saving a view, if you aren’t the owner of the current view, the Save as new option is automatically selected for you. You aren’t allowed to save changes to a view that was created by another user.
Views with access set to Private can only been seen by you. Views with access set to Public are visible and can be used by other build plan users.
If you select the Set as default checkbox, this view is automatically selected for you when build plan is first opened.
Clicking the Save button saves the view and automatically sets the saved view as the current view.
In addition to the Save View action, the Actions menu contains two other, view-related actions.
- Restore View. If you made temporary changes to the current build plan view and decide that you want to discard those changes, you can select the Restore View action. This refreshes the table based on the view as it was last saved. Any unsaved view changes are discarded.
- Delete View. This deletes the current view. You’ll be asked to confirm your action. You can only delete a view if you’re the owner of it.
Let’s look at a couple of examples of build plan views.
Example 3: Application Default view
The following image shows an example of a build plan where the Application Default view is selected. This high-level view displays measure values for only a few measures at the period level.
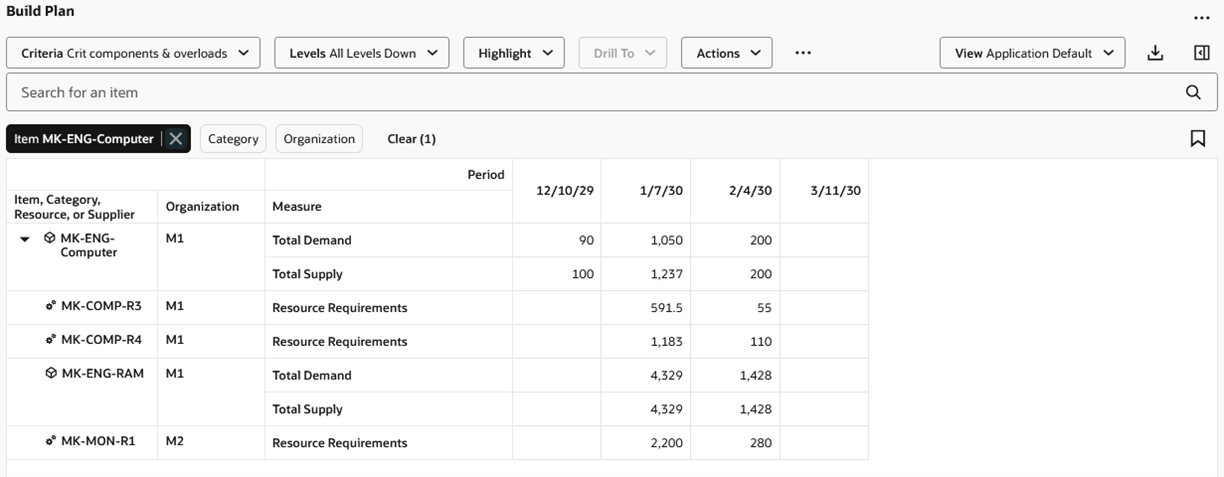
Build Plan Using Seeded Application View
Example 4: Detail view
The following image shows how the Build Plan table can change when a different view is selected from the one shown in Example 3. More measures are displayed and the time buckets changed from period to week.
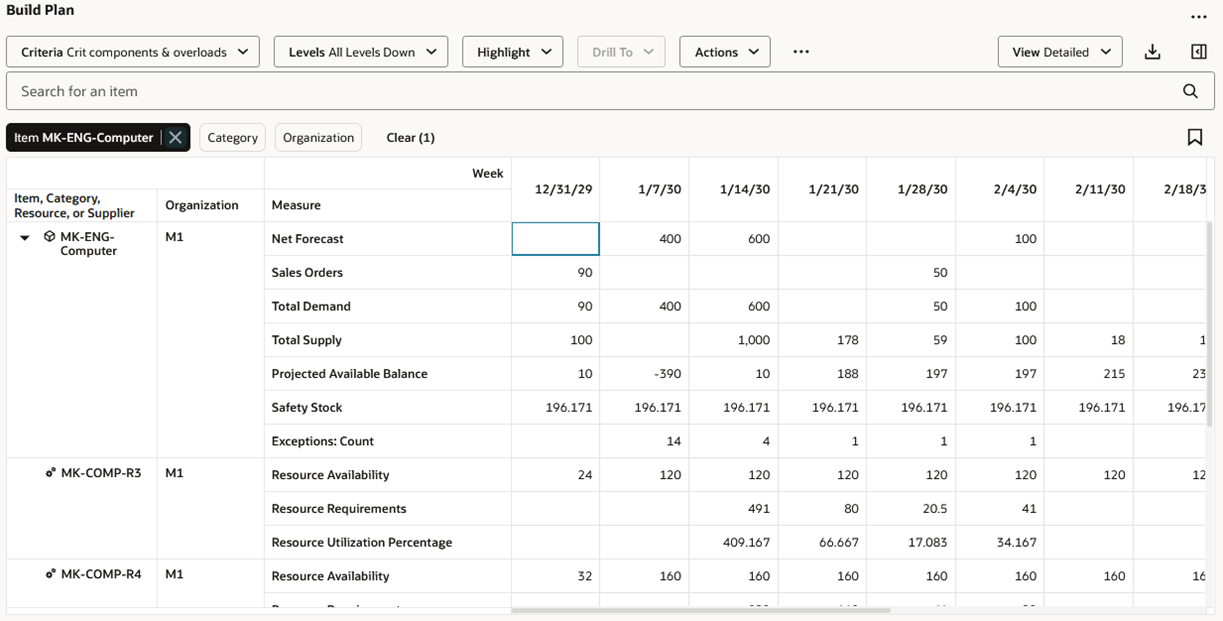
Build Plan Using Detailed View
Depending on the type of analysis you’re performing, you can switch between views that provide a high-level summary, to more granular views that provide greater detail.
Highlighting Cells
The highlighting capabilities in build plan let you explore the pegging relationships between supplies and demands across supply chain levels. This is useful in determining the root causes for conditions such as inventory shortages or resource capacity overloads.
To use the highlighting feature, select one or more demand or supply cells, and then choose an action from the Highlight menu. The Highlight actions that are available for selection are dependent on whether you’ve selected demand cells or supply cells. If you select a combination of both demand and supply cells, only the Remove Highlighting action is available.
The following image shows the Highlight actions that are enabled when one or more supply cells are selected. Highlight actions such as Pegged Supplies, Substitute Components, and Alternate Resources aren’t available when selecting supply cells.
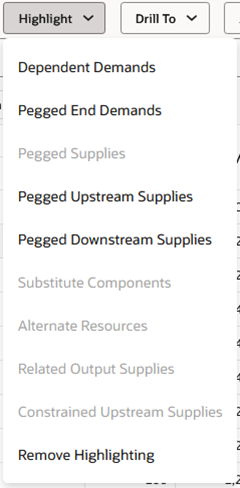
Highlight Menu When Supply Cells Are Selected
The following image shows the Highlight actions that are enabled when one or more demand cells are selected. Highlight actions such as Dependent Demands and Pegged End Demands aren’t available when selecting demand cells.
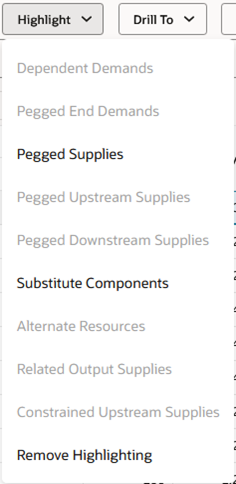
Highlight Menu When Demand Cells Are Selected
The following is an example of what happens when you select a highlighting action. The Total Supply cell for Item MK-ENG-CPU in organization M1 for the week of 1/14/30 was selected when the Pegged Upstream Supplies action was chosen. The related upstream supply cells are highlighted.
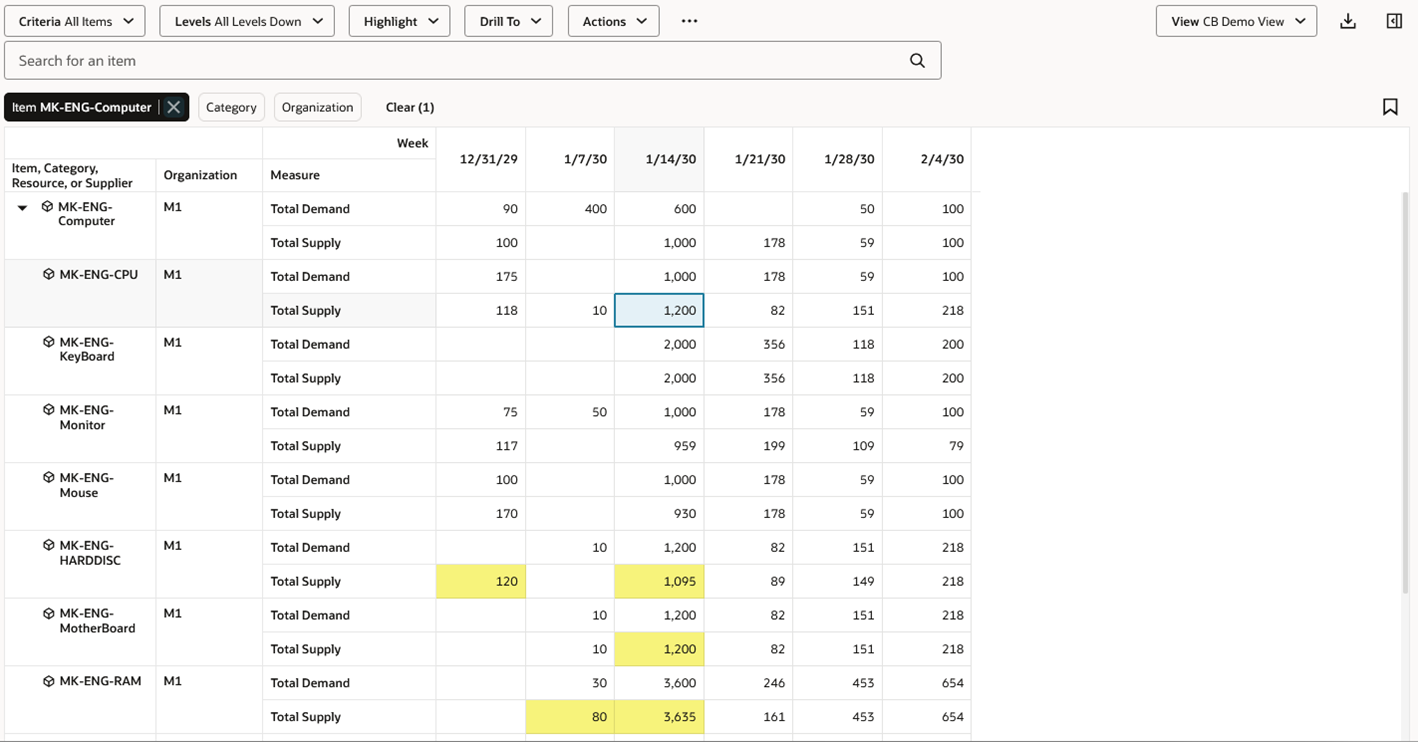
Example of Highlighting Upstream Supplies
The following table contains information on each Highlight action.
| Highlight Action | Description | Selected Cell(s) | Highlighted Cells |
|---|---|---|---|
| Dependent Demands | Highlights the dependent demands related to the selected supplies. | Any supply measure cell. | The Total Demand cells that contain the dependent demands related to the selected supply cells. |
| Pegged End Demands | Highlights the end demands that peg to the supplies within a selected supply cell. | Any supply measure cell. | The Net Forecast, Manual Demand, Sales Orders, or Total Demand cells that contain the end demands pegged to the selected supplies. |
| Pegged Supplies | Highlights the supplies that end peg to the selected demand cell. | Any demand measure cell. | The supply measure cells corresponding to the supplies that end peg to the selected demand. |
| Pegged Upstream Supplies | Highlights the supplies that peg up to the selected supply cell. | Any supply measure cell. | The supply measure cells corresponding to the upstream supplies that peg to the selected supply. |
| Pegged Downstream Supplies | Highlights the downstream supplies that peg to the selected supply cell. | Any supply measure cell. | The supply measure cells corresponding to the downstream supplies that peg to the selected supply. |
| Substitute Components | Highlights the Projected Available Balance measure of the substitute components to the component whose demand cell is selected. | Total Demand cells | The Projected Available Balance cells and the Total Supply cells of the related substitute components, for the time buckets up to and including the time bucket of the selected cells. |
| Alternate Resources | Highlights the alternate resource cells corresponding to a resource requirement cell. | Resource Requirement cells | The Resource Availability cells of related alternate resources, for the time buckets up to and including the time bucket of the selected cells. |
| Related Output Supplies | Highlights other supplies that are related to the selected supply through a co-product or by-product relationship. |
Planned orders, Work orders, Planned order co-product, Work order co-product, Planned order by-product, Work order by-product |
The supply cells that are related to the selected supplies through a co-product or by-product relationship. |
| Constrained Upstream Supplies | Highlights related supplies, resources, and supplier-related measures for a selected demand in a capacity constrained plan. | Any end demand or independent measure cell |
The supply, resource, and supplier cells for constrained resources and suppliers related to the demand. |
| Remove Highlighting | Removes all highlighting. | Not selection dependent | Removes all highlighting currently displayed in the Build Plan table. |
Steps to Enable
You don't need to do anything to enable this feature.
Tips And Considerations
- Rules created in the classic version of build plan are visible as criteria in the Redwood version of build plan.
- The drill-to context brought into build plan is mutually exclusive with the search fields. If you enter anything into the keyword search field or apply a filter chip after drilling into build plan, the new search criteria replaces the drill-to context.
- Use the Drill To action to show the details of one or more selected cells. The Drill To action is a replacement for the Show Details action that exists in the classic version of build plan
Upgrade Considerations
- You'll need create new build plan criteria in Redwood. The criteria and rules created in the classic version of build plan aren’t migrated.
- The layouts you created in the classic version of build plan are automatically available in the Redwood version of build plan. In Redwood they’re called views.
Key Resources
- See Redwood: Analyze Supply Plans Using a Configurable Redwood Page feature
Access Requirements
Users who are assigned a configured job role that contains these privileges can access this feature:
- View Planning Items (MSC_VIEW_PLANNING_ITEMS_PRIV)
- Edit Planning Items (MSC_EDIT_PLANNING_ITEMS_PRIV)
- View Planning Objects Using REST Service (MSC_VIEW_PLANNING_OBJECTS_REST_SERVICE_PRIV)
View Planning Items and Edit Planning Items privileges were available prior to this update. View Planning Objects Using REST Service is a new privilege.