Redwood: Manage Items Using a New User Experience
You can now use the Redwood user experience to view or modify items. Additionally, you can edit item attributes such as order modifiers in a plan or a simulation set or add items to a simulation set for planning analysis.
Items Overview
You can view the items table on the Items page. Items can be viewed in three distinct modes, Plan, Simulation Set, and Plan Inputs. However, in this release, in a simulation set, you can’t create or delete an item.
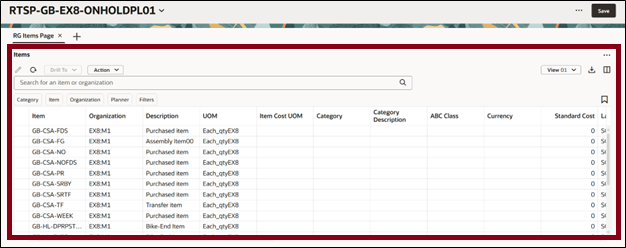
Items Table
Items Toolbar
The following screenshot shows the Resource toolbar.

Items toolbar
The actions available on the Items toolbar are:
- Edit: Modify the attributes related to items.
- Refresh: Select this option to:
- Notify you if there are unsaved changes. Any unsaved changes made to the table are discarded.
- Remove any column filters or column sorting that you’ve applied. See the Applying Column Filters and Sorting section for more information.
- Query the data again using existing filters, such as drill-to context or selected filters.
- Drill To: Pass the context to another table or graph by selecting one or more items. This action will open the selected table or graph on a different temporary page. To add more Drill To actions, select Manage Links from the Actions menu.
- Action: Save, restore, or delete views. Views are equivalent of Layouts in the classic Resource page version.
- View: Configure the table by selecting the columns to display and arranging them in your preferred order. You can quickly switch between views to show the information most relevant to your task.
- Export: Export the records. Only the columns in the current view are included in the exported spreadsheet in the same order as they appear in the table.
- Columns: Select and arrange the columns in your preferred order in the Item Structures table to suit your needs. You can reorder columns by grabbing the handle and moving the column up or down in the Columns drawer or drag and drop the columns to rearrange their order directly in the table.
Searching and Filtering Items
You can search for items using the search bar and the suggested filters.

Items Search Component
Use the search and suggested filters to assist in locating and filtering specific items as follows:
Keyword search bar: Search across multiple columns based on the text entered. For items, the keyword search operates specifically over the Items and Organization columns, using the contains operator. For example, just type ITE in the keyword search field and press Enter or click the search icon. This will display a list of all item names containing ITE, such as ITEMS1. Keyword search isn’t case sensitive.
Suggested filters: You can search for items using the suggested column-specific filter criteria. For example, you can filter items by selecting multiple item names and one or more organizations from the Organization filter. After you select the filter criteria, press Enter or click outside the filter. The table updates to display only the rows that match the selected criteria.
Filters button: Select this suggested filter to access additional filtering options, that aren’t available through the suggested filters. Use these filters for more data refinement.
Saved Searches: You can save and name your current keyword search and suggested filters. You can reuse the saved searches so that you can quickly reapply frequently used search criteria without manually resetting the filters each time.
Filters Drawer
You can filter an item table further by clicking the Filters button, which opens the Filters drawer. The available filter criteria options are based on the data type of the selected column.
Searching with numeric filters
For filtering a numeric column, you can specify both an operator such as equals, greater than, less than, and a value. For example, if you choose the Between operator, enter the From and To values to define a numeric range.
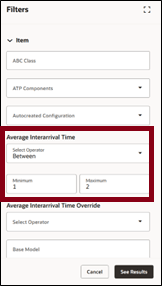
Filtering Items Using Numeric Filters
Searching with single or multiple values
You can select a single or multiple values from the columns that has a list of values to filter the required data. However, in certain cases where only binary values such as Yes or No are available, you can only select a single value.
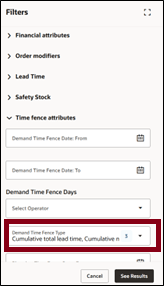
Filtering by Selecting Multiple Values in a Filter
Searching with free text
You can filter the resources by entering alphanumeric text in columns that don’t have predefined values. For example, filtering by items that contain the words high moving in ABC Class field.
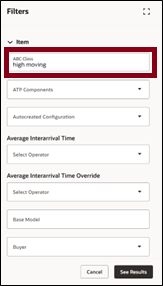
Filtering Resources Using Keywords
After specifying the desired filter conditions, click the See Results button. The results are displayed based on the filter criteria you chose. You can also see the same suggested filters with the other filters. The table refreshes and reflects the active filters. For example, in the following screenshot, the table is filtered with the description Purchased item. The table is updated to display only those records that have the description as Purchased item.
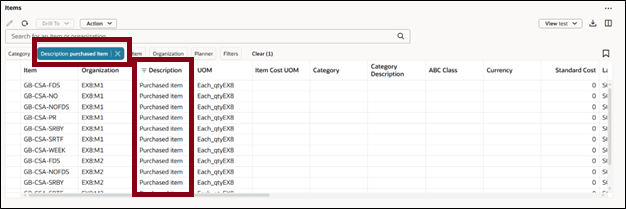
Active Filter Applied
Drill In and Drill to
You can seamlessly navigate between related tables using the Drill In and Drill To feature while maintaining the context based on specific filtering criteria.
Drill-To Example: From Supplies and Demands to Items Table
In this example, an Items table is opened via a Drill-To action from the supplies and demands table. The Filtered By value in the table view displays the active columns and filter criteria applied during the drill action.

Filtering Using Drill To Option
Drill-To Example: From Items Table to Supplies and Demands
In this example, a supplies and demands plan table was opened using a Drill-To action from the items table. The Filtered By value in the table view displays the active columns and filter criteria applied during the drill action. These contextual filters ensure that you are directed to the relevant subset of data, streamlining workflows and improving focus.

Filter Using Drill-To Context
Column Filters and Sorting
Column filters are ad-hoc filters used to further refine your results. To access column filters, hover over the column header and click the Filter icon as shown in the following screenshot.

Invoking Column Filters
After you click the filter icon, a dialog box opens. Pick an operator and enter the applicable criteria.
For certain columns such as Item and Organization, you can enter directly into the column filter input.
The following image shows the Item column filter.
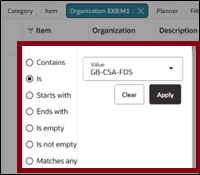
Column Filters
After clicking Apply, the table is filtered accordingly. In this example, the Items table displays only the items specified in the column filter.

Column Filter Result with Keyword Search
Here’s some additional information about column filters:
- The operators available vary by data type. Date fields and numeric fields have different operators than alphanumeric fields.
- You can remove a column filter by clicking the Clear button on the column filters dialog box.
- Column filters are retained when keyword search or suggested filters are changed.
- Column filters can be used in combination with drill-to context.
- All column filters are cleared when you click the Refresh icon.
- Column filters are separate from the Redwood search component that’s responsible for saved searches. Consequently, column filters aren’t included in saved searches.
In addition to filtering, you can also modify the order in which resources are displayed by applying column sorting. To sort the columns, hover over a column heading to reveal the Sort icon. Click the Sort icon to toggle the sorting order in ascending and descending order.
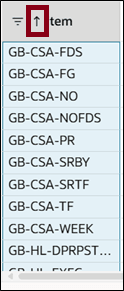
Invoking Column Sorting
You can only sort one column at a time. If you try to sort another column, the sorting applied to the previously sorted column is automatically removed. Column sorting is removed if you select Refresh.
Viewing and arranging Columns
You can view the columns relevant to your plans and reorder them.
Click the Columns icon to open the Columns drawer. The drawer displays all the available columns. Select all those columns that you want to be displayed. Reorder the column by dragging it up or down.
For example, in the following image the Description column is currently hidden. To make the column visible, select the column name and then click Show.
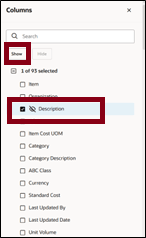
Columns Drawer
You can also rearrange the columns in an item table using drag and drop. To do this, click the column heading text to select the column. The column will be highlighted in blue. Drag the column to the desired position and drop it.

Selecting Columns for Drag and Drop
Saving and Managing Views
Save View: After you've arranged the columns to your preference, open the Action menu and select Save View to save your changes. The Save view drawer opens.
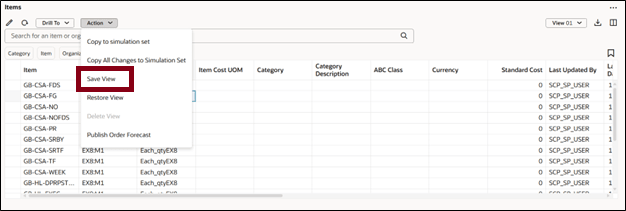
Save View Action
In the Save view drawer, you have two options:
- Save as existing: Updates the current view.
- Save as new: Creates a new view.
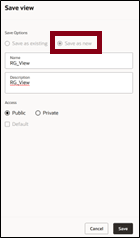
Save View Drawer
If you're not the owner of the current view, automatically Save as new is selected. You can't overwrite a view created by another user.
Restore View: Reverts the table to the last saved version of the current view. Any unsaved changes, such as column rearrangements or visibility toggles are discarded.
Delete View: Permanently deletes the current view. A confirmation is required before deletion, and only the owner can delete this view.
Editing Items
You can make both inline and mass edits directly in the items table. The editable fields in the Redwood version of the Resource table are the same as those in the classic version. To perform an inline edit, simply double-click in a field to enter the edit mode.
After making your edits, be sure to click the Save button at the page level to commit the changes.
To perform mass edits, select the rows in the items table that you want to update, then click the Edit icon. This will open the Edit drawer, where you can modify the editable attributes for the selected rows.
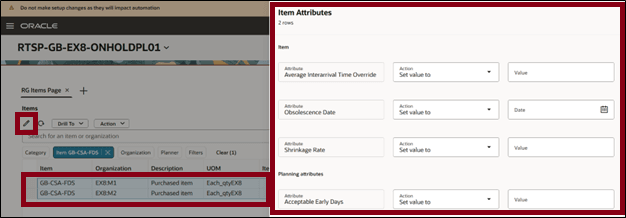
Editing Multiple Items
Select Apply to save the changes after you make changes to the attributes.
Copy to Simulation Sets
If you've updated any data, you can add the changes to a simulation set from the plan. You can also add the data to simulation sets without making changes from plan inputs and other simulation set. After copying the data, you can open a simulation set to verify your changes. You can then include this updated data in subsequent plan runs.
To copy plan data to a simulation set:
- Select the rows that you have edited and save the table.
- From the Actions menu, select one of the following options:
- Copy to simulation set: Copies data from the selected cells.
- Copy All Changes to Simulation set: Copies all changed data.
- In the Copy to Simulation Set drawer, select an existing simulation set or create a new one.
- Select an existing simulation set from the drop-down list if you want to copy the changes to an existing one.
- Select Copy.
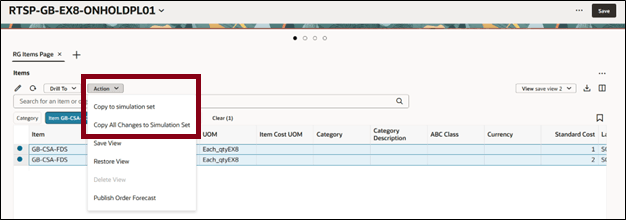
Copy to Simulation Set/ Copy all changes to Simulation Set Action Menu
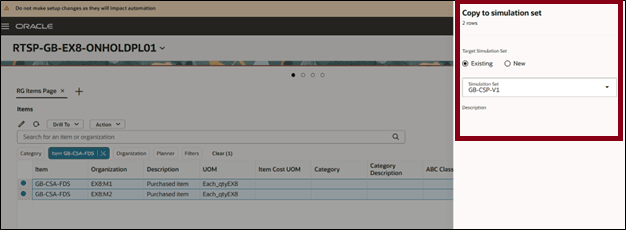
Copying Selected Rows to Existing Simulation Set
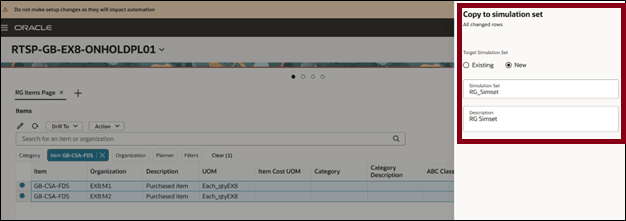
Copying All Changed Rows to New Simulation set
Steps to Enable
You don't need to do anything to enable this feature.
Tips And Considerations
- Searching and Filtering: Entering a value into the keyword search or selecting values from suggested filters overrides any existing drill-to context.
- Views: Views define which columns are visible, the order in which they appear, and the width of each column. Views don’t include any filtering or sorting settings. For example, if you apply a column filter and then save the view, that filter is not preserved as part of the view.
- Vertical blue bars between column headers indicate hidden columns. To reduce visual clutter, you can group hidden columns together.
For example, if you move the Category Description column directly after Organization but before the hidden columns, all hidden columns will be grouped between Organization and UOM.

Before Moving Columns Two Groups of Hidden Columns Exist

After Moving Columns Only One Group of Hidden Columns Exist
If your page contains only the items table, consider hiding the page-level search bar. This maximizes space for the table and avoids duplicate search bars. To hide the search bar, go to the Planning Pages task from the plan-level Actions menu. Edit any of your pages and disable the search bar display.
Migration Considerations
- Saved searches created in the classic version of Resource do not carry over to Redwood user experience. You’ll need to recreate saved searches manually in Redwood user experience.
- Layouts from the classic version can’t be migrate. You’ll need to create new views in Redwood user experience to match your previous layouts.
Key Resources
- See Redwood: Analyze Supply Plans Using a Configurable Redwood Page feature.
Access Requirements
Users who are assigned a configured job role that contains these privileges can access this feature:
- View Planning Items (MSC_VIEW_PLANNING_ITEMS_PRIV)
- Edit Planning Items (MSC_EDIT_PLANNING_ITEMS_PRIV)
View Planning Items and Edit Planning Items privileges were available prior to this update.