Redwood: Assign Pick Slips, PAR Counts, Cycle Counts, Physical Counts, and Deliveries to a User
As a warehouse or inventory manager, you can spend a considerable amount of time assigning, tracking, and delegating tasks to your staff. Then, if any of your operators aren't able to come in for a shift, you spend even more time reassigning and balancing their workload across your available personnel. To streamline this process, you now have the ability to assign or reassign tasks to your warehouse operators for open pick slips, cycle counts, physical counts, periodic automatic replenishment (PAR) counts, and receipt deliveries. Once assigned, your users can view the tasks assigned and immediately begin working on them without needing to navigate to different pages. Alternatively, your operators can self-assign tasks and then begin executing them as they would an assigned task. Additionally, as part of this feature, you can create zones that contain groups of subinventories and locators to manage how picks and counts are turned into specific tasks.
Here's what you can do with this feature:
- Create and update inventory zones.
- Assign activities that take place within each zone.
- Assign subinventories and locators to a zone.
- Assign workers to perform tasks in a zone.
- Enable tasks and define task grouping rules for each activity.
- Automatically create tasks for activities such as pick confirmation, cycle counting, physical counting, and receipt deliveries.
- Manually create tasks for PAR counting and assign receipt deliveries to a task.
- Create recurring tasks for PAR counting.
- View all open tasks and assign them to workers.
- View tasks assigned to you and start performing your tasks.
Inventory Zones
Zones are groups of subinventories and locators primarily used to manage tasks and workers efficiently. For example, a warehouse may have different areas where specific sets of workers perform tasks. You can create zones for these areas and assign workers to them. When assigning tasks using the Inventory Task Assignments page, you can easily find available workers in a zone and assign tasks accordingly.
You can access the Inventory Zones task from the Setup and Maintenance work area. Alternatively, you can access the Inventory Zones page from the Inventory Management work area or through quick actions.
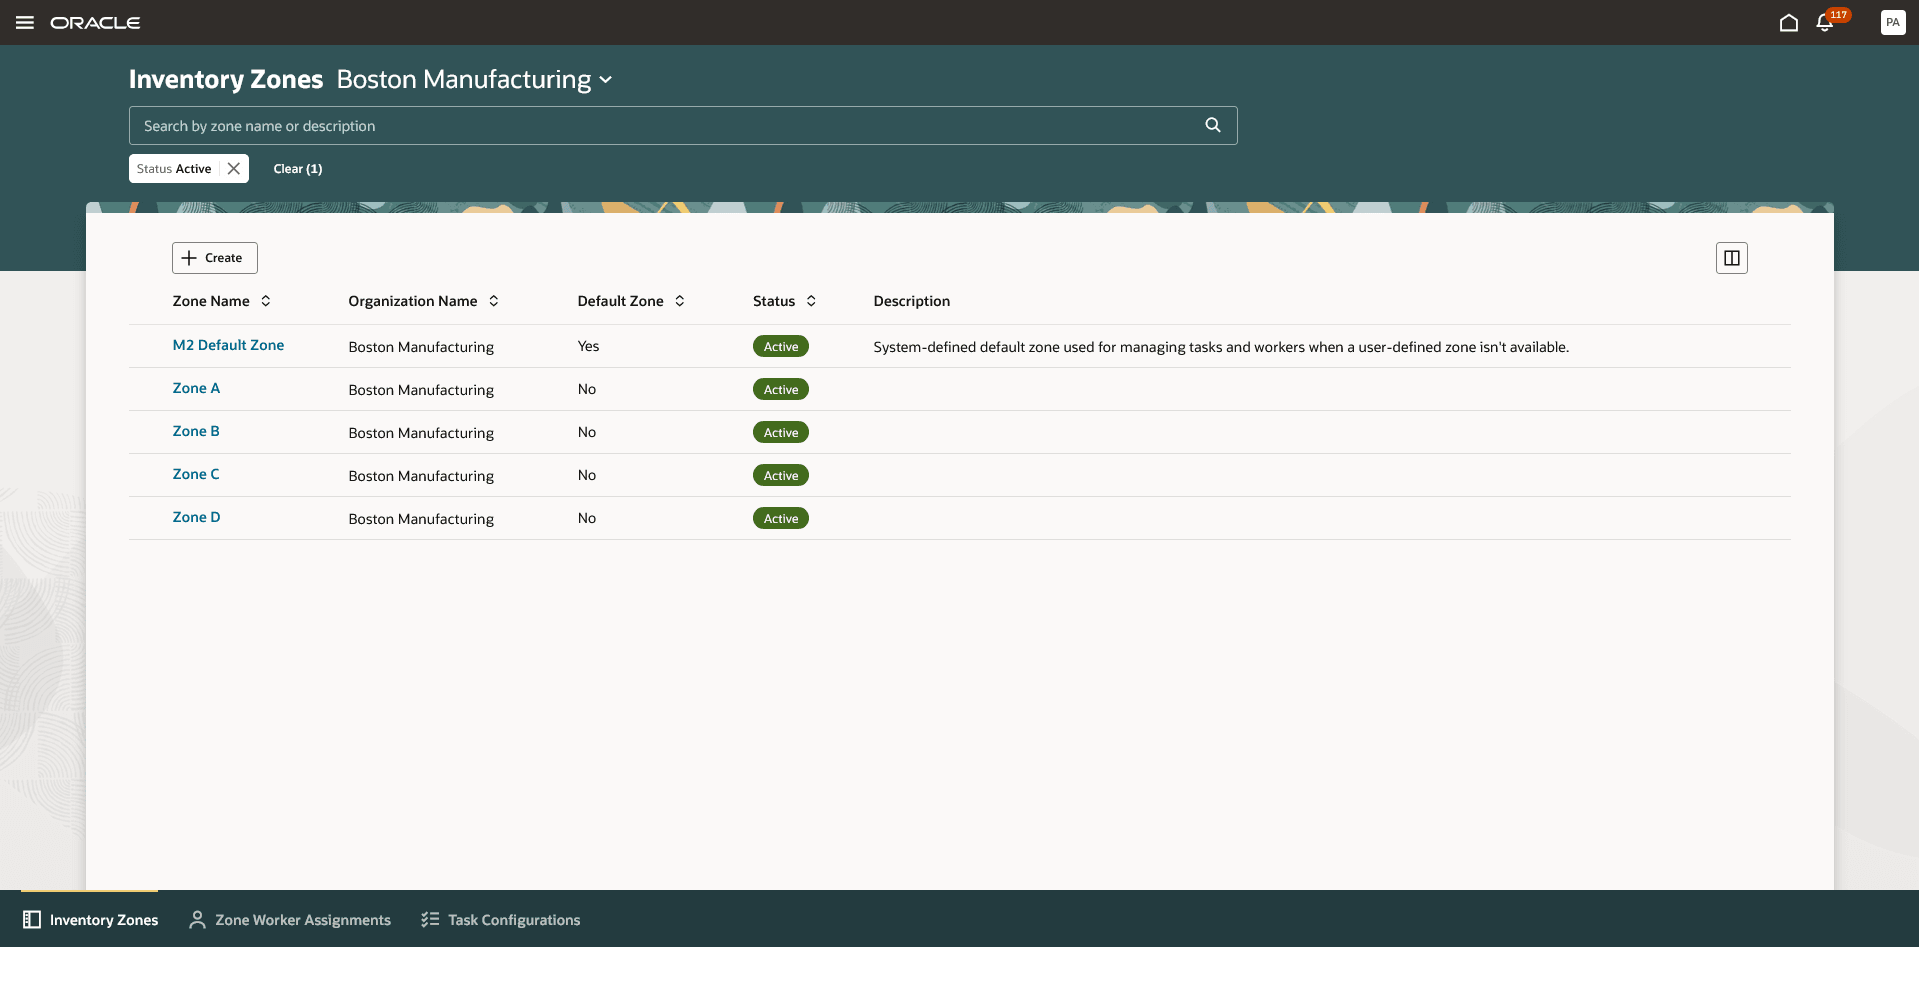
Inventory Zones
By default, the Inventory Zones page displays a list of all active zones in the selected organization. You can use the Status filter to view zones that are in active, inactive, or draft status. To create a new zone, select the Create button. To edit an existing zone, click the link for the zone name.
On the Zone detail page, you can:
- Add the activities performed in the zone.
- Assign subinventories and locators to the zone.
- Capture additional zone configurations.
To activate the zone, select the Activate button.
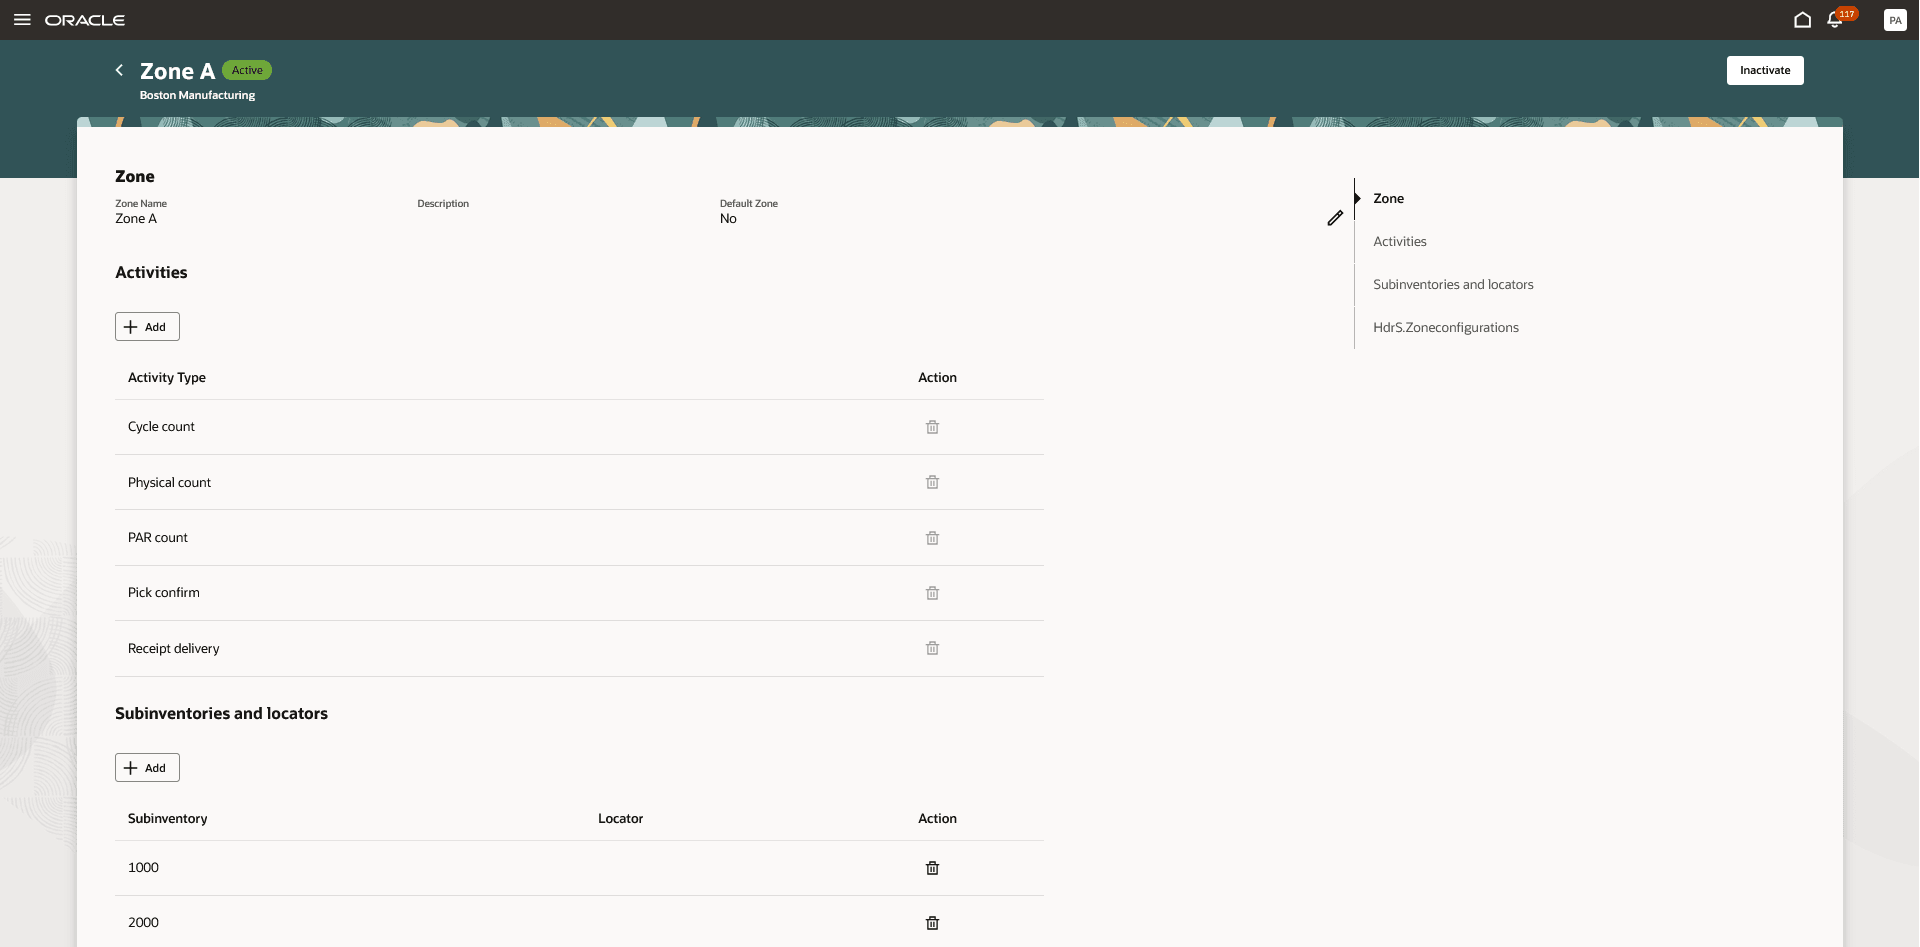
Zone Detail
NOTE: When you enable task generation for an activity, the system automatically creates a default zone. This default zone applies to all subinventories and locators that aren't assigned to any user-defined zone.
Zone Worker Assignments
Once a zone is created, use the Zone Worker Assignments page to assign workers to the zone.
You can access this page from the Inventory Management work area or through quick actions. Alternatively, if you're on the Inventory Zones page, you can use the in-application navigation at the bottom of the page to switch to the Zone Worker Assignments tab.
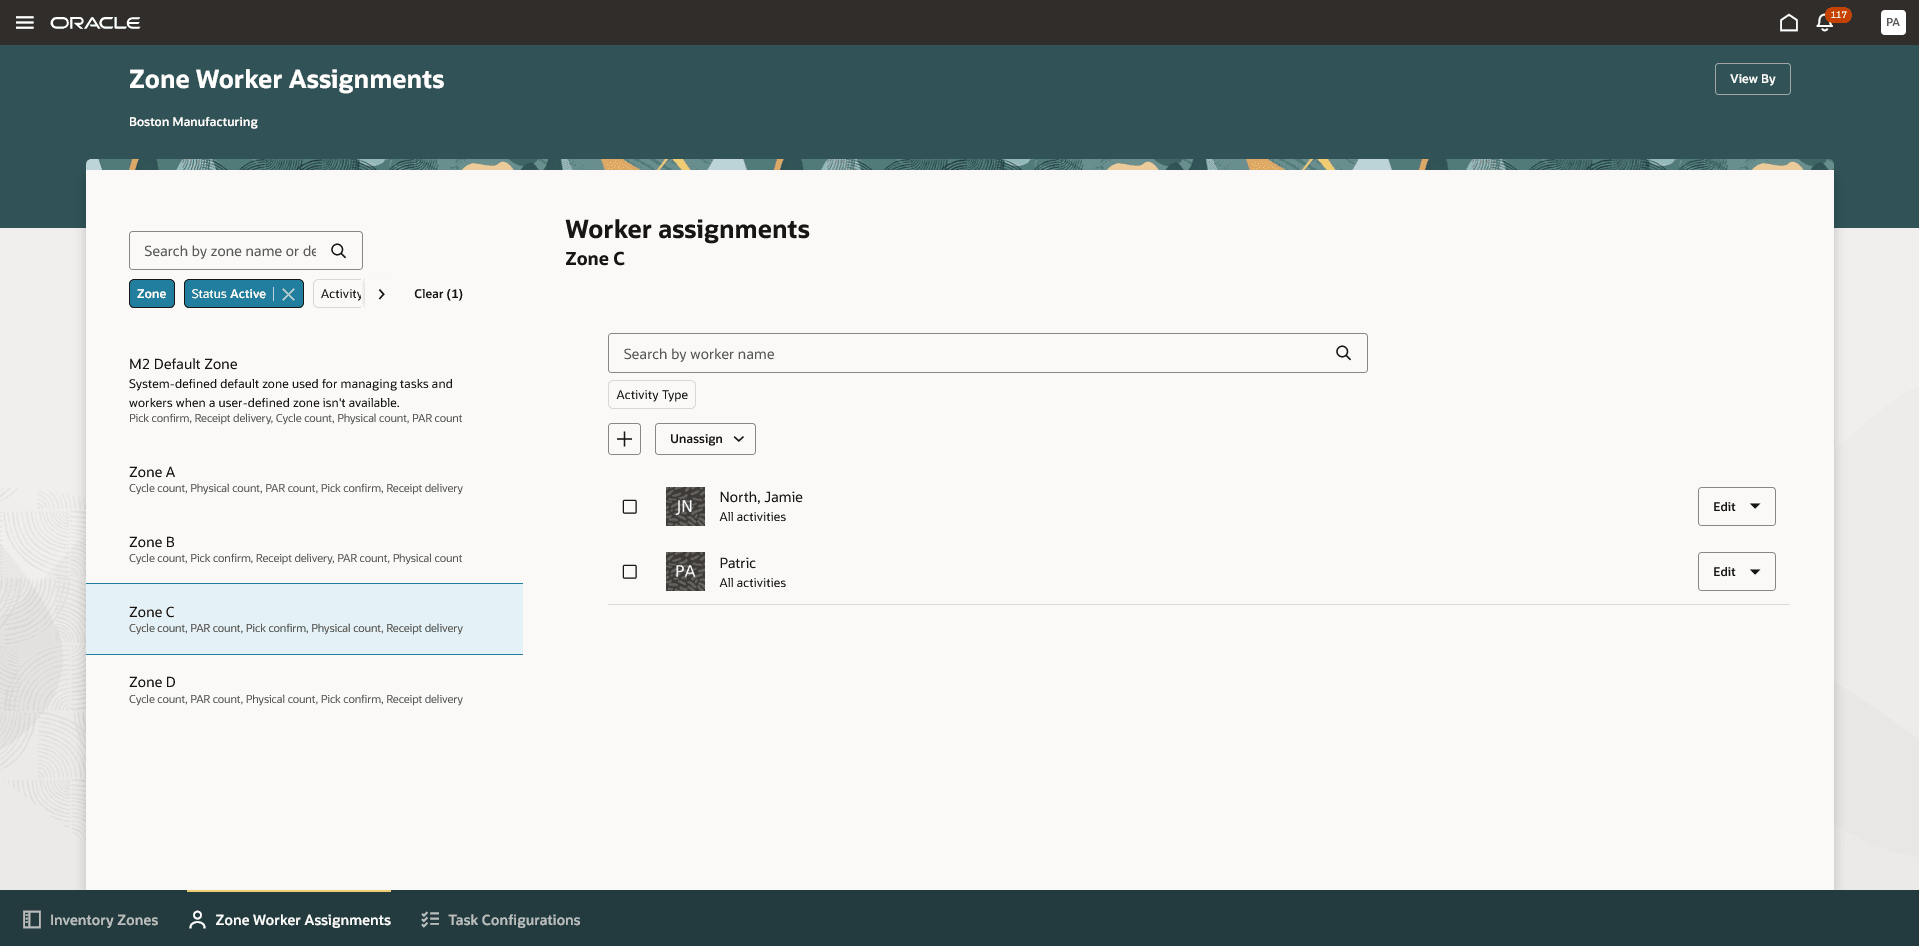
Zone Worker Assignments
The Zone Worker Assignments page, by default, shows the assignments by zone. The zone view displays a list of available zones. When you select a zone, it shows the assigned workers.
You can also use the filter chip to view assignments by worker. The worker view displays the list of workers assigned to a zone. When you select a worker, it shows the zones assigned to them.
On this page, you can:
- Add a worker to the zone.
- Assign a worker who is already assigned to another zone or add a new worker.
- When adding a new worker, specify the activity they'll perform.
- The available activities are those associated with the zone. Selecting All activities makes the worker available for all activities supported by the zone.
- Remove workers from the zone.
Inventory Tasks
A task is a work unit assigned to a worker in an inventory organization. Tasks are linked to a zone and specific activities like pick confirmation, cycle counting, physical counting, PAR counting, and receipt delivery.
- Pick confirmation, cycle counting, and physical counting tasks are generated automatically by the system.
- PAR count tasks must be manually created using the Inventory Task Assignments page.
- Receipt delivery tasks are created from the Receipt Deliveries page and assigned to a delivery cart.
- If delivery carts are automatically assigned to the receipt delivery, the system automatically creates and assigns the corresponding task.
- Tasks can be manually assigned to workers using the Inventory Task Assignments page.
- Workers can:
- Execute tasks assigned to them from the Inventory Tasks page.
- Self-assign unassigned tasks from the Inventory Tasks page.
Task Creation
Use the Task Configurations page to enable task creation for specific activities.
- Pick confirm tasks
- Automatically created when a pick is released to the warehouse.
- One task is generated per pick slip.
- Cycle count tasks
- Automatically created when count sequences are generated.
- The task grouping rule determines how count sequences are grouped into a task.
- Count sequences can be grouped by zone, subinventory, or cycle count definition.
- Physical count tasks
- Automatically created when physical inventory tags are generated.
- The task grouping rule determines how physical inventory tags are grouped into a task.
- Physical inventory tags can be grouped by zone, subinventory, or physical inventory definition.
- PAR count tasks
- Manually created from the Inventory Task Assignments page.
- Go to the Open PAR Count Tasks tab and click Create Task.
- Specify PAR subinventories, locators, and items to count.
- Click the Create button to create the task, or click the Create and Assign button to create the task and open the Assign Worker drawer.
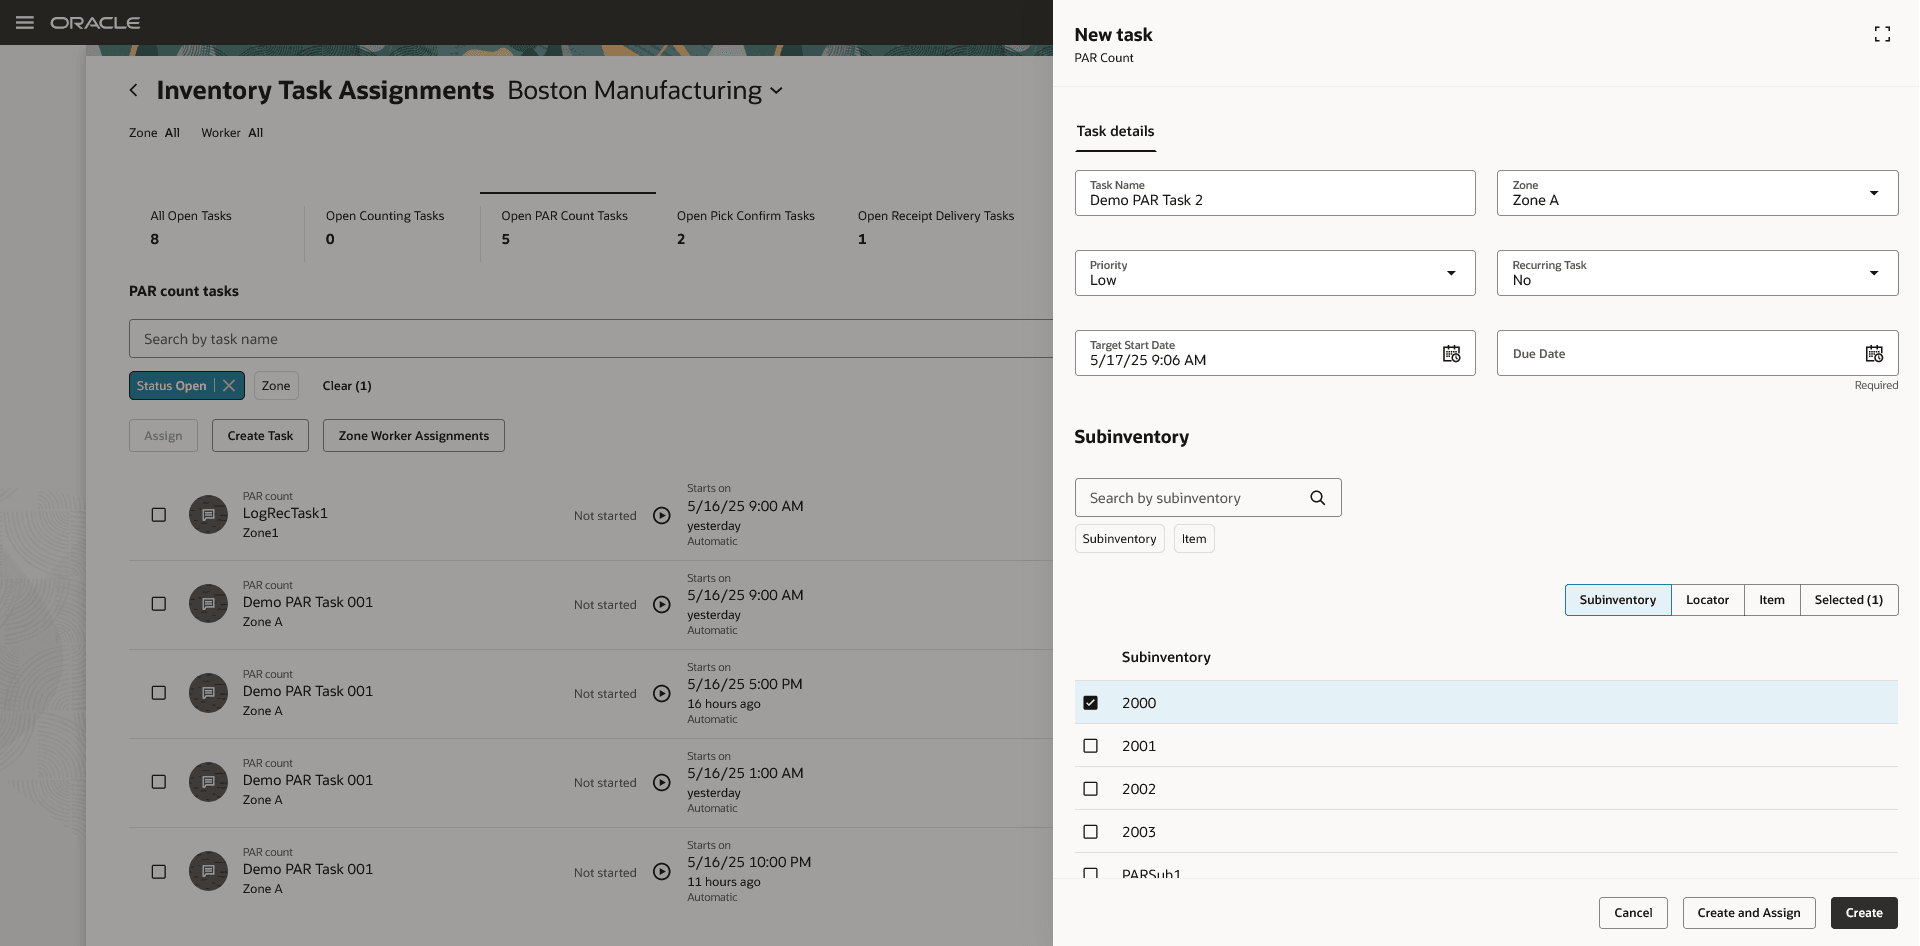
Create PAR Count Task
- Recurring PAR count tasks
- When creating PAR count tasks, you have the option to create recurring schedules. This allows the task to be automatically generated at defined intervals (for example, daily, weekly) based on a specified recurrence pattern, duration, and time slot.
- On the Task Details tab:
- Set Recurring Task = Yes
- Specify the expected Duration to complete each task.
- On the Schedule tab:
- Select the Repeat pattern (for example, Day)
- Set the Repeat Frequency (for example, every day = 1, every other day = 2)
- Enter the Start and End Dates or number of Occurrences
- Select time Slots (optional: multiple slots per day)
- Click Generate to preview the full schedule.
- Click the Create button to create the task.
- If the schedule includes tasks for the current day, they will immediately appear on the Task Assignment page.
- For future-dated schedules, ensure the Perform Actions on Inventory Tasks scheduled process is set to run daily with the Create Recurring Tasks action. This process automatically generates tasks for the current day based on the recurring schedule.
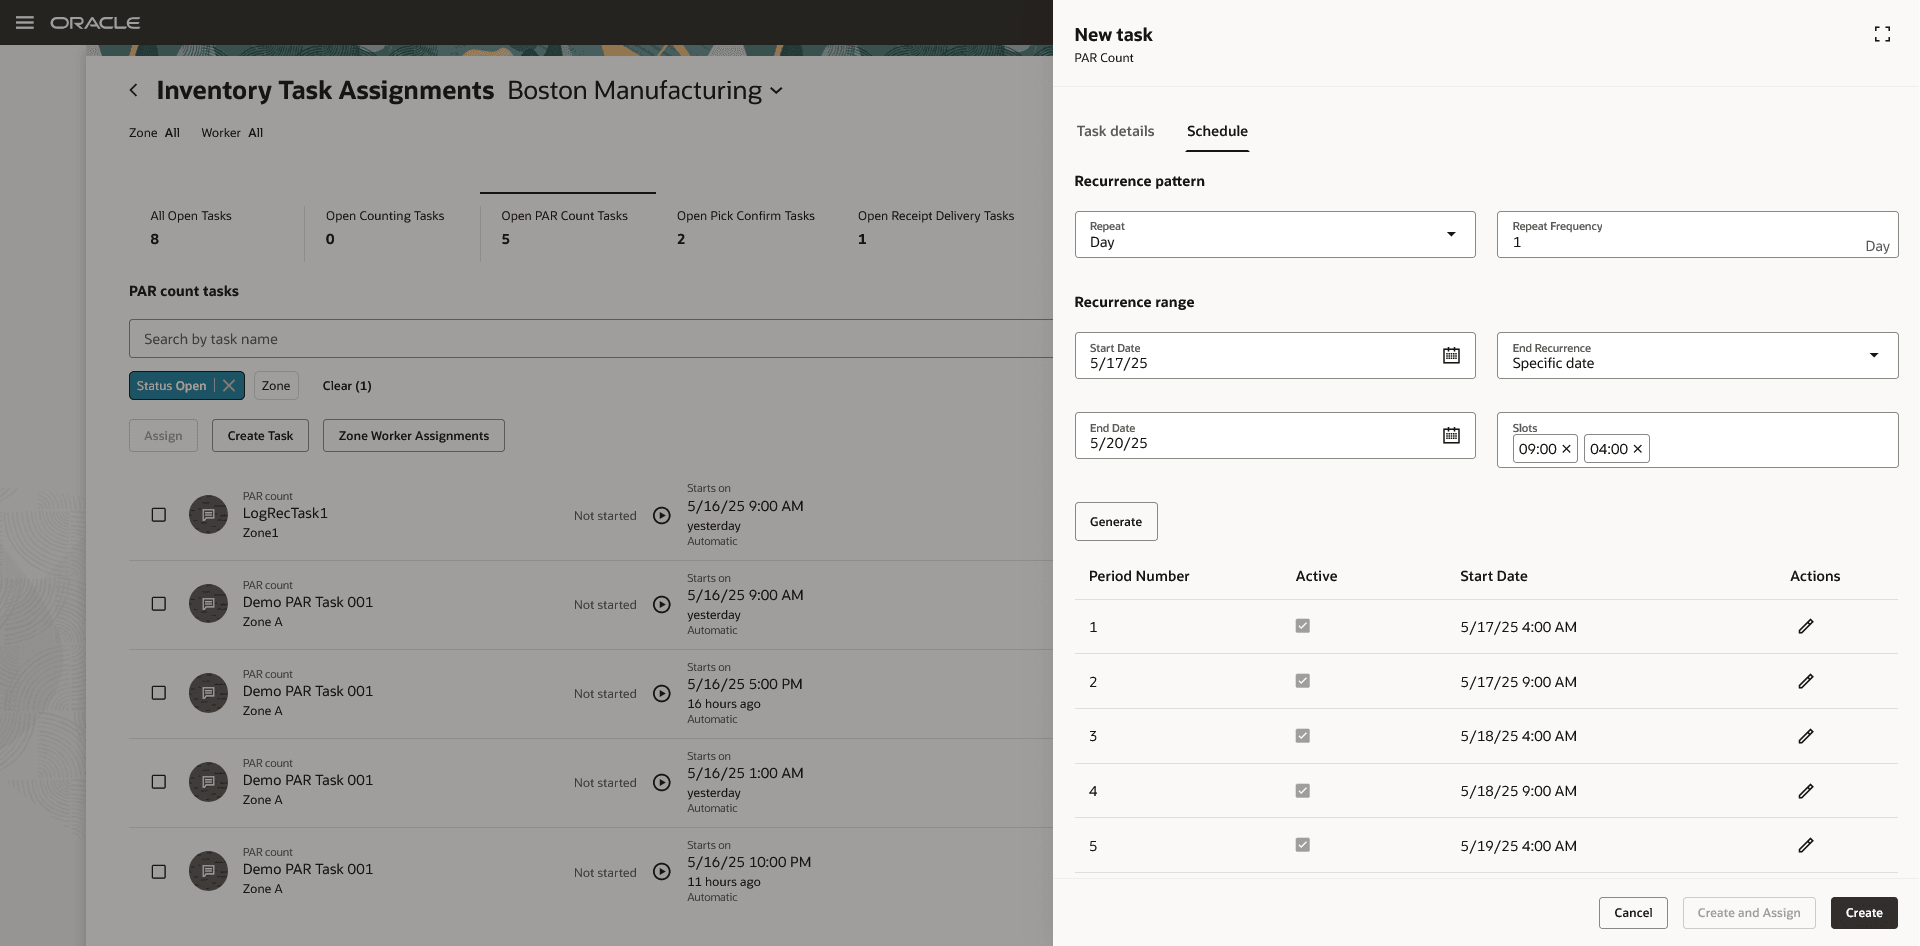
Recurring PAR Count Task
- Receipt delivery tasks
- Created from the Receipt Deliveries page.
- Select deliveries and click Add to Delivery Cart.
- A dialog box opens where you can assign a Delivery Cart and a Task.
- You can select an existing task that's open and not yet assigned to a worker. If no such task exists, click the + (Add) button next to the Task Name field to create a new one.
- If your setup uses the feature to automatically assign deliveries to carts:
- Deliveries are assigned to the latest open, unassigned task associated with the cart.
- If no such task exists, a new task is automatically created.
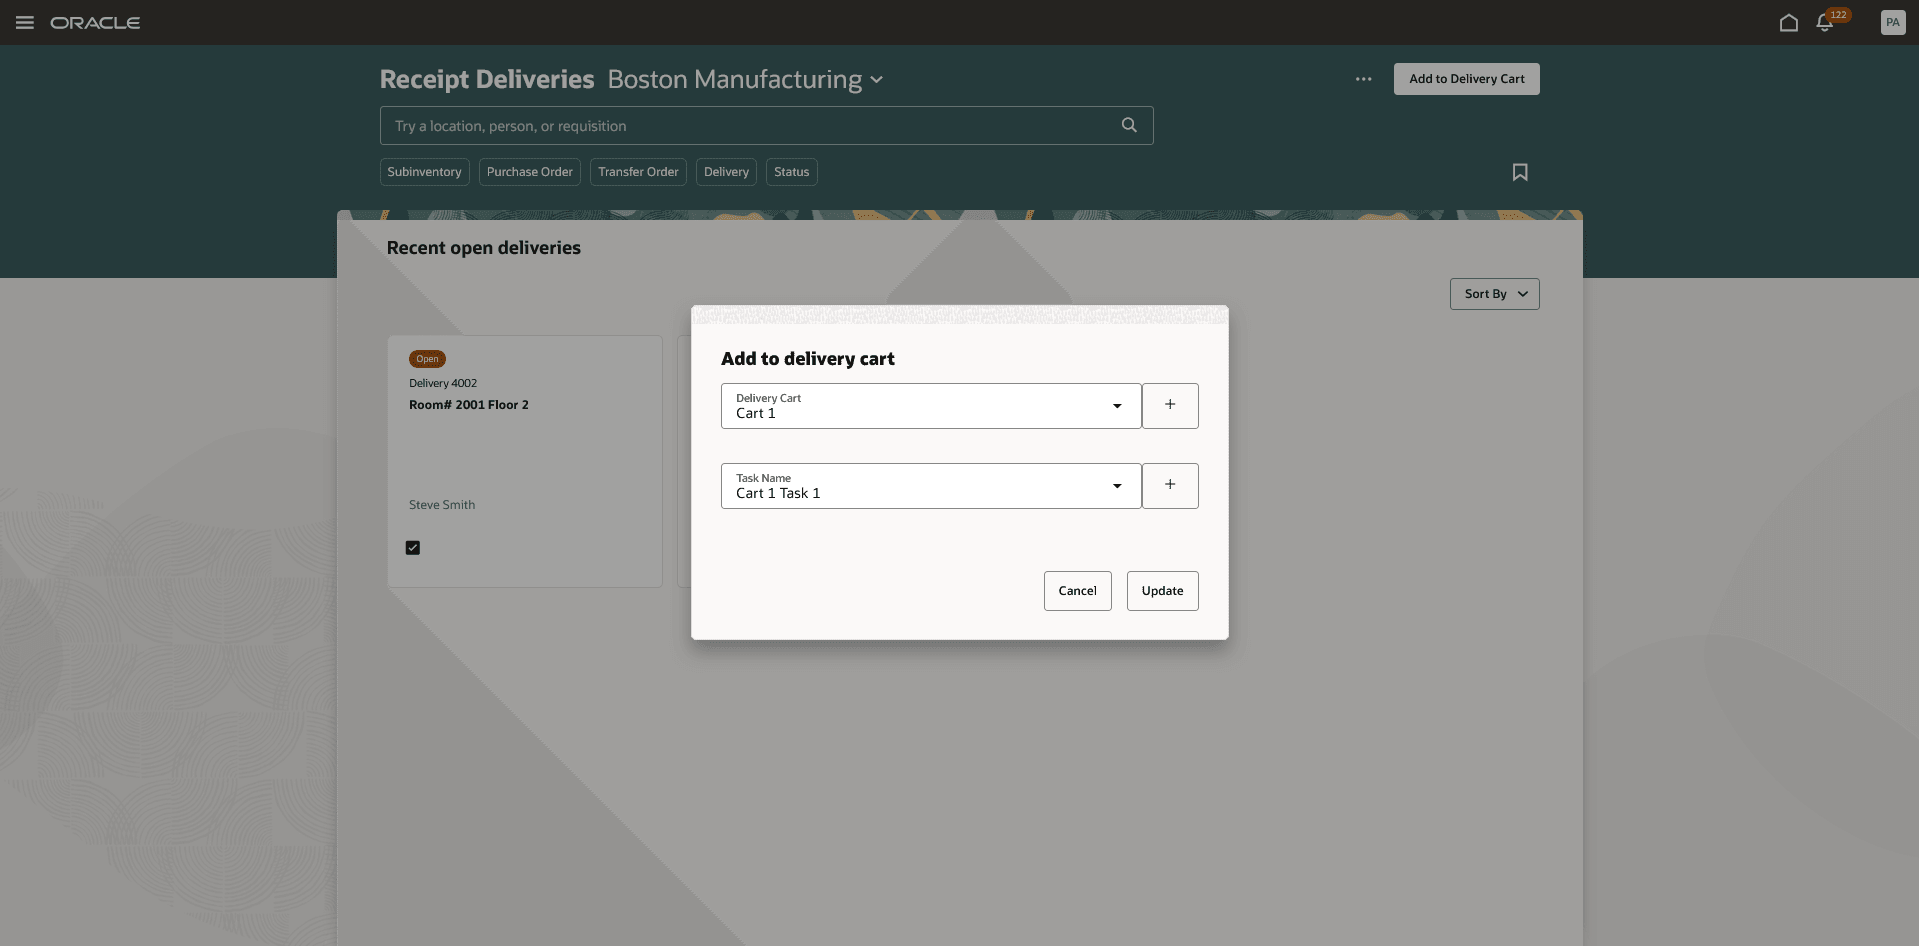
Assign Task to Delivery Cart
Inventory Task Assignments
The Inventory Task Assignments page is primarily used by warehouse managers or inventory managers to manage tasks within the organization. It provides visibility into open tasks and allows task assignment to workers. You can access this page from the Inventory Management work area or through quick actions.
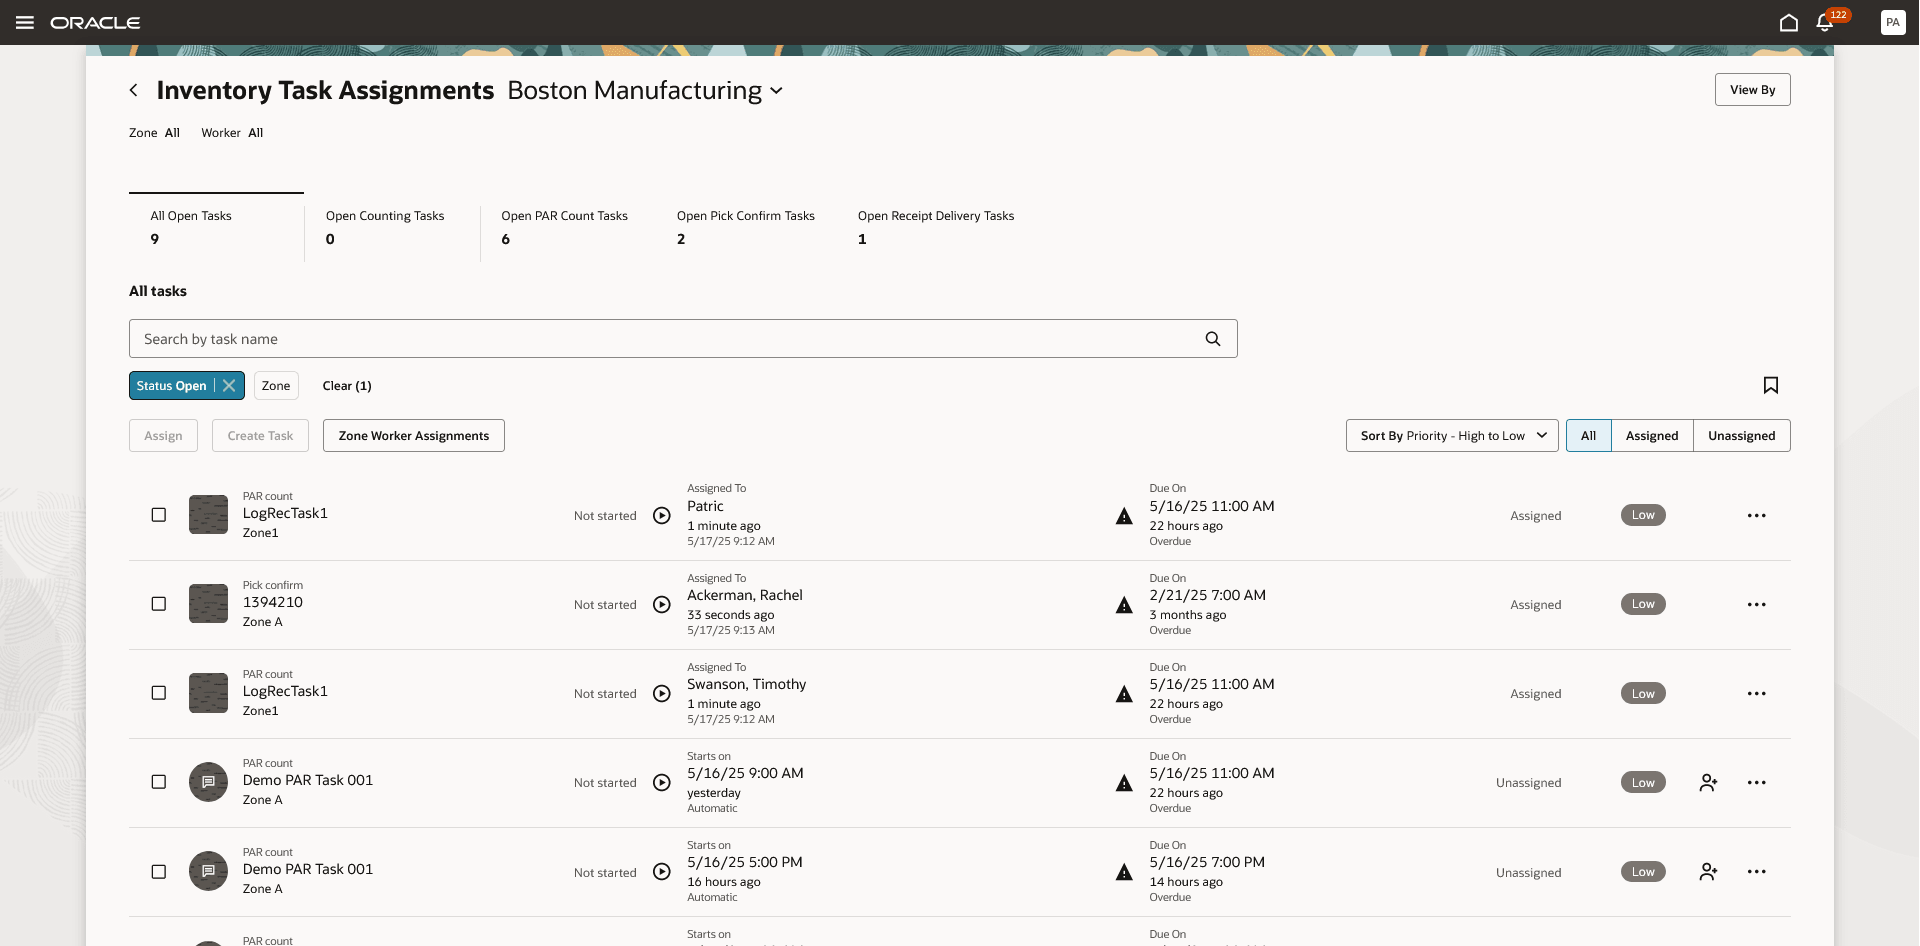
Inventory Task Assignments
On the Inventory Task Assignments page, you can:
- View all open tasks in the organization.
- Filter tasks by zone or worker.
- View closed tasks.
- Assign tasks to workers.
- Unassign or reassign tasks for a worker.
- Update due dates and task priorities.
- Track task progress.
- Add notes to tasks.
- Create PAR count tasks.
Inventory Tasks (Mobile)
The Inventory Tasks mobile page is primarily used by workers to view and execute assigned tasks. Workers can also view unassigned tasks and assign these tasks to themselves.
You can access this page from the Inventory Management (Mobile) work area or through quick actions.
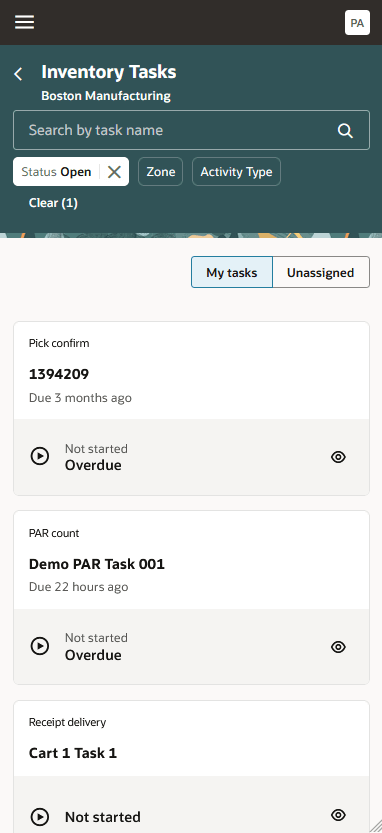
Inventory Tasks (Mobile)
On the Inventory Tasks mobile page, you can:
- View assigned tasks.
- View and self-assign unassigned tasks.
- Unassign a task assigned to you.
- Execute tasks by clicking the task name link, which redirects you to the respective mobile transaction page.
- Complete tasks on the mobile transaction page. Once completed, the task automatically closes and the system redirects you back to the Inventory Tasks page.
This feature provides you more control in specifying exactly which tasks you want a specific user to complete and helps increase your operational efficiency by preventing users from working on the same tasks simultaneously.
Here are the demos of these capabilities:
Steps to enable and configure
Important: Before you set up Oracle Fusion Cloud Advanced Inventory Management, see the licensing and enablement information at the beginning of the Advanced Inventory Management section.
Configure Advanced Inventory Parameters
Follow these steps to enable or disable task management for an organization:
- In the Setup and Maintenance work area, search for and select the Advanced Inventory Parameters task.
- On the Advanced Inventory Parameters page, select the organization for which you want to enable or disable task management.
- In the Task management section:
- Select the Enable task management checkbox to enable the feature.
- Clear the checkbox to disable the feature.
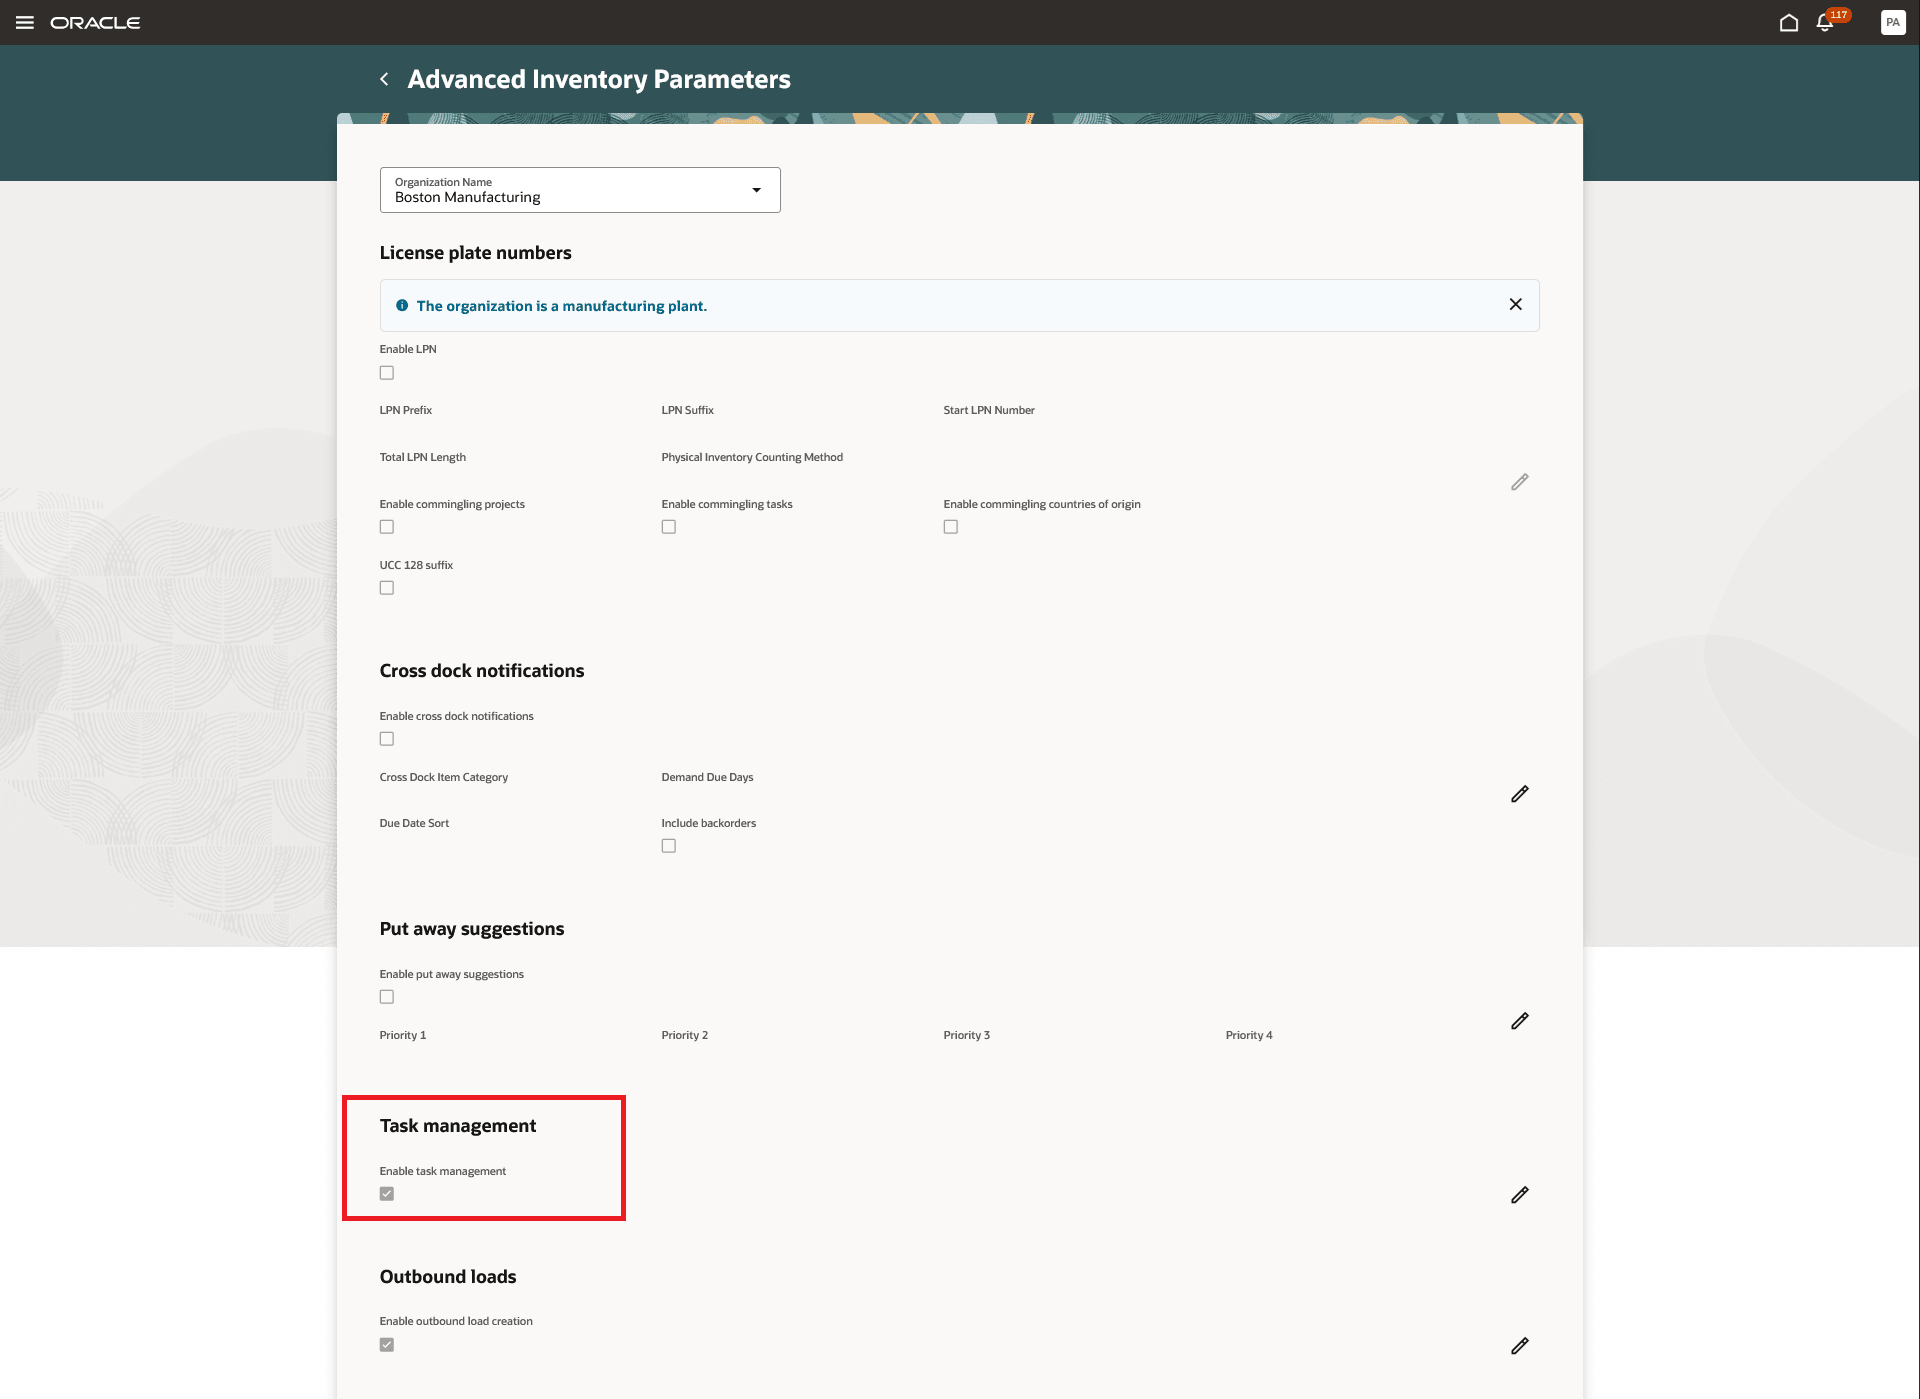
Advanced Inventory Parameters
Follow these steps to enable task creation:
- Navigate to the Setup and Maintenance work area.
- Search for and select the Inventory Task Configurations task.
- On the Task Configurations page, select the inventory organization.
- Select the Enable Task Generation checkbox for the activities that require task creation.
- If enabling task generation for cycle counts or physical counts, specify the Task Grouping Rule.
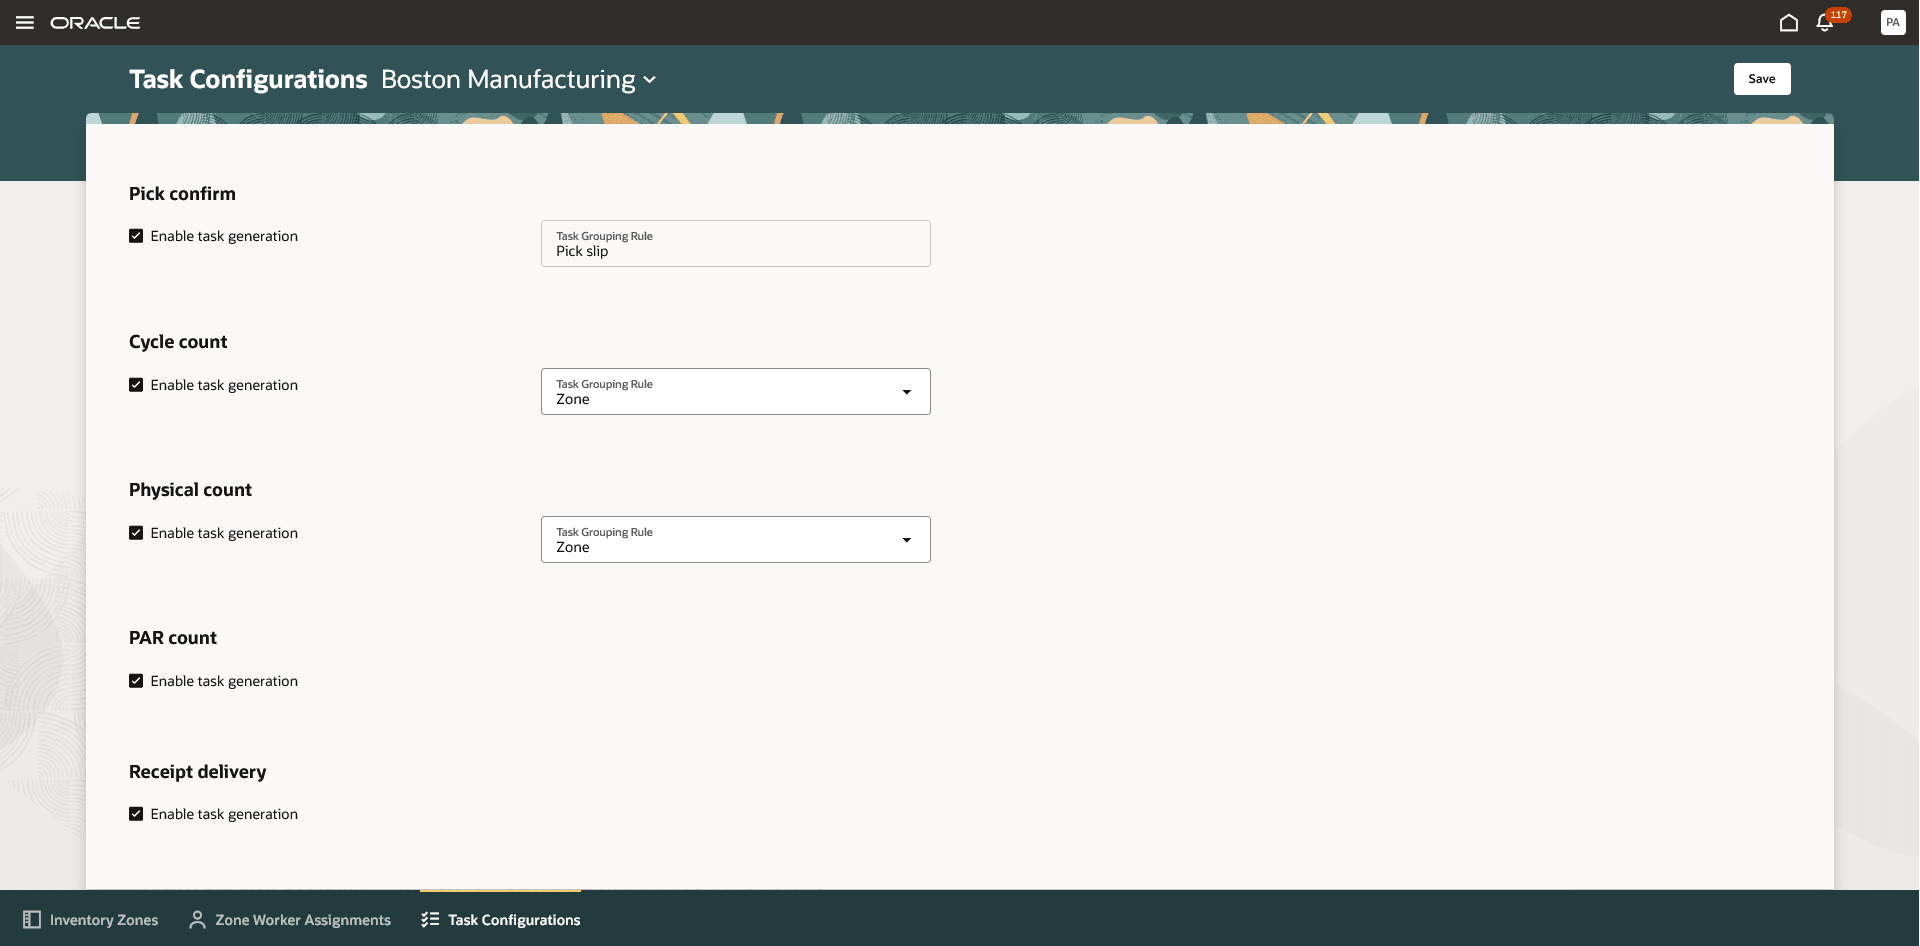
Task Configurations
Follow these steps to enable the Inventory Zones and Zone Worker Assignments pages:
- Navigate to the Setup and Maintenance work area.
- Search for and select the Manage Inventory Profile Options task.
- On the Manage Inventory Profile Options page, search for and select the ORA_INV_ZONES_AND_WORKER_ASSIGNMENTS_REDWOOD_ENABLED profile option code.
- In the Profile Values section, set the Site level to Yes. The default value is No.
- Click Save and Close. Changes will take effect the next time users sign in.
Follow these steps to enable the Inventory Task Assignments and Inventory Tasks pages:
- Navigate to the Setup and Maintenance work area.
- Search for and select the Manage Inventory Profile Options task.
- On the Manage Inventory Profile Options page, search for and select the ORA_INV_TASK_ASSIGNMENTS_AND_TASKS_REDWOOD_ENABLED profile option code.
- In the Profile Values section, set the Site level to Yes. The default value is No.
- Click Save and Close. Changes will take effect the next time users sign in.
Tips and considerations
- Zones can be used for zone picking without enabling tasks and worker assignment features. In this case:
- You can create zones as groups of subinventories and locators.
- You can define a pick slip grouping rule with zone as a grouping criterion.
- When generating a pick wave using this rule, picks will be grouped by zone, ensuring that each pick slip contains only picks from a single zone.
- If your organization doesn't require multiple zones, but still needs to manage tasks and workers, you can use the default zone without creating user-defined zones. In this case, the default zone applies to all locations in the warehouse, and workers assigned to the default zone will be available to perform tasks in all locations in the warehouse.
- When task generation is enabled for a specific activity, selecting the respective mobile page task from the Inventory Management (Mobile) work area or quick actions will direct you to the Inventory Tasks page. If you want to override this behavior and perform the transaction without going through the Inventory Tasks page, you can use this page constant in Visual Builder Studio’s Express mode:
- Constant Name: DISABLE_INV_TASKS_UI_NAVIGATION
- To disable navigation to the Inventory Tasks page, set the value to true.
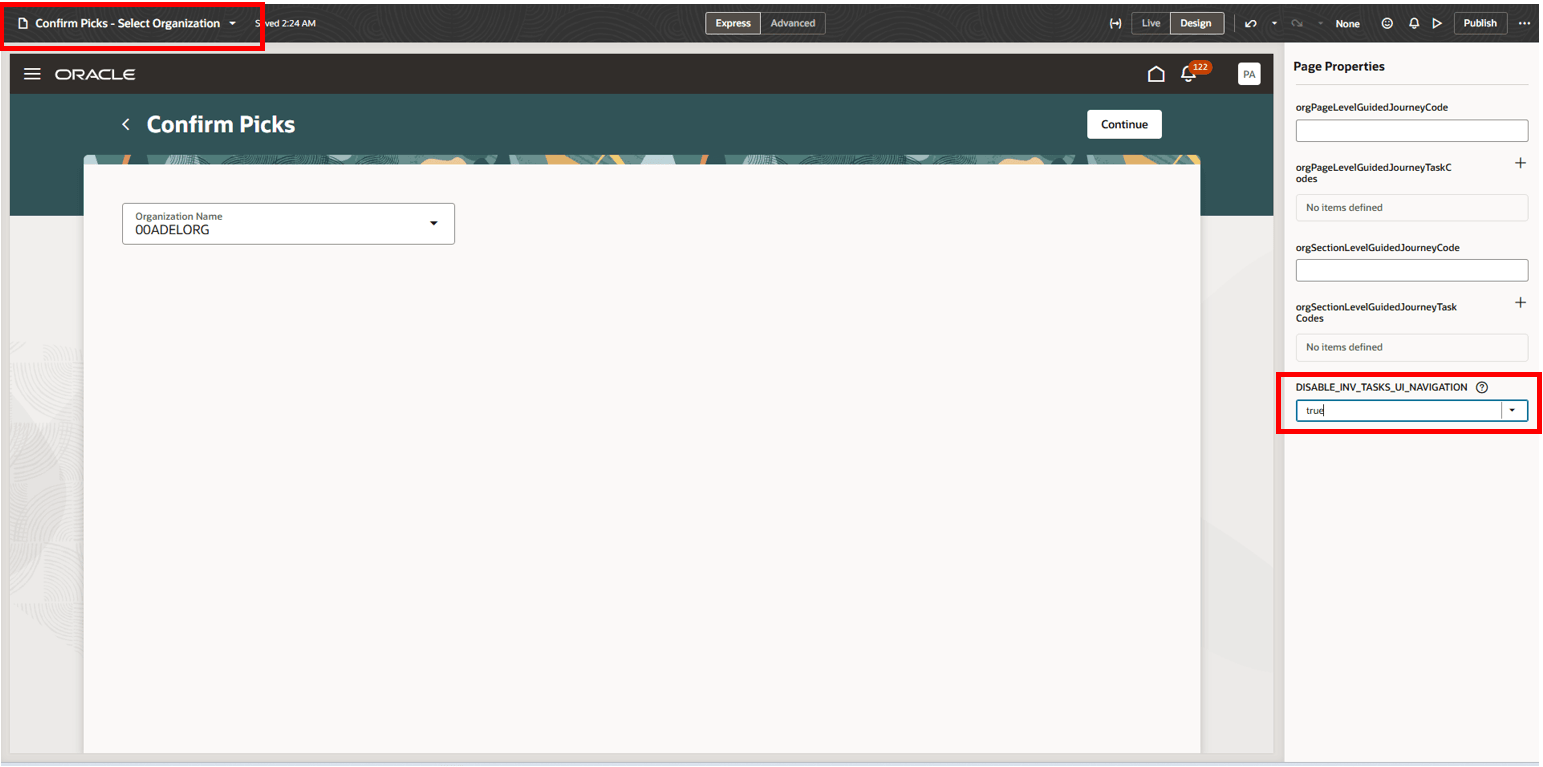
Confirm Picks - Select Organization: Visual Builder Studio’s Express Mode
- When you're assigning tasks to a worker, by default you'll have an option to select from the list of workers assigned to zones or select from the list of all employees on the Assign Worker drawer. If your organization doesn't want to select from the list of all employees, you can use this page constant in Visual Builder Studio’s Express mode to hide the All workers radio button from the Assign Worker drawer:
- Constant Name: DISABLE_ALL_WORKER_ZONE_ASSIGNMENT
- To disable the radio button, set the value to true.
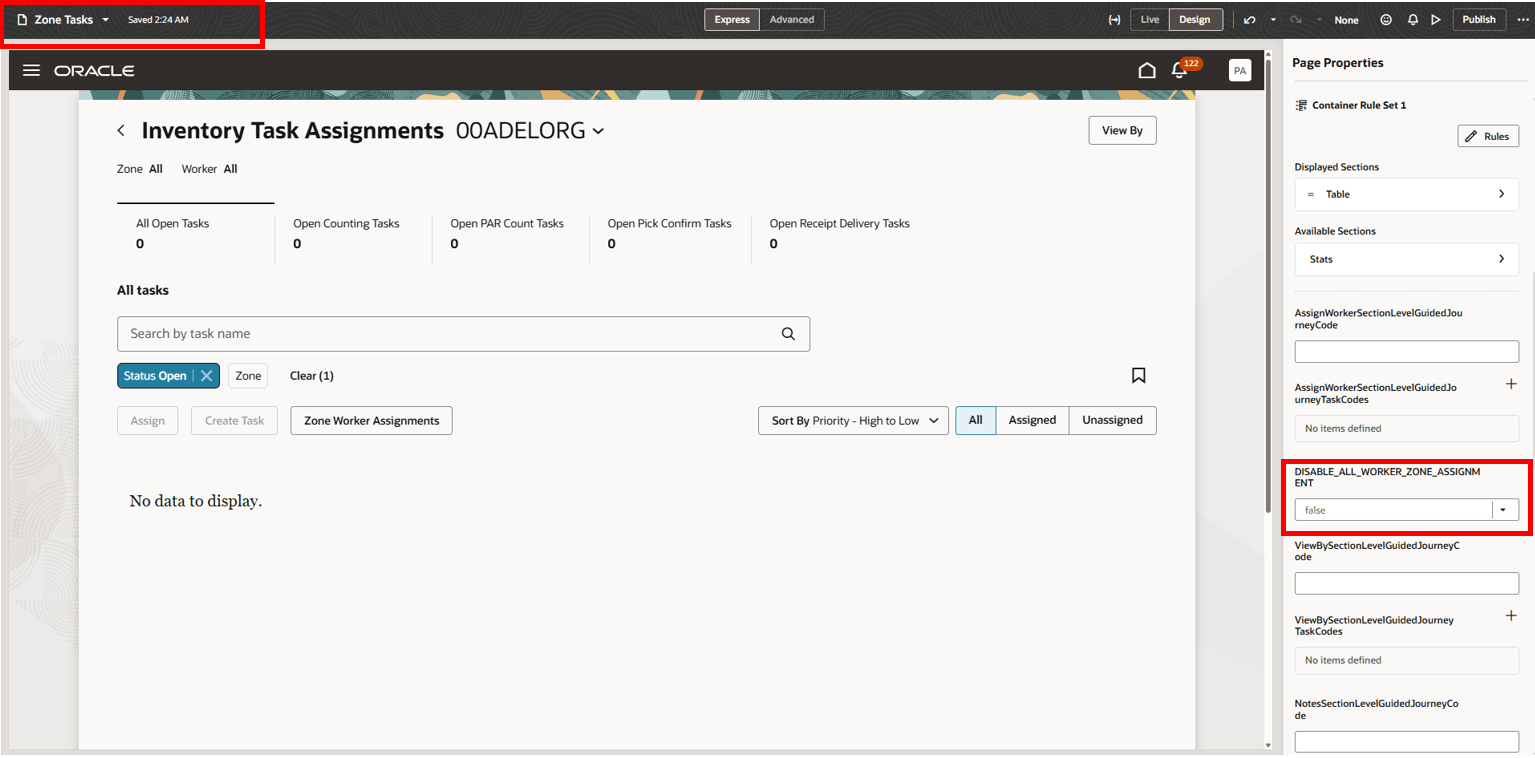
Inventory Task Assignments: Visual Builder Studio’s Express Mode
- Use the Perform Actions on Inventory Tasks scheduled process with the Purge closed tasks action to delete old closed tasks. By default, the process deletes closed tasks that are older than 90 days.
- To change this retention period, use the Closed Task Retention Days profile option (profile option code: ORA_INV_ZONE_TASK_PURGE_DURATION_DAYS), which specifies how many days closed tasks should be retained before being purged.
Key resources
- Oracle Fusion Cloud SCM: Using Inventory Management guide, available on the Oracle Help Center.
- Oracle Fusion Cloud SCM: Implementing Manufacturing and Supply Chain Materials Management guide, available on the Oracle Help Center.
Access requirements
Users who are assigned a configured job role that contains this duty role can access this feature:
- Advanced Inventory Management Duty (ORA_INV_ADVANCED_INVENTORY_MANAGEMENT_DUTY)
This duty role is new in this update.
NOTE: The Advanced Inventory Management duty role is not assigned to any predefined job roles. In the Security Console, you must manually assign the duty role to a configured job role.
Users who are assigned a configured job role that contains these privileges can access this feature:
- Configure Inventory Zones Using Responsive Inventory (INV_CONFIGURE_INVENTORY_ZONES_USING_RESPONSIVE_INVENTORY_PWA_PRIV)
- Perform Actions on Inventory Tasks (INV_PERFORM_ACTIONS_ON_INVENTORY_TASKS_PRIV)
- Perform Inventory Tasks Using Responsive Inventory (INV_PERFORM_INVENTORY_TASKS_USING_RESPONSIVE_INVENTORY_PWA_PRIV)
These privileges are new in this update.
NOTE: The Perform Inventory Tasks Using Responsive Inventory privilege is not assigned to any predefined job roles. In the Security Console, you must manually assign the privilege to a configured job role.
To set up this feature, you'll need a configured job role that contains this new duty role, which is not assigned to any predefined job roles:
- Advanced Inventory Management Administration Duty (ORA_INV_ADVANCED_INVENTORY_MANAGEMENT_ADMINISTRATION_DUTY)
This duty role is new in this update.