Redwood: Use License Plate Numbers to Perform Inventory Transactions
A license plate number (LPN) is a unique identifier typically assigned to a pallet, bin, or container of goods that makes it easier to track inventory and manage the movement of goods within a warehouse. For instance, after receiving serialized goods from your supplier, you pack the goods into an LPN. Later, when you need to move these goods from one storage location to another, you don't need to scan each individual serial number to specify that you're moving them. Instead, you can simply scan the LPN to specify that you're moving every serial number in that LPN to the new location. Now you have the ability to use LPNs when receiving goods into your warehouse, performing inventory transactions within the warehouse, and shipping goods out of your warehouse.
Use License Plate Numbers (LPNs) to Perform Receiving, Shipping, Transfer, and Counting Activities within Oracle Fusion Cloud Inventory Management
You can specify the LPN for lines to receive during receiving. You can enter new LPNs which weren't previously generated, previously generated LPNs with the status of Defined but not used, or previously generated LPNs with the status of In receiving.
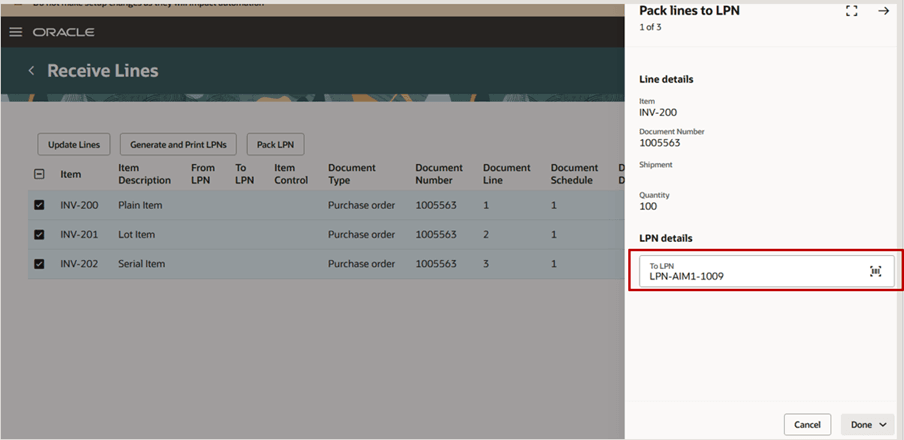
Pack Lines into LPN During Receiving
You can also use the receiving LPN for put away if all the items to be put away are stocked in the same location. If the items packed in the receiving LPN are stocked in separate locations, you can specify a new LPN for each line during put away. The To LPN you enter during put away can be an existing LPN with In inventory status, a new LPN which wasn’t previously generated, or a new LPN with a Defined but not used status.
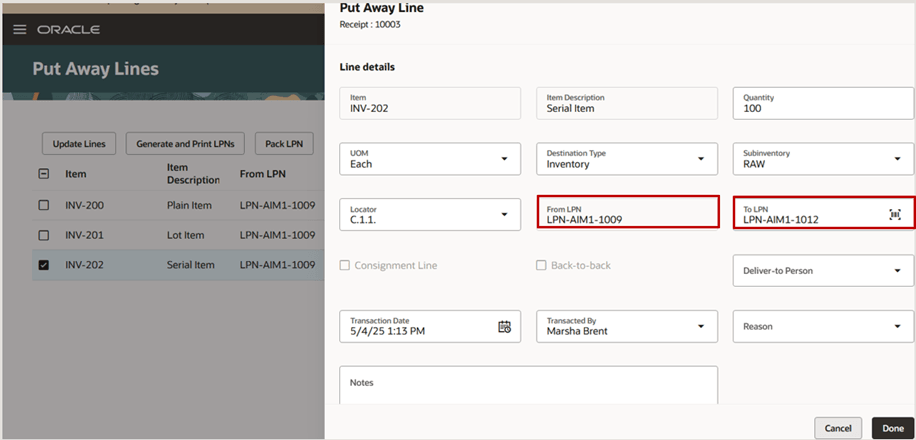
Enter To LPNs for All Lines During Put Away
During pick confirmation, if the source subinventory and locator are LPN enabled, you can enter the LPNs from which items are picked.
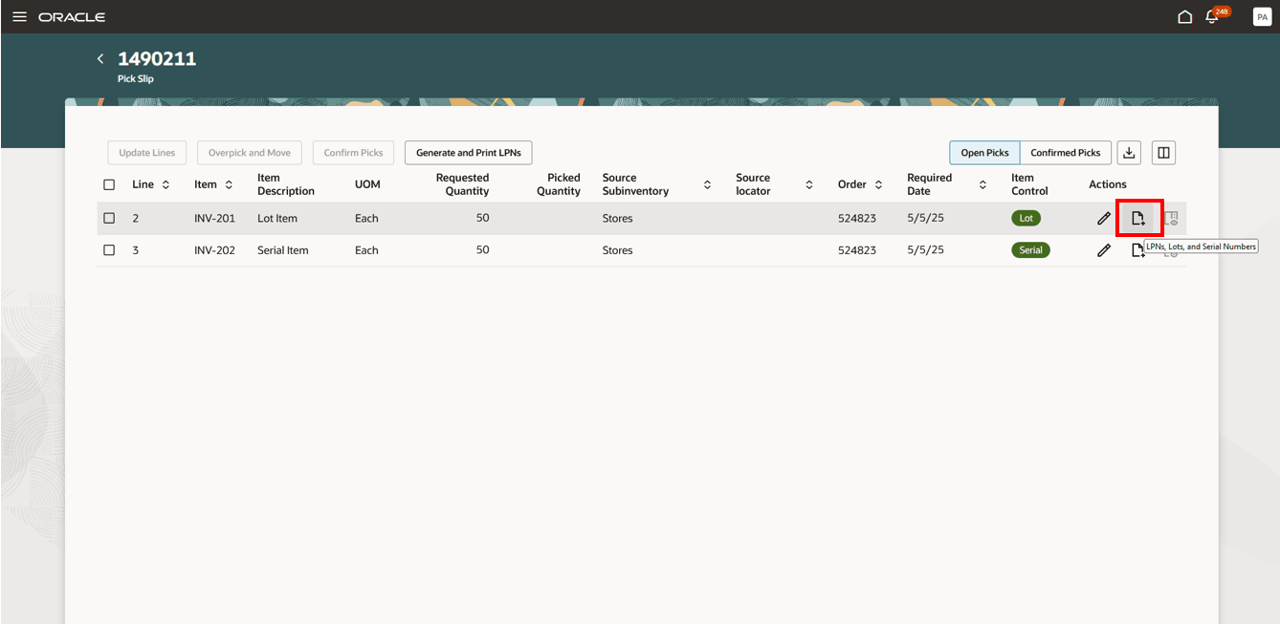
Select LPNs, Lots, and Serial Numbers Action on Confirm Picks Page
- You can pick the entire LPN if it contains only the item being picked and its quantity is less than or equal to the requested quantity.
- If the LPN contains more than the requested quantity or includes additional items, you must specify a To LPN to transfer only the picked content.
- If the destination subinventory and locator aren't LPN enabled, the picked contents are transferred and confirmed as loose inventory.
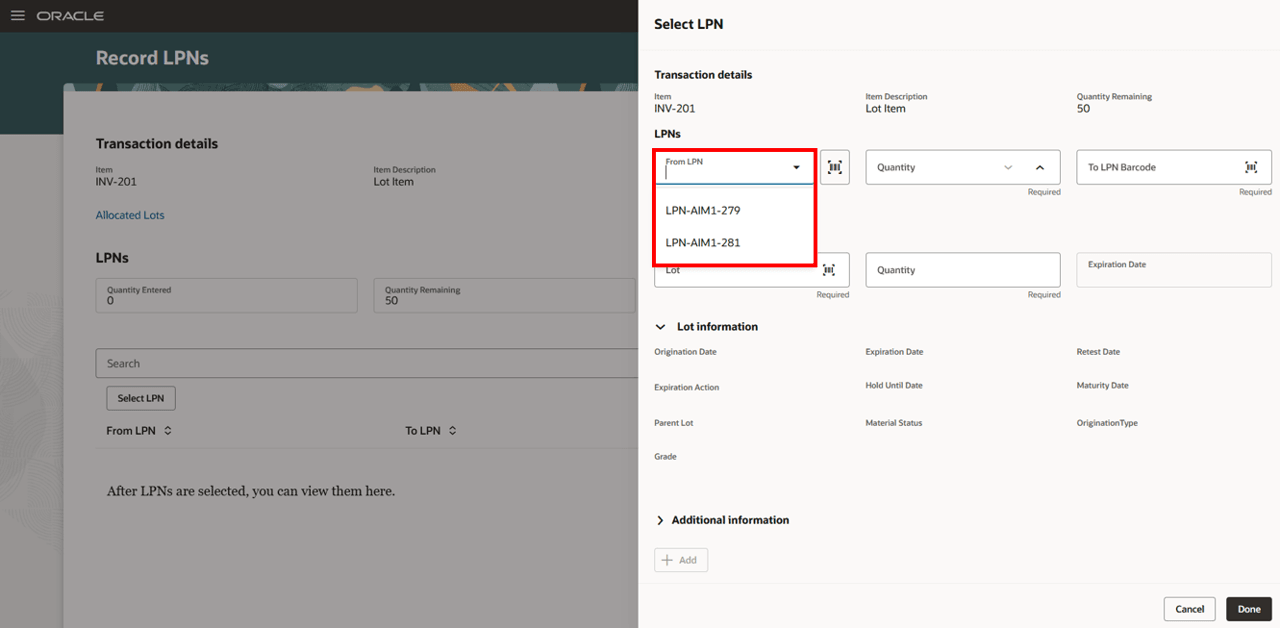
Record LPNs on Pick Lines
In Shipping, picked LPNs are visible on the Shipment Lines, LPNs, and Shipments pages. You can repack picked LPNs or pack them into another LPN before confirming the shipment. Additional actions such as Backorder and Submit for Cycle Count are supported for picked LPNs. When these actions are performed, the LPNs are unassigned from the shipment lines, and the lines are moved to Backordered status.

Shipment with LPNs
LPN Generation and Print LPNs
You can choose to pregenerate LPNs and have the LPN labels preprinted so that you can scan the LPNs during receiving, inventory, or shipping transactions.
The Generate LPNs scheduled process lets you generate LPNs and launches an Oracle BI Publisher report with the LPNs that can be printed. You can choose to generate the LPNs using the LPN parameters specified on the Advanced Inventory Parameters page, or you can override those parameters and generate LPNs using the input parameters. The LPNs generated by the scheduled process are unique across organizations and are created in the Defined but not used status. You can use this scheduled process to generate LPNs for container items.
Use the Generate and Print LPNs action to generate new LPNs during receiving, inventory, or shipping transactions if you haven't previously generated LPNs using the Generate LPNs scheduled process.
- Creates an LPN that honors the LPN prefix, LPN suffix, and next in sequence.
- Gapless support ensures there are no gaps in LPN sequence. You can reuse LPNs for which the contents are transferred to another LPN as long as the LPNs aren't shipped or issued out.
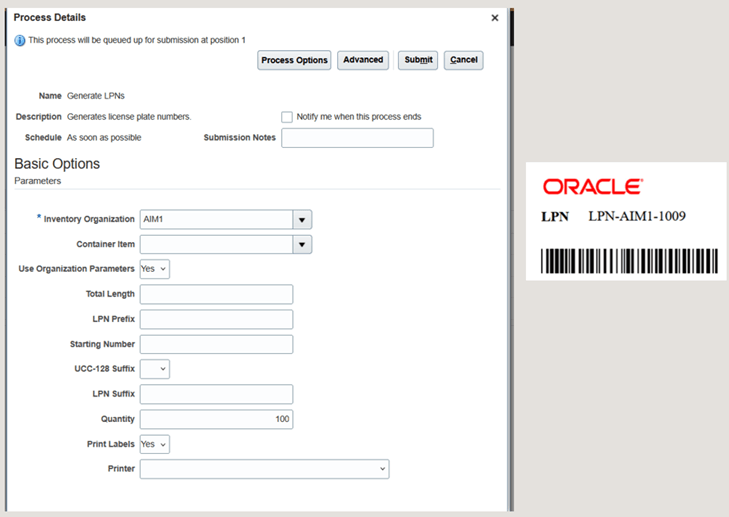
Generate LPNs
You can receive the incoming material as loose material or have it packed by specifying the LPN for the lines to receive during receiving. You can specify the LPN for a line by using the Edit action which invokes the drawer where you can enter an LPN for a line, or you can use the Pack LPN action to specify the LPN for each line.
Use the Pack LPN action to enter the LPN for multiple lines. The From LPN field is available only when the LPN is specified for an ASN.
The Generate and Print LPNs action allows you to generate LPNs and labels during receiving.
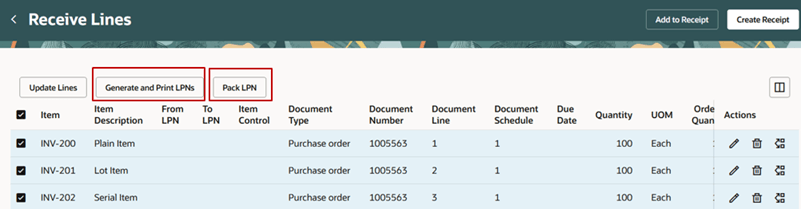
Generate and Print LPN During Receiving
Use the Generate and Print LPNs action to generate new LPNs during receiving, inventory, or shipping transactions if you haven't previously generated LPNs using the Generate LPNs scheduled process.
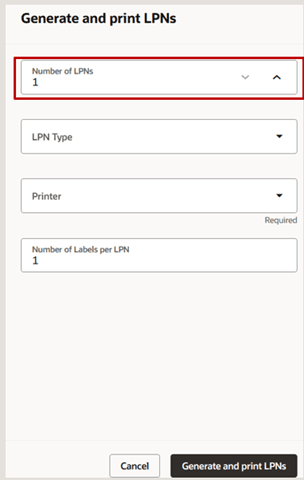
Generate and Print LPNs
LPN Visibility and Pack, Unpack, Repack, and Split Actions
The Item Quantities page displays the LPN page along with Item, Lots, Serial Numbers, and Action Status pages for an LPN-enabled organization. You can perform the Repack LPN action to transfer the contents of an LPN to a new LPN on the Item Quantities page. You can perform this action only for the LPNs which are in an In inventory LPN status. This performs a transfer action to move the LPN contents into a new LPN with an In inventory LPN status or to an existing LPN available in the same location. Additional LPN actions that can be performed include:
- LPN Pack - Packs loose material in a location into an LPN after ensuring that the corresponding subinventory and locator have an LPN setup of packed and loose.
- LPN Unpack - Unpacks packed material in a location into loose after ensuring that the corresponding subinventory and locator have an LPN setup of packed and loose.
- LPN Split - Breaks and distributes an LPN's packed contents into one or more LPNs.
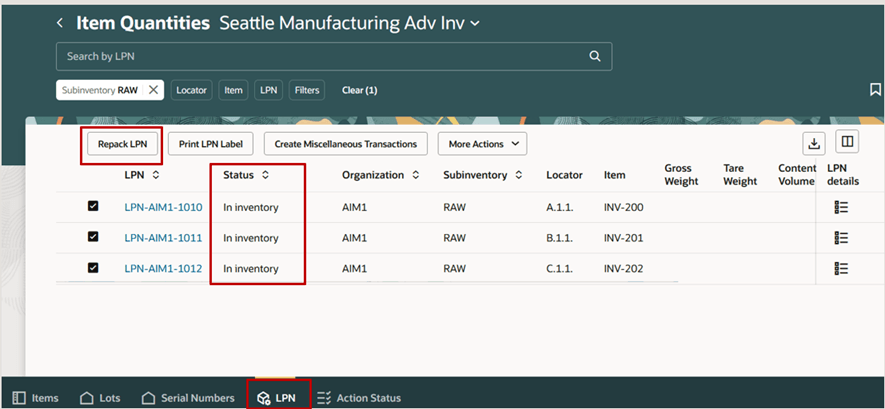
Initiate Repack Action in Item Quantities
Use the Split action to transfer the contents from the original LPN to a new LPN. Specify the new LPN with an In inventory status. This creates new LPNs corresponding to an original LPN using the LPN Repack transaction type. The Split action is available only for the original LPN, and it's not available for the new LPNs created by the Repack action.
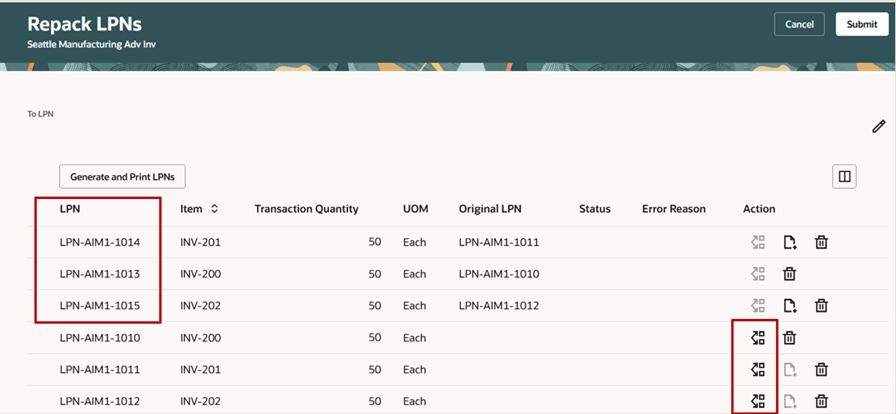
Split Action on Repack Lines
The LPN status can be viewed from the Item Quantities page anytime after the LPN creation. The LPN status changes from Picked to Shipped after shipping the LPN. Use the LPN Details button corresponding to an LPN on the LPN page from the Item Quantities page to view the summary for an LPN. Once shipped, the LPN can't be reused for any other inventory transaction. You can also view the hierarchy for an LPN.
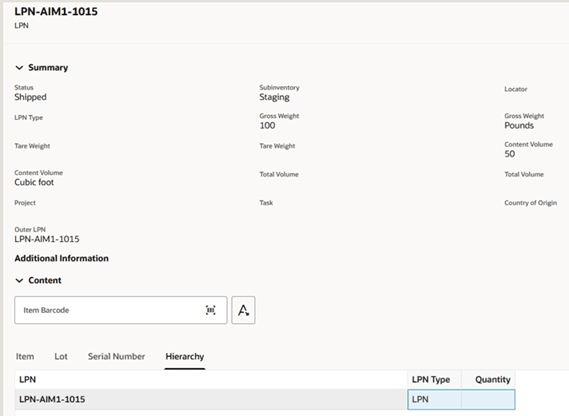
LPN Summary
Mobile Inventory
You can also capture LPNs for all receiving, inventory, or shipping transactions using the Inventory Mobile pages.
Additionally, you can perform these LPN-triggered transactions:
- Issue an LPN using the Miscellaneous Issue transactions
- Move an LPN from one location to another using the Subinventory Transfer transactions
- Move the LPN from one organization to another organization using the Interorganization Transfer transactions
The transfer of an LPN from an LPN-enabled subinventory to a subinventory that's not LPN enabled implicitly unpacks the material in the destination subinventory.
This feature provides you greater flexibility and control of your goods by letting you pack goods into LPNs and subsequently transact the goods using the LPN itself.
Here are the demos of these capabilities:
Steps to enable and configure
NOTE: Before you set up Oracle Fusion Cloud Advanced Inventory Management, see the licensing and enablement information at the beginning of the Advanced Inventory Management section.
NOTE: If LPNs are enabled for the organization, integration for an external execution system (such as WMS, 3PL) is not supported.
Navigate to the Advanced Inventory Parameters page to enable the organization for LPNs. An LPN-enabled organization supports both packed (contained in LPN) and loose (not packed) material for the on-hand inventory.
You can specify these fields on the Advanced Inventory Parameters page:
- Enable LPN: Determines if the organization is enabled to store packed material.
- LPN Prefix: Determines the prefix to use for the LPN.
- LPN Suffix: Determines the suffix to use for the LPN.
- Start LPN Number: Starting number to use to generate LPNs in an LPN-enabled organization.
- Total LPN Length: Determines the length of the LPN.
- Physical Inventory Counting Method: You can choose to count physical inventory by LPN or item. Setting this to LPN allows you to count by LPN for the packed on-hand inventory.
- Enable commingling projects: Select to comingle on-hand quantities associated with different projects.
- Enable commingling tasks: Select to comingle on-hand quantities associated with different tasks corresponding to a project.
- Enable commingling countries of origin: Select to comingle on-hand quantities associated with different countries of origin.
- UCC 128 suffix: Select to add a code 128 suffix to the LPN.
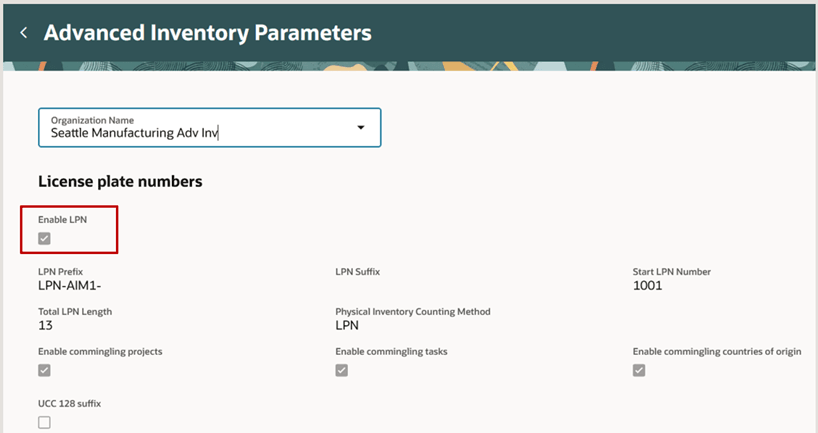
Advanced Inventory Parameters
You can enable a subinventory in an organization for LPNs only when the organization is LPN enabled. You can only enable the Storage type of subinventories for LPNs. Enabling the subinventory for LPNs lets you store only packed material in a subinnventory. You can store only loose material in a subinventory when the subinventory isn't enabled for LPNs.
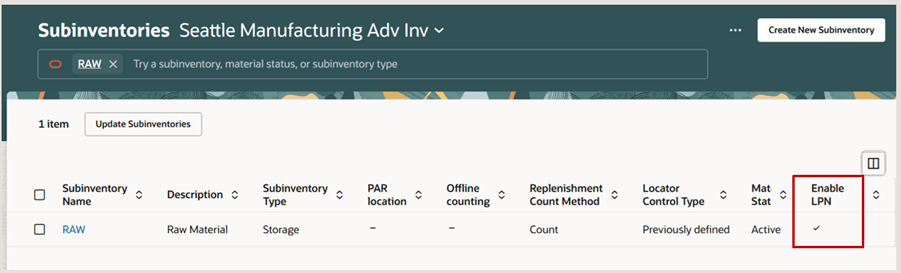
Configure Subinventories
You can enable LPNs for a specific locator. You can specify the LPN control at a locator level for a locator-controlled subinventory.
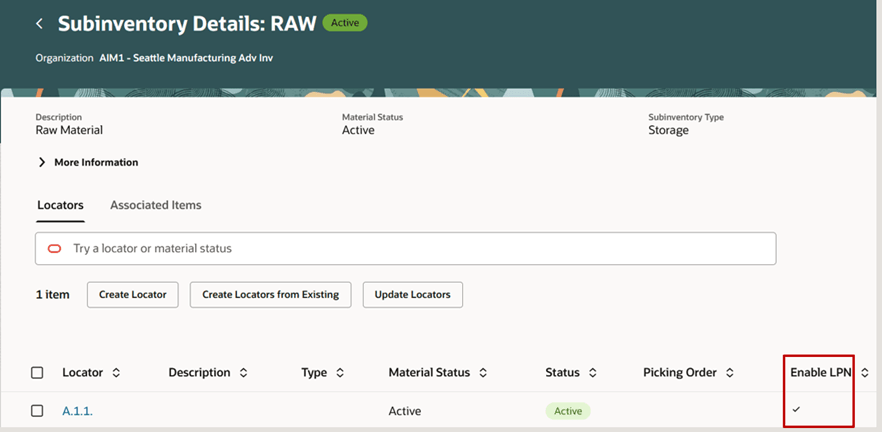
Configure Locators
Here's a table that illustrates the behavior of LPN control for subinventories and locators.
|
Subinventory Enabled for LPN |
Locator Controlled Enabled for Subinventory |
Locator Enabled for LPN |
Behavior |
|
No |
No |
NA |
LPN isn't required for the transactions. Allows only loose material to be stored in a subinventory. |
|
Yes |
No |
NA |
LPN is required for the transactions. Allows only packed material to be stored in a subinventory. |
|
Yes |
Yes |
No |
LPN isn't required for the transactions. Allows only loose material to be stored in a subinventory. |
|
Yes |
Yes |
Yes |
LPN is required for the transactions. Allows only packed material to be stored in a subinventory |
Follow these steps to enable the Repack LPN pages:
- Navigate to the Setup and Maintenance work area.
- Search for and select the Manage Inventory Profile Options task.
- On the Manage Inventory Profile Options page, search for and select the ORA_INV_REPACK_LPN_REDWOOD_ENABLED profile option code.
- In the Profile Values section, set the Site level to Yes. The default value is No.
- Click Save and Close. Changes will take effect the next time users sign in.
Cycle Count Considerations
Use the cycle count parameters on the Cycle Count page to specify if you want to process LPN adjustments and allow LPN discrepancies. The LPN adjustment allows the adjustment of on-hand quantities in an LPN. The LPN discrepancy allows you to transfer the LPN to another location based on the location where the count is recorded for an LPN. For example, if you count an LPN in the Stores subinventory, but the system on-hand quantity for that LPN is in the FGI subinventory, counting the LPN in the Stores subinventory will move the system on-hand inventory for the LPN from FGI to Stores through a behind-the-scenes subinventory transfer.
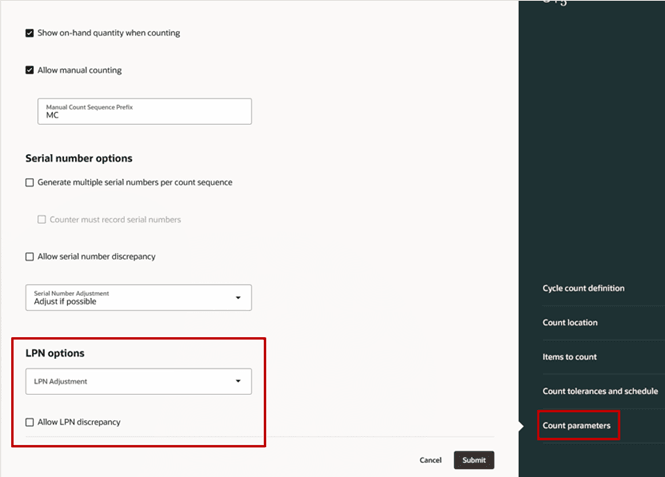
LPN Changes in Cycle Count
Tips and considerations
- Organizations enabled for Manufacturing or Maintenance can't be enabled for LPNs.
- When the Integrated System Type organization parameter is set to Warehouse Management System or Third Party Logistics, the LPN feature can't be enabled through the Advanced Inventory Parameters setup. Additionally, if LPNs are enabled, the Generate Shipment Request process will not select shipment lines to interface to the external execution system, and the Perform Shipping Transaction process will not process shipment transactions from the WMS or 3PL.
- You can't create manual or application generated reservations or picks with LPN references using pick release.
- You can trigger business events when printing LPN labels and LPN content labels by enabling business events for labels using the Inventory Business Event Configurations setup.
- The existing ADF pages don't support LPN functionality. Use the Redwood pages to capture LPNs during receiving, inventory, or shipping transactions.
- You can't choose an LPN-enabled organization from the classic Inventory Management landing page.
- ADFdi doesn't support LPNs for transactions.
- Use the Oracle Visual Builder Cloud Service plug-ins to update transactions with LPN references.
- You can choose to enable an existing organization for an LPN. Review these points before you choose to do so:
- Associate the shipping parameters to an LPN-enabled staging subinventory if you ship packed material.
- Review your existing subinventories and locators and define new subinventories or locators where you stock packed material.
- You can choose to define a new organization for an LPN.
- Create new subinventories to store loose and packed material.
Disabling LPNs
NOTE: Should you decide to stop using Advanced Inventory, there could be a significant amount of work to undo some features such as the use of LPNs and task management.
You can disable an organization for an LPN if no subinventories or locators are defined as LPN enabled.
To assist you in identifying what you will need to disable, you can use the Print Pending Inventory Activities Report to review the list of:
- On-hand balances with LPN references.
- Pending cycle counts and physical inventories for LPN-enabled subinventories or locators.
- Open shipments with shipment lines associated with LPNs.
You can choose to disable subinventories or locators for LPN control only when the report doesn't list any on-hand inventory, pending cycle counts or physical inventories, or open shipment lines with LPN references.
Key resources
- Oracle Fusion Cloud SCM: Using Receiving guide, available on the Oracle Help Center.
- Oracle Fusion Cloud SCM: Using Inventory Management guide, available on the Oracle Help Center.
- Oracle Fusion Cloud SCM: Implementing Manufacturing and Supply Chain Materials Management guide, available on the Oracle Help Center.
Access requirements
Users who are assigned a configured job role that contains this duty role can access this feature:
- Advanced Inventory Transaction Duty (ORA_INV_ADVANCED_INVENTORY_MAINTENANCE_DUTY)
This duty role is new in this update.
NOTE: The Advanced Inventory Transaction Duty duty role is not assigned to any predefined job roles. In the Security Console, you must manually assign the duty role to a configured job role.
Users who are assigned a configured job role that contains these privileges can access this feature:
- Repack LPN Using Mobile Inventory (INV_REPACK_LPN_MOBILE_PWA_PRIV)
- Repack LPN Using Responsive Inventory (INV_REPACK_LPN_PWA_PRIV)
- Generate License Plate Numbers (INV_GENERATE_LICENSE_PLATE_NUMBERS_PRIV)
- Print Pending Inventory Activities Report (INV_PRINT_PENDING_INVENTORY_ACTIVITIES_REPORT_PRIV)These privileges are new in this update.
These privileges are new in this update.
NOTE: The Print Pending Inventory Activities Report privilege is not assigned to any predefined job roles. In the Security Console, you must manually assign the privilege to a configured job role.
To set up this feature, you'll need a configured job role that contains this new duty role, which is not assigned to any predefined job roles:
- Advanced Inventory Management Administration Duty (ORA_INV_ADVANCED_INVENTORY_MANAGEMENT_ADMINISTRATION_DUTY)
This duty role is new in this update.