Redwood: Create and Edit Items
You can use the new simplified user interface pages in Product Management to create and edit items more efficiently. You can view item attributes, descriptive flexfields, extensible flexfields, and all other child item entities on a single page.
NOTE: All the actions for creating and editing items that you could perform in the Product Development and Product Information Management work areas can now be performed in the new Product Management work area.
To create an item, do one of the following:
- On the Product Management landing page, in the Actions panel, click View all actions, and then click New Item.
- On the Product Management Search page, click the Add icon, and then click Create Item.
The Create Item drawer appears on the right side. You can create an engineering item or a commercial item.
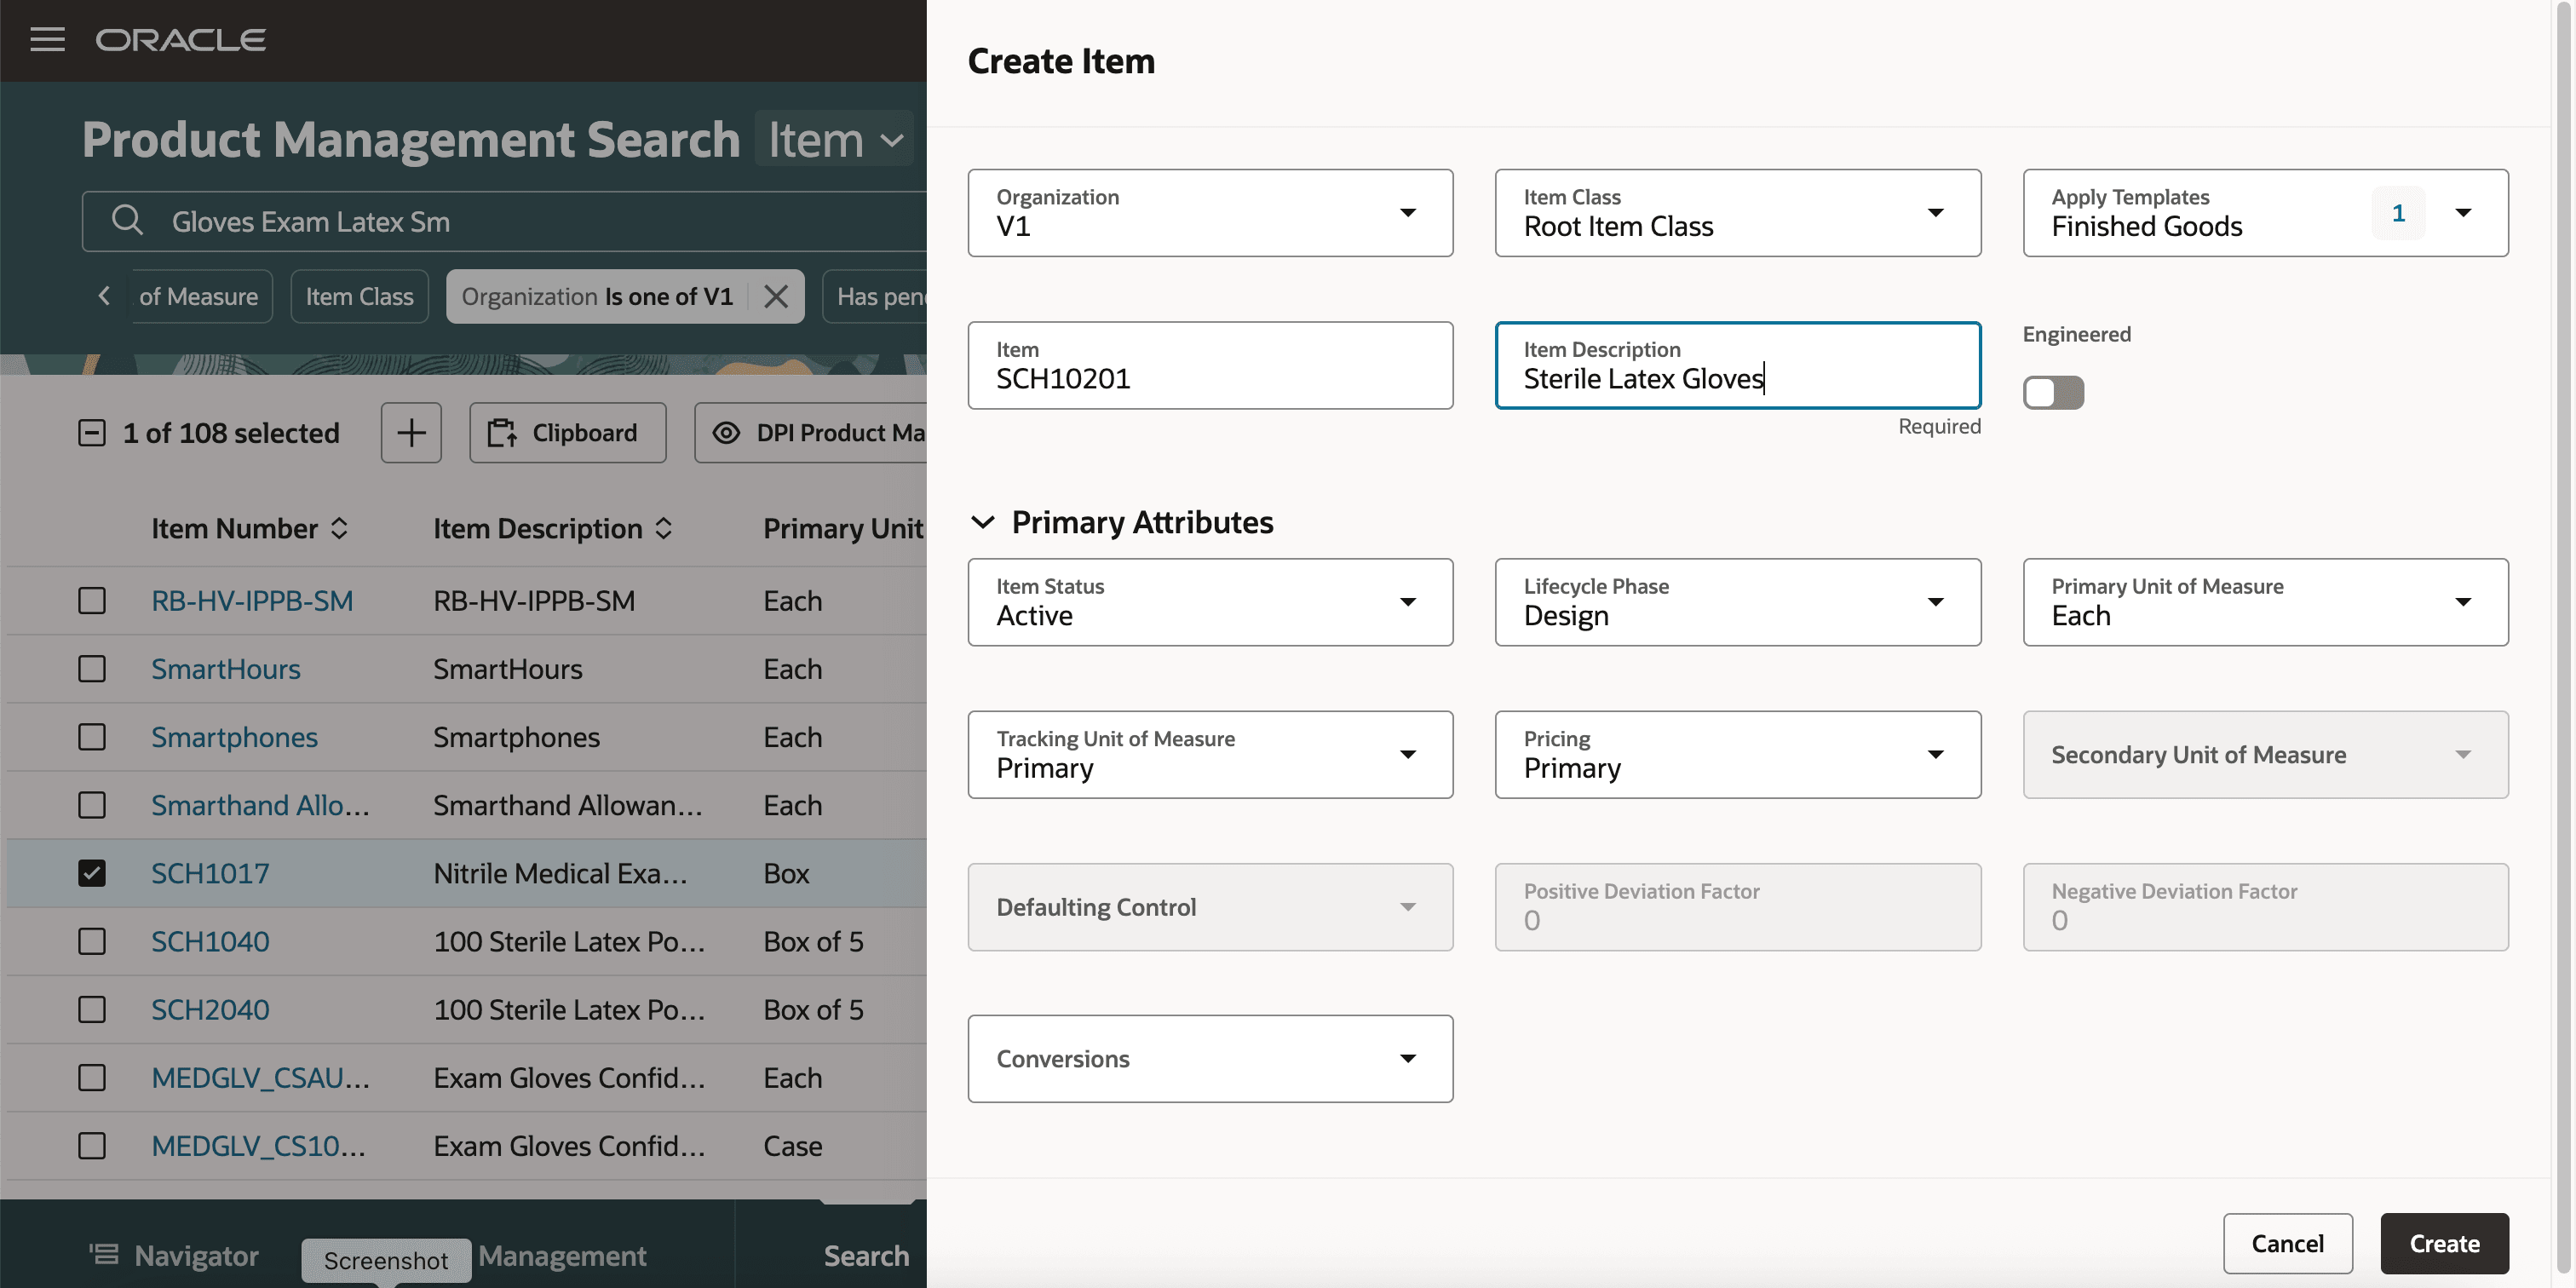
Create Item Drawer
Creating an item initially involves specifying a wide range of attributes that define the item's identity, behavior, and usage across various business functions. After you specify the attribute values, you can manage the following for the item:
- Attachments
- Structures
- Change Requests
- Associations
- Categories
- Relationships
- Where Used
- Quality
Manage Attributes for an Item
On the Create Item drawer, select the organization, item class, and the template. Based on the item class, templates are available. You can select multiple templates and the template values will be applied in the order of selection.
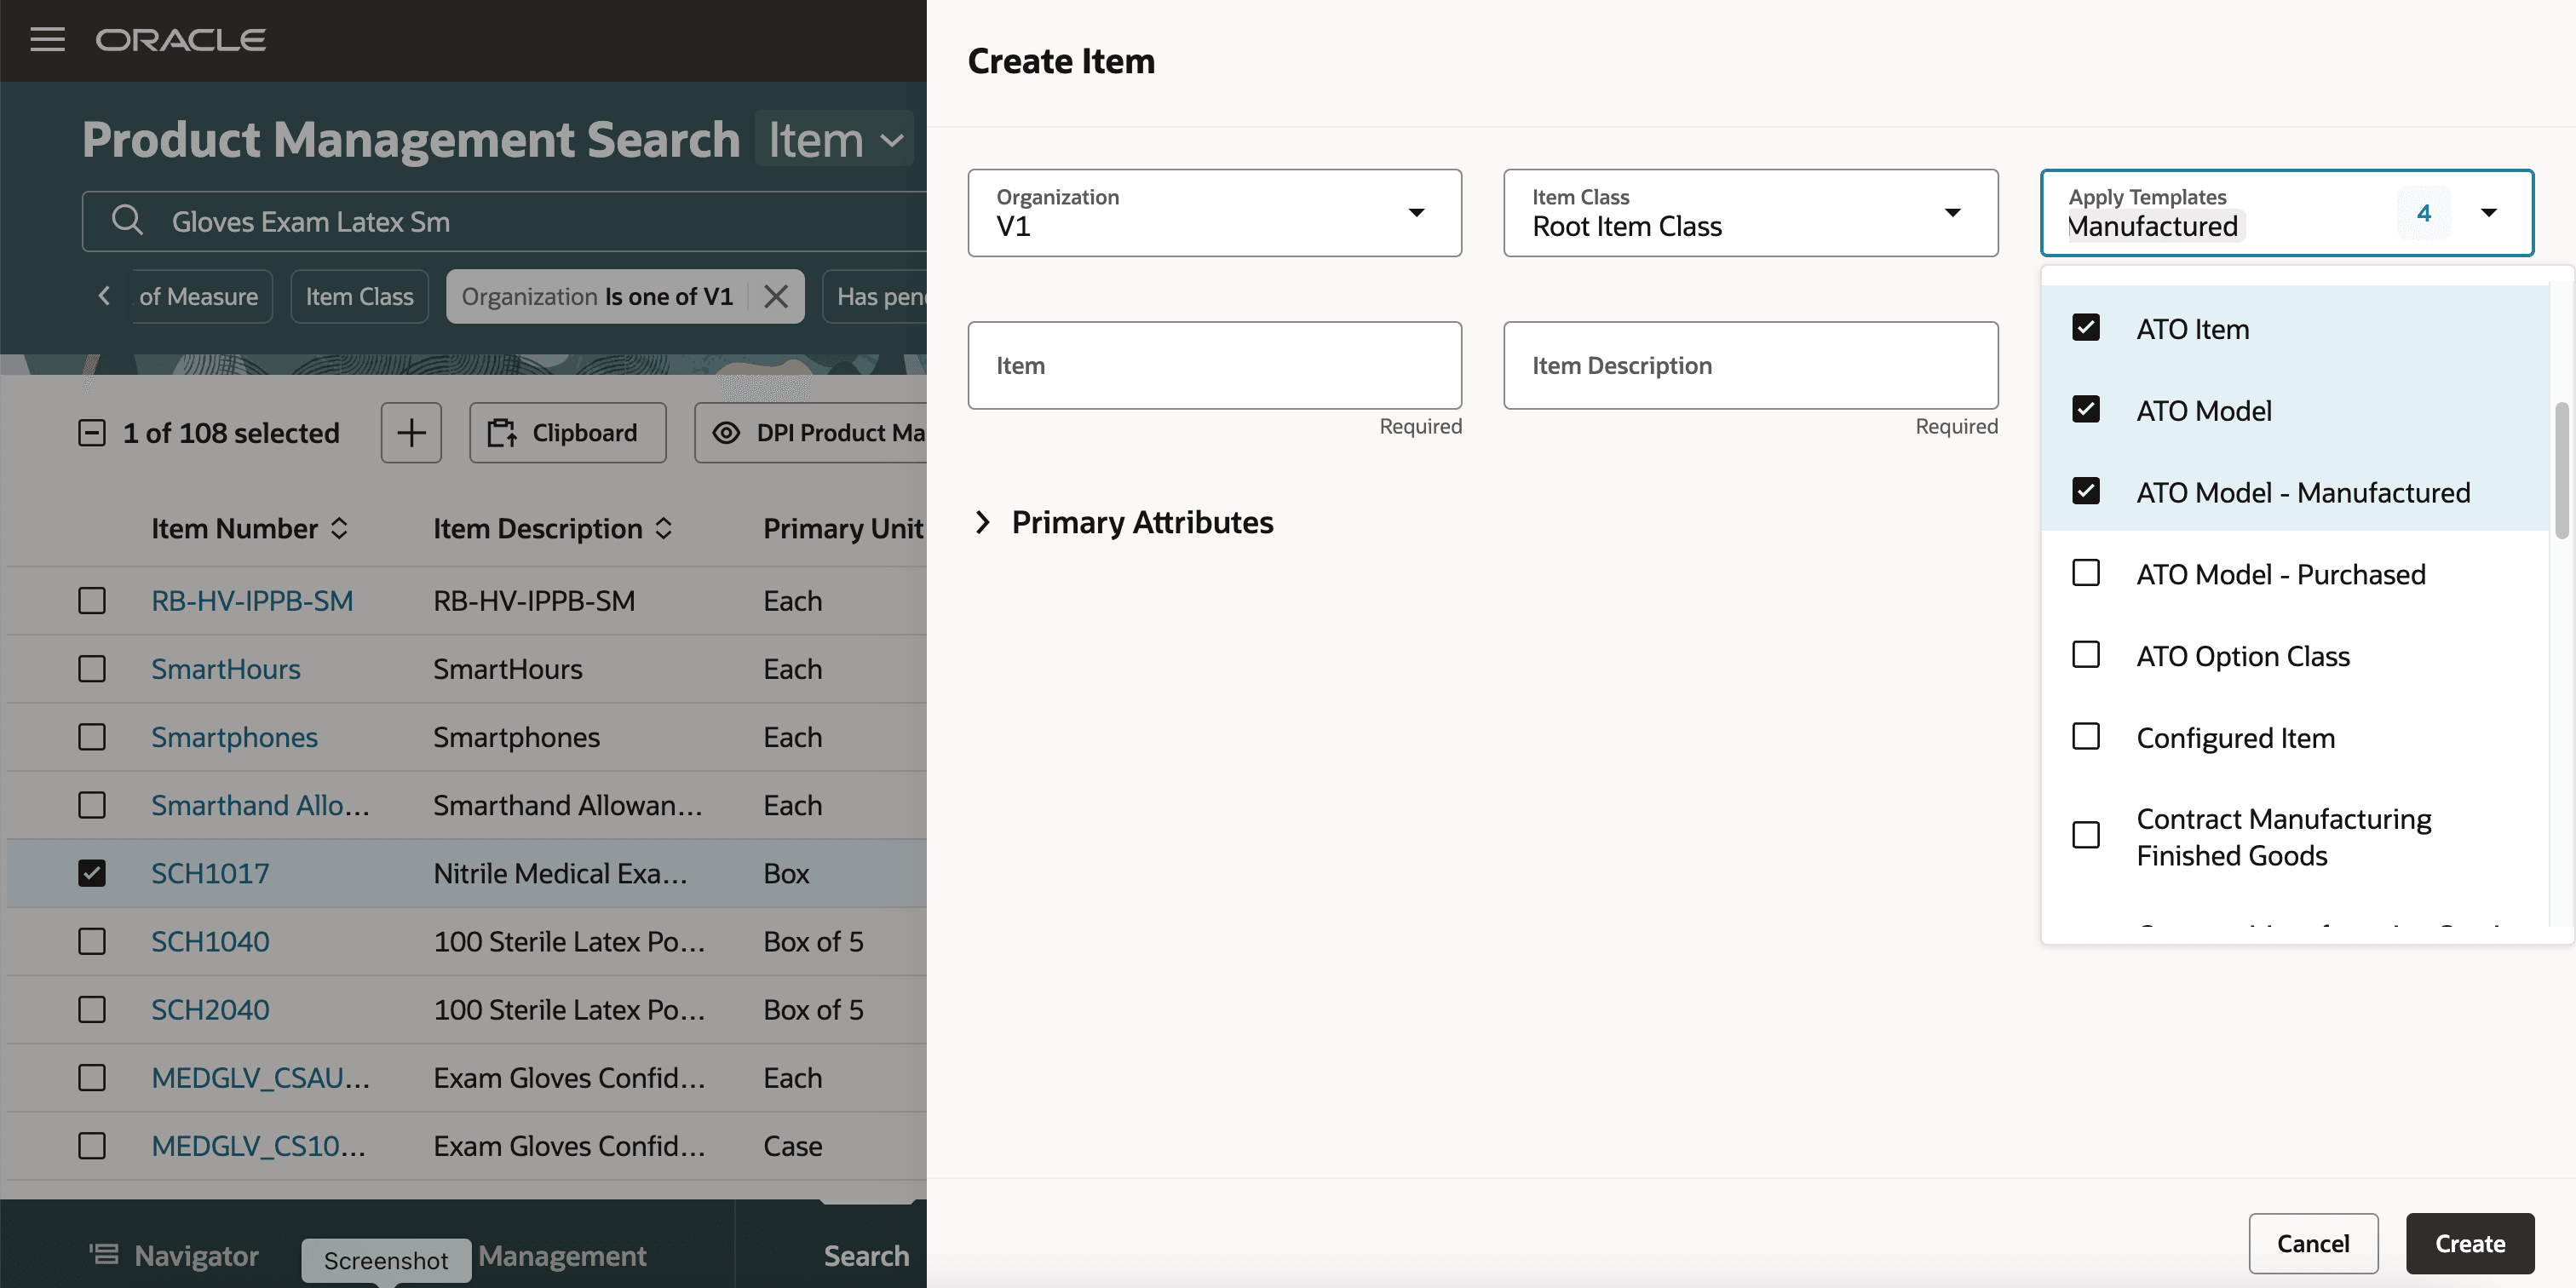
Template Selection
Specify the Primary Attributes and Mandatory Attributes, and then click Create.
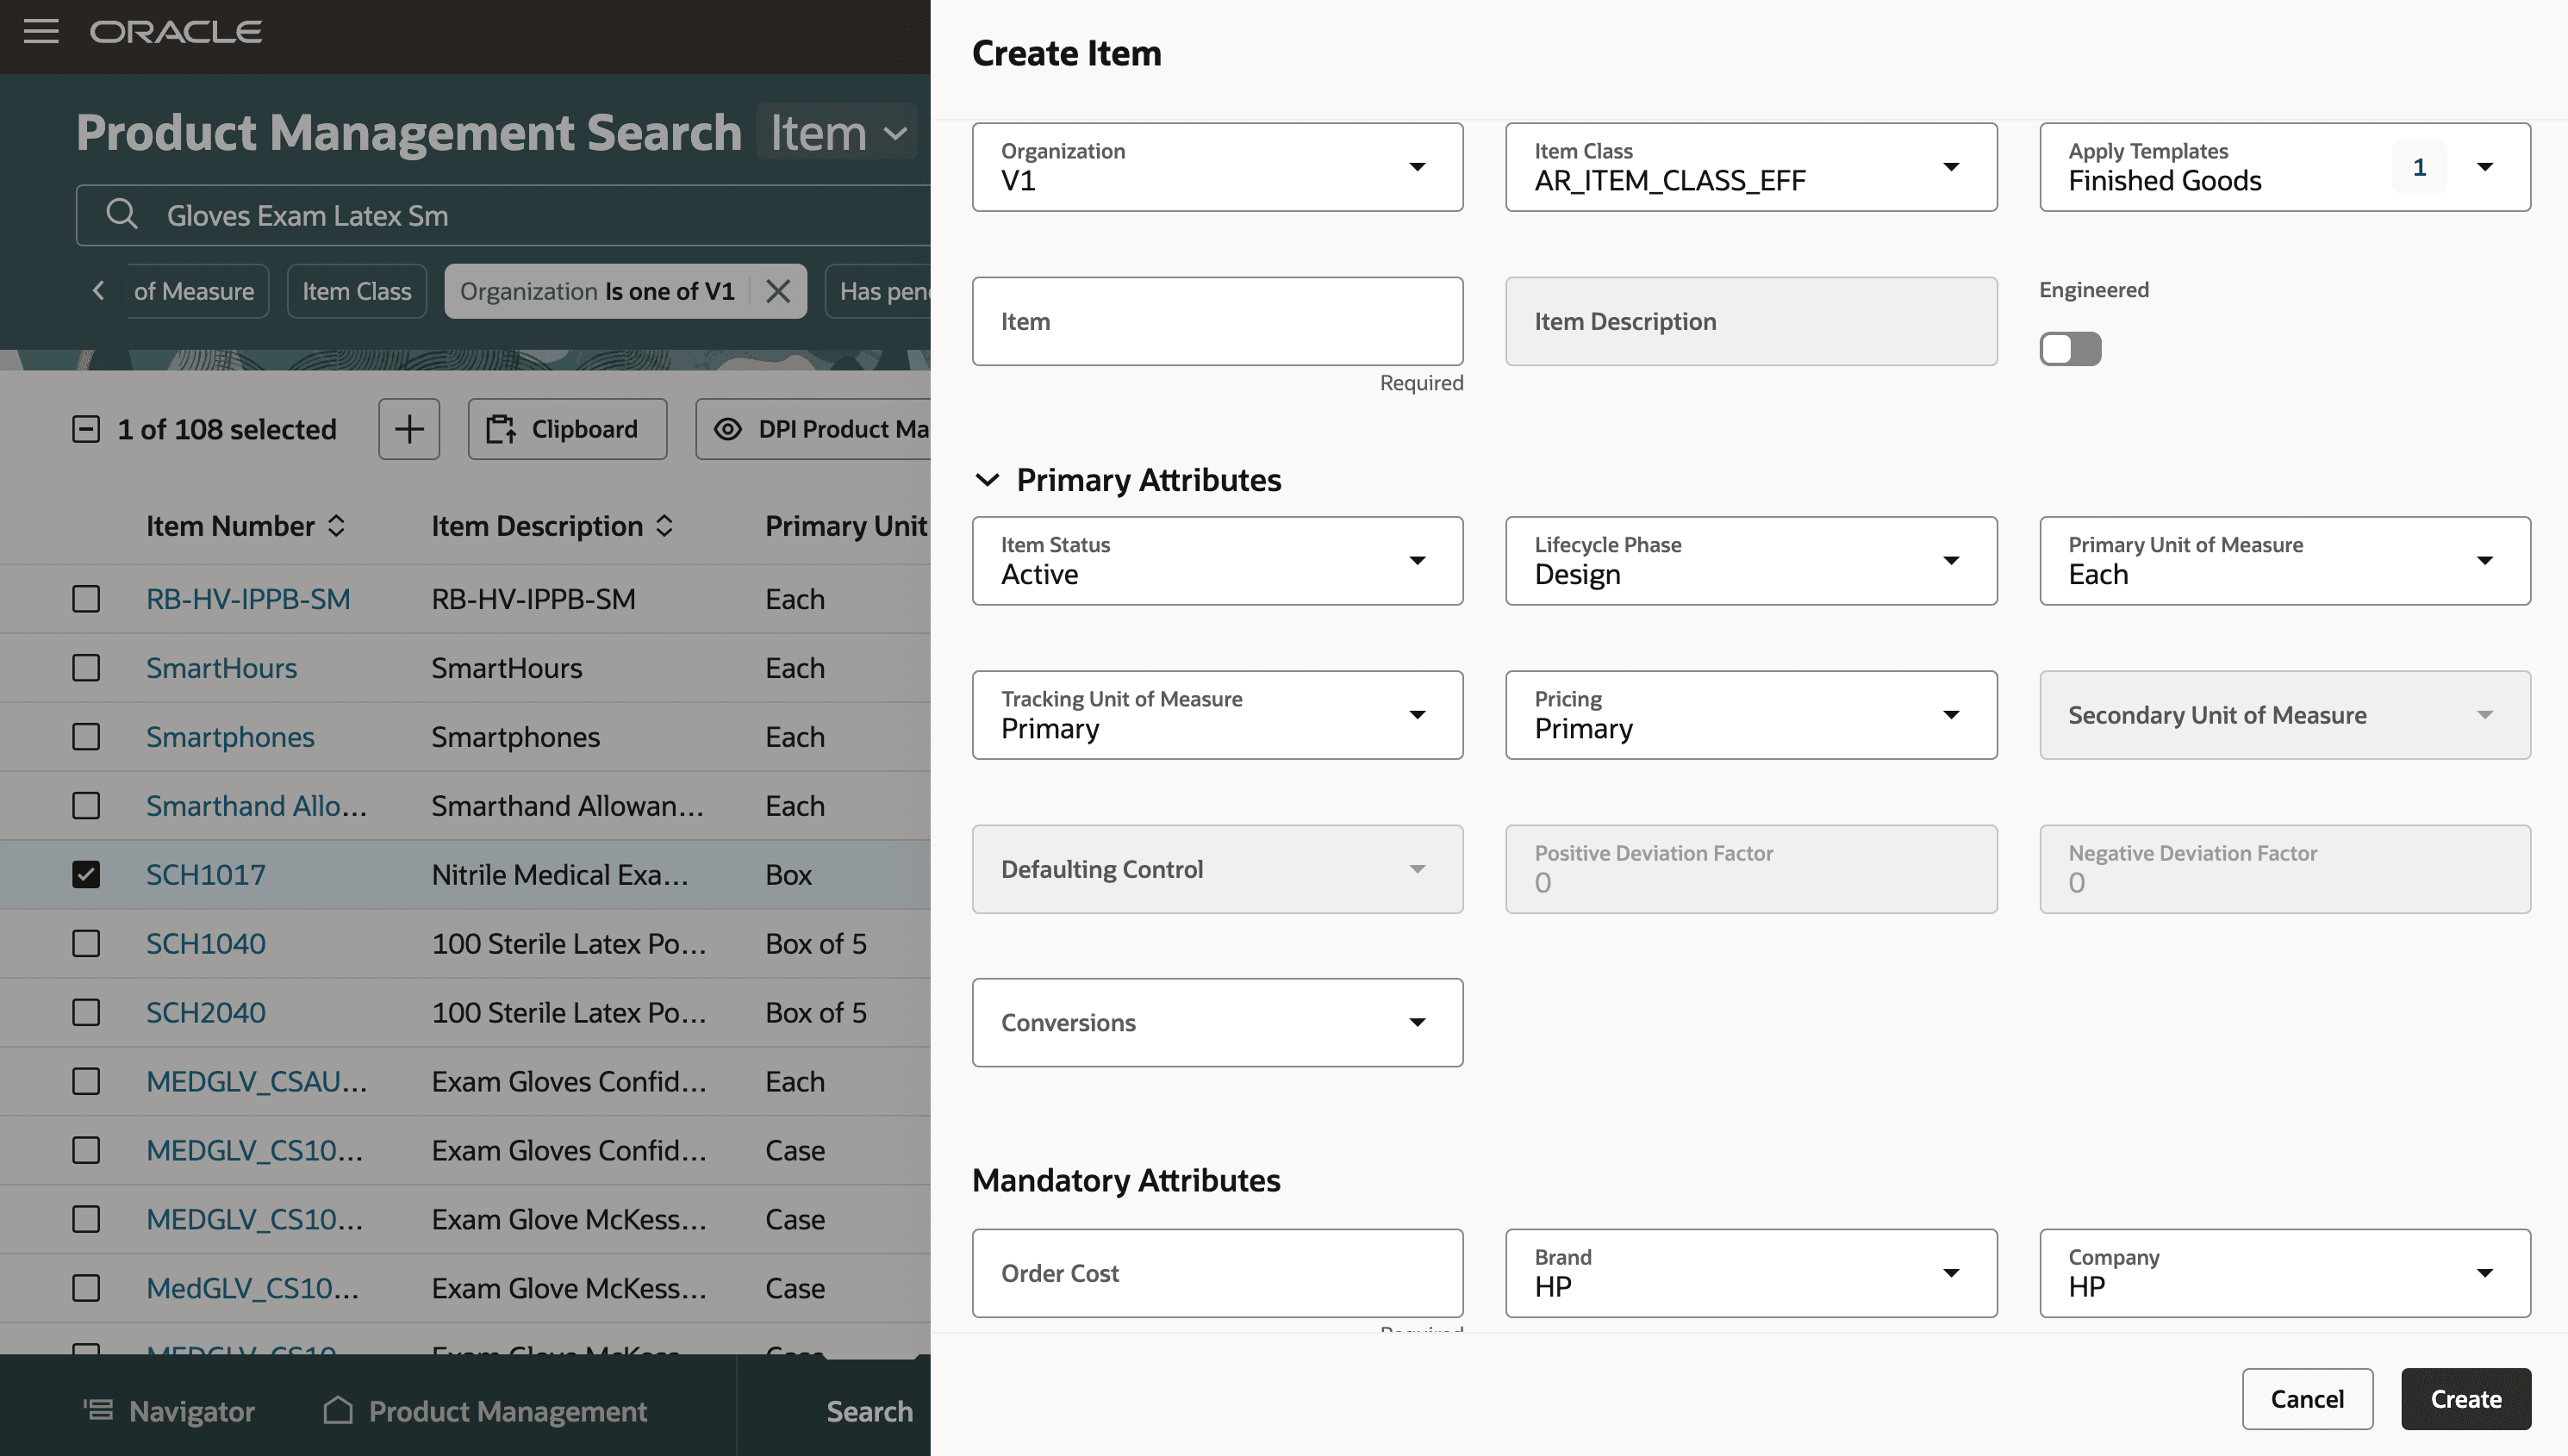
Primary and Mandatory Attributes
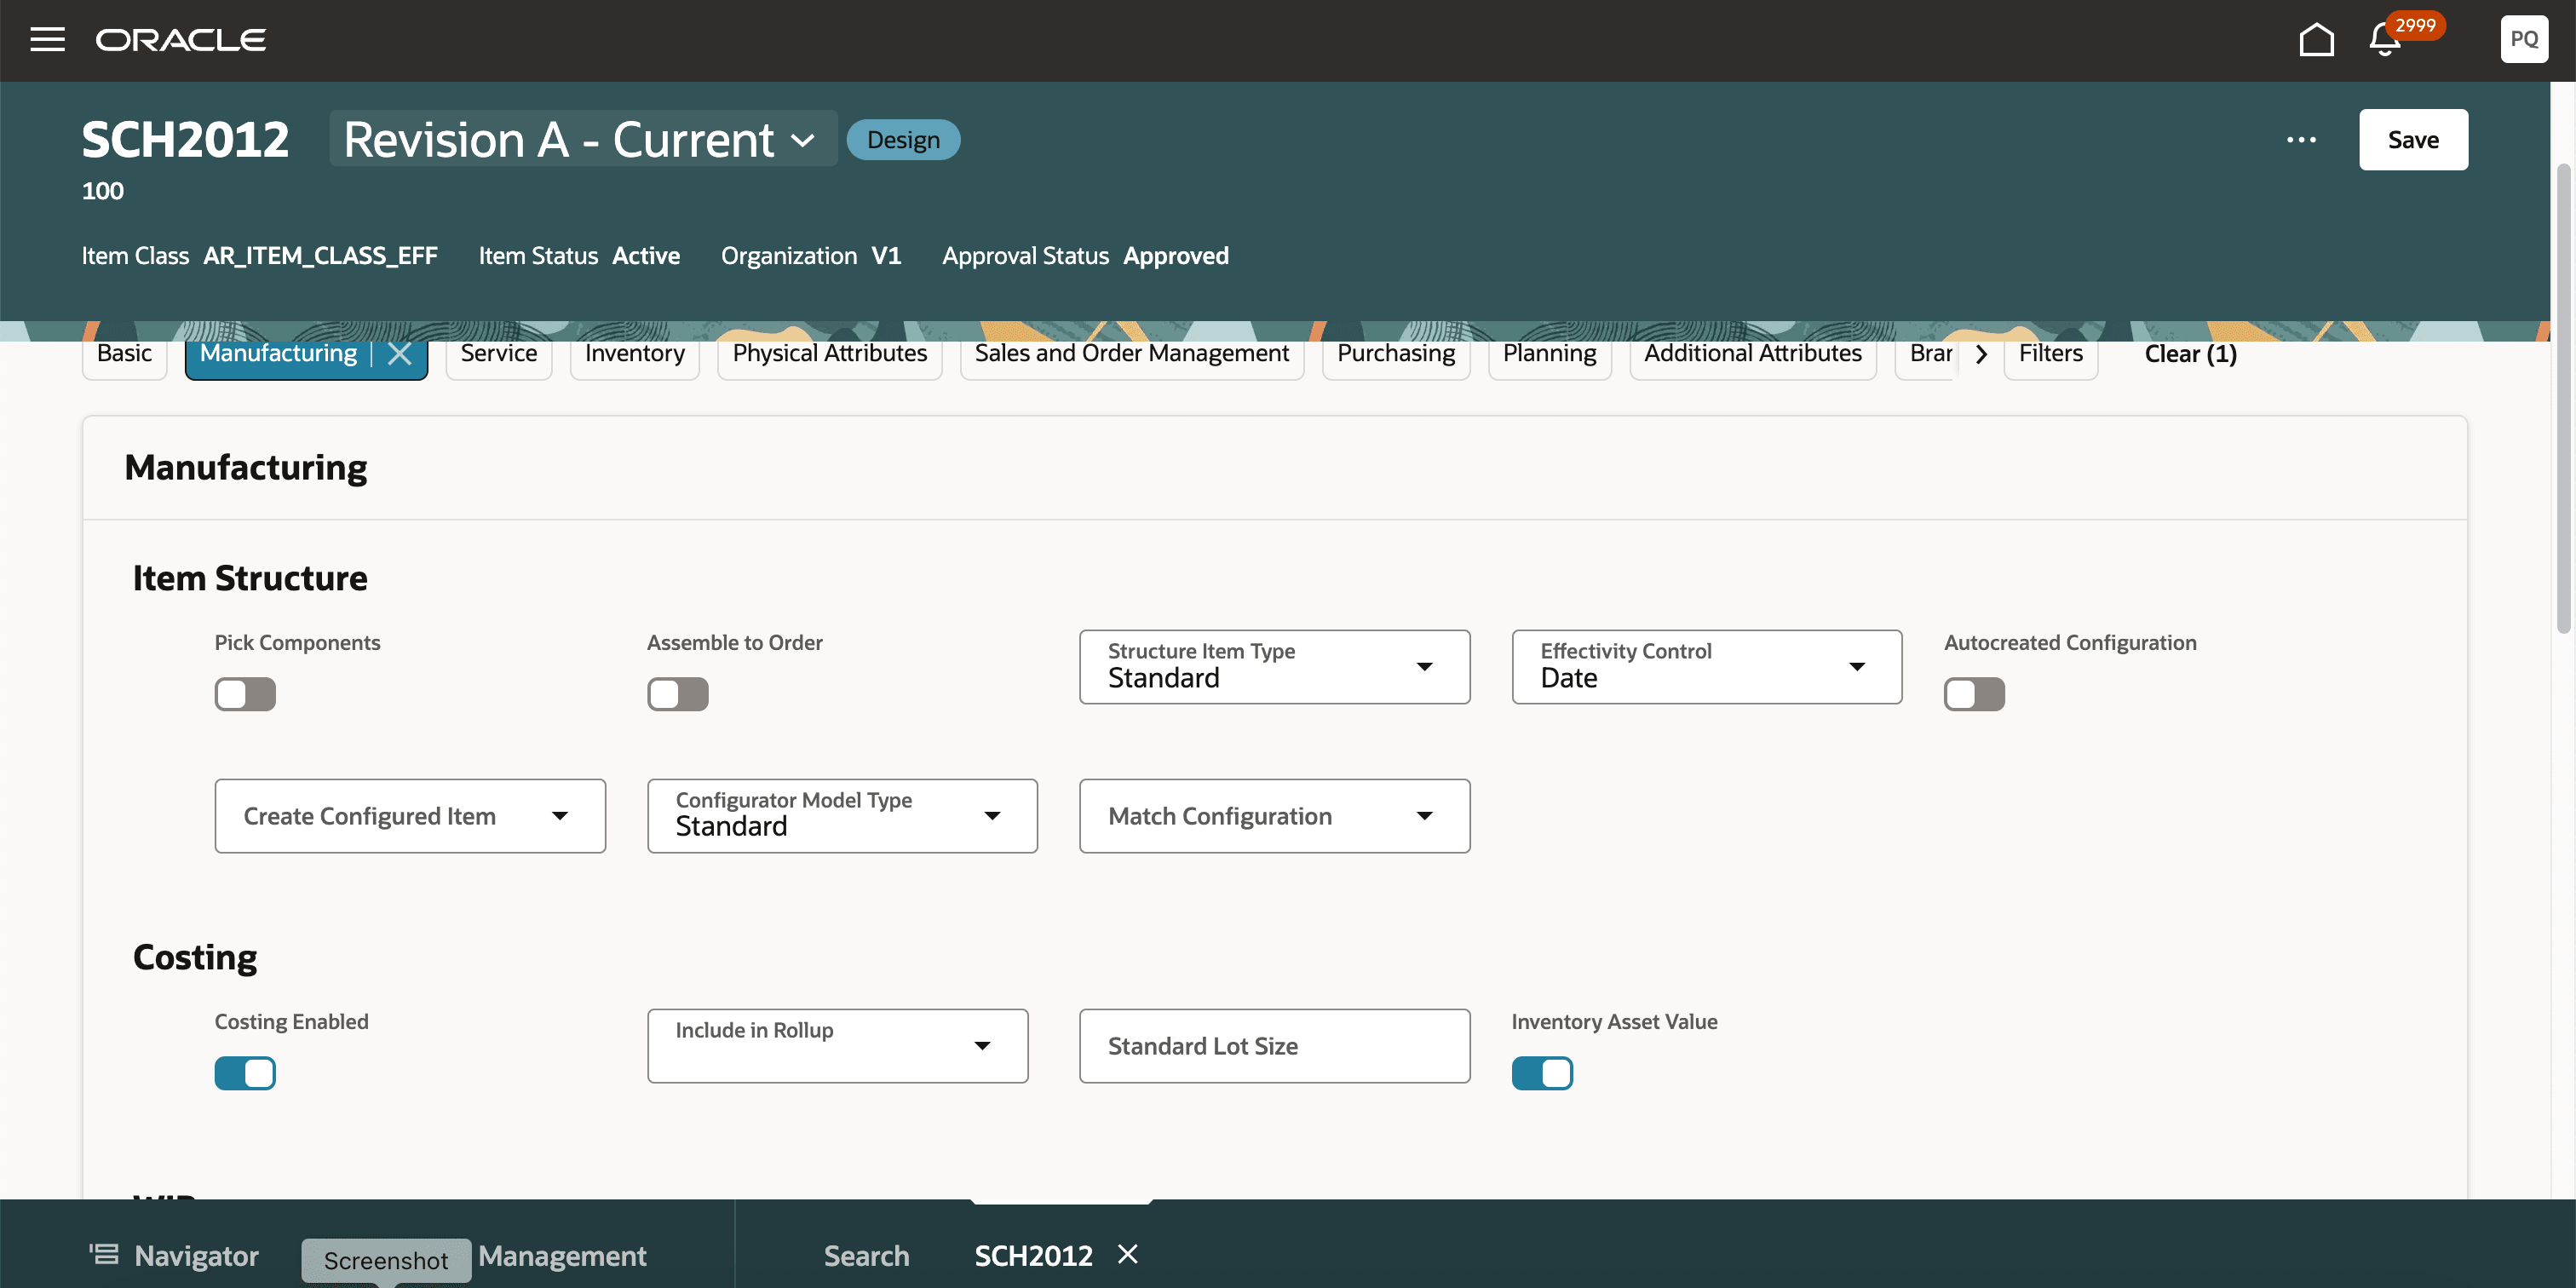
All the predefined operational attributes grouped under various attribute groups are displayed on a single page.
You can use the suggested filters to refine the view further and display only the specific attributes belonging to the predefined page.
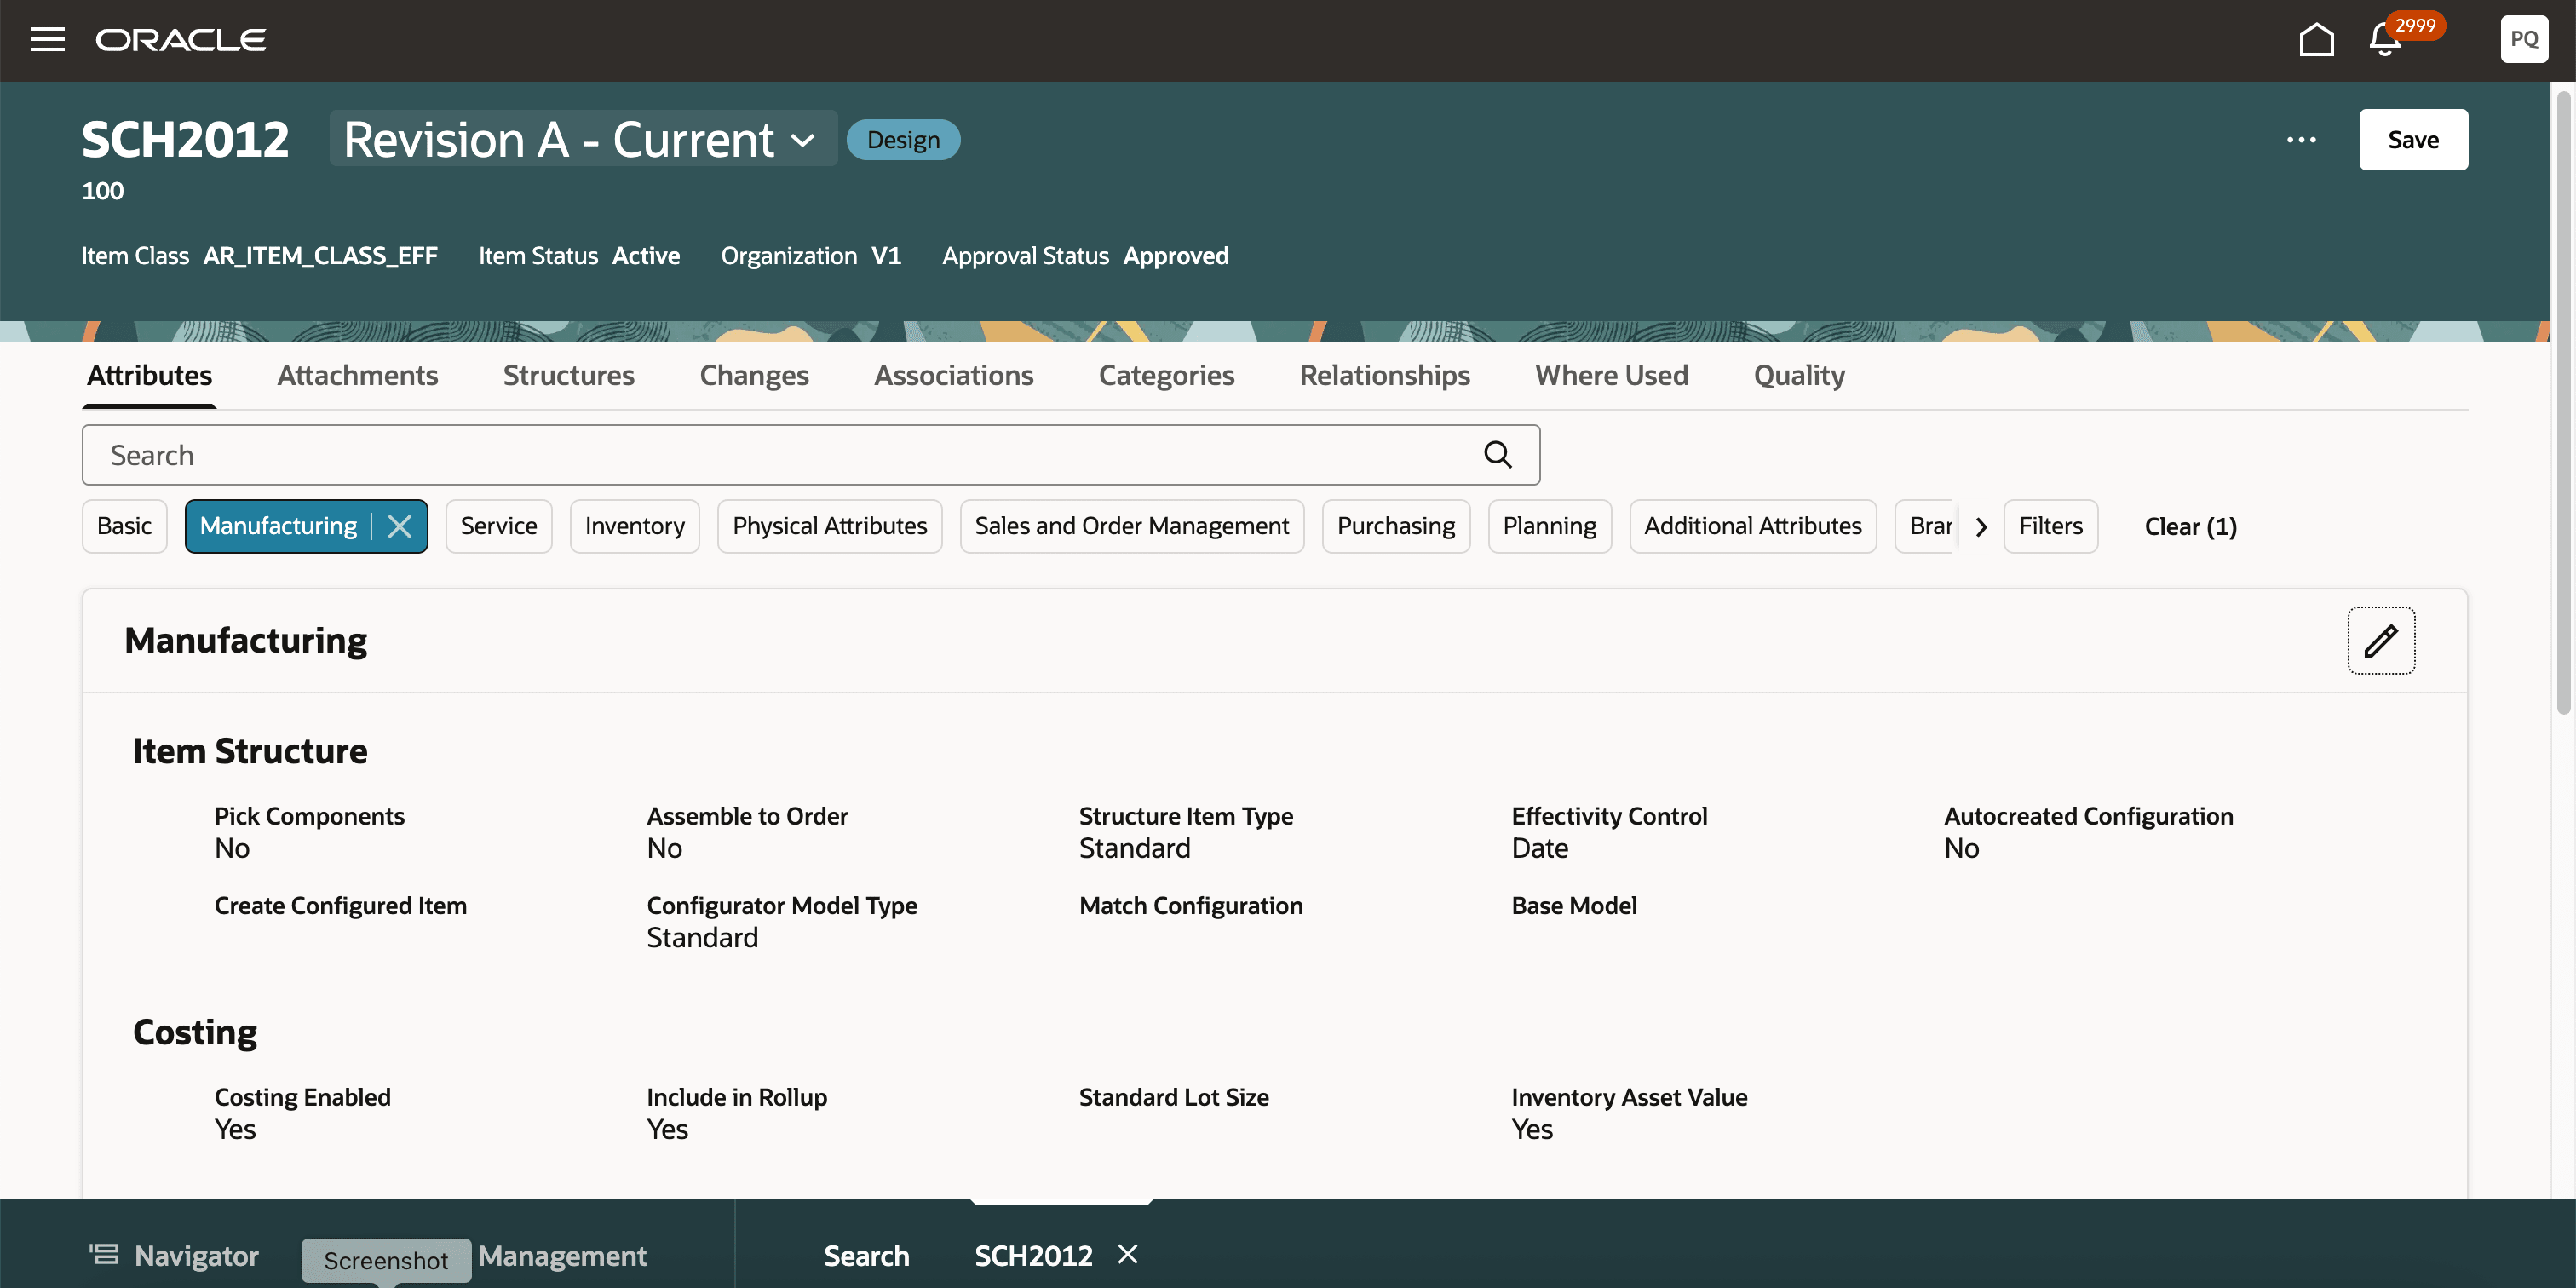
Suggested Attributes
You can search for attributes, attribute values, and attribute groups. The data is filtered based on the search criteria and the text that you've searched for is highlighted as shown in the following screenshot.
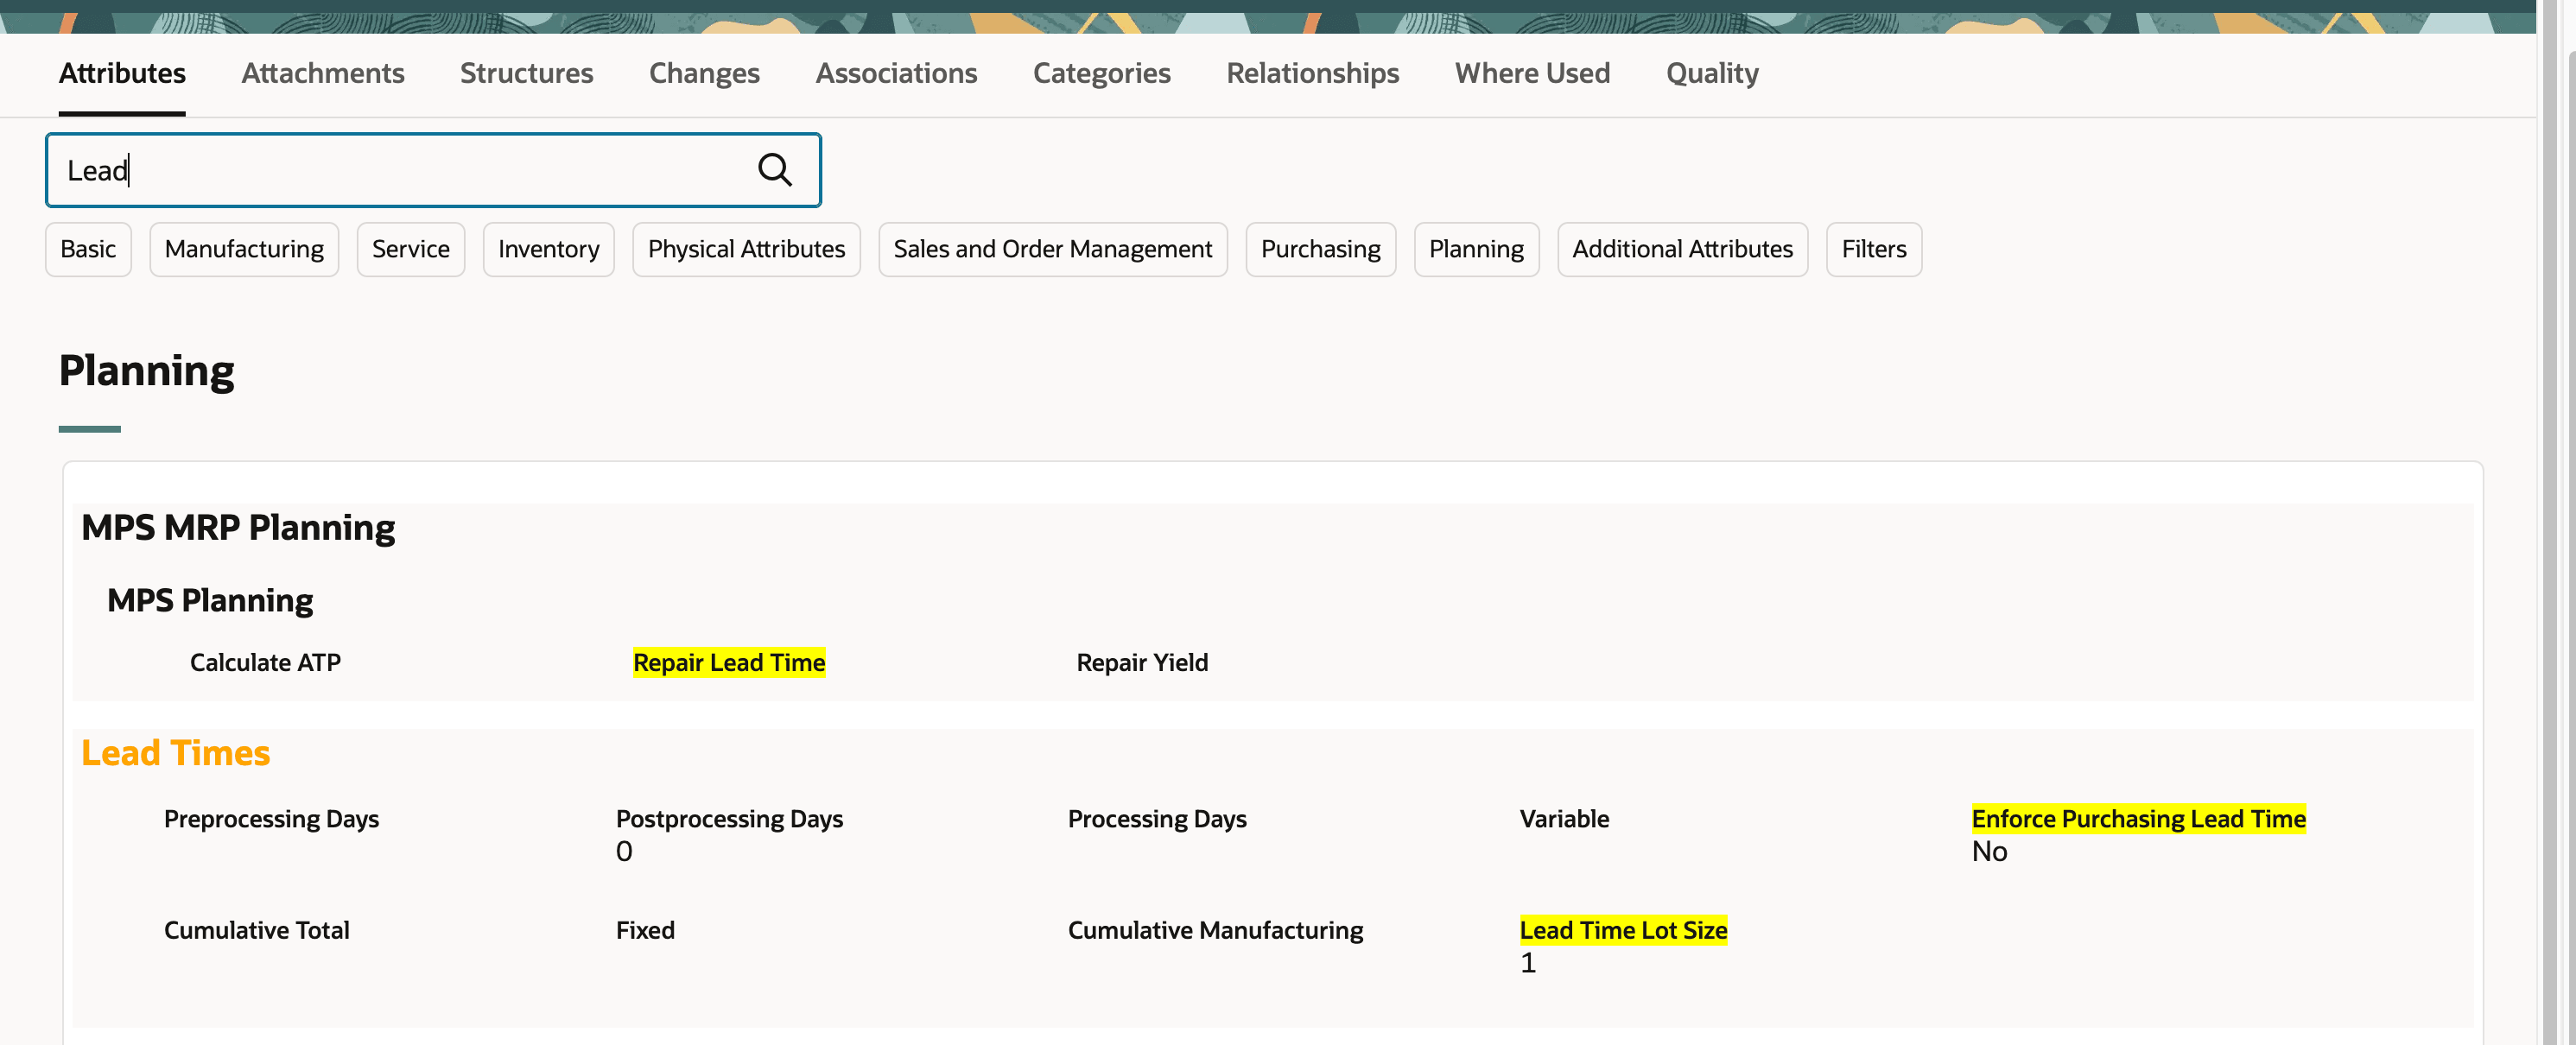
Highlighted Search Text
To edit the attribute values, click the Edit icon. After specifying the values, click Apply and the values will be visible on the user interface. Clicking Save at the page level saves the changes to the item.
Editable Attributes
You can save the item or submit the item to new item request depending on the item class setup.

Assign to New Item Request
After you click Save at the top of the page, if there are any errors during item creation due to rules, the item is created in New Status as shown in the following screenshot. You must resolve the errors before using the item.
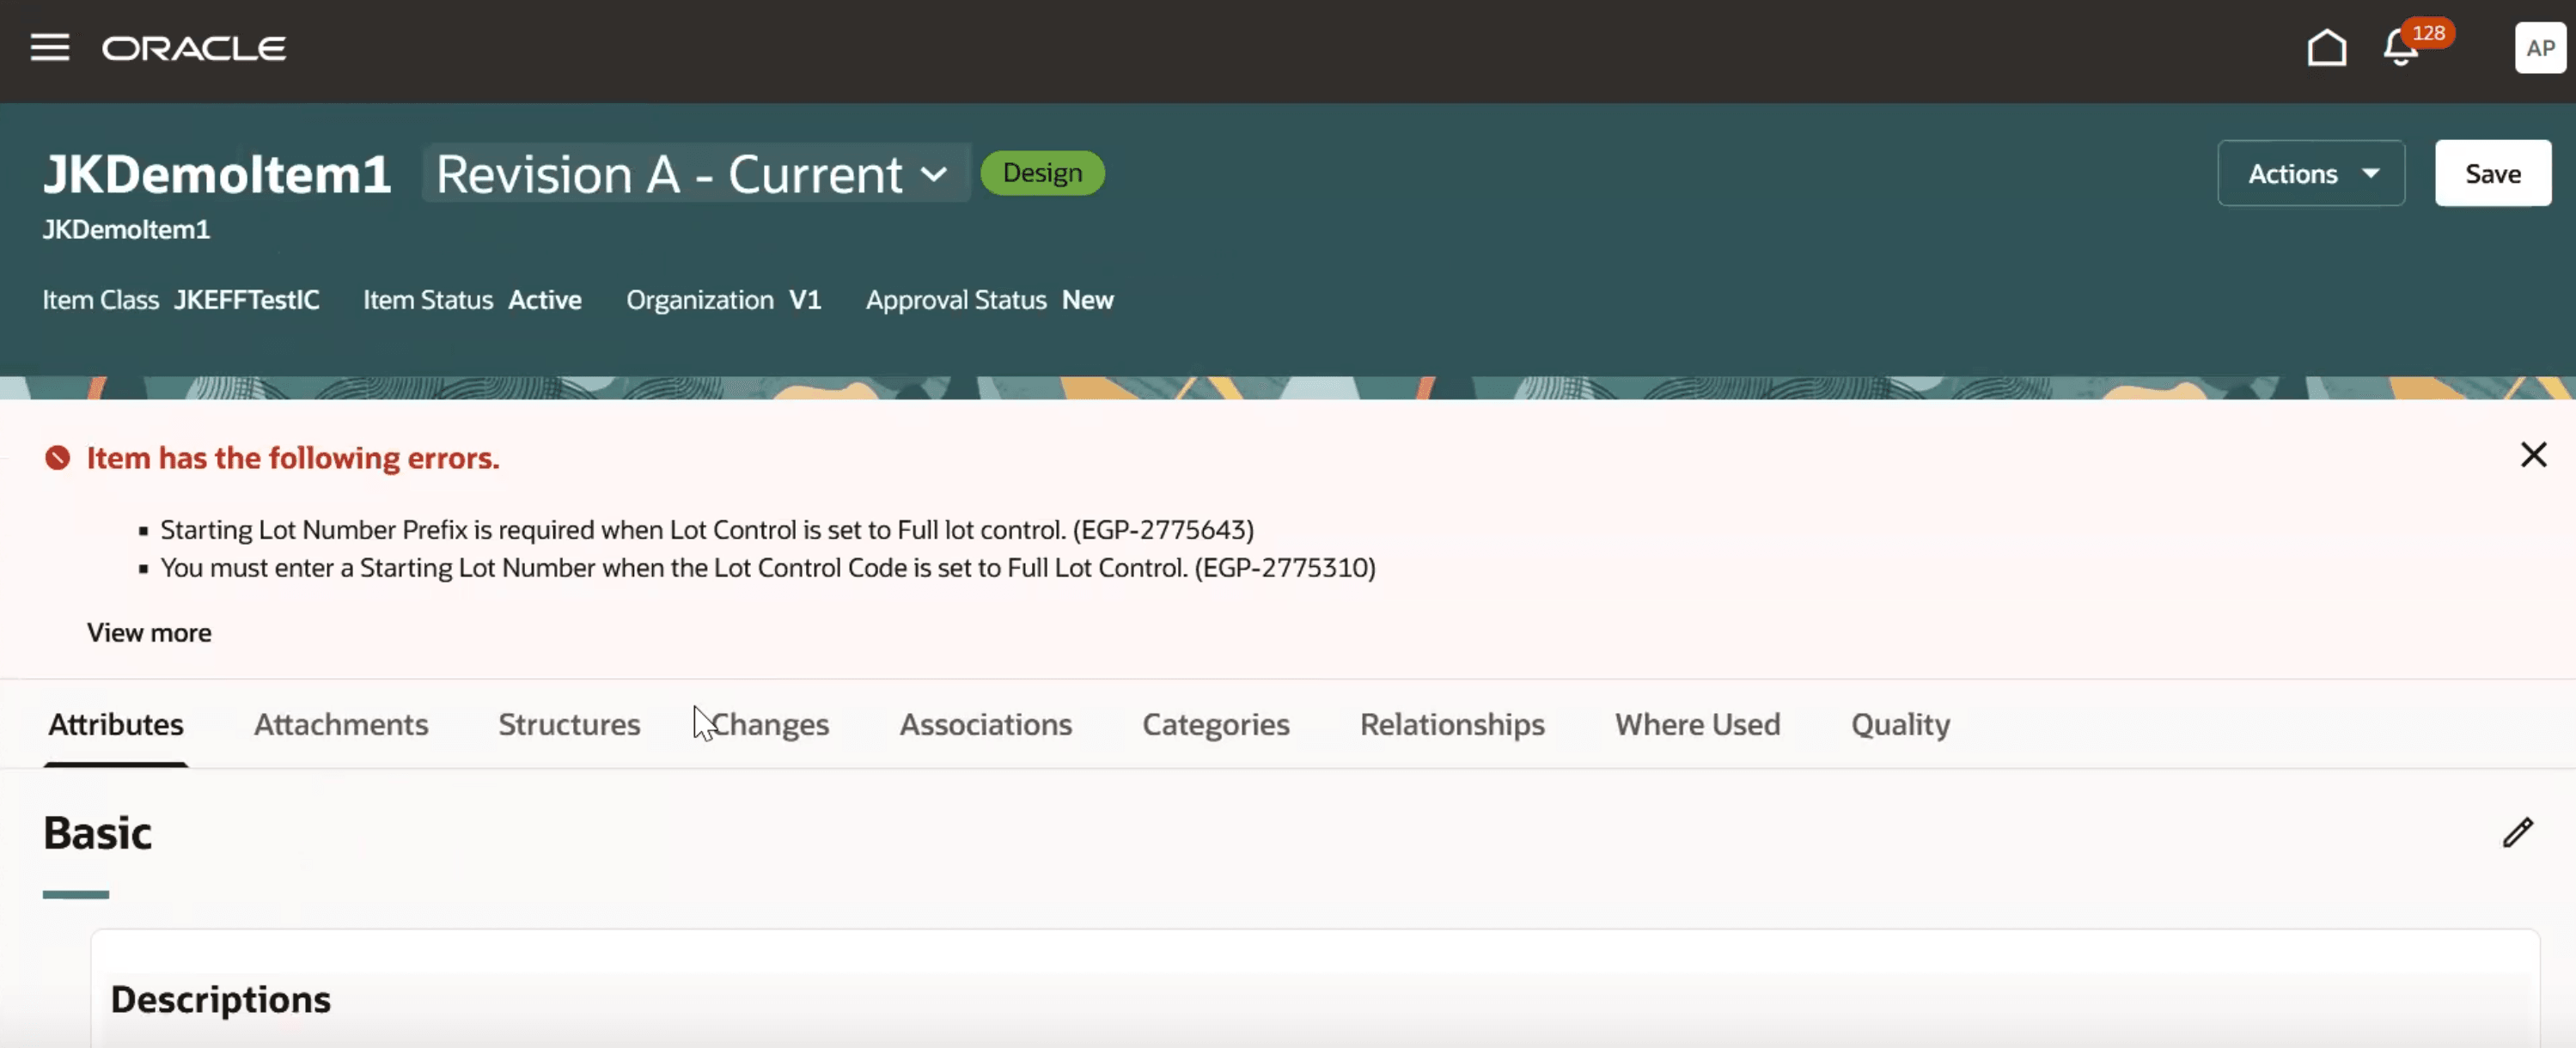
Item Page With Error and New Status
Manage Attachments for an Item
You can view and manage the attachments added to item or item revision on the Attachments tab for an item.
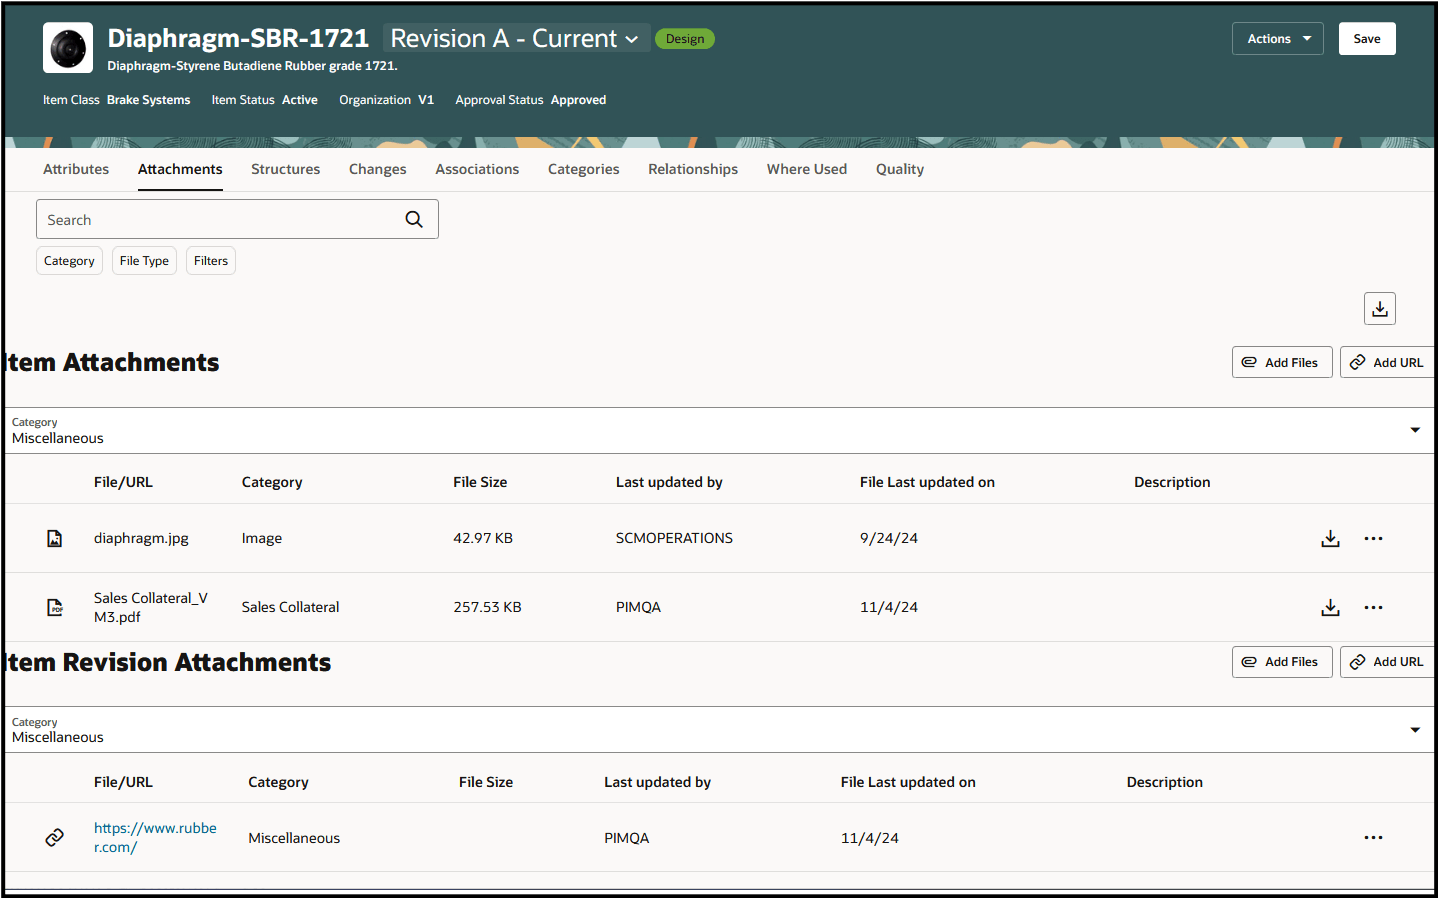
Attachments Tab
The following screenshot shows the Attachment details drawer that’s displayed when you click the Add icon.
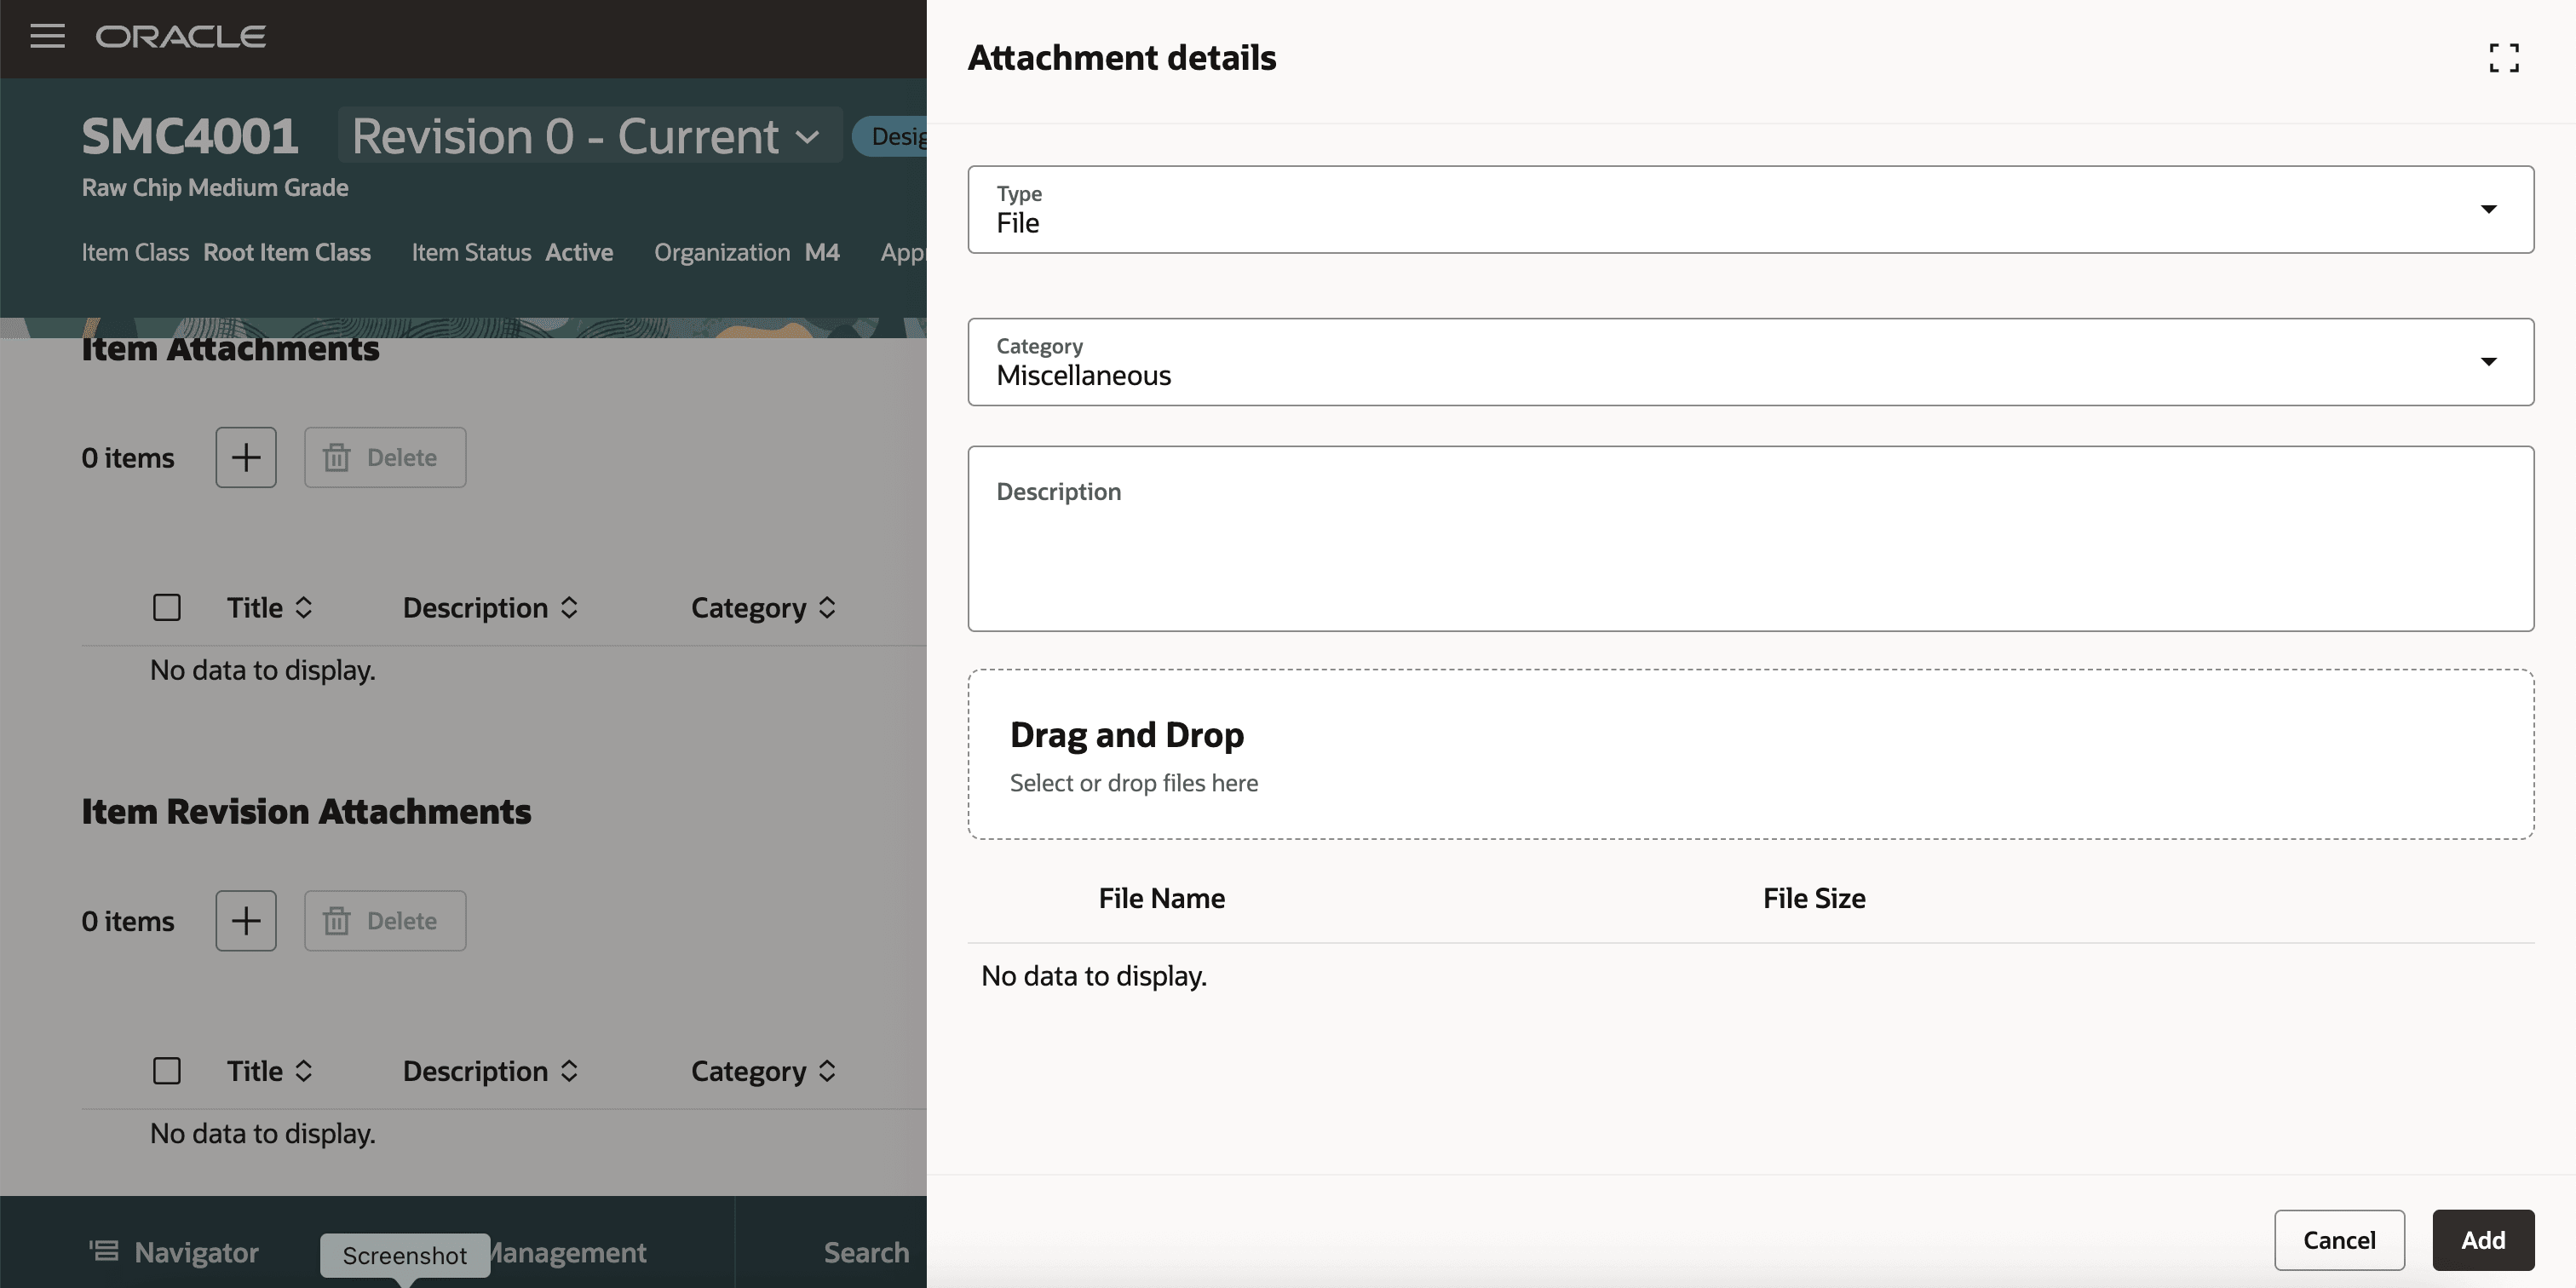
Attachment Details Drawer
Manage Structures for an Item
You can manage structures on the Structures tab of the item. For more details, refer to the Redwood: Accelerate Structure Building and Editing What's New.
Manage Change Order and Change Requests
You can manage change orders and change requests using the Changes tab for an item. Separate tables are displayed for change orders and change requests.
You can do the following:
- Export the selected rows to an Excel file.
- Use the Customize Columns icon to hide, display, and re-organize the default columns. The configured descriptive flexfields are included in the default columns.
- You can hide specific tables with business rules.
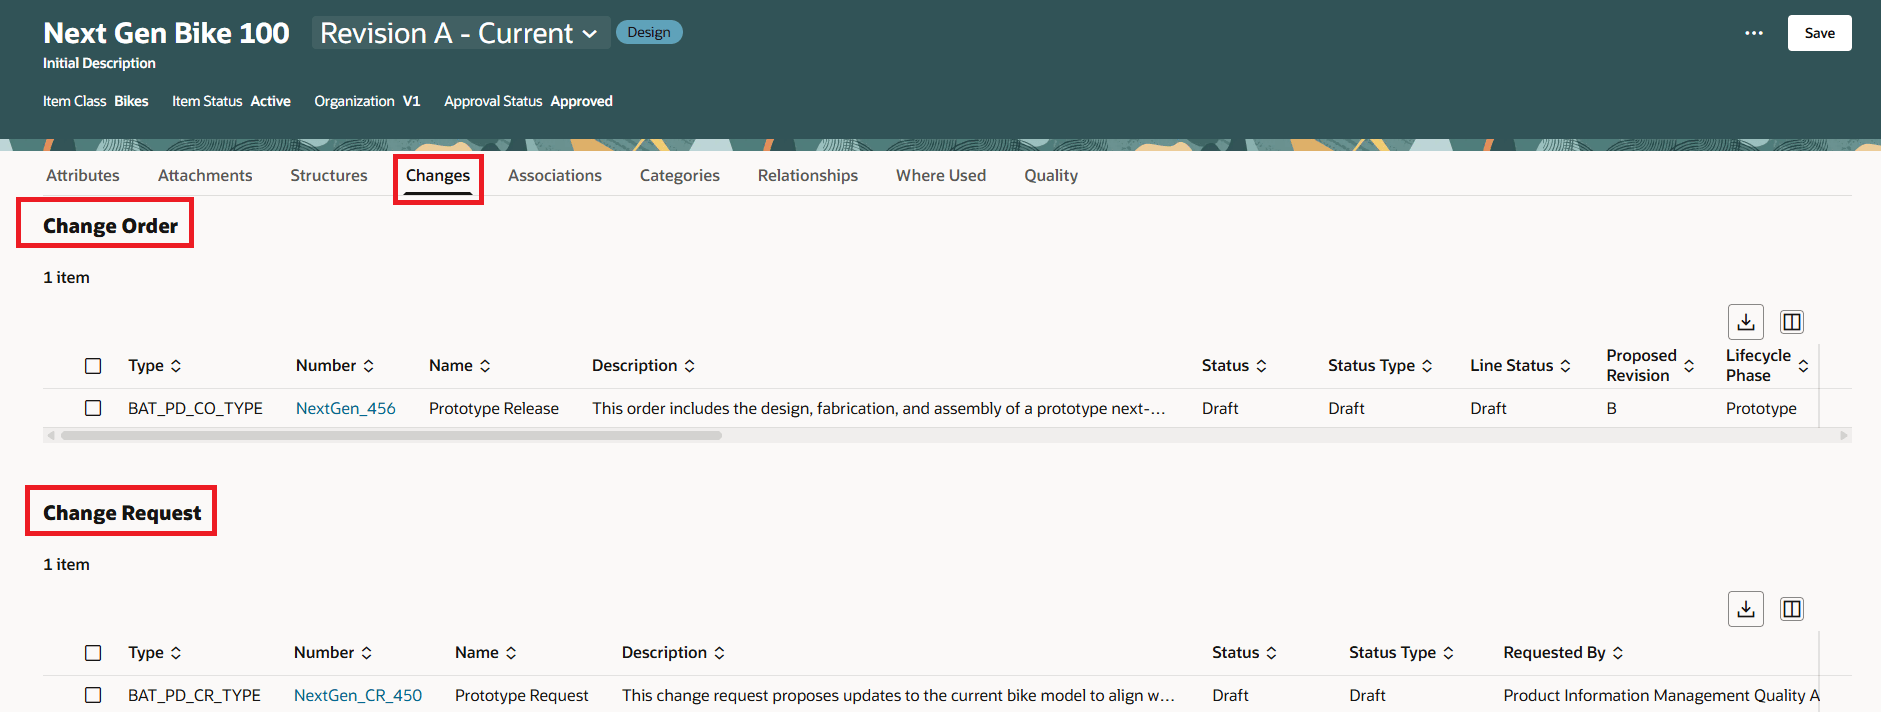
Changes Tab
Manage Associations
You can create and manage organizations associated with the item using the Associations tab.
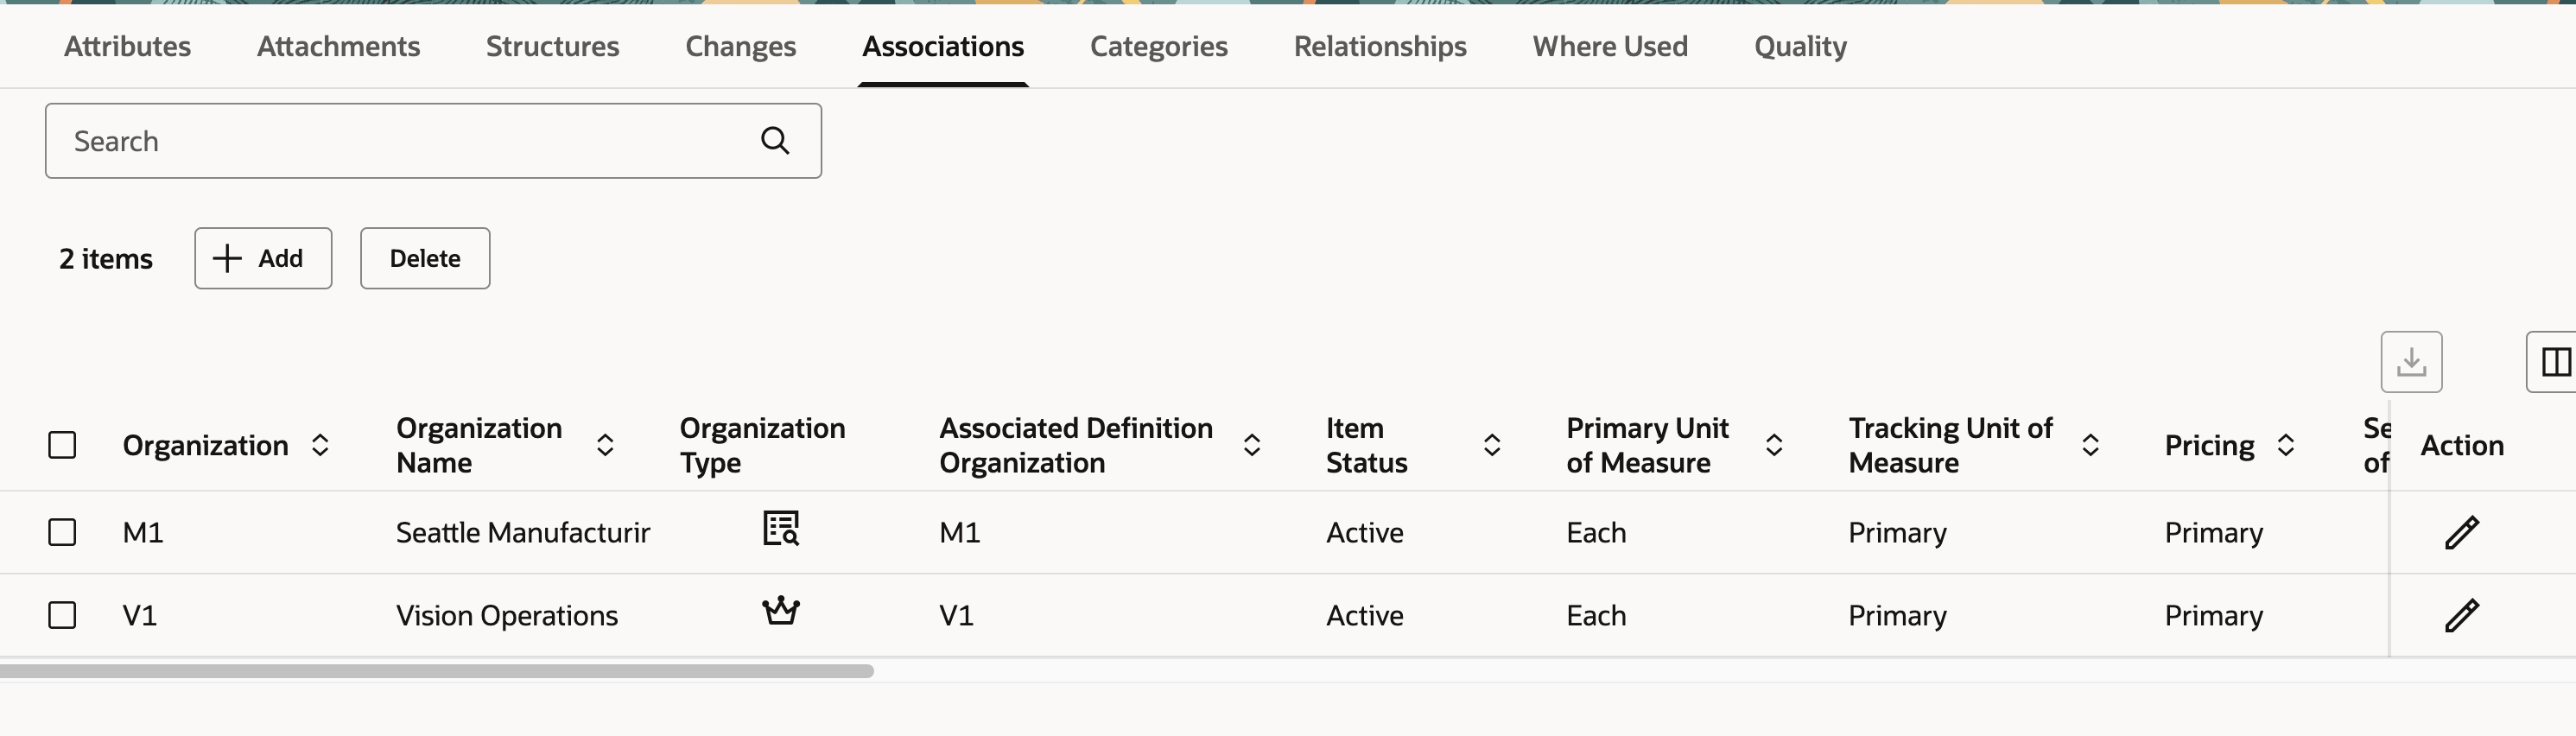
Associations Tab
You can assign the items to various organizations. Also, you can apply templates and provide values for the primary attributes when assigning the item to the child organization. To add an association, click Add to open the Add associations drawer as shown in the following screenshot. Provide the required information and click Add.
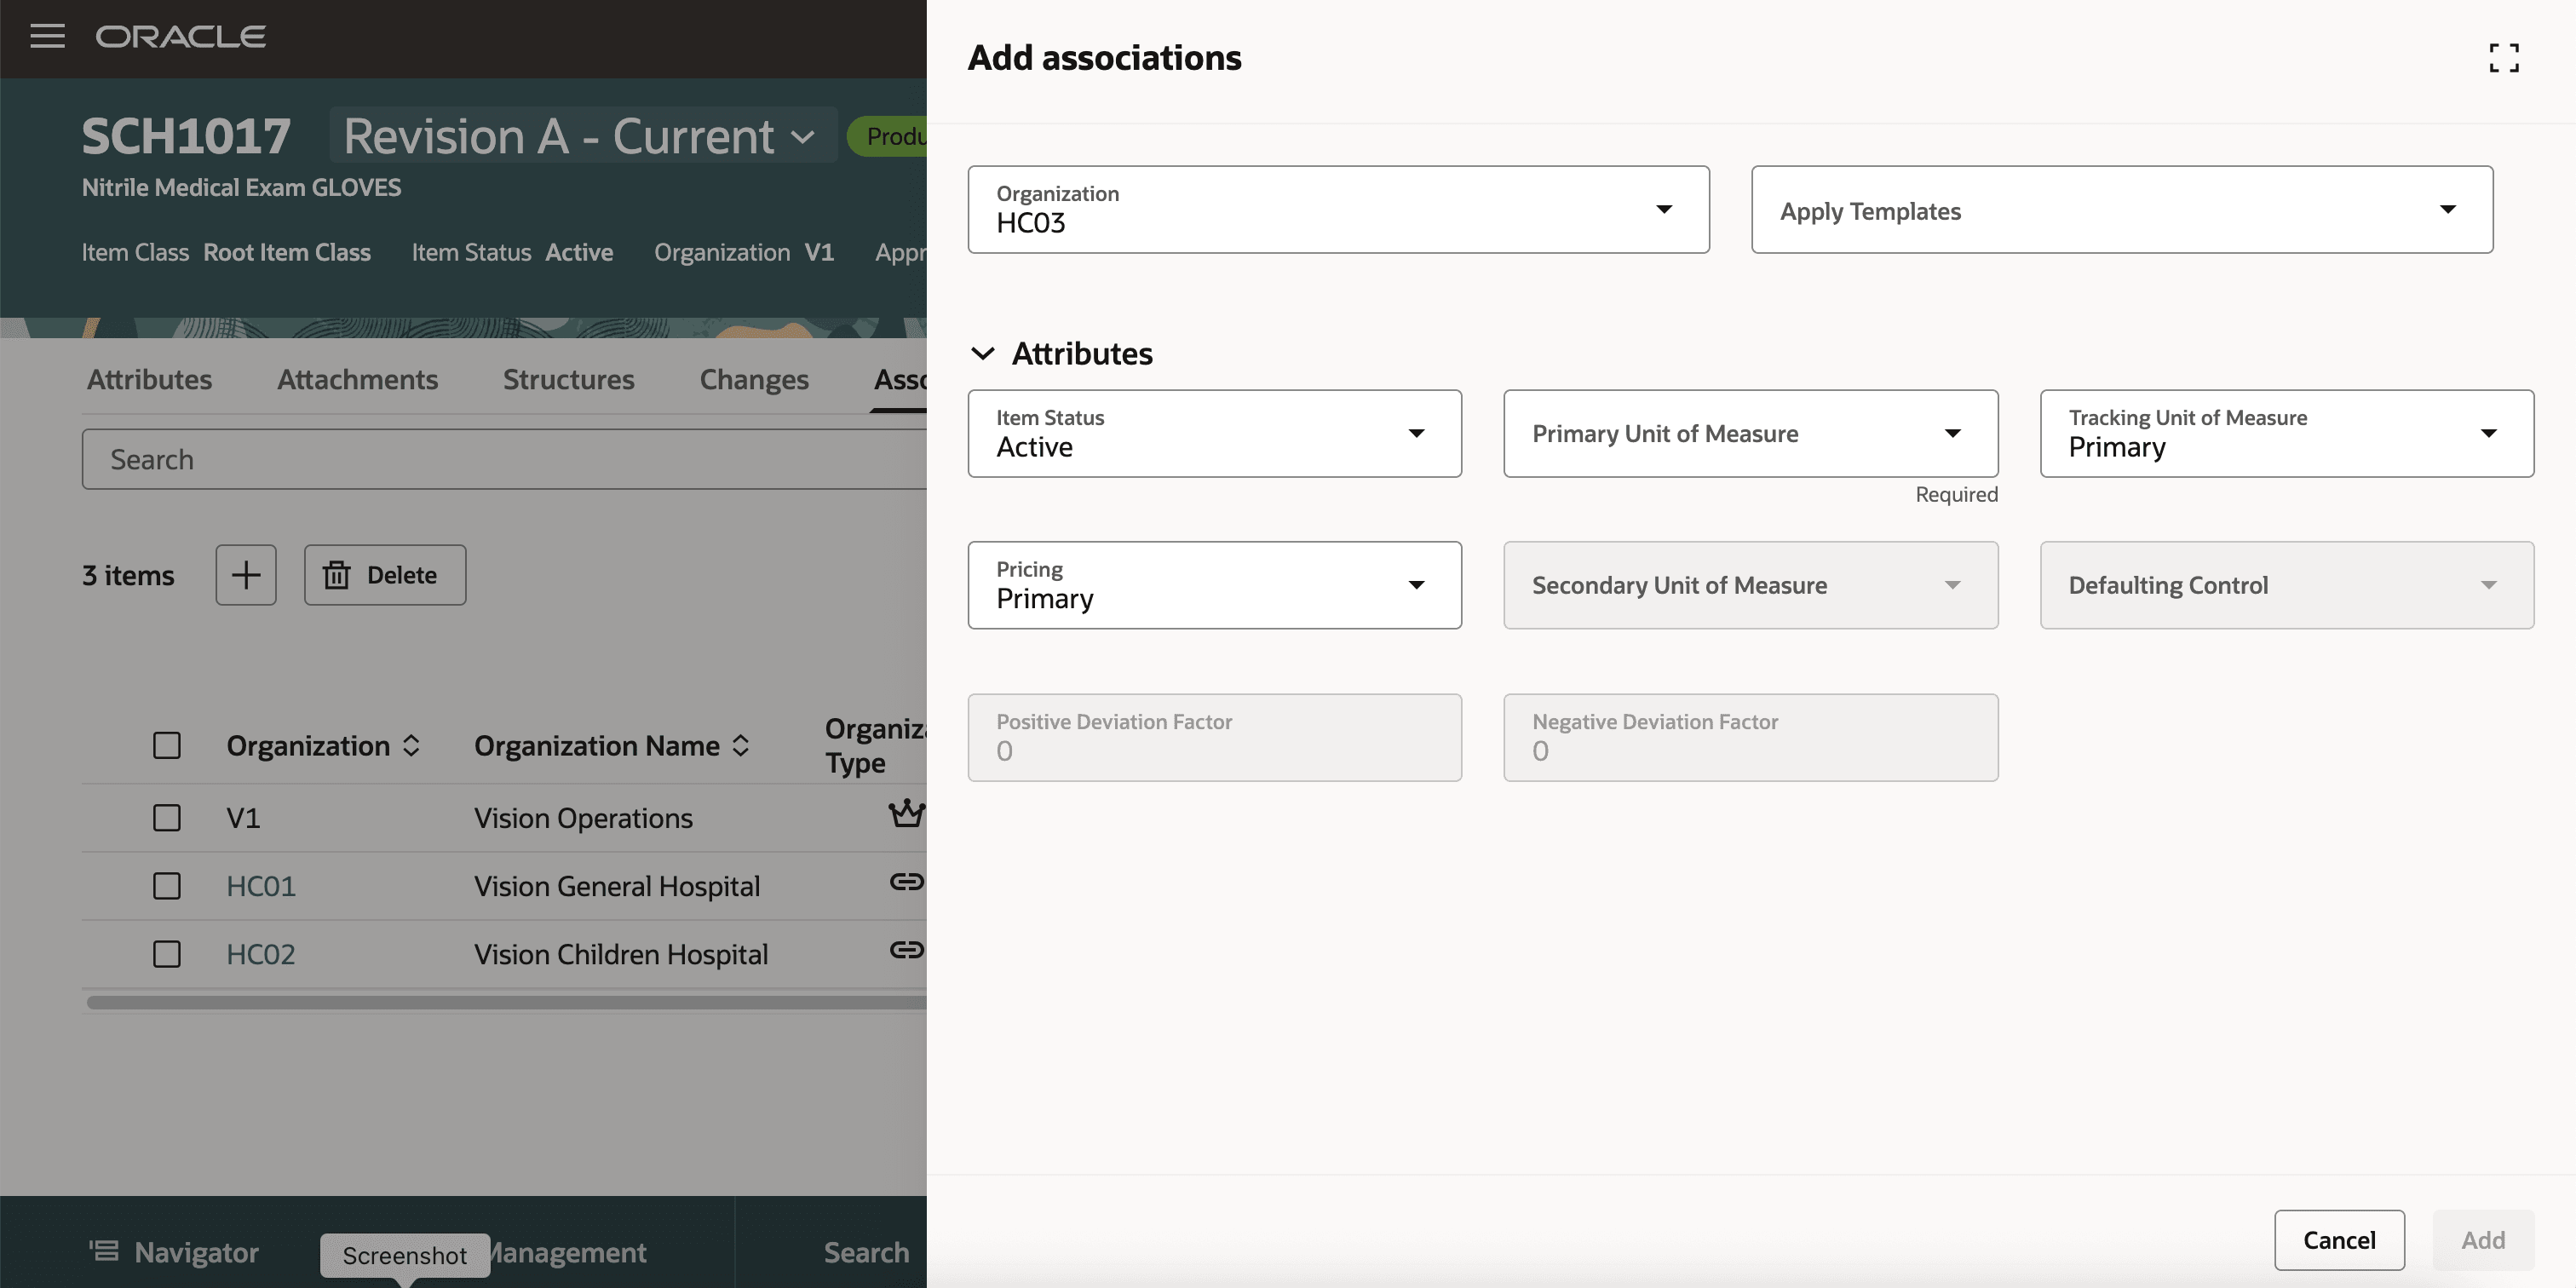
Add Associations Drawer
Manage Categories
You can view, create, and edit the category assignments for an item using the Categories tab.
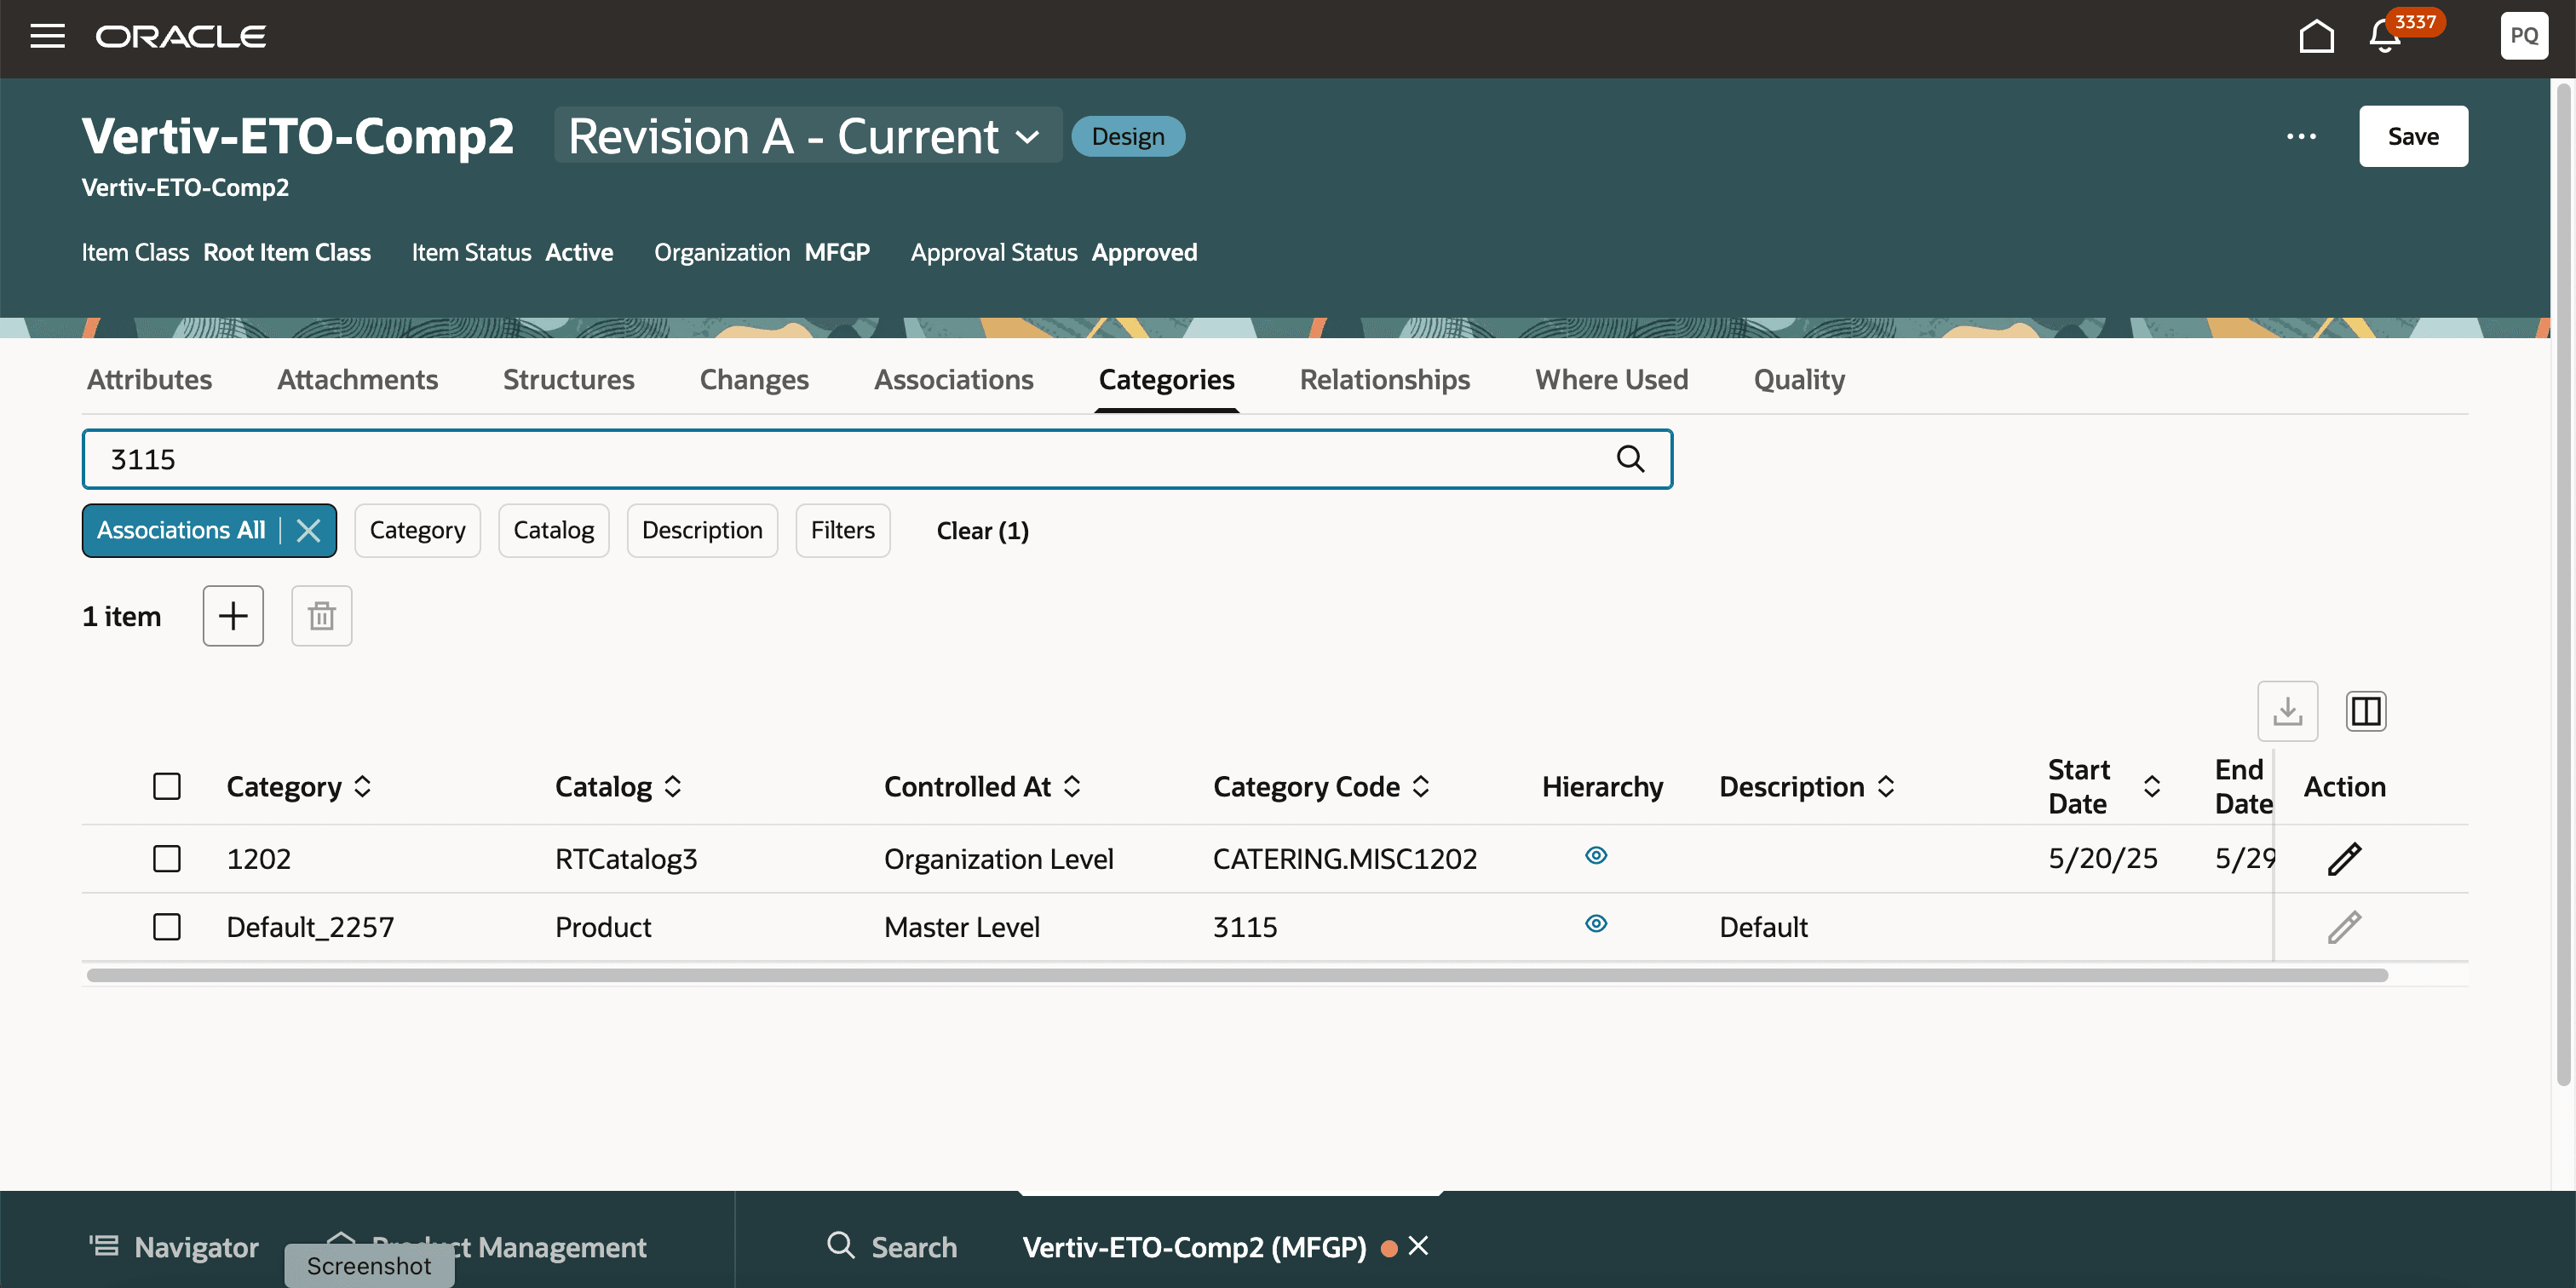
Categories Tab
Use the suggested filters to view the specific category as shown in the following screenshot.
To create a category assignment:
- Click the Add icon to create a category assignment. The following screenshot shows the suggested categories.
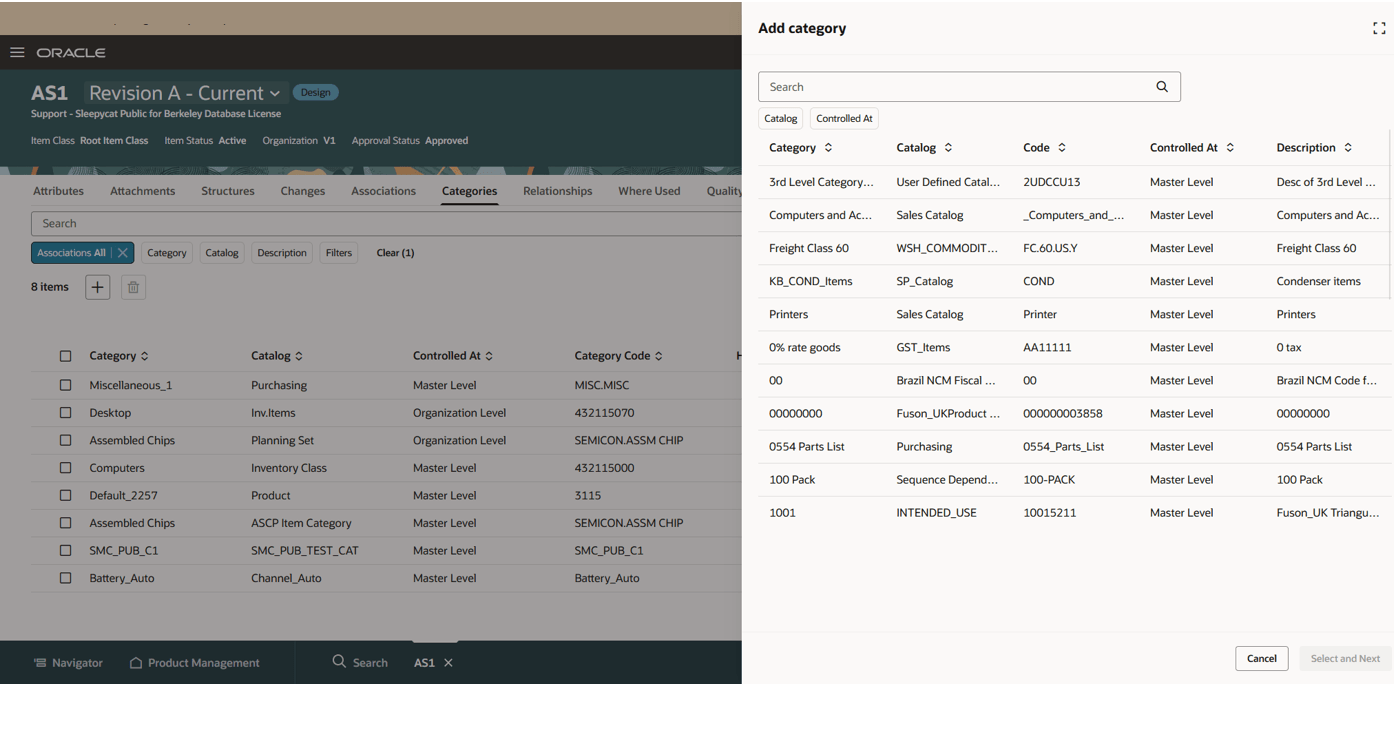
Add Category Drawer
- Select the required category and click Select and Next.
- Assign effective dates for the category assignment and click Assign to create the item category assignment.
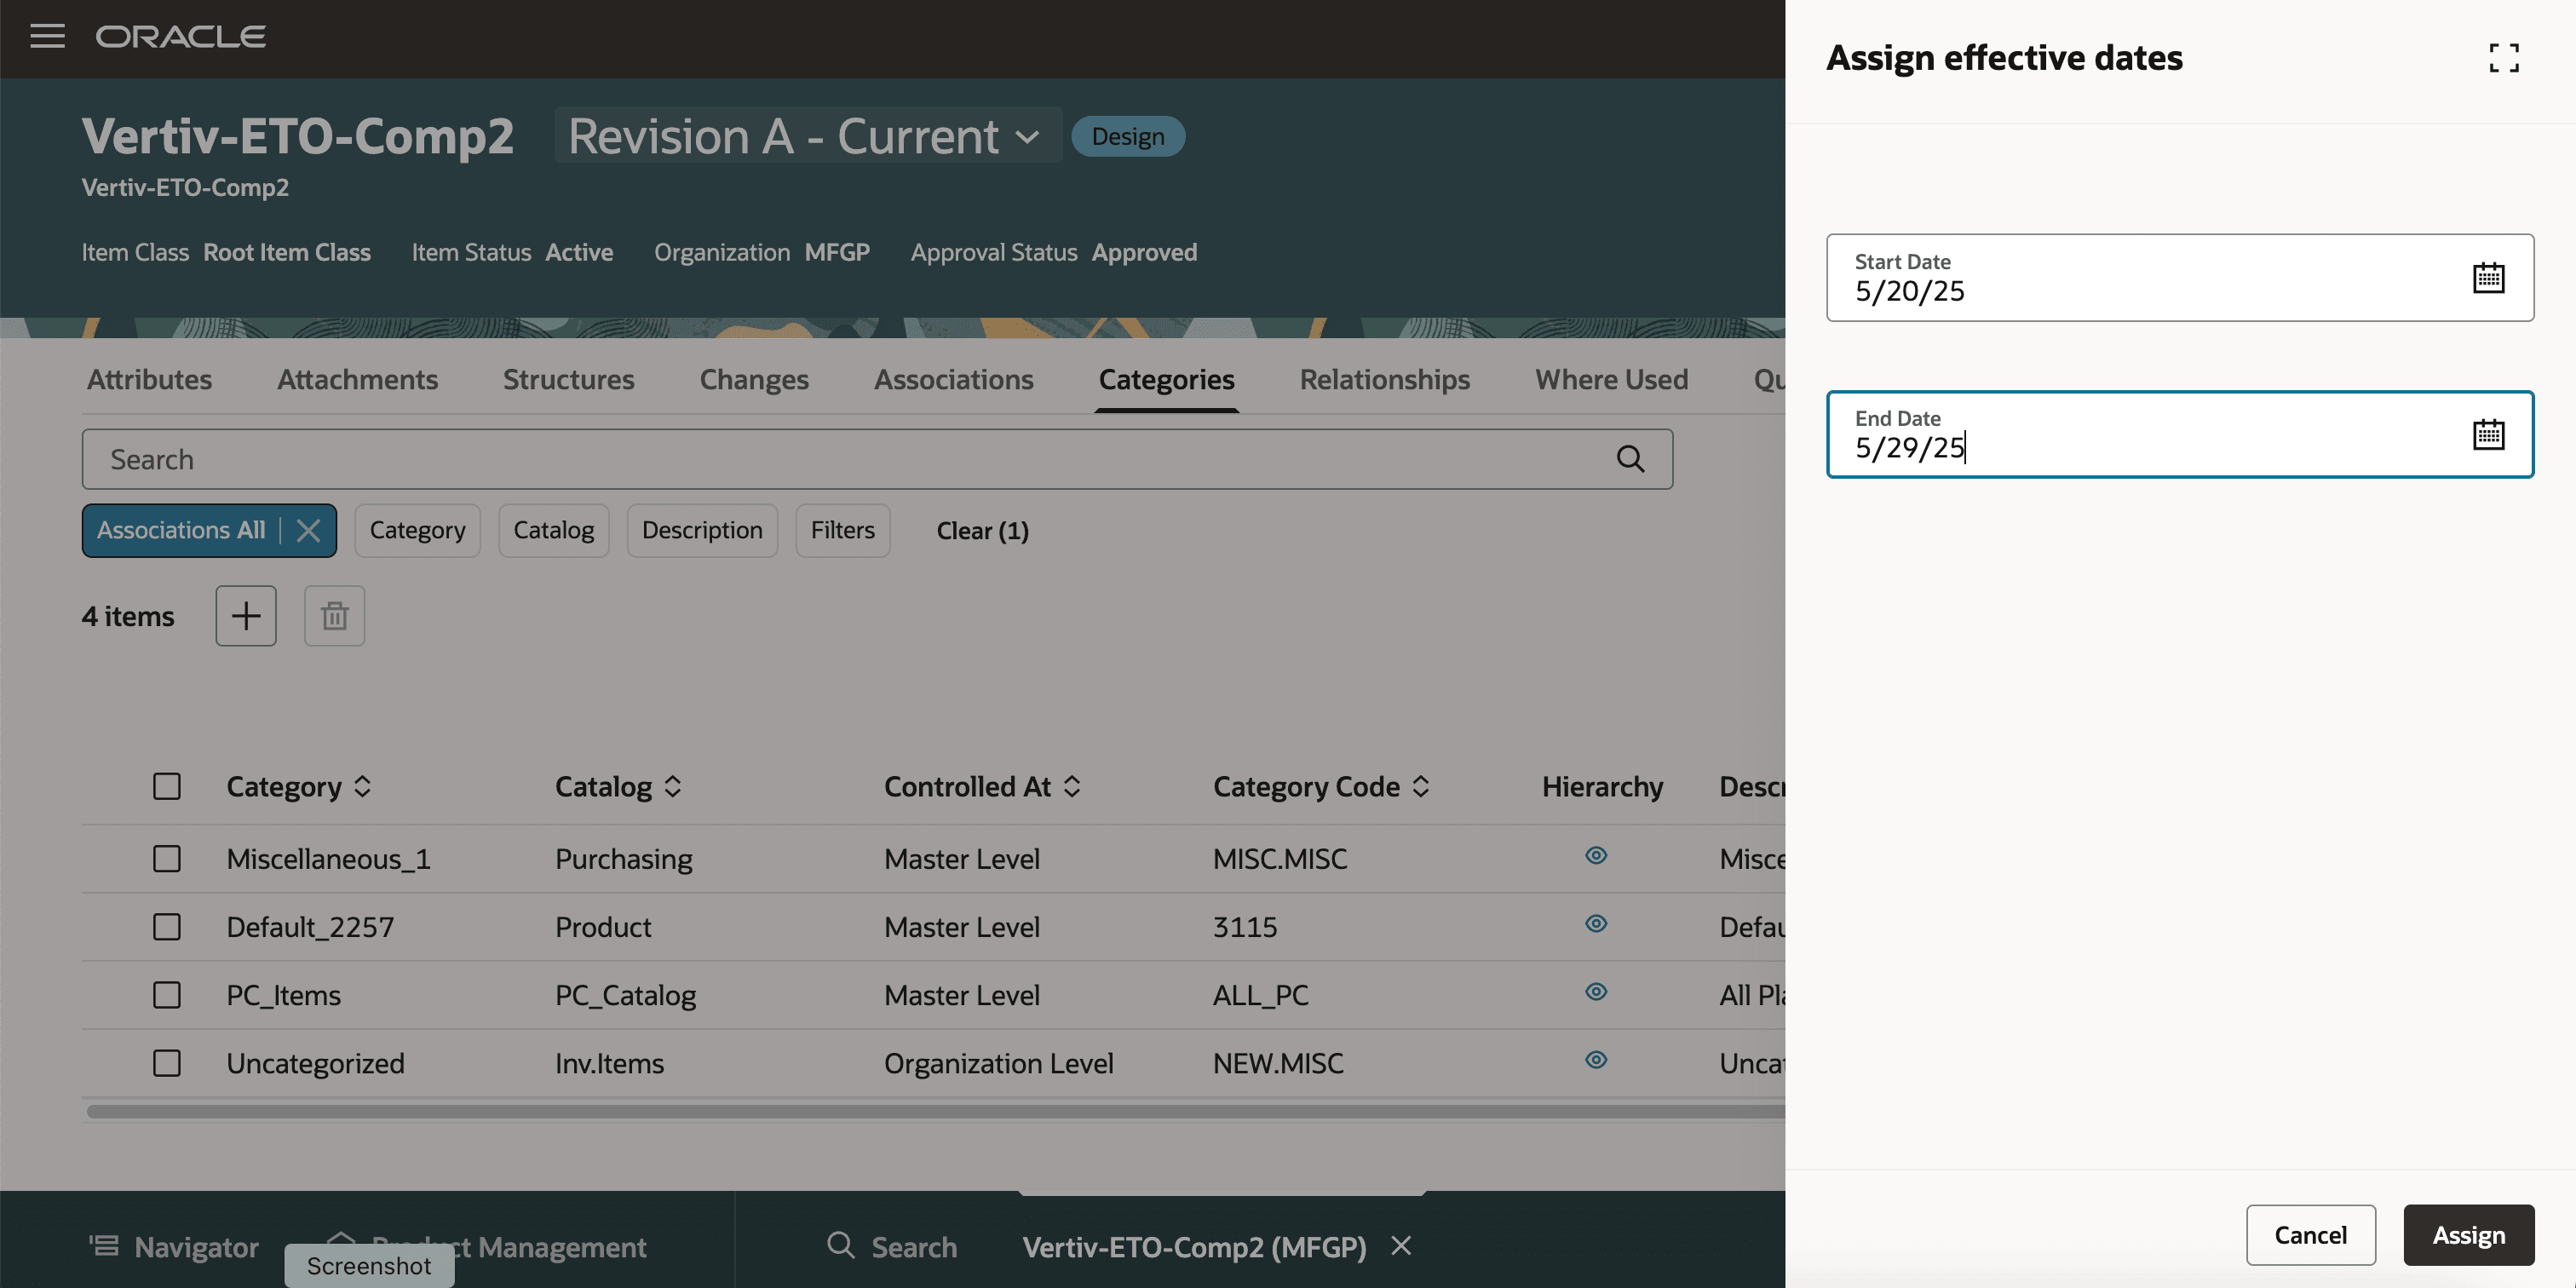
Assign Effective Dates Drawer
To edit a category assignment:
- Click the Edit icon in the Action column for the category assignment that you want to edit. The Edit item category assignment drawer is displayed.
- Edit the required information and click Update and Close for closing the edits. Clicking Update and Next updates the data for this category row and the drawer shows the next category for editing.
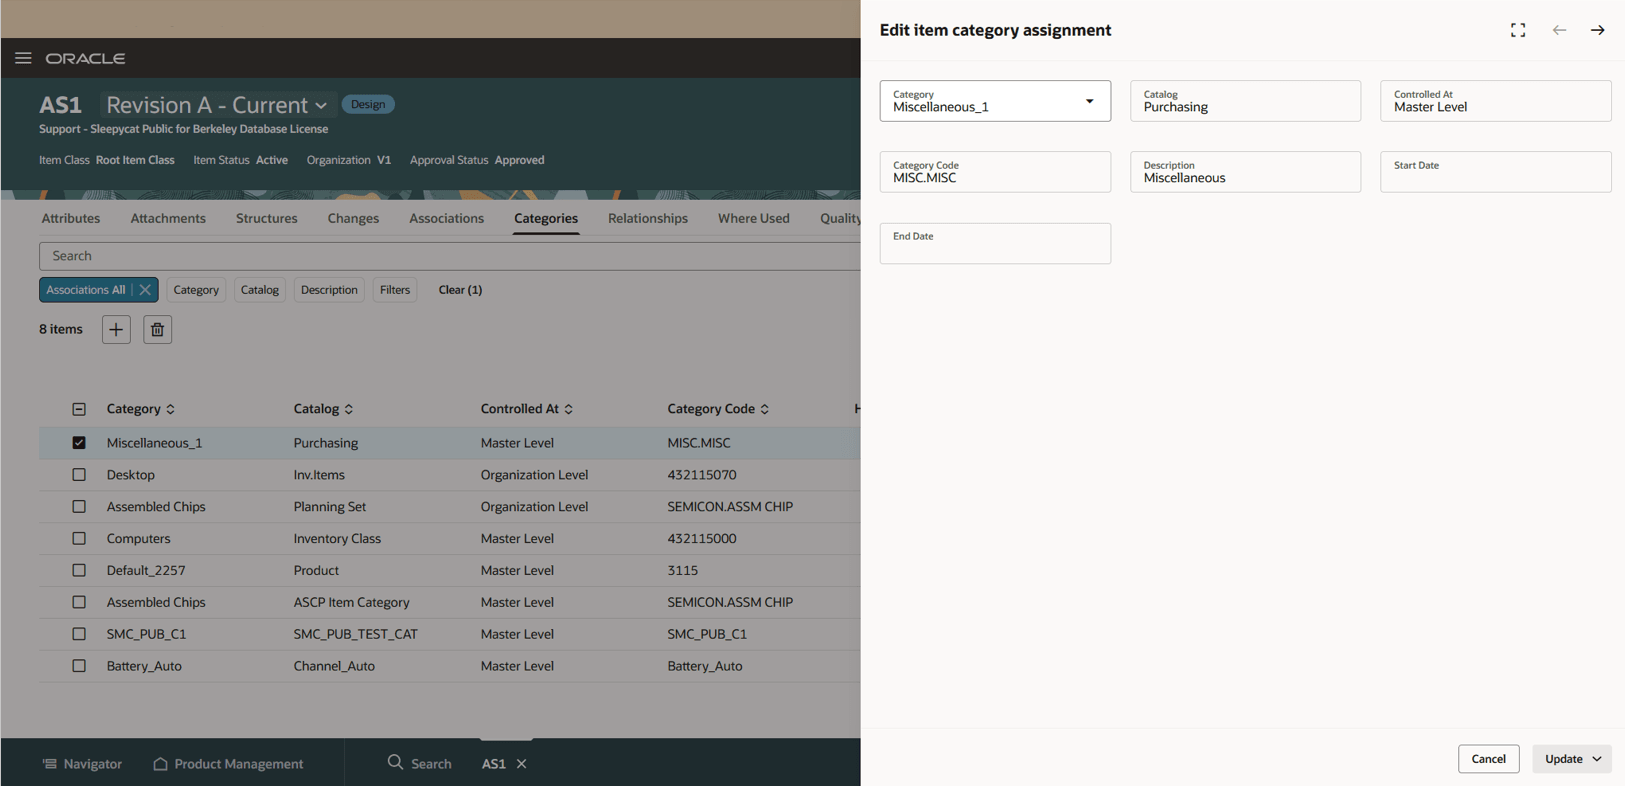
Edit Item Category Assignment
Manage Relationships
You can create and manage the relationships for an item using the Relationships tab. The types of relationships are:
- Trading Partner Item Relationships
- Related Item Relationships
- GTIN
- Spoke System Item Relationships
- Cross-Reference Relationships
- Links
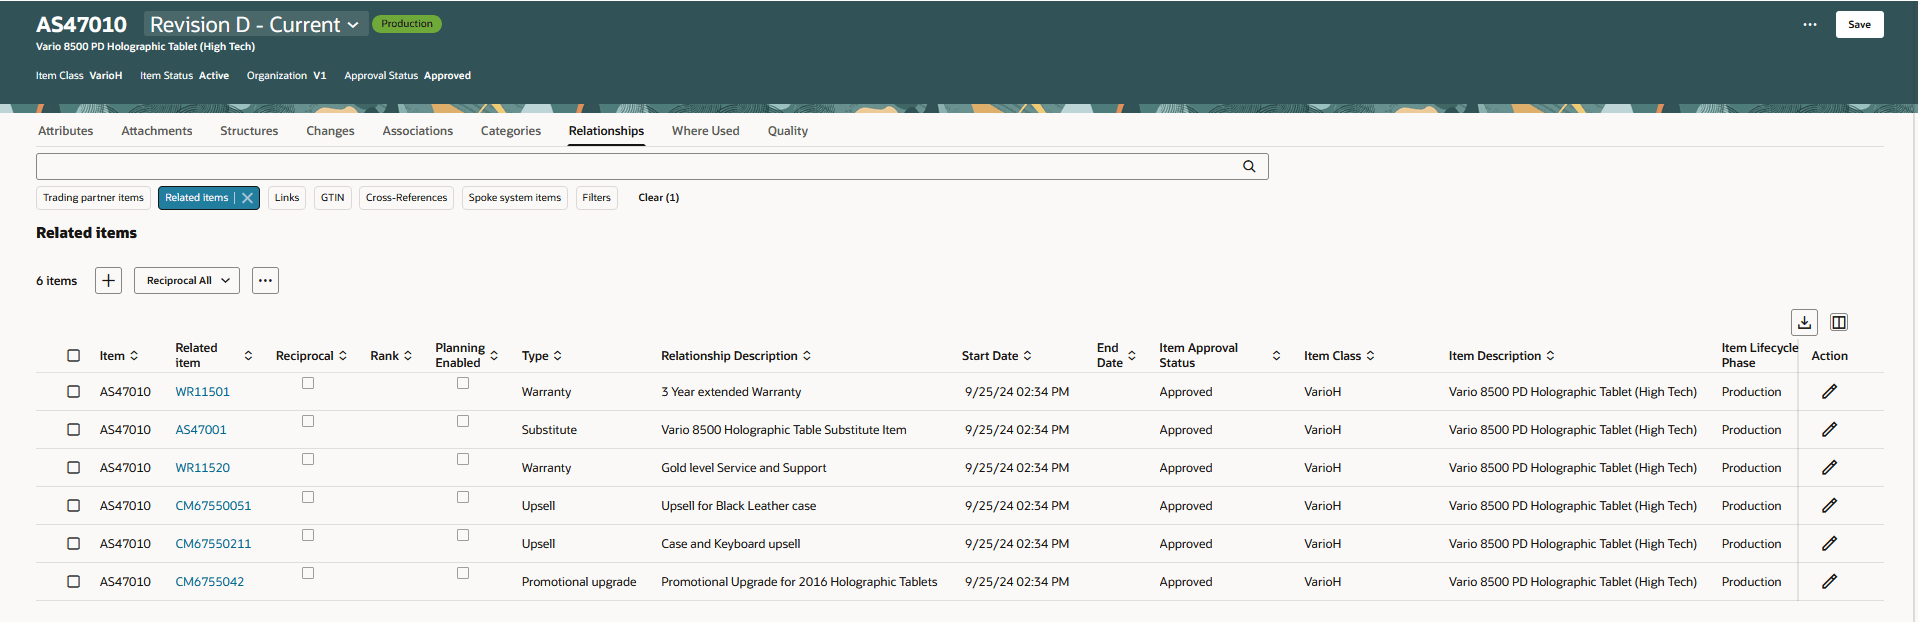
The following screenshot shows the Relationships tab for an item.
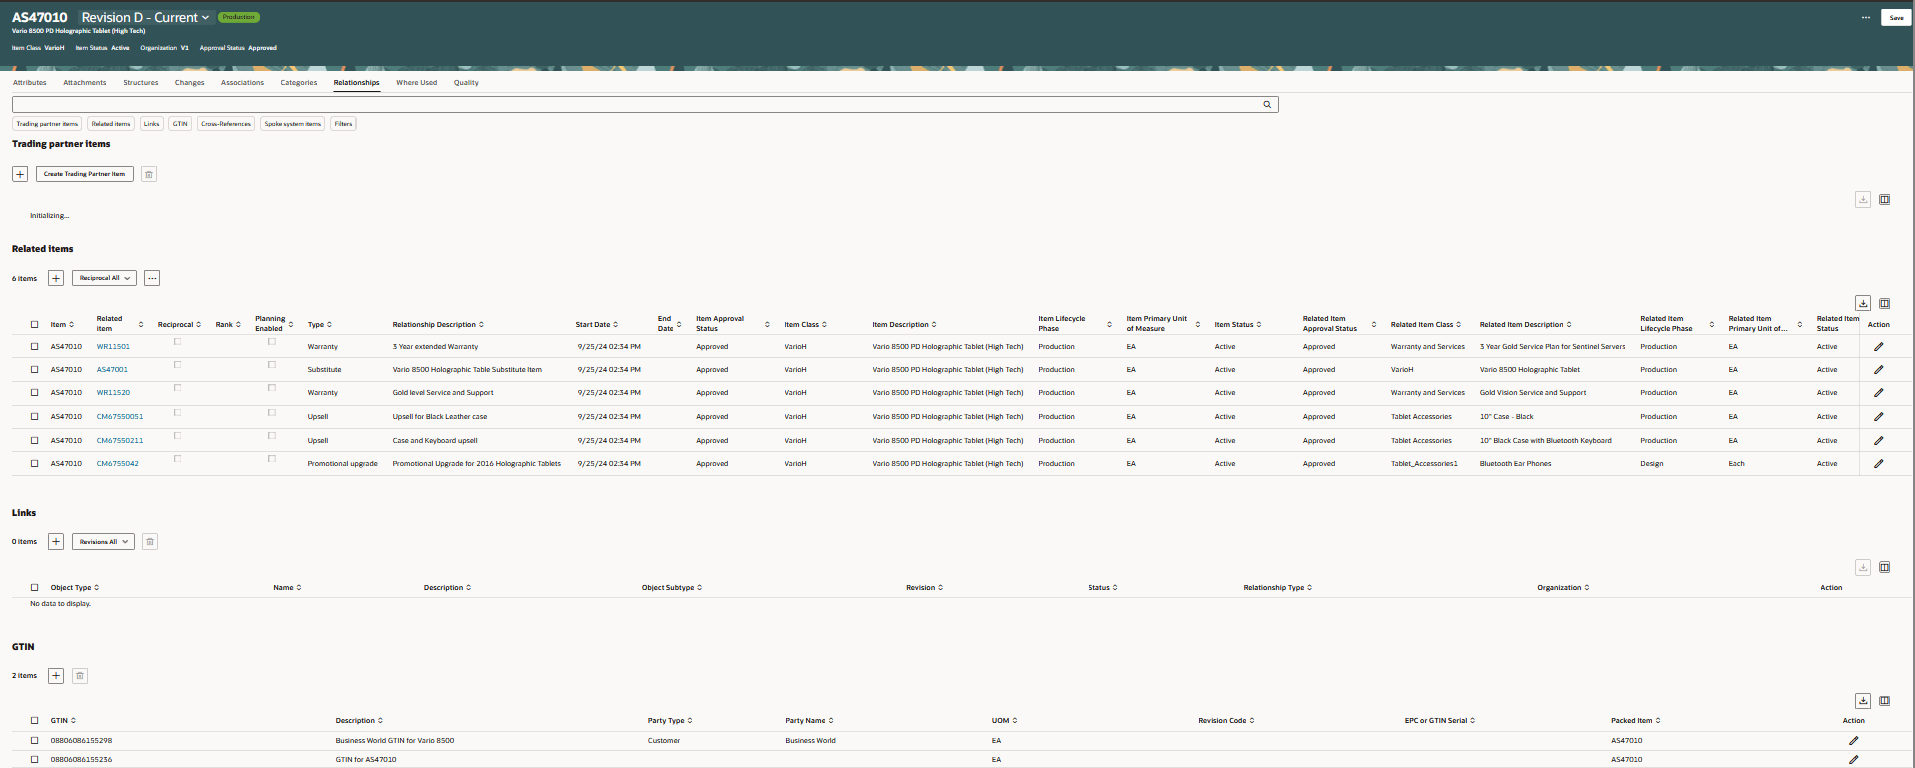
Relationships Tab
Manage Trading Partner Item Relationship
On the Relationships tab > Trading partner items section, you can create, edit, and delete trading partner item relationship. Click the Add icon to create a trading partner item relationship. The New trading partner item relationship drawer opens as shown in the following screenshot. Specify the details and click Create.

New Trading Partner Item Relationship
To edit a trading partner item relationship, select the relationship listed in the Trading partner items section as shown in the following screenshot and click the Edit icon in the Action column.
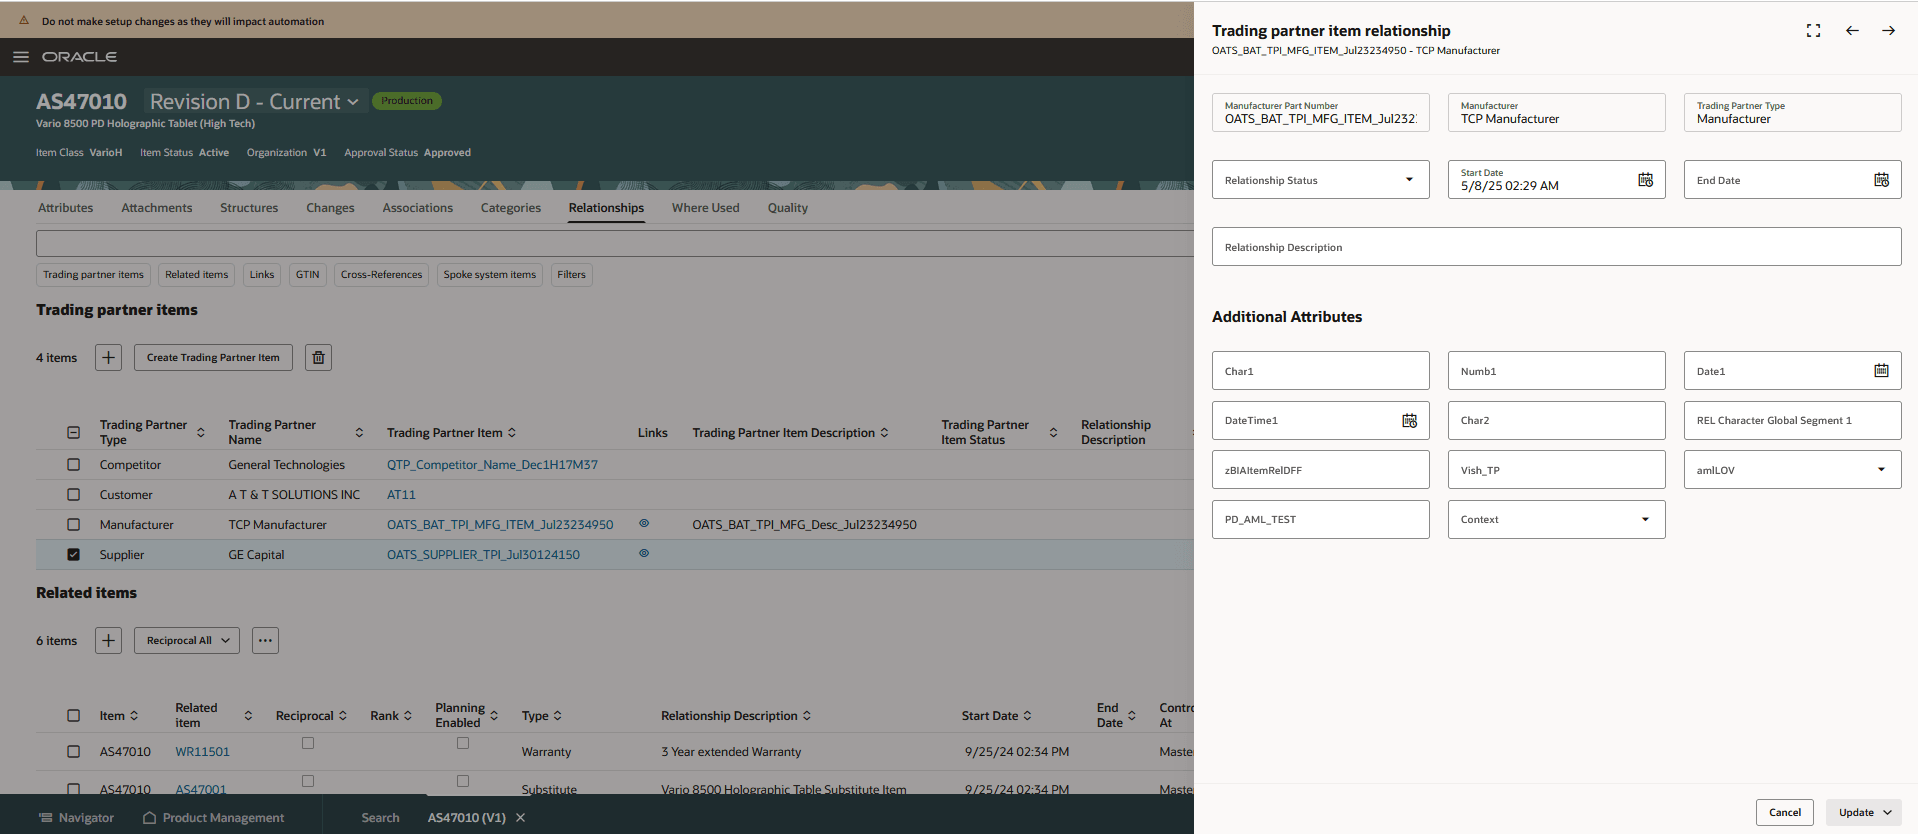
Edit Trading Partner Item Relationship
You can also select and delete an item relationship as shown in the following screenshot.
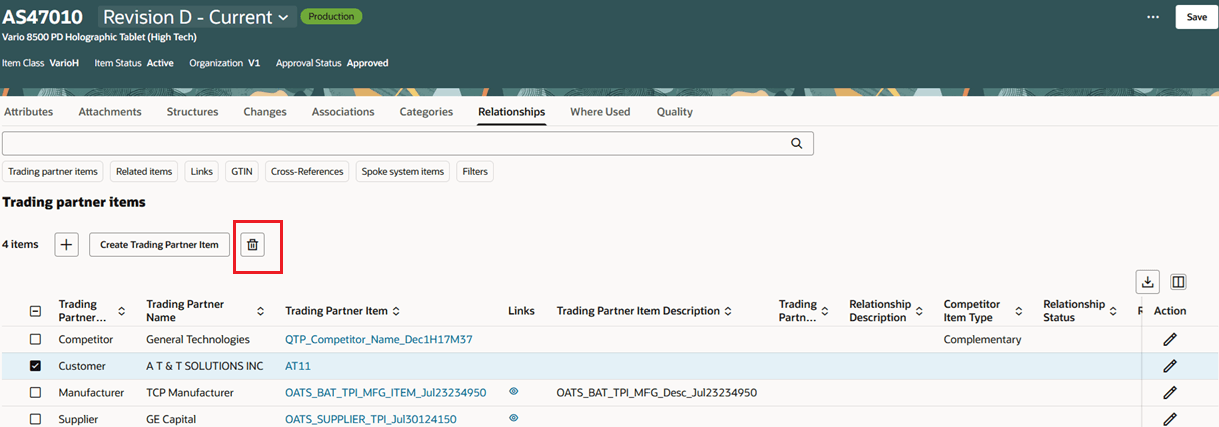
Delete Item Relationships
Similarly, you can create, edit, and delete other types of relationships on the Relationships tab.
You can create a new trading partner item with attachments using Create Trading Partner Item and add it as a relationship to the item as shown in the following screenshot.
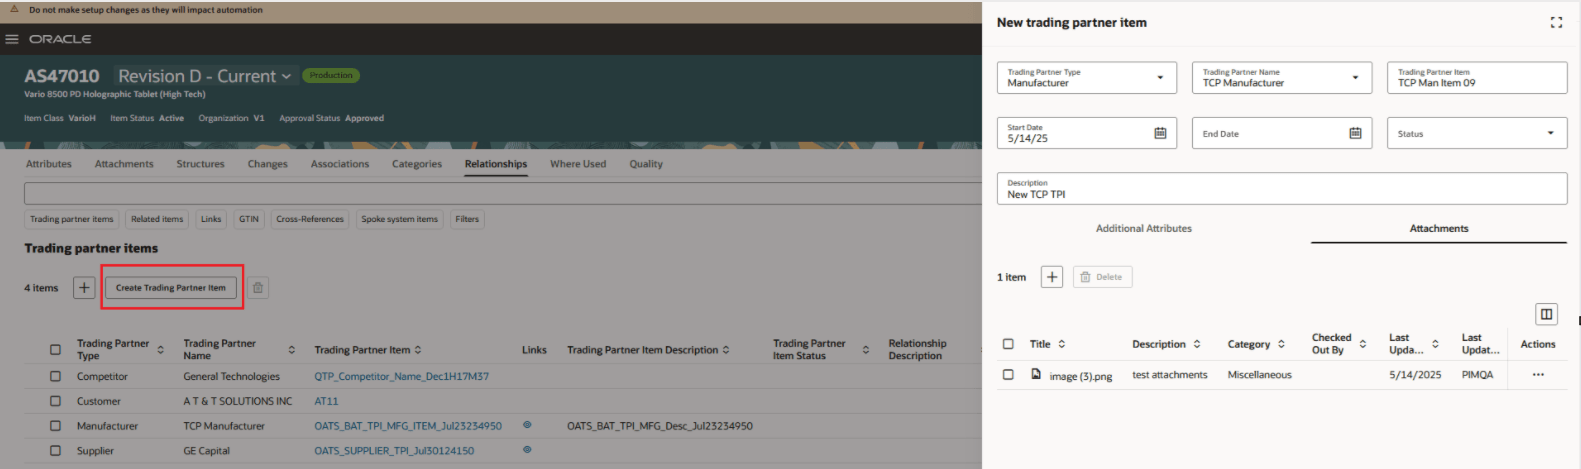
New Trading Partner Item Drawer
You can create a link between the Manufacturer Part Number and Supplier Item Relationships as shown in the following screenshot.

Link Manufacturer Part Number and Supplier Item Relationships
Manage GTIN Item Relationships
While creating GTIN relationships, you can select New or Existing GTIN as shown in the following screenshot.
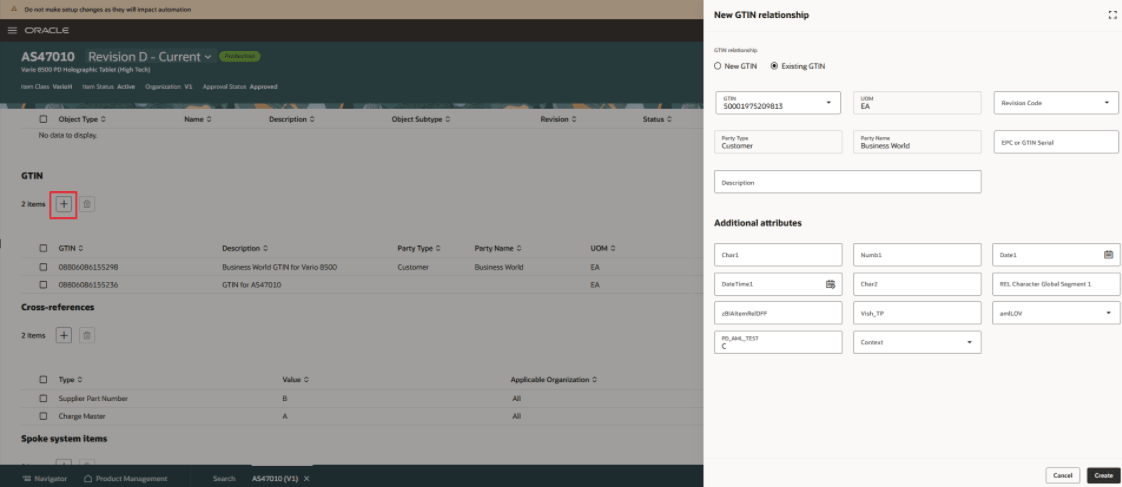
New GTIN Relationship
Search Item Relationships
To filter one or more specific relationships, use the suggested filters available for each type of relationship. Additionally, you can use relationships attributes such as Related Item, to search for a specific relationship.
The following screenshot shows the suggested filters that you can use to search for an item relationship.
Suggested Filters to Search for an Item Relationship
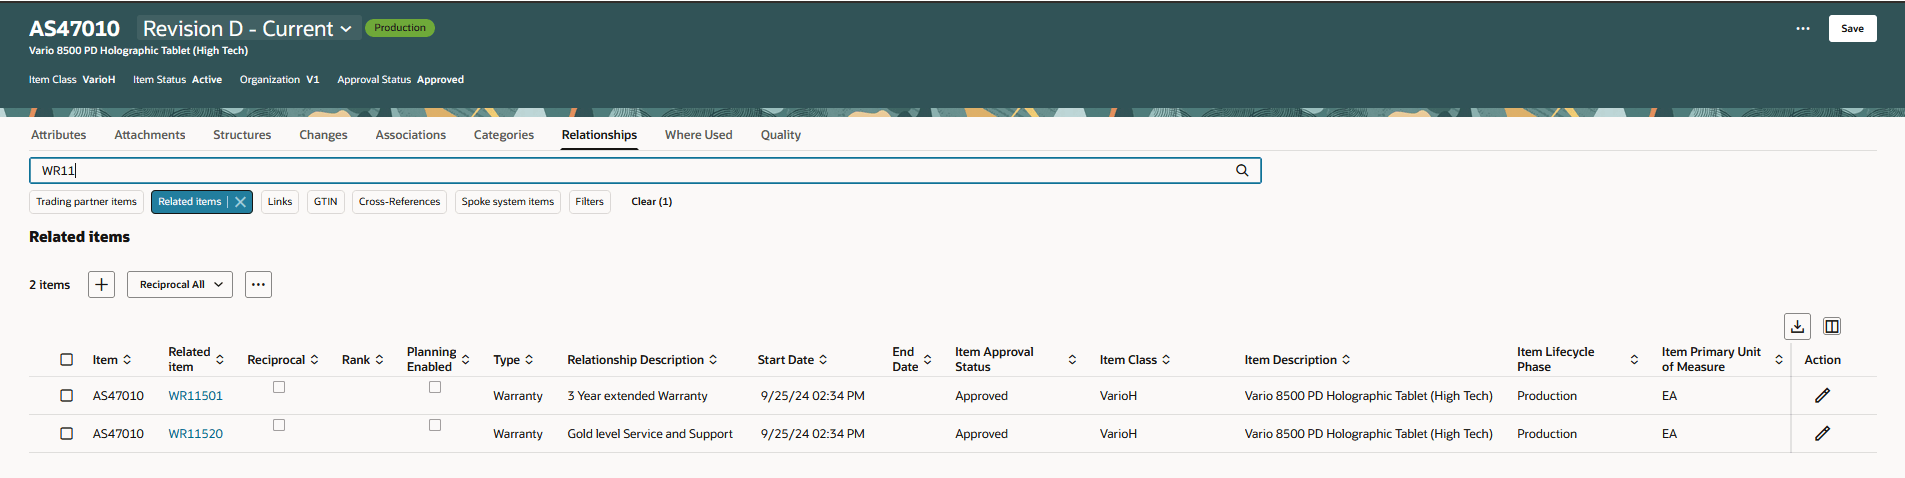
The following screenshot shows the Search field that you can use to search for an item relationship.

Search Item Relationships Using Search Field
Manage Related Item Relationship
You can create a new related item relationship using the New related item relationship drawer as shown in the following screenshot.
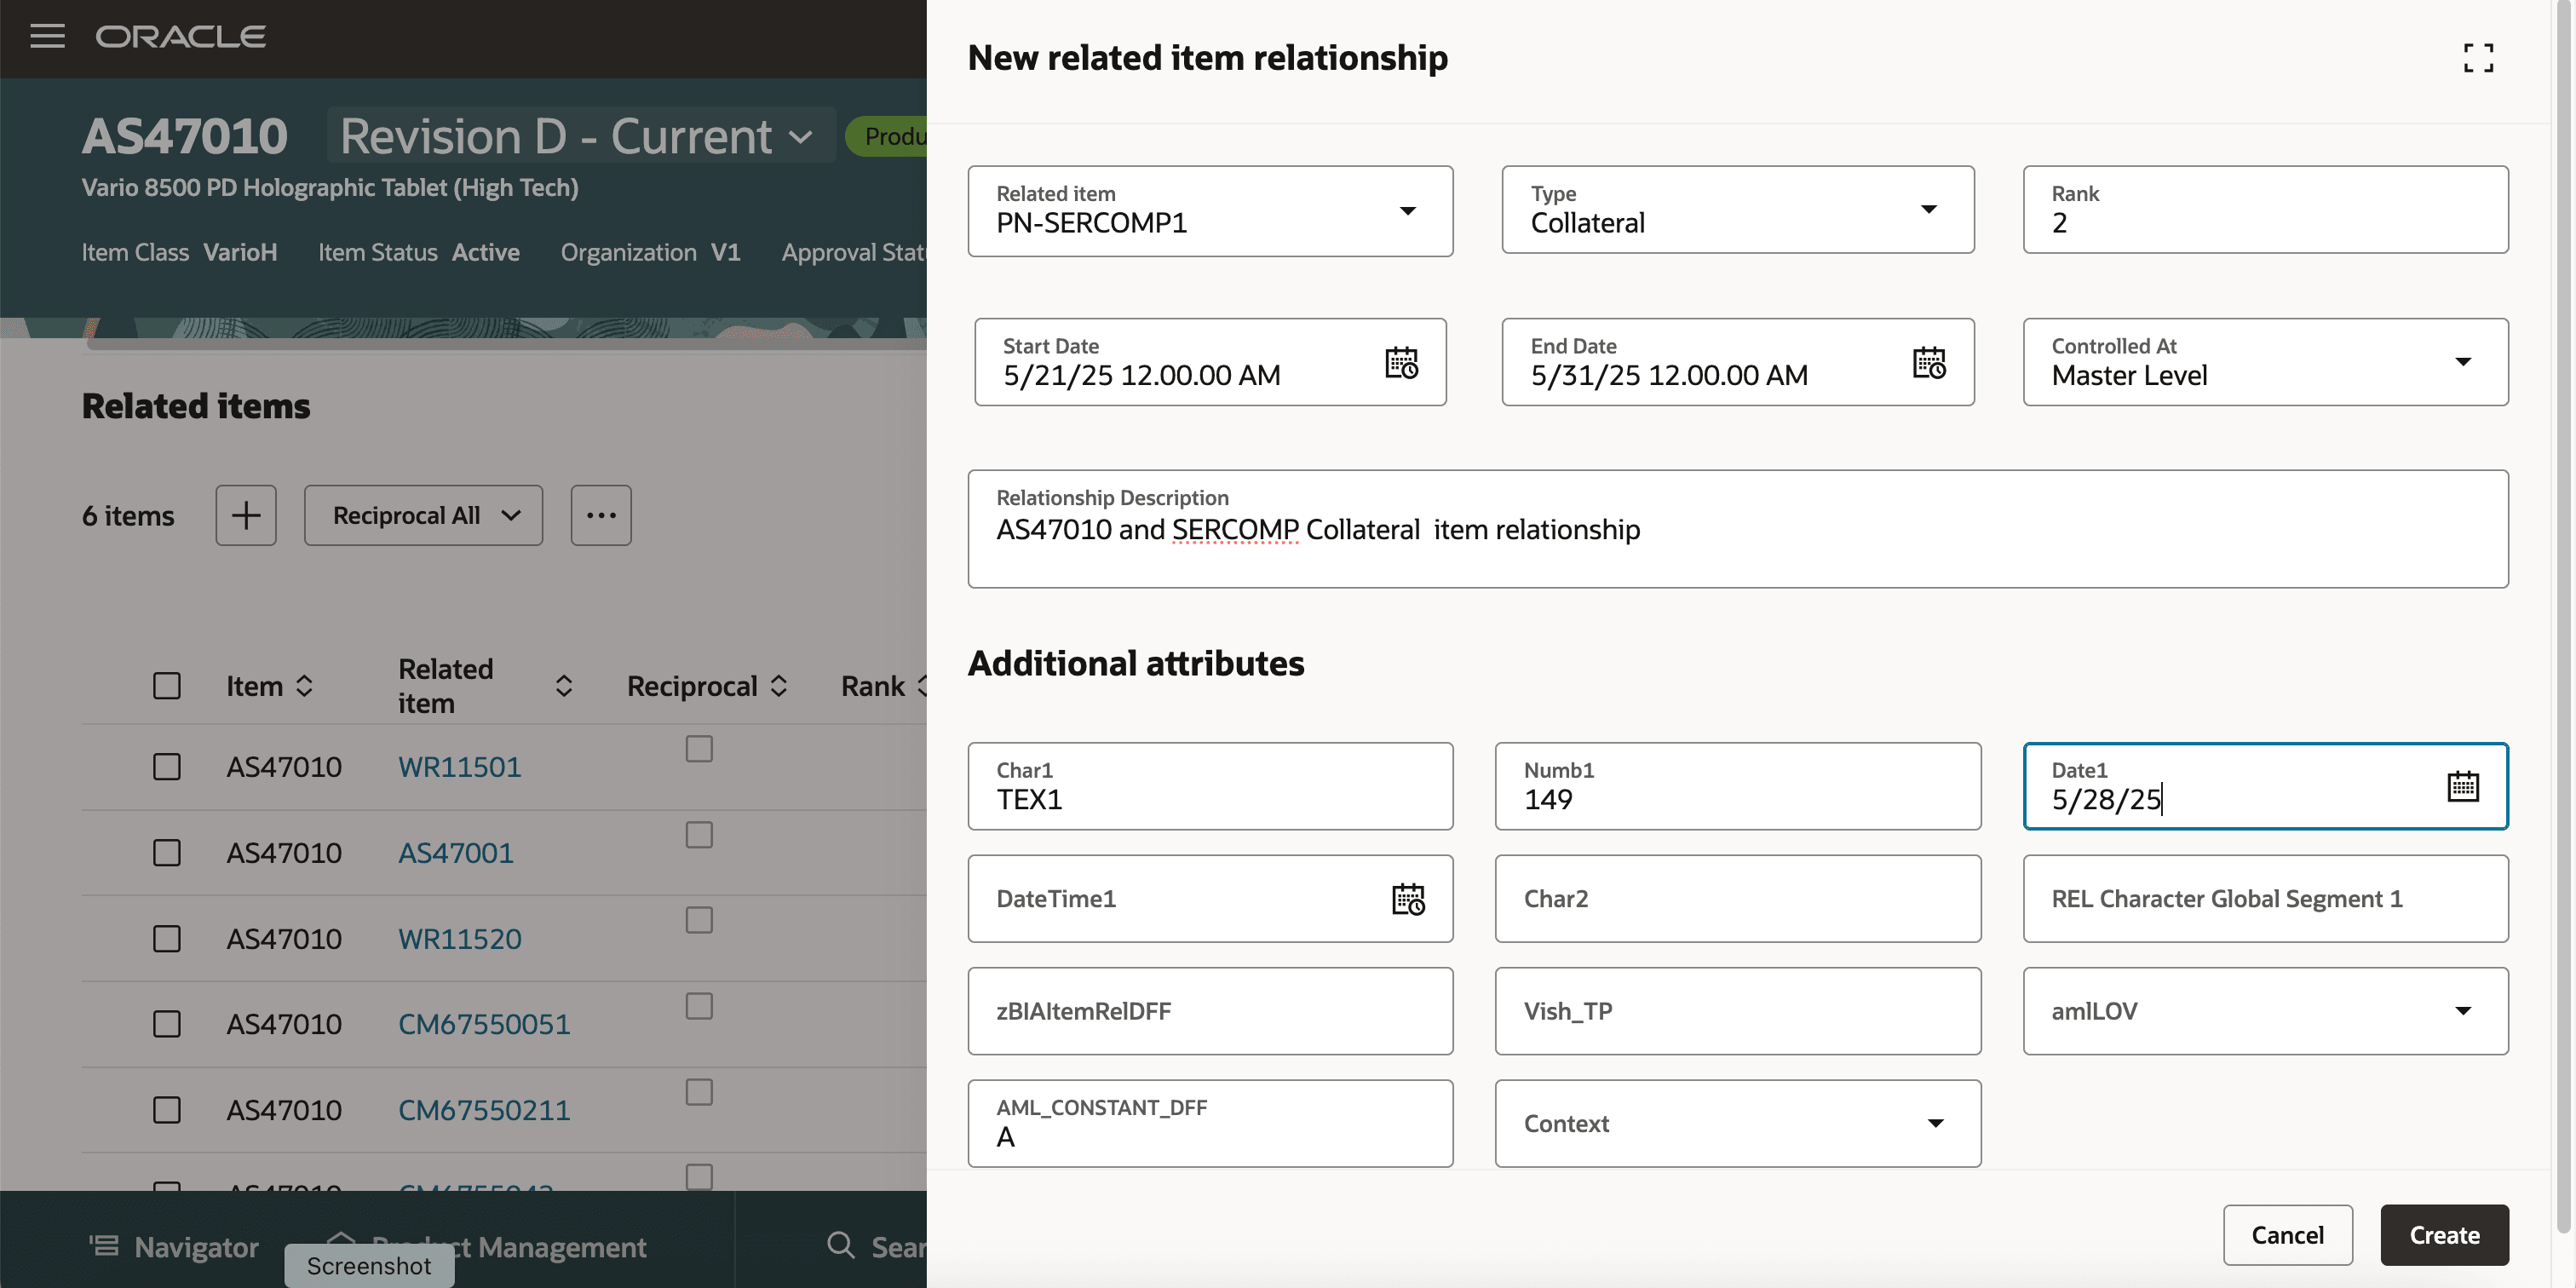
New related item relationship drawer
For Related Items relationships, you can use the filters:
- Reciprocal to filter reciprocal related item relationships
- Relationships to filter Forward or Derived relationships

Suggested Filters for Related Item Relationships
Search Item Relationships
Manage Spoke System Item Relationship
You can create and manage spoke system item relationships in the Spoke system items region.
To create a new spoke system item relationship, click the Add icon in the Spoke system items section. The New spoke system item relationship drawer opens as shown in the following screenshot. Specify the details and click Create.
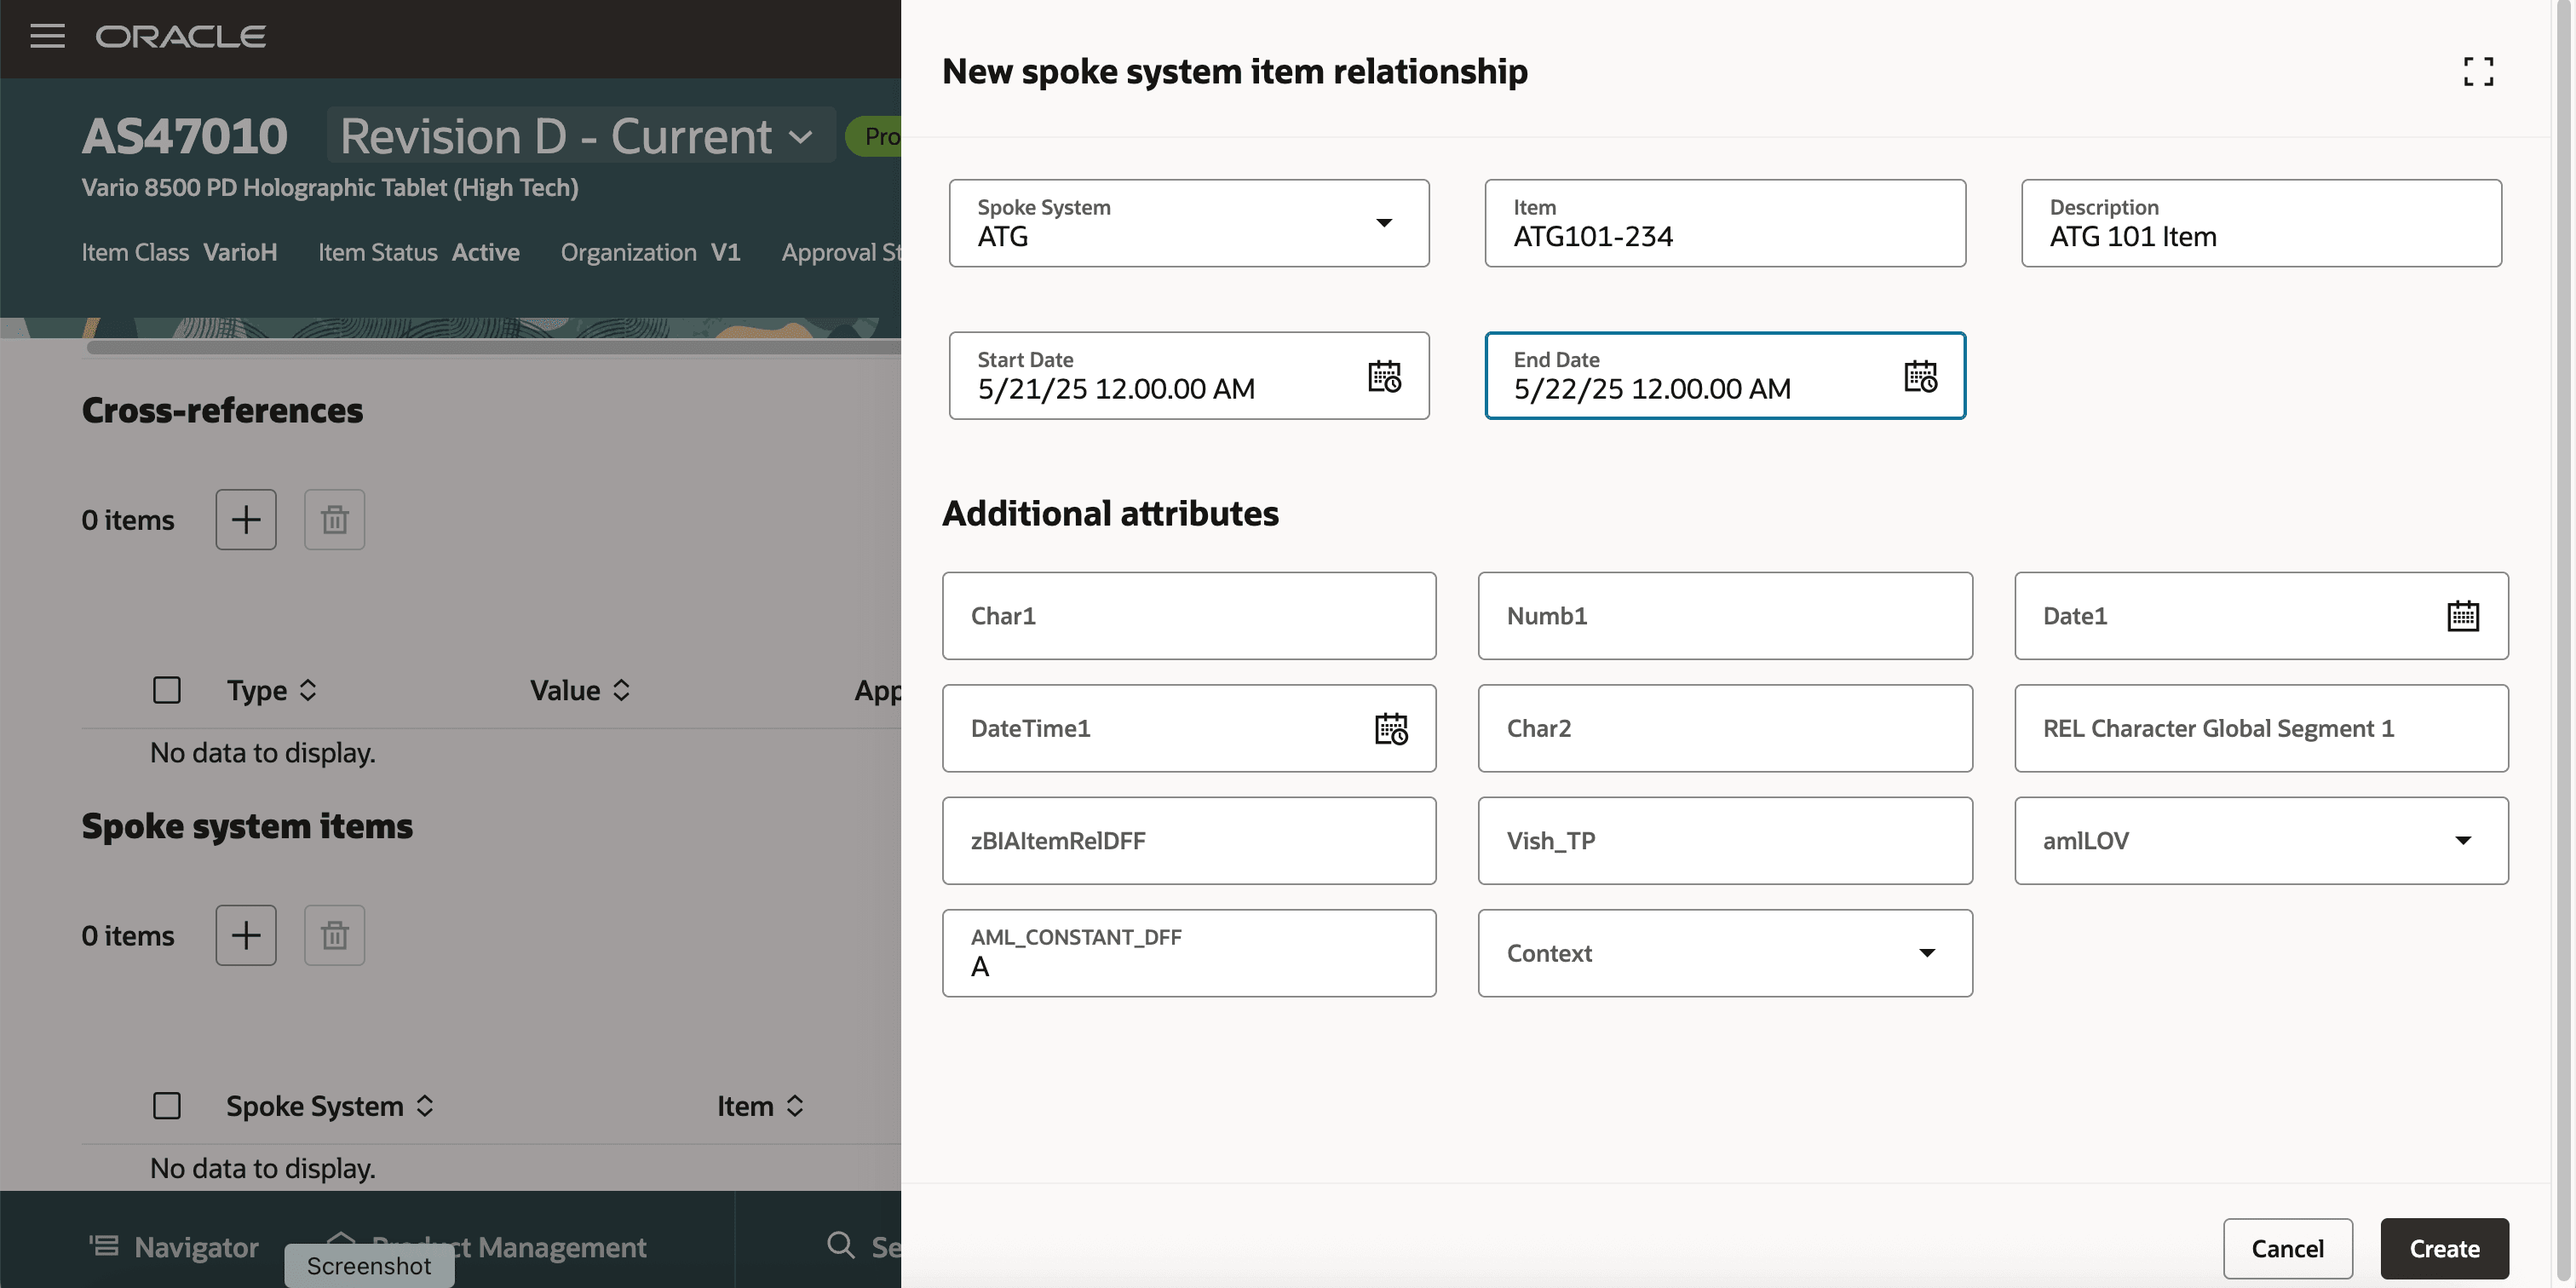
New spoke system item relationship
Manage Cross-Reference Relationship
To create a cross-reference item relationship, in the Cross-references section, click the Add icon. The New cross-reference relationship drawer opens as shown in the following screenshot. Specify the details and click Create.
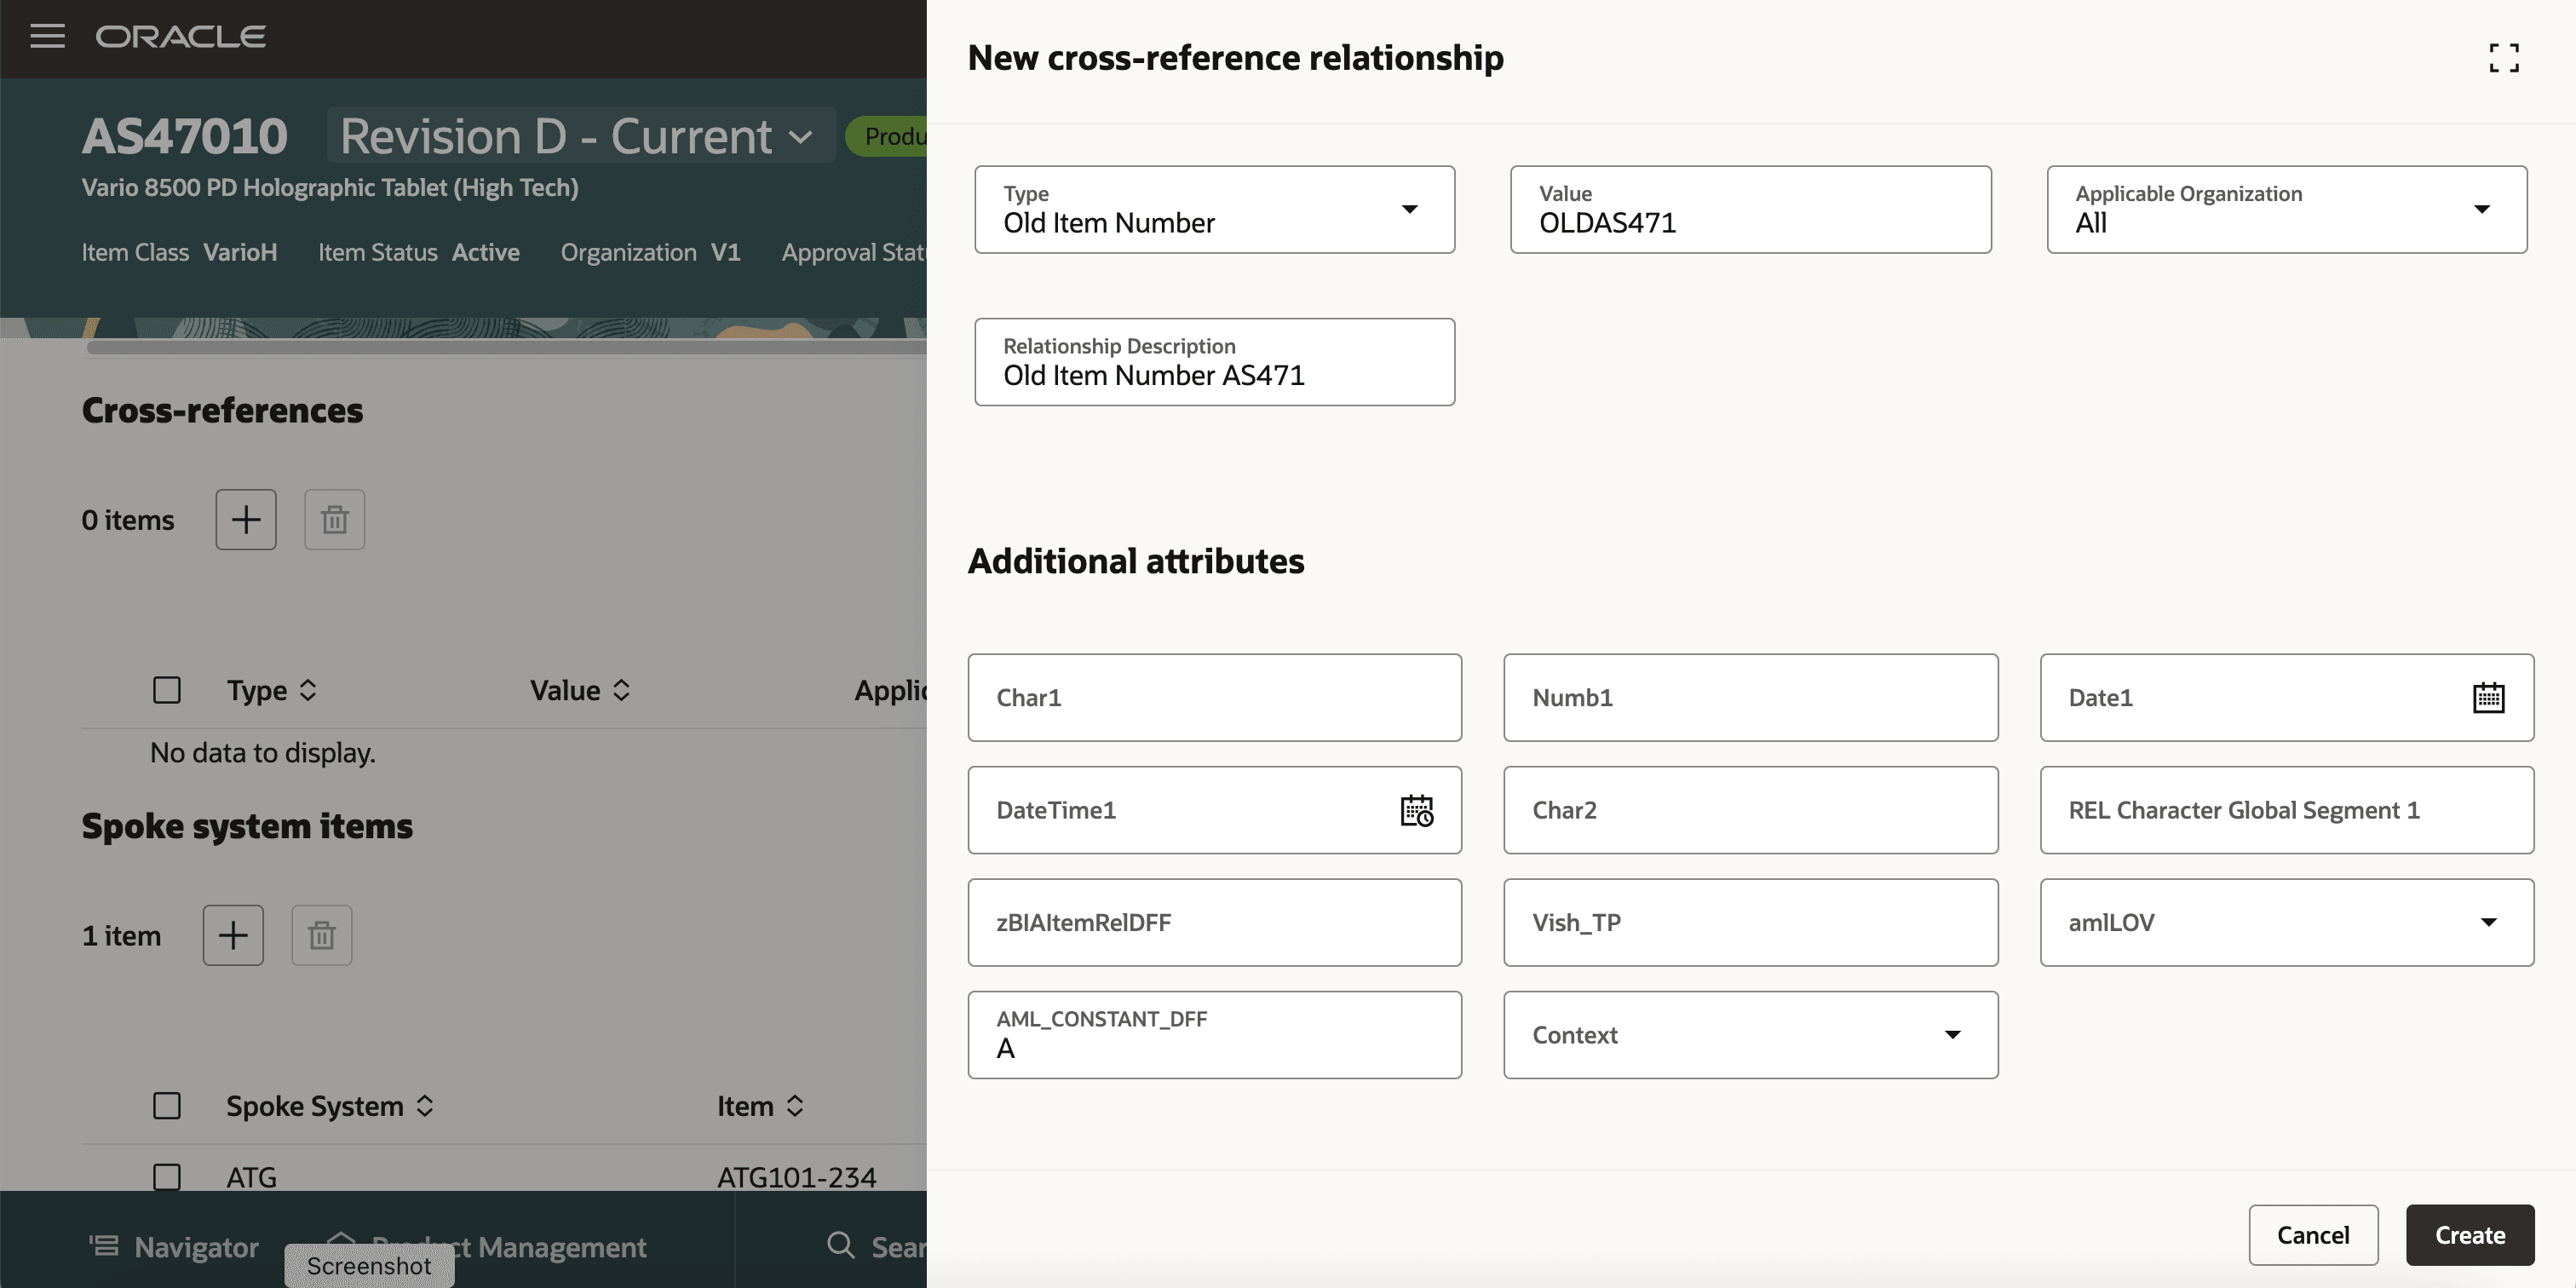
New cross-reference relationship
Manage Links Relationship
You can add links relationship for both commercial and engineering items. You can create links to objects such as changes, concepts, corrective actions, ideas, items, problem reports, proposals, and quality actions.
To create a new link, in the Links section, click the Add icon to open the Add link drawer to create a new link as shown in the following screenshot. Select the Object Type, Name, and Relationship Type and then click Create. Click Save at the page level to save the changes for the item.
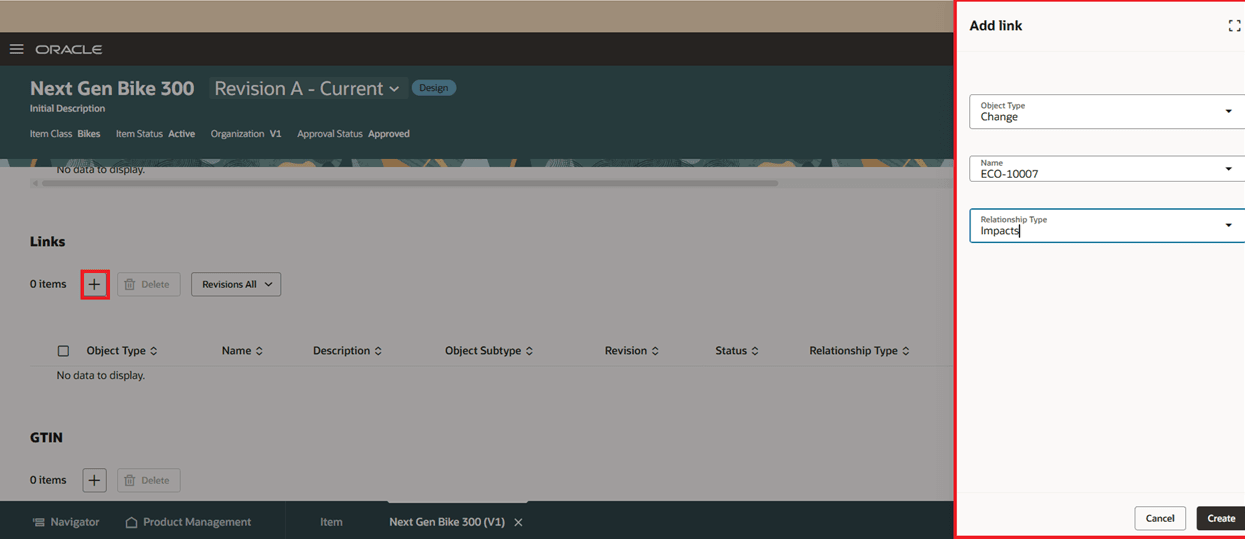
Add Item Link
You can perform the following for an existing link:
- To edit the link, click the Edit icon for the link row that you want to edit.
- To delete a link, selecting the link row that you want to delete and then click the Delete icon.
- Toggle between displaying the links for all revisions or only the latest revision (All is the default).
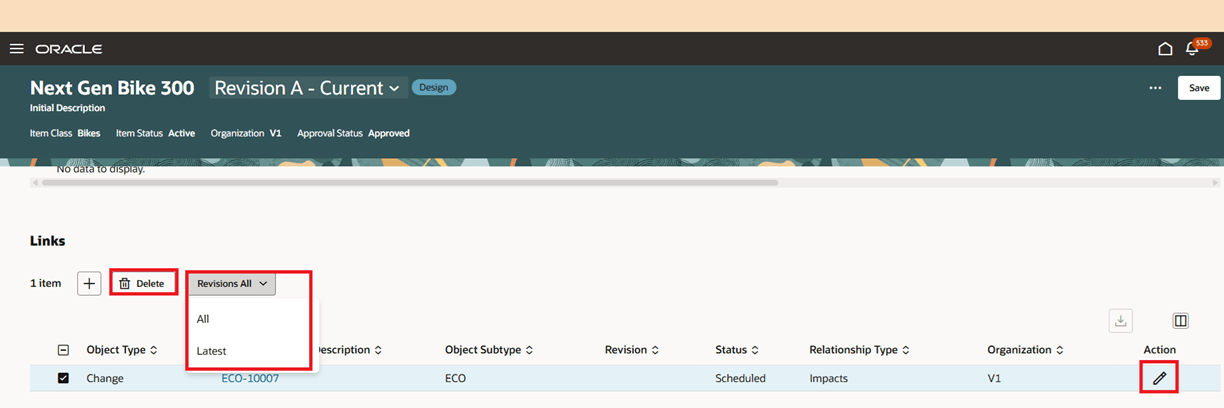
Link Actions
View Instances Where Item is Used
You can view all instances where a specific item is utilized across various processes on the Where Used tab for an item as shown in the following screenshot.
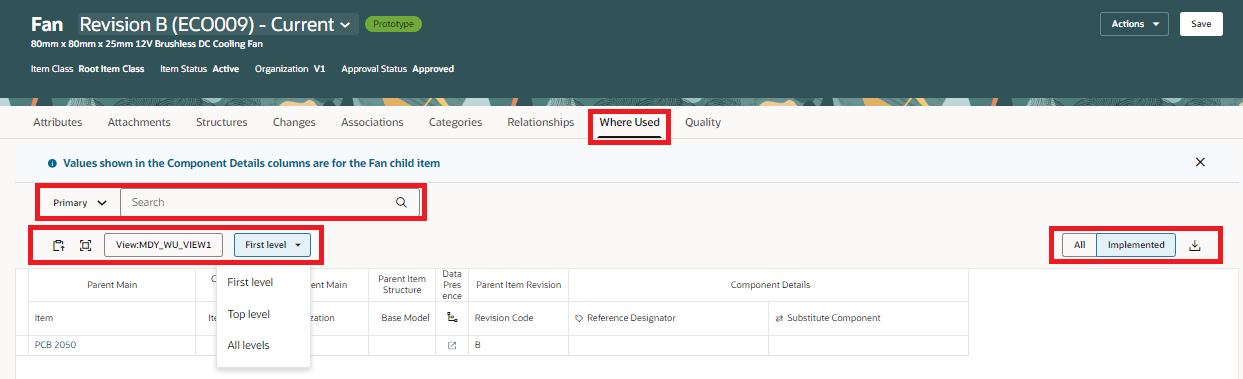
Where Used Tab
You can do the following on the Where Used tab:
- A structure selector allows you to search for the where used in the default Primary structure or in any Alternate structure.
- Search field allows you to search across any displayed field.
- Select any configured Where Used view using the View selector.
- Use the Level Selector to view where the item is used in the structure:
- First Level: Displays the first level of the structure, where the item is used. This is the default level.
The Component fields are displayed for the child item and the Main fields are displayed for the parent item. When displaying the First Level, the column headers displays a prefix of either the parent item or the component. A banner message is displayed indicating that the values shown in the Component Details columns are for the selected child item. - Top Level: Displays the topmost level of the entire structure, where the item is used.
- All Levels: Displays all levels from the item to the topmost level, where the item is used.
- First Level: Displays the first level of the structure, where the item is used. This is the default level.
- Filter items based on their approval status in a change order:
- All: View items that are effective and the items that are yet to be approved through the change order approval process.
- Implemented: View items that are already effective.
Manage Item Quality
You can manage the item quality issues, actions, view problem reports, and perform corrective actions on the Quality tab for an item. Also, you can do the following:
- Export all selected rows to an Excel file.
- Use the Customize Columns icon to hide, display, and re-organize the default columns. The configured descriptive flexfields are included in the default columns.
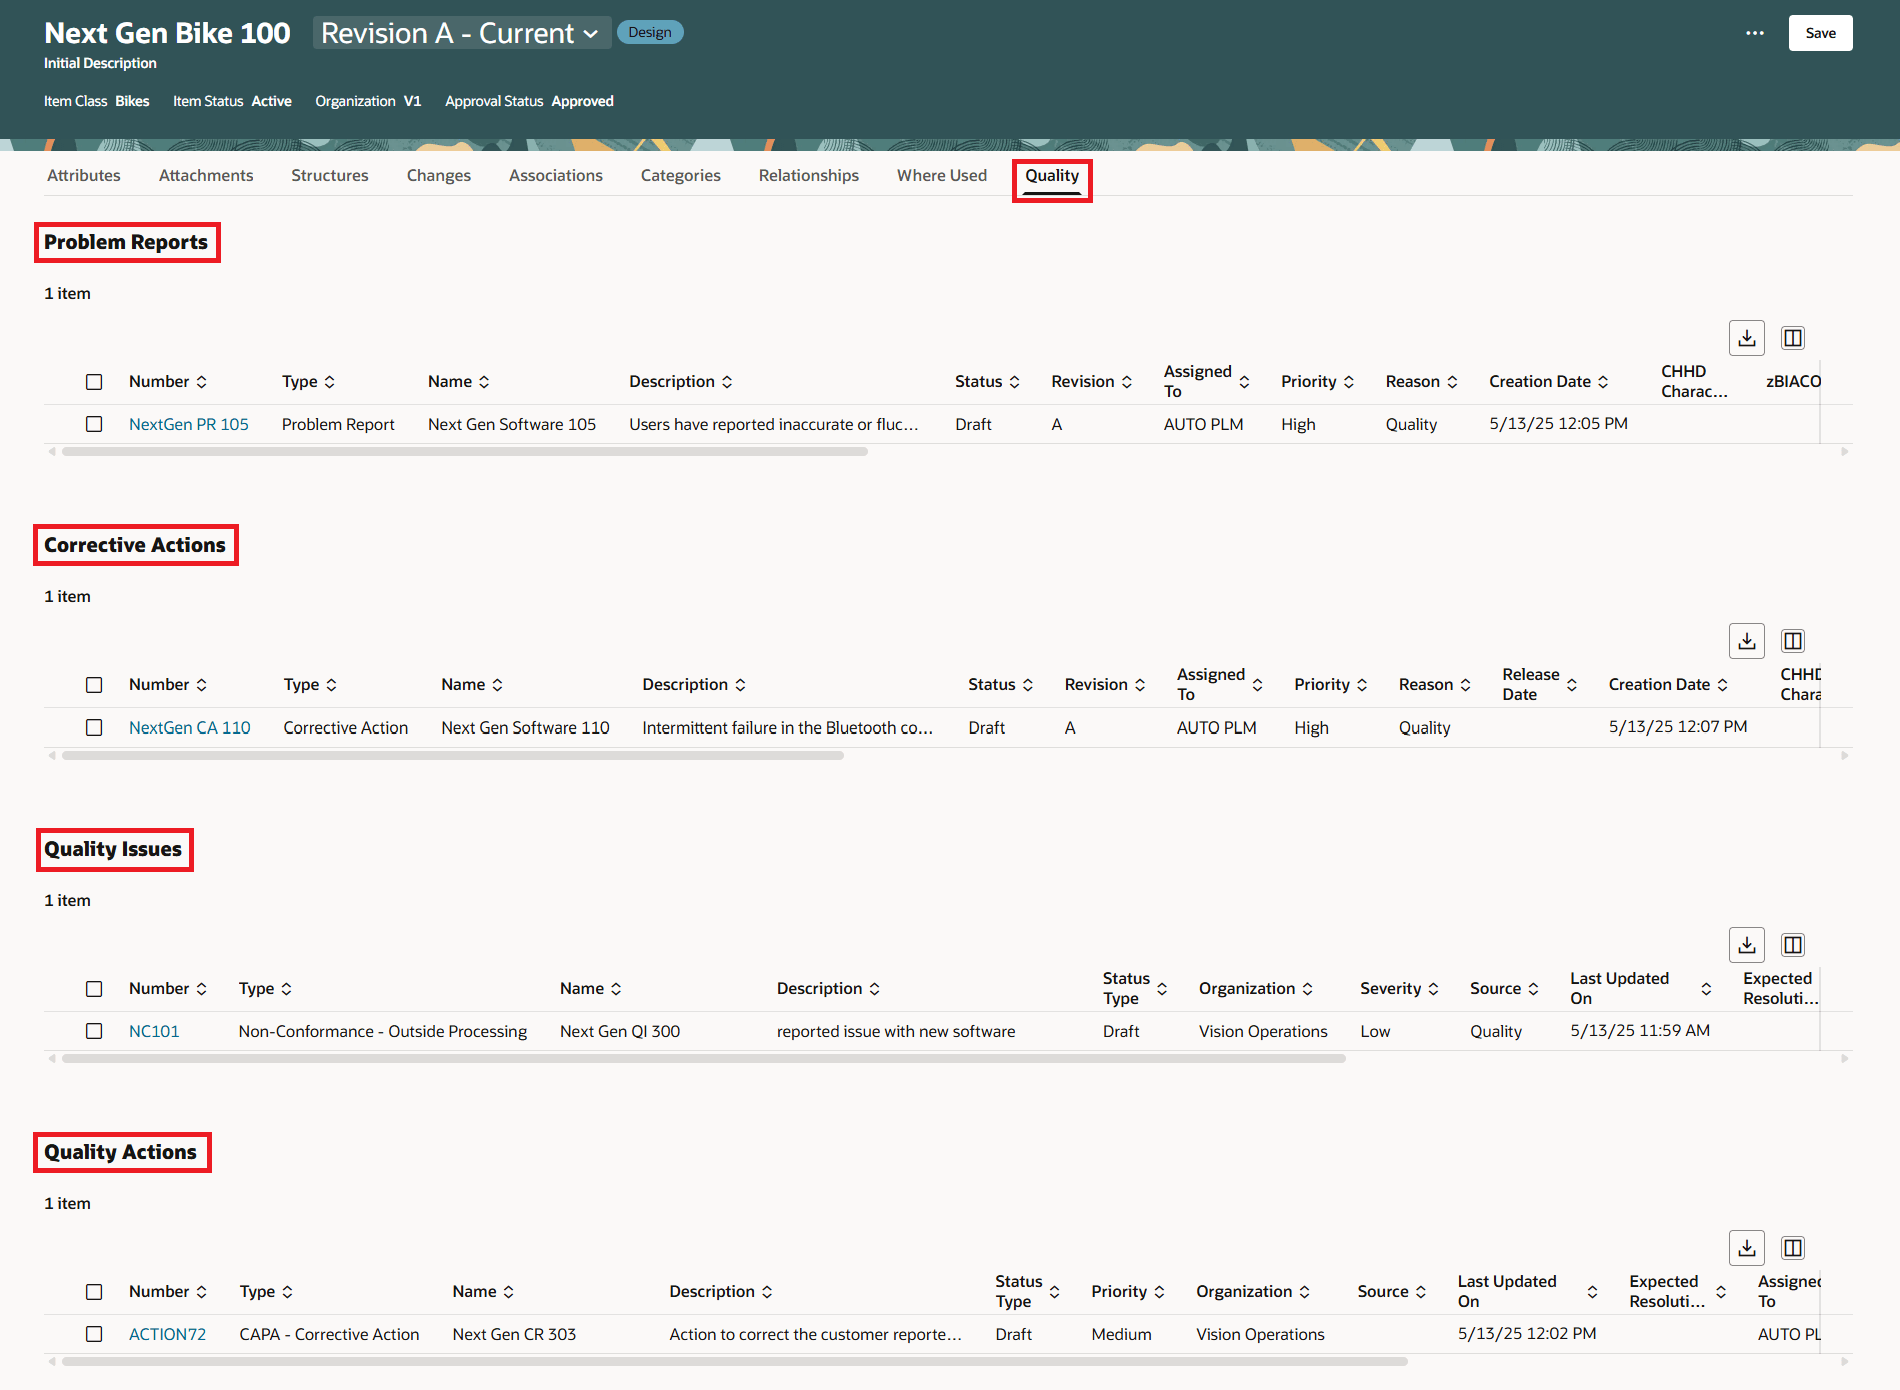
Quality Tab
Page Level Actions for an Item
You can perform the following actions for an item at the page level as shown in the following screenshot:
- Assign to Change Order
- Assign to Change Request
- Assign to Problem Report
- Assign to Corrective Action
- Change Item Class
- Apply Templates
- Spotlight
- Delete
- Send Object
- Download Attachments
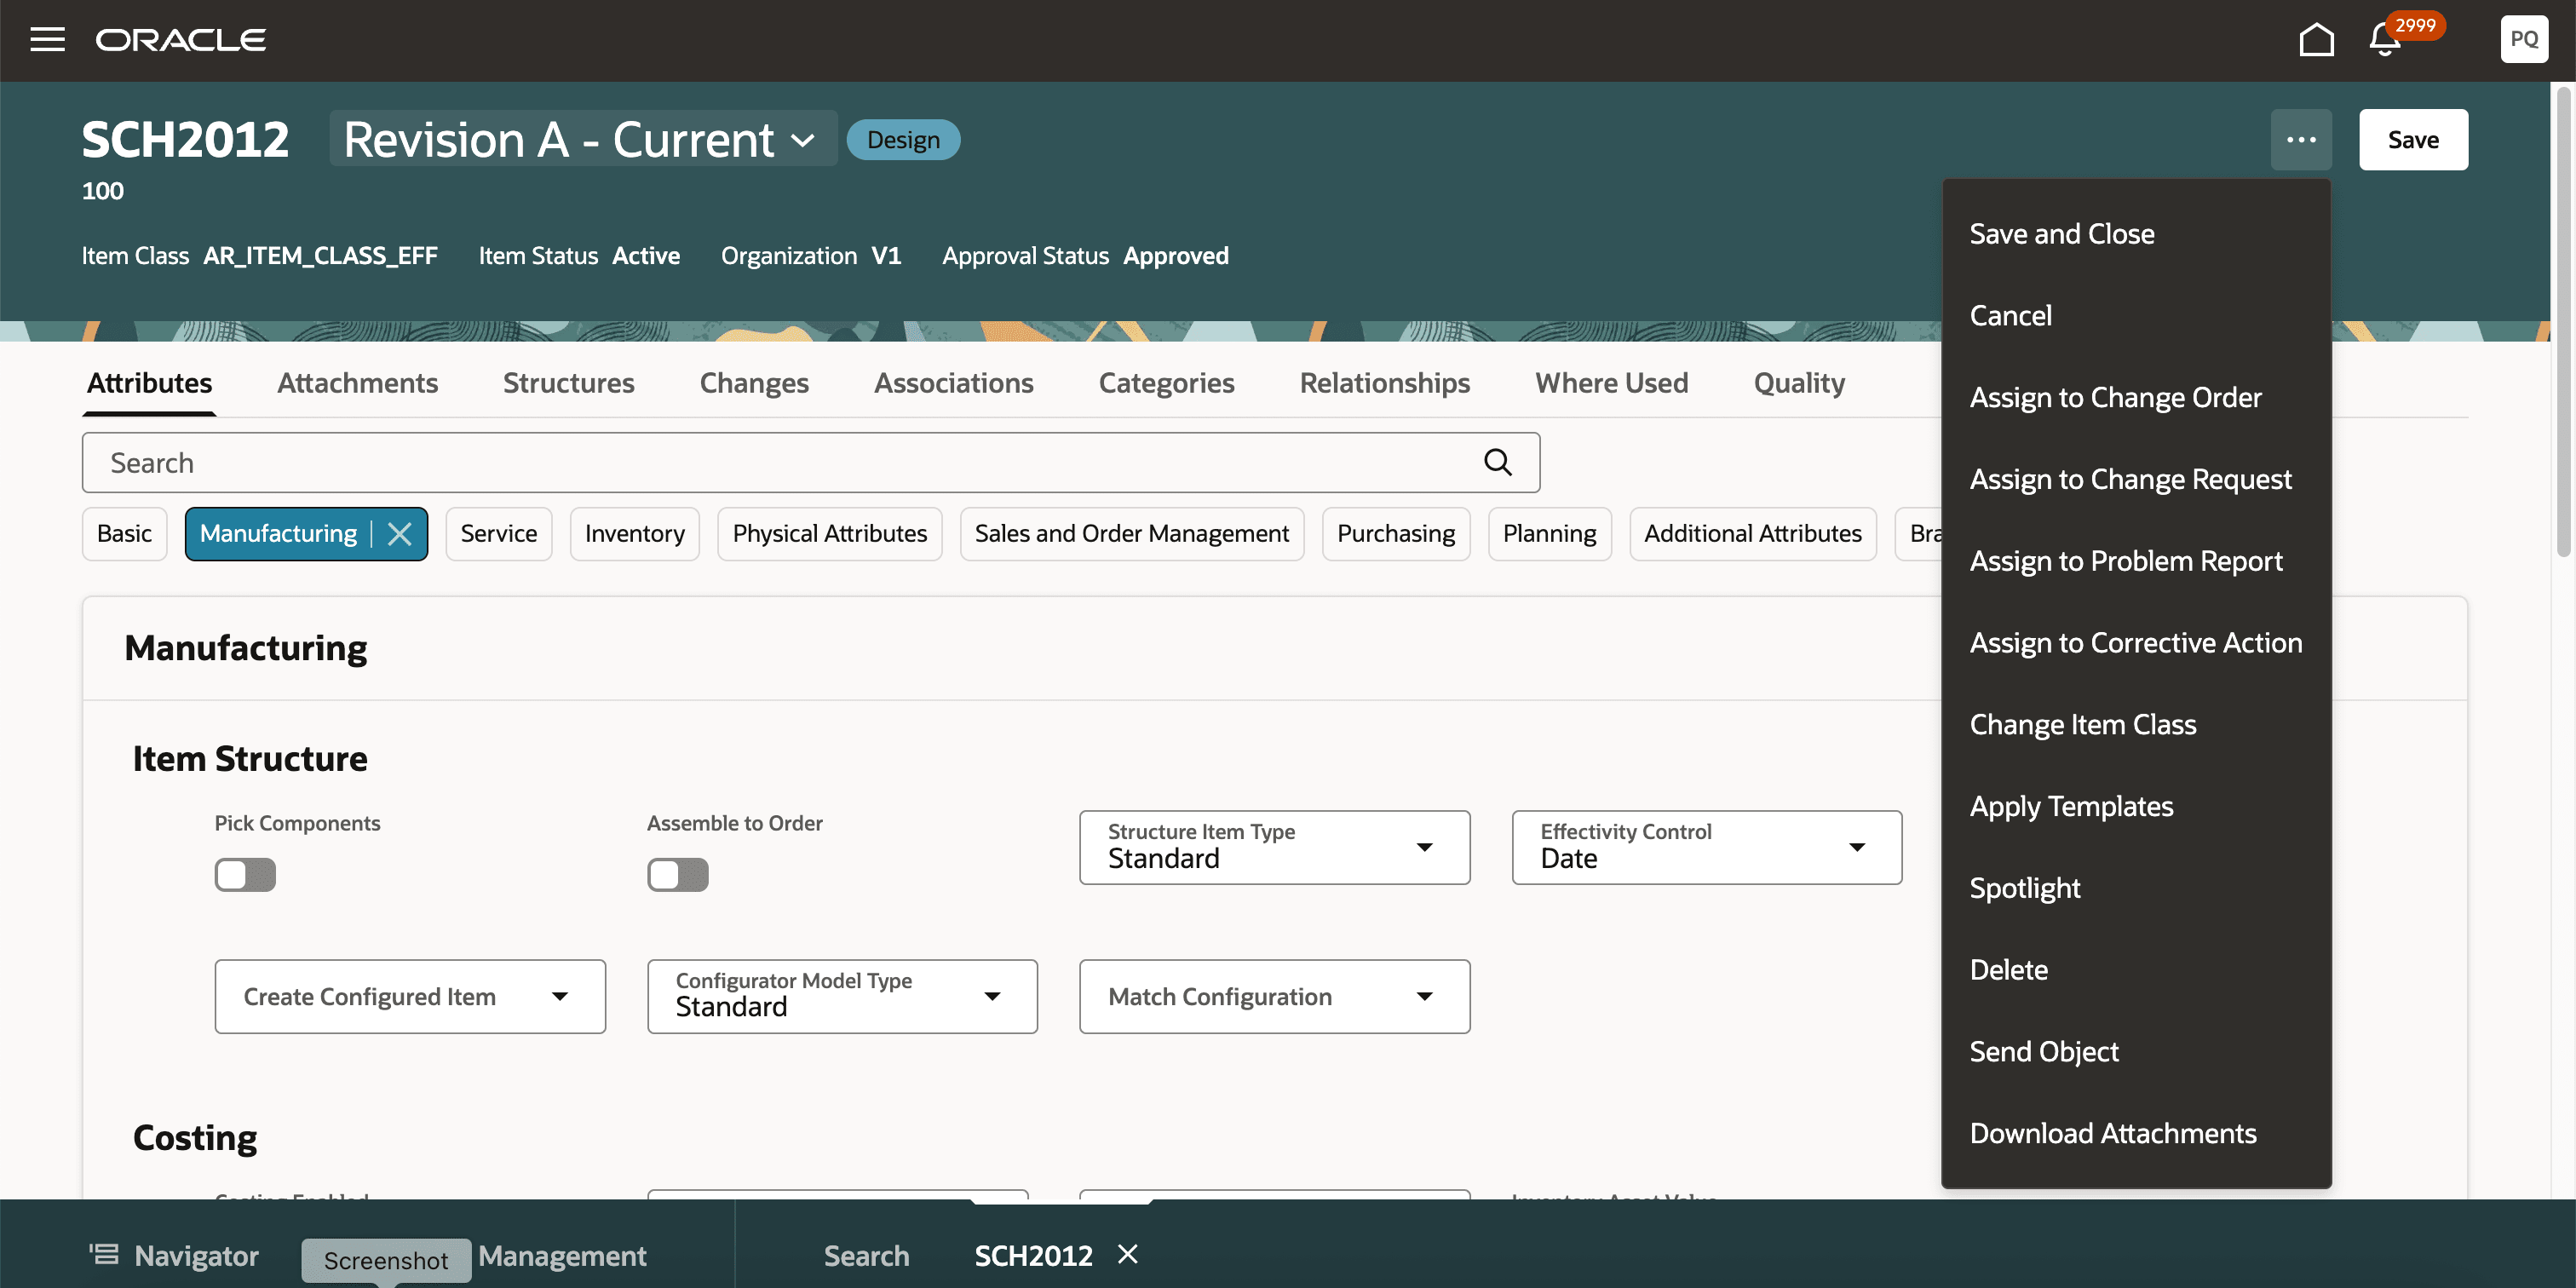
Page Level Actions
The feature provides the following business benefits:
- Increased efficiency by providing quick access to relevant attributes.
- Increased productivity by highlighting the attribute and attribute values based of search criteria.
- Improved workflow by optimizing the item category assignment and relationship assignment process.
- Enhanced performance by improving the visibility of changes, where used, and quality related item data.
Here's the demo of these capabilities:
Steps to enable and configure
Follow these steps to enable or disable this feature:
- In the Setup and Maintenance work area, search for and select the Manage Administrator Profile Values task.
- On the Manage Administrator Profile Values page, search for and select the ORA_EGP_VIEW_ITEM_REDWOOD_ENABLED profile option code.
- In the Profile Values section, set the Site level to Yes or No. The default value is No.
- Yes = enables the feature
- No = disables the feature
- Click Save and Close. Changes in the profile value will affect users the next time they sign in.
- Define the security policies to access the Changes and Quality tabs of an item. For details, see:
- Create Data Security Policy section in Configure Workflows
- Secure Access to Quality Issues and Actions section
Tips and considerations
- Search is case insensitive.
- The organizations also indicate whether they are a definition organization or reference organization.
- The Manage Item Change Order privilege won’t give Redwood users access to problem reports and corrective actions. This is a change from the earlier Product Development classic page. You should use the new Manage and View privilege to access the problem reports and corrective actions.
- You can add images of an item as item attachments.
- You can’t add repository and text attachments. Also, you can’t mark one of the image attachments as primary.
- You can click Download to download the rows for a relationship.
- An item relationship that’s being added, modified, or deleted is saved only when you click Save or Save and Close at the page level.
- If there are any errors when you create or modify an item relationship, they are displayed at the page level during save or when you save the changes at the drawer level.
Key resources
- Overview of Item Attachments in the Oracle Fusion Cloud SCM: Using Product Master Data Management guide, available on the Oracle Help Center.
- Manage Item Relationships in the Oracle Fusion Cloud SCM: Using Product Master Data Management guide, available on the Oracle Help Center.
- Extend SCM Redwood Application Pages Using Visual Builder Studio What's New documentation, available on the Oracle Help Center.
- Create Guided Journeys for Redwood Pages What's New documentation, available on the Oracle Help Center
Access requirements
Users who are assigned a configured job role that contains these duty roles and privileges can access this feature:
-
Manage Item Redwood ( ORA_EGP_REDWOOD_MANAGE_ITEM_DUTY )
-
Manage Item Redwood Items (EGP_MANAGE_REDWOOD_ITEM_PRIV)
-
Manage Item Redwood Attachments (EGP_MANAGE_REDWOOD_ITEM_ATTACHMENT_PRIV)
-
Manage Item Redwood Associations (EGP_MANAGE_REDWOOD_ITEM_ASSOCIATION_PRIV)
-
Manage Item Redwood Item Categories (EGP_MANAGE_REDWOOD_ITEM_CATEGORY_PRIV)
-
Manage Item Redwood Structures (EGP_MANAGE_REDWOOD_ITEM_STRUCTURE_PRIV)
-
Manage Item Redwood Relationships (EGP_MANAGE_REDWOOD_ITEM_RELATIONSHIP_PRIV)
-
Manage Subscription Setup (OSS_MANAGE_SUBSCRIPTION_SETUP_PRIV)
-
View Trading Community Organization (HZ_VIEW_TRADING_COMMUNITY_ORGANIZATION_PRIV)
-
View Trading Community Person (HZ_VIEW_TRADING_COMMUNITY_PERSON_PRIV)
-
Enter Trading Community Organization Information (HZ_ENTER_TRADING_COMMUNITY_ORGANIZATION_INFORMATION_PRIV)
-
Remove Trading Community Organization (HZ_REMOVE_TRADING_COMMUNITY_ORGANIZATION_PRIV)
-
Update Trading Community Organization (HZ_UPDATE_TRADING_COMMUNITY_ORGANIZATION_PRIV)
-
Access Relationships for Product Development Objects Using a REST Service (ACA_GET_PRODUCT_DEVELOPMENT_REL_REST_PRIV)
Users who are assigned a configured job role that contains these preceding privileges and who meet any of the following data security conditions can access the Quality and Changes tabs of the item.
Data security conditions (any of the following):
- They are the owner of the change order and quality issues.
- They have view access to the change order and quality issues.