Redwood: Secure Items Using Access Control Lists
You can now create your own data access groups to control which users can view, create, delete, or manage items using criteria-based access control. Access can be granted according to a user's role, to individual users regardless of role, or based on filtered lists that group users by location or business unit. You can control access to each item by creating conditions based on basic and extensible flexfield attributes and assigning permissions to various item groups. Additionally, you have the flexibility to selectively hide or display various attribute groups, including Basic Attributes, Operational Attribute Groups, Associations, Relationships, Categories, Quality, Structures, Attachments, Usage, Changes, and Extended Attribute Groups.
You can set up precise access levels to select users in your organization that you want to have access to specific data. For example:
- Some users need create, view, and manage access.
- Other users might need only view access.
Access can be controlled through Teams:
-
Team – A team comprises a set of roles, users, filtered lists, and one or more permission sets.
Members can be added to the team individually, or by adding them using roles or derived from a filtered list of workers who match certain membership conditions. -
Permission Sets - Each permission set contains individual permissions. Each permission identifies the object for which permission is given, the conditions that must be met, the type of access to be granted, and the attribute groups the team can access.
For example- The administrator wants to give component engineers based out of New York City or Houston permission to view all Engineering items and restrict manage permission to some commercial items.
To enable criteria-based access control, you must perform these configuration tasks.
- Create team members.
- Create permission sets with data access conditions.
- Create teams, add roles, users or filtered lists, and apply permission sets.
You can add the following members (or users) in your team.
- Roles: These are users assigned to roles created in Security Console.
- Users: These are individual users created in Security Console.
- Filtered Lists: These are workers added to a group using a condition on the Worker attribute.
NOTE: If you're assigning roles or users directly, there's no need to convert users into workers. However, if you plan to use filtered lists, then the user must be converted to a worker. For details on how to create filtered list refer to Redwood: Secure Manufacturers Using Access Control Lists.
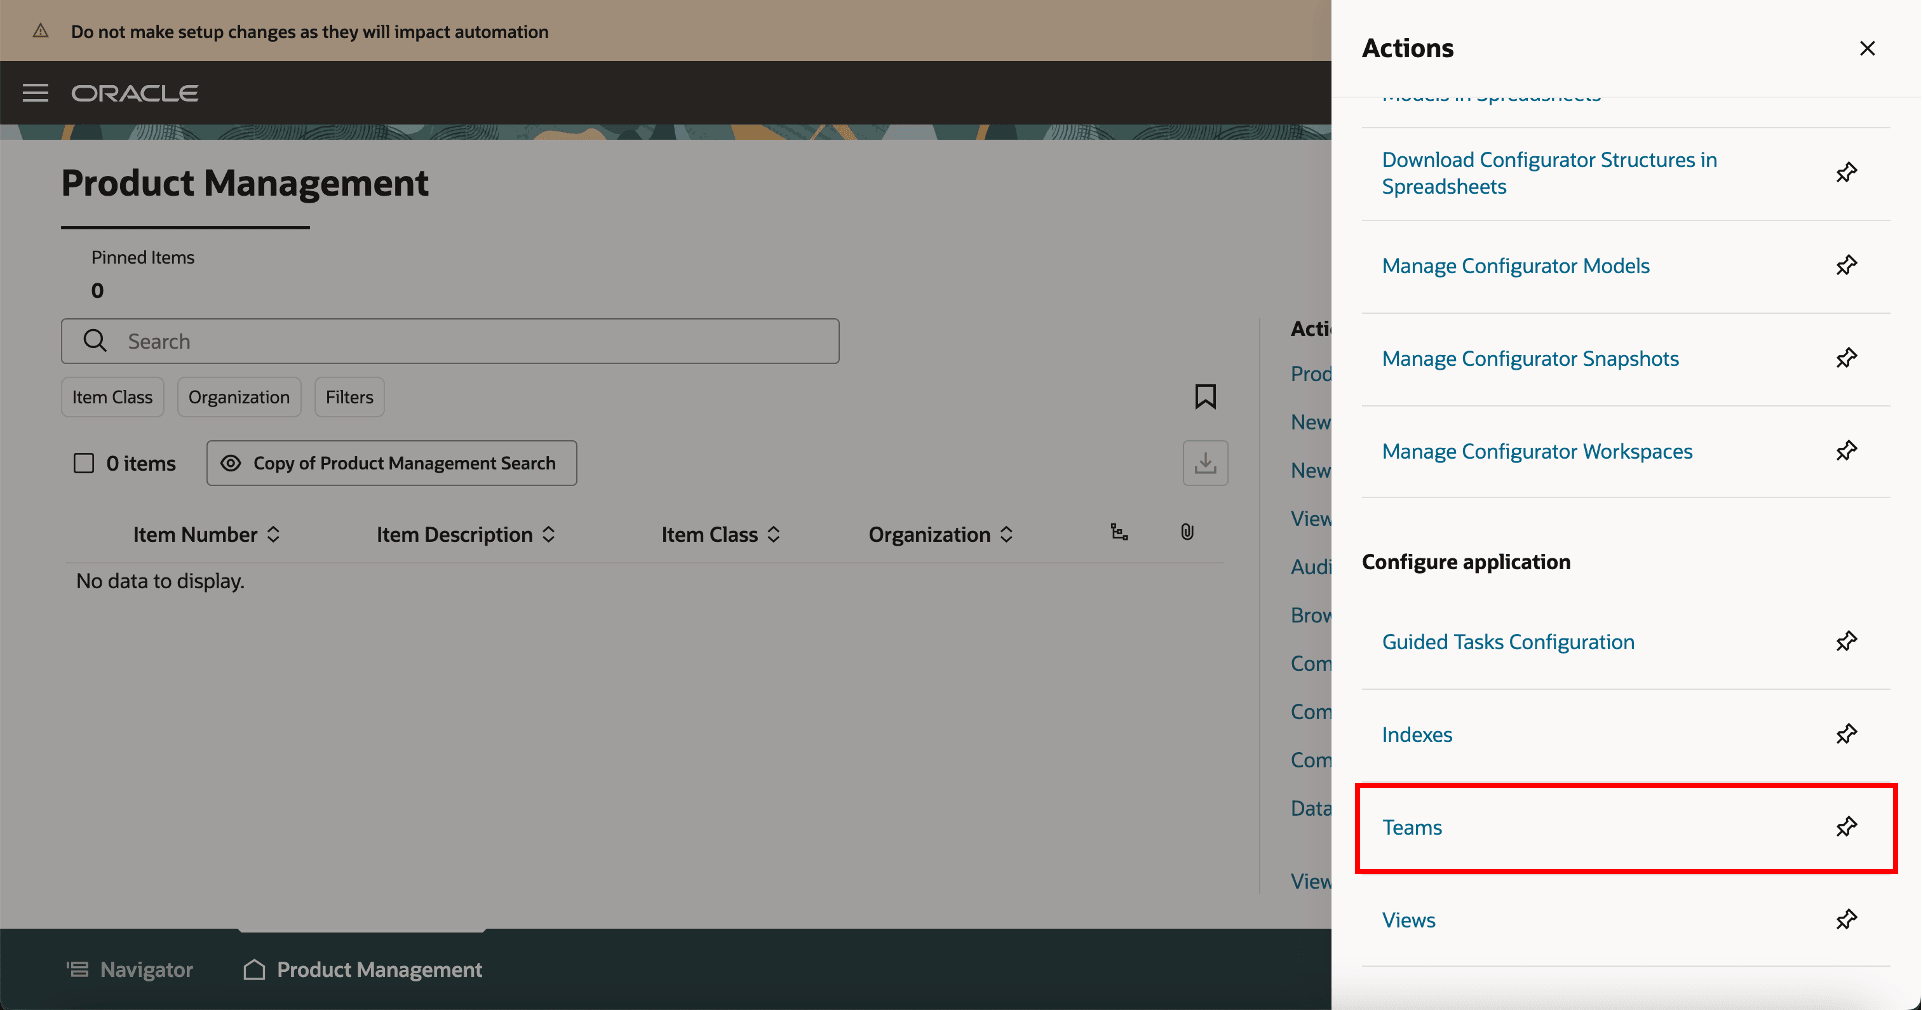
New Link for Teams on Product Management Landing Page
Configure Teams
Navigate to Product Management home page > In Actions > click Teams.
On the Search Teams page, you can search for existing teams or create new teams. For each team, you can define membership conditions and select the applicable permission sets.
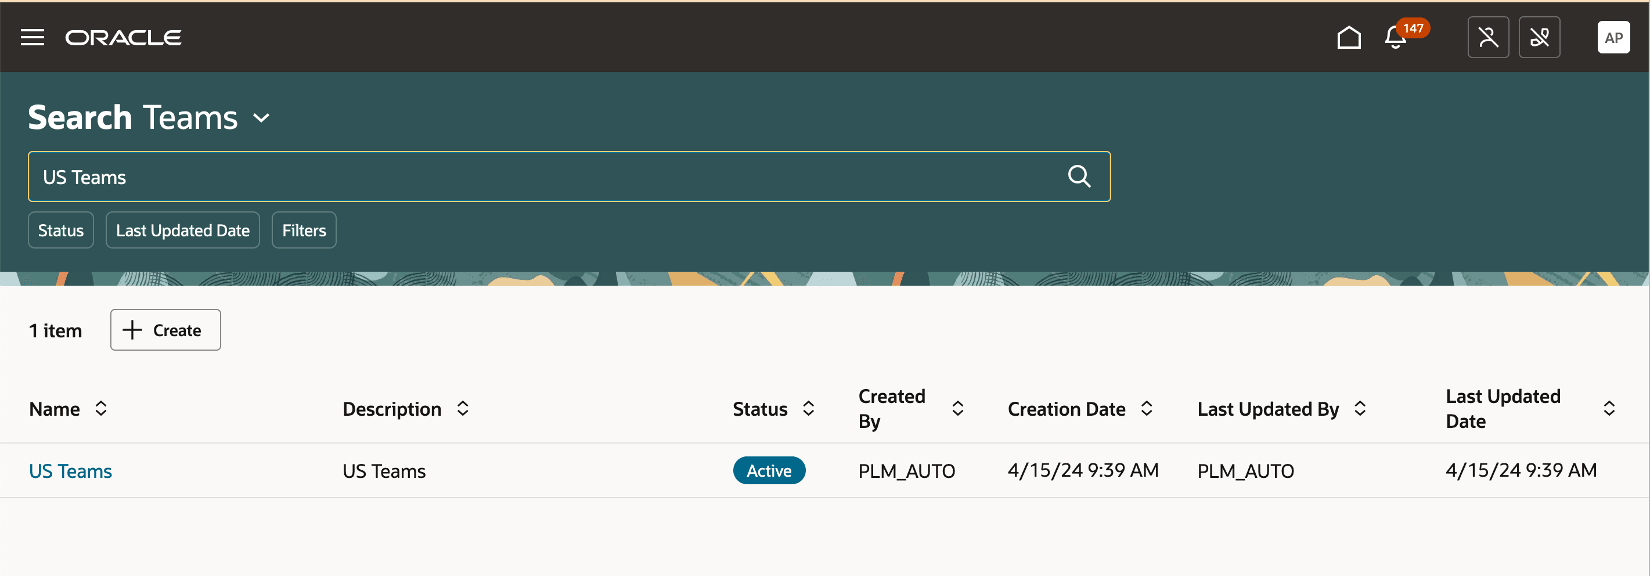
Search Page for Teams
To create a new team:
- In the Teams Search page, click Create.
- In the Create Team page, provide these details:
- Name- Unique name for the team
- Description- A short description of the team.
- Status- Set the status of the team to Active.
-
In Filtered Lists:
- Add roles that you want in your team.
- Add individual users you want in your team.
- Add members based on the membership conditions defined for your filtered list.
-
In the Permission Set tab:
-
Add the permissions you created in the Permission Set page.
-
-
Click Save and Close.
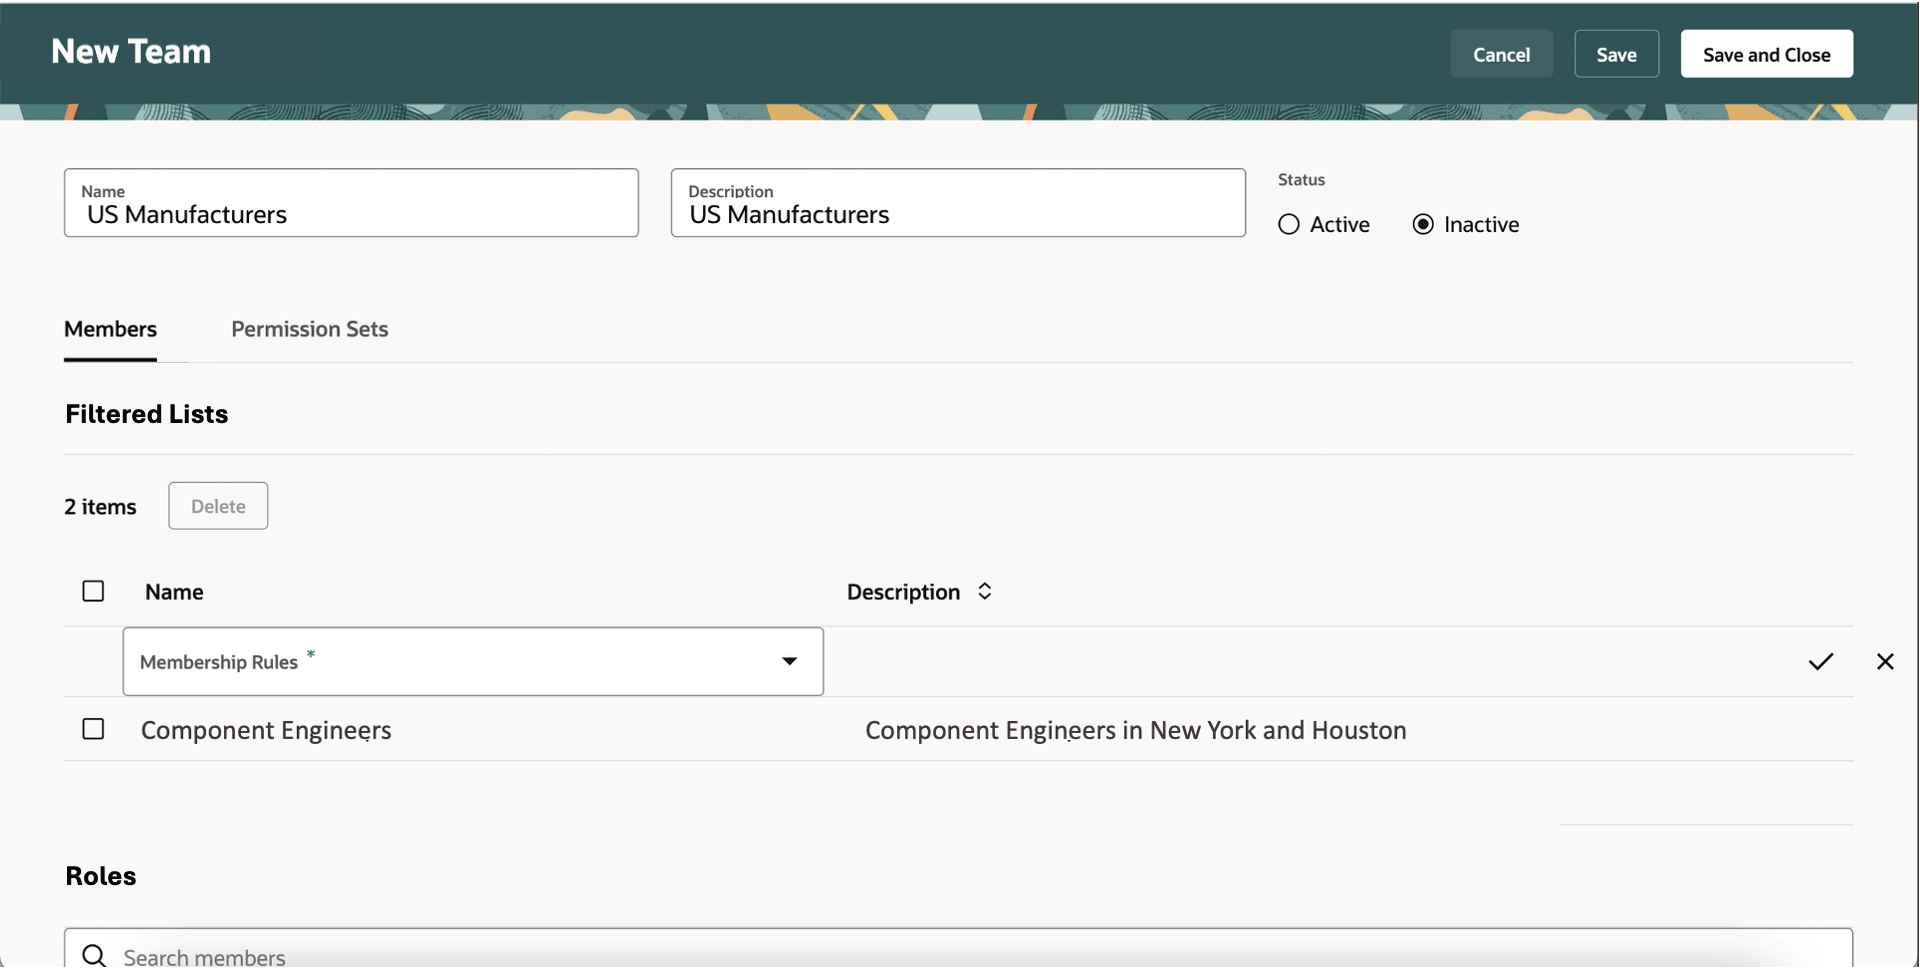
Members Tab on the Create Team Page
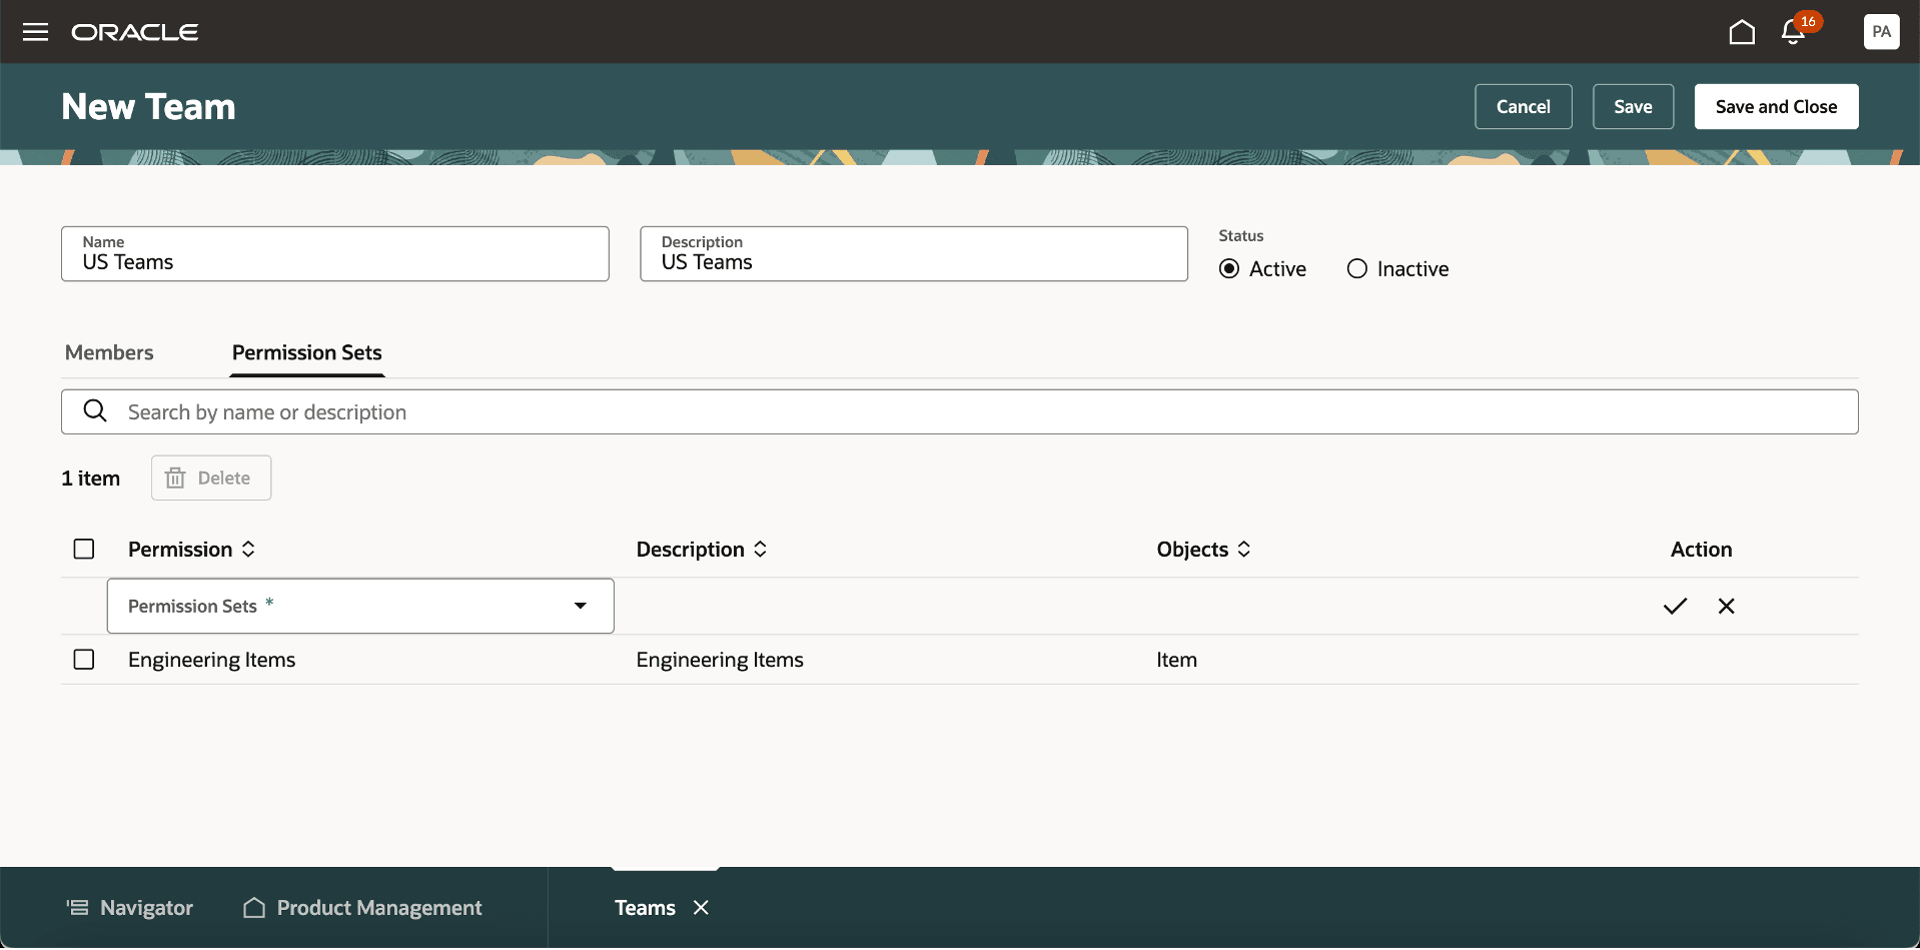
Permission Sets Tab on the Create Team Page
If you add role to the team, all the users in the role will have access to the items associated to that team.
Create Permission Sets with Access Conditions
Permission sets enable you to define access on items and other objects. In each of the permission set you can add multiple permissions on items granting access to the item for the team members.
You can provide access to items conditionally using permissions such as, create, view, manage, discover, and delete.
Using a permission set you can control the visibility of tabs or tables appearing on the item details page, thereby controlling the shape of the item object. This can be done by configuring access to an attribute group or table using the Access To column, where you can specify which tabs are accessible to the user. For example, if a user is granted access only to Basic Attributes, Attachments, and Structure, they will only be able to see these three tabs, while the others will remain hidden.
On the Search Permission Sets page, you will see a listing of the permission sets that have already been created. Here’s what you can do:
- Search for specific permission sets.
- See details of the permission set by clicking the name of the permission set.
- Sort the permission sets by the columns.
On the Permission Set Search page, you will see a listing of the permission sets that have already been created. Here’s what you can do:
- Search for specific permission sets.
- See details of the permission set by clicking the name of the permission set.
- Sort the permission sets by the columns.
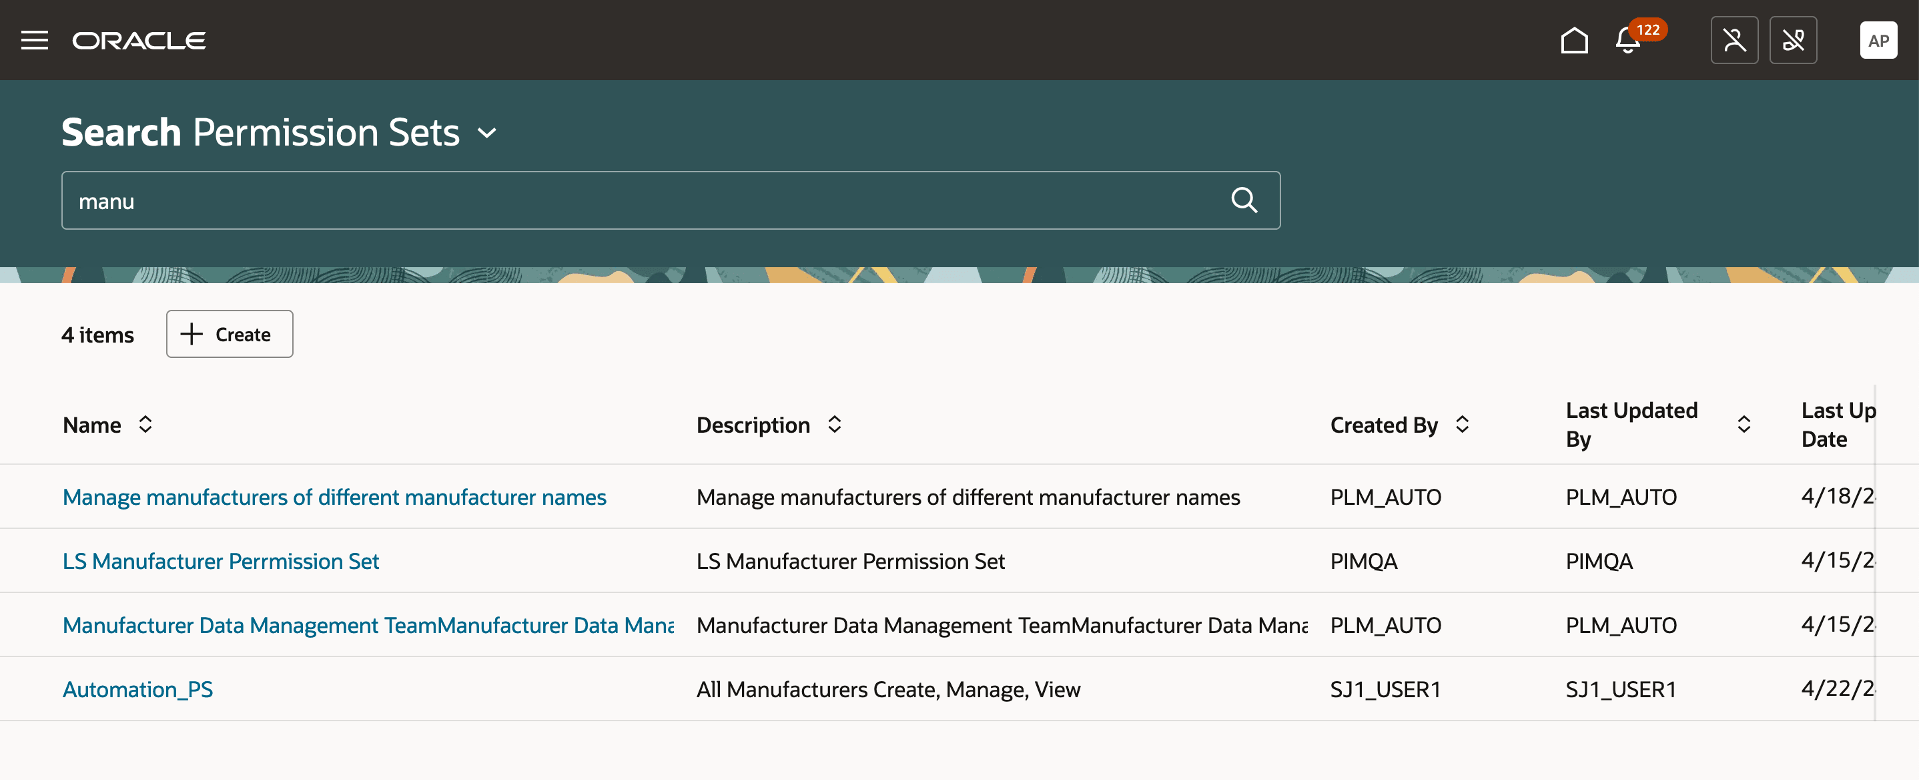
Search Page for Permission Sets
To create a permission set, click Create on the Search Permission Sets page and add these details:
- Name- Unique name of the permission set.
- Description- Short description on the permission set.
- Add permissions:
- Object- contains a list of objects in the application. Select Item.
- Condition- helps narrow down the object by applying filters on object attributes. Select a condition from the list of available conditions or click Create Condition to create a new condition.
- Permission- select one of Create, Delete, Discover, View, or Manage, depending on what the team should be able to do.This helps user select one of Create, View, or Manage, depending on what the team should be able to do.
- Create Permission- allows the user to create an item. On a create permission user can setup a condition with an organization and item class only.
- View Permission- allows the user to see the item attributes in a read-only format.
- Manage Permission- allows the user to view and edit an item.
- Delete Permission- allows the user to add the item to a delete group.
- Discover Permission- allows the user to view only the item number of the item on which he has discover permission in various places like relationships, structure, affected objects and so on. The items with only discover permission can’t be searched or found in item picker.
-
Access To: control access to item attribute groups by selecting the groups a team can access in.
Note that:
- You can control access to attribute groups when using the View and Manage permissions.
- You can’t control access to attribute groups when using the Create, Discover, and Delete permissions.
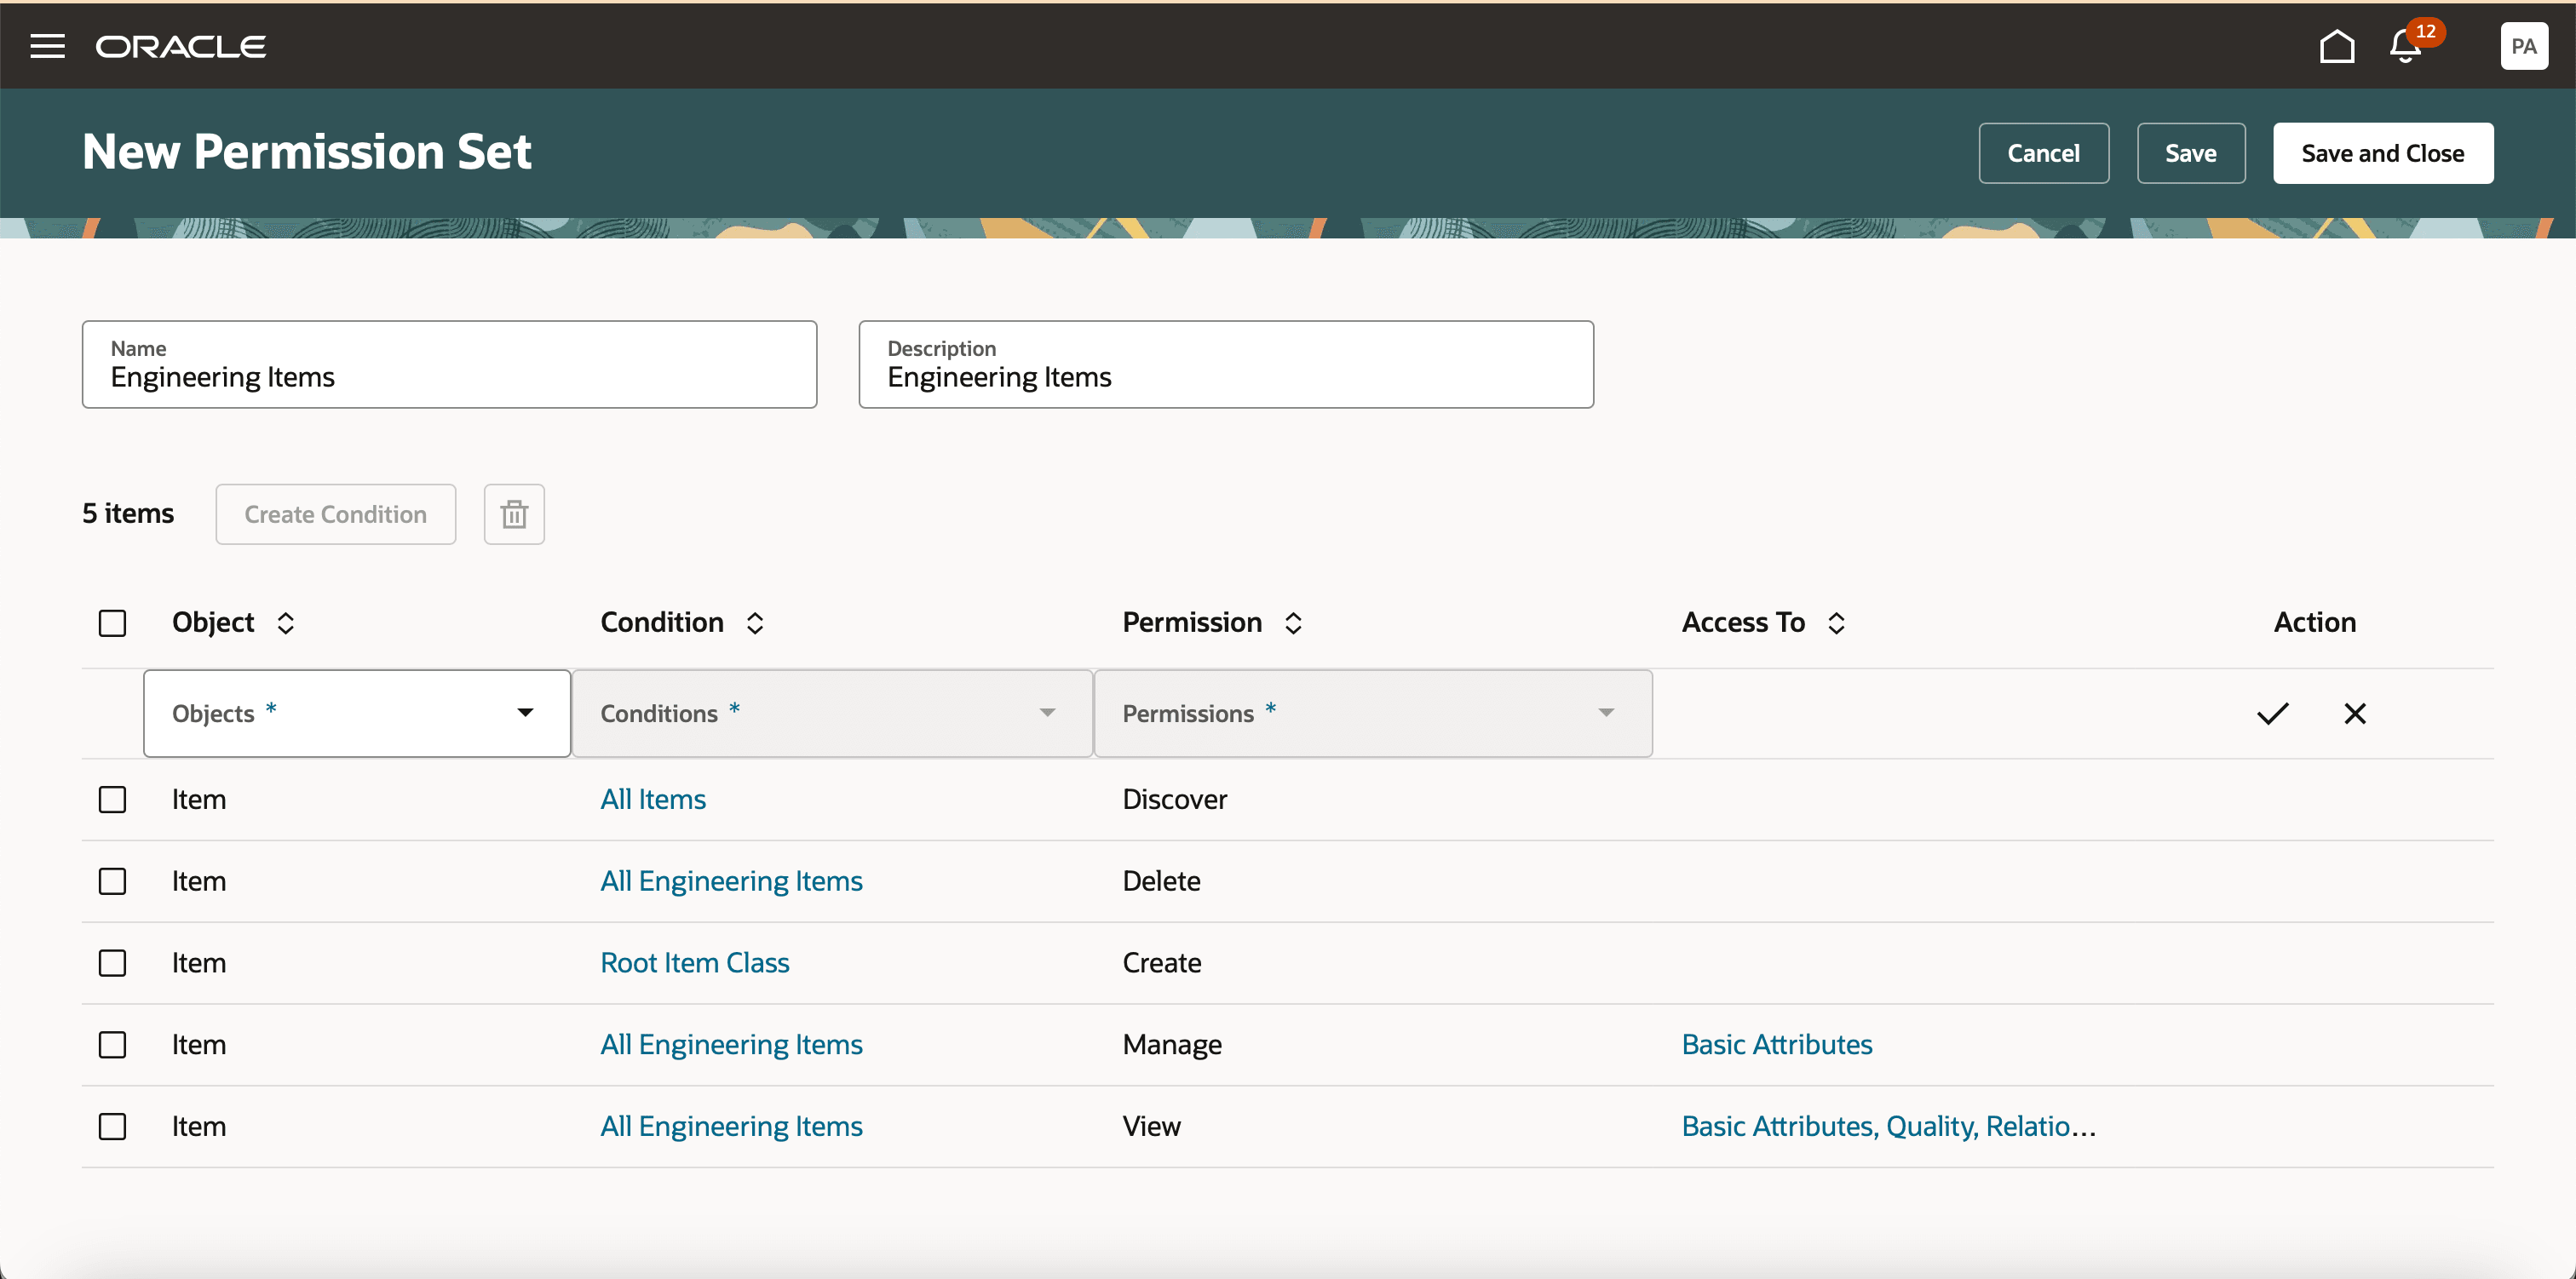
New Permission Set Page Showing All Permissions Applicable for Items

Select the Attribute Groups for the Item
For example, you can create a permission set for an item that allows you to:
- Create items in the item class named Root Item Class.
- Discover all items in the application.
- Delete all engineering items.
- View Basic Attributes, Quality and Relationships on all engineering items.
- Manage only Basic Attributes on all engineering items.
Create a Condition
A condition is used to define restrictions on items based on the item attributes. Users can create a condition on one or more item attributes.
Click Create Condition on the New Permission Set page to create a new condition for the item.
Add these details:
- Rule Name- A unique name for the condition.
- Description- A short description of the condition
- Active- By default, this is set to Yes.
- Add Rule
- Attribute- Select the attribute on which you want the rule to be set up. You can add a rule on basic attributes or extensible flexfield attributes of the items
- Operator- Select an operator such as equals, is, or not equal to.
- Value- Provide the attribute value.
In this example, Engineering condition filters out items where the Engineered flag is set to Yes.
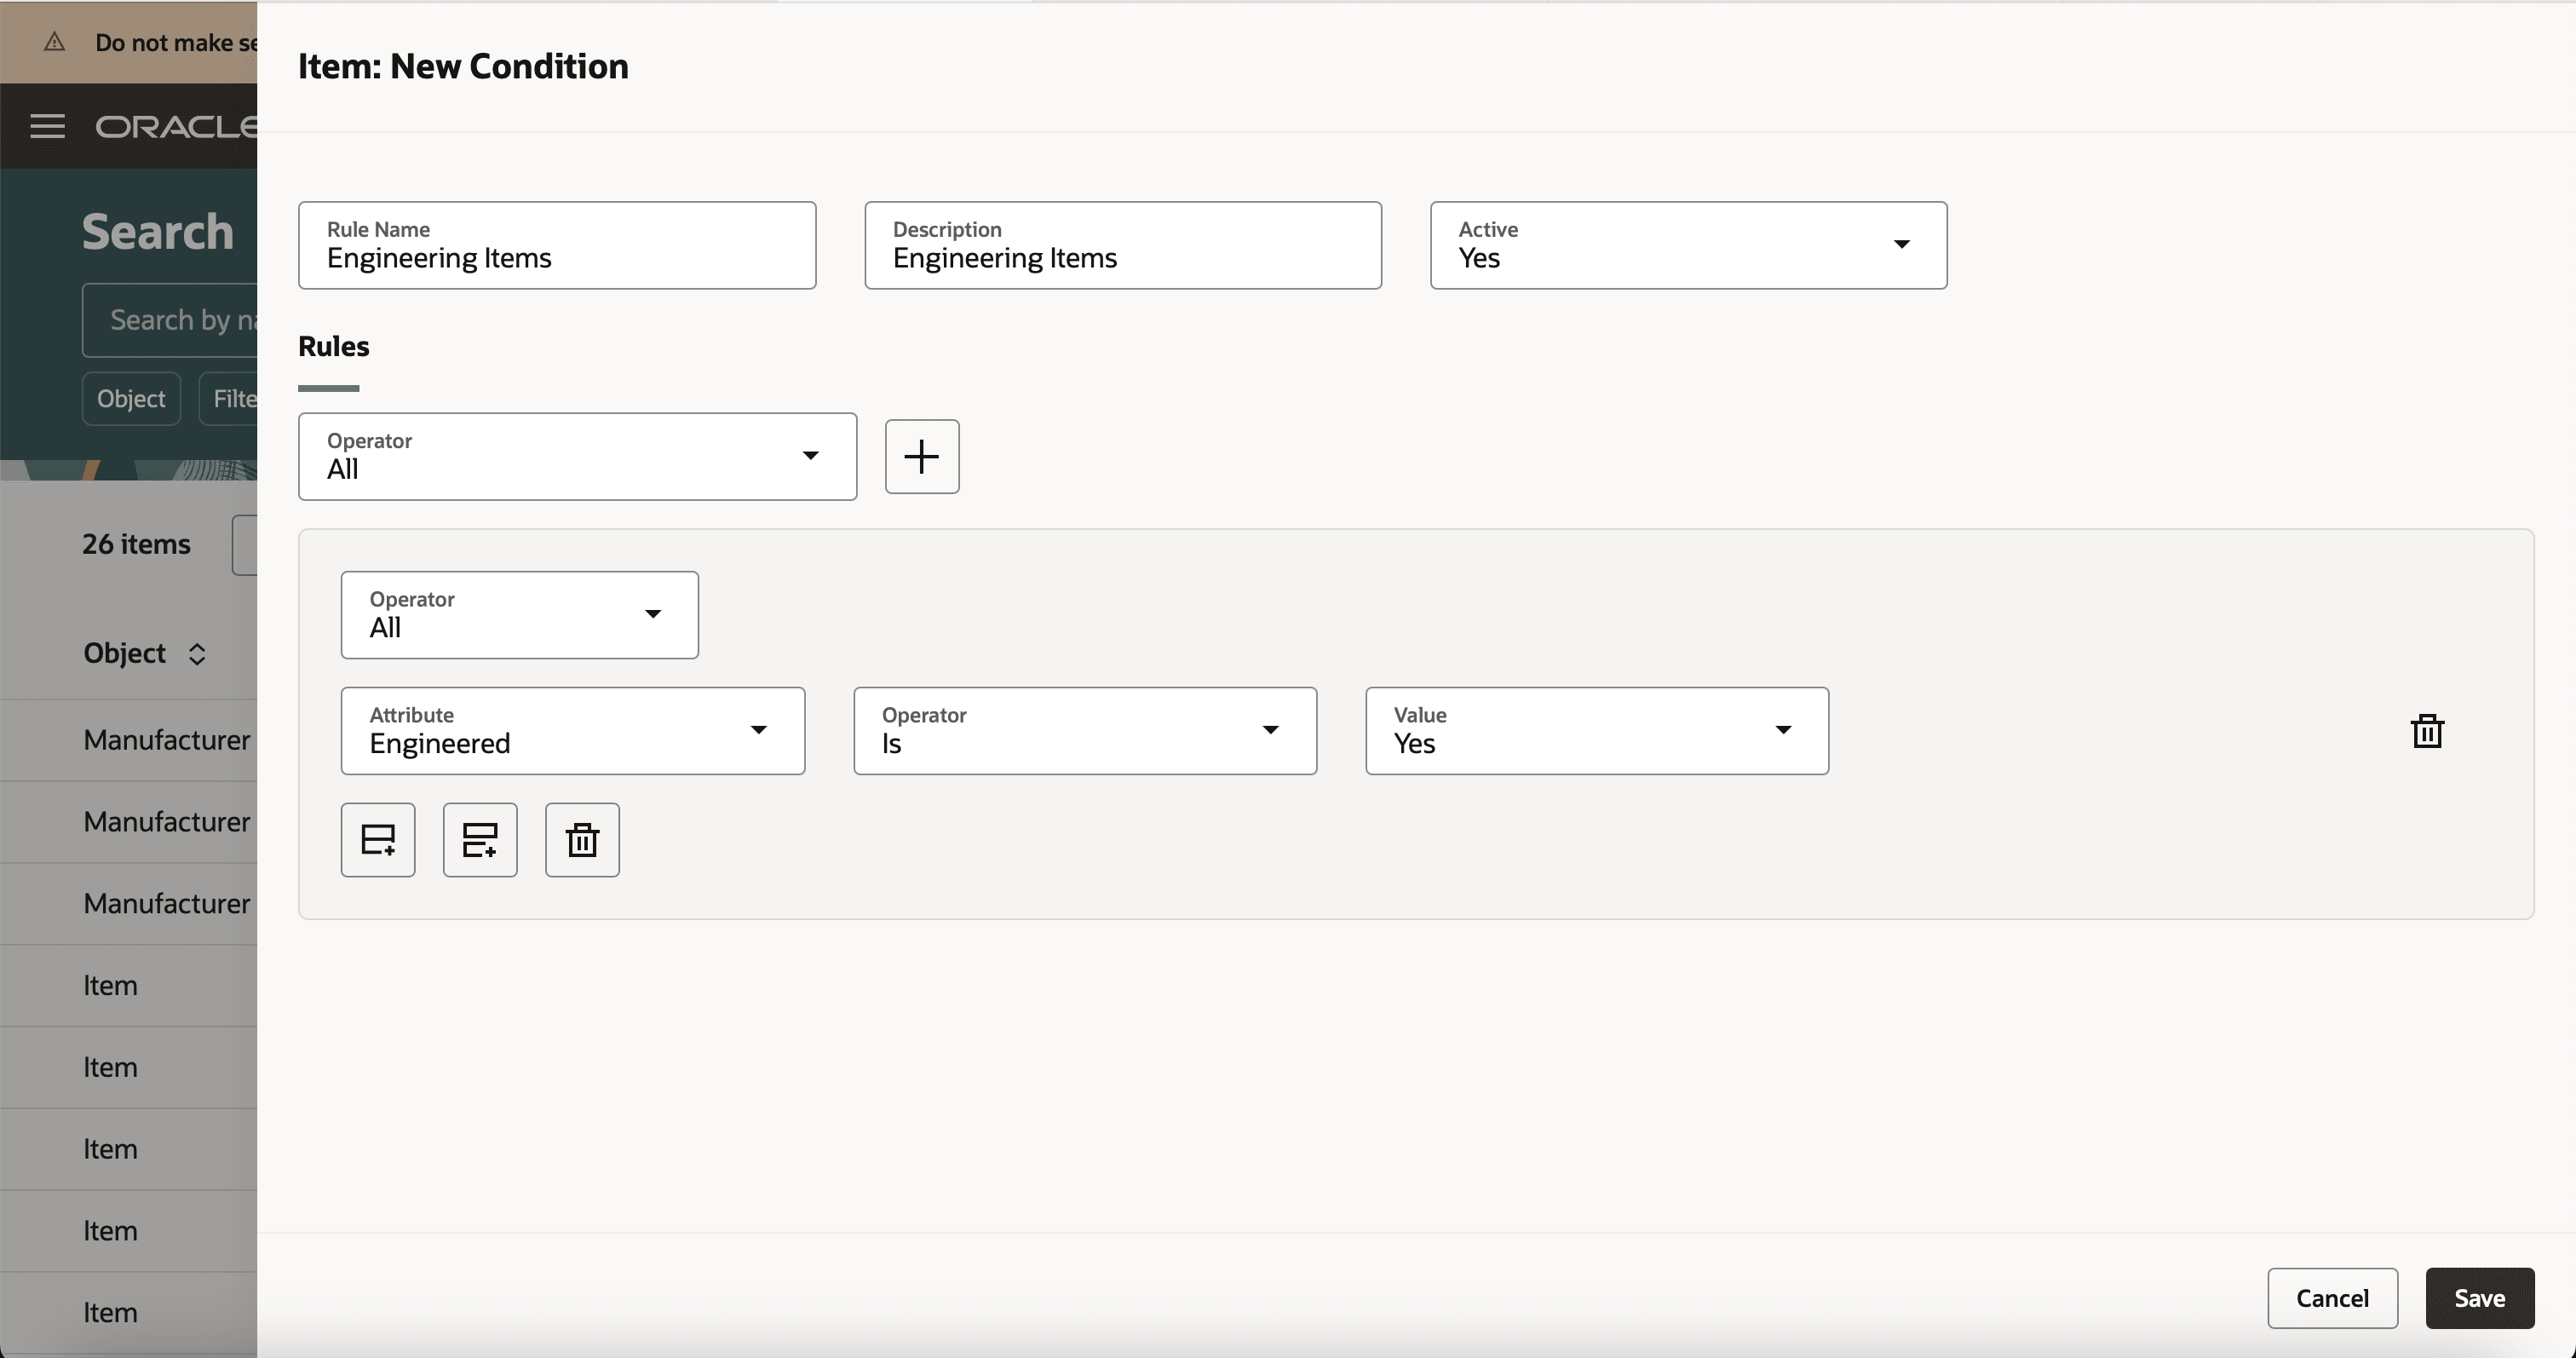
Create a Condition for Engineering Items
NOTE: Rebuild the item and structure index after creating permission sets and activating your teams to ensure data security is applied the first time you enable the profile option Enable Access Control List for Items.
Example of Data Access Groups
Consider that you want to create teams that function as data access groups for users located in the US.
-
Team 1: Engineering users who can create, delete, and manage all items, but only view commercial items. They can manage all attributes except operational attributes.
-
Team 2: Data stewards who have permission to view and delete all items in the draft and production lifecycle phases. They can only see the item number for items in the New Age Chips item class, as they hold only the discover permission for this class.
-
Team 3: Users John and Sam are U.S. based data stewards who can view only those items where the extensible flexfield attribute Location is set to US.
Table showing teams that function as data access groups.
|
Team Name |
Users and Roles |
Permission |
Condition |
Access Groups |
| Team 1 | Engineering Users | Create | Engineered=Yes | Not applicable |
|
Team 1 |
Engineering Users |
Manage |
Engineered= Yes |
All attributes except Operational Attributes |
|
Team 1 |
Engineering Users |
Delete |
Engineered= Yes |
Not applicable |
|
Team 2 |
Data Stewards |
View |
LCP= Design or Production |
All attributes |
|
Team 2 |
Data Stewards |
Delete |
LCP= Design or Production |
Not applicable |
|
Team 2 |
Data Stewards |
Discover |
Item Class= New Age Chips |
Not applicable |
|
Team 3 |
John, Sam |
View |
Location=US |
All attributes |
Generate Item Instance Report
You can now generate the item instance report from the Search Teams page to view which users have access to the item. Here’s how:
- Select Generate Object Instance Report from Actions menu on the Search Teams page.
- In the Generate object instance report drawer:
- Object Type: Select Item.
- Select the items for which you want to generate the and click the + (plus) icon.
- Click Generate.
The job ID appears.
- Navigate to Scheduled Processes Page.
- Search for Generate Oracle Analytics Publisher Report and download the report.
- In the report and download the attachment TeamsItemInstanceReport.
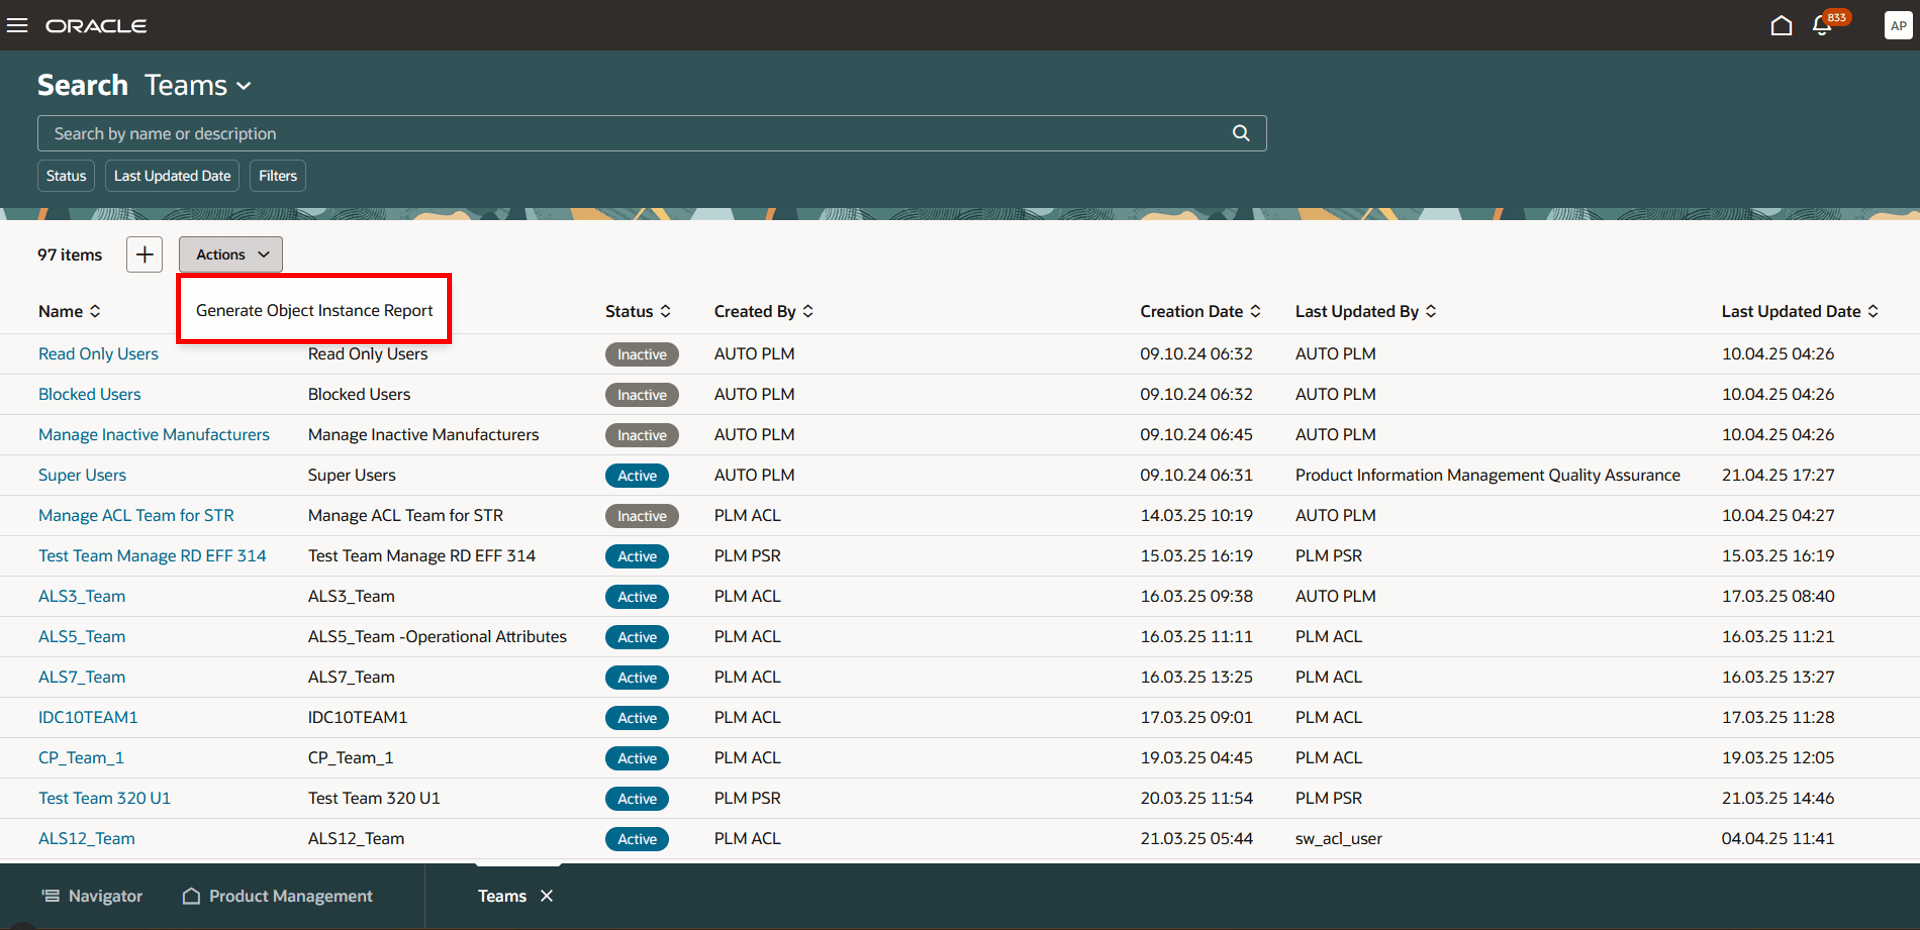
Select Generate Object Instance Report from the Actions Menu
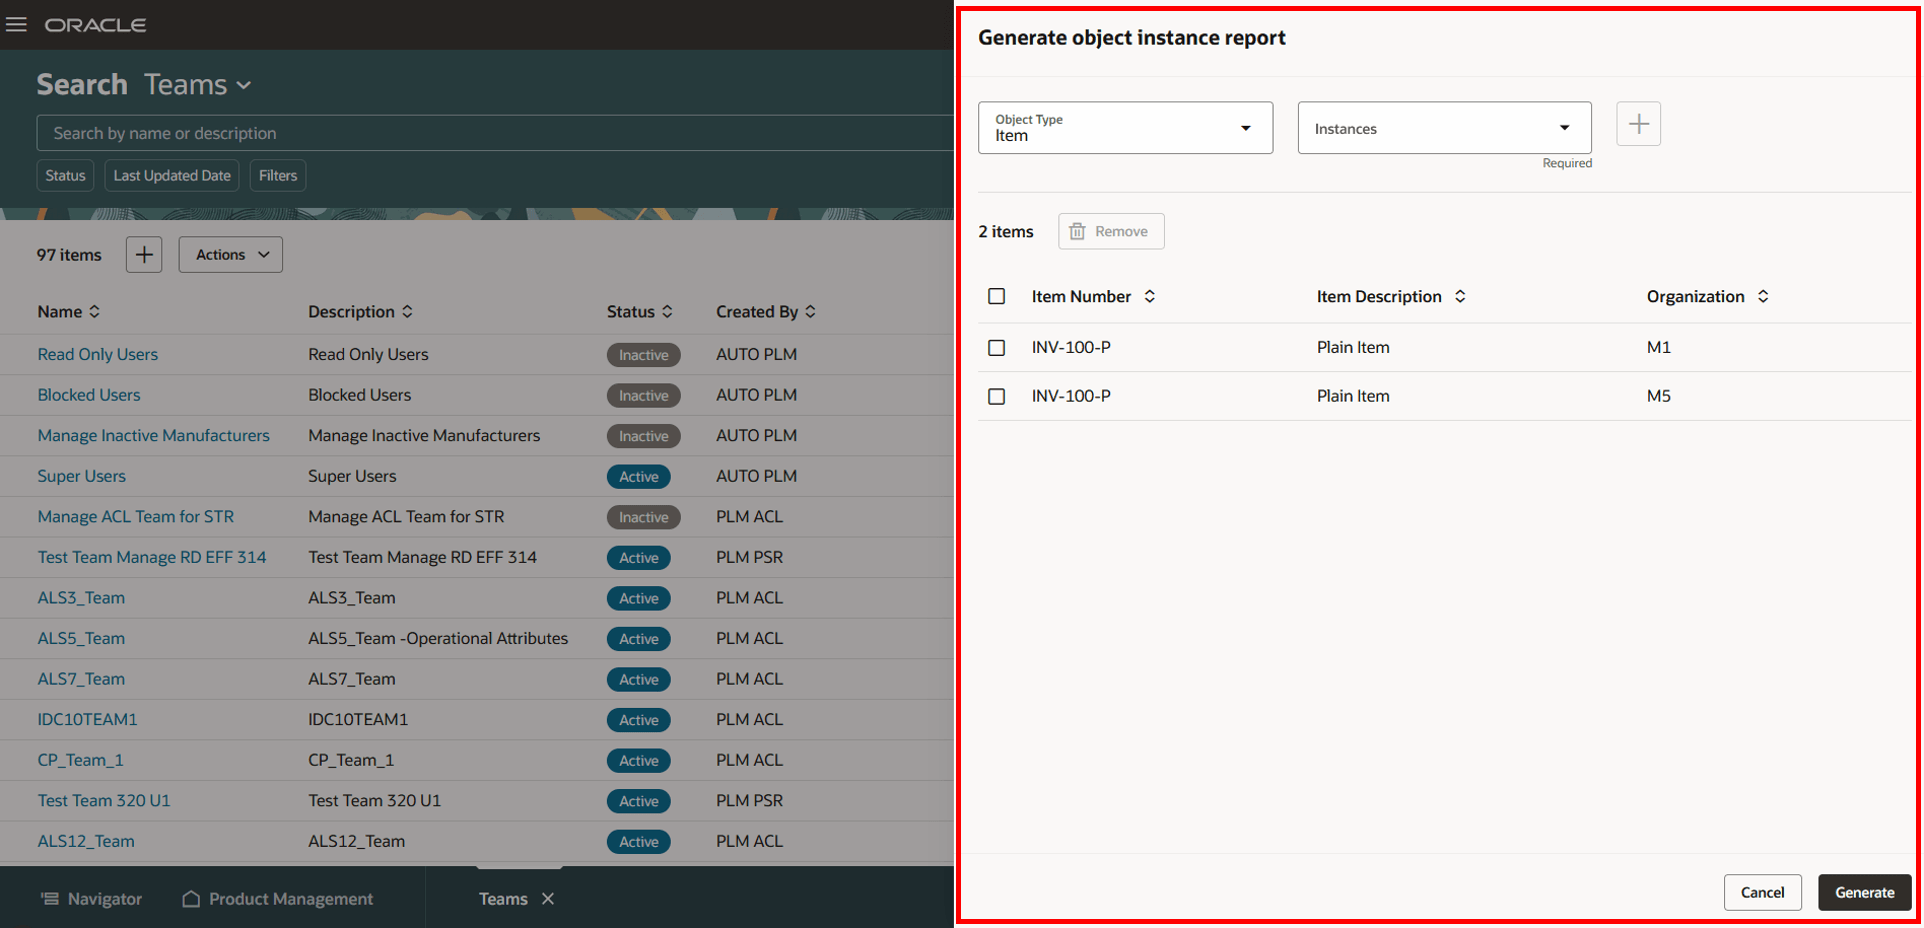
Generate Object Instance Report Drawer
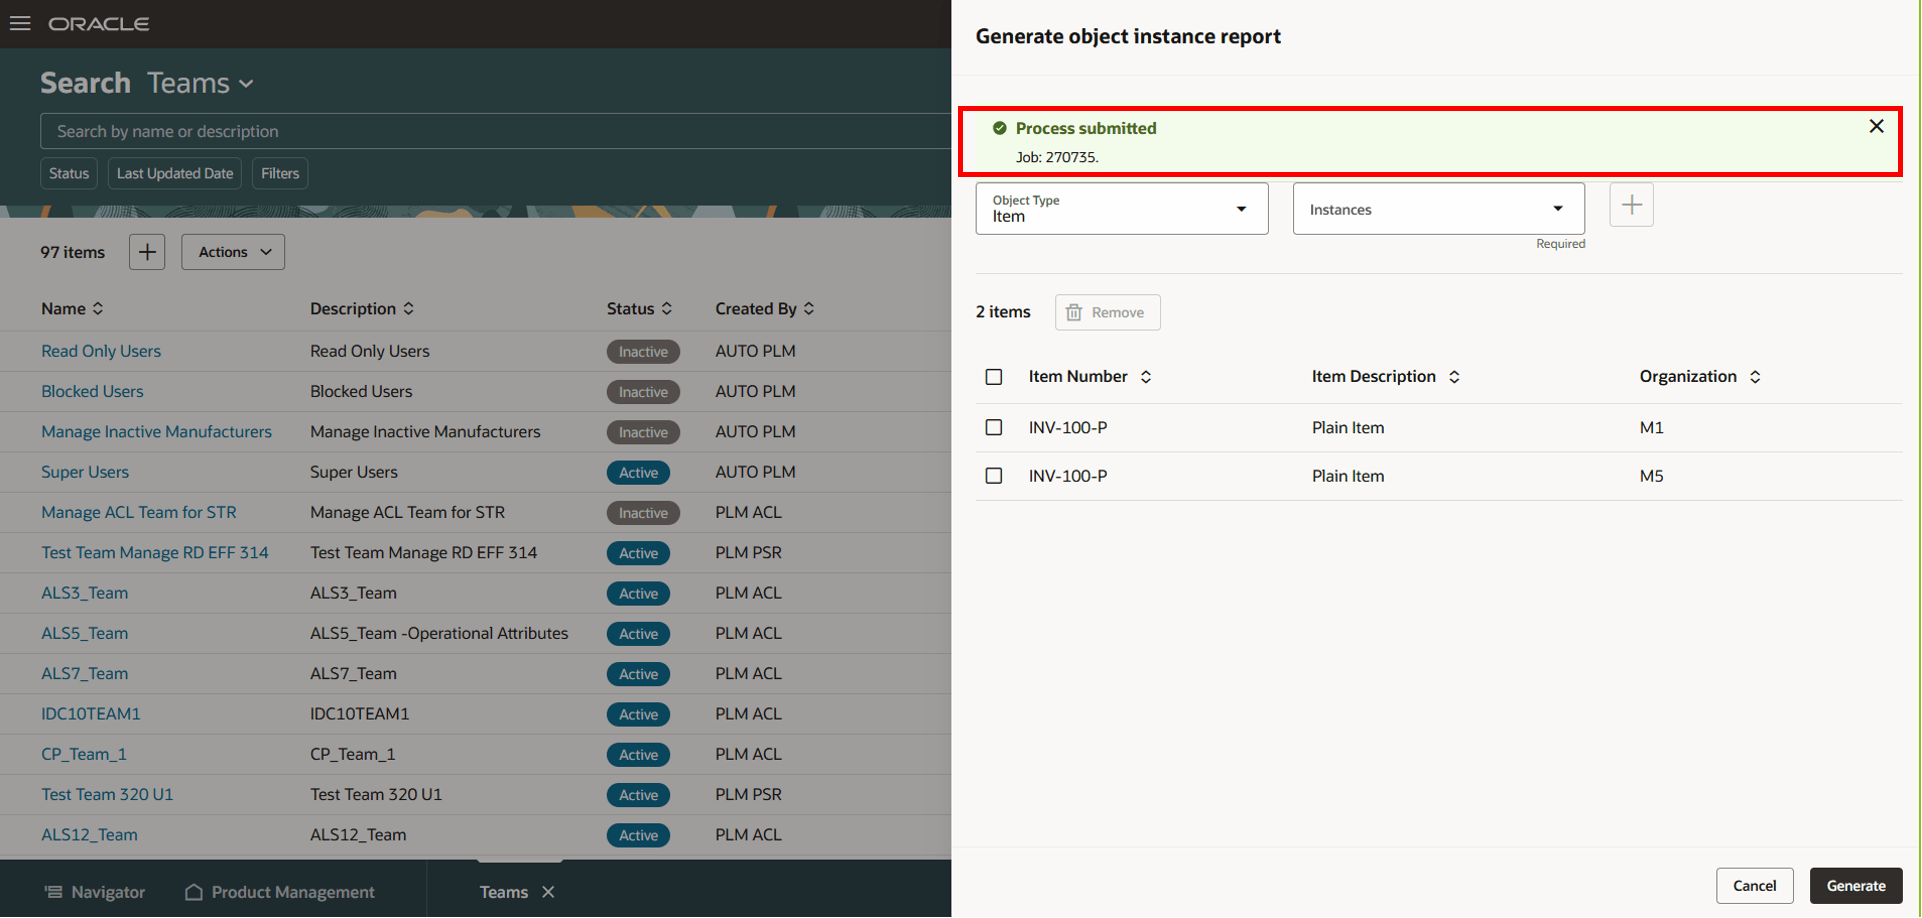
Confirmation Message and Job ID Appearing on Click of Generate
Here are some details shown in the instance report for items:
- Item name.
- List of users having access to the item and the corresponding privileges.
- Permission sets created for the item.
- Fields, tabs, and attributes on the item for which access is granted.
An entry in the columns Membership Rule Name, Role, and Team Name indicates that the user was added to the team through membership rule (or filtered lists), role, or directly to the team.
Sample Report Showing the Access Control List for Items
Analyze the Teams Using Oracle Transactional Business Intelligence (OTBI)
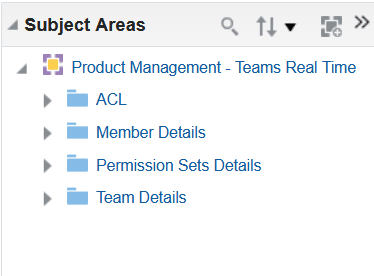
You can use the new subject area Product Management - Teams Real Time in OTBI to analyze team configurations, including team members, assigned permission sets, associated conditions and so on.
Product Management - Teams Real Time Subject Area
Here’s some information on the folders in the new subject area.
- ACL - includes metrics that provide the count of teams, permission sets and conditions.
- Member Details - includes information such as name, email address, department, rules from HCM (created as filtered list), and so on.
- Permission Set Details - displays details such as permission name, condition name and their associated object.
- Team Details - provides team name, description, and the team status.
Here, users can use the columns available in the folders to analyze and verify the conditions, permission sets, and members associated with a specific team.
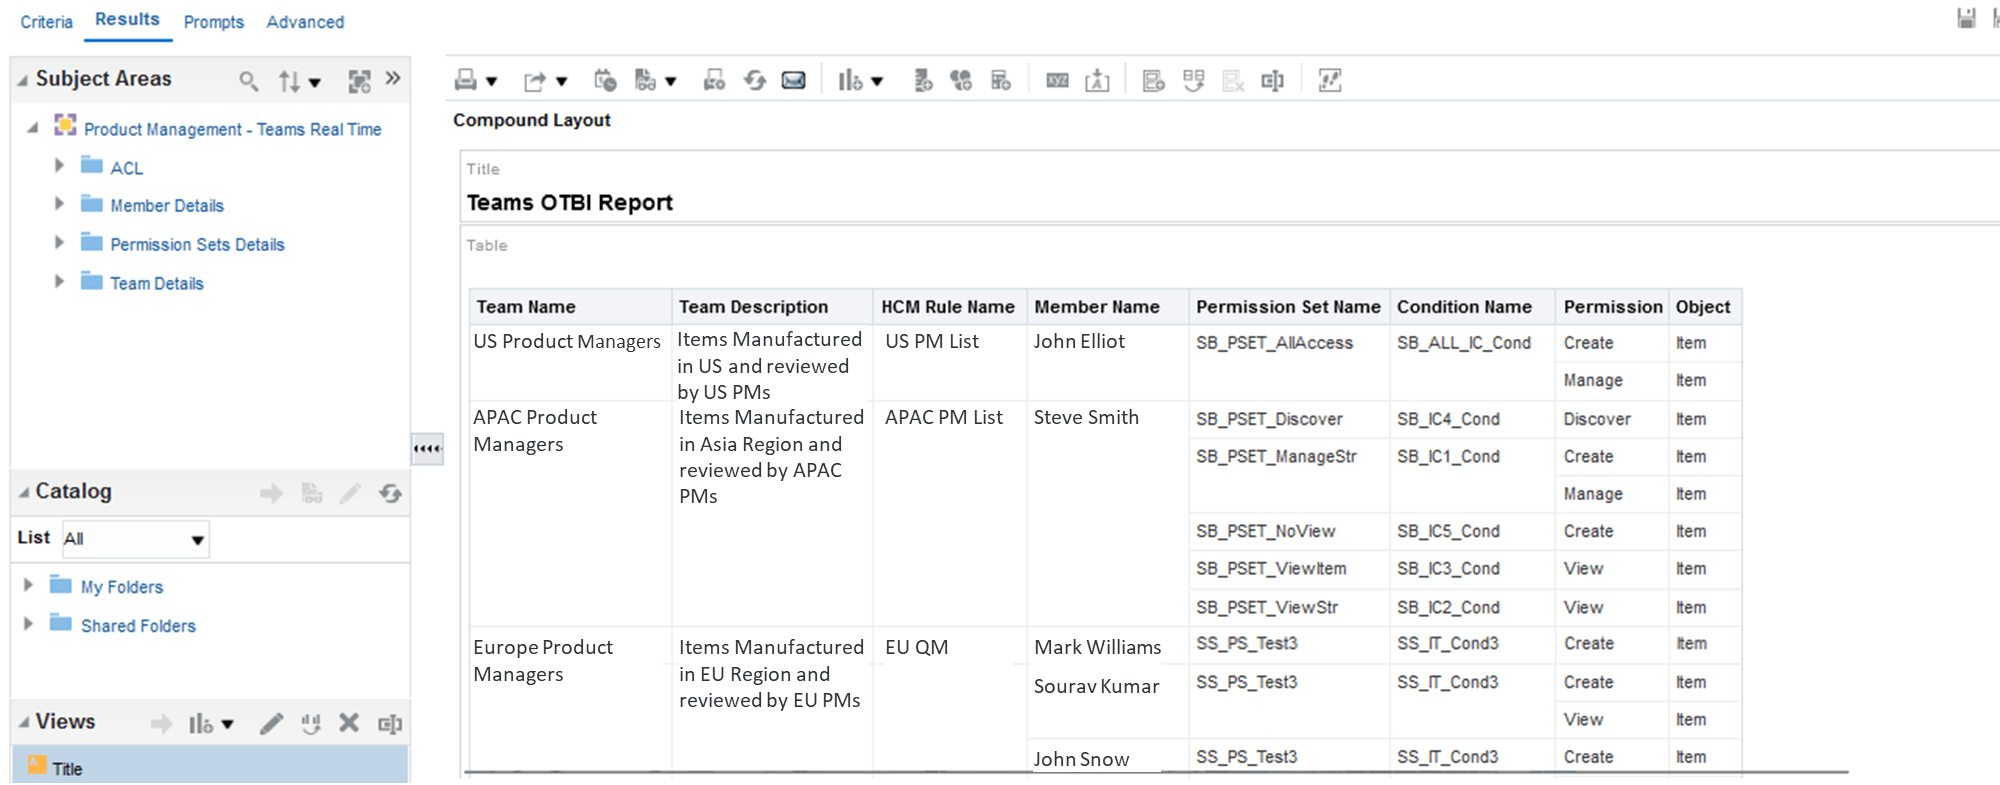
Here’s an example of a report to show one of the ways you can use the new subject area to analyze and verify the team configuration.
Example -
In a globally operating company, the admin is responsible for ensuring that Product Managers in each region having access to the specific items manufactured in their respective locations. To verify what has been configured in the system, the admin can create an OTBI report, as shown below, which includes Team Details, Member Details, Permission Sets, and Object Details—providing a comprehensive view of the Access Control List setup for assigning item access to the relevant Product Managers.

Report in OTBI Showing the Details of Team Configuration
Scheduled Process
-
Refresh the Access Control List for the Teams: This process runs automatically whenever you save a permission set used in a team or add a permission set to a team. If you disable and then enable the profile option (Enable Access Control List for Items), you'll need to run this process manually.
-
Update the Members List Based on Membership Criteria: Run this first time you associate filtered lists to the team. You can specify the frequency at which the member list should be refreshed, based on how often member data is likely to change. You can run this when members are moving divisions, joining the organization or leaving the organization and you want to refresh the data before the scheduled refresh you can run this job. In order for this job to work you need to enable Atom Feeds.
Here’s how this feature benefits your business:
-
Allows administrators to define granular access control such as create, view, manage or delete and provides control to define who has access to item data.
-
Provides flexible user management to manage permissions in multiple distinct manners such as assigning users, roles, conditions, and so on.
-
Enables easy identification and readability of privileges that are assigned to each user.
-
Reduces time and effort when managing the security of your item data because your list of workers can be built dynamically based on specified conditions.
-
Enables or restricts access at the item tab level or within specific types of attributes and attribute groups.
-
Leverages pre-existing roles and enables faster security implementation by adding them to teams.
Here's the demo of these capabilities:
Steps to enable and configure
To use criteria-based access control for items, you must enable the profile option Enable Access Control List for Items. By default, the profile option is set to No.
On enabling the profile option, the items continue to honor the existing security settings till you create a permission and permission set.
NOTE: Once the profile option is enabled and a permission is created for an item, all items in the application will become private, regardless of their current public or private settings. You must manually assign user permissions to these items.
Tips and considerations
-
The criteria-based access control for items will apply for items on Redwood pages, not on classic pages. Once this feature is enabled, it is recommended to use Redwood pages, as certain features might not function properly on classic pages.
-
If you disable and enable the profile option, then you need to rebuild your Item Index and structure Index again for Access Control List to apply.
-
When you save your team or permission set, internally the scheduled process "Refresh the access control list for the teams" is run automatically along with rebuilding the Item Index.
-
Access control through teams must be provided along with the necessary functional privileges assigned from Security Console.
-
To use filtered lists, ensure that the members you create from Security Console are linked to a person record through Setup and Maintenance-> Product Management-> Users and Roles-> Manage Users.
-
If you have added new extensible flexfields, you must deploy the flexfields for the security to be applied.
-
The create permission on items only allows you to configure conditions on item class and item organization.
-
In OTBI reports, you can only view items for which you have either View or Manage permissions.
-
If the access controls aren’t applied on the objects, run the Refresh the Access Control List for the Teams scheduled process (manually) to secure your data.
-
Affect on Global Actions and tabs on items:
The access control list affects the following Global Actions for items on Redwood pages:-
Save, Save and Close, Change Item Class, and Apply Templates: available only for users with the Manage permission on items.
-
Delete: available only for users with the Delete permission on items.
-
The Manage permission, in combination with the selection in the Access To column, controls the add, edit, and delete actions within the respective item tabs. Note that the Quality and Changes tabs are read-only.
-
Use a column with unique values to optimize performance when working with multi-row attributes.
-
Use multi-row attributes within the same attribute group in the condition builder for efficient evaluation. Avoid combining multi-row attributes from different attribute groups.
-
Ensure that the multi-row table contains no more than 20 rows per item instance, as this directly affects performance.
-
Ensure that no more than five conditions are used to filter a specific item for a single permission (such as View). For example, consider that you’ve created 5 conditions based on the following extensible flexfield attributes:
-
Product Line = AI
-
Product Team = AI Item
-
Program = Next Gen Phase1
-
Organization = Texas Manufacturing Unit
-
Functional Area = Design
-
All the conditions are associated with the View permission. As a result, the user is granted View access to the item named AI Chip. In this case, it is recommended not to create any additional conditions to filter the same item for the same permission.
Key resources
Access requirements
Users who are assigned a configured job role that contains these privileges can access this feature:
To configure conditions for items using a filtered list:
-
Use REST Service - Identity Integration (ASE_REST_SERVICE_ACCESS_IDENTITY_INTEGRATION_PRIV)
-
Use Atom Feed - Employees Workspace (PER_ATOM_WORKSPACE_ACCESS_EMPLOYEES_PRIV)
-
Manage HCM Lists (HRC_MANAGE_HCM_LISTS_PRIV)
-
Human Capital Management Application Administrator (ORA_HRC_HUMAN_CAPITAL_MANAGEMENT_APPLICATION_ADMINISTRATOR_JOB)
To configure teams, permission sets, and conditions:
-
Manage Landing Page Layout (EGP_MANAGE_LANDING_PAGE_LAYOUT_PRIV)
-
Access Clipboard (ACA_ACCESS_CLIPBOARD_PRIV)
-
Access HCM Common Components (HRC_ACCESS_HCM_COMMON_COMPONENT)
-
Manage Search Consumer Applications Rest (EGP_MANAGE_SEARCH_CONS_REST_PRIV)
-
Monitor Product Development (ACA_MONITOR_PRODUCT_DEVELOPMENT_PRIV)
-
Configure Access Control Teams, Permission Sets, and Conditions (EGP_ACCESS_CONTROL_TEAMS_PRIV)
-
Use REST Service - Identity Integration (ASE_REST_SERVICE_ACCESS_IDENTITY_INTEGRATION_PRIV)
-
Use Atom Feed - Employees Workspace (PER_ATOM_WORKSPACE_ACCESS_EMPLOYEES_PRIV)
-
Manage HCM Lists (HRC_MANAGE_HCM_LISTS_PRIV)
-
Manage HCM Rules (HRC_MANAGE_HCM_RULES_PRIV)
-
Run Scheduled Processes (HEY_RUN_SCHEDULED_PROCESSES_PRIV)
-
Manage Scheduled Processes (FND_MANAGE_SCHEDULED_PROCESSES_PRIV)
-
Access Product Management Landing Page (EGP_ACCESS_LANDING_PAGE_PRIV)
-
Manage Scheduled Job Definition (FND_MANAGE_SCHEDULED_JOB_DEFINITION_PRIV)
-
Access Users (EGP_ACCESS_USERS_PRIV)
-
Manage Item Redwood Items (EGP_MANAGE_REDWOOD_ITEM_PRIV)
-
View product management search (EGP_VIEW_PRODUCT_MGT_SEARCH_PRIV)
-
Get Item Attribute Control REST(EGP_ITEM_ATTRIBUTE_CONTROL_READ_PRIV)
-
Get Item Lifecycle Phases Read Rest (EGP_ITEM_LIFECYCLE_PHASES_READ_REST_PRIV)
-
Get Item Status REST(EGP_ITEM_STATUSES_READ_PRIV)
-
Get Template REST(EGP_TEMPLATE_READ_PRIV)
-
View Global Inventory Organizations List of Values by Web Service (RCS_GLOBAL_VIEW_INV_ORG_LOV_WEB_SERVICE_PRIV)
-
View Units Of Measure List of Values by Web Service (RCS_VIEW_UNITS_OF_MEASURE_LOV_WEB_SERVICE_PRIV)
-
Get Item Class Rest (EGP_GET_ITEM_CLASS_REST_PRIV)
-
View Item (EGP_VIEW_ITEM_PRIV)
-
View Feature States Value by Web Service (RCS_VIEW_FEATURE_STATES_WEB_SERVICE_PRIV)
-
Use REST Service - Users and Roles Lists of Values (PER_REST_SERVICE_ACCESS_USERS_AND_ROLES_LOVS_PRIV)
To access the secured items, users must be assigned the relevant item privilege along with the following:
-
View Feature States Value by Web Service (RCS_VIEW_FEATURE_STATES_WEB_SERVICE_PRIV)
To access journeys setup and configure the roles in role hierarchy:
-
Manage Journey (ORA_PER_MANAGE_JOURNEY_TEMPLATE)
-
Manage Guided Journeys (ORA_PER_MANAGE_GUIDED_JOURNEYS)
-
Use REST Service - Guided Journeys Read Only (ORA_PER_REST_SERVICE_ACCESS_GUIDED_JOURNEYS_RO)
-
Use REST Service - Journey Categories List of Values (ORA_PER_REST_SERVICE_ACCESS_JOURNEY_CATEGORIES_LOV)
To access business rules:
-
Administer Sandbox (FND_ADMINISTER_SANDBOX_PRIV)
Additionally, add the following to access an object report:
-
Product Catalog Transaction Analysis Duty (FBI_PRODUCT_CATALOG_TRANSACTION_ANALYSIS_DUTY)
-
Product Transaction Analysis Duty (FBI_PRODUCT_TRANSACTION_ANALYSIS_DUTY)
-
BI Consumer Role (BIConsumer)