Redwood: Analyze Build Plan with Additional Capabilities
Supply chains can be complex with multiple layers of distribution, manufacturing, and suppliers in the mix. The build plan facilitates end-to-end analysis of supply and demand across the supply plan. The previous update included the first Redwood version of the build plan. This update includes additional build plan capabilities, such as the ability to edit measure values and display planning attributes.
If you haven’t already, please review the Redwood: Manage a Build Plan Using a New User Experience feature in the Oracle Fusion Cloud Supply Planning 25B What’s New for an overall explanation of how the Redwood version of build plan behaves because there are key differences in behavior from the classic (non-Redwood) version. In this update we’ll specifically focus on the individual capabilities that continue to enhance the Redwood build plan user experience.
Edit Measures
With this release you can update measure values of editable measures in build plan. The editable seeded measures are:
- Adjusted Safety Stock
- Gross Forecast
- Manual Demand
- Net Forecast
- Planned Orders
- Resource Availability
- Supplier Capacity Available
- Target Service Level
You can change the measure value within the cell, as shown in the following two images, or use mass edit to update measure values on one or more cells. Editable cells can be easily identified because they have a white background. To edit inline, simply click on the cell and change the measure value.
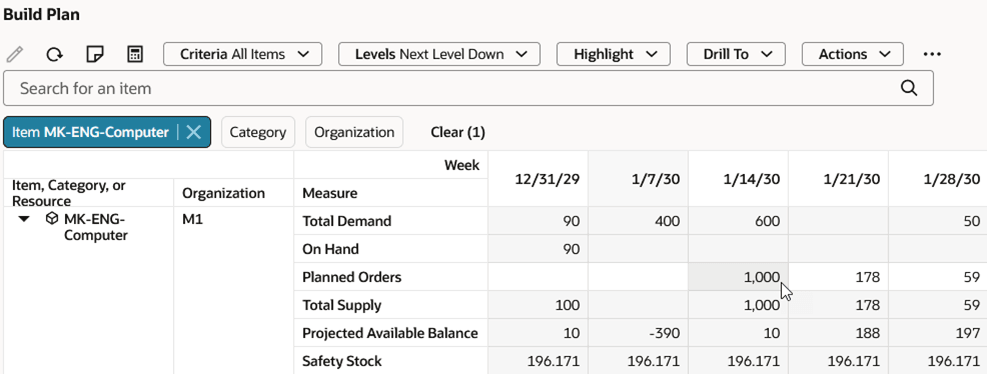
In-Cell Editing Before Change
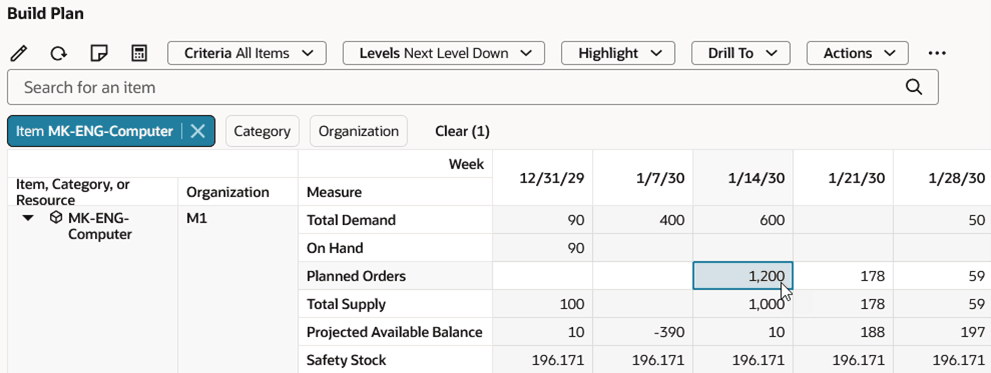
In-Cell Editing After Change
Alternatively, you can mass edit multiple values by selecting multiple cells and then clicking the Edit icon in the toolbar. The Edit drawer opens.

Mass Edit Drawer
You can adjust the values of the selected cells in one of several ways
- Using the Set value to action, you specify the value that each of the selected cells will be changed to.
- Using the Increase by or Decrease by action, you specify the number of units to add to or subtract from the current value of each selected cell.
- When using Decrease by in measures that don’t allow negative values, the measure value is set to zero instead of a negative value.
- Using the Increase by percentage or Decrease by percentage action, you specify the percentage by which to increase or decrease the value of each selected cell.
- When using Decrease by percentage, the maximum value you can enter is 100.
In the following example, we’ll increase the value of the selected cells by 50 units.
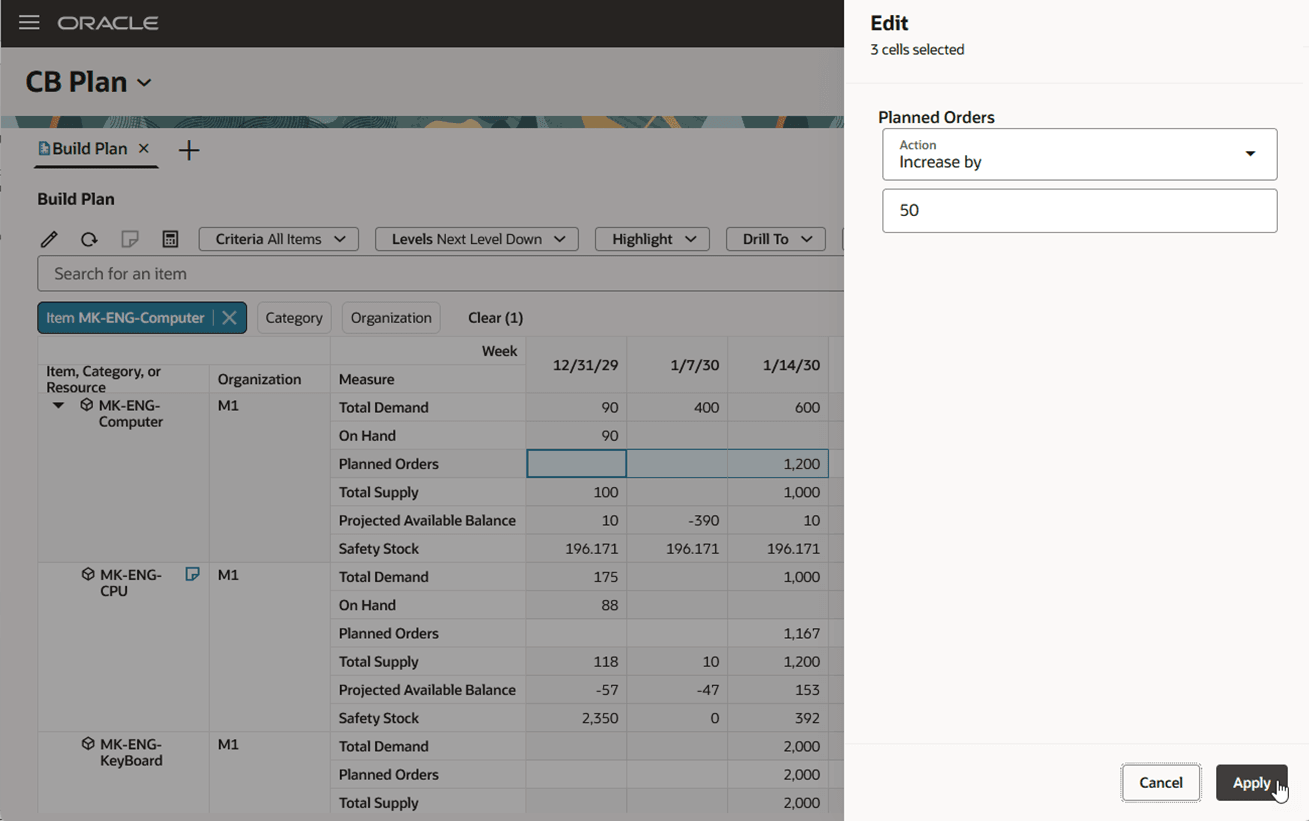
Mass Edit Drawer - Increase by 50 Units
Once you click the Apply button in the Edit drawer, each selected cell displays a value that’s increased by 50 units.
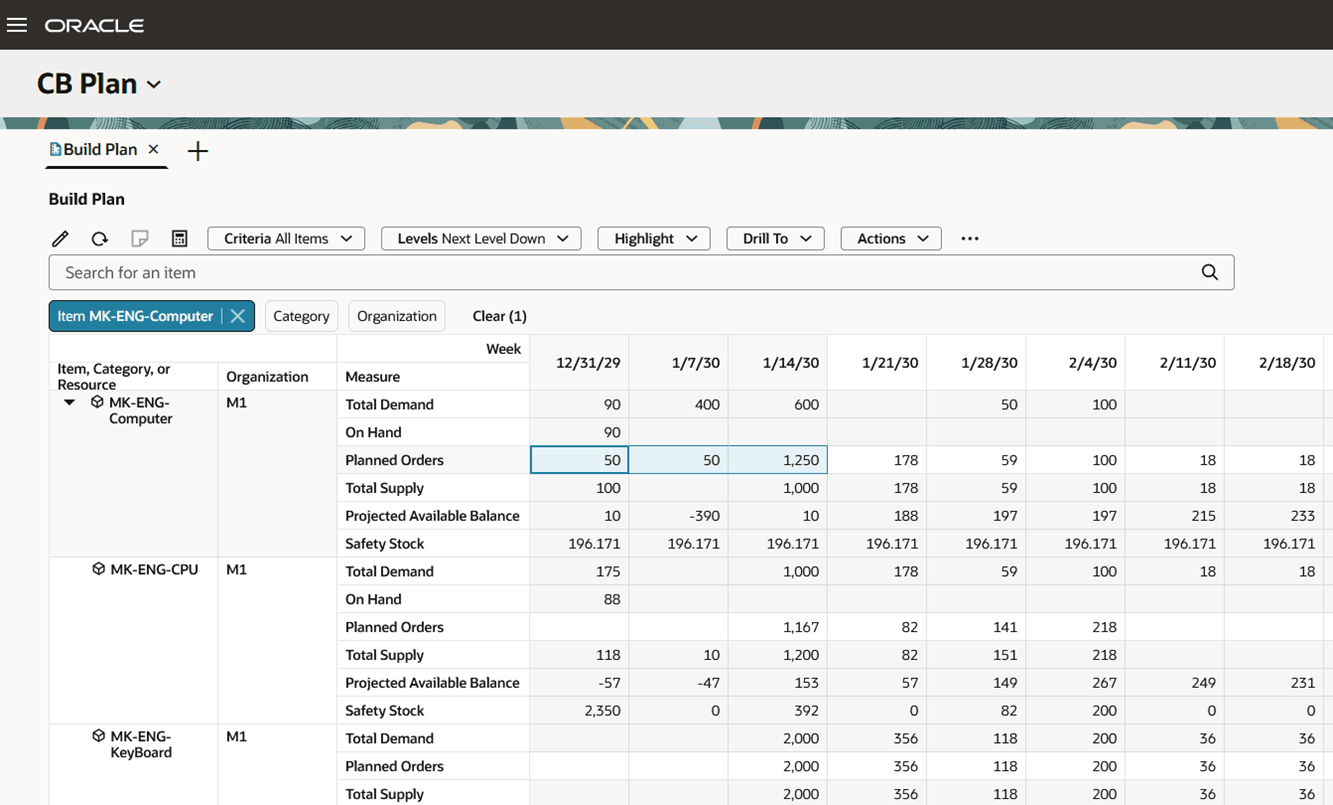
Result of Mass Edit
However, until the Save button, located in the upper-right corner of the page, is clicked, the changes are pending. To undo pending changes, click the Refresh icon in the toolbar, which opens the Refresh data dialog box.
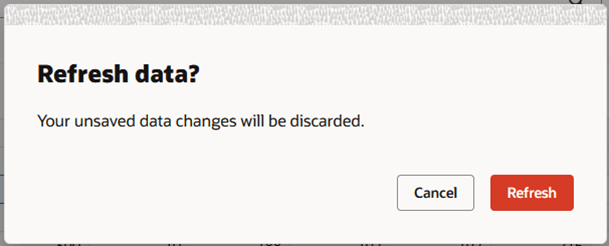
Refresh Data Dialog Box
Click the Refresh button in this dialog box to undo any pending changes or click the Cancel button to cancel the refresh action and retain your pending changes.
Data Recalculation Actions
We’ve added two data recalculation options to build plan. Prior to 25C, these actions were available only in pivot grids, such as material plan. These actions now have the same behavior regardless of whether they’re used in build plan or in material plan.
When clicked, the Calculate Now icon recalculates dependent, expression-based measures that are included in the build plan. It has no impact on measures that don’t use expressions. If you make additional edits to build plan measures, the dependent, expression-based measures included in the build plan, aren’t recalculated until you click the Calculate Now icon or turn on Automatic Calculations.

Calculate Now Icon
The Automatic Calculations toggle action turns on automatic recalculations of dependent, expression-based measures. Anytime you exit a cell after making an edit, the system recalculates the dependent, expression-based measures included in the build plan. When automatic calculations are turned on there’s no need to click the Calculate Now action because the recalculation is happening with every edit.

Automatic Calculations Toggle Action
As mentioned earlier, both calculation options apply only to dependent, expression-based measures. Here’s an explanation of what we mean by dependent, expression-based measures. The following image shows the measure definition of the Resource Utilization Percentage measure. Notice that:
- The measure’s value is based on an expression. If the expression was empty, then the measure isn’t an expression-based measure.
- The calculation of Resource Utilization Percentage is dependent on two measures: the Resource Requirements measure and Resource Availability measure. Any change in value to either measure will impact the calculation of Resource Utilization Percentage
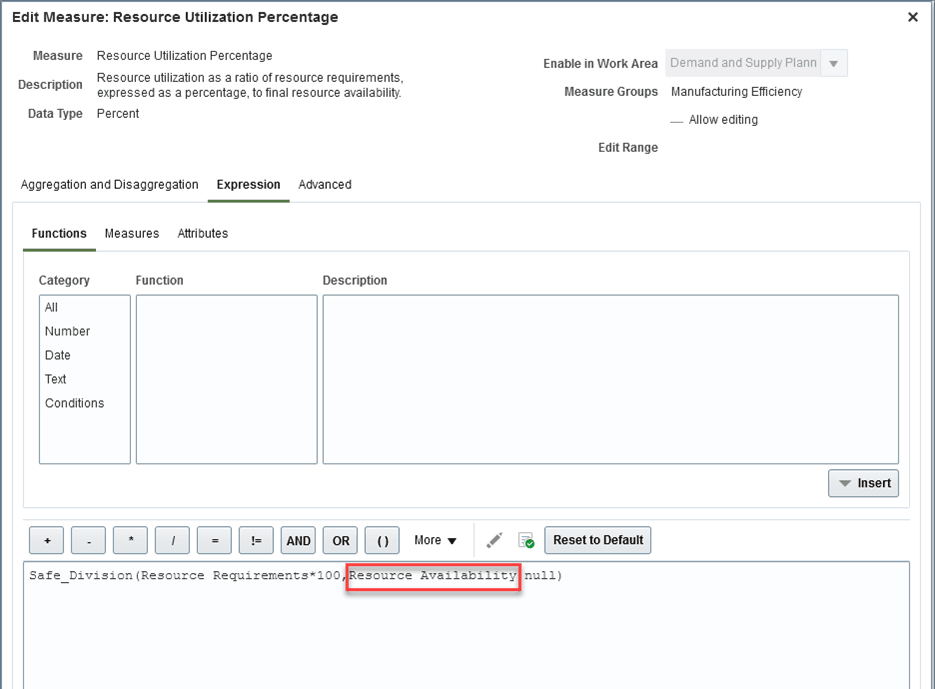
Resource Utilization Percentage Measure Definition
To illustrate how the recalculation options work, we’ll edit the resource’s availability in build plan. Resource Requirements isn’t an editable measure, so we can’t edit that measure in build plan. In the following illustration we’re displaying all resources used in building MK-ENG-Computer. Notice that the Resource Utilization Percentage of the MK-COMP-R3 resource for the week of January 14th is over 100%.
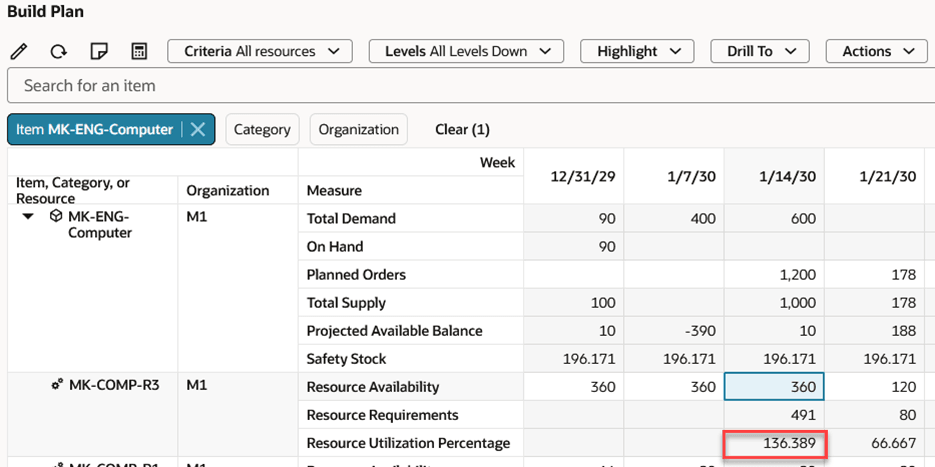
Resource Utilization Before Editing
Let’s see what happens to the Resource Utilization of MK-COMP-R3 when we edit its availability for the week of January 14th. Let’s change the available hours from 360 hours to 500 hours.
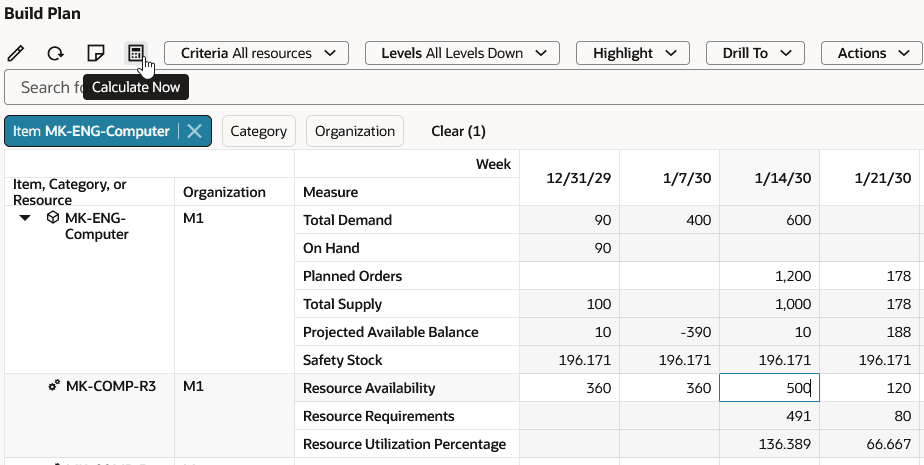
Resource Utilization After Edits, but Before Clicking the Recalculate Now Button
Notice in the preceding image that after changing Resource Availability to 500 hours, the Resource Utilization Percentage measure value remains unchanged. Let’s see what happens after selecting the Calculate Now action. The following image shows how the Resource Utilization Percentage has been updated to reflect the increase in resource availability.

Resource Utilization After Edits and After Clicking the Recalculate Now Button
If you’ve turned on Automatic Calculations, then Resource Utilization Percentage is automatically recalculated when you edit the field or perform some other action that moves the focus off the edited cell. Turning on Automatic Calculations may slow down build plan’s responsiveness when editing several cells at a time, whereas the Calculate Now action allows you to specify when to update the values of the dependent, expression-based measures.
Additional Resource Attributes
When configuring build plan criteria, there are two additional resource attributes you can use to focus on critical resources or resources with capacity constraints.
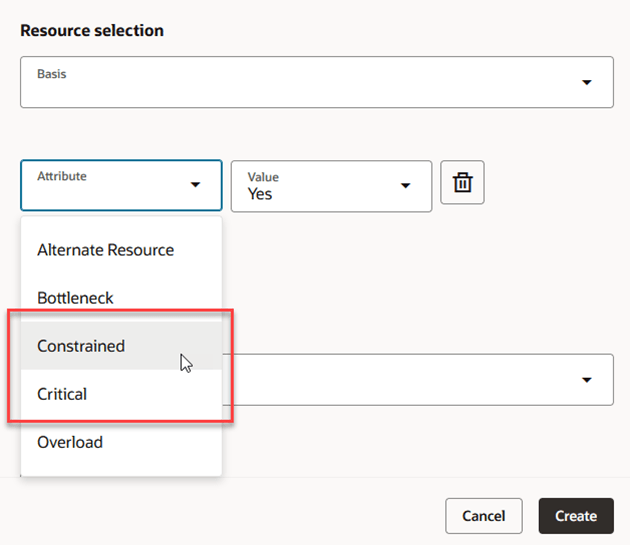
Build Plan Criteria - Resource Attribute Selection
Select Constrained = Yes to include resources in the build plan that have at least one resource capacity constraint exception. You can see different resources in the build plan based on the results of the last plan run.
Select Critical = Yes to include bottleneck resources that have been identified as critical. The resource’s critical attribute is collected or can be specified in a simulation set.
View and Add Notes
You now have access to view, create, and edit notes within build plan. Notes behavior in build plan is identical to how notes behave in other pivot grids such as material plan. Please review the Redwood: Manage Planning Notes Using a New User Experience feature in the Oracle Fusion Cloud Supply Planning 25B What’s New for how notes work.
Here’s a quick overview to viewing and editing notes.
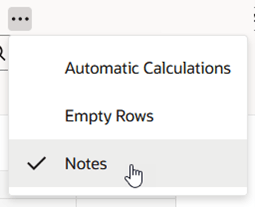
When you initially open build plan, the notes icon in the toolbar is disabled. To view or edit notes, you need to turn on the Notes toggle action from the More Actions (…) menu.
Show Notes Using Notes Toggle Action
Once the Notes toggle action is set to show notes, you’ll see icons for members or cells that have existing notes. In addition, the notes icon in the toolbar will be enabled, so you can add notes.
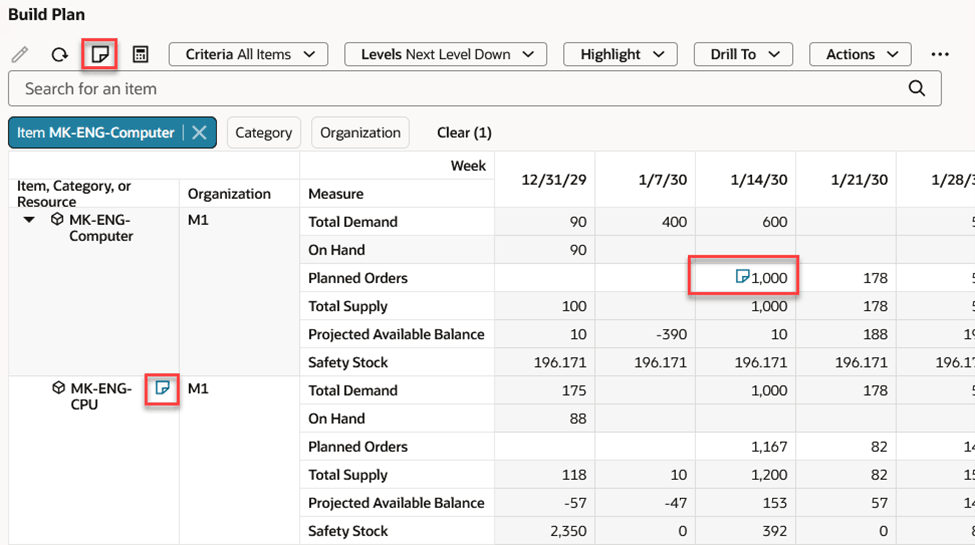
Build Plan with Notes Icon Shown
To view or add a note, perform one of these actions:
- Click on the notes icon within a cell to see existing notes.
- Select a cell and click on the notes icon in the toolbar to see existing notes or add a note.
- Right-click on a cell to bring up the context menu and select the Notes action.
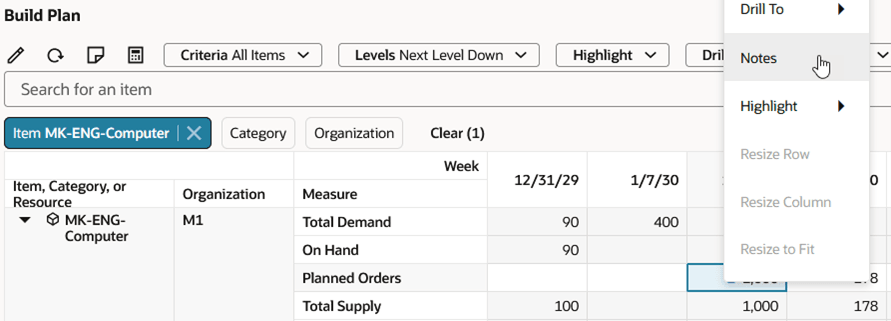
Build Plan Context Menu Showing Notes Action
The Notes drawer opens and displays any existing notes, with the most recent note on top.
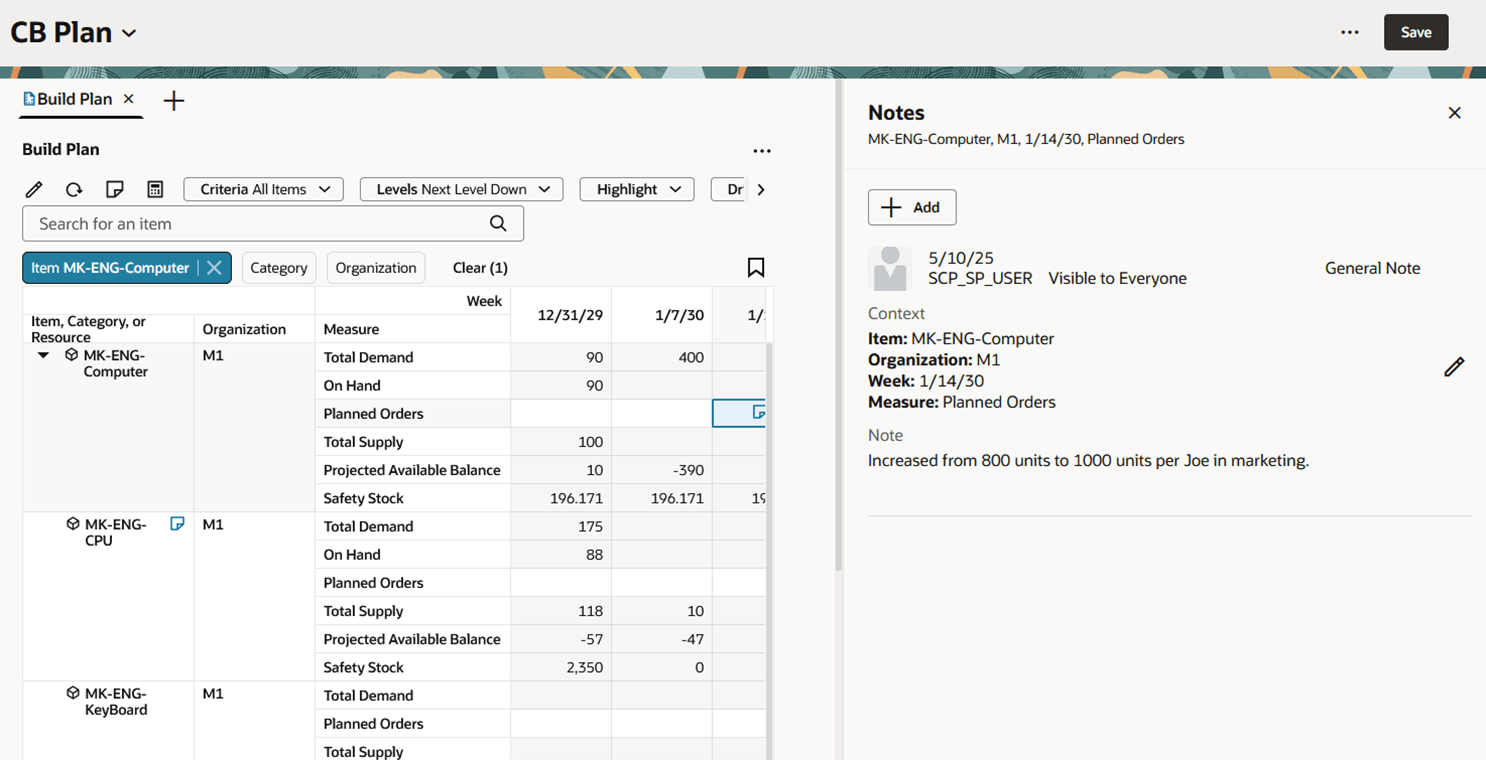
Notes Drawer
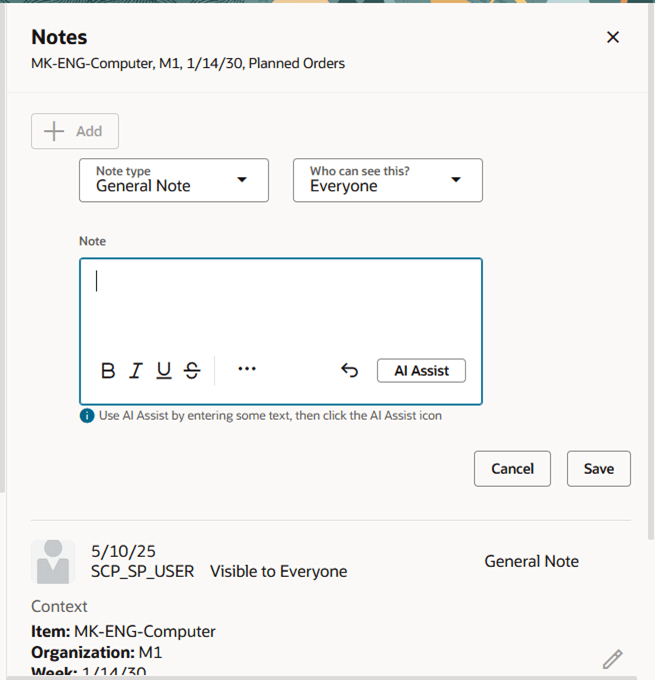
To add a new note, click the Add button and then enter your text in the Note field. You can even use the AI Assist button to polish up the wording of your note.
Adding a New Note
Contextual Menu Changes
We’ve updated the right-click context menus to make it quicker to access selection-based actions. For example, you can select three cells and right-click the mouse button to bring up the context menu and chose the Edit action. This way you don’t have to drag your mouse up to the toolbar to select the Edit icon. As its name implies, which menu actions are available is dependent on which cells are selected.
Row Header Context Actions
The following image illustrates the actions that are available from the context menu when right-clicking on a row header. The options are Drill To, Notes, Resize Row, Resize Column, and Resize to Fit.
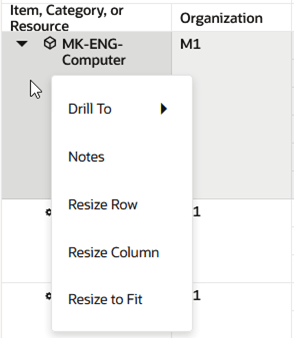
Row Header Context Menu
Column Header Context Actions
The following image illustrates the actions that are available from the context menu when right-clicking on a column header. The options are Drill To, Notes, Resize Column, and Resize to Fit.
Column Header Context Menu
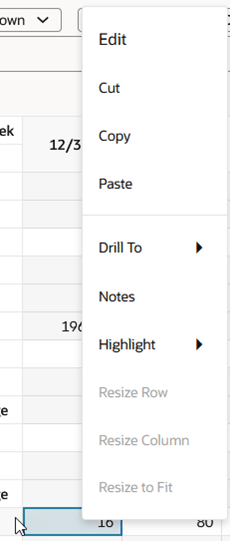
Editable Cells Context Actions
The following image illustrates the actions that are available from the context menu when right-clicking on an editable measure. The options are Edit, Cut, Copy, Paste, Drill To, Notes, and Highlight.
Editable Cell Context Menu
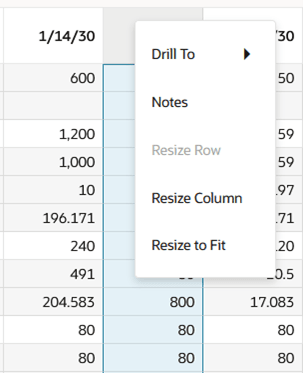
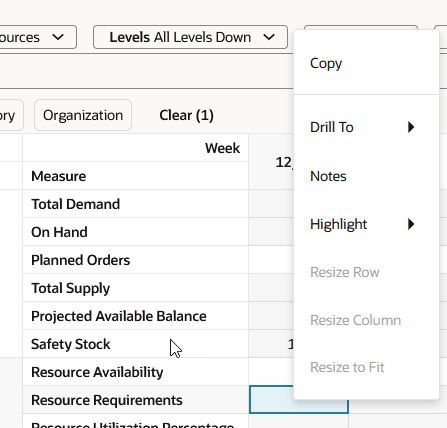
Noneditable Cells Context Actions
The following image illustrates the actions that are available from the context menu when right-clicking on a noneditable measure. The options are Copy, Drill To, Notes, and Highlight.
Noneditable Cell Context Menu
Here’s a description of what each context menu action does:
- Edit. Applicable only to editable measures. Enables editing of the values of selected cells using the mass edit drawer.
- Cut. Applicable only to editable measures. Removes any values in the selected cells. Can be used with the Paste action to transfer values to other cells.
- Copy. Applicable for both editable and noneditable measures. Copies measure values and makes them available for pasting into other cells.
- Paste. Applicable only to editable measures. Used in conjunction with the Cut or Copy action to copy values to other cells.
- Drill To. Drills to a visualization or page with selected context.
- Notes. Applicable when selecting a single member (row or column heading) or a single cell. Opens the Notes drawer.
- Highlight. Highlights other cells based on the highlight option selected. See the 25B What’s New topic named Redwood: Manage a Build Plan Using a New User Experience for an explanation of the highlight actions.
- Resize Row. Adjusts the row height based on the number of pixels you enter.
- Resize Column. Adjusts the column width based on the number of pixels you enter.
- Resize to Fit. Adjusts the column width based on the content contained within the cells to avoid wrapping or truncating values.
Display of Planning Attributes
As of this update, planning attributes that are included in the plan’s netting rule are automatically displayed in the Redwood version of build plan, just as they did in the classic version of build plan. This allows you to see a breakdown of demands and supplies by attributes such as project group, project, task, or any other configured planning attribute, such as country of origin.
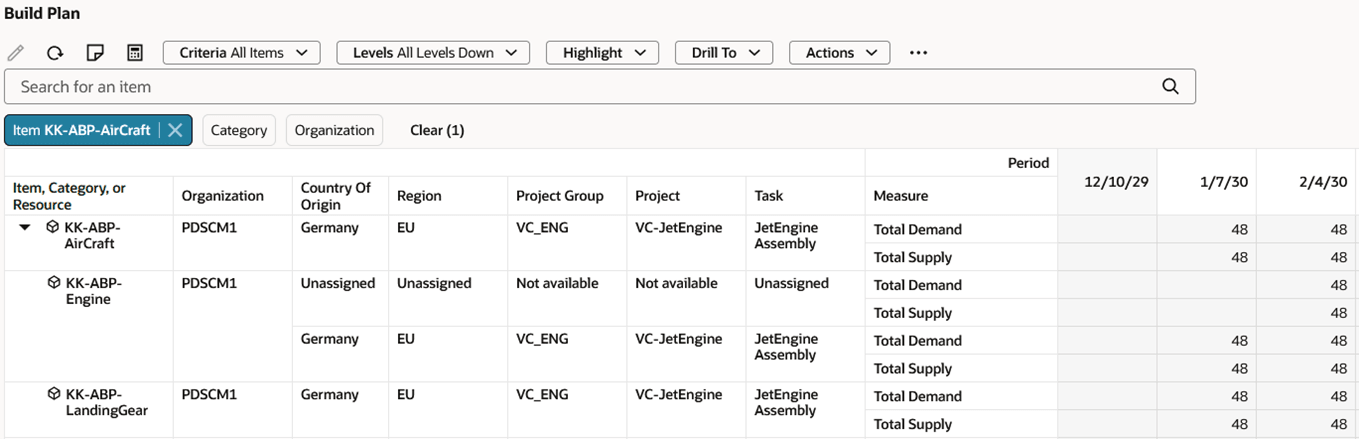
Build Plan with Planning Attributes
Here's the demo of these capabilities:
Steps to Enable
You don't need to do anything to enable this feature.
Tips And Considerations
- Don’t define a default Saved Search if you want to drill into build plan because any default saved search will override the drill-to context.
Key Resources
- See Redwood: Manage a Build Plan Using a New User Experience in the Oracle Fusion Cloud Supply Planning 25B What’s New
- See Redwood: Manage Planning Notes Using a New User Experience in the Oracle Fusion Cloud Supply Planning 25B What’s New
Access Requirements
Users who are assigned a configured job role that contains these privileges can access this feature:
- View Planning Items (MSC_VIEW_PLANNING_ITEMS_PRIV)
- Edit Planning Items (MSC_EDIT_PLANNING_ITEMS_PRIV)
- View Planning Objects Using REST Service (MSC_VIEW_PLANNING_OBJECTS_REST_SERVICE_PRIV)
These privileges were available prior to this update.