Redwood: Use Enhanced Workflow Capabilities
Leverage the enhanced capabilities on the workflow object to view redlines through presence indicators, resolve revision conflicts, reschedule change lines, utilize spreadsheet-style functionality such as drag and fill on the affected objects table, and publish it.
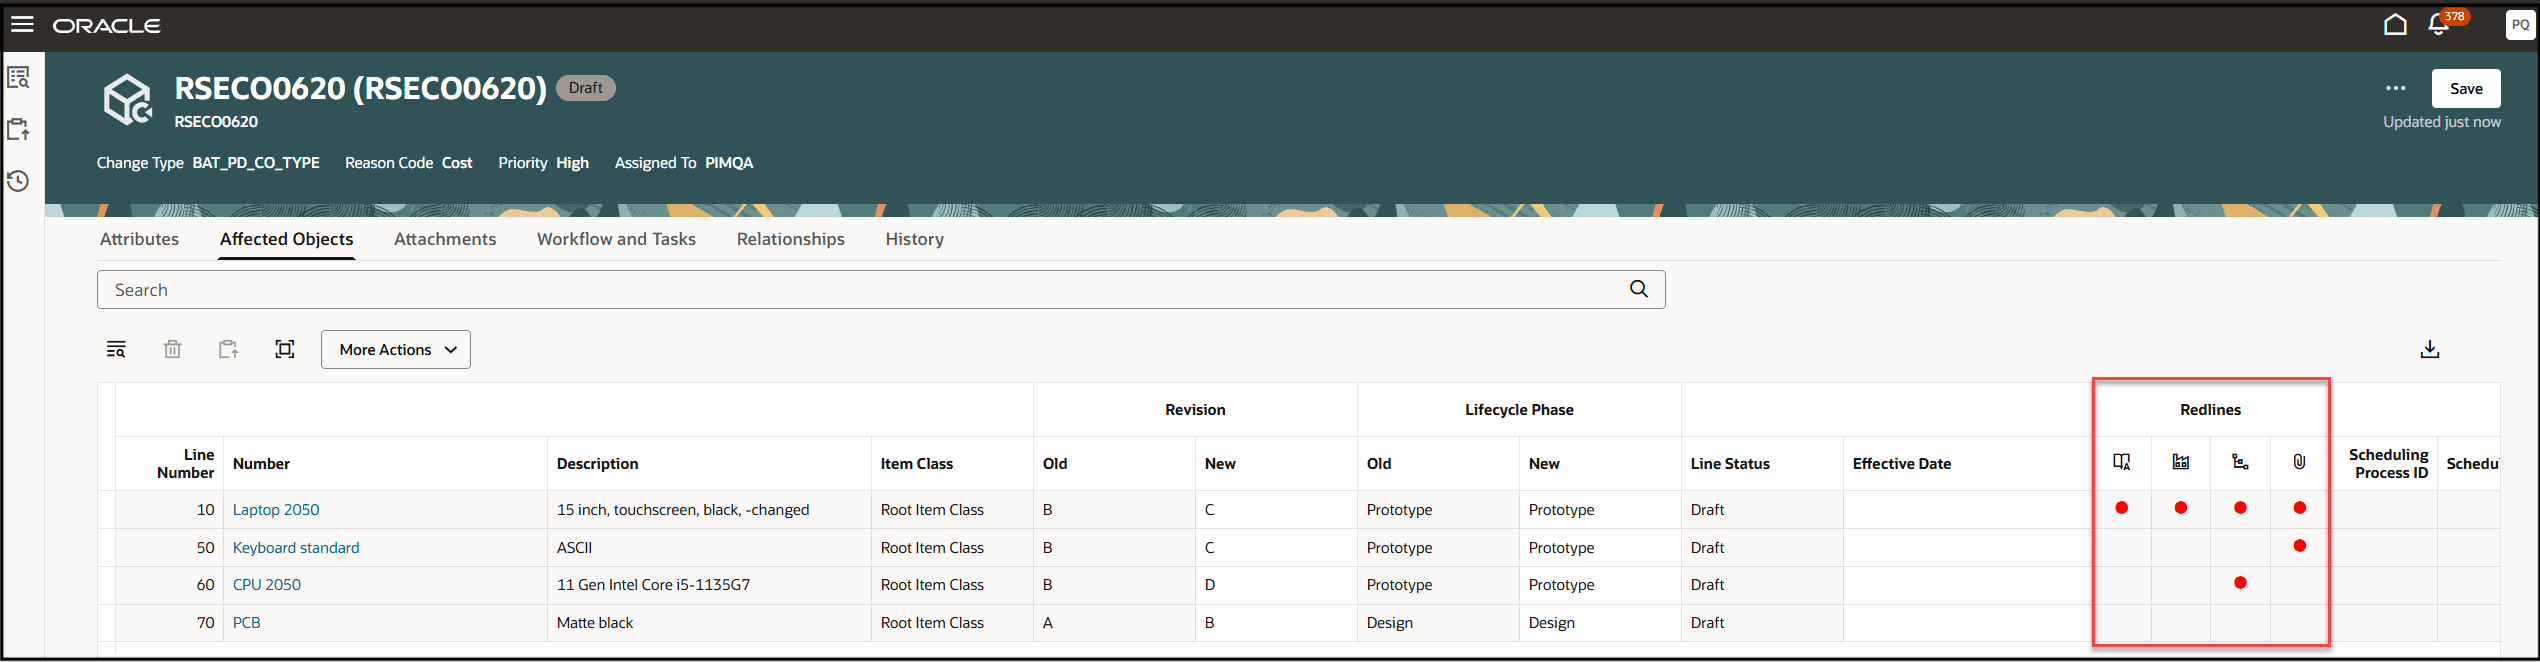
In the change order, the Affected Objects table now supports the display of Data Presence Indicators. Based on the change type, data presence indicators can be shown for attributes, AML, attachments, structures, and association between organizations. By clicking the red colored (dot) icon, you can navigate directly to the corresponding item entity within the change context.
Here’s a list of fields for a change type on which presence indicators are available:
- Engineering change order
- Attributes
- Attachments
- Structures
- AMLs
- Change order without revision control
- AML
- Commercialization change order
- Attributes
- Structure
- Organization
Data Presence Indicators in an Engineering Change Order
The presence indicator (red dot) icon for redlines is also visible in Spotlight if any of the change controlled entities have been redlined.
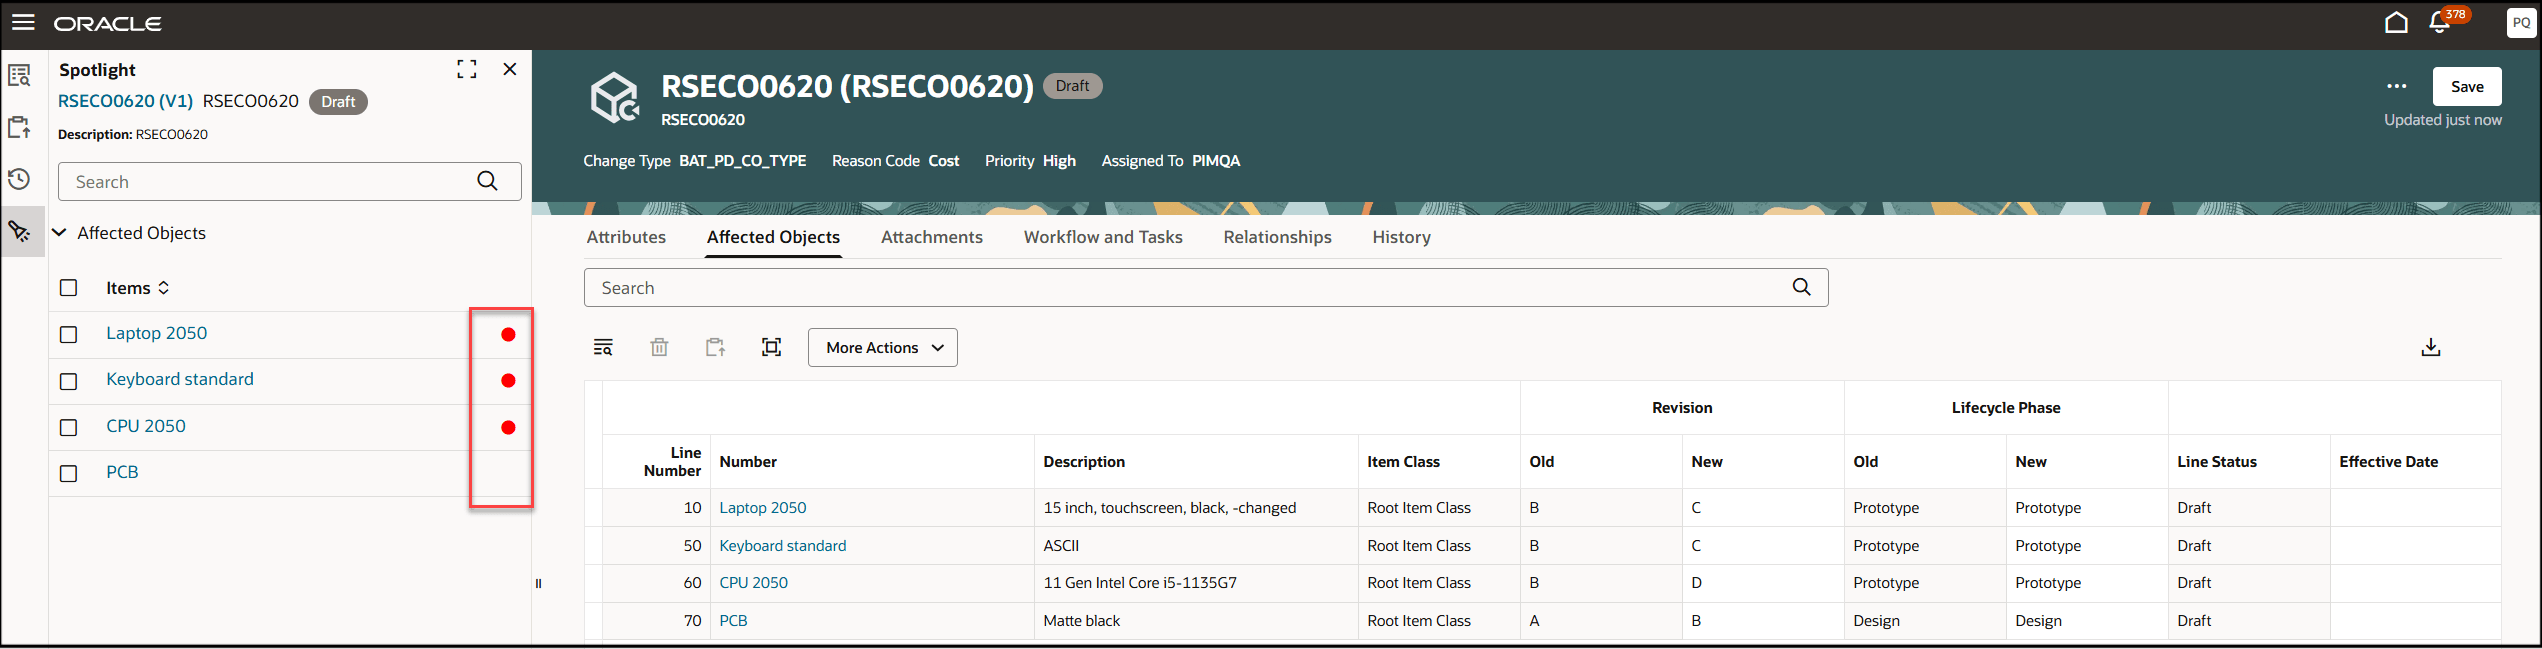
Data Presence Indicators in Spotlight
Working with items in change context have the following improvements:
-
A hyperlink Change order <name> Context appears along with the page title to indicate that you’re in the change order context. Clicking this link will take you to the previous page you were on, either the Affected Objects page or the Pending Item Revision page.
-
You can use the drop-down list (next to the change order name) to select the other affected objects, while viewing an object in the change order context.
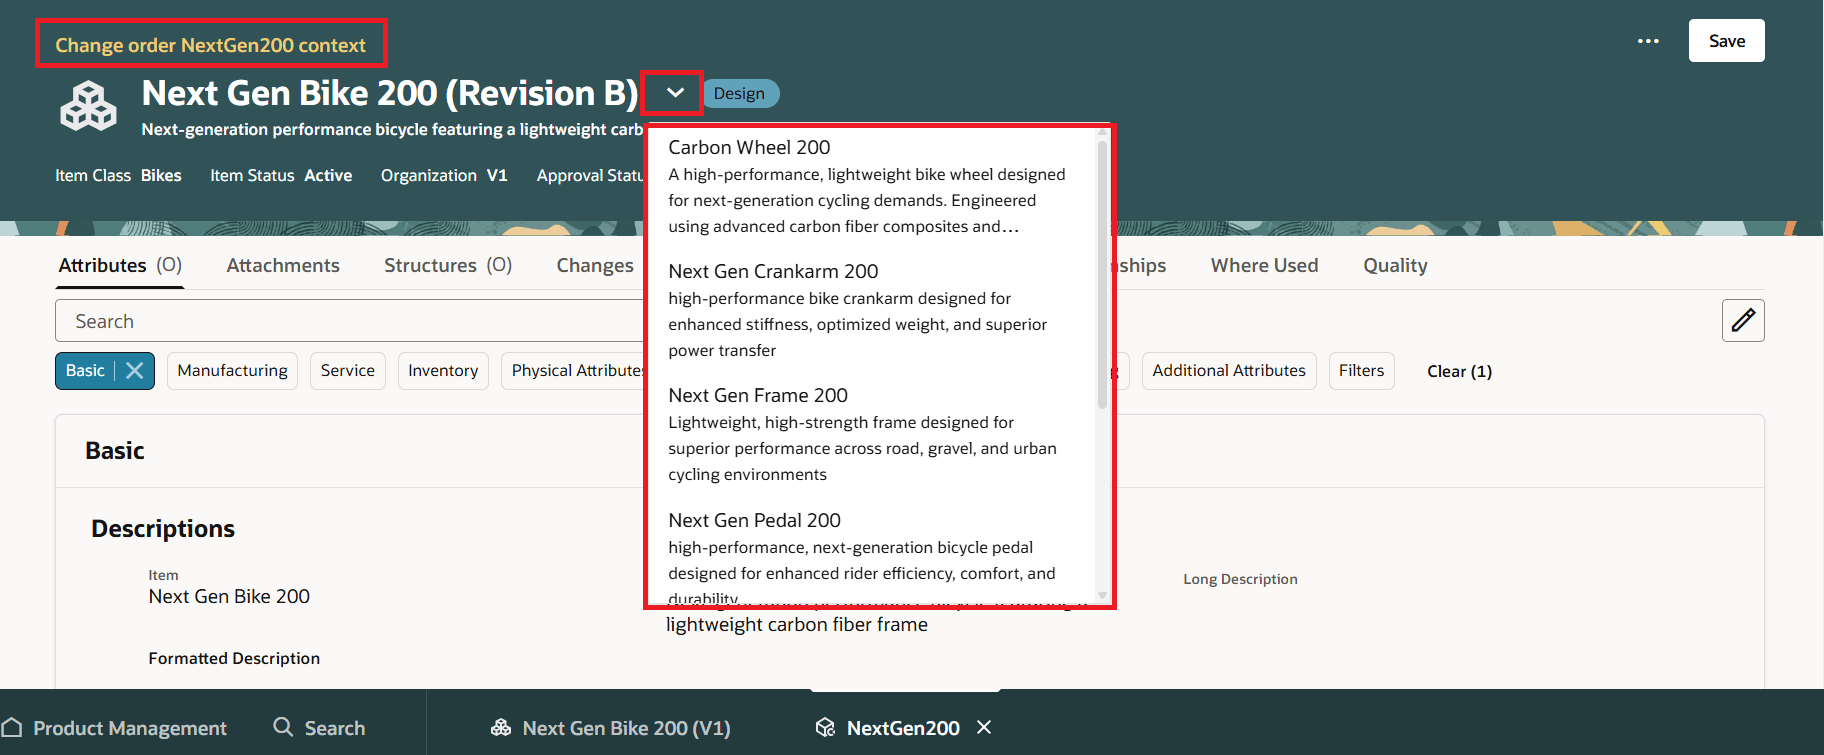
Hyper-Link to Indicate Change Order Context and Affected Objects on the Change Order
To help you modify affected objects on the workflow, an enhancement has been introduced to provide a spreadsheet-like functionality. This includes a cell drag feature that enables you to easily copy values across multiple affected objects. Like in any traditional spreadsheet, you can select a cell, grab the small square in the corner, and drag it vertically or horizontally to fill adjacent cells (or select and drag cells).
To perform bulk edits, select multiple cells and drag them up or down.
To quickly update cells, right-click a cell and select Auto Fill.
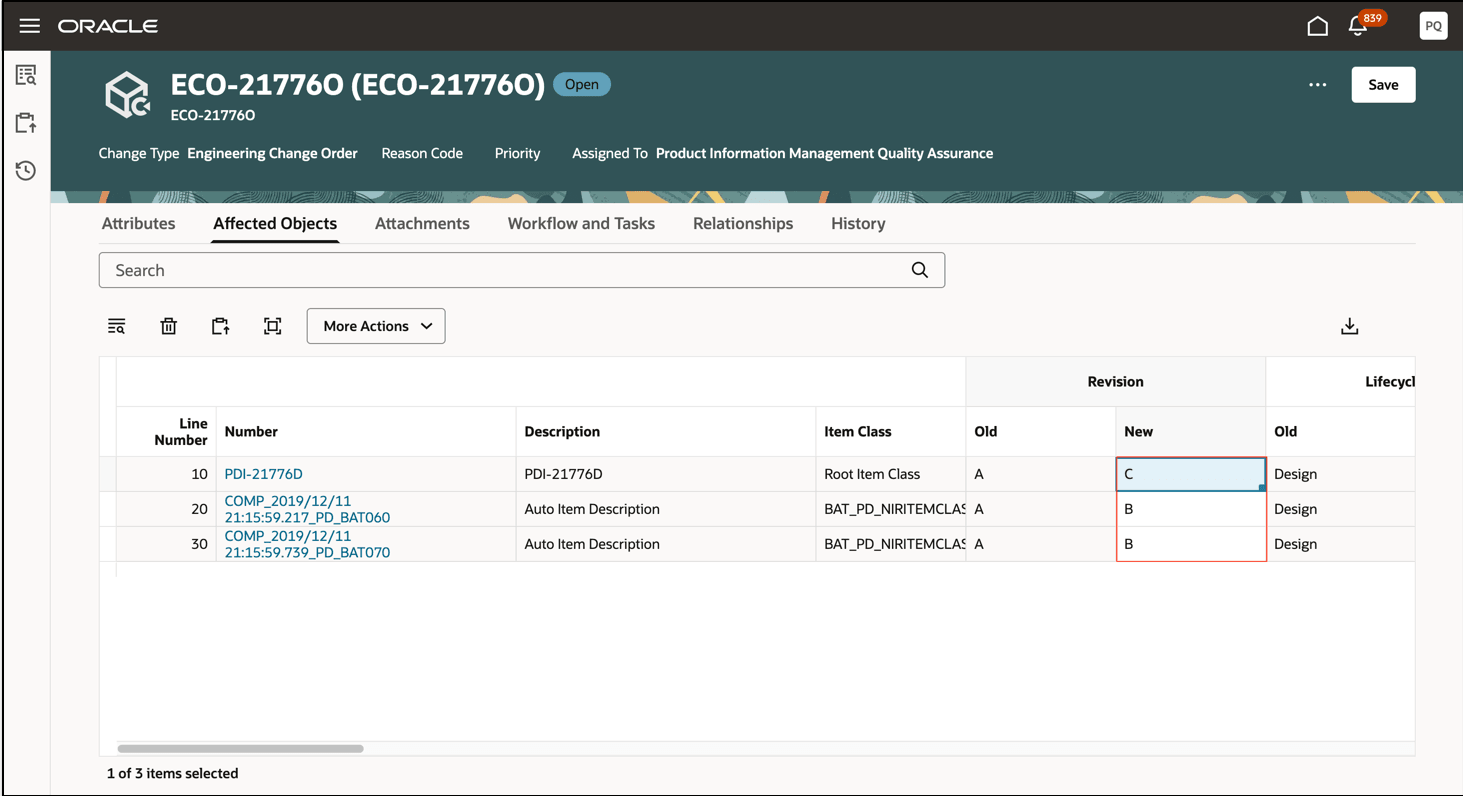
Use Fill Down on the Workflow
You can reschedule the change lines on a change order in the scheduled status, by updating the effective date and clicking Reschedule.
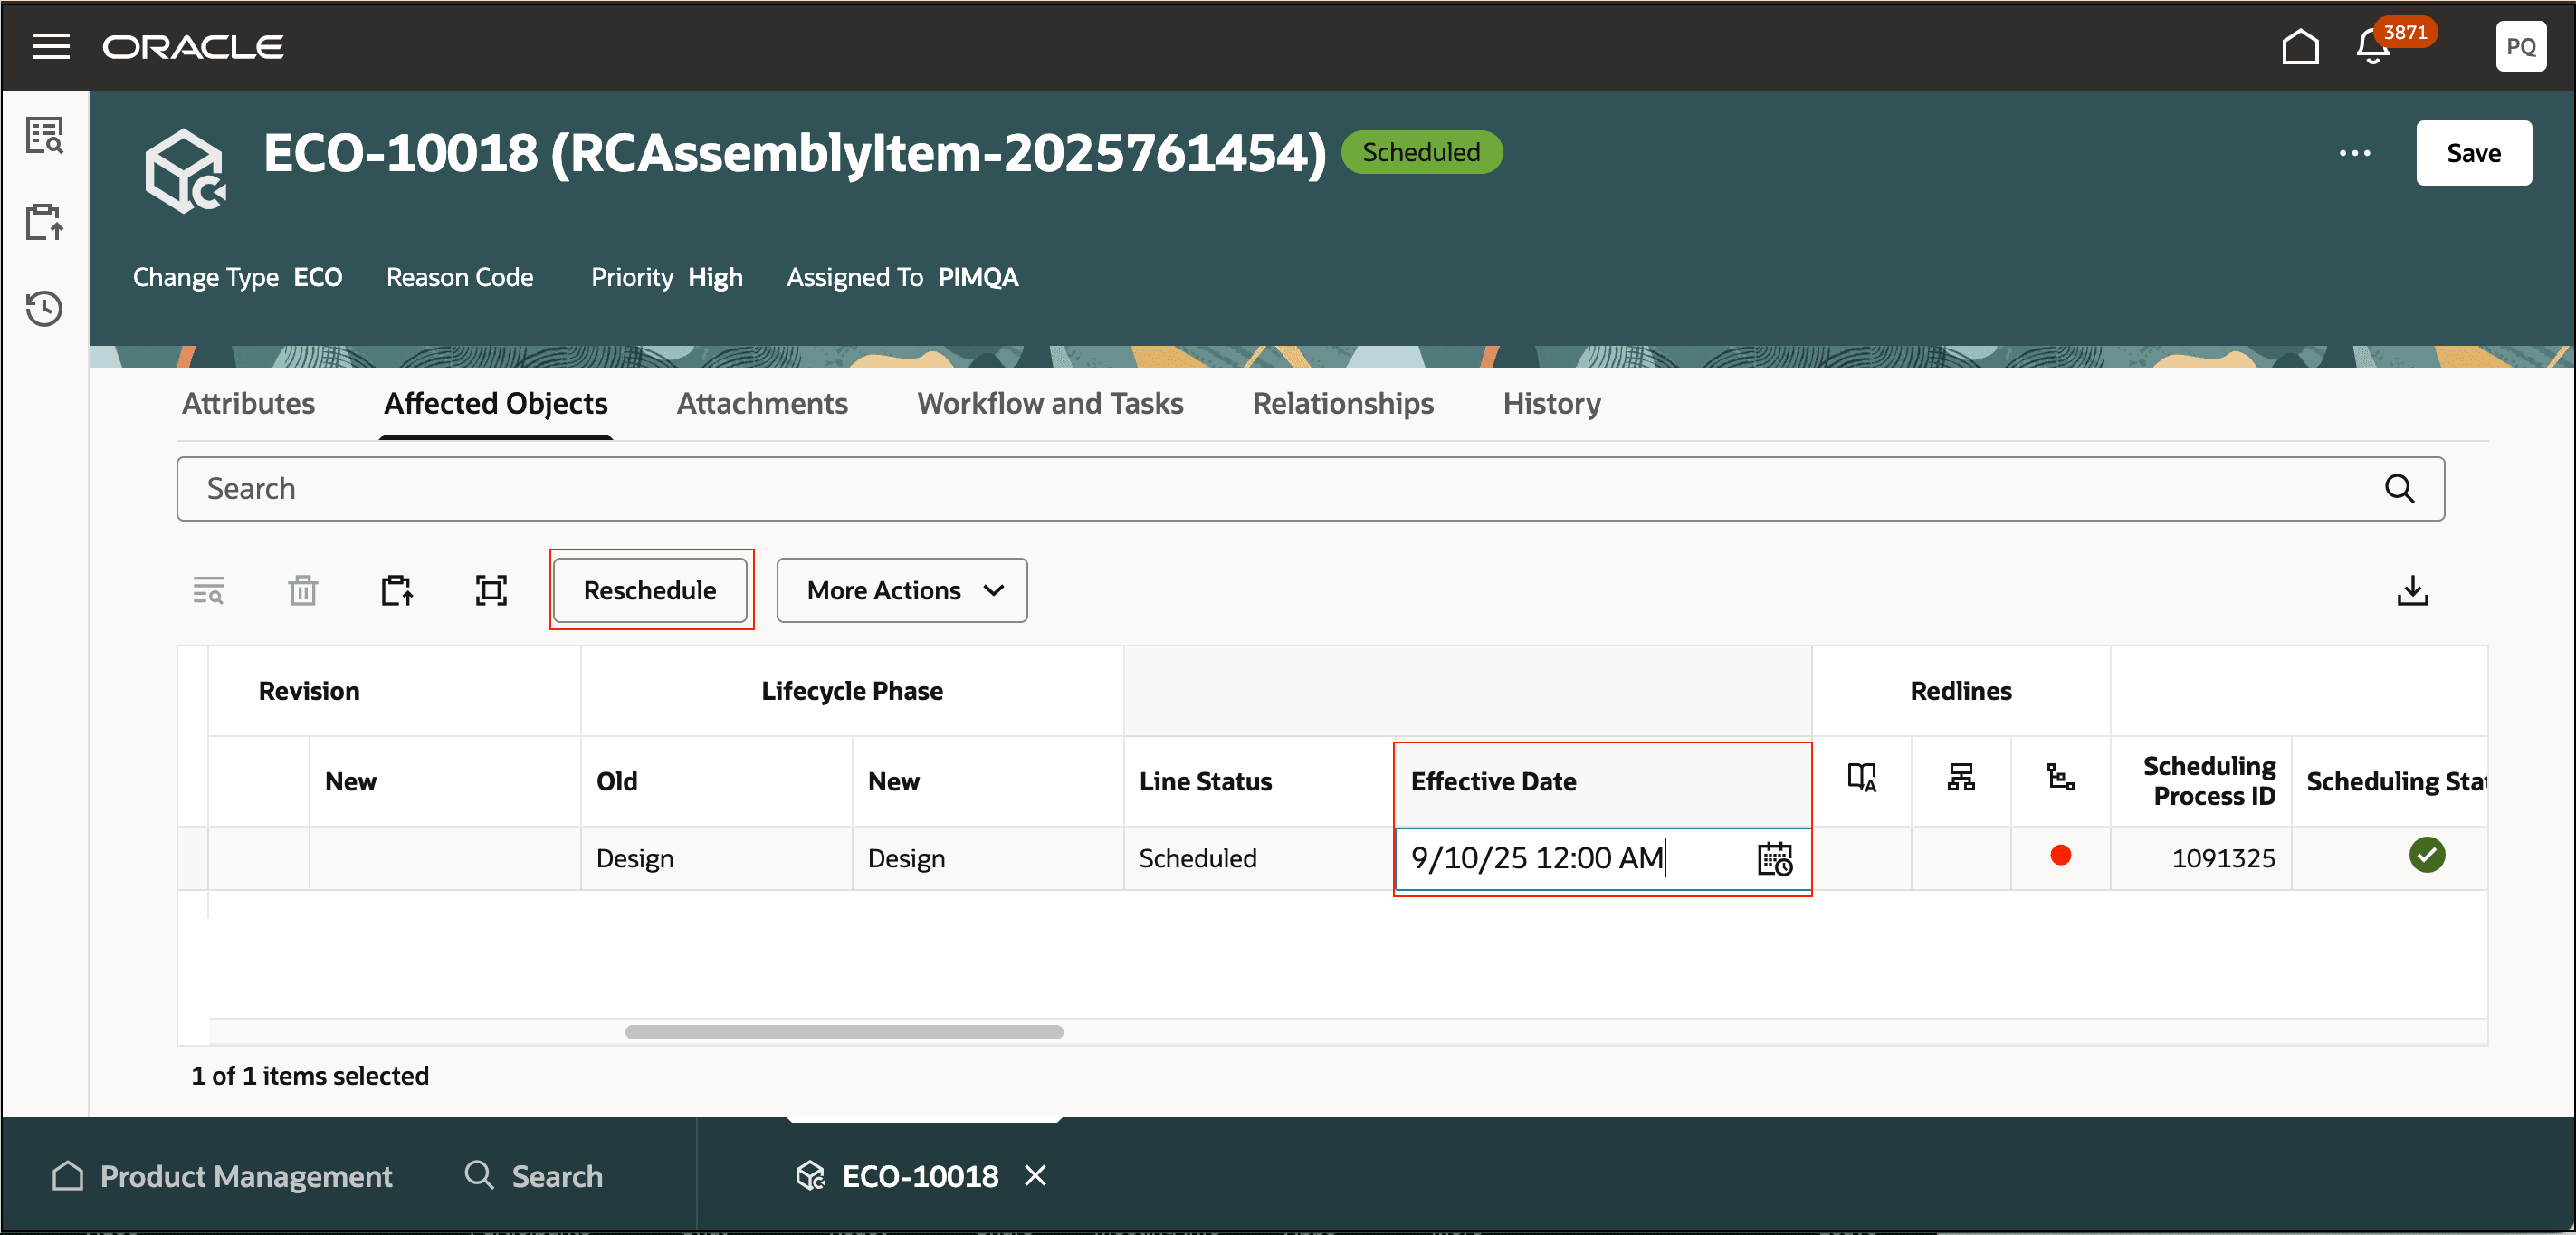
Reschedule Change Line
When there are revision conflicts on the affected objects in the change order, you can resolve them using the Resolve Revision Conflict action available on the Affected Objects tab. Additionally, the application will prompt you to address any conflicts when you attempt to change the workflow status to Approval or Interim Approval.
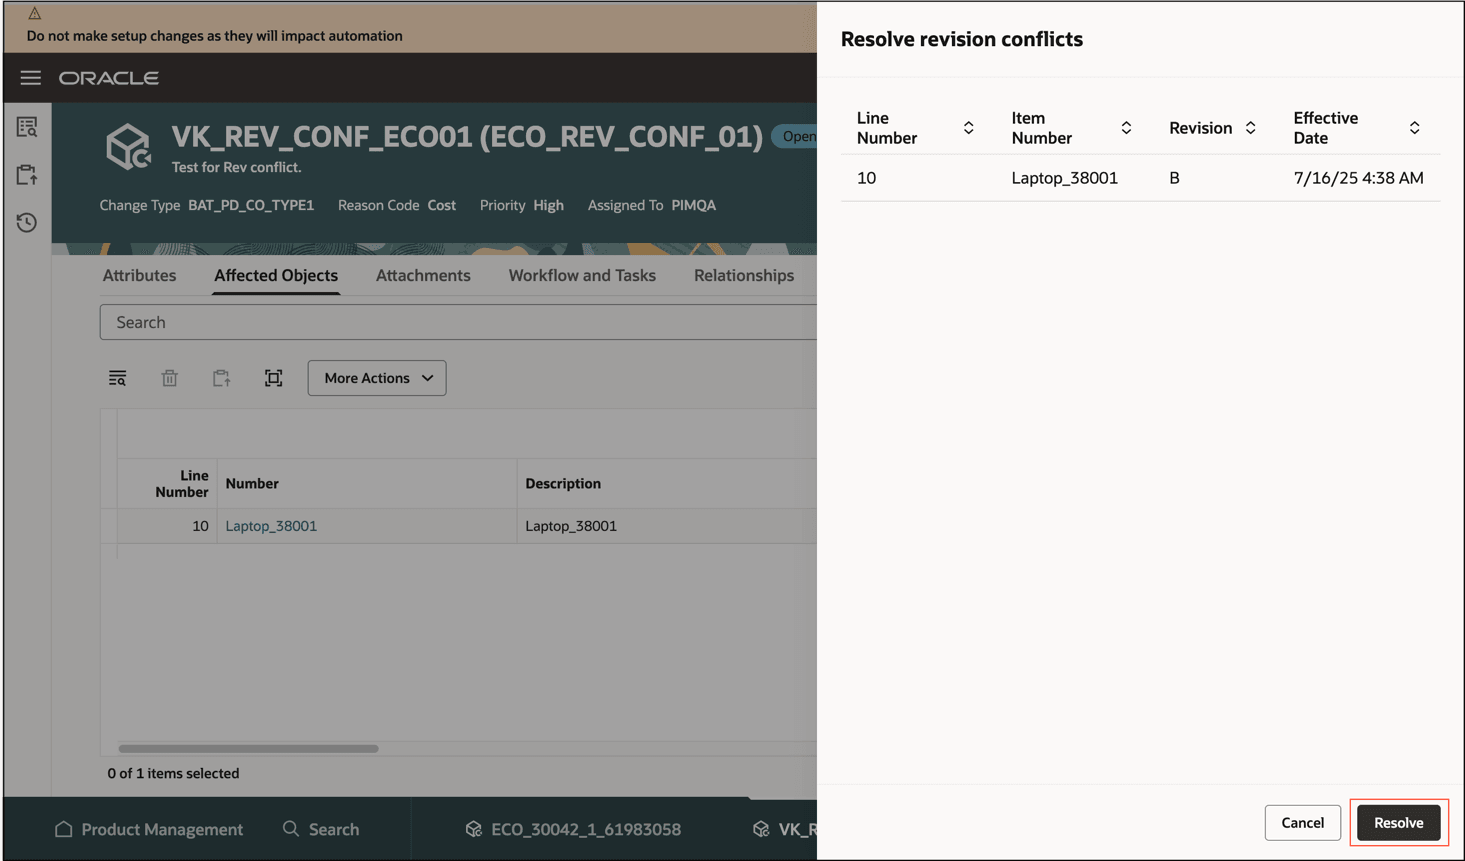
Resolve Revision Conflicts
View and Modify the Required Descriptive and Extensible Flexfields
You can now view and modify the required descriptive and extensible flexfield attributes when you create the change order from Product Management Search page, move the affected objects, or assign the item to a change order. Extensible flexfields, global descriptive flexfields and context sensitive descriptive flexfields can be set as required.
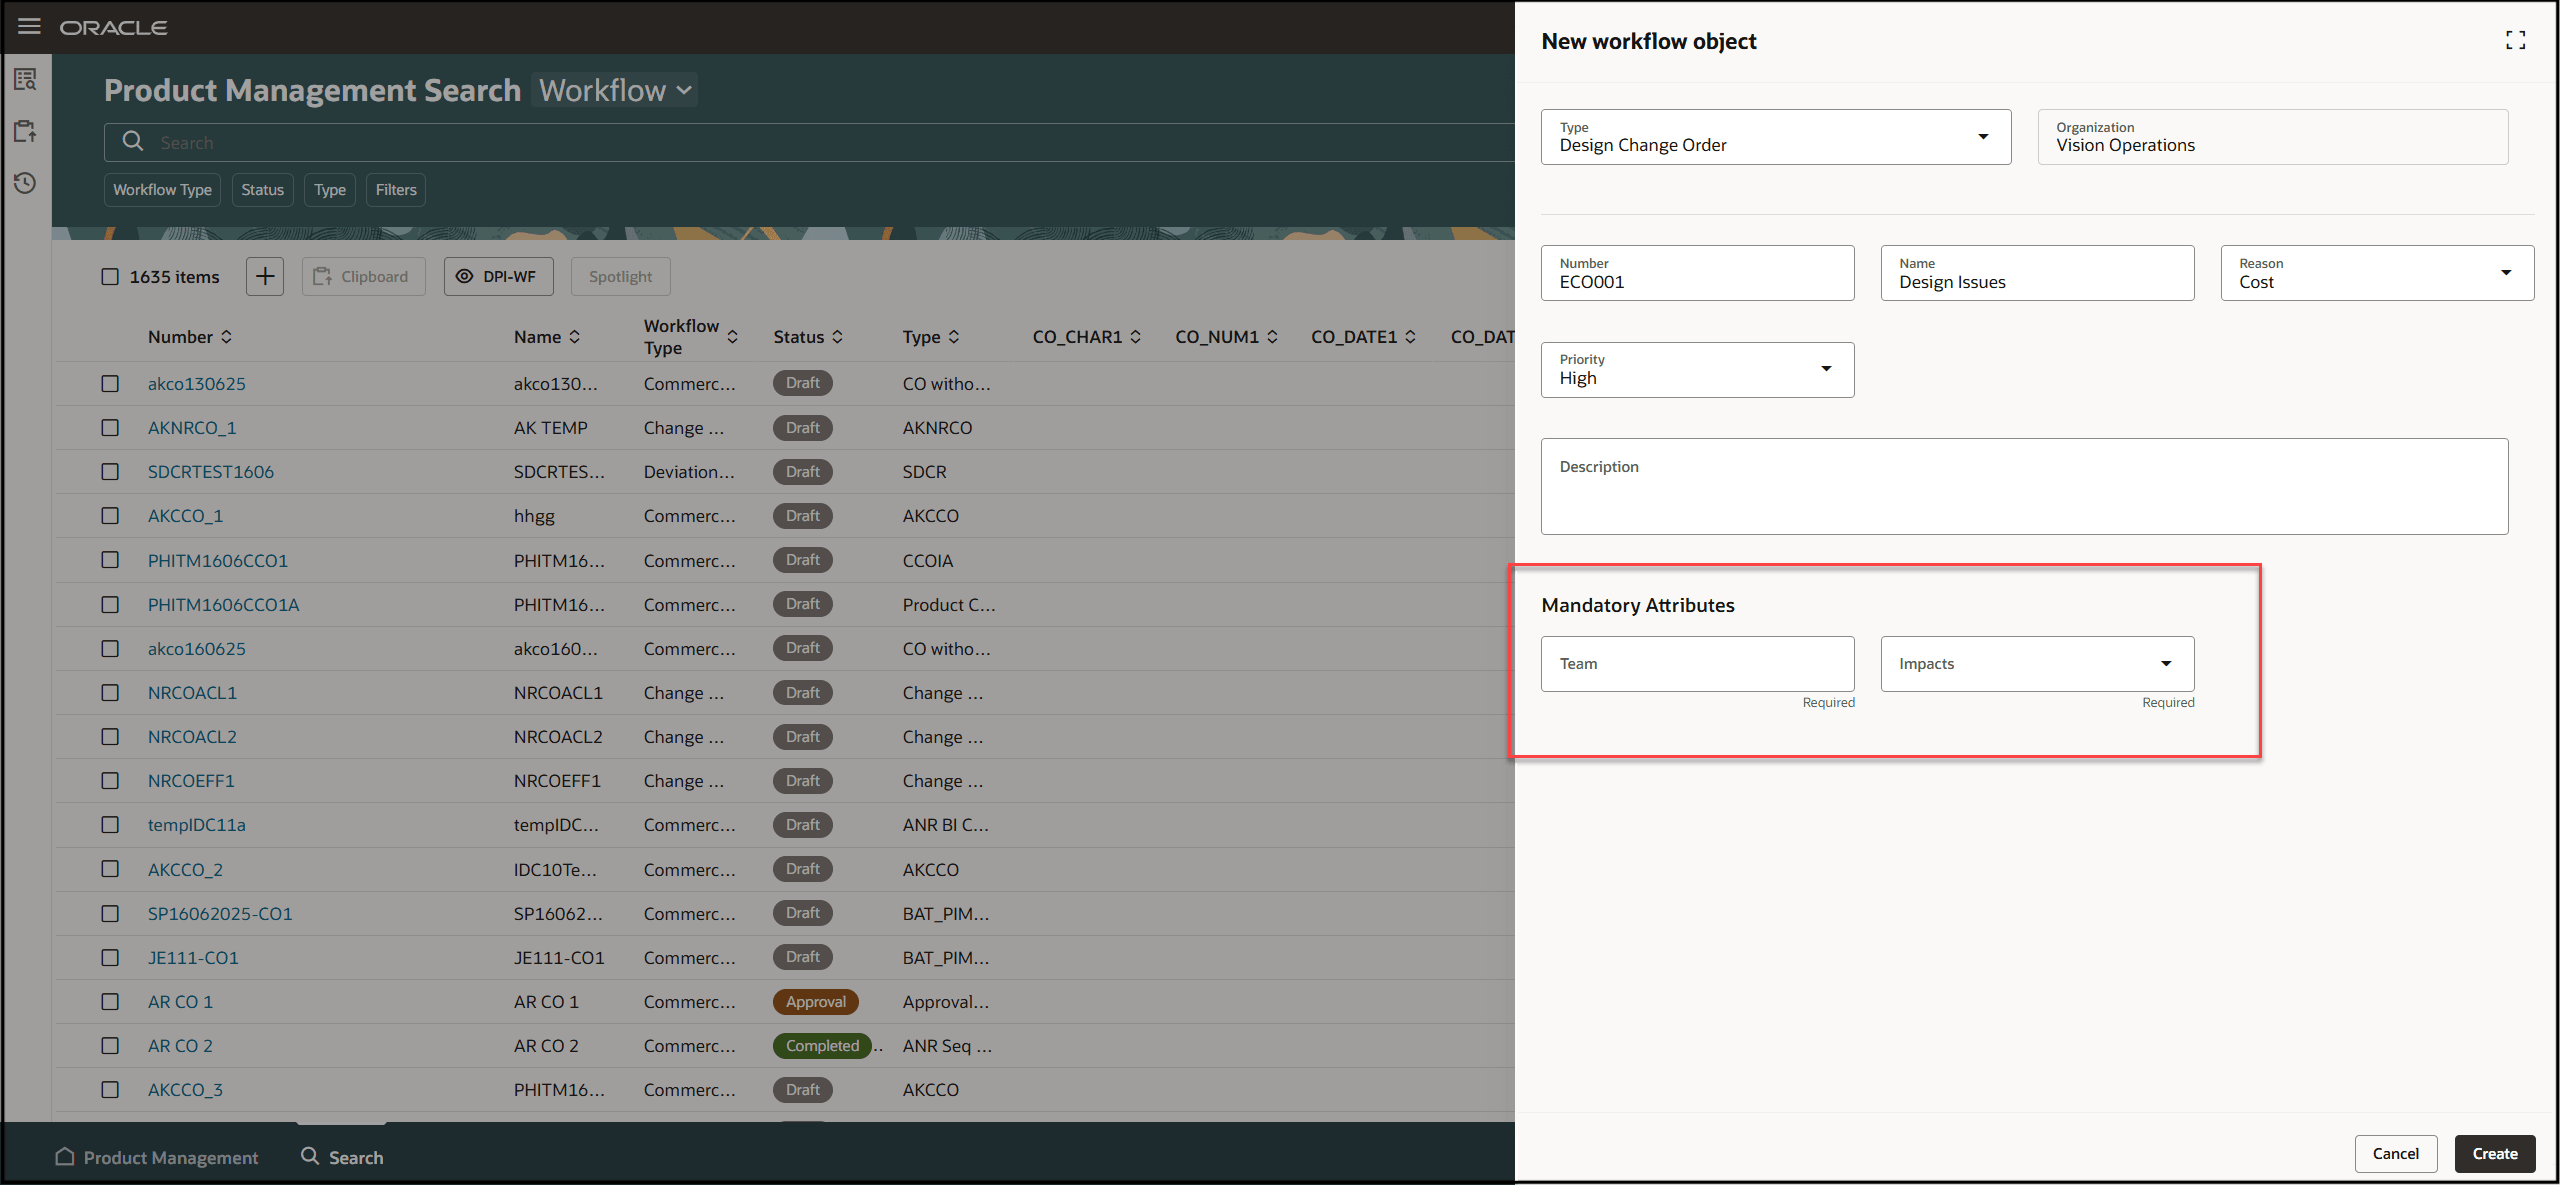
Required Extensible and Descriptive Flexfield Attributes on the New Workflow Object Drawer
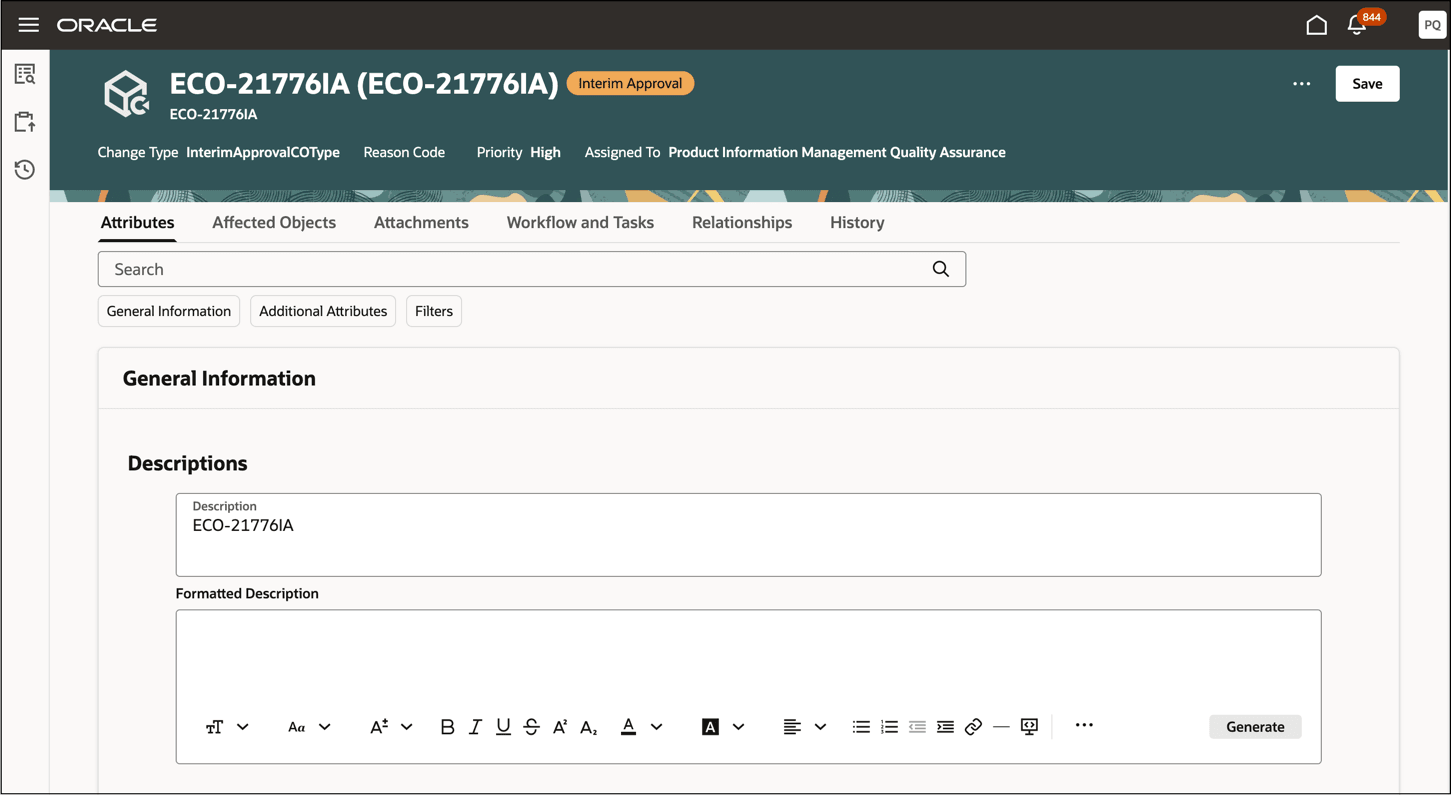
Use the new Edit icon on the Attributes tab of the workflow to make changes. This icon lets you switch between edit and read-only mode.
Workflow in Edit Mode with the Disable Edit Icon
Note: If you refresh the page or change the status of workflow with the Edit icon enabled, the page switches back to the read-only mode.
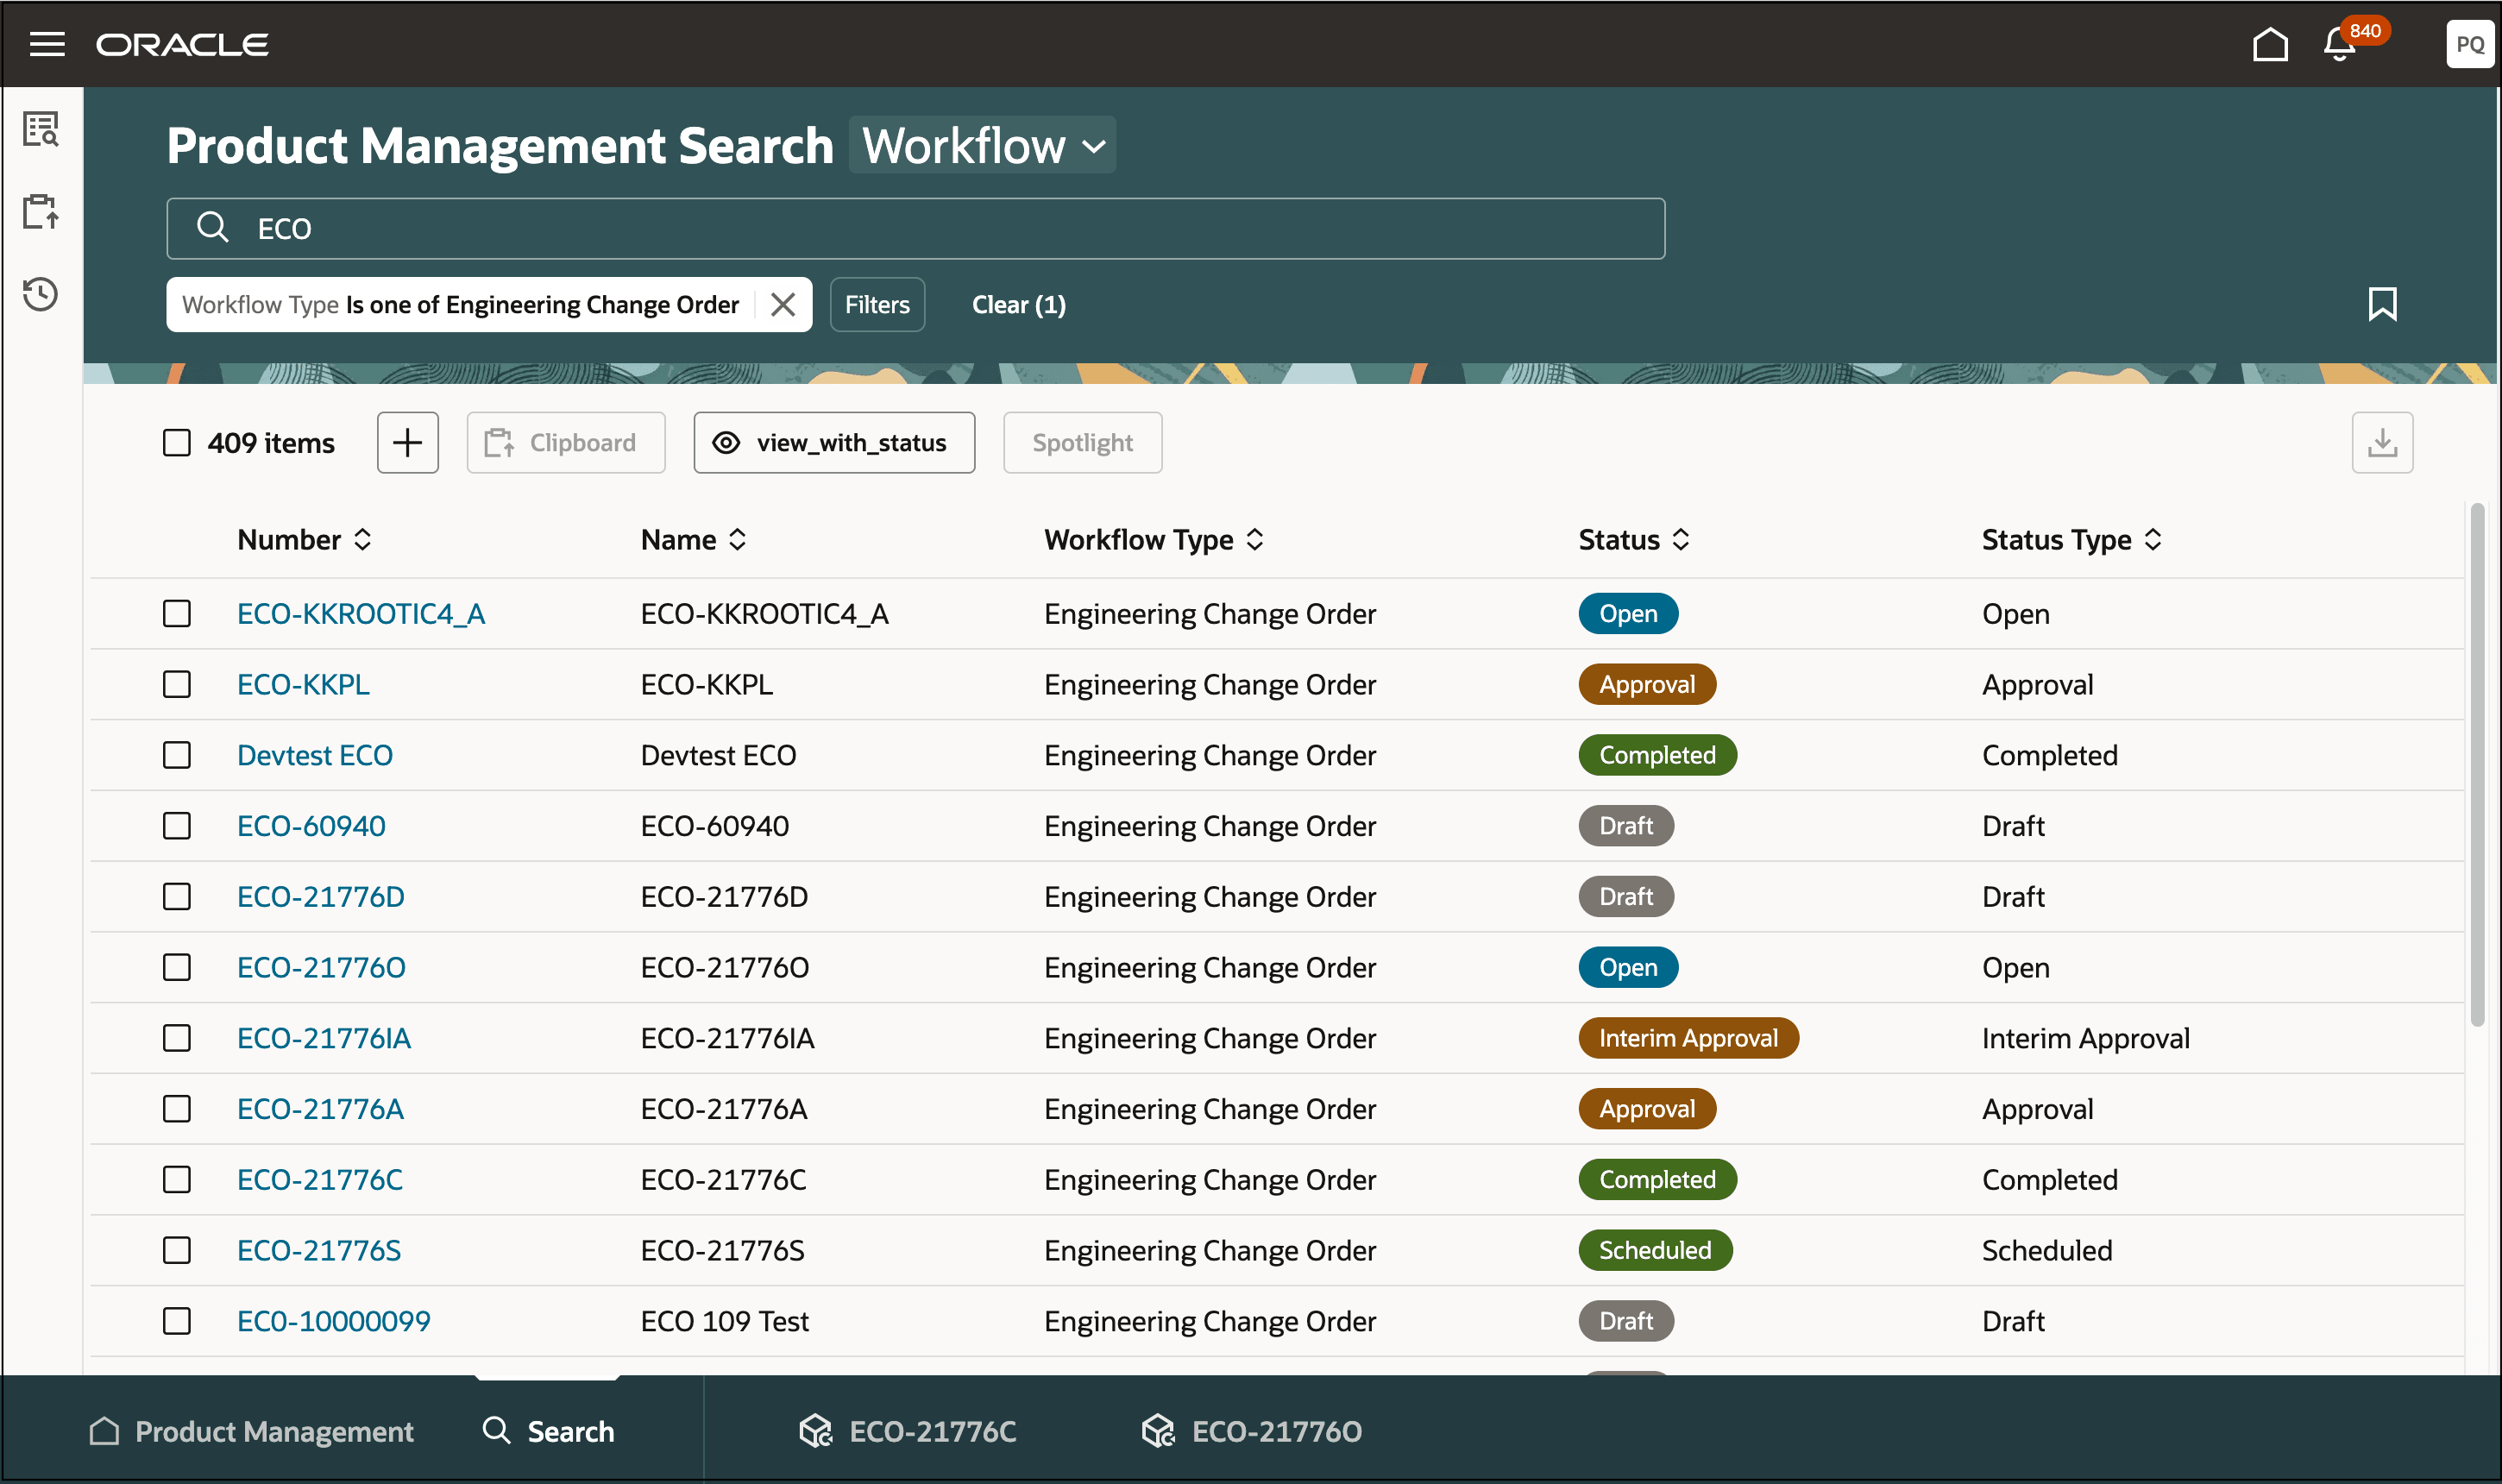
Identify Workflow Statuses Using Color Code
Color codes have been introduced to highlight workflow statuses on:
- Workflow and workflow approval search
- Workflow banner
- Item Data Presence Indicator when you click on Has Changes and Has Quality to view the data on the side panel
- Item page on the Changes and Quality tab
Color Codes in the Status Column on Workflow Search
Color Coded Workflow Status Displayed with Page Title
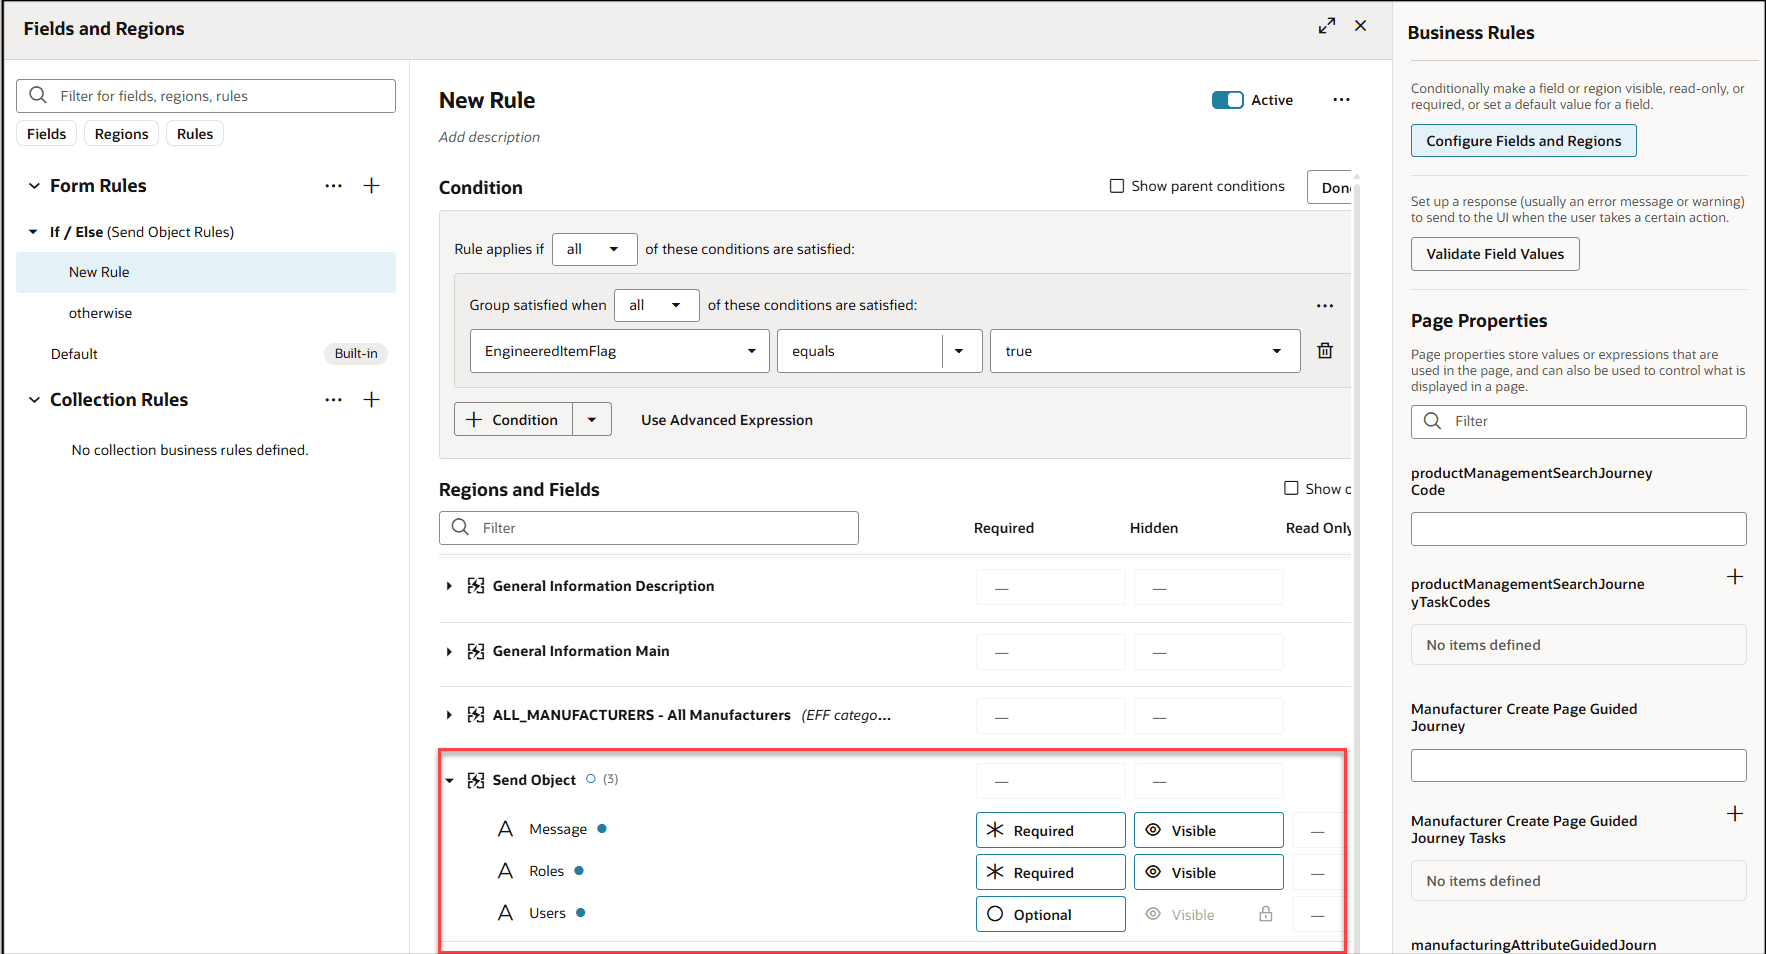
Use Business Rules on Send Object
You can now apply business rules on the Send Object. Rule support is available for the following fields:
- Message
- Roles
- Users
Business Rules on Send Object
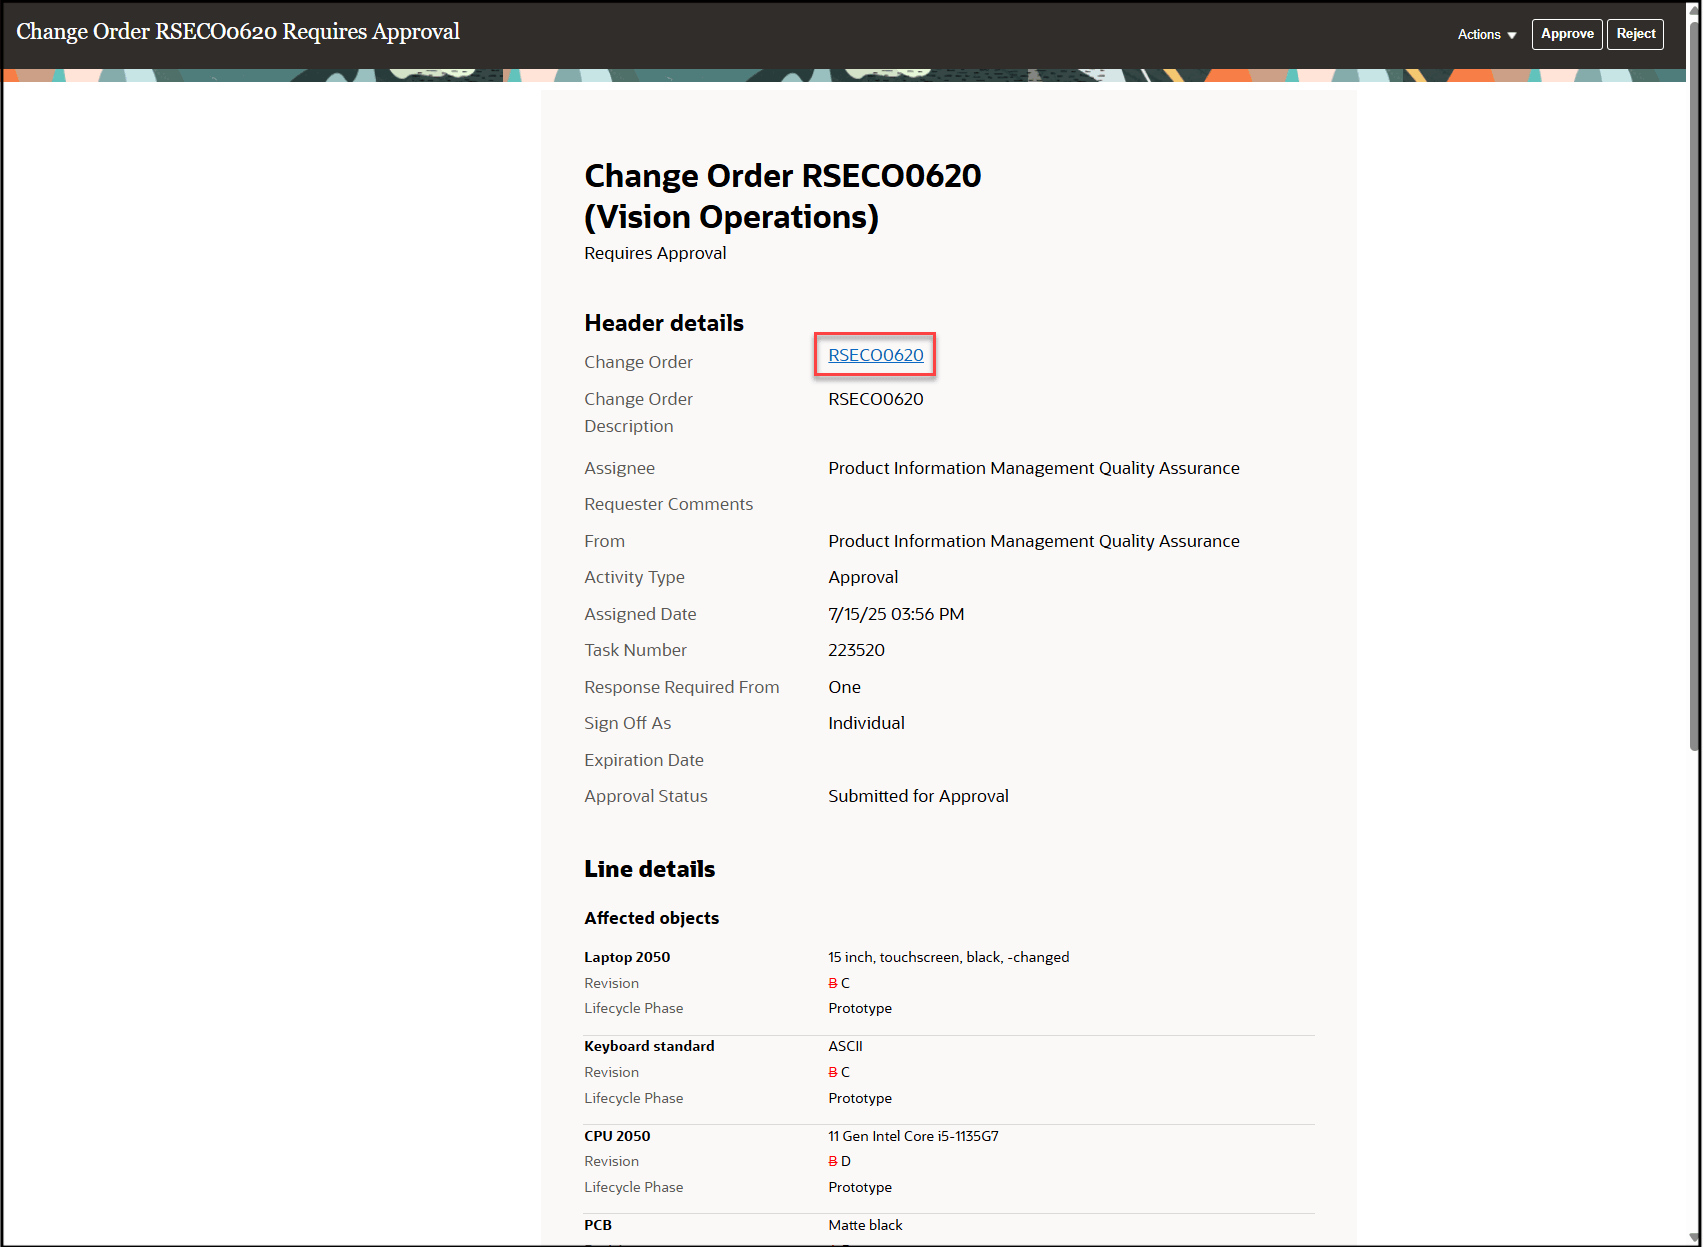
Use Notification Link to Navigate to Redwood
You can now navigate to a Redwood page by clicking the change number link on the notification. To use this feature, set the profile option ORA_ACA_WORKFLOW_REDWOOD_ENABLED to Y.

Link to Navigate to the Redwood Page
Publish Engineering Change Orders as XML Packages
You can now publish engineering change orders as an XML package by selecting all or one of the following entities:
- General Information
- Affected objects
- Header attachments
- Affected object redlines only
- Affected object attachments
- Affected object structures
- Affected object AML
NOTE: The attributes from the general information page are always included by default.
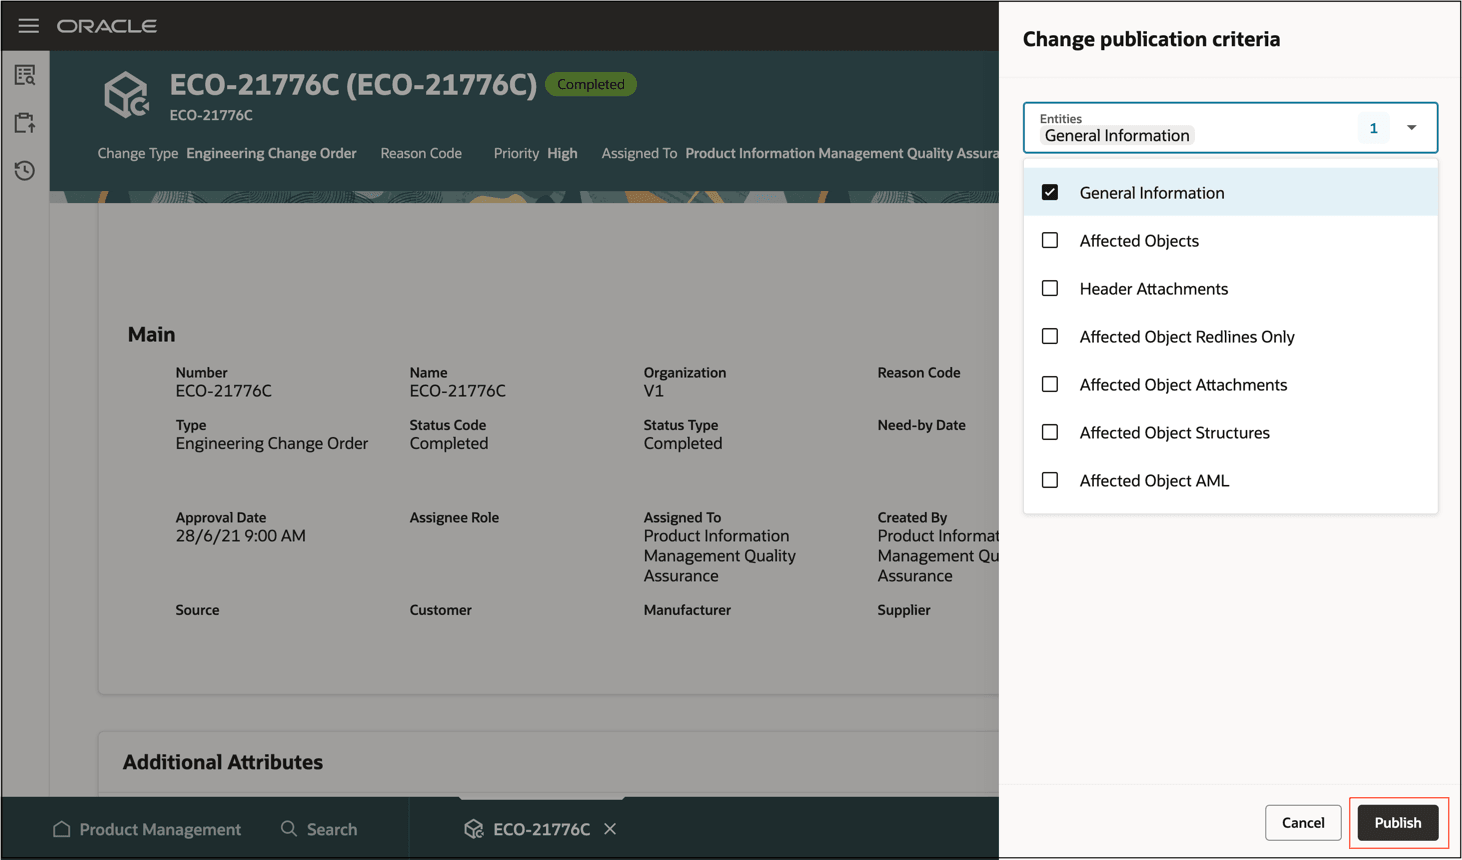
Entities for Change Publication
This feature drives business value through the following benefits:
-
Quickly view and identify affected items and their impacted child objects at-a-glance, enabling faster comprehension and navigation to specific changes.
-
Recognize context with a highlighted hyperlink that indicates you're viewing an item through a change order, with added drop-down lists and navigation aids to move between affected objects efficiently.
-
Accelerate updates using Fill Up and Fill Down capabilities to streamline data entry and reduce change cycle times.
-
Gain flexibility by updating the scheduled date on a change order in scheduled status.
-
Resolve revision conflicts proactively with proactive flags that guide corrective actions before interim or final approval.
-
View and modify descriptive flexfields directly on the change order, supporting both global and context-sensitive fields.
-
Visually track workflow progress with new, color codes to highlight current workflow status.
-
Access workflows directly from email notifications using embedded hyperlinks for quicker review and action.
-
Selectively publish some or all workflow and its associated entities directly from the workflow, offering flexible control over what is published.
Steps to enable and configure
-
Set the administrator profile value for ORA_ACA_WORKFLOW_REDWOOD_ENABLED to Y.
-
Create a Data Security Policy
-
Sign in to Security Console.
-
Search for the configured role on which you want to configure the data security policy. Click Actions > Edit Role.
-
On the Edit Role page, click Data Security Policies.
-
Click Create Data Security Policy (plus icon). On the Create Data Security Policy dialog box, enter the following:
-
Policy Name: <unique name>
-
Data Resource: Search for and add the resource named EGO_ENGINEERING_CHANGES_B
-
Data Set: Select Select by Instance Set
-
Condition Name: Access the item changes for table EGO_ENGINEERING_CHANGES_B for the item changes they have access to
-
Actions: Select all the actions.
-
Click OK and click Next.
-
-
Save your changes.
-
Tips and considerations
-
When you copy and paste objects or do a bulk update of effective dates to update the same effective date on more than 10 change lines, a scheduled process is triggered to update the dates on the click of Save. The change order is put on Hold status until effective dates on change lines are updated.
-
When you add an affected object to an engineering change order, the new revision is automatically updated on Redwood pages during import. However, the revision isn’t automatically incremented in the following cases:
-
The affected item is included in another change order that is currently in Scheduled status.
-
The existing revision doesn't follow a standard or recognizable pattern, making it unclear what the next revision should be. For example, if the initial revision is set as .001 or Z.
-
-
To view the data presence indicator on existing workflow objects, you must run the data script.
-
The primary keys of multi-row extensible fields on Redwood pages can’t be modified. However, if you attempt to edit and save them, a message will appear indicating that the changes can't be saved. This behavior also applies to both independent and dependent attributes within a multi-row attribute group.
Key resources
- Oracle Fusion Cloud SCM Using Product Development guide, available on the Oracle Help Center.
- Oracle Fusion Cloud SCM Using Product Master Data Management Guide, available on the Oracle Help Center.
- Oracle Fusion Cloud SCM Implementing Product Management Guide, available on the Oracle Help Center.
Access requirements
Users who are assigned a configured job role that contains these privileges can access this feature:
To view or edit workflows on the new workflow pages, or to access notifications,
- For change orders:
-
- View Change Order (ACA_VIEW_CHANGE_ORDERS_PRIV) or
- Manage Change Orders (ACA_MANAGE_CHANGE_ORDERS_PRIV)
- For change requests:
-
- View Change Request (ACA_VIEW_CHANGE_REQUESTS_PRIV) or
- Manage Change Requests (ACA_MANAGE_CHANGE_REQUESTS_PRIV)
- For problem reports:
-
- View Problem Report (ACA_VIEW_PROBLEM_REPORTS_PRIV) or
- Manage Problem Report (ACA_MANAGE_PROBLEM_REPORT_PRIV)
- For corrective and preventive actions:
-
- View Corrective Action (ACA_VIEW_CORRECTIVE_ACTIONS_PRIV) or
- Manage Corrective Action (ACA_MANAGE_CORRECTIVE_ACTION_PRIV)
To create workflows from the search pages or when using links in Actions on the Product Management home page:
- Create Change Order (EGO_CREATE_CHANGE_ORDER_PRIV)
- Access Change Types Using a REST Service (EGO_GET_CHANGE_TYPES_REST_PRIV)
To create a change order from the item, either through a Needs Approval rule or by using the Assign to action:
- Create Change Order (EGO_CREATE_CHANGE_ORDER_PRIV)
- Manage Change Orders (ACA_MANAGE_CHANGE_ORDERS_PRIV)
- Access Change Types Using a REST Service (EGO_GET_CHANGE_TYPES_REST_PRIV)
To approve or reject workflows:
-
Approve Item Change Order (EGO_APPROVE_ITEM_CHANGE_ORDER_PRIV)
To move change order lines to a new change order:
- Create Change Order (EGO_CREATE_CHANGE_ORDER_PRIV)
- Manage Change Orders (ACA_MANAGE_CHANGE_ORDERS_PRIV)
To move change order lines to an existing change order:
-
Manage Change Orders (ACA_MANAGE_CHANGE_ORDERS_PRIV)
To reschedule change lines, resolve revision conflict and Fill up-down actions on the affected objects:
-
Manage Change Orders (ACA_MANAGE_CHANGE_ORDERS_PRIV)
To publish changes orders:
- View Change Order (ACA_VIEW_CHANGE_ORDERS_PRIV) or
- Manage Change Orders (ACA_MANAGE_CHANGE_ORDERS_PRIV)
- Publish Change Order (ACA_PUBLISH_CHANGE_ORDER_PRIV)
To change status, delete, terminate, restart or cancel a workflow:
- Manage Change Orders (ACA_MANAGE_CHANGE_ORDERS_PRIV)
- Manage Change Requests (ACA_MANAGE_CHANGE_REQUESTS_PRIV)
- Manage Problem Report (ACA_MANAGE_PROBLEM_REPORT_PRIV)
- Manage Corrective Action (ACA_MANAGE_CORRECTIVE_ACTION_PRIV)
To select or be selected as an Assigned To user or assignee role on a workflow:
-
Manage Assignee (EGO_MANAGE_ASSIGNED_TO_PRIV)
To view the history tab on the workflow:
-
View Change History (EGO_VIEW_CHANGE_HISTORY_PRIV)
To run the change order details report:
- Generate Item Change Order Report (EGO_GENERATE_ITEM_CHANGE_ORDER_REPORT_PRIV)
- Get BIP Report Definitions (EGI_GET_BIP_REPORT_DEFINITIONS_REST)
To send a workflow object:
- Use REST Service - Users and Roles Lists of Values (PER_REST_SERVICE_ACCESS_USERS_AND_ROLES_LOVS_PRIV)
- Manage HR Name Format (PER_MANAGE_HR_NAME_FORMAT_PRIV) (optional)
To select users managing participants or changing workflow status:
- Use REST Service - Users and Roles Lists of Values (PER_REST_SERVICE_ACCESS_USERS_AND_ROLES_LOVS_PRIV)
- Manage HR Name Format (PER_MANAGE_HR_NAME_FORMAT_PRIV) (optional)
To search for items on Redwood pages:
-
Product Search (ORA_EGI_PRODUCT_SEARCH_DUTY)
To search for workflow objects in Redwood pages:
- Get Search View REST (EGP_GET_SEARCH_VIEW_REST_PRIV)
- GET Product Management Index REST (EGP_GET_PM_INDEX_REST_PRIV)
- Access Product Management Change Search(EGO_VIEW_PRODUCT_MANAGEMENT_CHANGE_SEARCH_PRIV)
To configure Business Rules:
-
Manage Item Rule Set (EGO_MANAGE_ITEM_RULE_SET_PRIV)
These privileges were available prior to this update.
Additionally, you will require the new privilege Access Users (EGP_ACCESS_USERS_PRIV), to select users in:
- Requested By or Assigned To attributes in the Attributes tab.
- Task assignee in Workflow and Tasks > Create or Edit Task drawers.
- Manage Participants or Change Status drawer.
- Send Object drawer.
To run workflow OTBI reports, you need the following:
- Product Catalog Transaction Analysis Duty (FBI_PRODUCT_CATALOG_TRANSACTION_ANALYSIS_DUTY)
- Product Transaction Analysis Duty (FBI_PRODUCT_TRANSACTION_ANALYSIS_DUTY)
- BI Consumer Role (BIConsumer)