Redwood: Create Link to External Systems Using a New User Experience
You can use the Redwood user experience to add, edit, and manage external links tied to specific visualization, such as a table or a graph. The links can be reused across plans that include the visualization and can be edited or deleted by the link owner. The authorized users can use them but not delete them. This streamlines the access to related reports and system without re-entering criteria, improving analysis speed and consistency.
External Links are references to information or systems outside of the planning application that you might need to access during daily planning work. You can quickly open relevant external applications, reports, dashboards, or reference documents directly from the planning UI without searching for them manually.
External links are custom hyperlinks you configure so that you or other users can quickly navigate from planning to another internal or external system. You might often need supporting details that aren’t stored inside the planning system. For example:
- Connect to external business intelligence dashboards to launch custom reports and supplement planning decisions with external information.
- Access other Oracle SCM Cloud applications or enterprise systems required for your collaboration
- Launch forecasting or analytics dashboards, OTBI reports to open custom report pages.
Instead of searching manually, you can navigate from visualizations like a pivot table or graph with just one click. This makes external links helpful in the following ways:
- Faster decision-making: Helps you look up related information without leaving the planning page.
- Reduced errors: Ensures you are using the correct and approved data sources, avoiding outdated files.
- Improved collaboration: Provides direct access to supplier or internal communication sites, improving workflow.
- Standardization: Ensures consistency of usage of the same dashboards, reports, and reference materials.
A link to an external system consists of these parts:
- Base URL: The link must include the host information and can also include the port details. This part is displayed in the Base URL field in the Create Link to External System dialog box and can't be modified. For example, https://oracle.example.com/db/instances/PROD-db01/connect
- Page path: This path is added to the base URL and contains details about the page or report in the external system to which you're creating the link. Along with the page path, you can also pass the name or ID of the Oracle Supply Chain Planning plan you're in to restrict the displayed information in the linked, predefined or user-defined analysis or report in Oracle Transactional Business Intelligence (OTBI), Oracle Analytics Cloud, or Oracle Analytics Publisher.
- An example of the page path without the plan context: /analytics/saw.dll?Dashboard&PortalPath=%2Fshared%2FCustom%2FSCP%2FSalesOrders_Booking_Rpt%2FSO_Bookings_Rpt4&Page=page%201&Action=Navigate, where SO_Bookings_Rpt4 is the name of the report.
- An example of the page path with the plan context:
/analytics/saw.dll?Dashboard&PortalPath=%2Fshared%2FCustom%2FSCP%2FPL_OTBI_report2%2FDM_Plan_Details&Page=page%201&Action=Navigate&col3=%22Plan%22.%22Plan%20Name%22&val3=#PlanName#
Provide the plan context only when the page or report in the external system has a filter for the plan context, and you want to review the information by plans. For example, a link to an external web page doesn't require plan context.
- Linking parameters: The linking parameters contain details about the dimensions, levels, and level members in the table or graph. This information is added to a combination of a base URL and page path and opens the external system object with the context of the data in your table or graph.
For example, the linking parameters could be: "Distributed Order Orchestration - Fulfillment Lines Real Time"."Order Header Detail"."Ordered Date"&op1=bet&val1=timestamp '#StartDate# 00:00:00' timestamp '#EndDate# 23:59:00'
After the link is encoded, when it's accessed from a table or graph, and the runtime values for the contextual parameters are passed, the linking parameters would look as follows: &col1=%22Distributed%20Order%20Orchestration%20-%20Fulfillment%20Lines%20Real%20Time%22.%22Order%20Header%20Detail%22.%22Ordered%20Date%22&op1=bet&val1=%22timestamp%20%272022-06-01%2000%3A00%3A00%27%22+%22timestamp%20%272022-06-30%2000%3A00%3A00%27%22
The resulting, concatenated link opens the external system object with the context of the selected data in your table or graph.
Setting up the base URL
Create an Application Integration
Presently, the setup of an external link path and URL details can only be done in the classic version of the application.
- Log into the application and navigate to the Setup and Maintenance page.
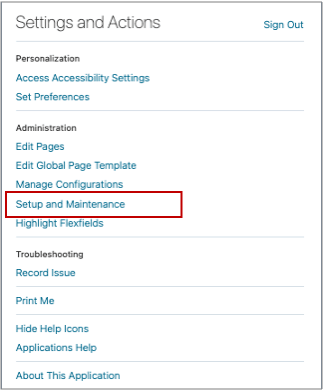
Logging into Setup and Maintenance
- On the Tasks menu, select Manage Setup Content.
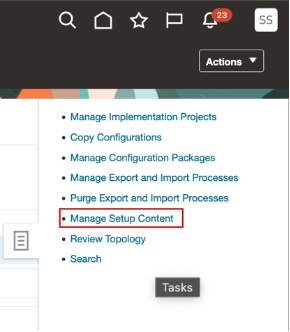
Manage Setup Content Option
- On the Manage Setup Content page, select Manage Integration of Additional Applications.
- On the Manage Integration of Additional Applications page, you can either edit the existing set up application or create a new one
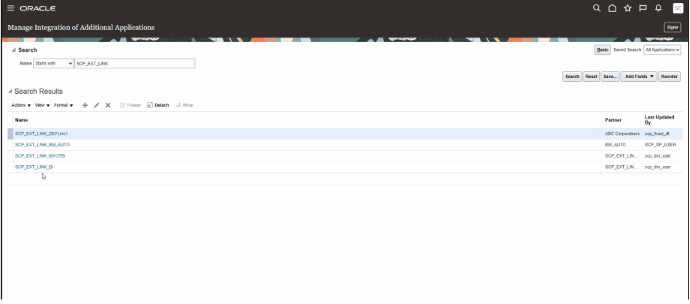
Manage Integration of Additional Applications Page
- Click the + icon to add a new link. The application name should begin with the suffix SCP_EXT_(Name) followed by name.
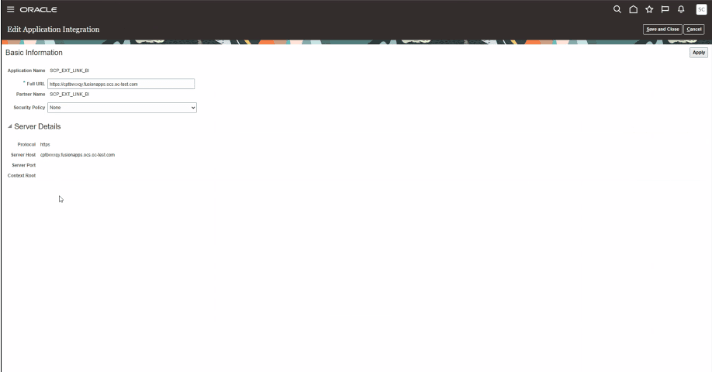
Creating a New Link
The base URL that you entered on the page is displayed in the Base URL field and can't be changed.
Creating an external link for a visualization
To create an external link for a visualization:
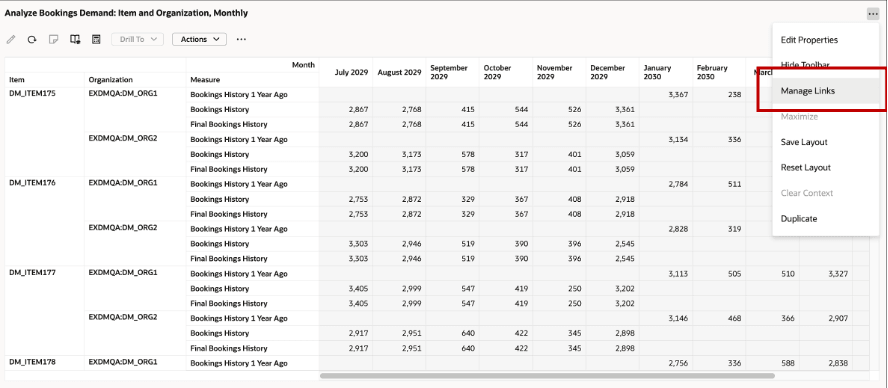
- Go to a visualization and click the More Action icon.
- From the menu options, select Manage Links. The Links drawer opens.
Manage Links Option
- In the Links drawer, click to the External Systems tab.
- Click the +Add button.
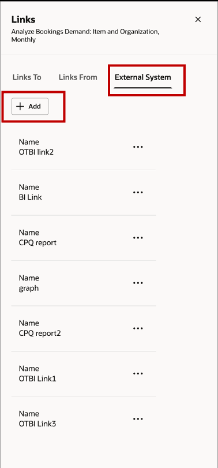
External System Tab
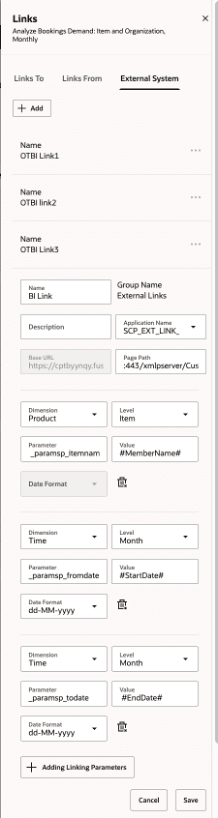
- Enter a name of the link. This will appear in the Drill To menu option of a visualization.
- (Optional) Enter a description of the link.
- In Application Name, select the application integration that was previously specified on the Create Application Integration page.
- In Page Path, enter the path to the page in the external system.
To restrict the displayed data to the current plan in the linked, predefined or user-defined analysis or report in Oracle Transactional Business Intelligence (OTBI), Oracle Analytics Cloud, or Oracle Analytics Publisher, specify these tokens:
-
- #PlanName#: Append this token to the page path to pass the name of the current plan in the Oracle Supply Chain Planning work area.
- #PlanId#: Append this token to the page path to pass the ID of the current plan in the Oracle Supply Chain Planning work area.
Ensure that the path doesn't contain the host or port details because they're derived from the application integration
- Click Add Parameters.
- Select a dimension that you want to pass along with the link to the external system. If you select the Time dimension, the Date Format field is enabled.
- Select a level that you want to pass along with the link to the external system. The available levels are those selected for the table or graph on the Hierarchies tab in the Selector Tool.
- In the Parameter field, enter a unique name for the parameter through which you want to pass the dimension, level, and value to the external system page or report. Ensure that the name meets the external system's nomenclature rules for parameters.
- In the Value field, enter a token for passing the selected level member in the table or graph. The information in this field should be in the decoded format for URLs. When you use the link, the tokens are replaced by the actual values for your selection in the table or graph You can specify these tokens:
- #MemberName#: Use this token to pass the member name. For example, the token can contain the name of the item, organization, customer, week, or month.
- #MemberId#: Use this token to pass the internal ID of the member.
- #StartDate#: Use this token to pass the start date of the time bucket for your selection in the table or graph.
- #EndDate#: Use this token to pass the end date of the time bucket for your selection in the table or graph.
- Select the date format in which the value for the Time dimension must be passed to the external system page or report.
You can add multiple parameters.
- Click Save.
The link is created and added to the External Links option that's available when you click Actions > Drill To > External Links for the table or graph.
Creating External Links
Steps to Enable and Configure
You don't need to do anything to enable this feature.
Access Requirements
Users who are assigned a configured job role with these privileges can access this feature:
- Edit Planning Analytics Configuration
- (MSC_EDIT_PLANNING_ANALYTICS_CONFIGURATION_PRIV)
- View Planning Analytics
- (MSC_VIEW_PLANNING_ANALYTICS_CONFIGURATION_PRIV)
- Maintain Planning Tables
- (MSC_MAINTAIN_PLANNING_TABLES_PRIV)
- Delete Planning Tables
- (MSC_DELETE_PLANNING_TABLES_PRIV
- View Planning Objects
- (MSC_VIEW_PLANNING_OBJECTS_REST_SERVICE)
These privileges were available prior to this update.