Redwood: Mass Change Item Class
You can use the guided task flows that belong to the guided task category Change Item Class available in the guided task library to mass migrate existing items to a different item class. The administrator has created each task flow to be used in a specific business process context. For example, the task flow Change Item Class – FD (created by your administrator) is used to change the item classes for items such as Ice Cream Slices and Pavlova that may currently belong to the Root Item class into Frozen Desserts item class. When running the task flow, you can further narrow down the data set of items (preselected by your administrator) and the list of target item class relevant for the specific business process context.
Each guided task flow in the Change Item Class category, at the minimum, includes the following tasks:
- Select items to be assigned
- Select target item class
- Review and submit
- View item batch status
When running the task flow, you must navigate to each task in the same order it’s listed. To complete a task, click Done for each task. However, until you complete the Review and submit task, you can’t revisit any of the prior tasks in the task flow and make changes.
To mass change item class, you must:
- Initiate a Predefined Task Flow for the Change Item Class Process
- Run the Mandatory Tasks
Initiate a Predefined Task Flow for the Change Item Class Process
- On the Product Management page, in the Actions panel, click View all actions and then click Guided Tasks. The Perform Guided Tasks page is displayed.
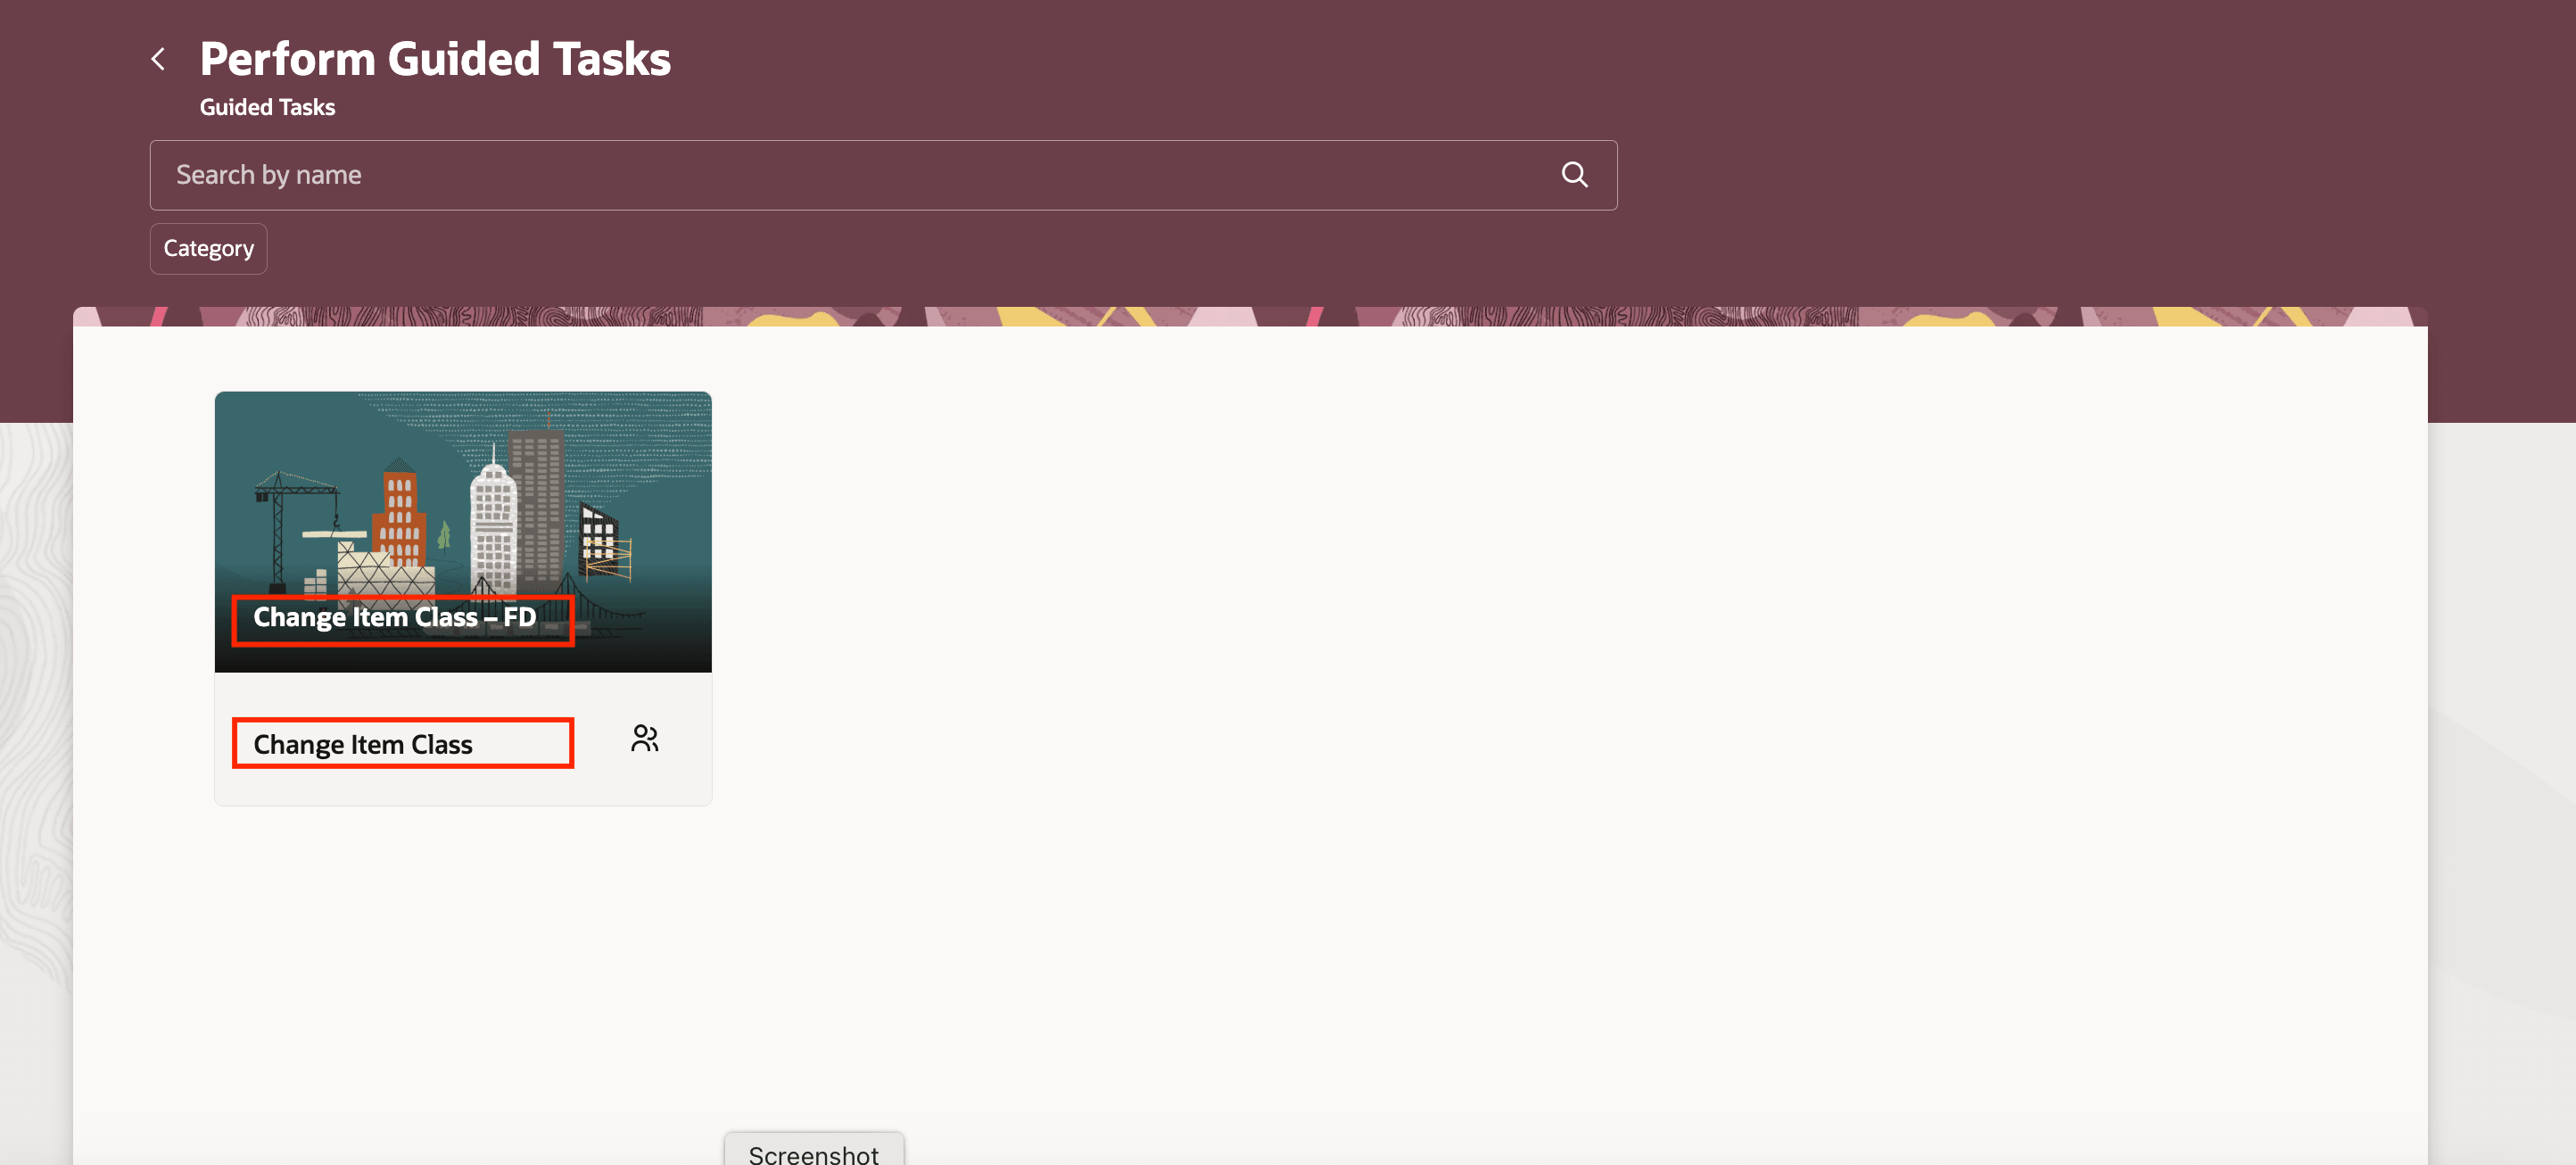
Guided Task Flow Library With Task Flows for Change Item Class Guided Task Category
- Click the guided task flow belonging to the Assign Items to Organization category. In this example, click Change Item Class – FD task flow and then click Start Guided Task.
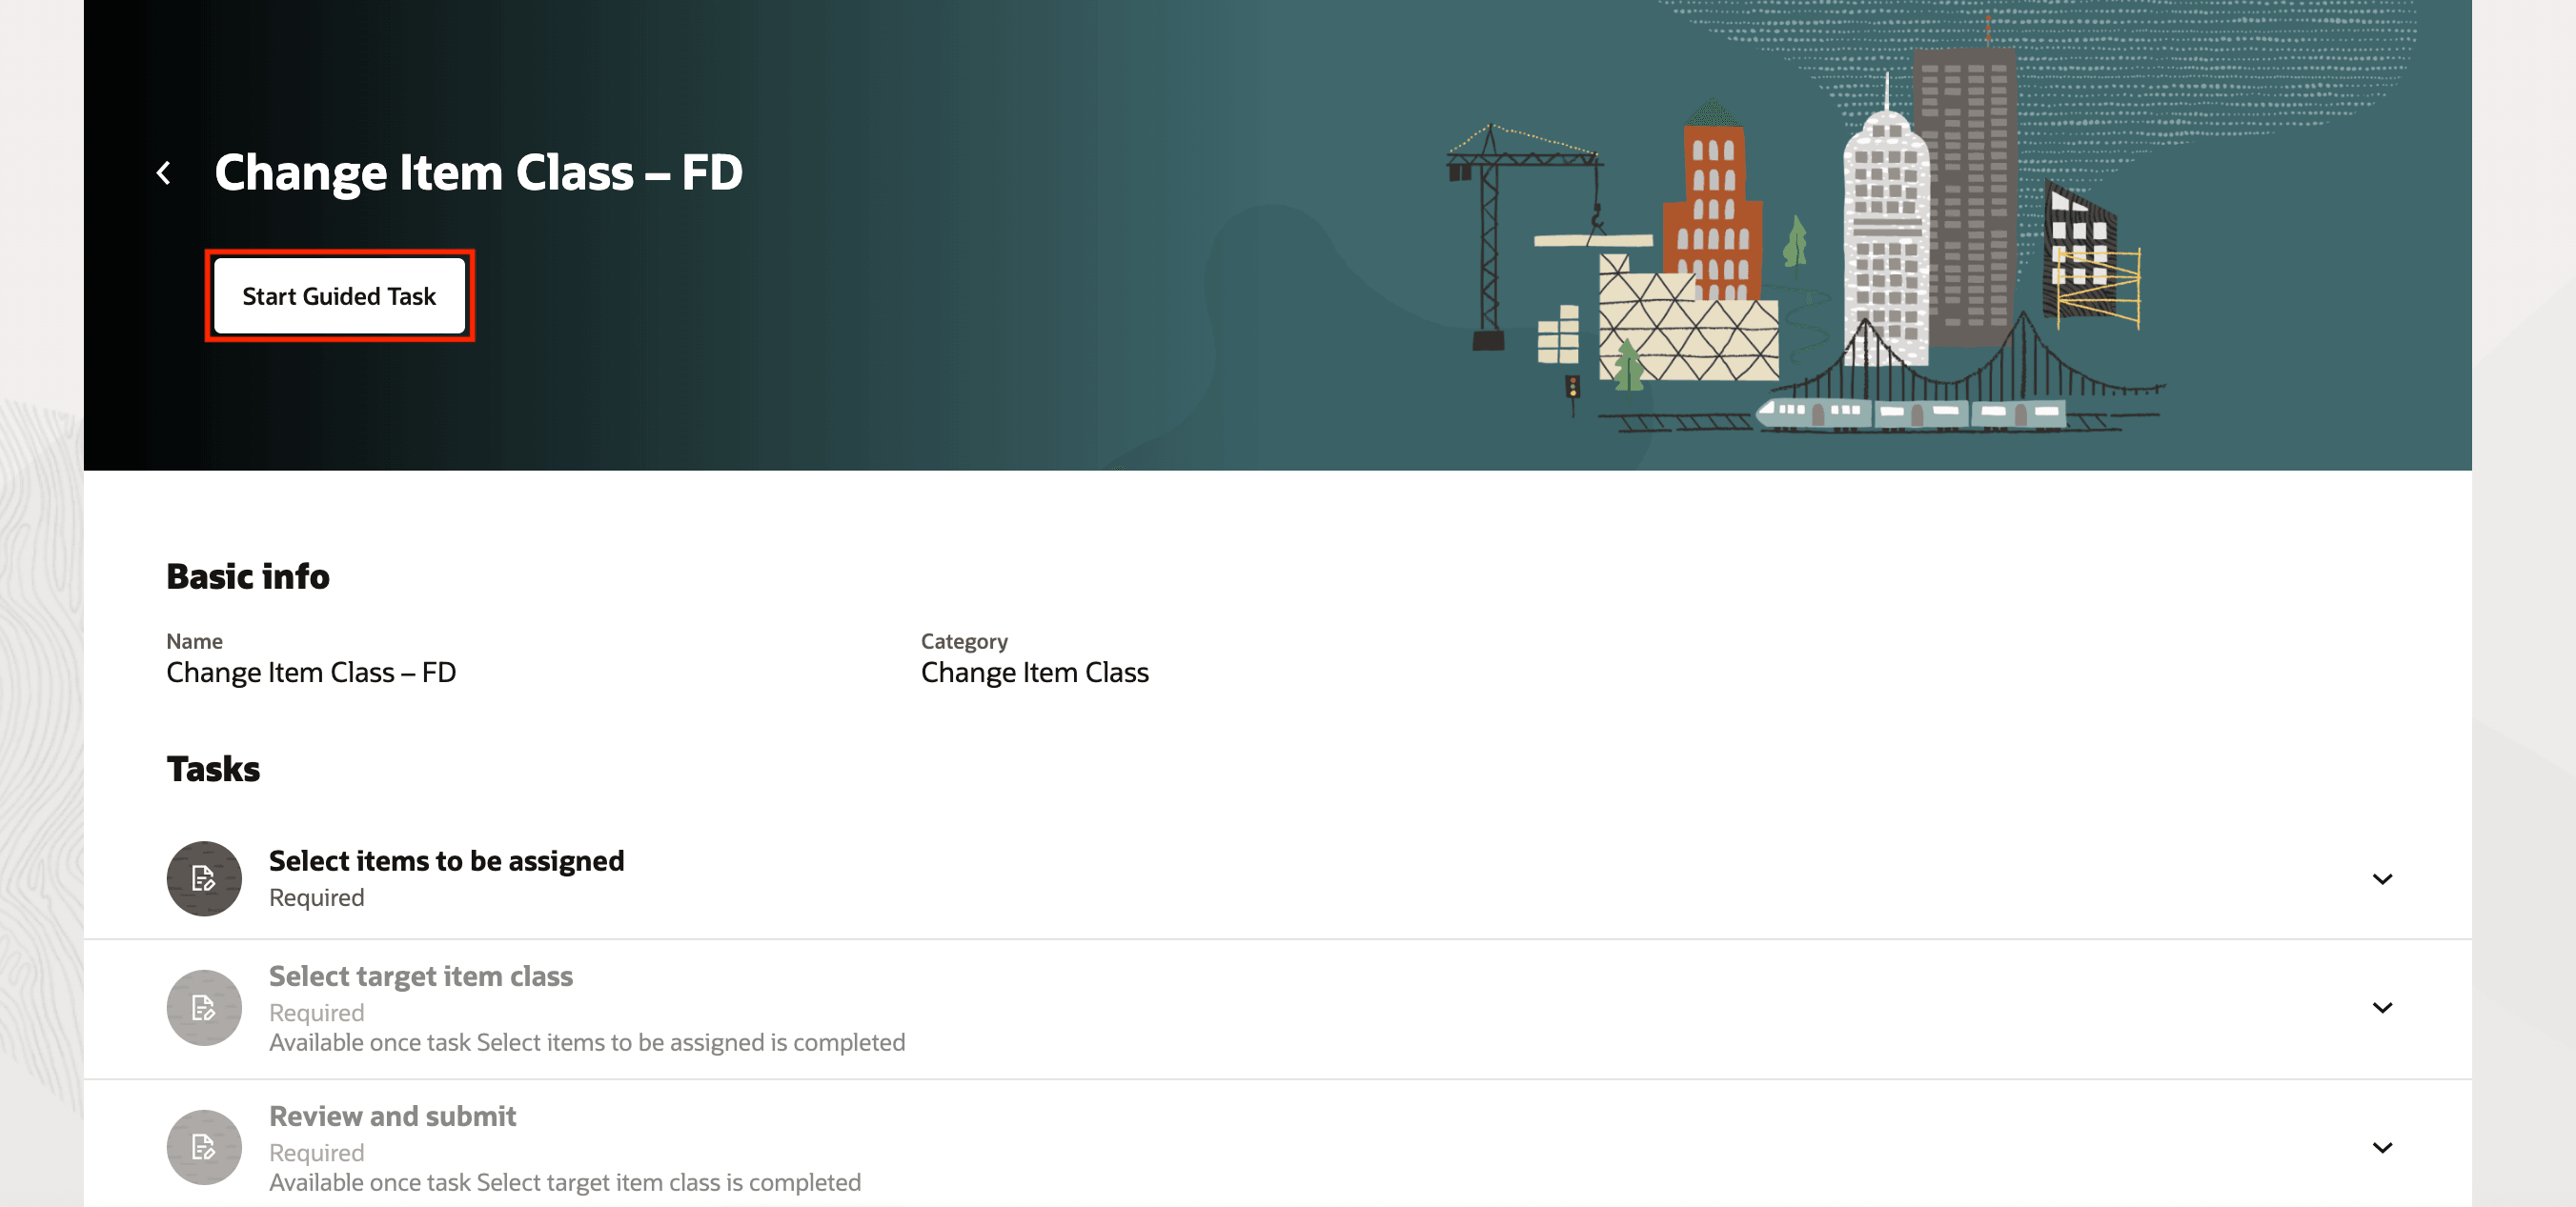
Initiate Change Item Class – FD Task Flow
This completes the guided task initiation phase.
Run Mandatory Tasks
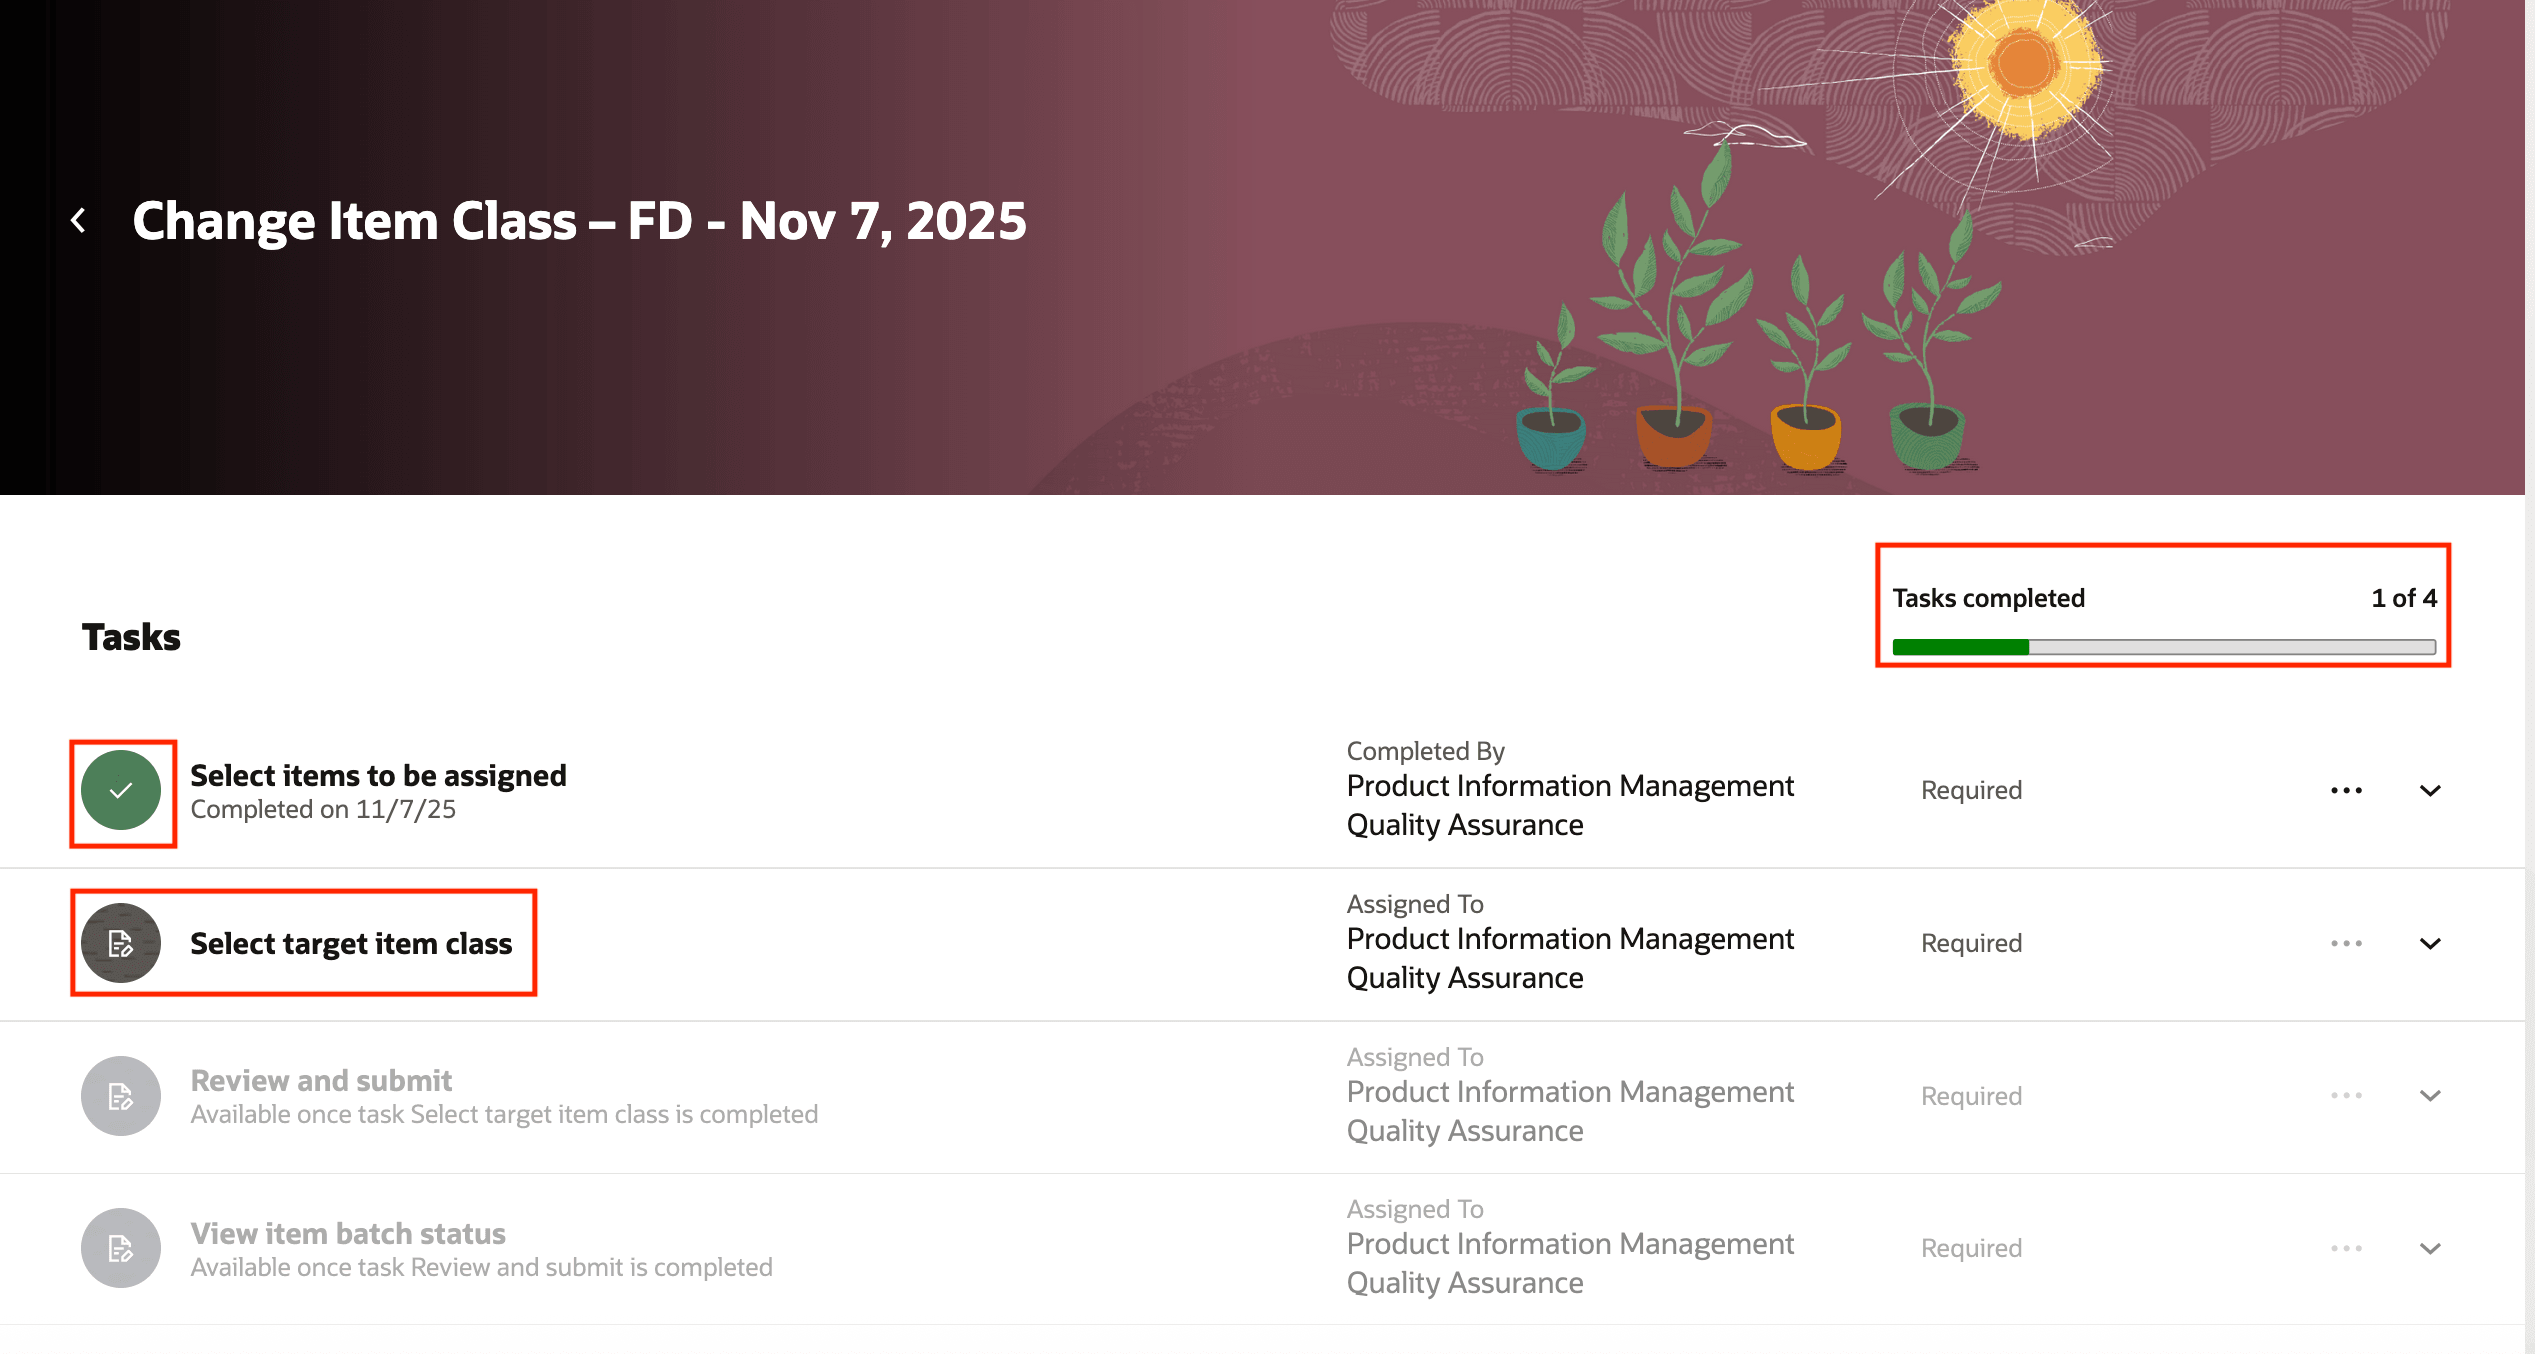
- Click the Select items to be assigned task as shown in the following screenshot.
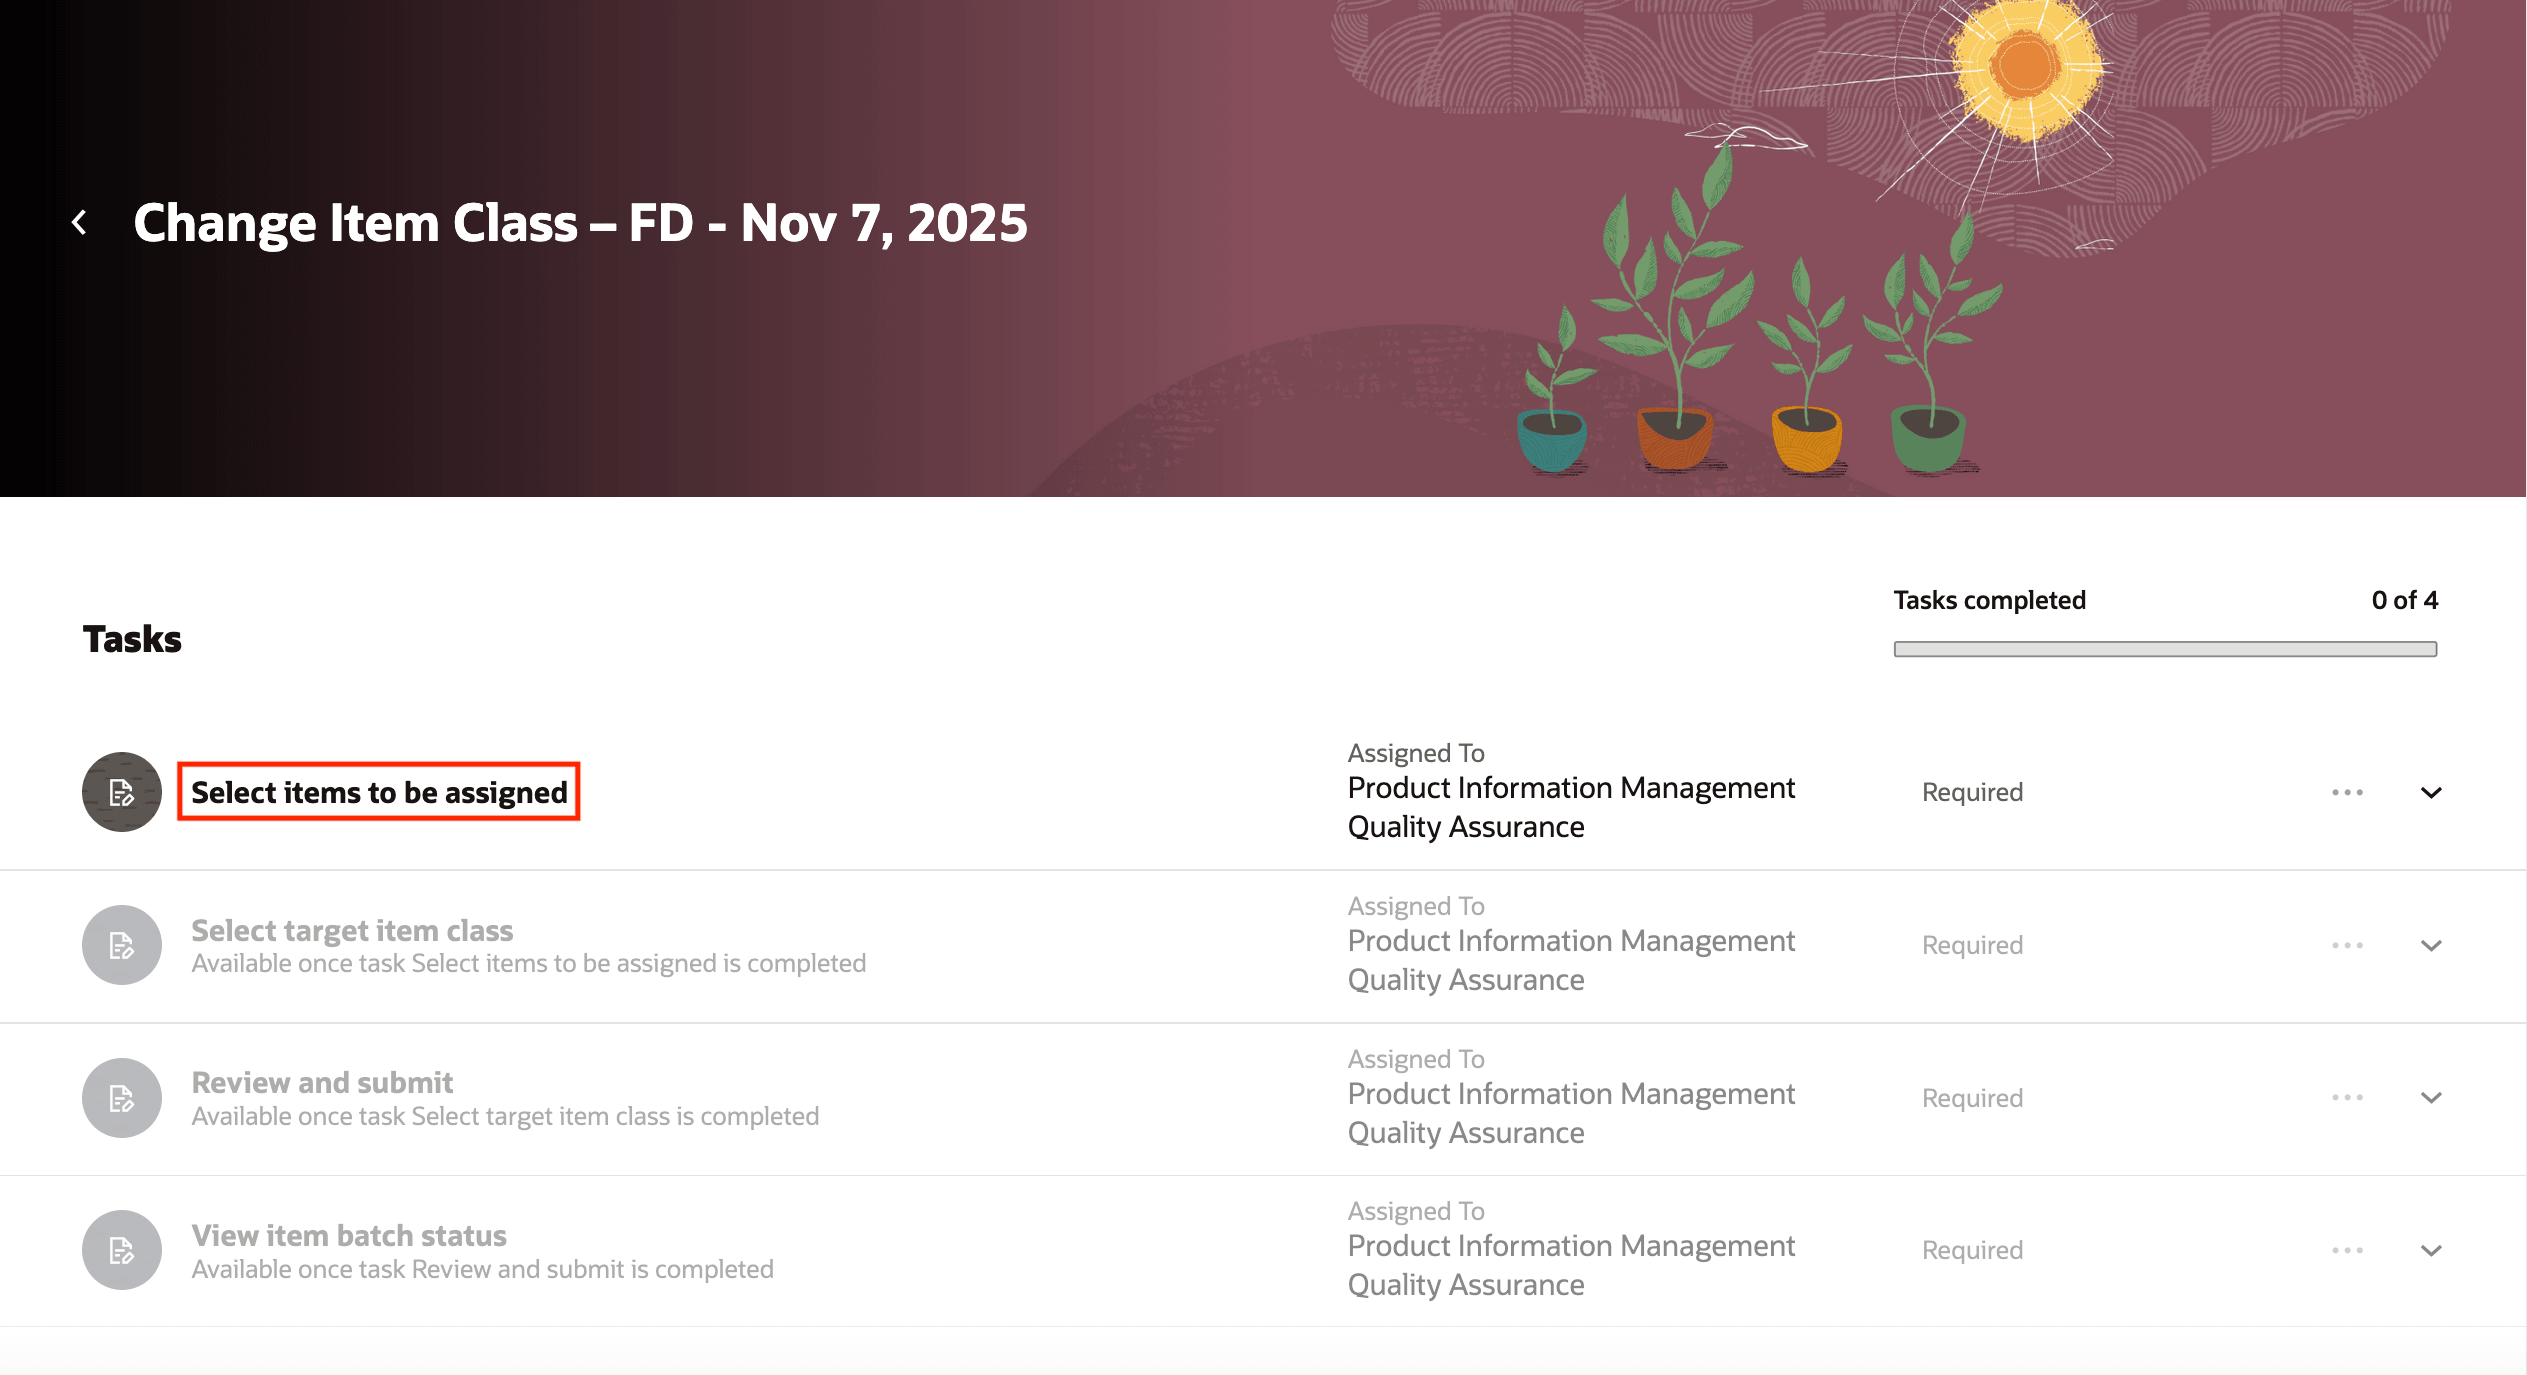
Task: Select Items to be Assigned
- Select the items you want to assign and then click Done.
The displayed items have been already preselected by the filter configurations and the master organization specified by your administrator.
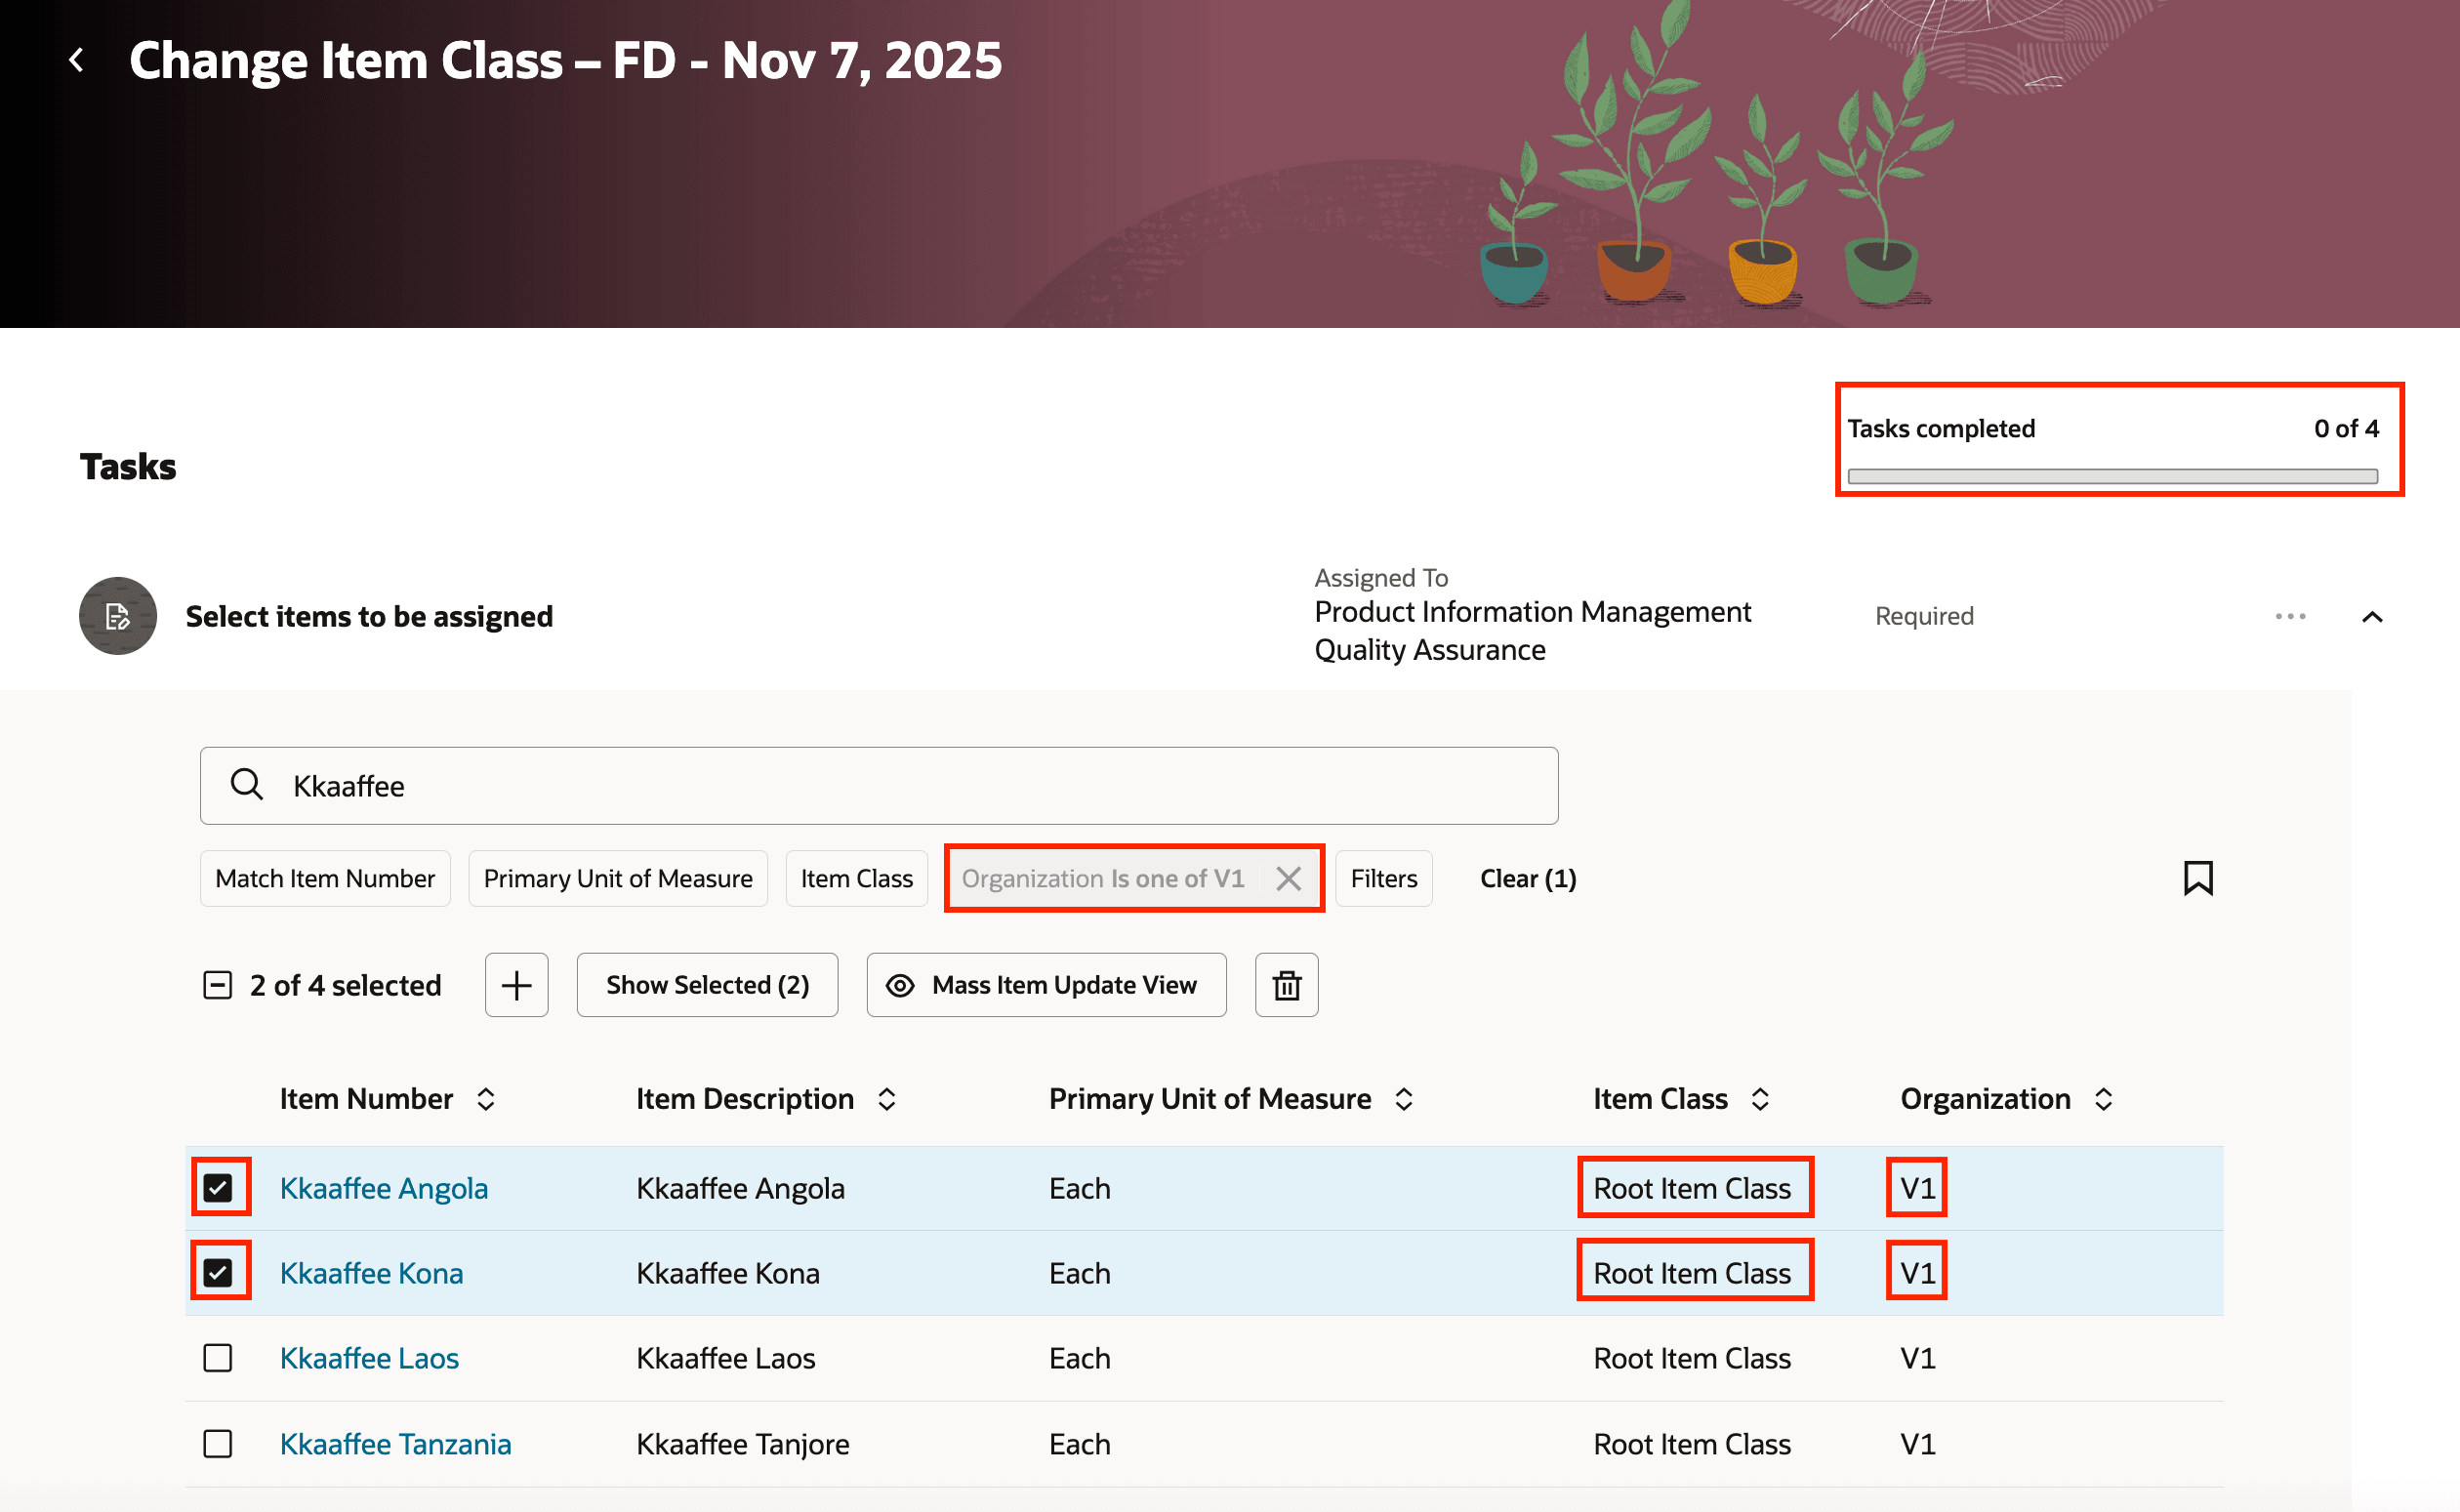
Items Selected for Assignment
- Click the Select the target item class task.
Task: Select Target Item Class
- Select the target item class to which items must be assigned and the target item view. Then click Done.
If your administrator has not preselected the target item class and the target item view, you will be able to choose one from the LOVs available.

Target Item Class Selected
- Click the Review and Submit task.
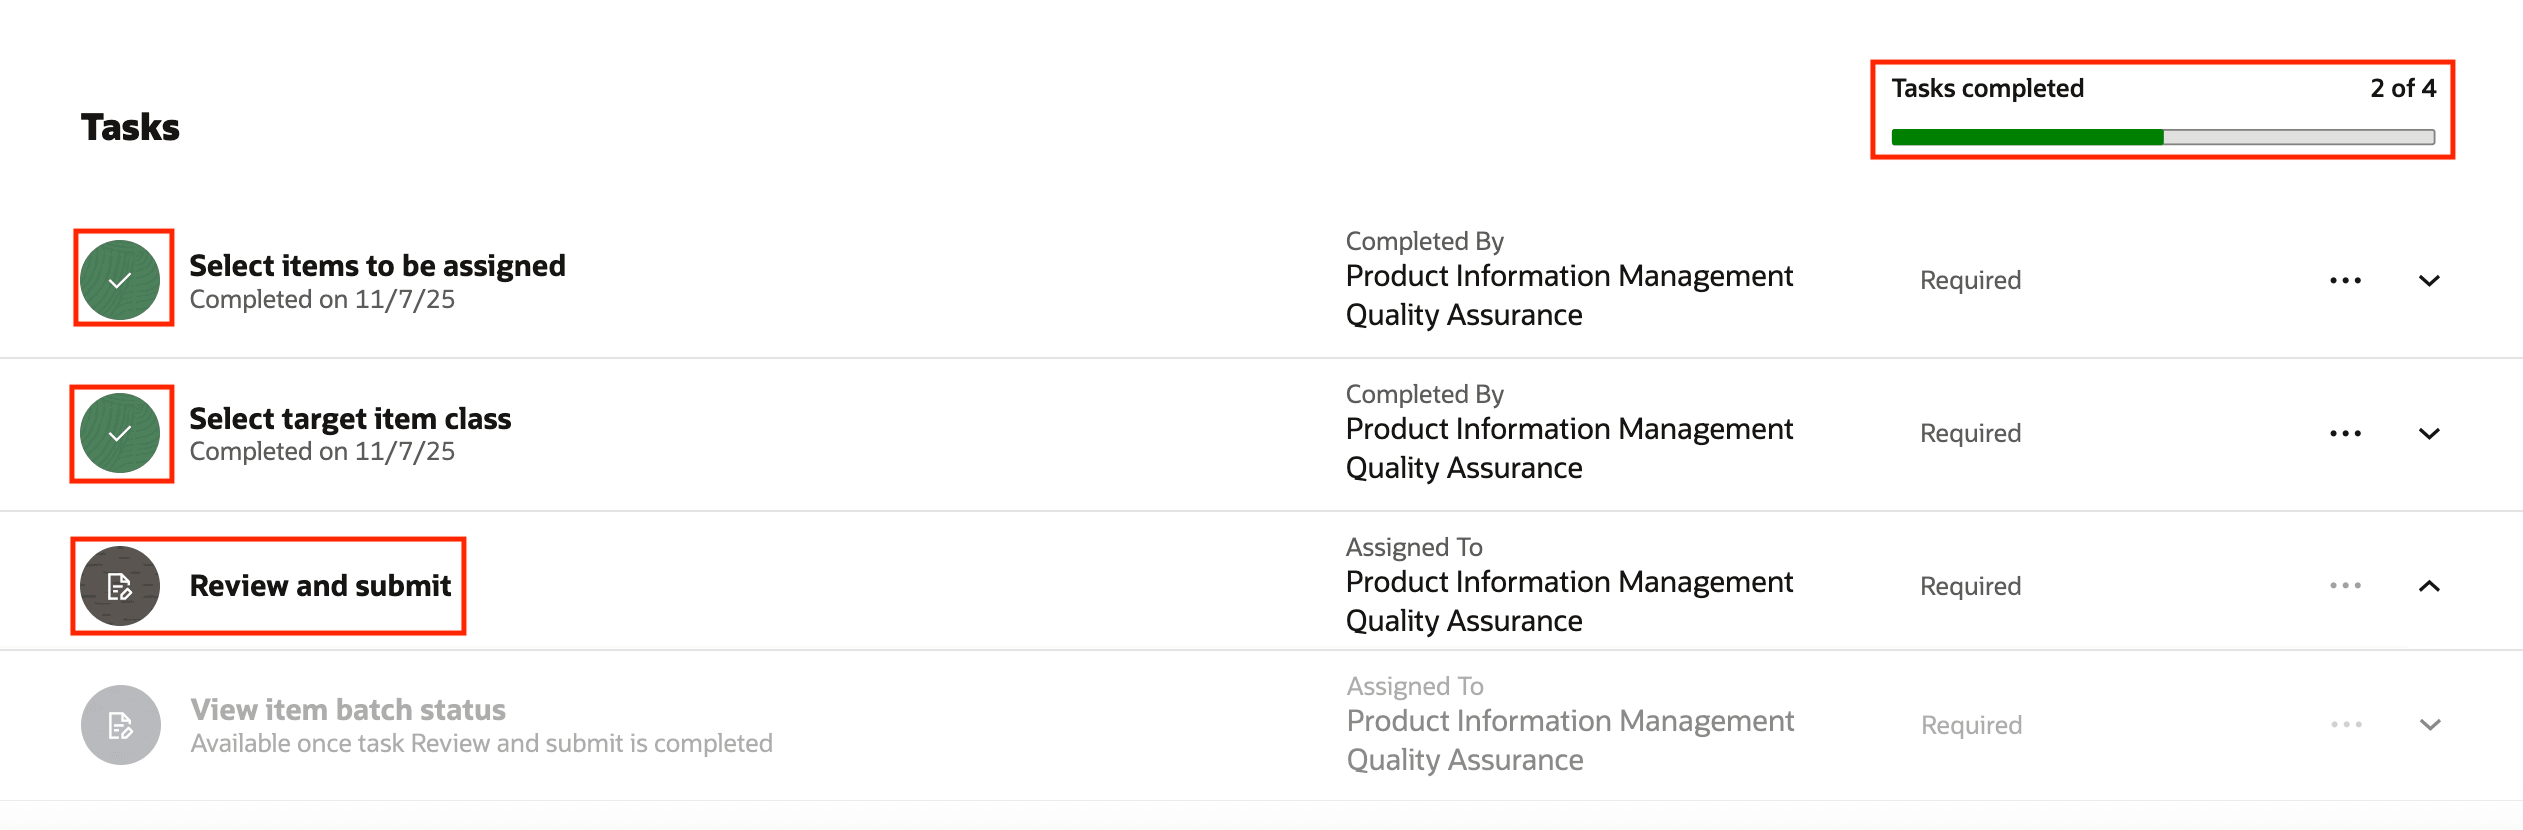
Task: Review and Submit
- Review the selections and choices you’ve made. If there are no changes, click Done. This will export the selected item into a smart spreadsheet with:
- Columns specified in the target item view
- One new item class name prepopulated with the target item class. In this example Frozen Desserts is the target item class
You must update the smart spreadsheet as required and submit the item import process.
If you want to change any of your selections, click the respective task and do the changes. View the updated changes and click Done.
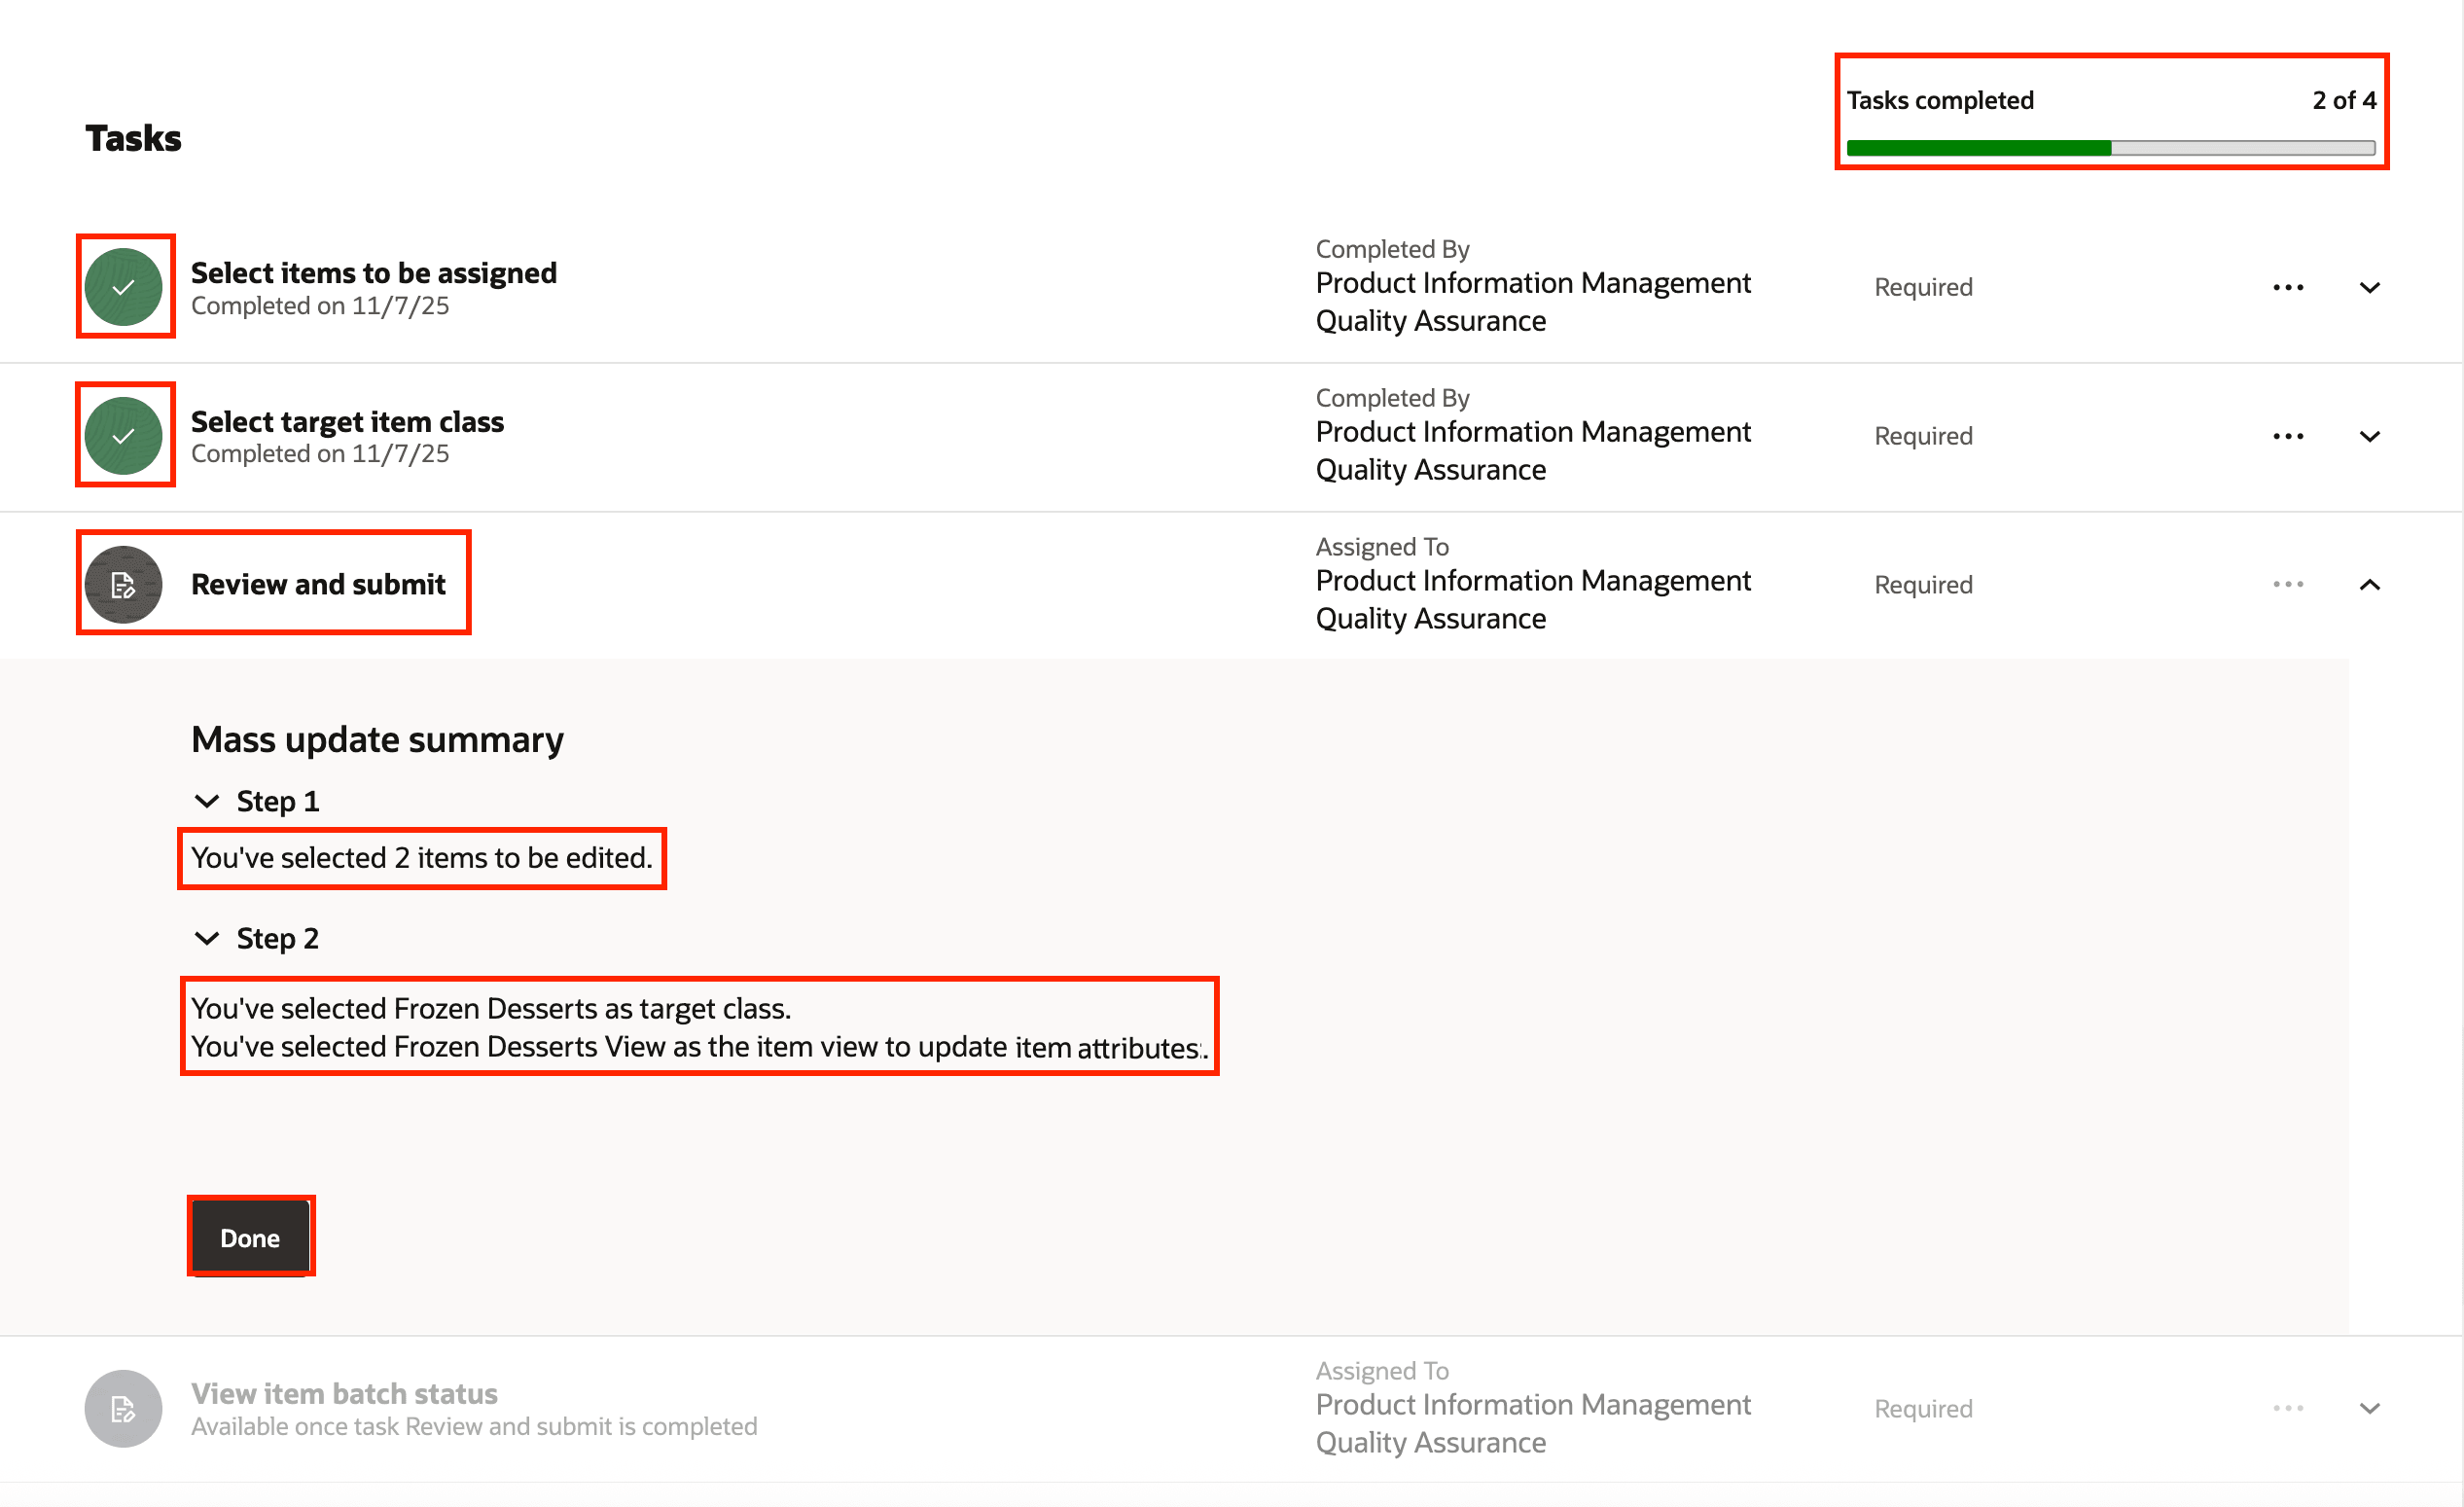
Task: Review and Submit - Displaying Your Selections
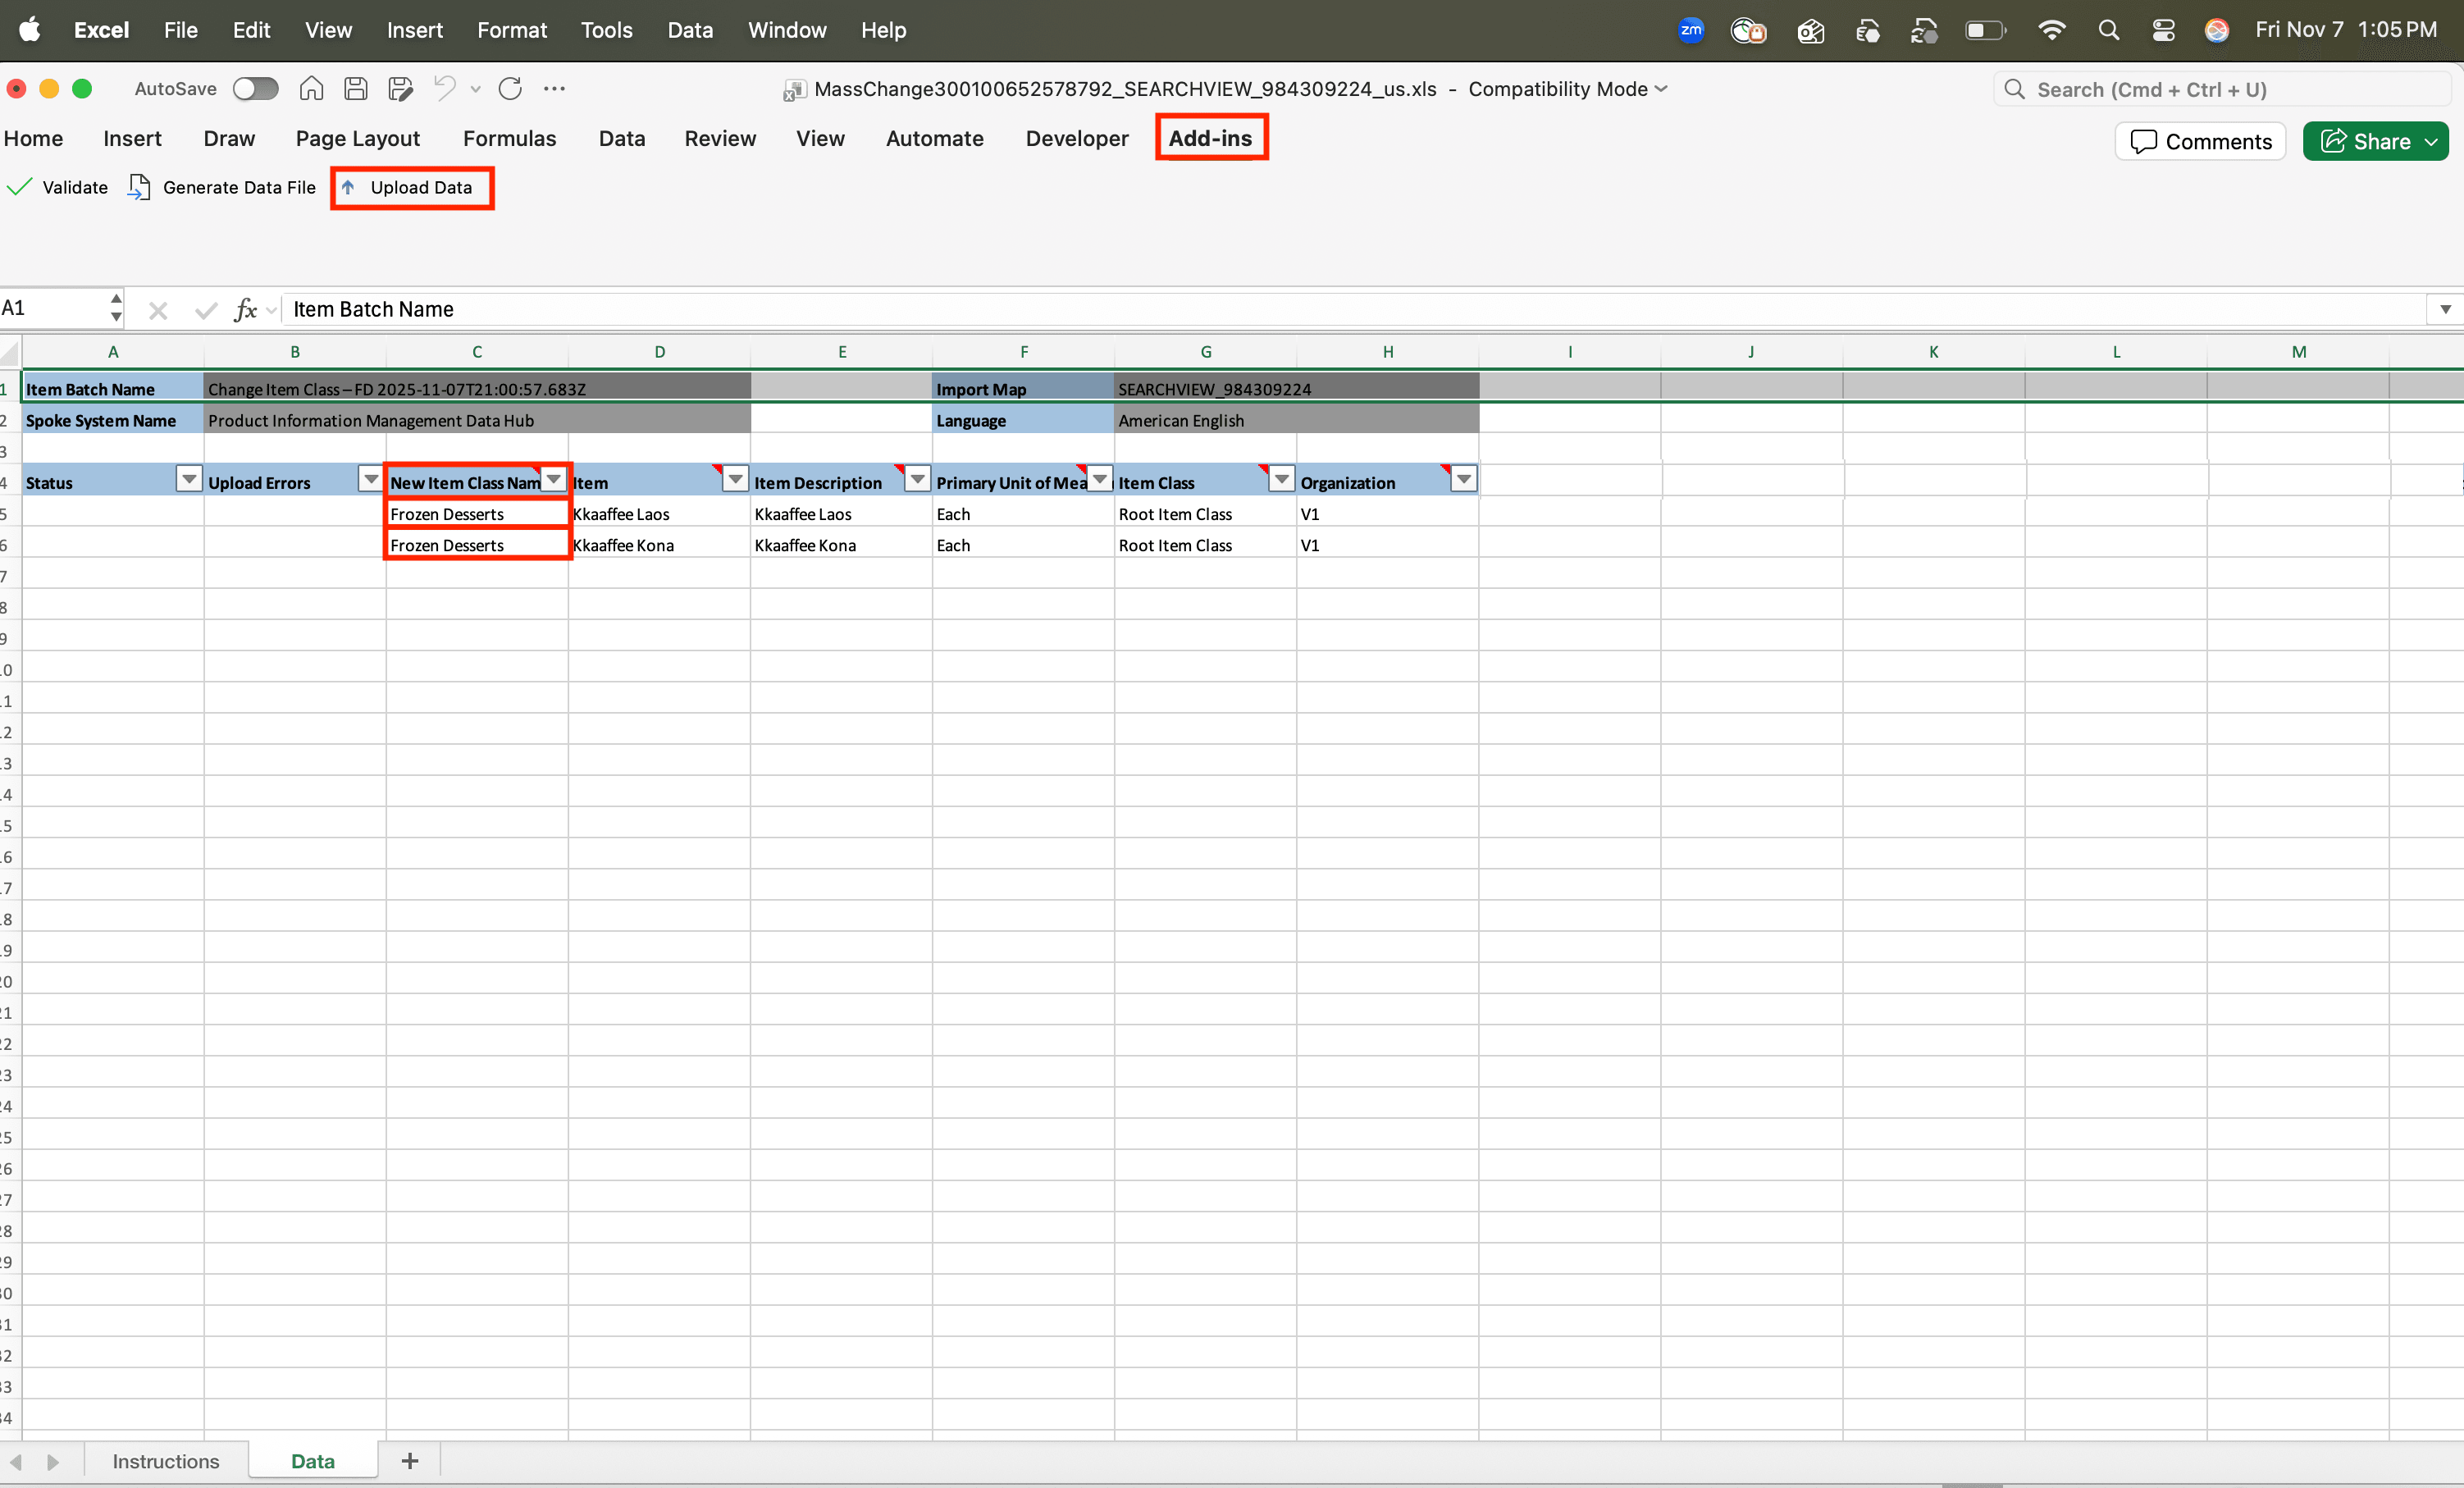
Smart Spreadsheet Generated
- Click the View item batch status task.
You can use this task to view the Job ID, Job Status, Submitted Date, and Batch Name of the scheduled process Item Import. You can click Refresh to view the progress of the scheduled process. When the Job Status changes to Succeeded, you’ve successfully completed the guided task flow. If the batch fails, then you can rerun the task flow after resolving the issue.

Task: View Item Batch Status
This feature benefits your business by providing the following:
- Streamlined, repeatable, and standardized business process.
- Implement guided task flows specific to your users and business processes.
- Increased enterprise data governance.
- Improved user experience and data quality due to a decrease in manual errors.
Here's the demo of these capabilities:
Steps to enable and configure
To enable this feature:
- Make sure that an employee record is associated with the user.
- Set the profile options. Use the Manage Administrator Profile Values task in the Setup and Maintenance work area to review and configure the profile options provided in the following table.
|
Profile Option Code |
Profile Display Name | Profile Option Description | Profile Level | Profile Value |
|
ORA_FND_SEARCH_EXT_ENABLED |
Enable/Disable Search Ext Framework |
Check if the search extension is enabled. |
Site |
Y |
|
HRC_ELASTIC_SEARCH_ENABLED |
HRC: Enable Elastic Search |
Enable elastic search-based search engine for Oracle Fusion Cloud HCM objects search. |
Site |
Y |
|
PER_SEARCH_LOGIN_EVENT_PUB |
PER: User Login Event Publication for Search |
Method to publish user login events for HCM objects search purpose. |
Site |
ATOM |
|
ORA_PER_CHK_ORACLE_SEARCH_INDEX_ENABLED |
Oracle Search Index for Journeys Enabled |
Enable Oracle search index for journeys. This must be set before doing the initial ingest or any incremental ingestion. If this isn't enabled, elastic ingestion won't happen. |
Site |
Y |
|
ORA_PER_JOURNEYS_ENABLED |
Journeys UI Enabled |
If you set this site-level option to Y, you can use Journeys to manage all journey categories (predefined or user-defined) from a single location. When you enable Journeys, the Onboarding and Checklists Tasks apps aren't available. |
Site |
Y |
|
ORA_PER_CHK_ORACLE_SEARCH_UI_ENABLED |
Oracle Search for Journeys Enabled |
Enable Oracle Search for Journeys for My Journeys, Team Journeys, and Organization Journeys pages. Enabling this profile option will display Team Journeys and Organization Journeys tabs instead of the existing Assigned Journeys tab. |
Site |
Y |
|
ORA_PER_CHK_ORACLE_SEARCH_DIRECT_INGEST_ENABLED |
Direct Uptake of Data for Oracle Search in Journeys Enabled |
Enable direct uptake of data for Oracle Search in Journeys. This profile option enables direct ingestion during UI operations instead of the default near real time ingestion. This only affects incremental ingestion during any updates happening in the UI. The ingestion bypasses the queue and is directly done on the index, which guarantees the elastic-based journeys UI to show latest data immediately. |
Site |
Y |
- Run the scheduled process ESS job to create index definition and perform initial ingest to OSCS with the Index Name to Reingest parameter set to the appropriate index for the feature. Run this process for the following indexes:
- fa-hcm-workerjourney
- fa-hcm-workerjourneytask
- fa-hcm-acl
You must rerun this process after P2T.
After running the scheduled process for the indexes, the administrator must create and configure the guided task flow that allows users to mass change item class for a set of selected items.
Create and Configure the Change Item Class Process
To create and configure the Change Item Class process:
- On the Product Management page, in the Actions panel, click View all actions and then click Guided Tasks Configuration. The Configure Guided Tasks page is displayed as shown.
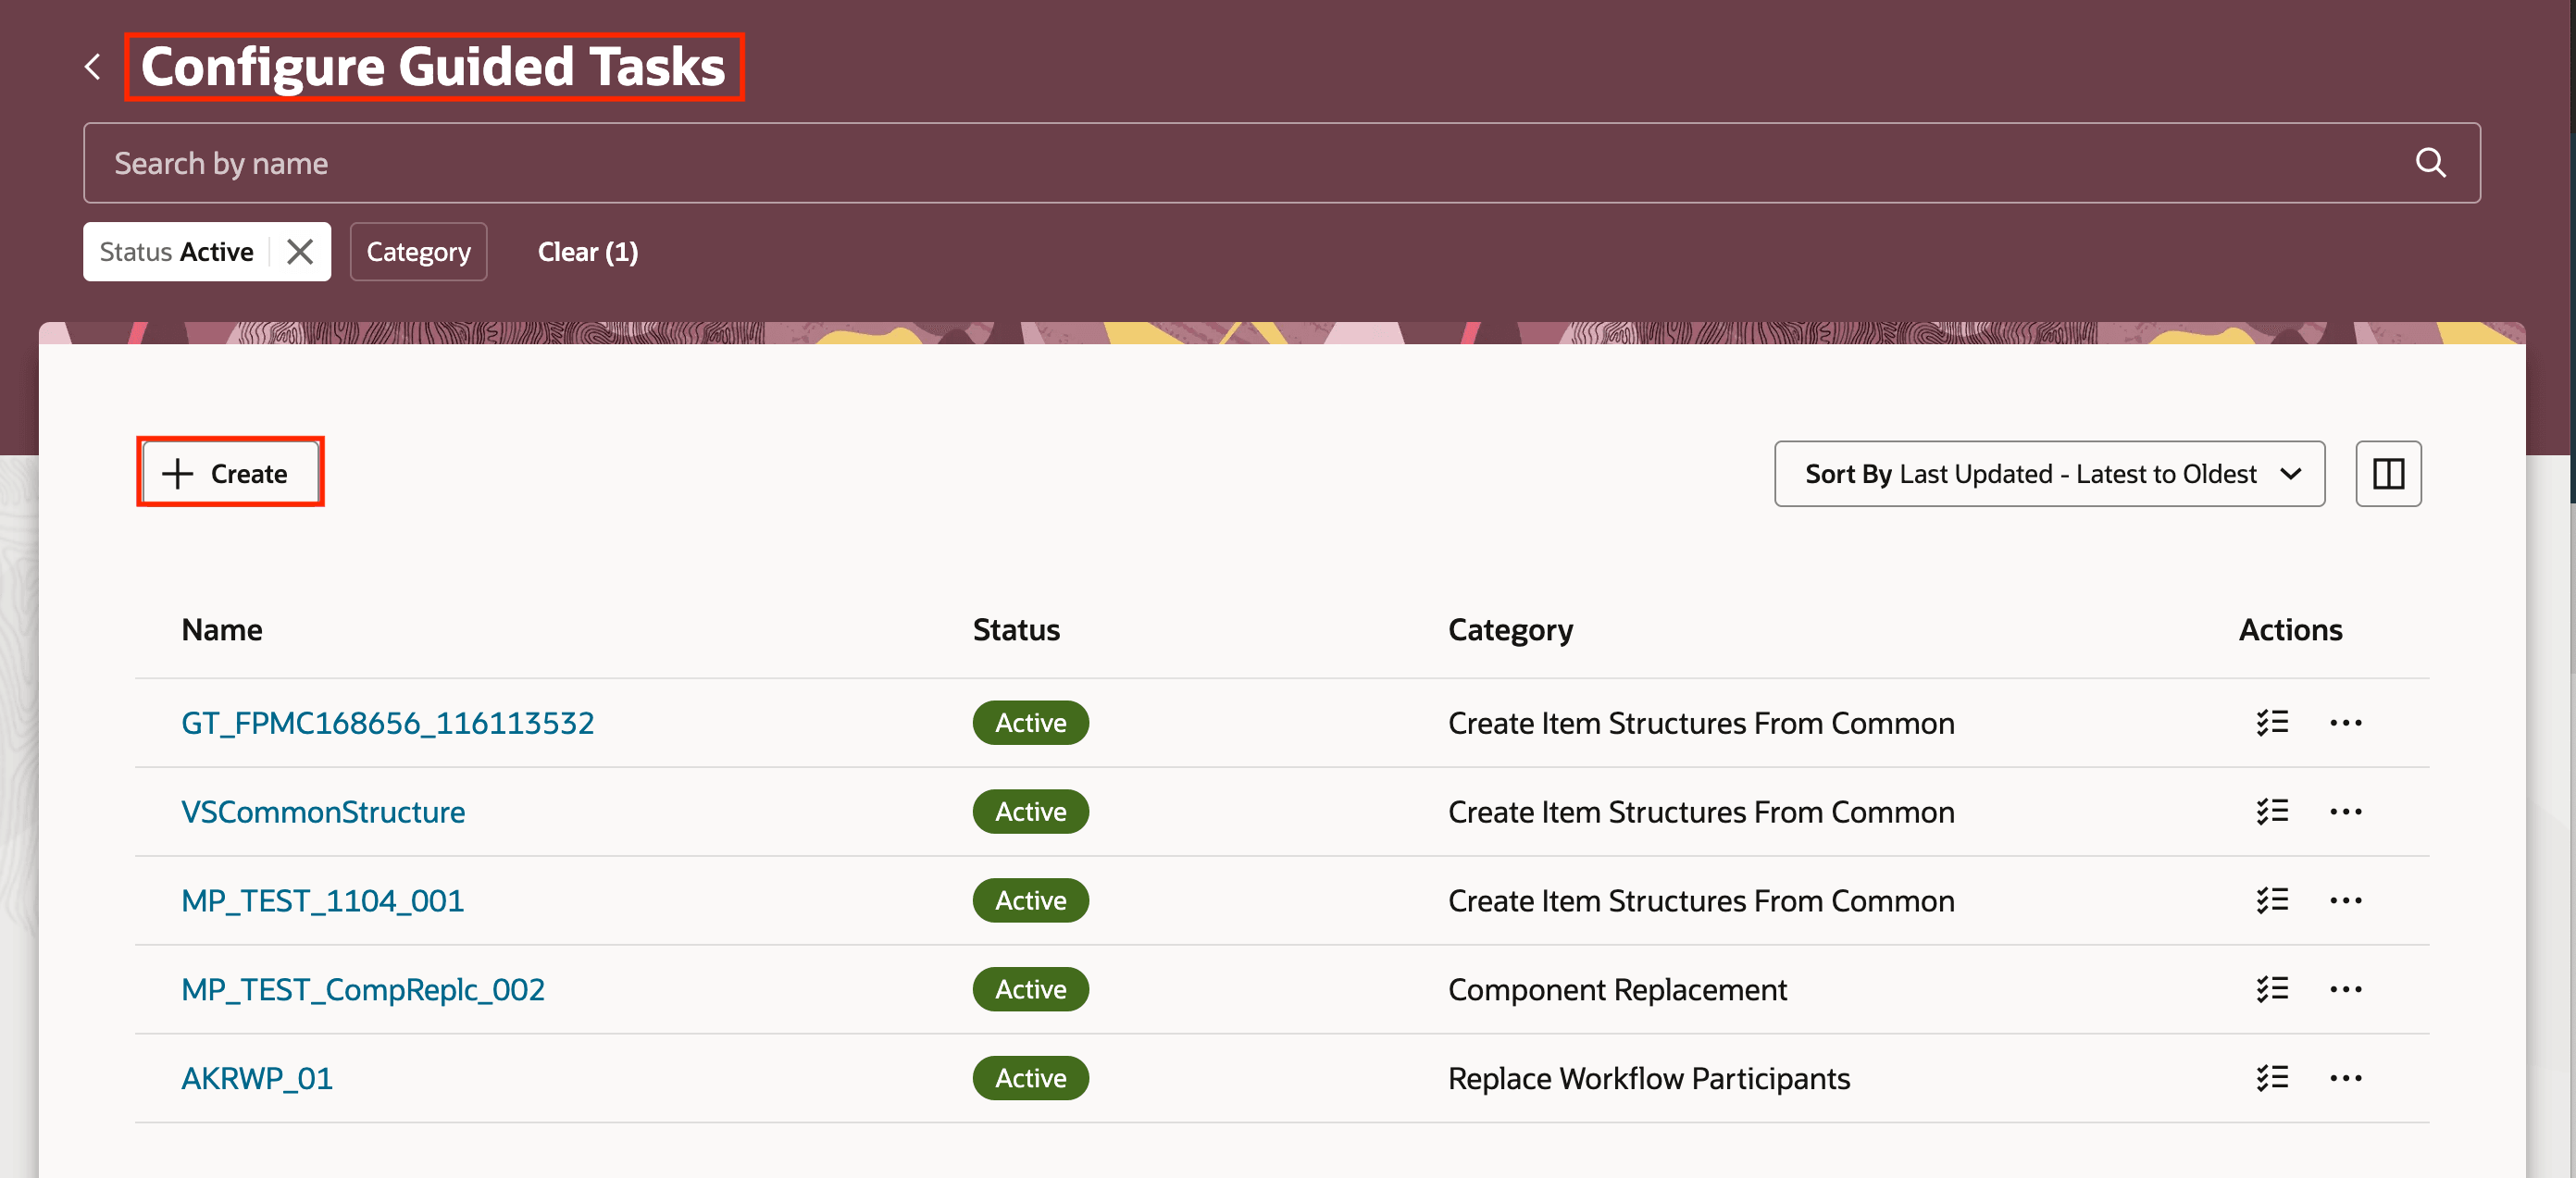
Configure Guided Tasks Page
- Click Create. The New Guided Task drawer appears. Here, you must provide the details as shown in the following screenshot for the guided task you're creating. Select the Category as Change Item Class. In the Name field, specify the task flow name for your specific business process. For example, Change Item Class - FD is a task flow name to be used to assign desserts to various organizations. After adding all the details, click Create Draft.
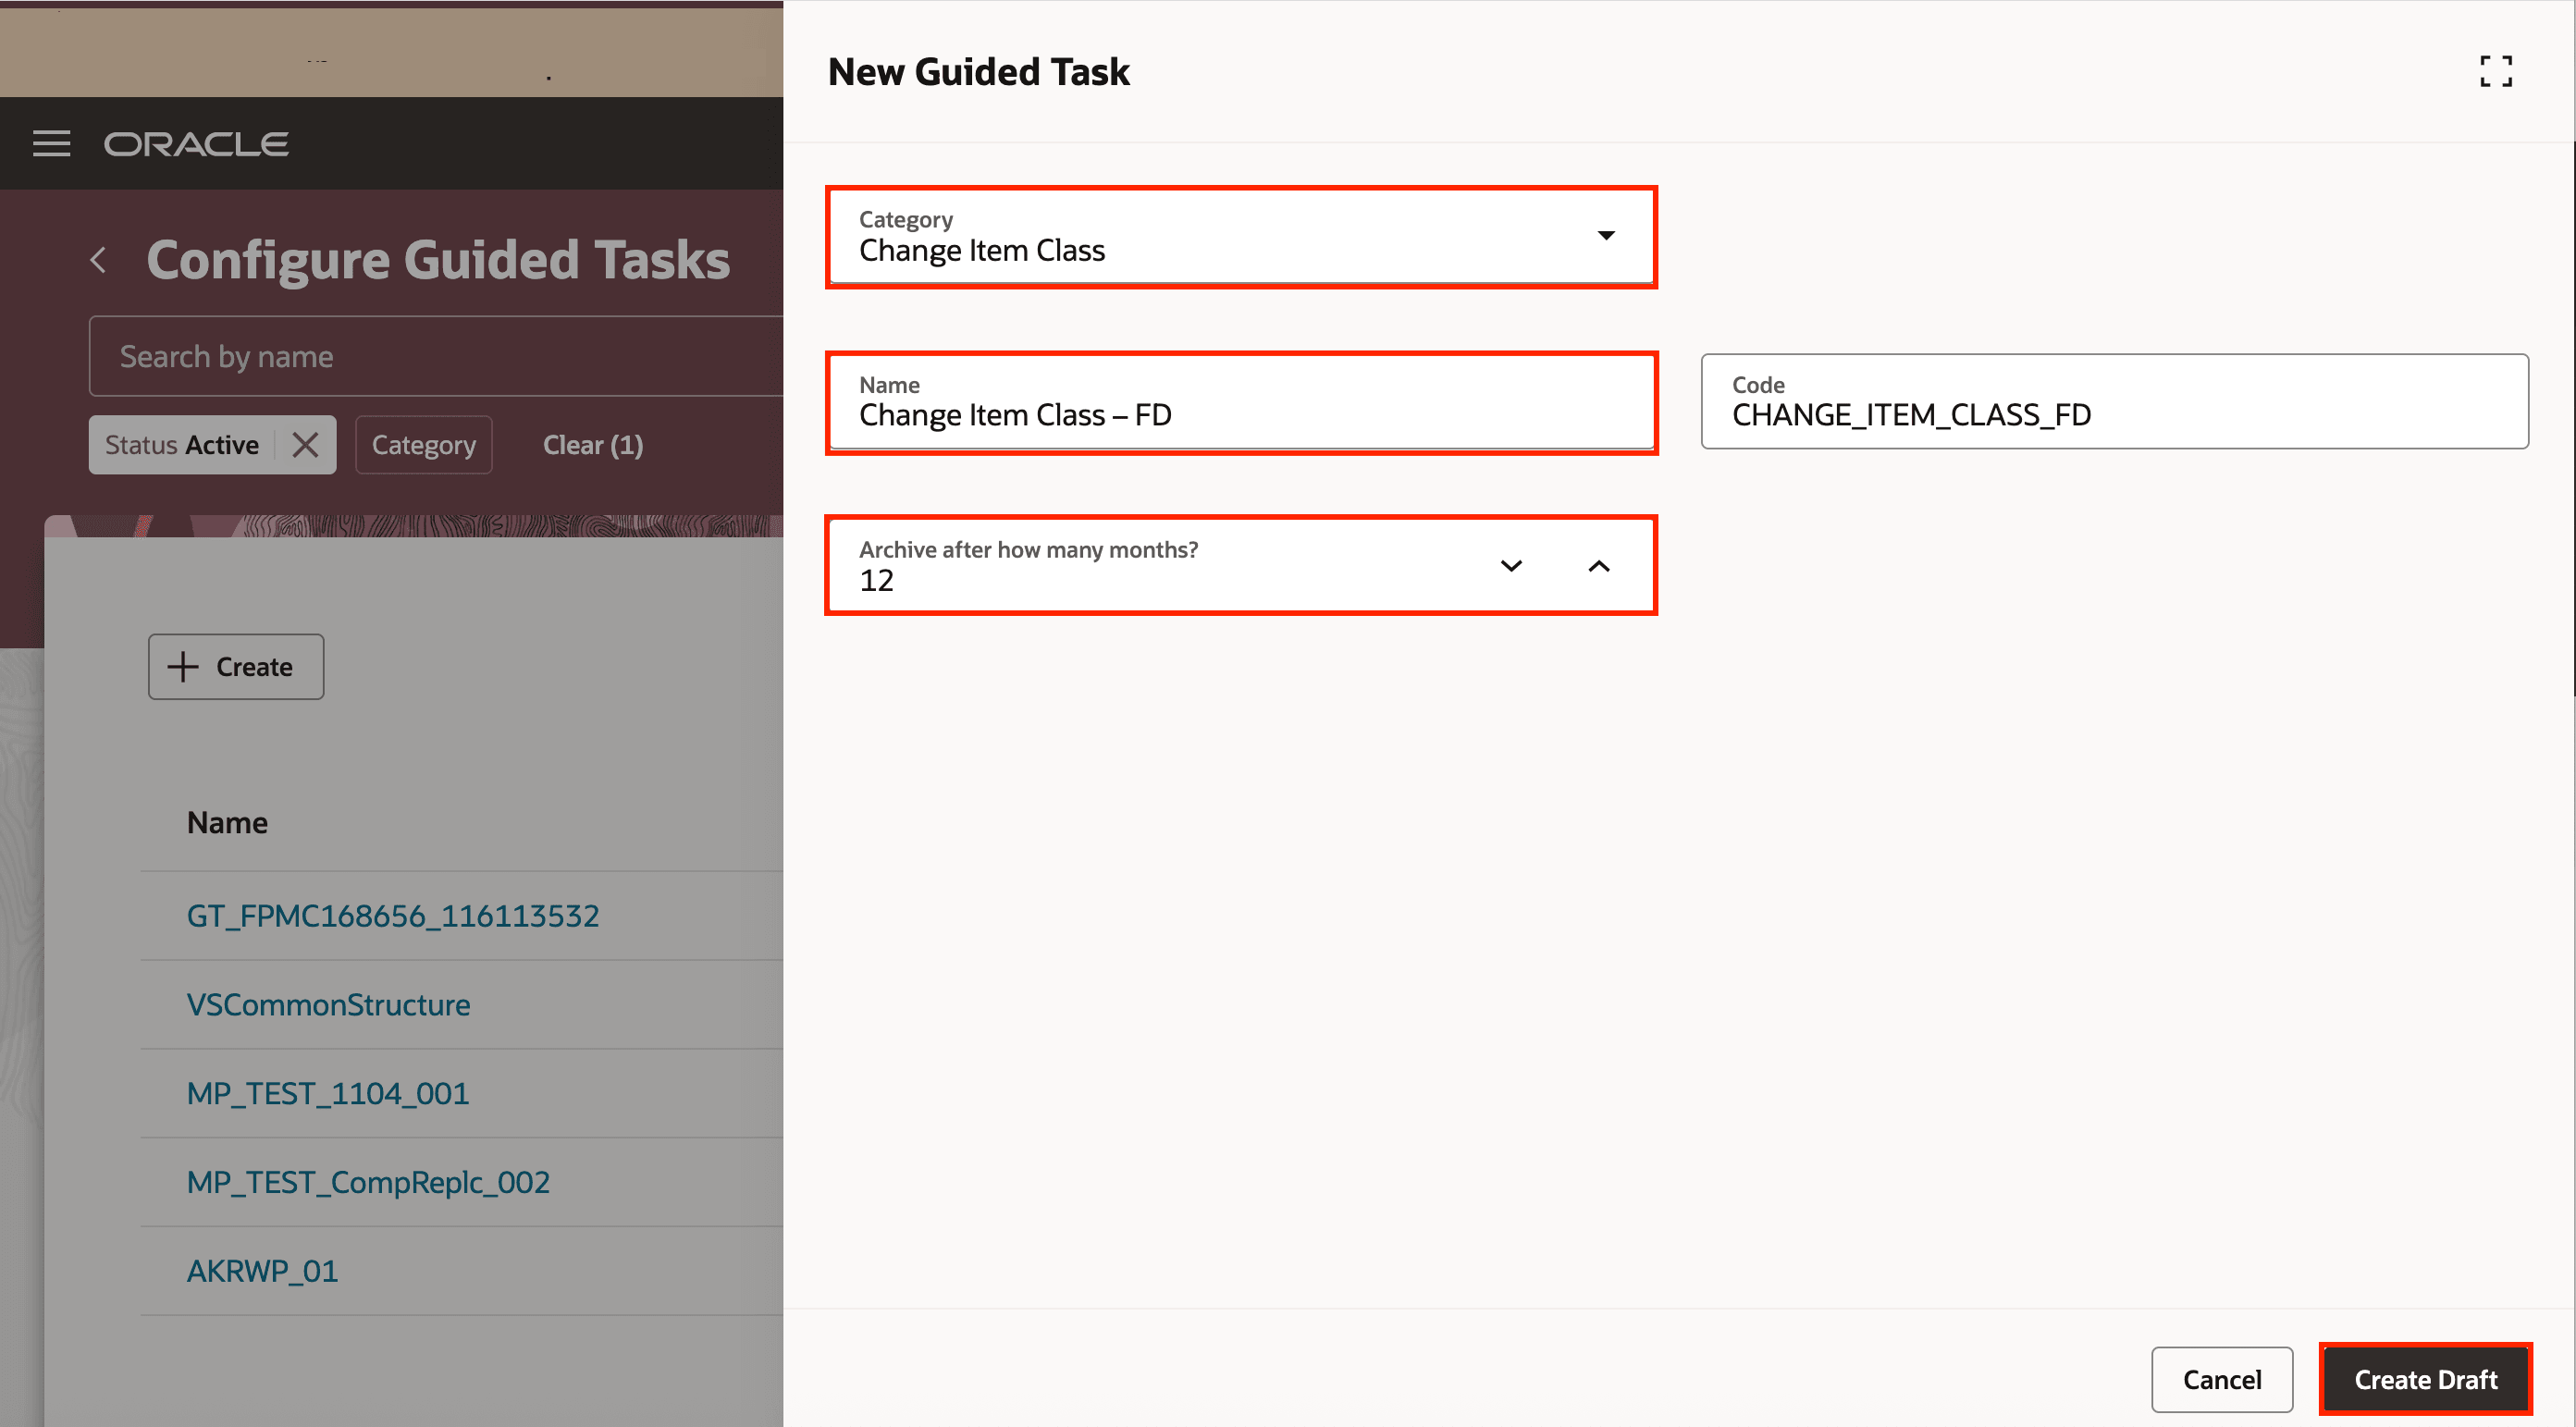
New Guided Task Drawer
The Change Item Class guided task page is displayed in draft mode with a list of mandatory tasks. In this example, the guided task name is Change Item Class – FD. For the Change Item Class – FD category, the mandatory tasks in the task flow are:
- Select items to be assigned
- Select the target item class
- Review and submit
- View item batch status
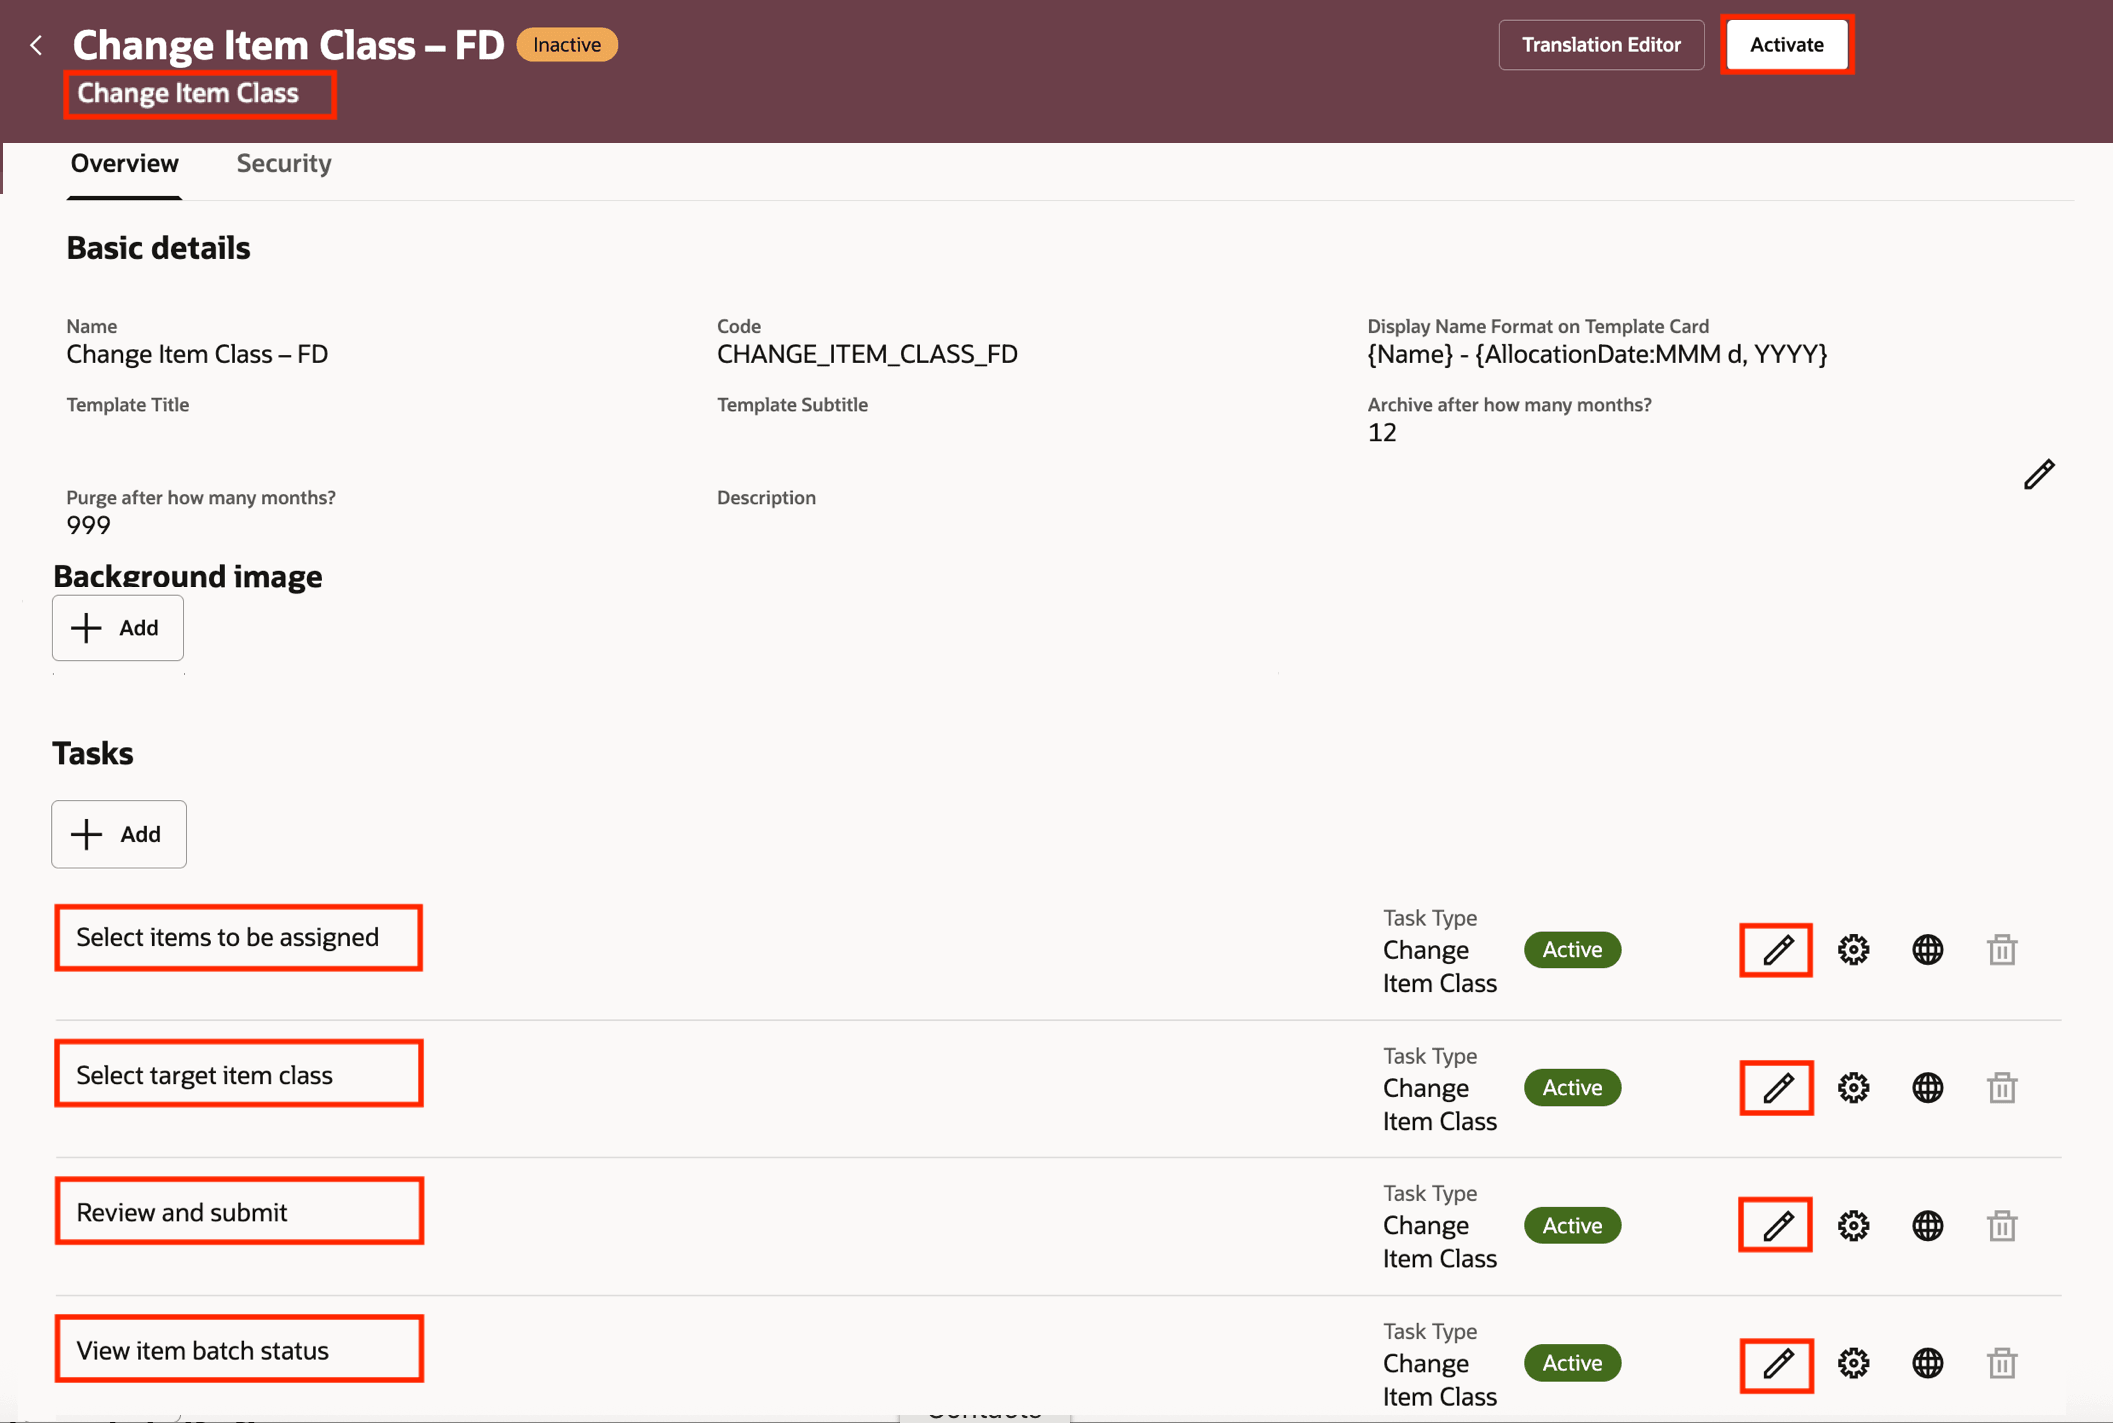
Task Flow in the Draft Mode
- Click the Edit Task icon for each task, populate the relevant fields, and click Save. After you’ve updated all the steps, click Activate to make the task flow available for your users. The details for each task are outlined in the next few steps.
- Update the Select items to be assigned task. In this task, you specify the master organization from which the items must be selected for assignment. You can also specify filters that such as Item Class, Catalog, and Category.
- Click the Edit Task icon for the Select items to be assigned task. From the Master organization drop-down list, select the master organization from which you want to select the items. This is mandatory.
- In the Filter configuration section, from the Attribute drop-down list, select an attribute and then specify the Values that will be used by the Guided Tasks to preselect an item data set for your users. For example, if you select Life Cycle Phase as a filter attribute and assign Production as its value, then the Guided Tasks will allow your users to select only the item set that are in the Production lifecycle phase. You can select multiple attributes to create a well-defined data set for your users.
- Click Save.
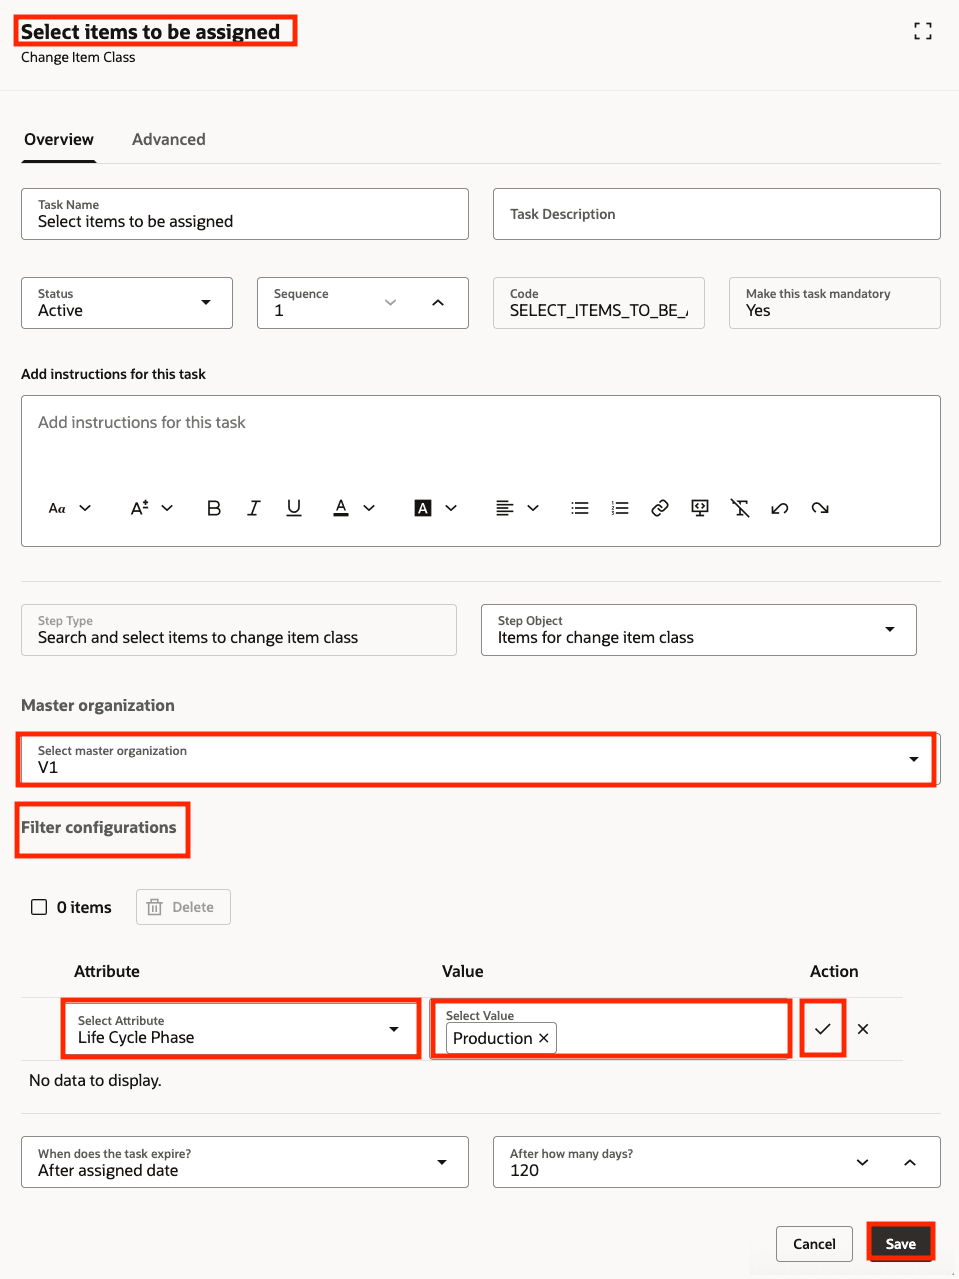
Task: Select Items to be Assigned
- Update the Select the target item class task. In this task, specify the item class to which the selected items must be migrated to along with the target item view to be used for migration.
- Click the Edit Task icon for the Select the target item class task.
- From the Select target item class drop-down list, select all the item class relevant to this task flow. This is optional. However, if you choose to:
- Populate a value in this field, while performing this guided task, your user won't be able to change the target item class at run-time.
- Not populate a value in this field, while performing this guided task, your user can select any item class as the target item class at run-time.
- From the Select target item view drop-down list, select all the views relevant to this task flow. This is optional.
- Click Save.
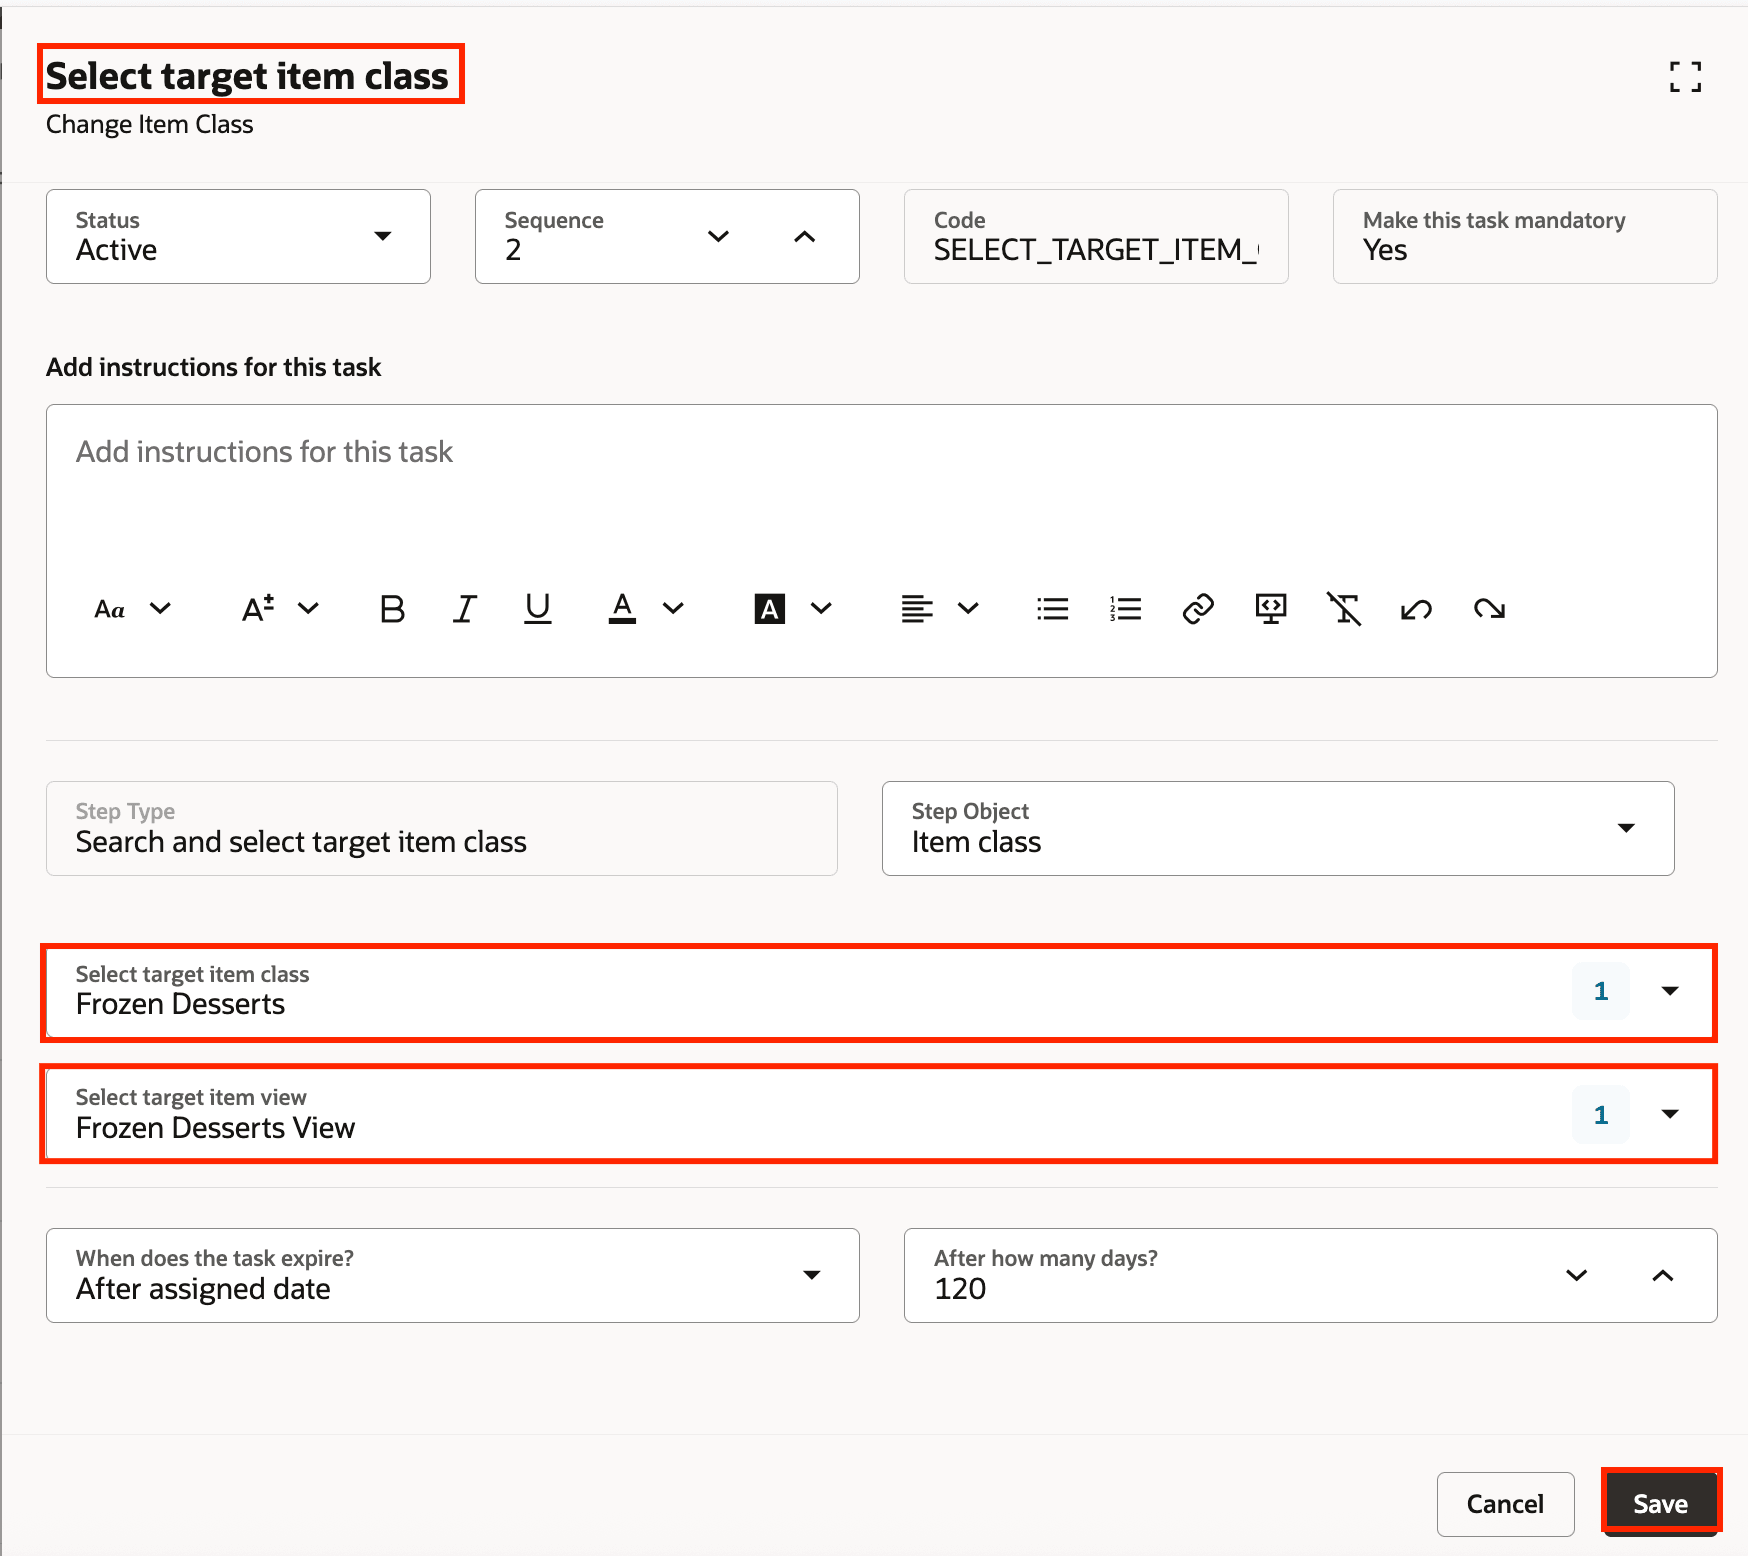
Task: Select the Target Item Class
- Update the Review and submit task. In this task, specify the task expiry days.
- Click the Edit Task icon for the Review and submit task.
- In After how many days? Field, specify the number of days after which this task expires. This is mandatory.
- Click Save.
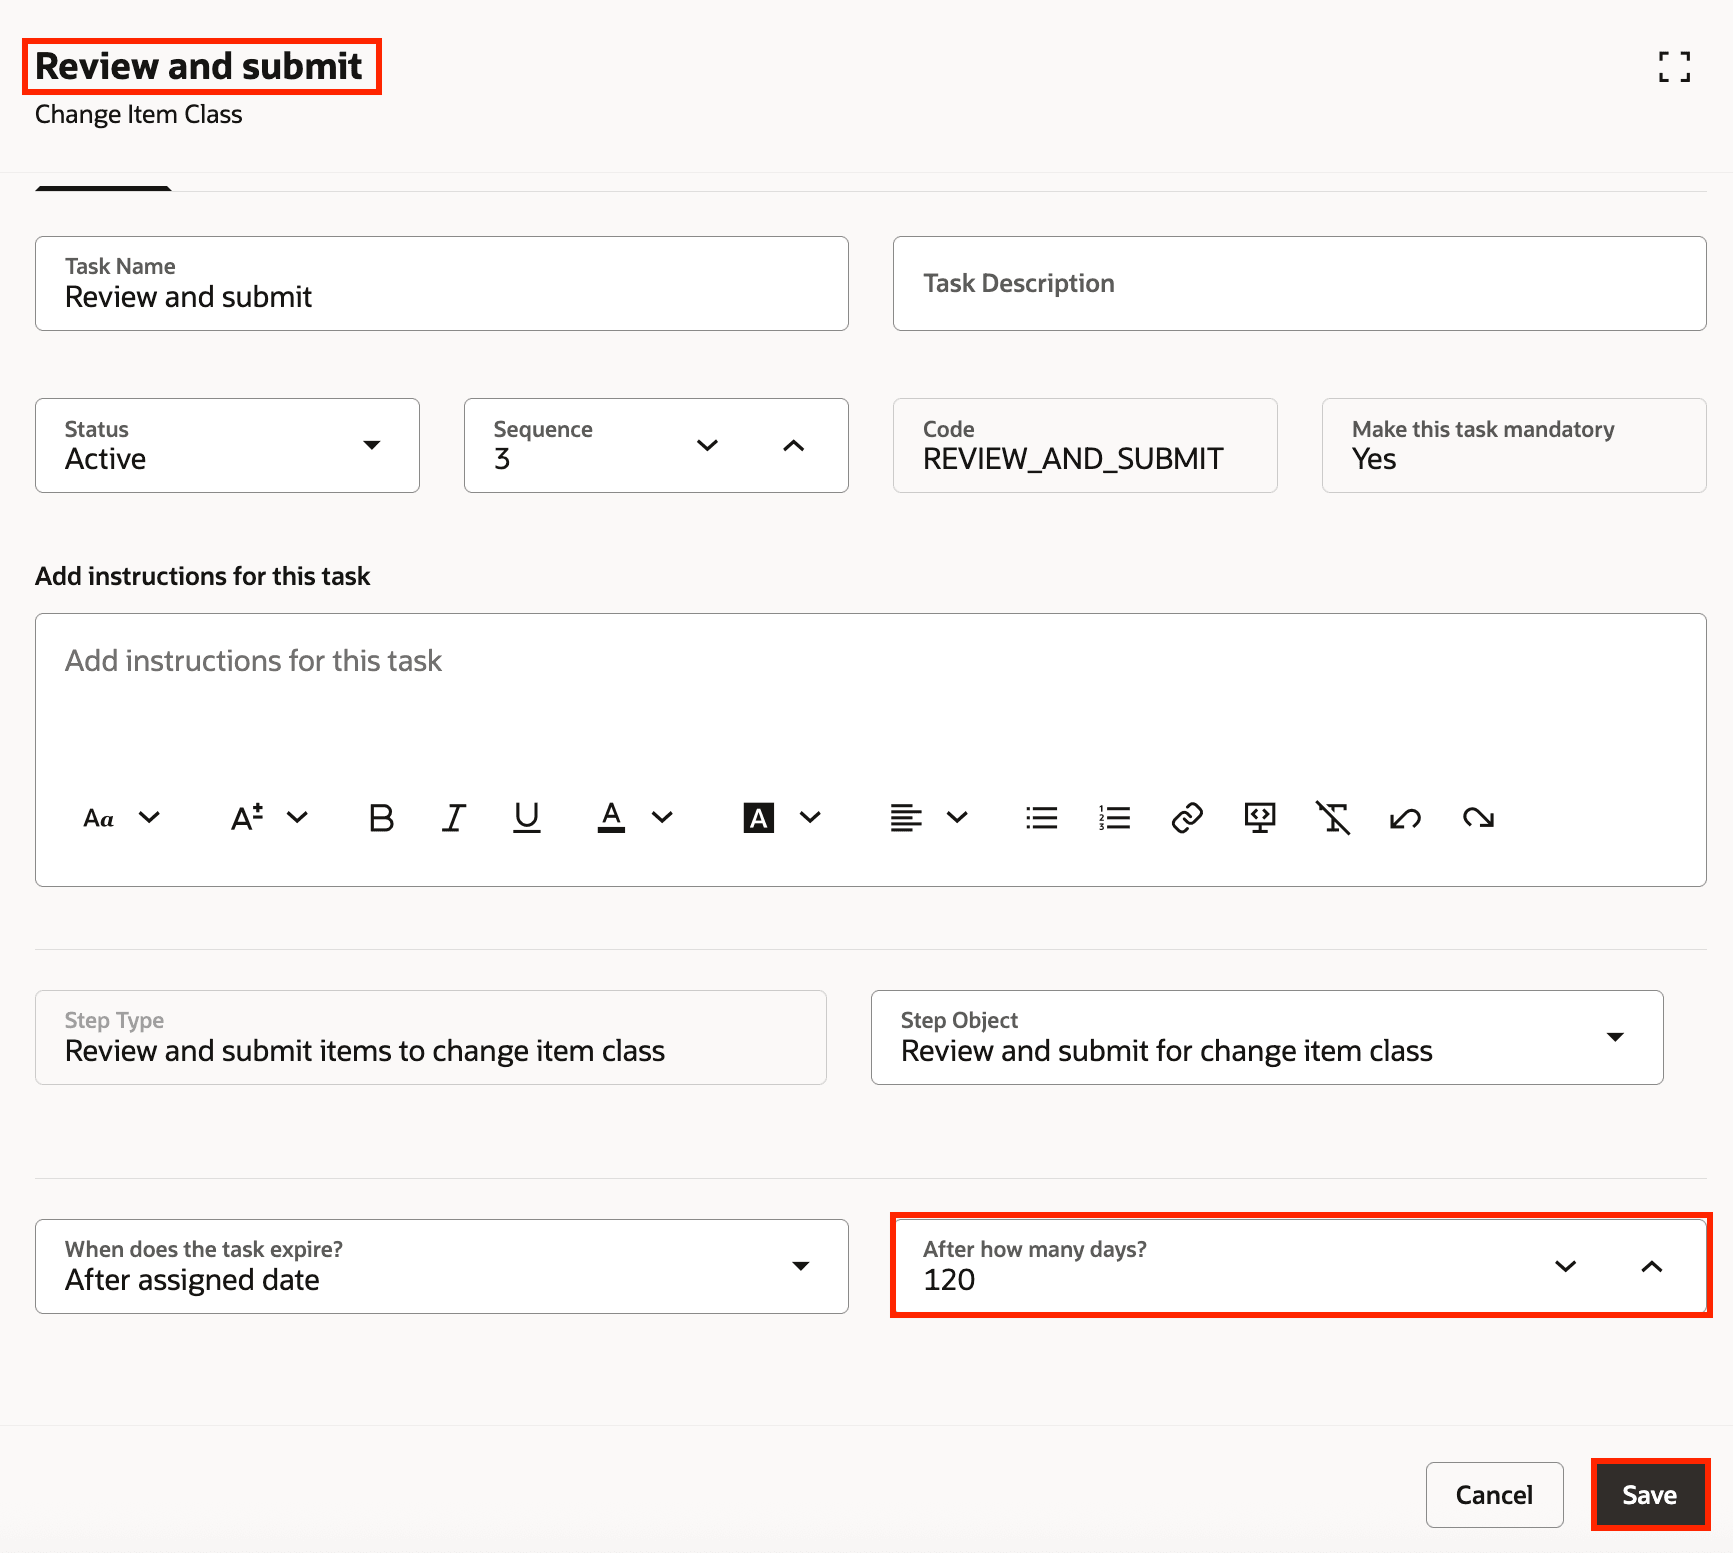
Task: Review and Submit
- Update the View item batch status task. In this task you specify the task expiry days.
- Click the Edit Task icon for the View item batch status task.
- In the After how many days? field specify the number of days after which this task expires. This is mandatory.
- Click Save.
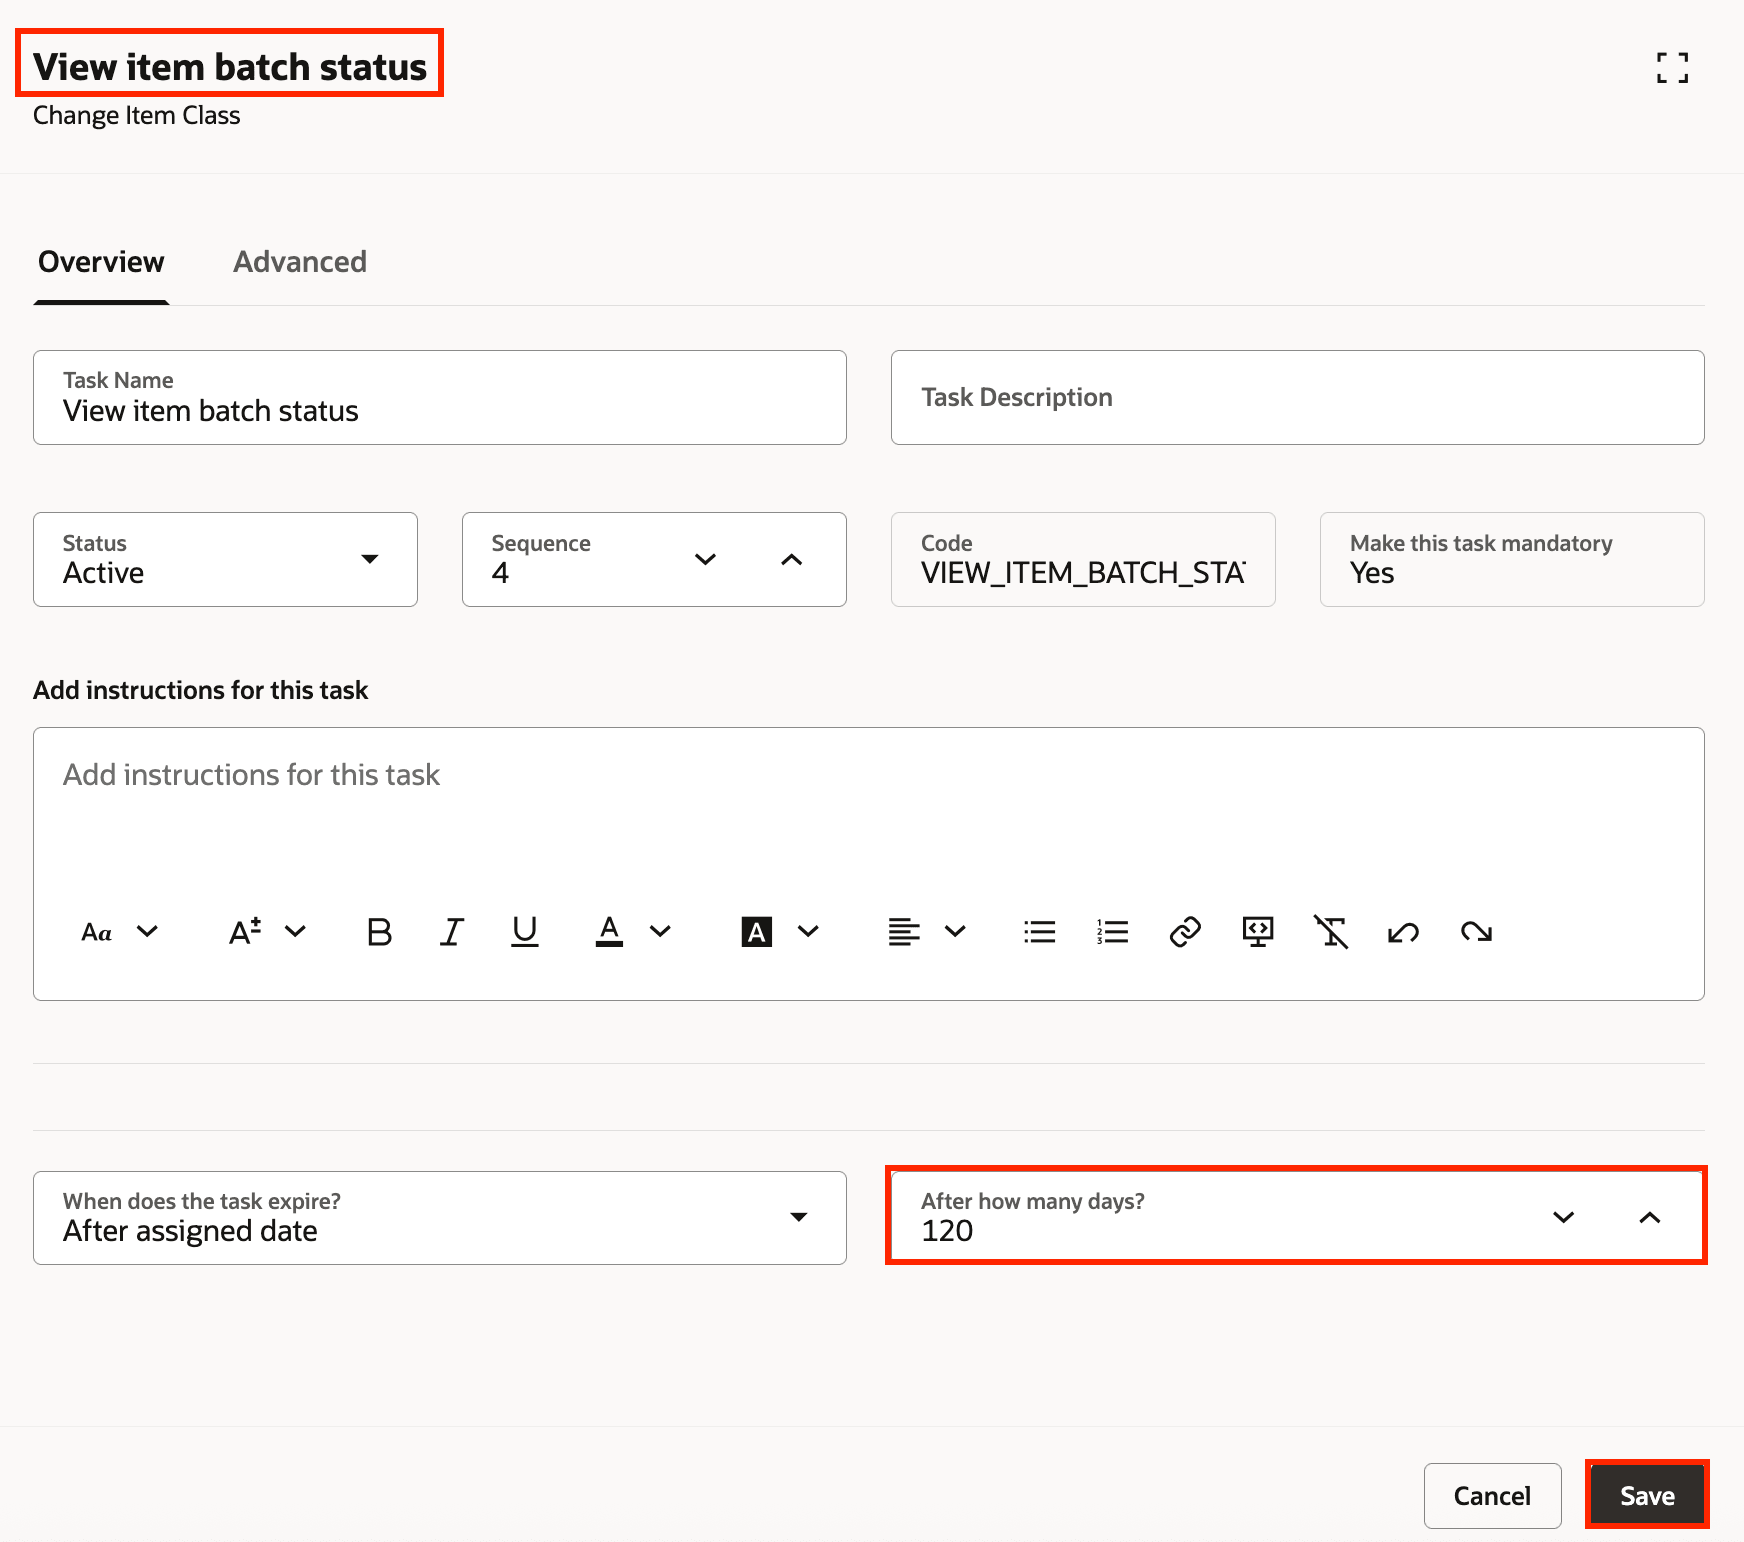
Task: View Item Batch Status
- Click Activate to activate the task flow you have configured. After the task flow is activated, your users will be able access this task flow from the Guided Task flow library.
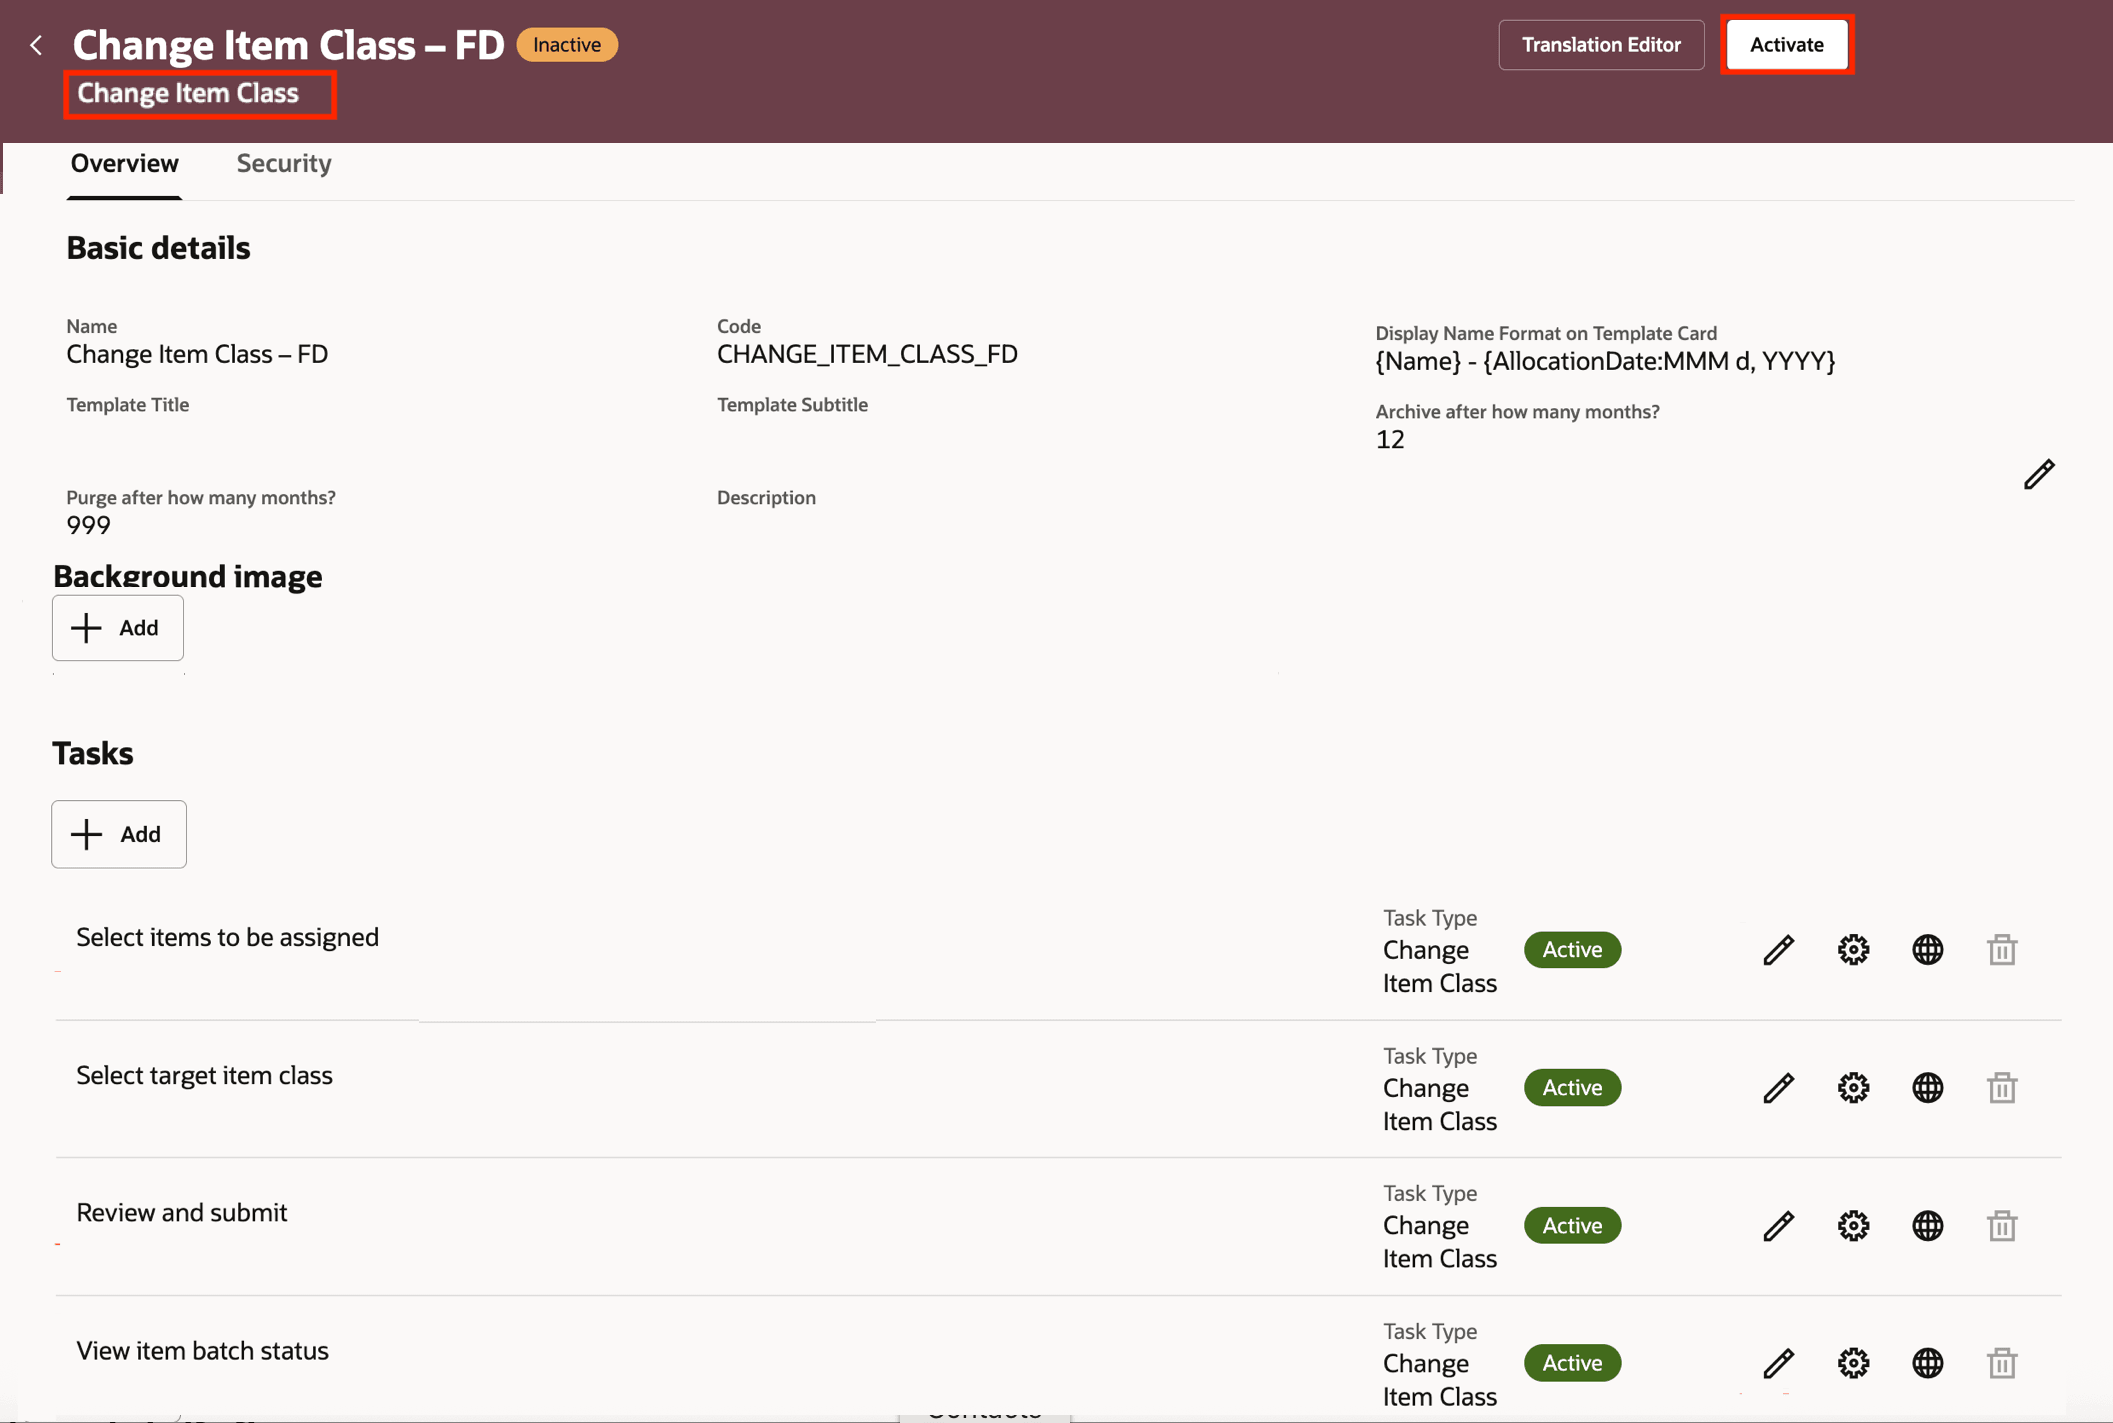
Activate Task Flow
Tips and considerations
- Target item view LOV contains views that meets the following criteria.
- Application: Guided Tasks
- Task Flow: Mass Item Attribute Update
- Target item view selected for a guided task must include:
- Item, Item Description, Primary Unit Of Measure, Item Class, Organization
- Any mandatory extensible flexfield attribute relevant for the target item class
- Any other attribute that's planned to be updated when running the guided task flow
- Every time the guided task flow is run, though you may select items from multiple item classes, you can assign only one target item class
Key resources
- Refer to the Options for Creating HCM Application Users section in the Oracle Fusion Cloud HCM: Securing HCM guide, available on the Oracle Help Center.
- Refer to the Oracle Fusion Cloud HCM: Open Contextual Journeys When Using Redwood Pages What's New, available on the Oracle Help Center.
- Refer to Get Started with Redwood: Oracle Cloud SCM and Product Management.
- Connect with experts at Oracle Cloud Product Management forum.
- Watch the Mass Change Item Class video.
Access requirements
Users who are assigned a configured job role that contains these duty roles or privileges can access the features:
- Configure Guided Tasks task:
- Configure Views (ORA_EGI_CONFIGURE_VIEWS_DUTY): This duty role allows admin users to create and configure views used in the Guided Tasks Flows.
- Guided Task Builder (ORA_EGI_GUIDED_TASKS_BUILDER_DUTY): This duty role allows admin users to create and configure views used in the Guided Tasks Flows.
- Guided Task Builder (ORA_EGI_GUIDED_TASKS_BUILDER_DUTY_HCM): This duty role allows admin users to create and configure views used in the Guided Tasks Flows. This is a prerequisite duty role for the Guided Task Builder (ORA_EGI_GUIDED_TASKS_BUILDER_DUTY) duty role.
- Perform Guided Tasks task:
- Guided Tasks Run Time (ORA_EGI_GUIDED_TASKS_RUN_TIME_DUTY): This duty role allows the users (including admin users) to run Guided Tasks Flows.
- Guided Tasks Run Time (ORA_EGI_GUIDED_TASKS_RUN_TIME_DUTY_HCM): This duty role allows the users (including admin users) to run Guided Tasks Flows. This is a prerequisite duty role for the Guided Tasks Run Time (ORA_EGI_GUIDED_TASKS_RUN_TIME_DUTY) duty role.
- View Guided Tasks task:
- Guided Tasks View (ORA_EGI_GUIDED_TASKS_VIEW_DUTY): This duty role allows the users (including admin users) to view the Guided Tasks Flows that have been initiated.
- Guided Tasks View (ORA_EGI_GUIDED_TASKS_VIEW_DUTY_HCM): This duty role allows the users (including admin users) to view the Guided Tasks Flows that have been initiated. This is a prerequisite duty role for the Guided Tasks View (ORA_EGI_GUIDED_TASKS_VIEW_DUTY) duty role.
- Other privileges: To access business objects used in the Guided Tasks Flows, use the following privileges:
- Get Item Batch Rest (EGI_GET_ITEM_BATCH_REST_PRIV): Allows query access to item batch through the REST API.
- Get Item Rest (EGP_GET_ITEM_REST_PRIV): Allows query access to items through the REST API.
- Import Item (EGP_IMPORT_ITEM_PRIV): Allows access to import items and related information.
- Manage Item Batch (EGI_MANAGE_ITEM_BATCH_PRIV): Allows management of item batches to import items and related data.
- Manage Item Batch Rest(EGI_MANAGE_ITEM_BATCH_REST_PRIV): Allows full access to item batch through the REST API.
These duty roles and privileges were available prior to this update.