Redwood: Automatically Calculate and Review PAR-Level Values Before Updating Current Values
Hospitals and healthcare providers rely on accurate PAR (Periodic Automatic Replenishment) levels to ensure critical supplies are consistently available while avoiding overstocking and waste. However, determining optimal PAR levels is often a manual, time-intensive process that may not fully account for varying demand patterns, leading to inefficiencies in supply management and potential risks to patient care. In update 26A, we introduced the ability to upload externally calculated PAR values, allowing you to review and manually adjust them if needed before publishing the updated values. You can now automatically calculate optimal PAR levels by leveraging historical replenishment data to generate intelligent recommendations. Users can review and update these system-generated recommendations before publishing them to Oracle Fusion Cloud Inventory Management, ensuring both data-driven accuracy and operational control.
Now in release 26C, policy profiles have been extended to support Inventory PAR replenishment in addition to min-max planning. Suggested PAR levels are calculated based on the prerequisite setup in the Functional Setup Manager. New Redwood pages have been added to allow you to configure specific PAR replenishment attributes to maintain optimal PAR levels. The new Redwood pages are:
- Default Classification
- Policy Profiles
- Policy Profile Assignments
You can calculate PAR levels by submitting the Calculate PAR Levels scheduled process from the PAR Levels page. Once submitted, a confirmation message is displayed. You can monitor the process by navigating to the Action Status tab. Once the process has completed, the PAR levels will be updated accordingly based on historical data. You can optionally submit the Calculate Policy Parameters for Min-Max Planning and PAR process from the Scheduled Processes work area.
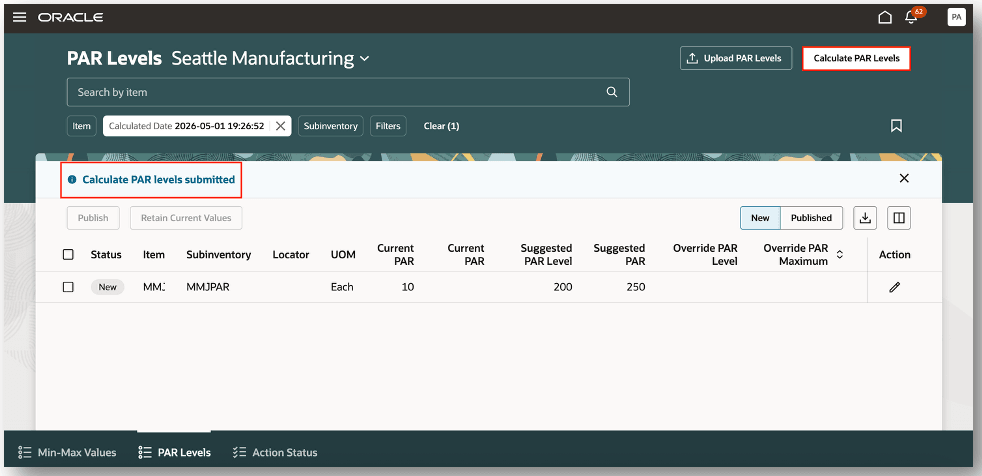
Calculate PAR Levels
In the event you need to override the Suggested PAR Level and Suggested PAR maximum quantities, you can edit the row and enter the Override PAR Level and Override PAR Maximum quantities. This provides you with the flexibility to update the suggested PAR levels when required. Once you have reviewed the calculated PAR levels, you have the option to either publish the values or retain the current values. When you publish the calculated or suggested PAR levels, the corresponding PAR levels will be updated at the item subinventory and item locator levels on the Configure Subinventories page.
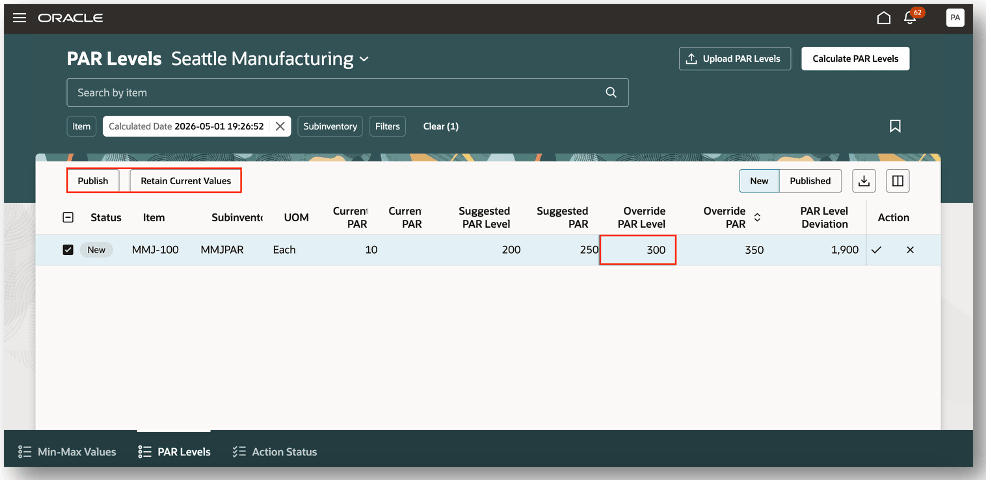
Override PAR Levels
This example explains how the PAR levels and PAR maximum levels are computed.
- Input:
- PAR Time Period = 30 days
- Number of Deliveries per Time Period = 4
- Using the current calculation method, the average daily demand and safety stock will be calculated:
- Calculated Average Daily Demand = 3.33
- Calculated Safety Stock = 40
- Average Inventory Usage in the time period is calculated as: Calculated Average Daily Demand * PAR Time Period
- Average Inventory Usage in the Time Period is 3.33*30=100
- PAR Level is calculated as: (Average Inventory Usage in the time period + Safety Stock) / Number of Deliveries per Time Period
- PAR Level is (100+40)/4=35
- PAR Maximum Quantity is calculated as: Maximum Quantity Days of Cover * Calculated Average Daily Demand
- If the Maximum Quantity Days of Cover is defined as 14 days, then the PAR Maximum Quantity is 14*3.33=47
This feature streamlines replenishment, improves supply availability, and enables healthcare organizations to maintain optimal inventory levels with greater confidence and efficiency.
Steps to enable and configure
When setting up PAR replenishment and min-max planning for Oracle Inventory Management, you can create classifications to categorize your items. You associate categories with similar item attributes with a classification. Categorizing items with similar attributes enables you to specify the policies for computing the PAR and min-max quantities efficiently.
Create Default Classification Group
- In the Setup and Maintenance work area, go to the Default Classification Group task:
- Offering: Manufacturing and Supply Chain Materials Management
- Functional Area: Inventory Management
- Task: Default Classification Group
- On the Default Classification Group page, in the Classifications section, click the Add (+) button to create a new classification.
- In the New classification panel drawer, specify the following:
- Enter a classification and description
- Enter criteria details
- Click Create.
Create Policy Profiles
- In the Setup and Maintenance work area, go to the Policy Profiles task:
- Offering: Manufacturing and Supply Chain Materials Management
- Functional Area: Inventory Management
- Task: Policy Profiles
- On the Policy Profiles page, click the Add (+) icon.
- On the New Policy Profile page:
- Enter a policy profile name and description
- Enter replenishment policy details
- Enter minimum quantity details
- Enter maximum quantity details
- Click Create.
Create Policy Profile Assignments
- In the Setup and Maintenance work area, go to the Policy Profile Assignments task:
- Offering: Manufacturing and Supply Chain Materials Management
- Functional Area: Inventory Management
- Task: Policy Profile Assignments
- On the Policy Profile Assignments page, click the Add (+) icon.
- In the New policy profile assignment panel drawer:
- Select a classification
- Select an organization
- Select a subinventory
- Select a policy profile
- Set the Calculate Policy Parameters option to Yes or No
- Click Create.
Nudges Overview
A nudge is a reminder sent to a worker to take a specific action on a certain event. Managers and employees can receive nudges for any overdue or pending tasks pertaining to events. Inventory replenishment value calculation is one such event where nudges can be configured to send reminders. You can configure nudges to send reminders through email or SMS.
Navigate to the Nudge Plans page by selecting the Nudge Configuration task from the quick actions.
Create a New Nudge Plan
- On the Nudge Plans page, click Create to add a new plan.
- In the New nudge plan drawer:
- Enter the nudge plan name
- Enter the nudge plan description
- Select the start date and end date
- Select the subscriber inventory
- Select the Min-Max and PAR adjustment type
- Click Create Draft.
- After the nudge is in draft state, select the nudge and click the Add button to create a new nudge.
- Select the Min-Max and PAR adjustment module
- Enter the organization for which you want to retrieve nudges when cross-dock opportunities exist
- Click Save.
Add Recipient Groups
- On the Inventory Replenishment page, click the Advanced tab of the draft nudge plan.
- In the Recipient Groups section, click Add to create the recipient groups that will receive notifications for nudges in the nudge plan.
- In the Users section, click Add to add users to the recipient group.
- Click Save.
Configure Notification Channel and Recipient
- On the New Nudge page, click the nudge name link to open its details.
- In the Channels section, click Add to create a new channel.
- On the New Channel page, choose whether to send notifications through email, SMS, or both, and select the recipient group to receive the notification.
- For email notifications, you can personalize the subject and body using user-defined content.
- After the nudge plan is configured, click Activate to enable the nudge plan.
Tips and considerations
- Historical receipt transactions at the subinventory level are considered for computing the PAR level and PAR maximum level.
Key resources
- Oracle Fusion Cloud SCM: Using Inventory Management guide, available on the Oracle Help Center.
- Oracle Fusion Cloud SCM: Implementing Manufacturing and Supply Chain Materials Management guide, available on the Oracle Help Center.
- Oracle Fusion Cloud SCM: Security Reference for Manufacturing and Supply Chain Materials Management guide, available on the Oracle Help Center.
Access requirements
Users who are assigned a configured job role that contains this privilege can access this feature:
- Review Min-Max Values and PAR Levels (INV_REVIEW_MIN_MAX_VALUES_PAR_LEVELS_PRIV)
This privilege was available prior to this update.
To set up this feature, you'll need a configured job role that contains this existing privilege:
- Manage Min-Max Planning Policies (INV_MANAGE_MIN_MAX_PLANNING_POLICIES_PRIV)
This privilege was available prior to this update.