Redwood: Create Link to AI Agents Using a New User Experience
You can use the Redwood user experience to add, edit, and manage AI Agents as links tied to specific visualization, such as a table or a graph. The links can be reused across plans that include the visualization and can be edited or deleted by the link owner. This streamlines the access to related AI Agents by improving analysis speed and consistency.
You can configure AI Agents such that you can access them directly from Supply Planning graphs and tables using the Drill To links.
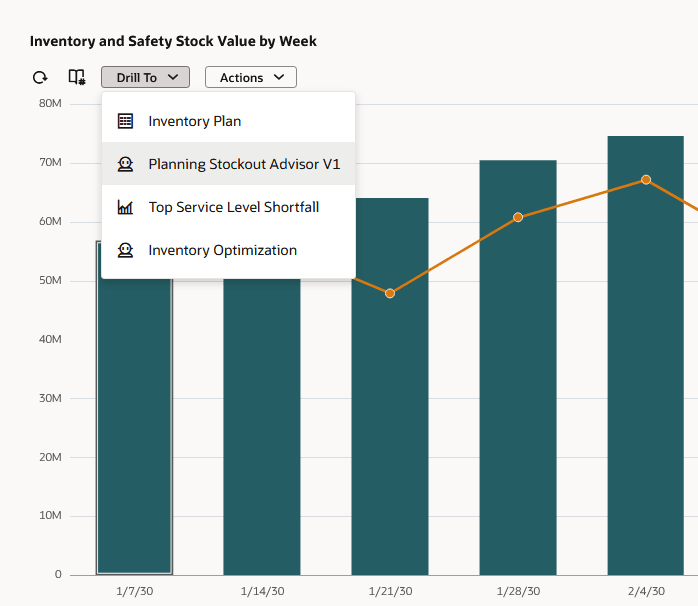
Bar Chart Showing Two AI Agent links in the Drill To Menu
To add an agent link to a graph or table:
- From the Actions menu of the table or graph, select Manage Links.
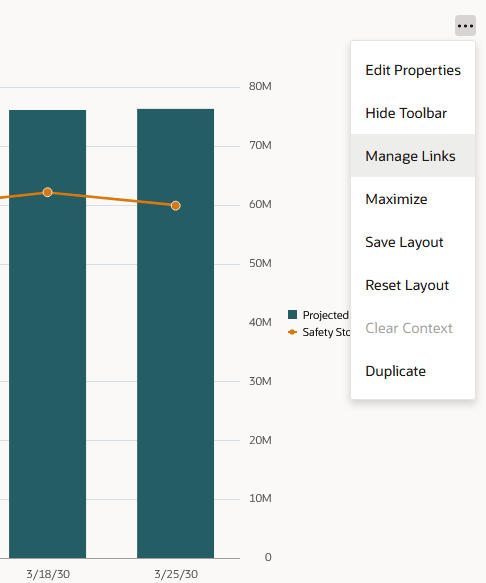
Manage Links Action Accessible From a Graph or Table’s Options Menu
The Links drawer opens.
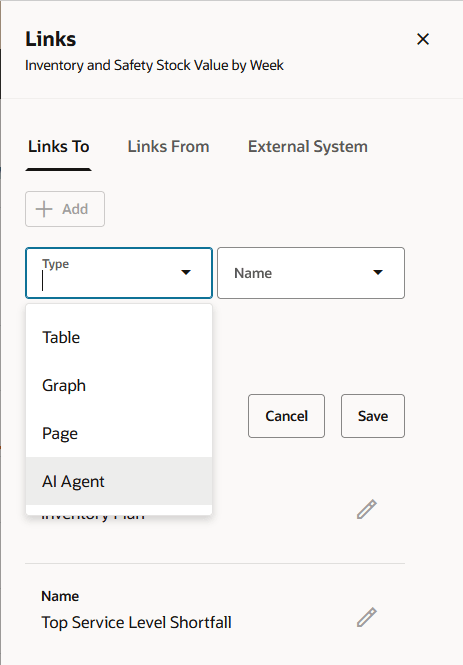
Adding a Link to an AI Agent
- Select Add.
- From the Type drop down list, select the AI Agent.
- Select the name of the desired AI Agent. The AI Agent list displays the published AI Agent Teams assigned to Supply Chain Planning.
A read-only Link Context section is displayed, showing that the context provided to the AI Agent is the highlighted selections and selected members from the graph or table. The current plan context is also provided.
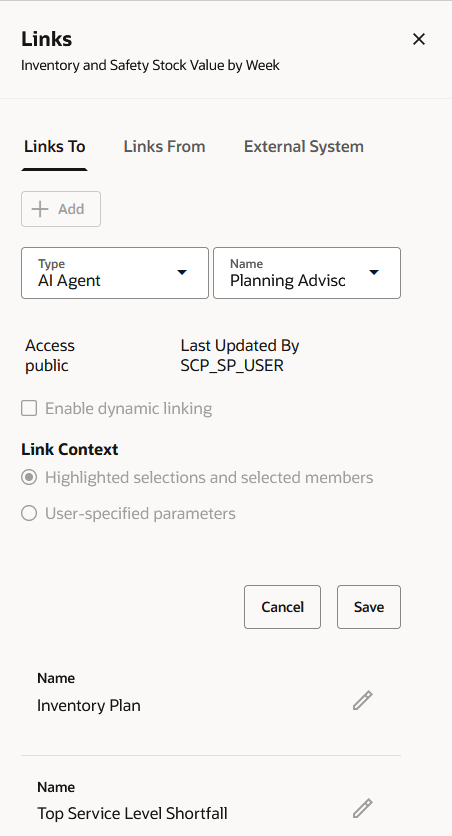
Configuring AI Agent Link
- Select Save and then close the Links panel.
The AI Agent link is now displayed in the Drill To menu.
- Select the AI Agent from the Drill To menu. This opens the AI Chat, loading the configured AI Agent and passing in the selected context.
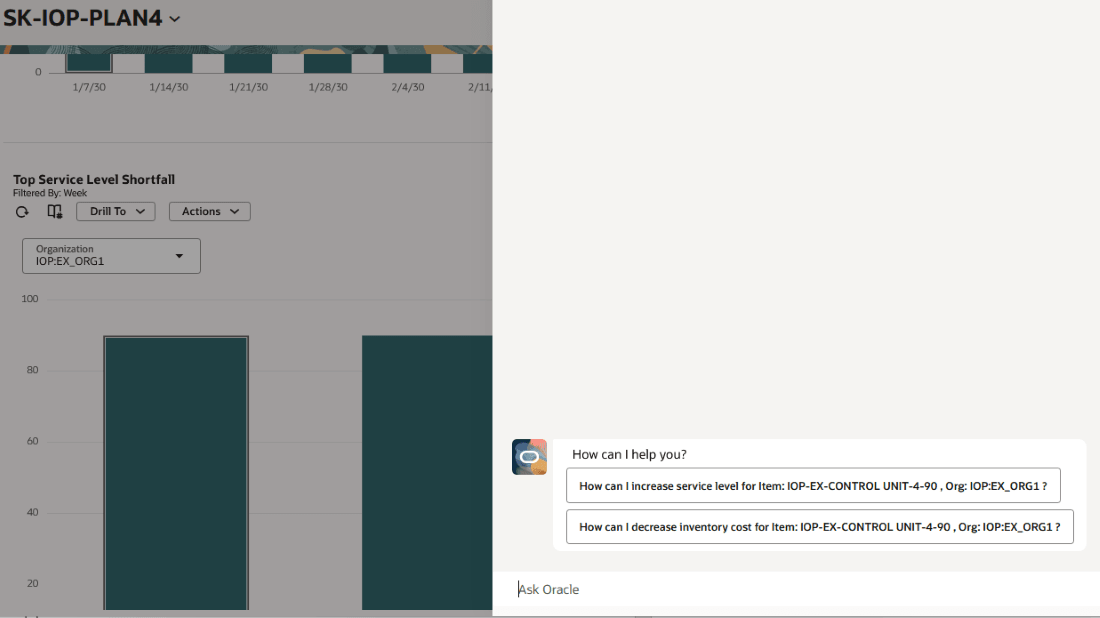
Chat Window of the Configured AI Agent
Steps to enable and configure
While any published Supply Chain Planning AI agents will be available in the manage links list, you must configure the selected agent to process the incoming data context. See Tips and Configuration for details.
Tips and considerations
Note that you must select in the graph or table for the Drill To menu to be enabled. When selecting an AI Agent, the selections from the graph or table are passed to the AI Agent, along with the plan information. Your AI Agent must be able to process this provided contextual information. For example, a graph showing metrics broken down by items and organization, will pass to the AI Agent the selected data (item id, organization id).
The format of that contextual input will generally be as follows:
| { "PlanId": 300100181776234, "PlanName": "AI-Sup-Coll-04" "drillFilters": [ [ { "levelId": 1, "memberIds": [ 825179 ], "levelName": "Item", "memberName": "YM-CRT-720P-32" }, { "levelId": 40, "memberIds": [ 10003 ], "memberName": "D1", "levelName": "Organization" } ] ], } |
The filter variables are defined as:
- levelId represents the numeric variable type.
- 1 = Item, 40 = Organization
- levelName the user-friendly type name (e.g., Item).
- memberIds is an array of unique identifiers for that variable.
- If multiple items are selected, for example, this would be a list of item ids.
- memberName the user-friendly name of the object.
- For a variable of Organization (levelId 40), the memberName would be the OrganizationCode, such as M1
You’ll want to add processing logic in your LLM Node.
The following is a simple example of parsing the incoming drill context by your Agent, using an LLM node, to assign the PlanId, PlanName, and a single organization and item.
|
------------------------------------- InputContext : {{$context.$system.$inputContext}} For eg : Information we can retrieve are : To extract this item & org details from incoming drill you can utilize below js code snippet. JS_CODE_START // Get drillFilters input // Initialize output object // Safely access first group filters.forEach(filter => { if (filter.levelId === 40) { JS_CODE_END From js code output, result has ItemId, ItemName, OrgCode, OrgId Always update the final context object based on new user questions and messages. Don't worry about optional fields, but always retrieve mandatory fields (ItemName, PlanName, OrgCode). |
Access requirements
Users with the Supply Chain Application Administrator Job Role can configure AI Agents using the manage links.
For Users without the Supply Chain Application Administrator Job Role
- Navigate to the Security Console and create a custom role.
- In the Basic Information section, select Enable Permission Groups.
- In the Role Hierarchy section, go to the Roles and Privileges tab.
- Click Add Role and add the following two roles:
- ORA_RCS_SCM_AI_AGENT_MANAGEMENT_DUTY
- ORA_RCS_SCM_AI_AGENT_MANAGEMENT_DUTY_HCM
- Switch to the Roles and Permission Groups tab and associate your custom role with the Fai Genai Agent SCM Administrator Duty duty role (Code: ORA_DR_FAI_GENERATIVE_AI_AGENT_SCM_ADMINISTRATOR_DUTY).
- Once created, assign this new role to the users who will be managing your manage links using AI Agents.