Access a Help Desk Request as a Contact
Help Desk in the Redwood Experience can now grant access to the additional contacts that are added to a request. The objective is to ensure that users assigned as secondary contacts can view and interact with Help Desk Requests (SRs) in the same way that a primary contact does.
In order to accomplish this, new access is granted to contacts who are resources through an access group. For non-resource contacts, a new DSP must be created.
Secondary contacts are also available for use in Adaptive Search. This allows Agents to search for all requests where a particular employee is a contact by using the Contacts filter chip on the Agent List page.
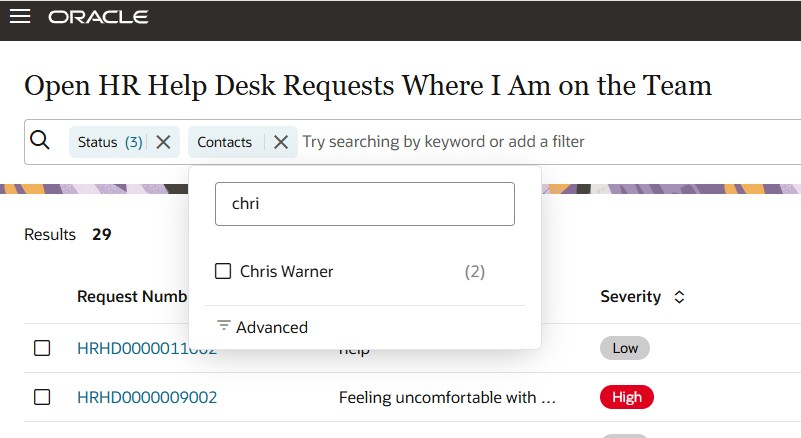
Filter on Contact
This allows all contacts to view the request or provide comments. For example, the "Add Manager" button on the Help Desk Request Detail page allows for including the primary point of contact's manager, and configuring this access would allow the manager to make comments on the request. Also, if there is an internal request that needs to be followed up by someone else because of a shift change off hours, they can be added as a contact to monitor and respond while the primary contact is out of the office.
The access given will allow a contact to respond to an email if one is sent to them with a link to the request.
Used in conjunction with the companion feature in this release, Filter the List of Requests on the Employee UI by Contact Type, the contact can monitor and respond directly through My Help, just as the Primary Contact would do.
Steps to enable and configure
First, we must add an Access Group for employees who also happen to be Resources:
- Under the Navigator, expand Tools
- Click to open Sales and Service Access Management.
- Navigate to the Configure Groups -> Access Groups tab.
- Click Create to create a custom Access Group.
- Provide a Name something like, Help Desk Request Contact Access.
- Add a Description, such as, Allows a Help Desk Request Resource to view and interact with Help Desk Requests.
- Click the Active checkbox.
- Click Save and Continue.
- Click the the Members Rule tab, and click on Create Rule.
- Name: Contact Access for Help Desk Resources
- Description: Gives access to contacts on a help desk request when they are a resource
- Check the Active checkbox.
- Under Conditions, click the plus sign to add a new Condition.
- Object: Resources
- Attribute: Roles (Roles)
- Operator: Does not equal
- Value: A value that will NEVER be used as a name of a role.
- From the Actions drop-down, choose Save and Publish.
- Under the Objects Rules tab, select the appropriate Object, and Search. Object is one of:
- HR Help Desk Request
- Internal Help Desk Request
- Click Add Rule.
- Search for the appropriate Rule for the Object:
- HR Help Desk request: HR Help Desk Request Contact Members
- Internal Help Desk Request: Internal Help Desk Request Contact Members
- Click on the Rule to be added.
- Click Apply.
- Click Done.
- Choose the appropriate Access Level. (You will likely want to choose Read or Update.)
- Repeat steps 7-12 for the second Help Desk Object, if desired.
- Click Save and Close.
- Click on the Object Rules tab again.
- Under Actions, choose Publish Rules.
Now, we must add a Data Security Predicate (DSP) to allow non-resource employee users of Help Desk to have access if they are added as a contact to the request.
- Go to Navigator -> Tools.
- Click on Security Console.
- Under Roles, Search
- For HR Help Desk: ORA_SVC_HR_SR_CREATION.
- For Internal Help Desk: ORA_SVC_INTERNAL_HELPDESK_SR_CREATION.
- From the drop-down on the role on the left Search Results Panel, choose Copy Role.
- Click Copy Role (with Copy Option of "Copy top role" selected).
- Click Next.
- Click Next to take you to the Data Security Policies page.
- Click + Create Data Security Policy, and provide the following values for the fields:
- Policy Name: Grant on Service Request Header
- Policy Description:
- For HR Help Desk: HR service request creation can manager service request header where they are a contact of the Help Desk service request.
- For Internal Help Desk: HR service request creation can manager service request header where they are a contact of the Help Desk request.
- Data Set: Select by Instance set
- Condition Name (should be found at the end of the list):
- For HR Help Desk: Access the service request header for table
SVC_SERVICE_REQUESTS
where they are the contacts of the HRHD service request - For Internal Help Desk: Access the service request header for table
SVC_SERVICE_REQUESTS
where they are the contacts of the internal help desk service request - Actions: Generally, either Read or Update, depending upon what is desired.
- For HR Help Desk: Access the service request header for table
- Click OK.
- Click Next.
- Click Submit and Close.
- Note the Process ID, and click OK.
- Click on the Administration tab from the left-hand panel.
- Click on the Role Status link at the top.
- Confirm that your process has completed.
Synchronize the new security privileges for the users.
- Go to Navigator -> Tools.
- Click on Scheduled Processes.
- Click the Schedule New Process button.
- Search for the Name Import User and Role Application Security Data. (This can take a long time.)
- Click OK.
- Click Submit to begin the process.
- Note the Process ID, and click OK.
- Expand the Search section.
- Enter the Process ID and Click Search.
- Monitor the process, until it changes from Running to Succeeded.
- Click the Schedule New Process button.
- Search for the Name Retrieve Latest LDAP Changes. (This can take a long time.)
- Click OK.
- Click Submit to begin the process.
- Note the Process ID, and click OK.
- Enter the Process ID and Click Search.
- Monitor the process, until it changes from Running to Succeeded.
Now, whenever this person is added as a contact, they will be able to see the request.
Tips and considerations
For best results, use this feature in conjunction with ability to filter and monitor requests as a contact in My Help.
Key resources
After this feature is generally available, a video showing how to configure your environment and a demonstration of the functionality will be found on Oracle Video Hub: Fusion Help Desk.
How do I define system-access-group-based data security policies?
Access requirements
Administrator privileges are required to set up the access for others.