Set Up Deep Linking Using Business Intelligence Features
Deep page linking lets your users drill down on a record without leaving the page. You can add deep page linking for records in most custom objects in CX Sales in Business Intelligence.
For more information on deep linking see: Direct Page Links for CX Sales. Also refer to the MOS article on deep linking MOS article 2145842.1">MOS article 2145842.1
There are three parts to deep page linking:
-
Defining an action link.
-
Constructing the deep link URL.
-
Updating the deep link URL and parameters to navigate to a selected record.
Define an Action Link
You can add a deep page URL to any column of an analysis created for a custom object by adding an action link from column properties. Note that the analysis must have a column that holds the identification of the record, such as Record ID in the case of a custom object.
-
Create or open an analytic that contains a column for the name of the document. Select the gear icon on the column and then from the drop-down list choose Column Properties.
As an example of this, say there is a custom object called Product Documents. For deep page linking, we want to add the deep URL/deep link to the column that holds the identification of the record. In the following figure, since there is a Product Document column, it would be the Document name that holds the ID of that record.
-
In Column Properties, select the Interaction tab.
-
Under Value, for Primary Interaction choose Action Links from the drop-down list.
-
Click the + icon to add an action link.
This shows the New Action, Navigate to a Web Page option. 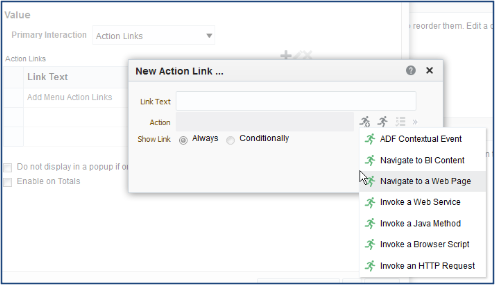
-
Click Create New Action and then from the drop-down list select Navigate to a Web Page.
This shows the Create New Action for a deep page link. 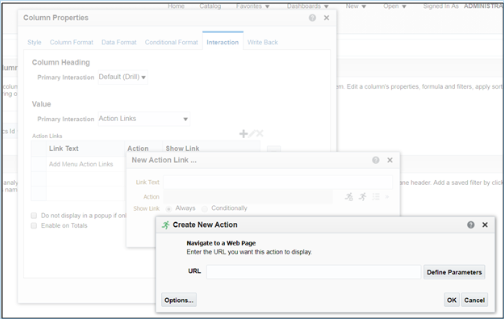
Construct the deep Link URL
You add your specific URL to the action field. These steps show you how to determine the correct URL for your environment. These URLs are examples only.
-
Add the deep link URL to the Create New Action field. There are deep page links patterns available for objects which can be found by going to Related Topics at the bottom of this section and clicking deep Page Links: Explained. In this example, you take the deep URL pattern for the Custom Object, which in this case is called Product Docs. To create a deep link to a default summary page tab for a custom object use the deep link URL pattern in the following example:
https://<hostname>:<port>/<application>/faces/FuseOverview?fndGlobalItemNodeId=CRM_CUSTOM_CARD_<XXXX>&fndTaskItemNodeId=CRM_CUSTOM_TAB_<XXXX>&fnd=%3BsubTabName%253DSUMMARY%253BObjectId%253D<YYYY>%253B%3B%3B%3Bfalse%3B256%3B%3B%3BReplace XXXX with the custom object's API name, for example, ProductDocs_c. Obtain the API name from the object overview page (click the object's node in the Custom Objects tree in Application Composer).
Replace the YYYY with the custom object's primary key in the database. In this case, the custom object primary key .comes from the Record_Id column, as shown in the following example:
https://<hostname>:<port>/<application>/faces/FuseOverview?fndGlobalItemNodeId=CRM_CUSTOM_CARD_ProductDocs_c&fndTaskItemNodeId=CRM_CUSTOM_TAB_
ProductDocs_c&fnd=%3BsubTabName%253DSUMMARY%253BObjectId%253D300100057476089%253B%3B%3B%3Bfalse%3B256%3B%3B%3B
Note that you can test the URL by replacing the host name with your actual host name and using a valid record value in place of <YYYY>. Put the URL in a browser to see if the record details page appears and the URL is valid.
-
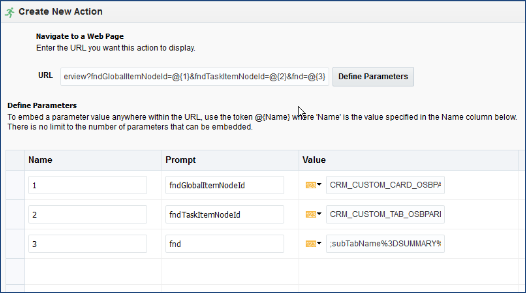
Once you have determined that the URL is valid, the next step is to embed this URL in the analytic and ensure that the object ID, represented in these instructions as <YYYY> is dynamically retrieved from the analytic whenever the Product Docs name is clicked. When you have added the URL click Define Parameters. The next part of these instructions is to construct the deep link URL.
Update the deep Link URL and Parameters
The define parameters fields are populated with some prompts and values already. The purpose of these steps is to ensure that the object ID is defined as a parameter.
To update the deep link URL and parameters:
-
Because you're changing the value of the ID only, delete the default parameters and leave only one parameter mapped to the ID.
-
Update the first parameter by renaming the Prompt value to
ObjectIdand set the value to a column value by selecting the record ID from the drop-down list. For exampleProductDocs_c.Id. -
Paste the URL again in the URL field and replace the ID of <YYYY> value with @{1} as shown in the following example:
https://<hostname>:<port>/<application>/faces/FuseOverview?fndGlobalItemNodeId=CRM_CUSTOM_CARD_ProductDocs_c&fndTaskItemNodeId=CRM_CUSTOM_TAB_
ProductDocs_c&fnd=%3BsubTabName%253DSUMMARY%253BObjectId%253D@{1}%253B%3B%3B%3Bfalse%3B256%
This shows the result of the Edit Action page when the correct values are added. 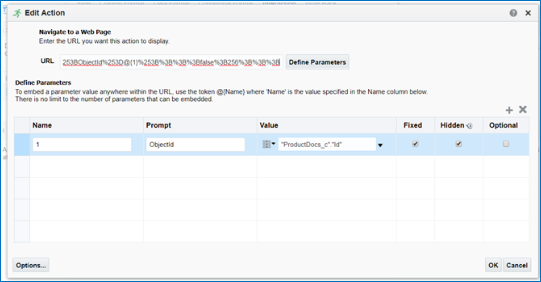
-
Check Hidden.
-
Click Ok.
-
Click OK to edit the Action Link window. The Column Properties window appears.
-
Click the Data Format tab.
-
Check the Override Default Data Format and select Number for Treat Number As.
-
Click OK and save.
-
Select the Results tab. Now the document name column shows the link. When users click the link, they're taken to that record detail in simplified page.
This shows an analysis with deep links from the document name column. This analysis with links to drill-down detail can be viewed on the Analytics page or any analytics tab. 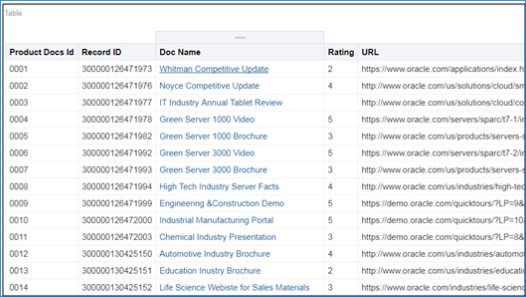
These same steps can be performed for any of the standard objects for sales and service using the deep link format and embedding links in the BI analyses.