Create and Manage Contracts for Oracle Sales in Redwood UI
Some contract management features in the classic contract UIs are now supported in Oracle Sales. The Contracts (New) icon is available as part of the Contract Management navigator menu. To view this menu, enable the opt-in Redwood Contract Management.
You can search and manage contracts directly from the Contracts list page. If you select a contract from the search results, it will open in the classic contract edit page if the selected contract meets any of the following conditions:
- Contains structured or simplified terms
- Has fulfillment lines created from the classic UI
- Status is Hold
- Contract types with AdobeSign and OneSpan E-signature enabled
- Contract has deliverables
Highlights of the contracts Redwood experience includes:
- List page: Faster, intuitive, and highly configurable interface powered by Adaptive Search. You can search across contract fields, apply multiple dynamic filters, group records, sort columns, mark favorites, manage columns, and access both list page-level and contract record-level Actions. The list page displays only buy-intent contracts and always shows the latest version. A Create Contract button is available directly on the page, enabling quick and streamlined contract creation.
- Drawer-based workflows: Create, edit, and manage the actions in drawers without leaving the page, reducing context switching.
- Inline authoring: Edit line attributes in the inline table, then adjust quantities and dates in place.
- Upload attachments: Select and upload multiple files for different document categories in one-go.
- Personalization: Use Visual Builder Studio to show or hide fields, set defaults, and order sections.
Access requirements
If you're assigned a configured job role that contains the following privileges, then you can access the Contracts (New) work area and search for contracts:
- Manage Contract Work Area (OKC_MANAGE_CONTRACT_WORK_AREA_PRIV)
- Search Contracts (OKC_SEARCH_CONTRACT_PRIV)
To view and work with contracts in the Contracts list page, you must have the appropriate OKC_VIEW_CONTRACT_PRIV functional privilege and have an appropriate object sharing rules assigned. Both are required for the list page to return contract records. Contract visibility on the list page is controlled through Access Group object-sharing rules. You must have at least one applicable Access Group rule assigned, such as All Contracts, Contract Owner Read Access, Contract Owner Full Access, or any other rule configured by your organization.
If you're are assigned a configured job role that contains the Edit Contract (OKC_EDIT_CONTRACT_PRIV) privilege, you can access the Edit Contract page from the Oracle Sales UI. If you job role contains the Manage Contract Fulfillment (OKC_MANAGE_CONTRACT_DELIVERABLE_PRIV) privilege then you can access the Create Purchasing Documents task.
Create and Edit Contracts
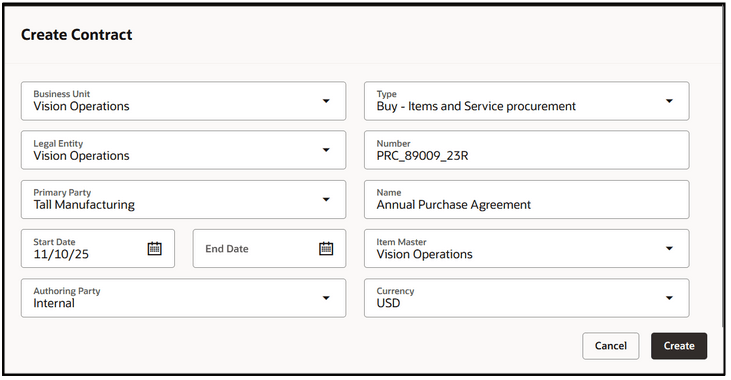
To create a new contract, select the Create Contract action on the Contracts List page. This will open a drawer where you can enter the required information. Select Create when done.
The newly created contract document is available from the contracts list page and you can navigate to the edit contract page by selecting the contract number. The details of the contracts are displayed in various tabs. For example, based on the status of the contract, you can edit certain fields. The Source document region contains the details of the source application such as Contract Request, Oracle Fusion Sourcing or Requisition and the document number which is the source for this contract. For example, when you process a requisition from the Process Requisition page with the sourcing method Initiate contract, a contract with requisition reference and lines is created in Enterprise Contracts to fulfill the requisition demand.
You can generate and view the contract summary from the Summary region. Once you begin to create the purchasing documents, you'll find the details of the fulfillment and the document created in the Fulfillment details region. You can also edit the descriptive flexfields and application composer attributes in this tab.

Create Purchasing Documents
To begin the fulfillment process, select the Create Purchasing Document action, which opens a drawer where you can enter all required information. If you check the Autosubmit for approval checkbox, the purchase order will be automatically submitted upon creation. When ready, select Create.

Where a requisition demand is fulfilled using a contract, the requisition line references are transferred to the purchase order and are accessible on the Distribution tab of the purchase order. The contract number associated with the purchase order appears on the Additional Order Details tab of the purchase order and can also be used to drill down to the contract document.
If the fulfillment outcome of the selected contract type on a staged document is a purchase order, the requisition lines are taken out of the buyer’s pool for processing and no longer appear on the Process Requisitions page. However, if the fulfillment outcome is an agreement, the requisition lines stay in the buyer’s pool and continue to display on the Process Requisitions page.
You can add lines to a contract, provided the contract type permits lines as per the Manage Contract Type setup. The available actions for the Lines tab appear at the top of the table. More columns for the line can be added to the layout using column layout management. To edit a line, select the pencil icon on the line level. To access line descriptive flexfields, use the action on the More Details column.

Use the Parties tab to manage the parties associated with your contract. You can add or remove parties using the actions above the table, and edit existing parties by selecting the pencil icon in the Actions column. If descriptive flexfields for parties are configured, access them from the More Details column. In the Default Locations section, you can maintain default values for Supplier, Supplier Address, Ship-to Organization, Ship-to Location, and Bill-to Location.
For each party you’ve added in the Parties tab, you can manage their associated contacts in the Contacts tab. The Contacts tab is divided into Internal and External sections. For Buy Intent contracts, internal contacts represent individuals within your business unit, while external contacts are linked to parties outside your organization, such as suppliers.
To add an internal contact, select the internal party and complete the necessary fields. For external party contacts, first choose the party role and organization before entering additional details.
Add and Sign Documents
Documents related to the contract can be added by selecting Add Documents. Documents can be added in the following sections.
- Signed contract document
- Contract documents
- Supporting documents
- Internal shared
- External shared
From the Documents tab you can add documents and URLs to various sections from the Add documents drawer, Custom document categories are supported.

For contract types with Docusign integration setup and contracts with
Enable Electronic Signature checkbox enabled, you can
create, manage and sign the envelopes. Ensure that the signer details are added in
the Contacts tab.
Use the history tab to get more information related to key dates, versions, approval history, and status. To navigate to a previous version of the contract, use the View action against the version in the History tab.