Configure Global Search UIs
Optionally, you can configure the behavior of global search UIs. For example, you can specify which suggestions display automatically when users click in the search field and which objects display in search results. You can create different configurations for different application pages.
If you already made a copy of the new OSC Default Global Search Configuration, then you can edit that copy and make your changes there. You don't need to create a second copy.
Duplicate the Default Configuration Provided by Oracle
You can't make changes to the Global Search configuration provided by Oracle. You must copy the Oracle configuration and edit that copy instead. If you already created a copy, you can skip this step.
-
Click .
-
In the Setup and Maintenance work area, open the Manage Global Search Configurations task:
-
Offering: Sales
-
Functional Area: Sales Foundation
-
Show: All Tasks
-
Task: Manage Global Search Configurations
-
-
On the Manage Global Search Configurations page, select the configuration with the OSC short name and Default Global Search Configuration name.
-
Click Duplicate (the document icon).
-
In the Short Name field, enter an alphanumeric code with uppercase letters and no spaces.
-
Enter a name for your configuration in Display Name.
-
Select CRM as the product family and module.
-
Leave the Default option deselected for now. You select this option as a last step.
-
Click Save and Close.
-
Open the Manage Global Search Configurations page again.
-
Click the name link for the configuration you created.
-
Use the tabs to define your configuration:
-
Autosuggest: Determine what's available to users in the global search autosuggest, as well as how autosuggest looks and behaves.
-
Search Field: Control the Search field in the global header and in the search results dialog box.
-
Search Results: Specify if salespeople can personalize the filters used in their searches
-
Pages: Specify where you want your configuration to apply.
-
Define Which Groups of Suggestions Users See
-
While editing the global search configuration you created, click the Autosuggest tab.

-
Skip setup of Synonyms as they don't apply to Sales.
-
Keep the Enable personalization of search groups option selected unless you want to prevent users from personalizing suggestion groups.
-
In the Suggestion Groups section:
-
Move the Saved Searches group (callout 2), and any other unwanted suggestion groups, to the Available Groups column. This action removes them from use. Saved searches can't be used with Global Search.
-
You can remove a suggestion group from being displayed by default by setting Enable to No. Users can still enable the group when they personalized their global search.
-
You can change the order the suggestion groups are presented to users.
-
You can change the suggestion group headings.
-
Click Manage Suggestion Groups.
-
Duplicate an existing group and edit your copy.
-
Click Refresh.
-
Swap your copy for the original.
-
-
-
You can turn the suggestion group headings off in the Appearance section (callout 3).
-
You can change suggestion behavior (callout 4):
-
Show Top Suggestions: Enable this option to display suggestions in autosuggest as soon as the user clicks in the search field, even without entering a search term. For example, the last few pages the user opened would appear as suggestions in the Recent Items group.
-
Minimum Characters for Autosuggest: Enter the number of characters that users must enter in the search field before matching suggestions appear in autosuggest.
-
Maximum Number of Suggestions: Enter the maximum number of suggestions to be displayed across all suggestion groups. This total is distributed as equally as possible among the groups.
-
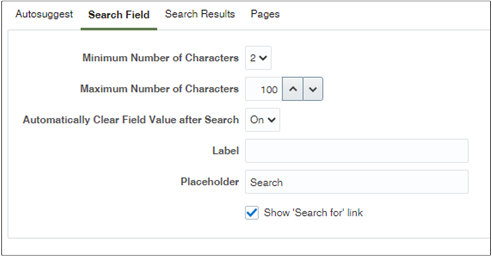
Configure the Global Search Field
Here are the main configurations for the global search box field:
-
You can change the minimum and maximum number of characters required for search.
-
You can specify a different word to appear in the Global Search box instead of "Search".
Configure How Salespeople Can Use Filters
-
In the Saved Search and Recent Search section, you can disable the display of recent searches by deselecting Enable recent searches. Saved searches aren't available in global search.
-
In the Filters section:
-
Keep Enable personalization of search categories selected unless you want to prevent users from specifying which objects they see in the search results. You determine the objects that show up as filters in global search while setting up Adaptive Search (see the topic Configure Global Search Scope and Display of Search Results).
-
Enable clear all filters: Allow users to clear all filters by clicking the Clear All Filters button in search results.
-
Show applied filters: Show all the filters that have been applied
-
-
The Search Categories section and the rest of the sections on this tab don't apply to Classic Sales.
Specify the Sales Pages Where Your Configuration Applies and Complete the Configuration
Entering the application pages is a one-time setup. If you're editing a configuration you created, then you don't need to reenter the page codes again. You can skip this step.
-
Enter codes (view IDs) for the applications or pages where you want your configuration to apply. Here are the entries for Classic Sales:
View Type
View ID
Application
CRMPerformanceApp%
Application
ORA_CRM_SERVICESAPP%
Application
ORA_CRM_UIAPP%
Application
ORA_SERVICEAPP%
Application
SalesApp%
Application
ORA_FSCM_UIAPP%
You can obtain other codes in Setup and Maintenance, using the Manage Taxonomy Hierarchy task as described the linked topic: Specify the Pages or Applications That a Global Search Configuration Applies To.
-
At the top of the page, select the Default option.
-
Click Save and Close.
-
Clear your browser cache and navigate to any of the sales pages to test your configuration.