Configure Zoom Web Conference for Your Sales Application
Here's how to integrate the Zoom conferencing application.
Before You Begin
To activate the web conference feature, you must first raise a service request from My Oracle Support who will then issue you with a promotion code. You must also have an active Zoom account and remain in agreement with the terms and conditions of your contract to successfully configure the web conference and your sales application integration. Also, note that your zoom license must include REST API support, as well as the necessary permissions to manage meetings and recordings.
You need the Configure Oracle Fusion Applications Offering privilege (ASM_CONFIGURE_OFFERING_PRIV) in your user role to enter the promotion code in the application.
When you receive a promotion code to activate Web Conferencing, follow these steps to enter it in your sales application.
-
Click work area.
-
On the Enterprise Information page, click Manage Promotion Code.
-
On the Manage Promotion Codes page, click Enter Promotion Code.
-
On the Enter Promotion Code dialog box, enter the promotion code, and click Save and Close.
The promotion code you entered appears in the Part Number column on the Manage Promotion Codes page.
Once you’ve entered your promotion code, follow the steps to enable, integrate, and verify a web conference app for your sales application.
- Start Zoom meetings
- Verify and update meeting participants as contacts while the meeting is ongoing
- Take notes and record the meeting outcome
Summary of Setup Steps
Here's a summary of the steps to enable and integrate a web conference app for your sales organization.
-
Create your own OAuth Application in Zoom.
An OAuth app defines a set of Zoom APIs to allow Oracle access those APIs on your behalf. The OAuth app can be private and doesn't need to be published. For more details, see the Create an OAuth Application in Zoom section of the Configure Web Conference for Your Sales Application topic.
-
Instead of making repeated calls to pull data frequently from an API, such as a Zoom account, Webhooks retrieve the required information about events that happen. The Zoom account must install your Webhook-enabled app to authorize data flow via Webhooks. For more details, see the Enable Webhooks for Web Conference section of the Configure Web Conference for Your Sales Application topic.
-
From your Classic Sales application, navigate to the Manage Web Conference Integration task in Setup and Maintenance to complete and activate the integration. For more details, see the Complete Your Web Conference Integration section of the Configure Web Conference for Your Sales Application topic.
Create an OAuth Application in Zoom
Here's how to create an OAuth application in Zoom.
-
Sign in to Zoom as a setup user with access to the Zoom Marketplace and with the necessary privileges to build apps.
-
Navigate to your profile page and select the Advanced drop-down option.
-
From the Advanced drop-down menu, select App Marketplace. You're redirected to the App Marketplace website.
-
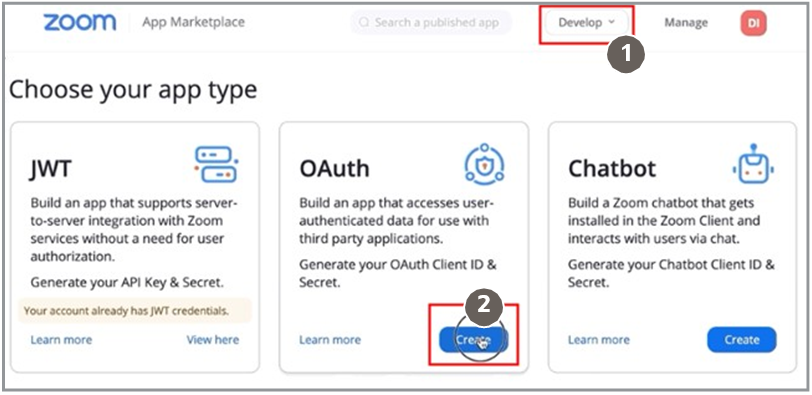
Select the Develop drop-down menu (callout 1 in the screenshot), and then click Build App.
-
From the OAuth panel, click Create (callout 2 in the screenshot).
-
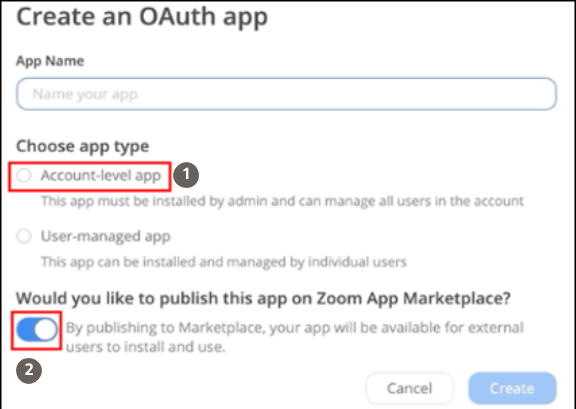
From the Create an OAuth app page, type your application name in the App Name field.
-
Select the Account-level app option (callout 1) and deactivate the Would you like to publish this app on Zoom App Marketplace? toggle (callout 2 in the screenshot).
-
Click Create.
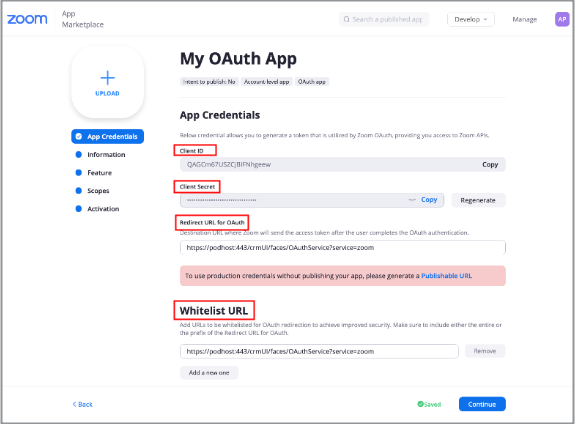
You're redirected to the App Credentials tab from where you can copy the Client ID and Client Secret.
Note:The Client ID and the Client Secret are necessary to complete and activate the Zoom integration with your sales application.
-
In the OAuth Redirect URL field, enter your platform destination URL where Zoom will send the access token after you complete the OAuth authentication.
-
In the Whitelist URL section, insert your platform full domain in the following format:
https://[podhost:podport]/crmUI/faces/OAuthService?service=zoom.Note:You can also get this URL from the OAuth Redirect URL field in the Manage Web Conference Integration task in Setup and Maintenance. See the Complete Your Web Conference Integration section below.
-
Click Continue.
-
In the Information section, complete the Basic Information for your app by entering these details:
-
App Long Name and Description
-
Your Company Name
-
Name and the Email Address of the developer in charge of the integration (as a point of contact)
-
-
Click Continue to move to the Features section where you can subscribe to the interested events to receive Webhook notifications for your app. For more information, see the section Enable Webhooks for Web Conference.
-
Click Continue again to move to the Scopes tab.
-
Click Add Scopes and select these two scope types and associated options:
-
Meeting - Select View and manage all user meetings
-
Dashboard - Select View all users' meeting information on Dashboard
These two scope types are the extent of APIs that Oracles are allowed to use. Scopes provide a way to limit the amount of access that's granted to an app.
-
-
Click Done to complete the creation of your OAuth application in Zoom.
Note:This OAuth application won't be published in the Zoom marketplace.
Enable Webhooks for Web Conference
- Meeting started or completed
- Participant joined or left the meeting
- Participant joined a meeting before the host
- Participant is waiting for host to start a meeting
Here's how to enable Webhooks for an OAuth application in Zoom.
-
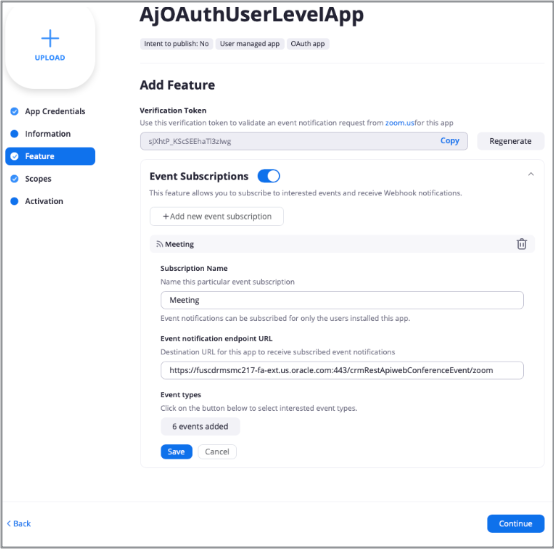
From the OAuth panel, click the Feature tab to display the My Feature page as follows:
-
Copy the Verification Token to validate an event notification request from Zoom.
Note:This validation token is necessary to complete and activate the Zoom integration with your sales application. See the Complete Your Web Conference Integration section for more information.
-
Click Event Subscriptions and subscribe to the interested events to receive Webhook notifications for your app by entering these details:
-
Click Add new event subscription and select Meeting. Click the field again if you want to add additional Event Subscriptions.
-
Enter the Subscription Name.
-
Select the events from available Event types that you would like to subscribe as follows.
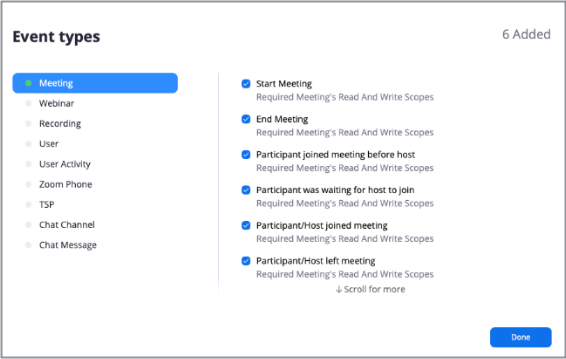 Note:
Note:Although you can subscribe to as many events as required for each event subscription, you can only have a maximum of 10 event subscriptions per app.
-
Enter a valid Event Notification Endpoint URL as shown in the following example:
https://<podhost>:<podport>/crmRestApi/webConferenceEvent/zoom.This is the designated URL of your app where you receive Webhook POST requests, also known as event notifications. Event notifications are sent as HTTP POST requests in JSON to the endpoint you specify in your Marketplace app. This URL must be secured over HTTPS.
-
-
Click Done to complete the Webhook configuration of your OAuth application in Zoom.
Complete Your Web Conference Integration
You're now ready to complete and activate the Zoom web conference integration for your sales application. Follow these steps:
-
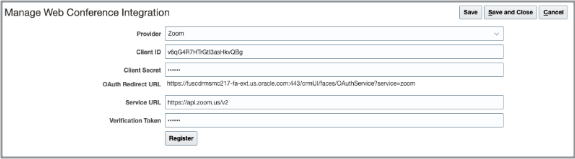
Navigate to . The following screen is displayed.
-
Enter the following:
Field
Value
Provider
Select Zoom from the drop-down list.
Client ID
Copy the value generated in the App Credentials section from the application created on Zoom marketplace. (See step 8 in the Create an OAuth Application in Zoom section).
Client Secret
Copy the value generated in the App Credentials section from the application created on Zoom marketplace. (See step 8 in the Create an OAuth Application in Zoom section).
OAuth Redirect URL
This pre-populated field defaults to the value you entered for the Whitelist URL in step 9 of the Create an OAuth Application in Zoom section. It contains your pod information in the following format:
https://[podhost:podport]/crmUI/faces/OAuthService?service=zoomService URL
This pre-populated field defaults to the value you entered in step 9 of the Create an OAuth Application in Zoom section.
To support GDPR requirements of EU customers, you can use this URL as the base URL for all API requests associated with EU accounts.
https://eu01api-www4local.zoom.usFor information about the Service URL, go to this URL
https://marketplace.zoom.us/docs/api-reference/introductionVerification Token
Copy the verification token value generated in the Add Feature section from the application created on Zoom marketplace. (See the section Enable Webhooks for Web Conference).
-
Click Register to initiate the OAuth process.
A new window is displayed which requests your Zoom credentials.
-
Sign in with your Zoom account details and once you're successfully authenticated, you receive this message:
Congratulations. You have successfully registered your web conference provider.Note:Calls to Zoom will be made with these credentials. The email address for Sales resources will be used as the Zoom user ID.
-
Next, you're prompted to authorize the usages of the scopes you selected in step 15 in the Create an OAuth Application in Zoom section.
-
Return to the Manage Web Conference Integration page and click Save and Close to complete the registration.
Verify Your Setup
Here's how to verify your setup.
-
Sign in to your sales application.
-
Create an appointment of type Web Conference.
-
Check your Zoom web profile to verify the successful creation of your meeting in Zoom
(https://zoom.us/meeting#/upcoming)
Remove a Web Conference
These steps describe how to remove a web conference integration from your sales application.
-
Sign in to Sales as a sales administrator.
-
Navigate to .
-
In the Setup and Maintenance work area, click the Tasks side panel icon and then click the Search link.
-
Search for and select the Manage Web Conference Integration task.
-
In the Provider field, remove the current value and leave blank.
-
Click Save and Close.