How do I group data in saved searches and visualizations by team members?
To group data, including by the different team members in saved searches and their visualizations, you enable the Team Members attribute for the Group By feature in Adaptive Search. You can then use the Team Members field to group data in your search and the resulting visualization.
Here's the setup overview:
-
If you're using Workspace in the classic Sales UI, then enable the Group By feature for Workspace. This step isn't required for Sales in the Redwood user experience.
See the Enable the Group By Feature for Workspace section for detailed steps.
-
Enable the Team Members and Team Member fields for Group By in the Configure UI tab on the Configure Adaptive Search page.
See the Enable Team Member Fields for Group By section for detailed steps.
Create the saved search with the Team Members group by selected.
See the topic Create Saved Searches for the Sales Organization.- Create the visualization from the saved search as described in the topic Create a Visualization of a Saved Search or an Analysis.
Enable the Group By Feature for Workspace
-
Click .
-
In the Setup and Maintenance work area, open the Configure Adaptive Search task.
-
Offering: Sales
-
Functional Area: Sales Foundation
-
Task: Configure Adaptive Search
-
-
On the Configure Adaptive Search page, click the Parameters tab.
-
Highlight the Enable Group By and click Edit.
-
In the Warning message, click Yes.
-
In the Current Value field, change the value from N to Y and click Save and Close.
Enable Team Member Fields for Group By
-
Sign in as a setup user.
-
Navigate to the Setup and Maintenance work area, and open the Configure Adaptive Search task :
-
Offering: Sales
-
Functional Area: Sales Foundation
-
Show: All Tasks
-
Task: Configure Adaptive Search
-
-
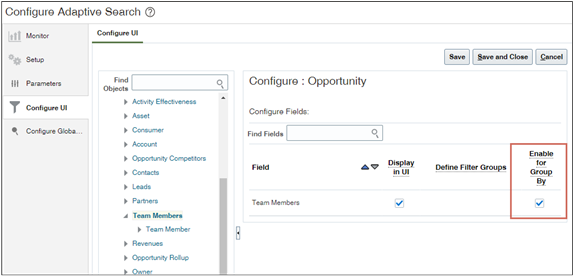
On the Configure Adaptive Search page, click the Configure UI tab.
Select the object you want to set up for your Group By in the left pane of the tab and open the object hierarchy to locate Team Members and Team Member.
-
Select the Enable for Group By option for both Team Members and Team Member fields.
Note: Ensure that the Display in UI option is also selected -
Click Save and Close.
-
Sign out and then sign in again to see your changes.
No publishing is required to see the option in the group by. The changes you made are reflected in the Workspace UI for the Group By field drop down lists for the selected object.