Set Up Geography Validation
Set up geography validation for those geography elements that you plan to use in your sales territories to prevent data entry errors. By default, application enforces the validation you specify for creating addresses in the UI only, so you must turn the validation on for import.
Set Up Validation
-
Open the Manage Geographies task from the Setup and Maintenance work area using the following:
-
Offering: Sales
-
Functional Area: Sales Foundation
-
Task: Manage Geographies
-
-
On the Manage Geographies page, search for each country you imported using either its name or its two letter ISO code. For example, you can search by entering either the country name United States or the two letter ISO code US, and clicking Search.
-
Select the country in the Search Results area.
-
Click Go to Task in the Validation Defined column.
Here's a screenshot of the Manage Geographies page highlighting the Go to Task icon in the Validation Defined column. 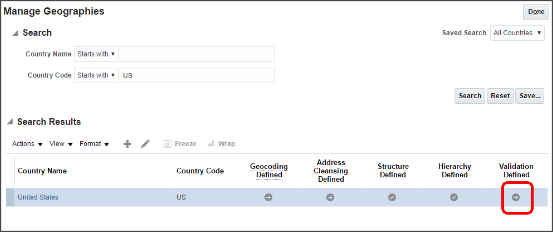
-
On the Manage Geography Validation page. Address Style section, ensure that the No Styles Format address style is selected. Defining validation for the No Styles Format address style ensures that the validations are performed for all addresses in the country.
-
Select Enable List of Values in the Geography Mapping and Validation section to display a list of values during address entry in the UI. For example, to have users select states from a list, select Enable List of Values for State.
Vision Corp. enables the list of values for State. The company uses states for its sales territories and wants to ensure that state names are always entered correctly.
-
Select Geography Validation for all the geography types that you plan to use in territories.
In our example, Vision Corp. plans to set up sales territories by state, so it selects Geography Validation for State.
Here's a screenshot of the Manage Geography Validation page highlighting the location of the Enable List of Values and Geography Validation options for the US State geography type.
 Note:
Note:If you don't select the validation for an address element, the application still suggests values during address entry. It just doesn't validate the address element.
-
Specify if you want to allow users to save incomplete or invalid addresses by making a selection from the Geography Validation Level for Country list.
-
No validation: permits users to save incomplete or incorrect addresses.
-
Error: permits only valid addresses to be saved.
Vision Corp. wants to save all addresses, including incomplete and invalid addresses, so it selects No validation.
-
-
Click Save and Close.
-
Click Done in the Manage Geographies page.
Turn On Validation for Address Import
You must set a system profile option Geography Address Validation Enabled to Yes for the validation to be enforced during import.
-
Open the Manage Administrator Profile Values task from the Setup and Maintenance work area:
-
Offering: Sales
-
Functional Area: Sales Foundation
-
Task: Manage Administrator Profile Values
-
-
On the Manage Administrator Profile Values page, search for the profile option by entering
Geography Address Validation Enabledin the Profile Display Name. -
Select Yes as the Profile Value.
-
Click Save and Close.