Example of Creating a Sales Manager in an Existing or New Resource Organization
In this example, you create a sales manager using import management and add them to the resource hierarchy. You can create a new organization or use an existing organization which doesn't have a manager.
Before You Begin
The scenario in this example assumes that the following prerequisites have already been set up.
-
User accounts and e-mail IDs should be unique.
-
Appropriate business units are set up using the Manage Business Unit task.
-
To find the business unit, navigate to the following in the Setup and Maintenance work area:
-
Offering: Sales
-
Function Area: Data Import and Export
-
Task: Manage Business Units
-
-
-
Appropriate legal entities are set up using the Manage Legal Entities task.
-
To find the legal entity, navigate to the following in the Setup and Maintenance work area:
-
Offering: Sales
-
Function Area: Data Import and Export
-
Task: Manage Legal Entities
-
-
Scenario
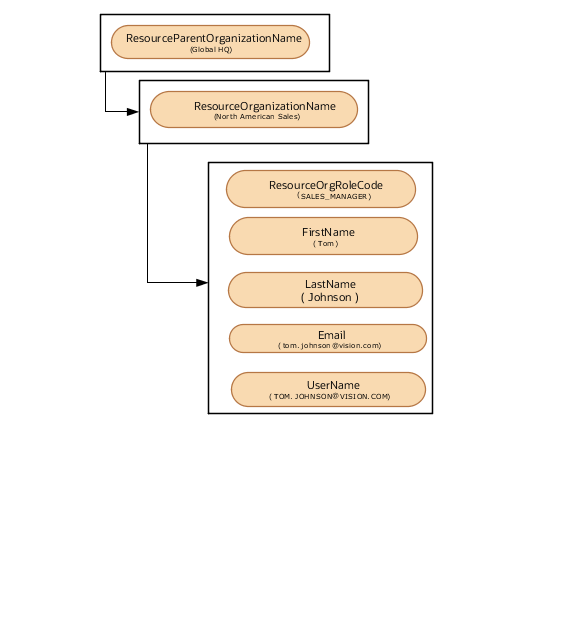
In this scenario, you create Tom Johnson as a manager of the resource organization North American Sales in the resource parent organization Global HQ. He is created as a resource with the role of SALES_MANAGER. You must create a source file (CSV) with the attributes and import it using import management as shown in this table.
|
Attribute Name |
Value |
|---|---|
|
FirstName |
Tom |
|
LastName |
Johnson |
|
UserName |
TOM.JOHNSON@VISION.COM |
|
|
tom.johnson@vision.com |
|
BusinessUnit |
Vision Corporation Enterprise |
|
LegalEntity |
Vision Corporation |
|
ResourceOrgRoleCode |
SALES_MANAGER |
|
ResourceParentOrganizationName |
Global HQ |
|
ResourceOrganizationName |
North American Sales |
Providing the user name is optional. If you don't provide the user name, the application will generate the user name by default. Provide values either for the ResourceManagerEmail or the ResourceParentOrganizationName attribute. If neither of these is provided, then the resource is associated with the root resource organization as parent organization.
The following figure shows the resource Tom Johnson created as a sales manager in the hierarchy.
To create a top resource in an existing resource organization, you must use the TopResourceFlag attribute in import management and REST services. This attribute indicates that the resource is a top resource, and is used by the Sales Setup Assistant.
You can import the source data file.
-
Go to .
-
Click Create Import Activity in the Manage Imports page.
-
In the Enter Import Options page, provide a name for the import activity, and select Resource from the Object drop-down list.
-
Select the CSV file in the File Name field, and click Next.
-
The source and target attributes are automatically mapped in the Map Fields page. Review and edit the mappings if required.
-
Check the file for unmapped columns or data format issues by clicking Validate Data. Click Next.
Note:Validation errors, if any, are displayed on the Mapping Validation screen. If you get warnings about unmapped columns, then you can ignore these columns and proceed to submit the import job. Validations are for informational purposes and applicable only for low-volume imports.
-
Review the import details on the Review and Submit page, and click Submit when you're ready.
You must run the following scheduled processes after creating the sales manager:
-
Reporting Hierarchy Generation: This job re-generates the resource reporting hierarchy when there is a change in the organization hierarchy. For more information about the Reporting Hierarchy Generation scheduled process see the section "Reporting Hierarchy Generation" in the Understanding Scheduled Processes guide.
-
Send Pending LDAP Requests: This job processes the pending LDAP requests to provision the user accounts and roles. You can specify the parameters User Type and Batch Size with this job. You must specify User Type (usually select All); if you leave it as blank, then this process won't process any requests. If you don't set Batch Size, the default will be A for automatic, which is 1/10th of the total requests number. You can specify a number for batch size to instruct the process to group that number of requests together for single batch process. If you want the process to pick up the FAULTED requests from previous run, you can set Batch Size as AF. Run this scheduled process when you create a new resource along with the user account.