Examples of Changing a Resource from Manager to a Non-Manager Role
You can make role-change related updates to a resource by changing the resource information such as resource role code and resource role type code. Before you change a manager to a non-manager role, move the employees reporting to this manager to a different manager.
These scenarios illustrate the various role-change related updates you can make to a resource.
-
Sales Manager changed to Sales Representative under the same manager.
-
Sales Manager changed to Sales Representative under a different manager.
Sales Manager Changed to Sales Representative under the Same Manager
Geriant Jones is a Sales Manager reporting to Charlotte Edwards. The reporting hierarchy and organization details of Geriant Jones are as shown in this image:
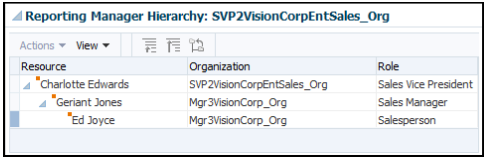
In this scenario, Geriant's role is changed to Sales Representative under Charlotte Edwards, without any change in the reporting hierarchy. Move employees reporting to Geriant Jones to Geriant Jones' parent organization. In this example, move Ed Joyce under Charlotte Edwards as salesperson before demoting Geriant Jones.
To change Geriant Jones' role to Sales Representative, you must create a source file (CSV) with the attributes listed in this table and import it using import management. You can use either ResourceParentOrganizationName or ResourceManagerEmail for Organization or Manager-related changes.
|
Attribute Name |
Value |
|---|---|
|
ResourcePartyNumber |
|
|
ResourceManagerEmail |
charlotte.edwards@vision.com |
|
ResourceOrgRoleCode |
SALES_REPRESENTATIVE |
|
ResourceParentOrganizationName |
SVP2VisionCorpEntSales_Org |
You can import the source data file.
-
Go to .
-
Click Create Import Activity in the Manage Imports page.
-
In the Enter Import Options page, provide a name for the import activity, and select Resource from the Object drop-down list.
-
Select the CSV file in the File Name field, and click Next.
-
The source and target attributes are automatically mapped in the Map Fields page. Review and edit the mappings if required.
-
Check the file for unmapped columns or data format issues by clicking Validate Data. Click Next.
Note:Validation errors, if any, are displayed on the Mapping Validation screen. If you get warnings about unmapped columns, then you can ignore these columns and proceed to submit the import job. Validations are for informational purposes and applicable only for low-volume imports.
-
Review the import details on the Review and Submit page, and click Submit when you're ready.
After your import runs successfully, send the pending LDAP user update requests:
-
In the Navigator, click Scheduled Processes.
-
In the Scheduled Processes page, click Schedule New Process.
-
In the Schedule New Process dialog box, from the Name drop-down list, search for Send Pending LDAP Requests.
-
From the search results, select Send Pending LDAP Requests and click OK.
-
In the Process Details dialog box, click Submit.
-
In the Confirmation dialog box, click OK.
-
Click Close.
-
In the Scheduled Processes page, click the Refresh icon.
-
Verify if the status of the process has completed successfully.
You run the scheduled process Reporting Hierarchy Generation to re-generate the resource
reporting hierarchy when there is a change in the organization hierarchy.
For more information about the Reporting
Hierarchy Generation scheduled process see the section
"Reporting Hierarchy Generation" in the Understanding
Scheduled Processes guide.
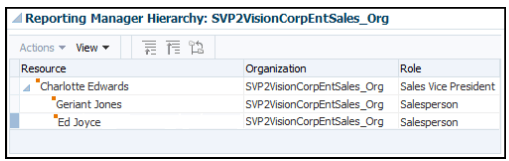
The reporting hierarchy and organization details of Geriant Jones after his role has been changed from SALES_MANAGER to SALES_REPRESENTATIVE are as follows:
The sales representatives reporting to the manager being demoted should be moved under their manager's manager or another manager. In this scenario, Ed Joyce who was reporting to Geriant should be moved under Charlotte Edwards who was Edward's manager, as shown in this image.
Sales Manager Changed to Sales Representative under a Different Manager
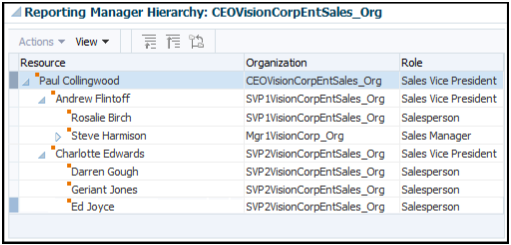
Darren Gough is a Sales Manager reporting to Andrew Flintoff. The reporting hierarchy and organization details of Darren Gough are as shown in this image:
In this scenario, Darren's role is changed to a Sales Representative and would be reporting to Charlotte Edwards, a different manager. To change role of Darren Gough from Sales Manager to Sales Representative under Charlotte Edwards, you must create a source file (CSV) with the attributes listed in the following table and import it using import management. You can use either ResourceParentOrganizationName or ResourceManagerEmail for Organization or Manager-related changes.
|
Attribute Name |
Value |
|---|---|
|
ResourcePartyNumber |
|
|
ResourceOrgManagerEmail |
charlotte.edwards@vision.com |
|
ResourceOrgRoleCode |
SALES_REPRESENTATIVE |
|
ResourceParentOrganizationName |
SVP2VisionCorpEntSales_Org |
You can import the source data file
-
Go to .
-
Click Create Import Activity in the Manage Imports page.
-
In the Enter Import Options page, provide a name for the import activity, and select Resource from the Object drop-down list.
-
Select the CSV file in the File Name field, and click Next.
-
The source and target attributes are automatically mapped in the Map Fields page. Review and edit the mappings if required.
-
Check the file for unmapped columns or data format issues by clicking Validate Data. Click Next.
Note:Validation errors, if any, are displayed on the Mapping Validation screen. If you get warnings about unmapped columns, then you can ignore these columns and proceed to submit the import job. Validations are for informational purposes and applicable only for low-volume imports.
-
Review the import details on the Review and Submit page, and click Submit when you're ready.
After your import runs successfully, send the pending LDAP user update requests:
-
In the Navigator, click Scheduled Processes.
-
In the Scheduled Processes page, click Schedule New Process.
-
In the Schedule New Process dialog box, from the Name drop-down list, search for Send Pending LDAP Requests.
-
From the search results, select Send Pending LDAP Requests and click OK.
-
In the Process Details dialog box, click Submit.
-
In the Confirmation dialog box, click OK.
-
Click Close.
-
In the Scheduled Processes page, click the Refresh icon.
-
Verify if the status of the process has completed successfully.
You run the scheduled process Reporting Hierarchy Generation to re-generate the resource
reporting hierarchy when there is a change in the organization hierarchy.
For more information about the Reporting
Hierarchy Generation scheduled process, see the section
"Reporting Hierarchy Generation" in the Understanding
Scheduled Processes guide.
Before demoting the manager, the sales representatives reporting to the manager being demoted should be moved under their manager's manager or another manager. In this scenario, before Darren's demotion to a different manager, Rosalie Birch who was reporting to Darren should be moved under Andrew Flintoff who was Darren's manager as shown in this image.
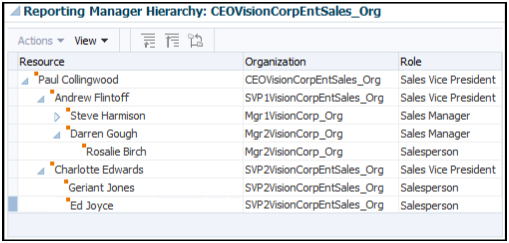
The reporting hierarchy and organization details of Darren Gough after his role has been changed from SALES_MANAGER to SALES_REPRESENTATIVE under Charlotte Edwards are as follows: