Configure Panels on the Detail Page
An individual record's detail page includes key information displayed in a region of panels. Panels display information related to the record, such as the most recent and pending activities or related contacts. As an administrator, you can use Oracle Visual Builder Studio to configure these panels to meet your users' requirements.
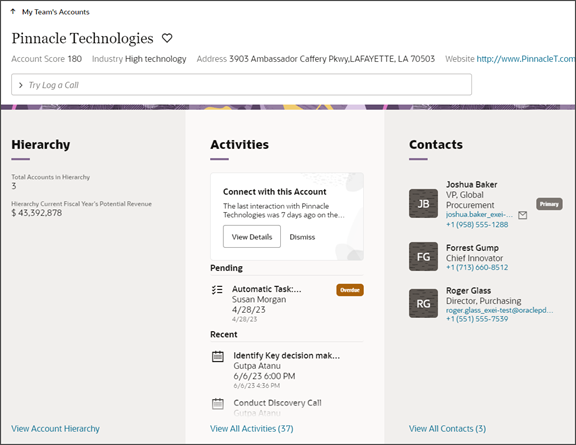
Here's an example of the panels that display for an account:
A different set of panels can display for different types of objects. For example, for an account, you'll probably see a hierarchy panel and a contacts panel. For an opportunity, meanwhile, you'll probably see a products panel and a team panel.
In Oracle Visual Builder Studio, these panels are rendered using a panel layout. Each Sales object has a default, read-only panel layout which you can duplicate and then configure. For example, you can:
-
Add and remove panels.
See Add a Panel.
-
If you add a panel, then you must add a subview, as well.
See Add a Subview.
-
-
Change the display order of the panels.
-
Display a panel based on a condition.
See Display a Panel Based on a User's Role and Display a Panel and Subview Based on a Field Value.
You can also configure the content inside most panels. See Configure the Contents of a Panel. Note, however, that you can't configure the Activities panel.
Add a Panel
Each Sales object comes with a set of panels. You can add a panel as needed.
To add a panel, you must first duplicate the object's read-only panel layout. Here's an example of duplicating the read-only panel layout for the Account detail page:
-
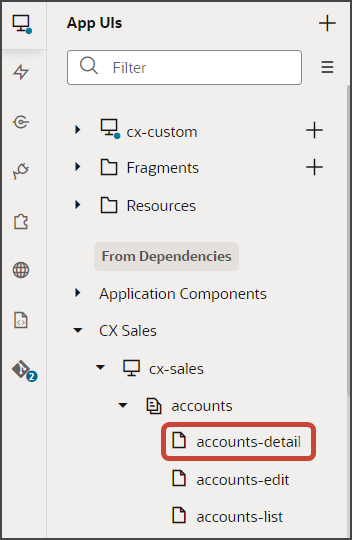
In Visual Builder Studio, navigate to the Page Designer tab on the accounts-detail page.
You can navigate to the accounts-detail page either by navigating to Visual Builder Studio from the Account detail page in the application, or by navigating to the accounts-detail node on the App UIs tab in Visual Builder Studio.
-
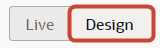
Click the Design button.
-
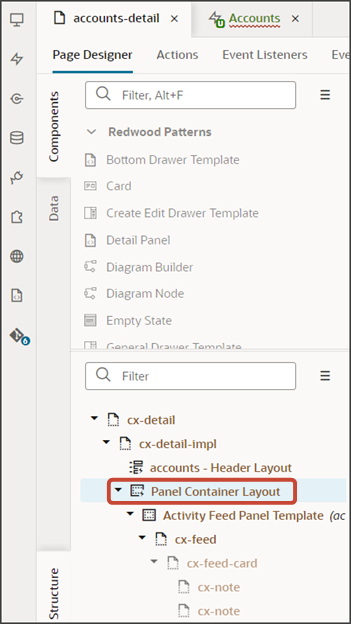
On the Structure panel, click the Panel Container Layout node.
-
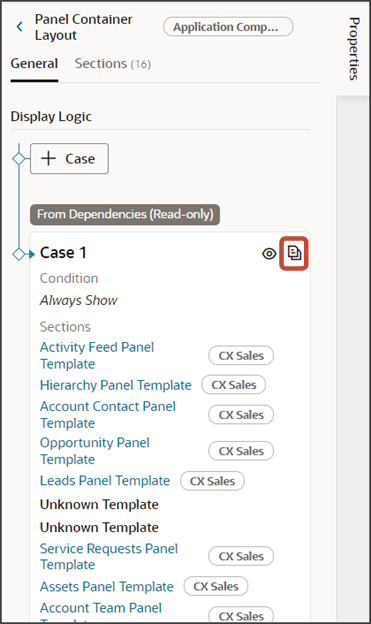
On the Properties pane, next to Case 1, click the Duplicate icon.
After duplicating the panel container layout, you can now add a panel. There are different procedures to follow depending on the panel object (is it a standard or custom object?) as well as on the type of relationship between the two objects.
-
If the relationship between the detail page's object and the panel object is one-to-many, and the panel's target related object is a standard object, then see Add a Standard Object Panel for Related Objects (One-to-Many).
-
If the relationship between the detail page's object and the panel object is one-to-many, and the panel's target related object is a custom object, then see Add a Custom Object Panel for Related Objects (One-to-Many).
-
If the relationship between the detail page's object and the panel object is many-to-many, then see Add a Panel for Related Objects (Many-to-Many).
These instructions apply whether the panel object is a standard or custom object.
Add a Subview
If you add a panel to an object's detail page, then you must also add a related subview for the panel. The subview displays all records that can't fit into the limited size of the panel.
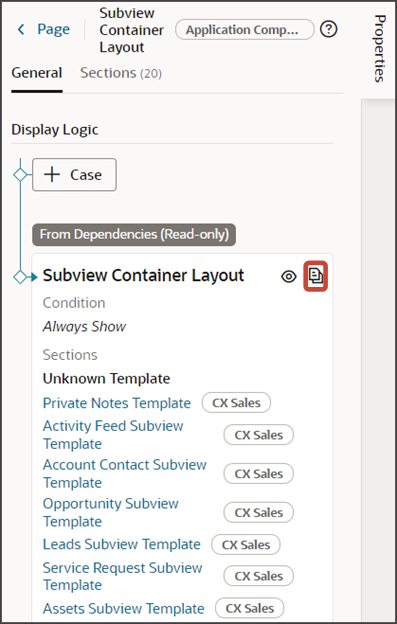
Before you can add a subview, you must first duplicate the object's read-only subview layout. Here's an example of duplicating the read-only subview layout for the Account detail page.
-
In your application, navigate to any record for the object that you just added a panel to.
For example, navigate to any account detail page.
Note: You must start from an application page first, before navigating to Visual Builder Studio. This ensures that the Subview Container Layout node is available, which you'll use in step 6. -
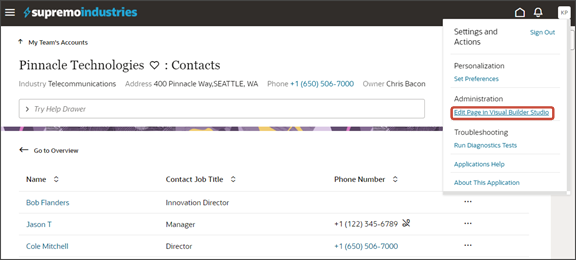
On the account detail page, click the View All link at the bottom of any panel to navigate to the panel's subview.

-
On the subview, under the Settings and Actions menu, select Edit Page in Visual Builder Studio.
-
When you enter into your workspace in Visual Builder Studio, the accounts-detail page is displayed in the Page Designer canvas.
-
Click the Design button.
-
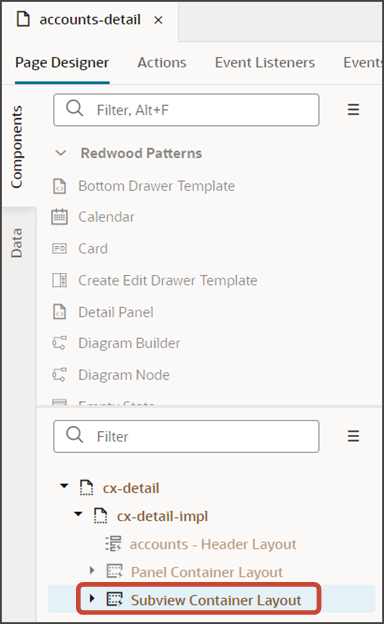
On the Structure panel, click the Subview Container Layout node.
-
On the Properties pane, next to Subview Container Layout, click the Duplicate icon.
After duplicating the read-only subview container layout, you can now add a subview. There are different procedures to follow depending on the subview object (is it a standard or custom object?) as well as on the type of relationship between the two objects.
-
If the relationship between the detail page's object and the subview object is one-to-many, and the subview's target related object is a standard object, then see the example documented in "Add a Subview for the Leads Panel" inside the Add a Standard Object Panel for Related Objects (One-to-Many) topic.
-
If the relationship between the detail page's object and the subview object is one-to-many, and the subview's target related object is a custom object, then see "Configure the Subview Layout" inside the Configure the Subview for Related Objects (One-to-Many) topic.
-
If the relationship between the detail page's object and the subview object is many-to-many, then see "Configure the Subview Layout" inside the Configure the Subview for Related Objects (Many-to-Many) topic.
These instructions apply whether the subview object is a standard or custom object.
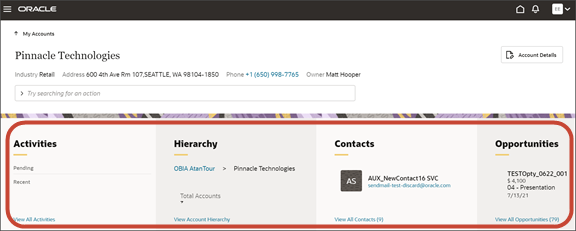
Change the Display Order of a Panel
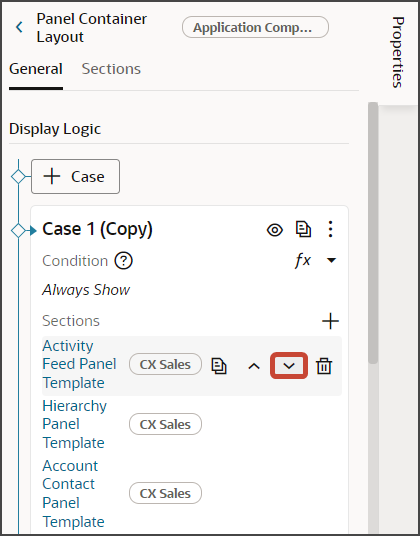
In this example, we'll move the Activities panel for an account so that it displays after the Hierarchy panel.
-
In Visual Builder Studio, navigate to the Page Designer tab on the accounts-detail page.
-
Click the Design button.
-
On the Structure panel, click the Panel Container Layout node.
-
On the Properties pane, next to Case 1, click the Duplicate icon.
-
On the Properties pane for the copied layout, next to the Activity Feed Panel Template section, click the Move Down icon so that this section displays after the Hierarchy Panel Template section.
-
Click the Preview button to see your changes in your runtime test environment.

Here's a screenshot of the Activities panel which now displays right after the Hierarchy panel.