Show or Hide a Field Based on Another Field’s Value
In Oracle Visual Builder Studio, you can use rules and display logic to determine which page layout to display at runtime. You can also set up your rules so that a field only displays depending on the value of another field. For example, maybe you want the Owner field to always display for an account record, unless the account type is Prospect. This topic illustrates how to implement this scenario using display logic.
This topic also provides an alternative method for simple hide/show scenarios.
Prerequisites
In this example, we'll show or hide a field based on an account's type. Before you try the following procedure, you must add the Type field to the account detail page's header using the instructions documented in Configure the Header on the Detail Page.
Add Display Logic to a Rule
To show a field depending on the value of another field, we'll create two rules and add a condition to the first rule, as follows:
-
If an account's type is Prospect, then display a layout without the Owner field.
-
If an account's Type is not Prospect, then display a different layout that includes the Owner field.
Let's create the rule and corresponding layout for item #1.
-
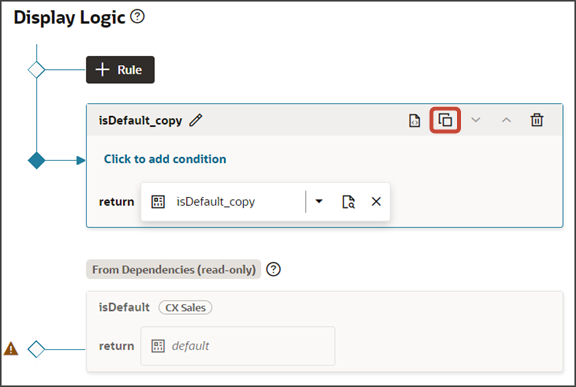
In Visual Builder Studio, on the Accounts layout tab > Rule Sets subtab, create a new rule by copying the rule that you created in the procedure documented in Configure the Header on the Detail Page.
Click the Duplicate icon.
-
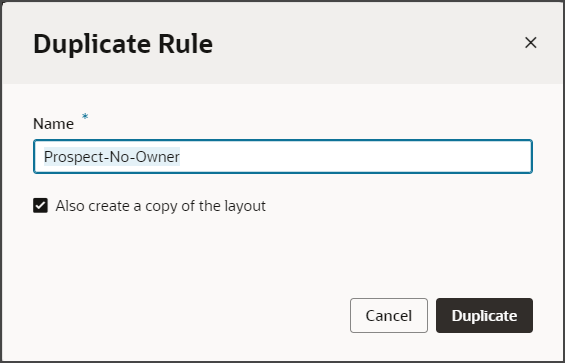
In the Duplicate Rule dialog, accept the default rule name or enter a new name. The name you enter here is both the rule name and also the layout name, so enter a layout name that makes sense for you, such as
Prospect-No-Owner.Also, make sure the Also create a copy of the layout check box is selected.
-
Click Duplicate.
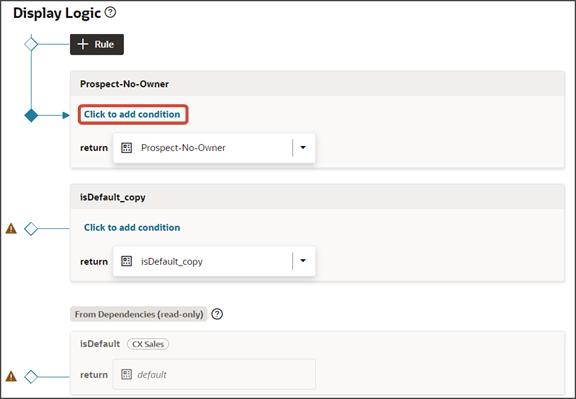
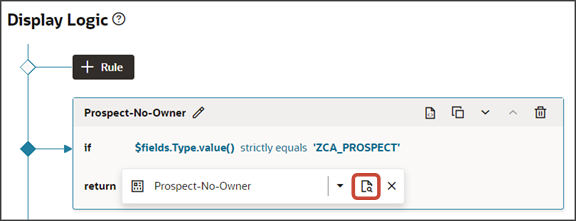
The new rule displays at the top of the list of existing rules, which means that this rule will be evaluated first at runtime. If the rule's conditions are met, then the associated layout is displayed to the user. Otherwise, the next rule will be evaluated.
-
Let's add a condition to the rule. Click Click to add condition.
-
Add the condition to specify when you want the associated layout to display at runtime.
In this example, we want the Type field to equal
Prospect.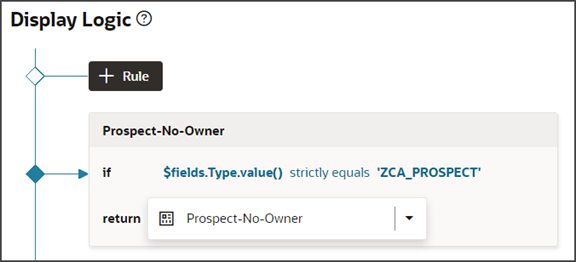
-
Edit the layout so that the Owner field is not included when the account type is Prospect.
-
Click the Open icon to edit the copied layout.
-
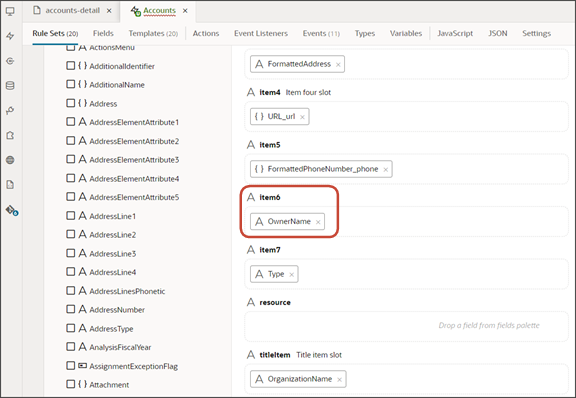
Delete the Owner field in the item6 slot.
-
-
Click the Preview button to see your changes in your runtime test environment.

The preview link must include the
application/containersegments in the URL. If not, then change the preview link using the following example URL:https://<servername>/fscmUI/redwood/cx-sales/application/container/accounts/accounts-detail?id=300000003513233&puid=7050&view=foldoutIn this example, we can see that this account is a prospect, and therefore there is no Owner field.

However, this account is a Customer, and thus we see the Owner field.
 Note:
Note:The header displays a field only if the field has a value. For example, if an account doesn't have a Type specified, then the Type field won't display.
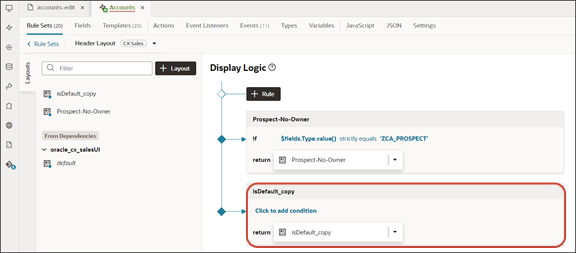
The rule and corresponding layout that you previously created in Configure the Header on the Detail Page satisfy the conditions for item #2, "If an account's Type is not Prospect, then display a different layout that includes the Owner field."
Alternative Method for Simple Hide/Show Use Cases
The previous example illustrates how to use rules, display logic, and custom layouts to show or hide a field based on another field's value. But, you can also directly modify the page template instead. This method is an alternative method that might be preferable for simple hide/show use cases.
Let's look at an example. In this next procedure, we'll hide the account's phone number if the account's industry is High Tech.
-
In Visual Builder Studio, on the Accounts layout tab > Rule Sets subtab, review the list of rules.
We can ignore the Prospect-No-Owner rule because that rule is specifically for the instance when the Type field is Prospect.
Instead, we'll edit the rule that you created in the procedure documented in Configure the Header on the Detail Page.
-
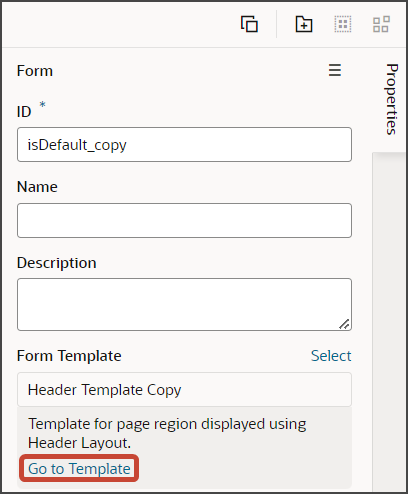
Click the Open icon to edit the rule's copied layout.
-
On the Properties pane, click Go to Template.
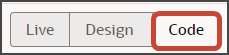
-
Click the Code button.
-
In the template editor, highlight the template tags for the header template.
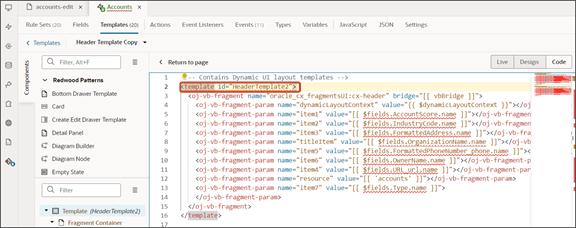
-
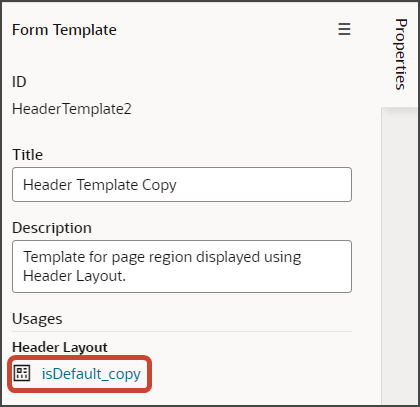
On the Properties pane, confirm the layout name.
-
In the template editor, highlight the FormattedPhoneNumber_phone parameter.
<oj-vb-fragment-param name="item5" value="[[ $fields.FormattedPhoneNumber_phone.name ]]"></oj-vb-fragment-param> -
Replace the highlighted parameter with this line:
<oj-vb-fragment-param name="item5" value="[[ ( $fields.IndustryCode.value() =='HIGH_TECHNOLOGY') ? null : $fields.FormattedPhoneNumber_phone.name]]"></oj-vb-fragment-param> -
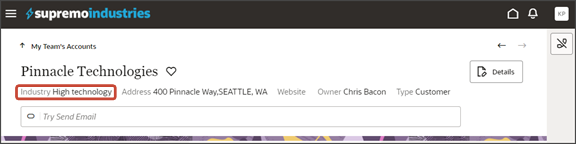
From the accounts-detail page, click the Preview button to see your changes in your runtime test environment.
The preview link must include the
application/containersegments in the URL. If not, then change the preview link using the following example URL:https://<servername>/fscmUI/redwood/cx-sales/application/container/accounts/accounts-detail?id=300000003513233&puid=7050&view=foldoutLet's look at an account. In this example, the account's industry is High technology, so the phone number doesn't display in the header.
If we change the industry to Automotive, notice that the phone number now displays.
 Note:
Note:The header displays a field only if the field has a value. For example, if an account doesn't have a Type specified, then the Type field won't display.