Before You Create an Application Extension
Before your team can start creating application extensions, you must first set up Visual Builder Studio and configure it. You only need to complete these steps once per implementation.
Before you begin, make sure you have the following information:
-
The URL of your instance of Visual Builder Studio
You can obtain the URL by navigating from your Oracle Cloud Applications development instance. From the Navigator, under Configuration, select Visual Builder.
Setting up Visual Builder Studio includes these steps:
-
Obtain the required roles and privileges.
-
Set up Visual Builder Studio users.
-
Create a project and workspace.
Or, create a workspace in an existing project.
-
Create the build pipeline to deploy your changes to your production environment.
Get the Required Roles and Privileges
To set up Visual Builder Studio and your Oracle Cloud Applications instances, make sure you're assigned the FND_ADMINISTER_SANDBOX_PRIV privilege. Each role listed below, for example, has this privilege:
-
Application Administrator (ORA_FND_APPLICATION_ADMINISTRATOR_JOB)
-
Application Developer (ORA_FND_APPLICATION_DEVELOPER_JOB)
-
Sales Administrator (ORA_ZBS_SALES_ADMINISTRATOR_JOB)
-
Customer Relationship Management Application Administrator (ORA_ZCA_CUSTOMER_RELATIONSHIP_MANAGEMENT_APPLICATION_ADMINISTRATOR_JOB)
In addition, in order to view the Edit Page in Visual Builder Studio option in the Settings and Actions menu, users must be assigned the View Administration Link privilege (FND_VIEW_ADMIN_LINK_PRIV). By default, this privilege is assigned to the predefined roles listed above. Grant this privilege to custom roles, as well, where required.
Set Up Visual Builder Studio Users in IDCS
First, you must authorize users so they can access Visual Builder Studio to do extension work. You do this in Oracle Identity Cloud Service (IDCS).
To sign in to the right instance of IDCS, complete these steps:
-
Navigate to www.oracle.com.
-
Click View Accounts.
-
Click Sign in to Cloud.
-
In the Cloud Account Name field, enter the name of your production pod, such as cakp. Click Next.
-
The Oracle Cloud Account Sign In page is specific to the Cloud Portal and is separate from your test and production pods. Enter your user credentials and click Sign In, or use the Click here link to reset your password.
On the Oracle Cloud Dashboard, navigate to the Active Applications region and click Identity Cloud. Scroll down to view your IDCS service instances:
-
Identity
IDCS instance associated with the Myservices portal.
-
CAKP (for example)
IDCS instance associated with your production pod.
-
CAKPTEST (for example)
IDCS instance associated with your developer pod.
-
-
To sign in to the IDCS instance associated with your test environment, click the Service Instance URL for your test pod (in this example, CAKPTEST), or click the Open Service Console link.
Tip: Bookmark this URL so you have it for next time. -
Sign in to IDCS directly, or click Oracle Applications Cloud (Fusion) at the bottom of the page to sign in using your Oracle Applications user credentials.
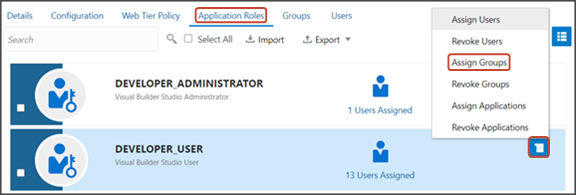
Once you're in the Identity Cloud Service console, you can now authorize users so they can access Visual Builder Studio. You can assign users, or groups of users, to the Visual Builder Studio administrator (DEVELOPER_ADMINISTRATOR) or Visual Builder Studio user (DEVELOPER_USER) roles. These two predefined roles are specific to working with Visual Builder Studio.
In this example, let's look at assigning a group to the Visual Builder Studio administrator (DEVELOPER_ADMINISTRATOR) role. This is a way to provide Visual Builder Studio access to Fusion Application roles and their users.
-
In the Identity Cloud Service console, expand the Navigation Drawer, and then click Oracle Cloud Services.
-
Click DevServiceAppAUTO_<VBSTUDIO_INSTANCE>.
-
Click the Application Roles tab.
-
On either the DEVELOPER_ADMINISTRATOR or DEVELOPER_USER row, click the menu icon, then click Assign Groups.
-
In the Assign Groups dialog, select the roles that you want to assign and click OK. For example:
-
Application Administrator
-
Sales Administrator
-
Customer Relationship Management Application Administrator
-
Application Developer
-
Any custom role, per your authorization plan
-
Users with the selected roles can now access Visual Builder Studio. Note that sometimes it may take up to 12 hours for Oracle Cloud Applications user updates to sync with IDCS.
For more information, see Set Up VB Studio Users in the Oracle Cloud Administering Visual Builder Studio guide.
Create Your Project and Workspace
If you haven't yet created a project and workpace in Visual Builder Studio, then you must do so before creating an application using the CX Extension Generator.
-
A project is a collection of resources that your team will use to create the application extension.
Note: The CX Extension Generator uses fragments which are building blocks that help to configure pages more quickly, with a minimal amount of manual coding. Create a new project to keep your fragment-based extension separate from extensions that don't use fragments. -
A workspace exists within a project, and is your private work area which connects to a Git repository, environment, and Oracle Cloud Applications sandbox.
If you already created a project, then you don't need to create a new one. Rather, you can create a new workspace within your existing project. See the next section.
To create a project and workspace at the same time:
-
In Visual Builder Studio, click the Organization side tab, then click the Projects subtab.
-
Click + Create.
-
In the New Project dialog, enter a name and description for the project.
-
Set the security for your project, either Private or Shared.
-
Click Next.
-
Select Empty Project as the template for this project, and click Next.
-
On the Properties step, click Next.
-
On the Team step, add team members and select their membership levels.
-
Click Finish.
Visual Builder Studio provisions your project, which could take a few minutes to complete. You will then be navigated to the project's home page.
-
Create a development environment for your project.
-
Click the Environments side tab, then click + Create Environment.
-
Enter a name and description for the environment and click Create.
-
Click + Add Instance.
-
In the Add Service Instances dialog, under Instance Type, click Oracle Cloud Applications.
-
Under Authentication Method, click Identity Domain.
-
Select the desired instance for the environment and click Add.
-
-
Create a new workspace.
-
Click the Workspaces side tab, then click .
-
In the New Application Extension dialog, in the Extension Name field, enter the extension name.
-
In the Extension Id field, enter
site_cxsales_Extension. -
In the Workspace Name field, accept the default value or enter a new workspace name.
-
In the Development Environment field, select the environment you just created.
-
In the Base Oracle Cloud Application field, select CX Sales (from CX Sales).
-
In the Git Repository region, click Create new repository.
-
Enter a name for both the repository and working branch.
-
Click Create.
-
Create a Workspace in an Existing Project
To create a new workspace in an existing project:
-
In Visual Builder Studio, click the Workspaces tab on the left pane, then click Clone from Git.
-
In the Clone from Git dialog, enter these values:
Field
Value
Workspace name
Enter the name of your workspace.
Repository Name
Select the Git repository connected to your team's project. Ask your administrator for this value.
Branch
Select main.
"New branch from selected" check box
Select this check box.
New branch name
Enter a name for your branch. For example, <user_id>_<feature_name>.
Development Environment
Select your development environment.
Sandbox (optional)
Select a sandbox, or leave this blank and attach a sandbox to your workspace later.
-
Click Create.
Create the Build Pipeline for Your Production Environment
Create the build pipeline to deploy your changes to your production environment.
When you created your project, a build pipeline was automatically created to deploy your application extension to your test environment. Now you must create a second pipeline for your production environment.
For complete instructions, see Configure VB Studio to Run CI/CD Pipelines and Set Up the Project to Deploy to Production in the Oracle Cloud Administering Visual Builder Studio guide.