Configure the Subviews for Appointments and Tasks
Using Oracle Visual Builder Studio, you can make it possible for users to create and view appointments and tasks right from a custom object's detail page.
What's the Scenario?
This example shows you how to create subtabs for appointments and tasks on a Payment custom object and how to enable users to view and create tasks and appointments directly from each payment's Action Bar. The view and delete actions are already provided for you, but you must create the Create smart actions for tasks and for appointments.
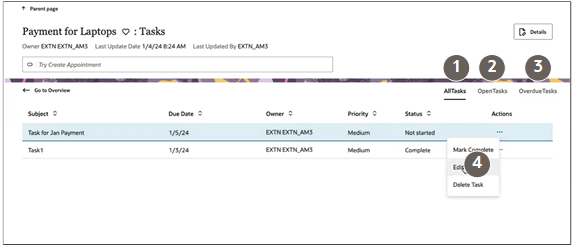
When you're finished with the setup in this example, you'll end up with separate subtabs for tasks and appointments.
Here's a screenshot of a sample Tasks subtab. The subtab includes 3 separate views highlighted by callouts: All Tasks, Open Tasks, and Overdue Tasks. For each task, there are 3 available actions: Mark Complete, Edit and Delete Task.
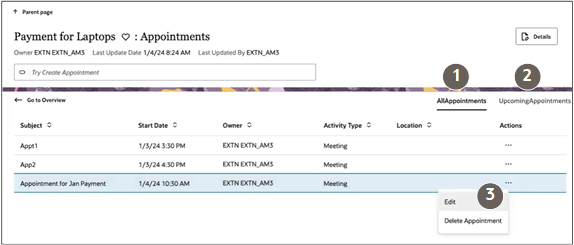
The Appointments subtab includes 2 separate views highlighted by callouts in the following screenshot: All Appointments and Upcoming Appointments. The available actions are: Edit and Delete Appointment.
Prerequisites
In Application Composer, Create a 1:M relationship between your custom object and the Activity object. In this example, we're adding the relationship for the Payment custom object.
Create Smart Actions for Appointments and Tasks
- In a sandbox, open Application Composer.
- Click Smart Actions.
- Create separate Create smart actions for tasks and appointments.
- On the Smart Actions list page, click
Create.
The application displays a guided process with 7 steps to complete in order.
Important: For your entries to be saved when creating smart actions, you must click Submit (available in the last step in the guided process). You can always go back and make changes after submitting. - In the Kind of Action step, select UI-based action.
- Click Continue.
- In the Basic Details step, enter the following on
the Payment object:
Field Name Entries for Tasks Entries for Appointments Name Create Task Create Appointment Object Payment Payment Action ID You can accept the default. You can accept the default. - Click Continue.
- In the Availability step, enter the
following:
Field Name Entries for Tasks and Appointments Application Sales UI Availability List page Action ID You can accept the default. Role Filter Optionally, specify the job roles that can use this smart action. No entry means that all job roles can use this action. - Click Continue.
- In the Action Type step, make the following
entries:
Field Name Entries for Tasks Entries for Appointments Type Create Create Subtype Task Appointment Target Object Activity Activity Object Subtype Task Appointment -
While in the Action Type step, in the Field Mapping section add two field mapping conditions.
Click Add (callout 1 in the screenshot)
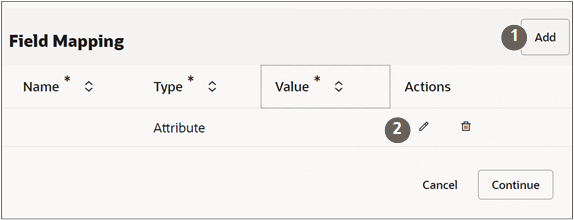
- In the Actions column, click Edit (the pencil icon highlighted by callout 2)
-
Make the following entries:
Field Name Entries for Tasks Entries for Appointments Name Payment ID Activities (Payment_id_Activities) Payment ID Activities (Payment_id_Activities) Type Attribute Attribute Value Record ID (Id) Record ID (Id) - Click Done to save the row.
-
Click Add again and add the second condition. The entries are the same for tasks and appointments except for the Value where you must type either TASK or APPOINTMENT.
Field Name Entries for Tasks Entries for Appointments Name Activity (ActivityFunctionCode) Activity (ActivityFunctionCode) Type User-entered User-entered Value TASK APPOINTMENT - Click Done.
- Click Continue twice to skip over the UI-Based Action Details step. This step doesn't apply to Redwood Sales.
- Optionally enter a confirmation message in the Confirmation Message step. The confirmation message appears briefly after the user creates the record.
- Click Continue.
- On the Review and Submit step, click Submit.
- On the Smart Actions list page, click
Create.
Create the Subviews
Create new templates for the subviews that display the appointments and tasks created for a payment. You will configure the actual subviews in the next section.
-
In Visual Builder Studio, click the App UIs tab.
-
Expand , then click the payment_c-detail node.
-
On the payment_c-detail tab, click the Page Designer subtab.
-
Click the button.
-
Confirm that you're viewing the page in Page Designer.

-
Remove the comment tags for the dynamic container components that contains the panels and any subviews.
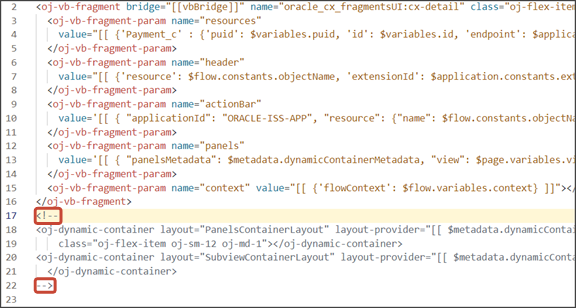
-
Highlight the
<oj-dynamic-container>tags for the subviews.
-
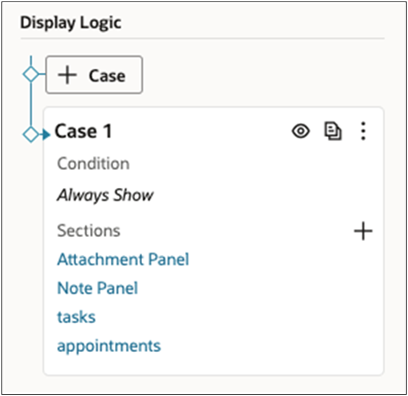
On the Properties pane, in the Case 1 region, click the Add Section icon, and then click New Section.
-
In the Title field, enter a title for the section, such as tasks.
-
In the ID field, accept the value tasks.
-
Click OK.
- Repeat steps to create a second section: appointments.
-
Add the following code for activity translations below imports:
 "translations": {
    "activityBundle": {
      "path": "faResourceBundle/nls/oracle.apps.crmCommon.activities.resource.activityManagement"
    }
  },
Configure the Subview Layouts
Next, build the structure of the subviews using the cx-subview fragment.
-
On the payment_c-detail tab, click the Page Designer subtab.
On the Properties pane, click the tasks section that you just added.
'
Page Designer navigates you to the template editor, still on the payment_c-detail tab, where you can design the tasks template.
-
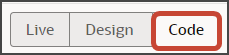
Click the Code button.
-
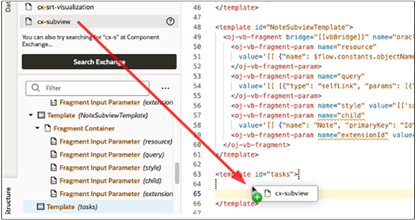
On the Components palette, in the Filter field, enter
cx-subview. -
Drag and drop the cx-subview fragment to the template editor, between the tasks template tags.
-
Add the following parameters to the fragment code so that the code looks like the below sample. For the query parameter, be sure to replace the foreign key
Payment_Id_PaymentToActivitieswith the appropriate value.Note:The format of the foreign key field's name is always <Source object name>_Id_<Relationship name>.
<oj-vb-fragment-param name="resource" value='[[ {"name": "activities", "primaryKey": "ActivityId","puid": "ActivityNumber", "endpoint": "cx" , "alias" : "tasks"} ]]'></oj-vb-fragment-param> <oj-vb-fragment-param name="sortCriteria" value='[[ [{"attribute": "LastUpdateDate","direction": "desc" }] ]]'> </oj-vb-fragment-param> <oj-vb-fragment-param name="query" value='[[ [{"type": "qbe","provider": "adfRest", "params": [{"key": "Payment_Id_PaymentToActivities", "value":$variables.id }]}] ]]'></oj-vb-fragment-param> <oj-vb-fragment-param name="context" value="[[ {} ]]"> </oj-vb-fragment-param> <oj-vb-fragment-param name="extensionId" value="oracle_cx_salesUI"></oj-vb-fragment-param> <oj-vb-fragment-param name="types" value='[[ $functions.getTaskSubviewTypesData($page.variables.id, $page.translations) ]]'></oj-vb-fragment-param> <oj-vb-fragment-param name="title" value="Tasks"></oj-vb-fragment-param> <oj-vb-fragment-param name="subviewLayoutId" value="[[ 'SubViewLayoutForTasks' ]]"></oj-vb-fragment-param> -
Return to step 2 and complete the same steps for the appointments section.
Add the following parameters to the fragment code so that the code looks like the below sample. For the query parameter, be sure to replace the foreign key
Payment_Id_PaymentToActivitieswith the appropriate value.Note:The format of the foreign key field's name is always: <Source object name>_Id_<Relationship name>.
<oj-vb-fragment-param name="resource"
      value='[[ {"name": "activities", "primaryKey": "ActivityId","puid": "ActivityNumber", "endpoint": "cx" , "alias" : "appointments"} ]]'></oj-vb-fragment-param>
    <oj-vb-fragment-param name="sortCriteria" value='[[ [{"attribute": "LastUpdateDate","direction": "desc" }] ]]'>
    </oj-vb-fragment-param>
    <oj-vb-fragment-param name="query"
      value='[[ [{"type": "qbe", "params": [{"key": "Payment_Id_PaymentToActivities", "value": $variables.id }]}]  ]]'>
    </oj-vb-fragment-param>
    <oj-vb-fragment-param name="context" value="[[ {} ]]">
    </oj-vb-fragment-param>
    <oj-vb-fragment-param name="extensionId" value="oracle_cx_salesUI"></oj-vb-fragment-param>
<oj-vb-fragment-param name="types" value='[[ $functions.getAppointmentSubviewTypesData($page.variables.id, $page.translations) ]]'></oj-vb-fragment-param>
    <oj-vb-fragment-param name="title" value="Appointments"></oj-vb-fragment-param>
      <oj-vb-fragment-param name="subviewLayoutId" value="[[ 'SubViewLayoutForAppointments' ]]"></oj-vb-fragment-param>
This table describes some of the parameters that you can provide for the subview:
Parameter Name Description sortCriteria Specify how to sort the data on the subview, such as sort by last updated date and descending order. query Include criteria for querying the data on the subview. types Pass a JavaScript function, either getTaskSubviewTypesData or getAppointmentSubviewTypesData. These functions enable the tabs on each subview, such as All Tasks, Open Tasks, and Overdue Tasks, as well as All Appointments and Upcoming Appointments. -
In the previous step, you added the types parameter to each subview fragment to pass a JavaScript function, either getTaskSubviewTypesData or getAppointmentSubviewTypesData.
In this step, manually add the functions to the JavaScript:-
On the payment_c-detail tab, click the JavaScript subtab.
- Add the below functions. Be sure to replace the foreign key
Payment_Id_PaymentToActivitieswith the appropriate value.
define(['vx/oracle_cx_salesUI/ui/self/applications/cx-sales/resources/utils/CrmCommonUtils','vx/oracle_cx_salesUI/ui/self/applications/cx-sales/resources/utils/FormatUtils'], (CrmCommonUtils,FormatUtils) => { 'use strict'; class PageModule { } PageModule.prototype.getTaskSubviewTypesData = function (id, translation) { const typesData = []; typesData.push({ "resource": "activities", "query": [{ "type": "qbe", "provider": "adfRest", "params": [ { "key": "Payment_Id_PaymentToActivities", "value": id }, { "key": "ActivityFunctionCode", "value": "TASK" } ] }], "isDefault": true, "sortCriteria": [{ "attribute": "LastUpdateDate", "direction": "descending" }], "title": "AllTasks", "id": "AllTasks" }); typesData.push({ "resource": "activities", "query": [{ "type": "qbe", "provider": "adfRest", "params": [ { "key": "Payment_Id_PaymentToActivities", "value": id }, { "key": "ActivityFunctionCode", "value": "TASK" }, { "key": "StatusCode", "operator": "$in", "value": "NOT_STARTED,IN_PROGRESS,ON_HOLD" } ] }], "isDefault": true, "sortCriteria": [{ "attribute": "DueDate", "direction": "ascending" }], "title": "OpenTasks", "id": "OpenTasks" }); typesData.push({ "resource": "activities", "query": [{ "type": "qbe", "provider": "adfRest", "params": [ { "key": "Payment_Id_PaymentToActivities", "value": id }, { "key": "ActivityFunctionCode", "value": "TASK" }, { "key": "DueDate", "operator": "$lt", "value": FormatUtils.getFormattedDate(new Date()) }, { "key": "StatusCode", "operator": "$in", "value": "NOT_STARTED,IN_PROGRESS,ON_HOLD" } ] }], "isDefault": true, "sortCriteria": [{ "attribute": "DueDate", "direction": "descending" }], "title":"OverdueTasks", "id": "OverdueTasks" }); return { "style": "tab", "items": typesData }; }; PageModule.prototype.getAppointmentSubviewTypesData = function (id, translation) { const typesData = []; typesData.push({ "resource": "activities", "query": [{ "type": "qbe", "provider": "adfRest", "params": [ { "key": "Payment_Id_PaymentToActivities", "value": id }, { "key": "ActivityFunctionCode", "value": "APPOINTMENT" } ] }], "isDefault": true, "sortCriteria": [{ "attribute": "SortDate", "direction": "ascending" }], "title": "AllAppointments", "id": "AllAppointments" }); typesData.push({ "resource": "activities", "query": [{ "type": "qbe", "provider": "adfRest", "params": [ { "key": "Payment_Id_PaymentToActivities", "value": id }, { "key": "ActivityFunctionCode", "value": "APPOINTMENT" }, { "key": "ActivityEndDate", "operator": "$ge", "value": new Date().toISOString() } ] }], "isDefault": true, "sortCriteria": [{ "attribute": "ActivityStartDate", "direction": "ascending" }], "title": "UpcomingAppointments", "id": "UpcomingAppointments" }); return { "style": "tab", "items": typesData }; }; return PageModule; }); -
- Comment out the dynamic container components from the payment_c-detail page:
-
Click the payment_c-detail tab, then click the Page Designer subtab.
-
Click the Code button.
-
Add the subview label for tasks and appointments in the actionBar parameters:
<oj-vb-fragment-param name="actionBar" value='[[ { "applicationId": "ORACLE-ISS-APP", "resource": {"name": "Payment_c", "primaryKey": "Id", "puid": "Id", "value": $variables.puid }, "subviewLabel": {"tasks" : "Tasks", "appointments" : "Appointments"}} ]]'> </oj-vb-fragment-param> -
Comment out the dynamic container components that contain the panels and subviews.
-
Test Your Subviews
Test the subview by previewing your application extension from the payment_c-list page.
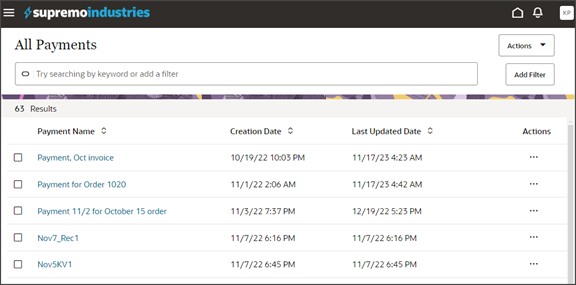
From the payment_c-list page, click the Preview button to see your changes in your runtime test environment.

-
The screenshot below illustrates what the list page looks like with data.
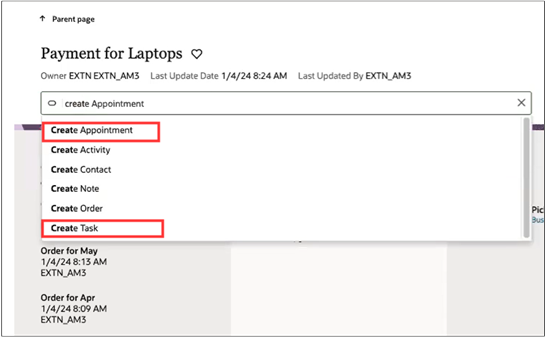
Create a task and an appointment by entering Create Task and Create Appointment in the Action Bar.
After creating a task and an appointment, view the records you created by entering Show Tasks and Show Appointments in the Action Bar.
- In the list page, drill down into the record you created to view the subtabs and actions.
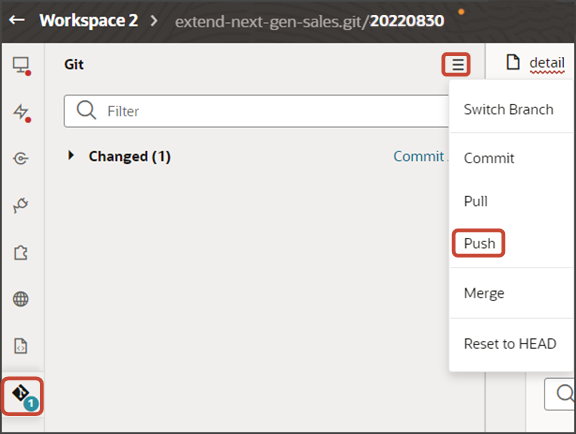
Save Your Work to Git
Save your work by using the Push Git command:
Navigate to the Git tab, review your changes, and do a Git push (which does both a commit and a push to the Git repository).