How to Migrate Your Existing Customizations
You can easily migrate your existing customizations from the previous version of the add-in (CX Sales for Microsoft 365) or from CX Sales Mobile.
The migration lets you import your existing customizations that you've made into the Oracle Sales for Outlook add-in.
As part of the migration, your custom layouts with fields, assigned roles, and advanced criteria are imported with the layout name appended with _migrated. The migration will also import custom objects and their related list and picker layouts. After successful migration, a report highlights all the layouts and fields that were migrated.
This table lists the objects and layouts that are migrated:
| Objects | Layouts |
|---|---|
| Accounts | Related List, Summary, Picker, and Global Search layouts |
| Contacts | Related List, Summary, Edit, Picker, and Global Search layouts |
| Sales Leads | Related List, Summary, Picker, and Global Search layouts |
| Opportunities | Related List, Summary, Picker, and Global Search layouts |
| Resources | Related List and Picker layouts |
| Task | Related List, Summary, Edit, and Global Search layouts |
| Custom Objects | Related List, Picker layouts |
- All fields that aren't already present in the default layout will be migrated to available empty slots in the layouts. If there are no empty slots on the layout, then the field won't be migrated.
- If you're migrating from a previous version of the CX Sales for Microsoft 365
add-in, then:
- Saved searches aren't migrated, since the newer add-in uses Workspace saved searches. See the topic How do I create and manage saved searches in classic Oracle Sales? for more details about how to create and manage Workspace saved searches.
- Field criteria on Edit layouts aren't migrated over to new add-in.
Here's how to migrate your existing customizations:
- Sign in as the sales administrator or as a setup user.
- Ensure that you're working in an active sandbox.
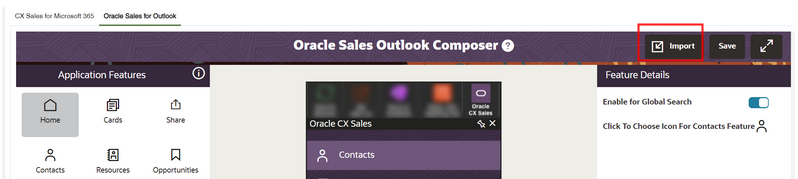
- Go to .
- Select Import, as highlighted in this example
screenshot:
- Specify whether you want to migrate your customizations from CX Sales Mobile or CX Sales for Microsoft 365.
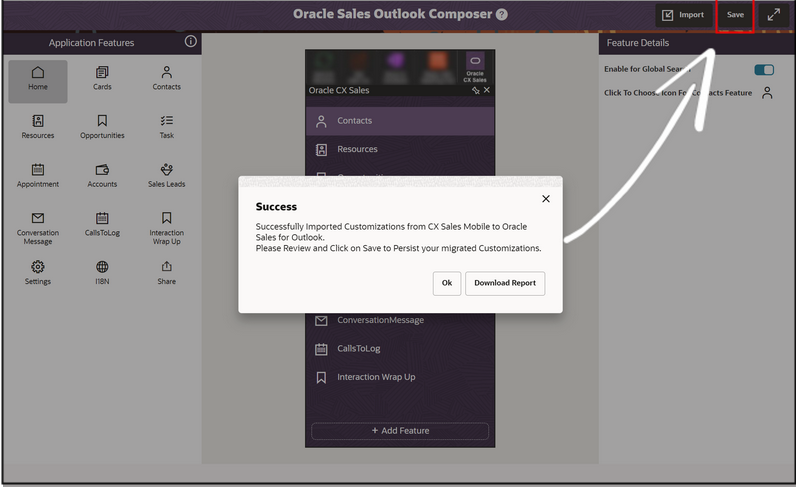
- Once the migration completes successfully, you can click Download
Report and review your customizations as shown in this example
image:
- Click Save.