Use Multi-Tenancy
If you're operating in multi-tenant environment, use these steps to enable multi-tenancy for the add-in.
Register the Add-In for Multi-Tenancy
Here's how to register the add-in to use multi-tenancy:
- Go to the Set Up the Application in Microsoft
Azure topic. We'll use the same steps as in that topic, with some
modifications to account for the multi-tenant use case.
Here's the difference in steps: In Step 6 of Set Up the Application in Microsoft Azure, in the section, Sign In and Register, instead of selecting the single-tenant option, select Accounts in any organizational directory (Any Azure AD directory - Multitenant) and personal Microsoft accounts.
- Sign in to the Sales application as a setup user.
- Go to .
- Select Productivity Applications Setup in the Overview region.
- Select the Oracle Sales for Outlook tab where you can configure the Oracle Sales for Outlook.
- Download the generated manifest file and share it with all of the subsidiary administrators.
- Create the application consent URL and provide it to the subsidiary
administrators. Here's an example of how to construct the URL:
See the Get Parameters for the URL section in this topic for details about how to get the parameters to construct the URL.
- After the subsidiary administrators receive the manifest and consent URL, the
subsidiary administrators need to upload the manifest from the Office 365 Admin
page at:
https://admin.microsoft.com/Adminportal/Home#/Settings/IntegratedApps. - Next, the subsidiary administrators sign in to Office at:
https://outlook.office.com/owa/, where they open a new browser tab, run the consent URL provided, and accept the consent. - After these steps, subsidiary users will start seeing the add-in in Outlook. They should be able to sign in and use the application.
Get Parameters for the URL
To get the Tenant ID and Client ID needed to construct the URL, go to the Azure portal, as shown in this section. Note that only Azure admins have the privileges to get this information.
Host Name
The hostName is the Oracle Sales cloud instance name.
Tenant ID
Go to: https://portal.azure.com/#view/Microsoft_AAD_IAM/ActiveDirectoryMenuBlade/%7E/Overview and locate the Tenant ID.
This image shows an example of where the Tenant ID is: located: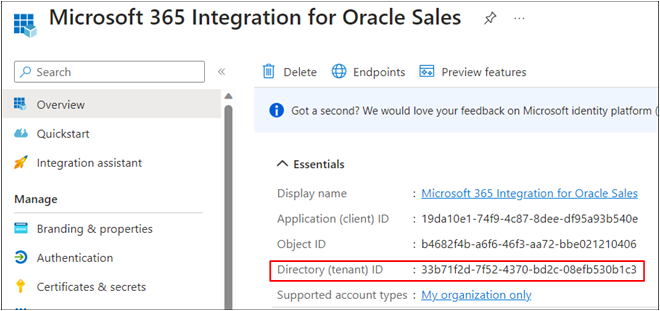
Client ID
Navigate to the App Registration page and look for the registered application. When you drill down to the application, you can see the Application (client) ID in the Overview section.