Best Practices for Content and Layout in Workflow Notifications
Here are some recommendations, tips, and reminders to keep in mind when you're working with content and format for your configurable workflow notifications and contract approval layout templates.
Follow the General Structure
In general, the workflow notifications contain a set of components that are displayed in a certain order. When you change notifications, try to keep to this general structure and don't remove essential elements such as the action buttons.
The callouts in this figure identify the email notification components listed in the following table.
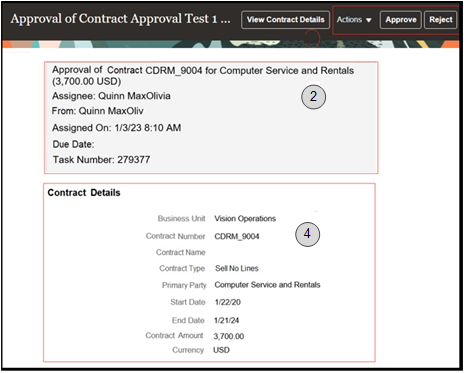
The callouts in this figure identify the in-app notification components listed in the following table. In addition to describing each component, the table also indicates if the component appears in the email notification, in-app notification, or both.
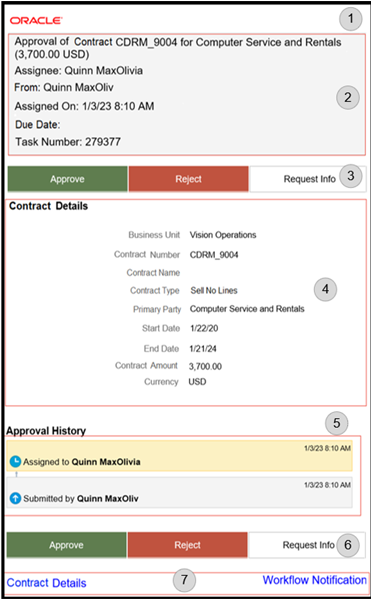
|
Callout |
Component |
Notification Type |
|---|---|---|
|
1 |
Notification component heading. |
Both |
|
2 |
Summary section listing key attributes of the workflow task and the associated transaction. |
Both |
|
3 |
Buttons for the primary actions to take on the task, such as Approve and Reject. These buttons aren't part of the configurable, report-based notification content. |
In-app |
|
4 |
Notification body that usually includes transaction and line level details, displayed in tables or sets of attributes with corresponding values. The data model for the report restricts the total number of rows displayed in some tables. If the limit is exceeded, the table footer provides a link to the transaction details page, where users can view all the rows. To change this limit, you can edit a copy of the data model. |
Both |
|
5 |
Approval history, including any attachments that users in the history uploaded for the task. You can't edit the approval history component, which usually appears in the body of only email notifications. For in-app notifications, you can usually view the history by clicking the Actions button and selecting History. |
Email (or both, in rare cases) |
|
6 |
Buttons for the primary actions again. |
|
|
7 |
A link to the corresponding transaction page, and another link to the in-app notification. |
|
Keep Mobile in Mind
Because users can view the workflow notifications on mobile devices, always consider mobile first and keep the notifications as simple as possible. For example:
-
Don't put too much content horizontally, such as too many columns in tables.
-
Keep all text, including attributes and column headings, as short as possible.
-
Center align lists of attributes and their values, if they appear outside tables.
For workflow tasks with configurable notifications, make sure that the Hide End User Web URL in notifications checkbox is selected in BPM Worklist. If not, a default first line will appear in the emails, in addition to what comes from the report layout template. It’s best to hide this extra content because it might cause emails to not render well, especially when viewed from mobile devices.
Make sure to test your email notifications on mobile devices.