Workspace Infolet Filters and Actions
With a few clicks, navigate to the relevant areas in your sales process where you can use filters to view the records and take immediate actions.
For example, with just a single click of a button, you can complete or defer tasks without having to drill down to view the record, or you can accept or reject new leads without having to navigate to the Leads UI. You can also refresh your record data, edit the title of your infolets, and move, hide, or show specific Workspace infolets on your infolet page.
The smart actions match the smart actions available from the Workspace UI, and the quick action denoted by the ellipsis icon opens an inline window where you perform your action without having to navigate outside the infolet. You can also create a new record for your specific Workspace infolet by clicking the Create icon (plus sign) from the top right corner of the infolet.
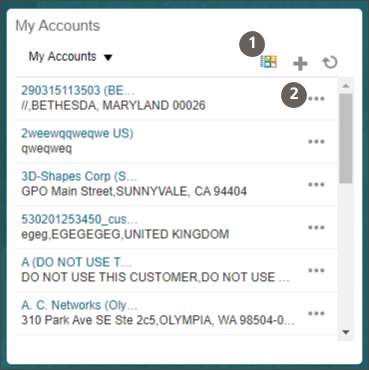
Make sure the infolet that's displayed on the page is a Workspace infolet. Workspace infolets include the Workspace icon (callout 1) and the three dots for quick actions (callout 2). Here's a screenshot of the My Accounts Workspace infolet:
Predefined Workspace Infolet Filters and Actions
Here are the predefined filters and actions available to you from your Workspace infolets:
|
Workspace Infolet |
Select one of these filters... |
Select one of these record quick actions... |
Select one of these infolet actions... |
|---|---|---|---|
|
My Accounts |
|
|
|
|
My Appointments |
|
|
|
|
My Contacts |
|
|
|
|
My Leads |
|
|
|
|
My Opportunities |
|
|
|
|
My Tasks |
|
|
|
Add a Saved Search List as a Filter to the Workspace Infolet
For each of the six predefined Workspace infolets, you can choose which Workspace saved search list to view from the drop down filter menu configured by your administrator. Click the Workspace icon in the top right of the Infolet to drill down to the currently selected filter list. This action takes you to the Workspace UI. Click Home to return to the Sales Infolets tab on the Analytics page.
To add a list as a filter:
-
Click Home to return to the home page.
-
Scroll down to the Analytics section where the infolet is located.
-
Click Actions (the arrow icon in the top right corner of the infolet) and select Configure.
-
In the window, click the Filters tab.
-
In the Search field, start to enter the name of the saved searches you want as filters to display, and from the list returned in the Available column, highlight the saved searches you want.
-
Move the list you want from the Available to the Selected column.
-
You can use the arrow buttons to change the order of the filters.
-
Click Save and Close to close the window and return to the home page.
The filter is now available in your Workspace infolet.