Import Files into Visual Builder Studio
The CX Extension Generator generates a compressed file (.zip) that you can import into Visual Builder Studio. You use the CX Extension Generator to add other custom objects and create panels and smart actions. To add more objects, you must export a compress file from VBS and import it back into CX Extension Generator to make your changes.
Use these steps to import files generated from CX Extension Generator:
-
Use the Navigator to navigate to Visual Builder Studio: .
-
In Visual Builder Studio, create a new workspace if you haven't already.
Important:The workspace Extension ID must be site_cxsales_Extension. For information on how to change the extension, see How can I change my project's Extension ID?.
To create a workspace, see Before You Create an Application Extension. Be sure to follow the instructions for updating the extension ID for your workspace.
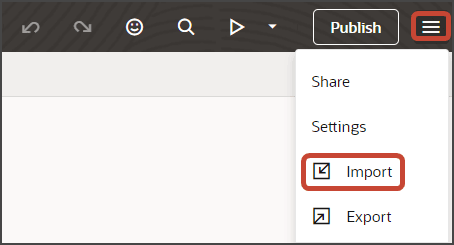
Click the Menu icon, and then click Import.
-
In the Import Resources dialog, add your compressed file and click Import.
Click the Preview button to see your newly created application.

-
The resulting preview link will be:
https://<servername>/fscmUI/redwood/cx-custom/<object_name>_c -
Change the preview link as follows:
https://<servername>/fscmUI/redwood/cx-custom/application/container/<object_name>_cNote:You must add
/application/containerto the preview link. -
You can now continue to change your application extension in Visual Builder Studio.
For example, you can change the fields that display in the detail page's header region, or on a subview or create page. The Extension Generator adds some default fields, but you'll most likely want to add and remove fields depending on your business needs.
-
If you need more smart actions, you can create them in Application Composer. For example, if you keep the Notes panel, then you must create a Create Note smart action.