Enable Microsoft 365 Integration
Enabling the integration between Oracle Sales and Microsoft 365 accomplishes two things:
-
Allows users to access the Outlook add-in in the side panel
-
Sets up background processes that keeps information between Sales and Outlook consistent
- A setup user in Sales
- An administrator user for the Microsoft Azure and Microsoft 365 portals.
Enabling the integration involves these steps:
-
Register the add-in in Microsoft Azure.
During the setup, you copy the generated application ID and application key.
-
In Sales, you enter the application ID and application key and generate a manifest file. You also enable data synchronization.
-
In the Microsoft 365 portal, you upload the manifest file and deploy the add-in.
User Agreement
This Oracle-Microsoft integration or plug-in may enable you to link to or transmit your content or third-party content to, or otherwise access, or retrieve content from, Microsoft and its platforms, users, or services. Oracle doesn't control and isn't responsible for Microsoft sites or platforms or services, the performance or availability of the services, or any content received or sent. You bear any and all risks associated with access to and use of Microsoft sites, platforms, and services and are solely responsible for entering into and compliance with separate terms between you and Microsoft. Oracle isn't responsible for the security, protection or confidentiality of such content (including obligations in the Hosting and Delivery Policies and Data Processing Agreement and Oracle's Privacy Policy) that's transmitted to such Microsoft sites or platforms or services. You're solely responsible for obtaining or having any required consents or other legal basis for your use of this integration or plug-in. Oracle reserves the rights to terminate your connection or integration if your use of this integration or plug-in violates the terms of your Agreement(s) with Oracle.
Register the Oracle Add-In in Microsoft Azure
-
As an Azure/Exchange administrator, sign in to the Microsoft Azure portal at
https://portal.microsoft.com/Adminportal/Home#/Settings/IntegratedApps. -
Under Azure Services, click Azure Active Directory.
Note: If you're a first-time user, then you must sign up for your Microsoft Azure Active Directory account. -
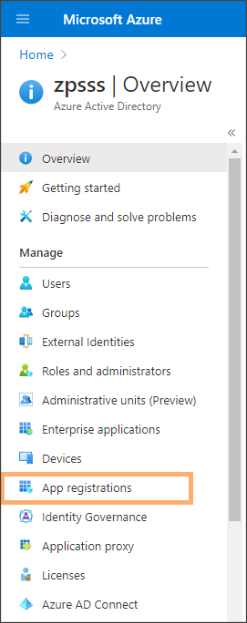
In the left pane of the Azure Active Directory Overview page, click App registrations.
-
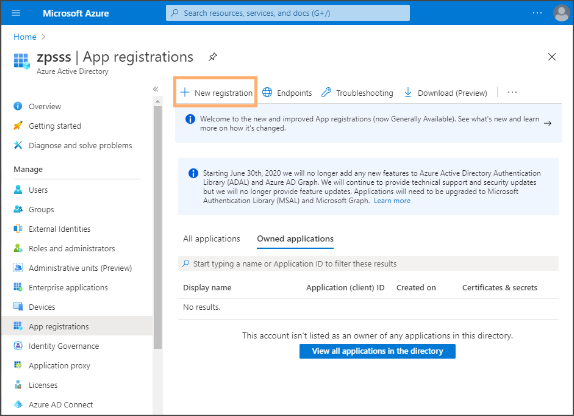
Click New Registration.
-
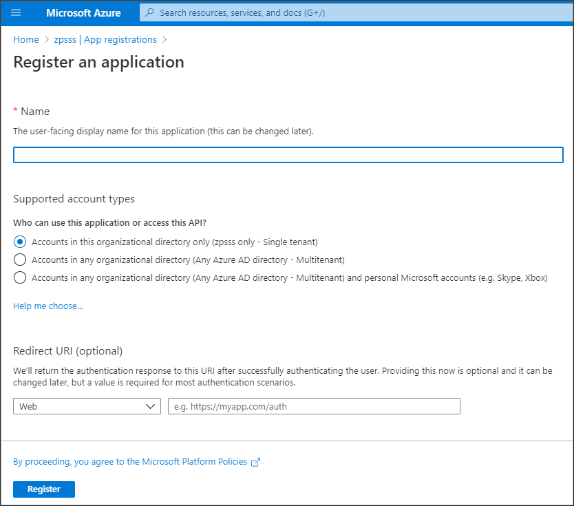
On the Register an application page, make these entries:
-
Enter a name for the application (in this example,
Vision Microsoft 365 Integration). The name you enter appears during Azure setup only. It doesn't appear in the add-in. -
For Supported account types, make sure Accounts in this organizational directory only (single tenant) is selected.
Note: If you want to use a multitenant setup, select the multitenant option. -
Leave theRedirect URI blank.
-
Click Register.
-
-
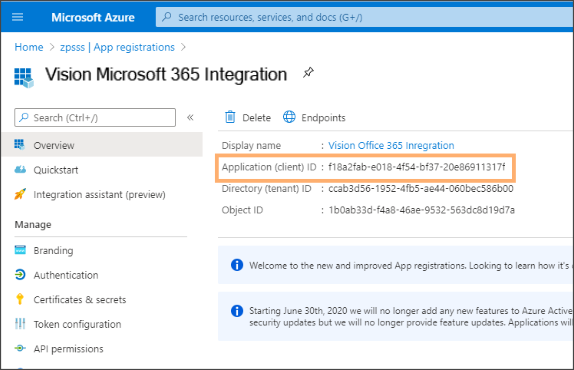
On the App registrations overview page with the name of your application, copy the Application (client) ID for later use.
-
In the left-hand pane, under the Manage heading, click Branding & properties.
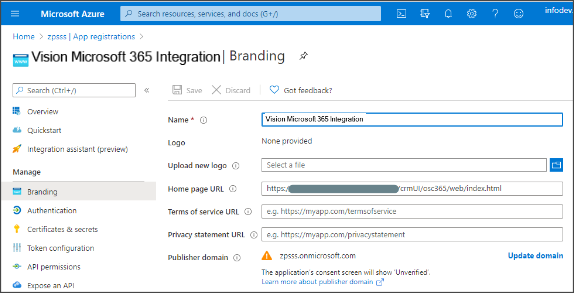
-
In the Home page URL, enter the host name of your sales environment with an additional string appended to it:
https://<Host Name>/crmUI/osc365/web/index.html -
Click Save.
-
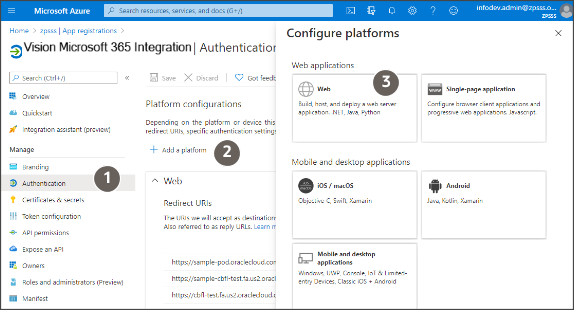
In the left-pane of the page, under the Manage heading, click Authentication (callout 1 in the following screenshot) and make these entries:
-
Click Add a Platform (callout 2).
-
In the Configure platforms page, click Web (callout 3).
-
Add the following URIs in the Redirect URIs section.
-
https://<host>/sales/office365/jet/close.html
For example: https://sample-pod.oraclecloud.com/sales/office365/jet/close.html
-
https://<host>/crmUI/office365/jet/close.html
For example: https://sample-pod.oraclecloud.com/crmUI/office365/jet/close.html
-
https://<host>/crmUI/osc365/web/close.html
For example: https://sample-pod.oraclecloud.com/crmUI/osc365/web/close.html
You must add each URI separately:
-
In the Configure Web window, enter the first URI in the Redirect URIs field (callout 1 in the screenshot).
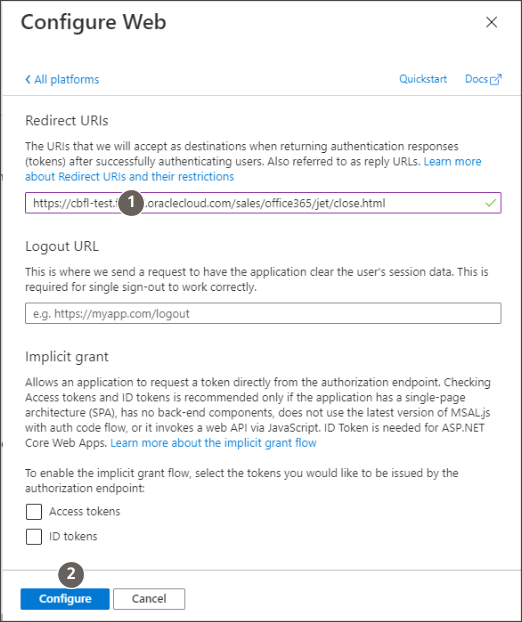
-
Click Configure (callout 2).
-
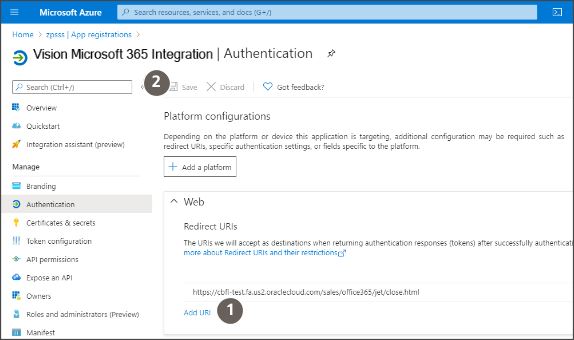
In the Authentication page, Web section (following screenshot), Click Add URI (callout 1) to add each of the other two URIs.
-
-
Click Save (callout 2) at the top of the page.
-
-
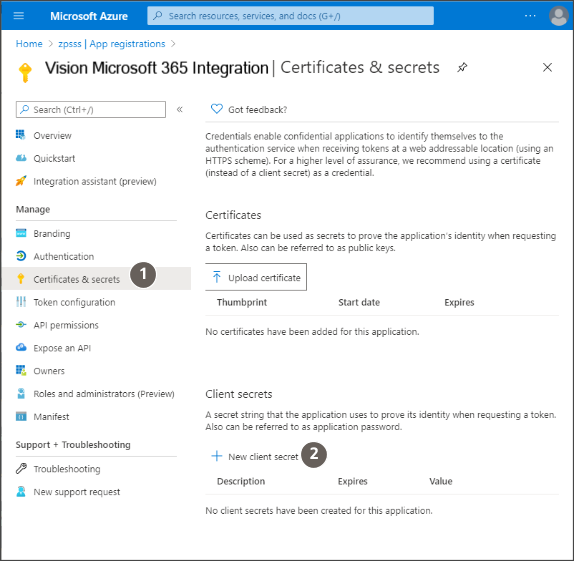
In the left-pane, click Certificates & secrets (callout 1 in the following screenshot).
-
In the Certificates & Secrets page, Client secrets section, click New client secret (callout 2).
-
Enter a description, for example:
CX Sales client server secret. -
Select a duration for the expiry of Client Secret. For example, if you select 12 months, the Client Secret becomes invalid after 12 months and the automatic refresh stops. The sync process will start only after you sign in to the client again.
If you select Custom, enter the start and end dates to be within 24 months. After the end date, you must sign in to the client again, to start the sync.
-
Click Add.
-
Copy the generated string from the Value field. This value is the application key.
-
-
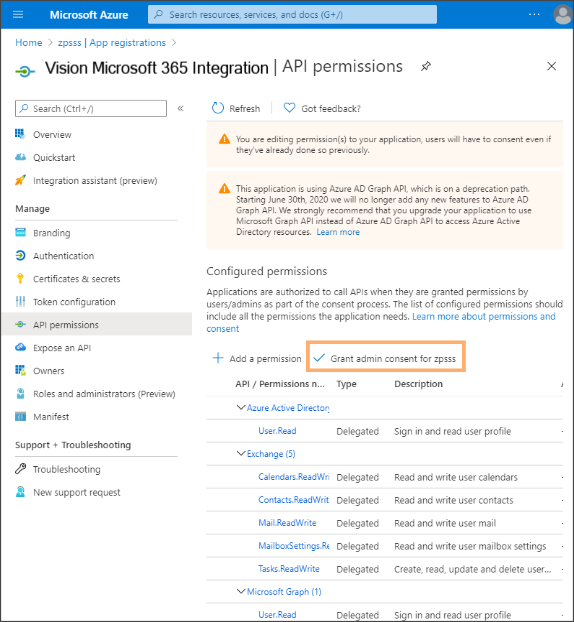
In the left pane, under the Manage heading, click API permissions and make these entries:
-
Click Add a permission.
-
On the Request API permissions page, switch to the APIs my organization uses tab.
-
Search for the term 'Office' and select Office 365 Exchange Online.
-
Click Delegated permissions. and add the following permissions.
Permission
Option to select
Calendars
Calendars.ReadWrite
Contacts
Contacts.ReadWrite
MailboxSettings
MailboxSettings.ReadWrite
Mail
Mail.ReadWrite
Tasks
Tasks.ReadWrite
Tasks.ReadWrite.Shared
-
Click Add Permissions.
-
On the API permissions page, click Grant admin consent to consent on the behalf of users (center of the right-hand pane of the page highlighted in the screenshot).
-
Generate the Microsoft 365 Manifest File in CX Sales
-
Sign in as a setup user into your sales application.
-
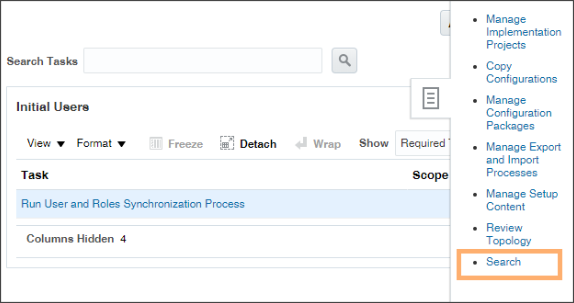
In Setup and Maintenance, open the side panel and search for the task Manage Microsoft 365.
Here's the open side panel with the Search field highlighted.
-
Accept the End User License Agreement.
-
In the Manage Microsoft 365 page, Outlook tab, Set Up Outlook Integration section, enter the Application ID and the Application Key you copied from Microsoft Azure. Also enter Tenant ID and Domain name
-
Enter an application display name. This is the name on the add in that appears to users in Outlook.
-
Save.
The application generates the manifest file.
-
Download the manifest file to your desktop.
Enable Synchronization of Data
While in the Manage Microsoft 365 page, you must also enable the synchronization of data between Sales and Microsoft 365. The actual synchronization is accomplished by processes you run in a separate step. Selecting these check boxes just enables the processes to do their job.
-
In the Synchronization Settings section, Select the Sync Enabled check boxes for Contacts, Appointments, and Tasks, depending on what you use.
-
Save your changes.
You can find more information about the sync setting in Manage Microsoft 365
Upload the Manifest File and Deploy the Add-In
-
Sign in to the Microsoft 365 portal:
https://portal.microsoft.com. -
In the side panel, click the Navigation Menu and Show all. Then select .
-
For App type, select Office Add-in.
- Select Upload manifest file (.xml) from device, and select the manifest file you downloaded earlier.
-
Click Next.
-
On the Configure add-in page, you can specify who gets the add-in and if users can hide the add-in from the Outlook ribbon. By default the add-in is automatically placed in the Outlook ribbon for all users.
-
Assign Users
You can limit who gets the add-in for: specific users (for testing, for example), groups (for example, to users in Sales), or an entire organization.
-
Deployment Method
-
If you're rolling out the add-in to the whole sales organization, consider accepting the Fixed (Default) option.
-
If you're testing with a few administrators, then Available may be the better option. Administrators may test both the test and production environments at the same time, and might want to hide one or the other from their ribbon.
-
Optional makes sense if you don't want the add-in showing up on any of the users' ribbons unless they need to test it.
-
The Available and Optional deployment methods make it possible for users to hide the add-in from their ribbon.
-
-
-
Review and finish the deployment.
The application confirms the deployment is complete and the add-in appears in the list on the Add-ins page. It can take 12 hours for the deployed add-in to appear on a user's Outlook ribbon. Users who are added to the group are automatically assigned the add-in. And, when users are removed, they lose access to the add-in.