How do I replace the existing master geography data with revised Oracle-Licensed geography data?
Before you replace existing geography data, you must check its impact on all parts of the application. You can then import and set up reference geography data for the countries where you do business.
Using the Oracle-licensed geography reference data, you no longer have to source geography data from a third party. You can import Oracle-licensed data from Loqate, including the country structure and hierarchy information, either to create a new geography setup or replace your existing geography data.
All customers with the exception of United States HCM Payroll customers, can use the information in this section to replace existing geography data with Loqate geography data. You can follow these steps if you're using Nokia or any other geography data and now want to move to Loqate geography data.
Before you begin, perform the following steps:
-
Backup existing geography data including customizations, if any.
-
Backup territory geographies.
-
Perform impact analysis by contacting the support team to identify the use of geography IDs downstream.
Before deleting the geography data, make sure that GEOGRAPHY_ID isn't referenced in any downstream applications such as TAX, FIN, Legal, and so on. Geography data is used across Oracle Cloud applications such as Human Capital Management, TAX, and Legal. Global Single Instance POD users share the same geography data and before deleting geography data, the geography usage POD analysis is required. The Oracle Support team can help you identify the downstream impact.
The process of replacing the existing master geography data with revised Oracle-Licensed geography data is depicted in this diagram:
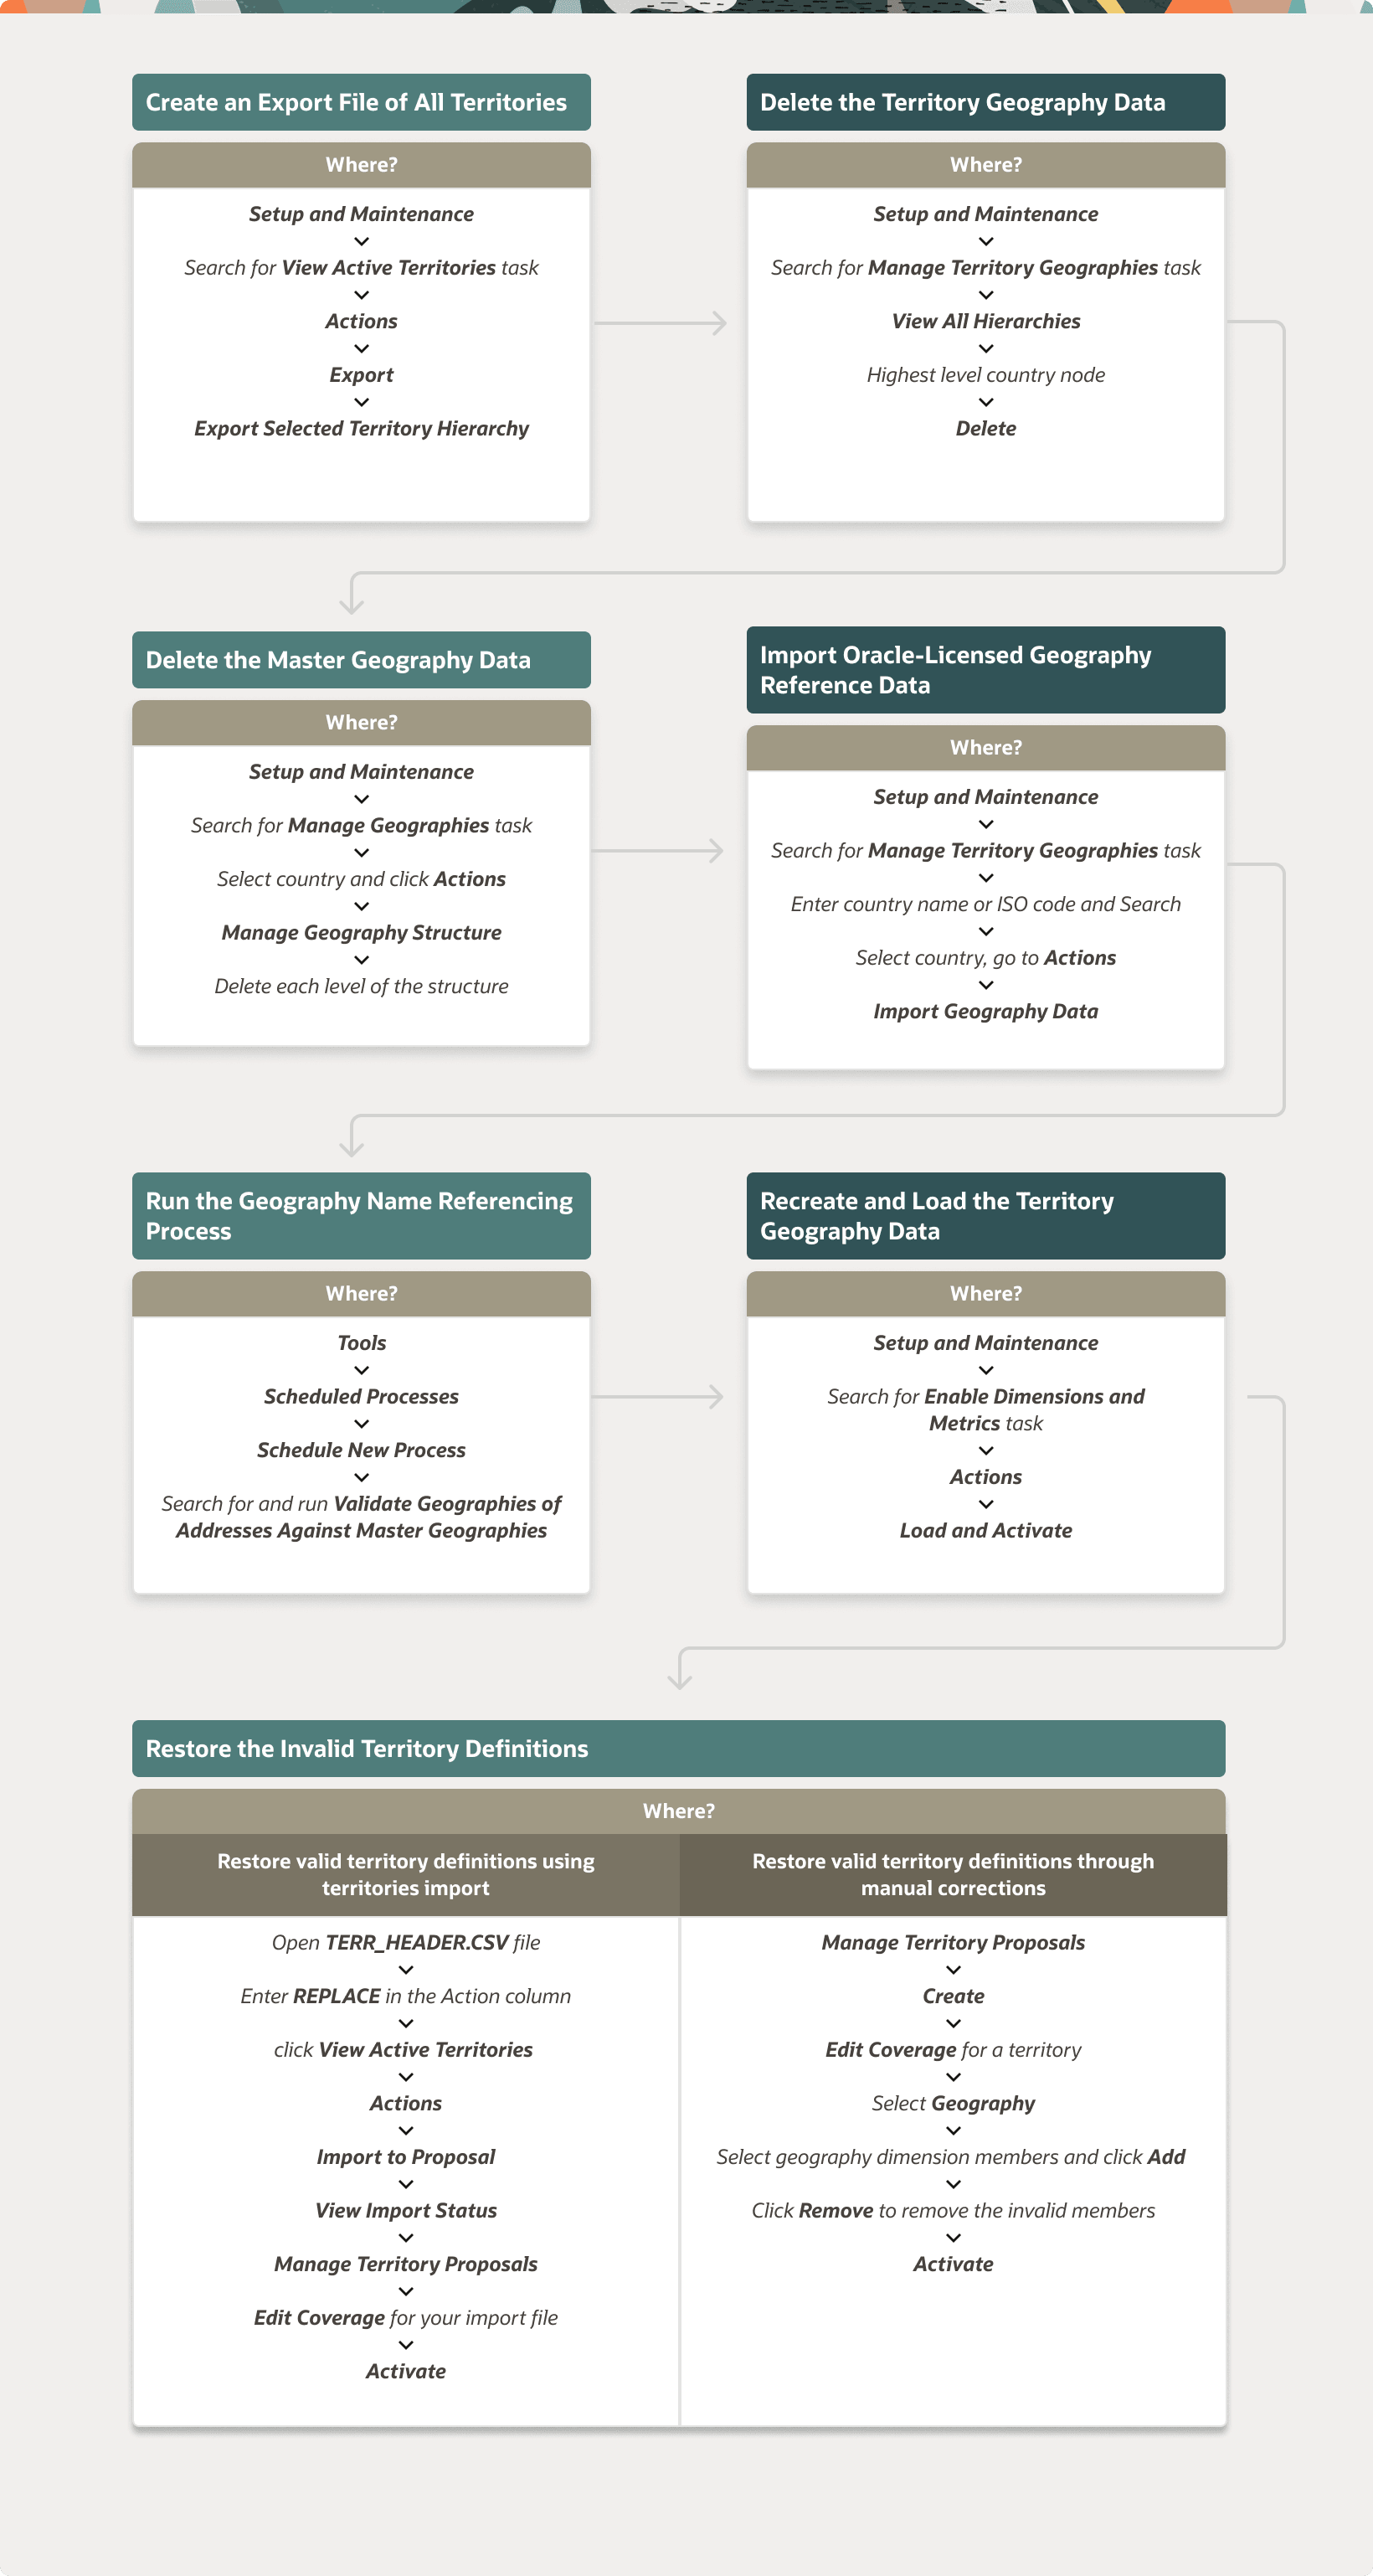
Create an Export File of All Territories
In case you have implemented Customer Data Management along with the sales functionality, you must export all territories before deleting the master geography data because removing the master geography data invalidates the territory definitions that are based on the Geography dimension. You can either export the definitions of all territories to a file or make manual corrections. If there are a large number of territories, export the territories definition to a file for the territories import process. However, if there are very few affected territories, then you can choose to either export the territories definition to a file or make corrections manually.
This procedure is applicable only if there are territories defined using the Geography dimension.
Perform the following steps to create an export file of all territories.
-
From the Territories and Quotas work area, click View Active Territories in the Tasks pane.
-
In the View Active Territories page, select the territory at the highest level.
-
Click the Actions list, and select Export, and then Export Selected Territory Hierarchy.
-
In the Warning dialog box, click OK.
-
Click the Actions list and select Export, and then View Export Status.
-
Review the status of the export job and verify if it has completed successfully.
-
In the Exported Data File column, click the .zip file against your export job, and click Save. All the territories are exported to a compressed file on your system.
-
Click OK.
-
Click Done in the View Active Territories page.
Delete the Territory Geography Data
A territory definition has references to the territory geography data and master geography data. Territory geography data is based on the master geography data, in case you have implemented Customer Data Management along with the sales functionality, you must delete the territory geography data prior to deleting the master geography data. When you delete the territory geography data, all territories that are defined using geography dimension become invalid.
This procedure is applicable only if territory geographies are defined.
Perform the following steps to delete the territory geography data.
-
In the Setup and Maintenance work area, go to the following:
-
Offering: Sales
-
Functional Area: Territories
-
Task: Manage Territory Geographies
-
-
On the Manage Territory Geographies page, click View All Hierarchies.
-
Select the highest level node for the country for which you want to replace the master geography data and click the Delete icon.
-
In the Warning dialog box, click OK.
-
In the Confirmation dialog box, click OK. The parent node of the territory geography data and its children are deleted.
-
Repeat steps 3 to 5 to delete all the higher nodes in the territory geography data.
-
Click Save and Close.
The Territory Management application retains a copy of the dimension members referenced in the territory definitions. This copy is updated when you trigger the Load and Activate process from the Enable Dimensions and Metrics task. Therefore, although the territory geography data is deleted, the territory definitions may appear to remain valid.
Delete the Master Geography Data
Delete the existing geography data one country at a time. We recommend that you raise a service request for assistance in deleting the geography data.
Delete Geography Structure
If you have created a geography structure, it prevents the geography imports from working or working as desired. For example, if the geography structure exists, the Import Geography option may not be enabled for a country in Manage Geographies even if Loqate predefined geography data is available for that country and the geography hierarchy doesn't exist yet.
If any geography hierarchy was created manually, it must be deleted first.
If the geography structure was created manually, you can follow these steps to delete it. However, we recommend that you raise a service request for assistance in deleting the geography structure.
-
In the Setup and Maintenance work area, go to the following:
-
Offering: Customer Data Management
-
Functional Area: Enterprise Profile
-
Task: Manage Geographies
-
-
On the Manage Geographies page, enter either the country name or the two-letter ISO code (for example, US), and click Search.
-
Select the country in the search results and click .
-
In the Manage Geography Structure page, delete each level of the structure.
-
Click Save and Close.
You can now proceed to importing geography data.
If other setup or transaction data exists that's based on the geography data, replacement procedures for that setup must also be followed.
Import Oracle-Licensed Geography Reference Data
Use this procedure to import Loqate geography data on the Manage Geographies UI page one country at a time. If the country data you want isn't supported by Loqate geography seed data and point the Loqate supported country list here, then the Import Geography Data action is disabled.
The geography data is provided by Loqate and is third-party content. As per Oracle policy, this software and documentation may provide access to or information about content and services from third parties. Oracle and its affiliates aren't responsible for and expressly disclaim all warranties of any kind with respect to third-party content and services. Oracle and its affiliates aren't responsible for any loss, costs, or damages incurred due to your access to or use of third-party content, products, or services.
Perform the following steps to import Oracle-licensed geography reference data.
-
In the Setup and Maintenance work area, go to the following:
-
Offering: Customer Data Management
-
Functional Area: Enterprise Profile
-
Task: Manage Geographies
Alternatively, you can go to and search for Manage Geographies.
-
-
On the Manage Geographies page, enter either the country name or the two-letter ISO code (for example, US), and click Search.
-
Select the country in the search results.
-
Click the Actions list, and select Import Geography Data.Note: Import Geography Data is disabled for a country if the geography data for that country isn't available from Loqate or if the geography structure or hierarchy is already defined for that country. The existing master geography hierarchy can be from Loqate or non-Loqate.
-
In the Warning dialog box, click OK.
-
In the Confirmation dialog box, click OK.
The import of larger countries may require several hours to complete. Note that countries may have different amount of data depending on the structure and the data can grow exponentially which correlates with different load times.
You can track the progress of the import process by selecting Scheduled Processes from the Navigator.
To access the Scheduled Processes work area, you must be signed in as a user with the Employee abstract role. The initial user doesn't have this role assigned, but the other users you created do.
After the import is complete, you can search for the country again in the Manage Geographies page. Check marks now appear in the Structure Defined and Hierarchy Defined columns indicating the import completed successfully.
Next, click the Validation Defined icon to define the validations, enable List of Values, and choose address style format for a country as set up before. For more information, see the Geography Validation topic.
The Geocoding Defined and Address Cleansing Defined columns are used for additional features which you must license from Oracle and set up separately.
-
Geocoding makes it possible to display customers in the vicinity of a mobile address. You set up Geocoding Enabled for those countries where you're using Around Me functionality in CX Sales Cloud Mobile.
-
Cleansing makes it possible to validate addresses down to the street level.
Add any geography customizations.
Run the Geography Name Referencing Process
The Geography Name Referencing (GNR) process validates address elements in location tables, such as HZ_LOCATIONS, against the master geography data.
- When you are using geography based address validation (not third party address validation services).
- GNR data is needed for your business processes (such as ERP Tax).
Note: You can't update existing data, such as effective start date, in the GNR process tables for the locations.
Perform the following steps to run the GNR process.
-
Navigate to work area.
-
On the Overview page, click .
-
Click the Name list and search for Validate Geographies of Addresses Against Master Geographies, and then click OK.
-
Click OK in the Schedule New Process dialog box.
-
In the Process Details dialog box, enter the following details:
-
Location Table Name: HZ_LOCATIONS
-
Run Type: ALL
-
Usage Code: GEOGRAPHY
-
-
Enter the country code in the Country Code field.
-
Click Submit.
-
In the Confirmation dialog box, click OK.
-
Click Close.
-
In the Scheduled Processes page, click the Refresh icon.
-
Verify if the status of the process has completed successfully.
Find the locations failing in Geography Name References using: https://cloudcustomerconnect.oracle.com/posts/b1e16b06ae. Fix Geography Name References failures by updating addresses with the latest geography data.
Recreate and Load the Territory Geography Data
In case you have implemented Customer Data Management along with the sales functionality, you can recreate the territory geography data, after the master geography data is imported, using either of the following methods:
-
Import process: If you created the original territory geography data using the import process, then use the same import file to recreate the territory geography structure. For more information about importing the territory geography data using Import Management, see Import Your Sales Territory Data in the Oracle CX Understanding Import and Export Management for Sales and Fusion Service guide.
-
Manual creation process: You can manually recreate the territory geography data structures, as they existed before their deletion, using the Manage Territory Geographies task. For more information about creating zones and adding geographies to a zone, see Managing Territory Geographies.
After you have recreated the territory geography data, perform the following steps to load the data.
-
In the Setup and Maintenance work area, go to the following:
-
Offering: Sales
-
Functional Area: Territories
-
Task: Enable Dimensions and Metrics
-
-
On the Enable Dimensions and Metrics page, click the Actions list, and select Load and Activate. The process loads the territory geography data to make dimension members available for selection when defining territories.
-
In the Confirmation dialog box, click OK.
-
Click Done.
Restore the Invalid Territory Definitions
After recreating the territory geography hierarchies and running the Load and Activate option from the Enable Dimensions and Metrics task, the geography dimensions are populated with the new geography members. The geography members in the territory appear as invalid because your territories still reference the old copies of the dimension members that were deleted. The new members aren't referenced automatically by the territories. You must re-reference the territory definitions from the old geography dimension members to the new ones.
You can restore the invalid territory definitions by either importing the previously created export file or making manual corrections to the territories.
To restore valid territory definitions using territories import:
-
Open the export file you saved in the Creating an Export File of All Territories step. The compressed file contains four CSV files.
-
Open TERR_HEADER.CSV file.
-
Enter REPLACE in the Action column for all territories that are based on geography dimension.
-
Save the file in CSV format and compress it together with three other CSV files.
-
From the Territories and Quotas work area, click View Active Territories in the Tasks pane.
-
Click the Actions list, and select Import to Proposal, and then Import Territories.
-
Select the newly created compressed file and click OK.
-
Click the Actions list and select Import to Proposal, and then View Import Status.
-
Review the status of the export job and verify if it has completed successfully.
-
Click OK.
-
From the Tasks pane, click Manage Territory Proposals.
-
In the Manage Territory Proposals page, on the Current Territory Proposals table, search for the proposal with your import file name.
-
Click the import file name to open the territory proposal.
-
Click Edit Coverage to verify that the territory definitions are valid.
-
Verify that there are no values listed as invalid in the Selected Dimension Members section.
-
Click Save and Close.
-
Click Activate. The territory proposal of your import file is activated.
To restore valid territory definitions through manual corrections:
-
From the Territories and Quotas work area, click Manage Territory Proposals in the Tasks pane.
-
In the Manage Territory Proposals page, click the Create icon.
-
In the Create Territory Proposals dialog box, enter a name and click Save and View.
-
In the Territory Proposals page, add all the territories with the Geography dimension value other than the value Any to the proposal.
-
Select a territory and click Edit Coverage.
-
In the Edit Coverage page, select Geography from the Dimensions list. The invalid dimension members are displayed in the Selected Dimension Members pane.
-
Expand the values in the Available Dimension Members section or search for the member that has the same name as the one marked invalid in the Selected Dimension Members pane.
-
Select one or more new geography dimension members from Available Dimension Members pane and click Add icon to the Selected Dimension Members pane.
-
Click the Remove icon to remove the invalid members from the Selected Dimension Members pane.
-
Click Save and Close.
-
Repeat steps 4 to 10 for all territories that were based on Geography dimension.
-
Click Activate. After the activation process is complete, your territory definitions are valid again and are referencing to the new geography data.
Although this method is always applicable, it's most appropriate when you have to restore territory definitions for a smaller number of territories.
To run the batch assignment process for opportunities:
-
From Navigator, click Scheduled Processes.
-
In the Schedule Processes page, click Schedule New Process.
-
In the Schedule New Process dialog box, search for the Request Revenue Territory Assignment process and select it.
-
Click OK.
-
In the Process Details dialog box, enter OpenOpportunitiesByCreationDate in the View Criteria Name field. This selects all revenue lines belonging to open opportunities that were created in the last 'X' days.
-
Enter BindOptyCreationDateFrom= followed by the date.
For example, if BindOptyCreationDateFrom=2014-01-01, then all open opportunities which were created between 1st January 2014 till the current date, are processed.
-
Click Submit to schedule the process.
-
In the Confirmation dialog box, make a note of the process identifier for monitoring the process, and click OK.
-
Click Close.
-
In the Schedule Processes page, click the Refresh icon.
-
Review the status of the process job and verify if it has completed successfully.
Note:Review a small subset of the open opportunities to confirm that the territory assignment is as expected.
To run the batch assignment process for sales accounts:
-
Ensure that the ZCA_SA_AUTO_ASSIGN_ON_CREATE and ZCA_SA_AUTO_ASSIGN_ON_UPDATE profile options are set to Yes in the Manage Customer Center Profile Options task.
-
From Navigator, click Customers.
-
In the Customers page, click Create Account.
-
In the Create Account page, enter a name and address of the sales account, and select the Address is sell to check box.
-
Click Save and Close.
-
From Navigator, click Customers.
-
In the Search pane, search for the name of the sales account you created and select it.
-
In the section Customer Information, select Sales Account Team. The details of the sales account and territories associated with the sales account are displayed.
This indicates that the sales account was created successfully and the batch assignment was run automatically to assign the matching territories to the sales account.
To run the batch assignment process manually from the Scheduled Processes page, perform the following steps.
-
From Navigator, click Scheduled Processes.
-
In the Schedule Processes page, click Schedule New Process.
-
In the Schedule New Process dialog box, search for the Request Account Assignment process and select it.
-
Click OK.
-
Enter SalesAccount_Work_Object in the Work Object Code field and SalesAccountTerritory_Candidate_Object in the Candidate Object Code field.
-
Select Territory in the Assignment Mode list.
-
Enter AllSalesAccountsVC in the View Criteria Name field. This selects all sales accounts.
-
Click Submit to schedule the process.
-
In the Confirmation dialog box, make a note of the process identifier for monitoring the process, and click OK.
-
Click Close.
-
In the Schedule Processes page, click the Refresh icon.
-
Review the status of the process job and verify if it has completed successfully.
Note:Review a small subset of the accounts to confirm that the territory assignment is as expected.
Verify that the downstream applications using geography data is working fine.