Set Up Additional Workspace Infolets
Workspace infolets consist of six preconfigured infolets that display key sales information for accounts, contacts, leads, opportunities, tasks, and appointments, and four blank infolets with the title Additional Actionable Infolet. After you enable them, Workspace infolets replace the existing actionable infolets.
Select the Additional Workspace Infolets from the Infolet Repository
The Additional Actionable Infolet is one of four predefined blank infolets that you can use to create custom Workspace-based infolets from scratch. For example, if some of your salespeople rely heavily on partners for their sales activities, then you can configure the blank infolets to use Partner-based task flows and saved search filters. Similarly, service users might place the Service-based task flow as a higher priority item and their administrators can tailor one of the additional actionable infolets specifically to their needs. These additional custom Workspace infolets can also be used by sales users on the Analytics section of the home page or dashboard dot.
Here's how to select the additional Workspace infolet templates that you can configure to suit your business requirements.
-
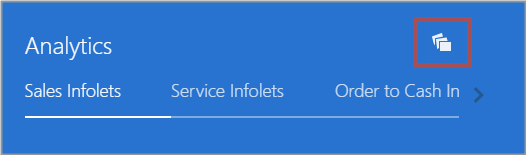
Scroll down to the Analytics section where the Workspace infolets are located.
-
Click Infolet Repository (the file icon on the top right side of the Analytics heading, highlighted in the screenshot).
-
Select or deselect the individual additional infolets to display or hide them.
-
You drag infolets to change their order. Alternatively, click Infolet Repository, scroll down to the bottom of the list, and select Reorder Infolets.
Configure Additional Workspace Infolets
After you select an additional actionable infolet, you configure and personalize it to suit your business needs. For example, you can edit the title of your infolet, move, hide, or show specific Workspace infolets on your infolet page, and refresh your record data. The smart actions match the smart actions available from the Workspace UI, and the quick action denoted by the ellipsis icon opens an inline window where you perform your action without having to navigate outside the infolet. You can also create a new record for your specific Workspace Infolet by clicking the Create icon (plus sign) from the top right corner of the infolet.
Here's how to configure the filters of a Workspace infolet:
-
Ensure that you're working in an active sandbox.
-
Navigate to the Additional Actionable Infolet you want to include to your custom infolet template.
-
Select Configure from the Actions menu.
The Manage Infolet screen is displayed.
-
From the Filters tab, the predefined filters are listed in the Available section of the screen.
-
Select filters to include or not include, rearrange filters, and add custom filters.
You can multiselect and double-click filters in the Available list to move them to the Selected list. You need to select at least one filter from the Workspace infolet filter list.
-
Click Save and Close when you have finished selecting your filters.
-
From the Layout tab, go to Saved Search drop-down list and select the filter you want.
-
Select the attributes that you want to edit from the respective filter you selected from the Saved Search drop-down list.
-
Set and adjust the two-column table widths in percentage terms by sliding your mouse along the Column Width ruler.
-
Select Show quick actions to display the quick actions that you can perform at the record level for this saved search filter.
-
Click the Actions icon on the top right corner of the actionable infolet, and select Edit Title and Views to edit the infolet title.
-
Click Save and Close.
-
Verify your changes and publish the sandbox.
For more information, see the topic, Configure Workspace Infolets.