Modify Workspace Infolets
As an administrator, you can specify or remove existing predefined fields (attributes) or select additional user-defined attributes to display on Workspace infolets for salespeople.
You can apply different setting for salespeople by role or at the site level. Salespeople can improve their sales performance tasks by prioritizing tasks and using filters.
Before You Modify the Infolets
Before modifying the predefined Workspace infolets, do the following:
-
Understand the typical workflows for working with runtime application changes.
-
Ensure that you can modify the infolet by checking if the Edit Pages menu item is available in the Settings and Actions menu available from the global header region. If the menu item isn't available, then you can't modify the page.
Note:Workspace infolets are secured through the "View Sales Homepage pagination dot one" and the "View Sales Representative Dashboard" privileges. Ensure users have these two privileges. For more information, see the Securing CX Sales and Fusion Service guide and the Security Reference for CX Sales and Fusion Service guide on Oracle Help Center.
-
Confirm that your privilege is sufficient to modify the page.
-
Create or activate an existing sandbox.
When configuring Workspace infolets, make sure the sandbox has only the Page Composer tool selected. If you want to make changes in a context layer other than the default Site layer, you must create a separate sandbox and use only Page Composer in it. You can then change the context layer from Site to other layers. For example, to create or edit infolets for a user with a specific job role, you must select the Job Role context layer.
If you delete an infolet, you can't easily retrieve it. Contact your help desk if you accidentally delete one.
Edit the Infolets for Different Job Roles
Workspace infolets are available to predefined roles. However, you can set the availability of Workspace infolets so that they become visible to other user-defined roles by editing the visibility settings for the infolet. For example, you can create different Workspace infolet configurations for the whole enterprise, or for specific job roles. If you're configuring different configurations of Workspace infolets for different job roles, then you must create separate sandboxes for each job role.
For more information, see the topic, Create and Enter a Sandbox with Page Composer as Your Tool in the Enable and Configure Workspace Infolets section in the Configure the Navigator and Home Page chapter of the Getting Started with Your Sales Implementation guide.
Specify Which Workspace Infolet Attributes to Display
You can select and replace any of the predefined attributes shown on the Workspace infolets with alternate available attributes of your choice.
If you want to hide one of the predefined attributes, enter a blank value, in which case nothing is displayed in the corresponding drop-down list position you select.
This table shows the attributes that you can modify and represents the order as they appear on the UI.
|
Workspace Infolet |
Attributes |
|---|---|
|
My Accounts |
|
|
My Appointments |
|
|
My Contacts |
|
|
My Leads |
|
|
My Opportunities |
|
|
My Tasks |
|
Here's how to modify the attributes of a Workspace infolet:
-
With Page Composer and your sandbox open, scroll down to the Analytics section, Sales Infolets tab, where the Workspace infolets are located.
-
From Settings and Actions in the global header region, select Edit Pages.
The Edit Pages window appears.
-
Select one of the following:
-
Site to make your changes available to everyone.
-
Job Role to target a specific job role you select from the list.
-
-
From the Workspace infolet that you want to modify, for example, My Accounts, select Configure from the Actions menu.
-
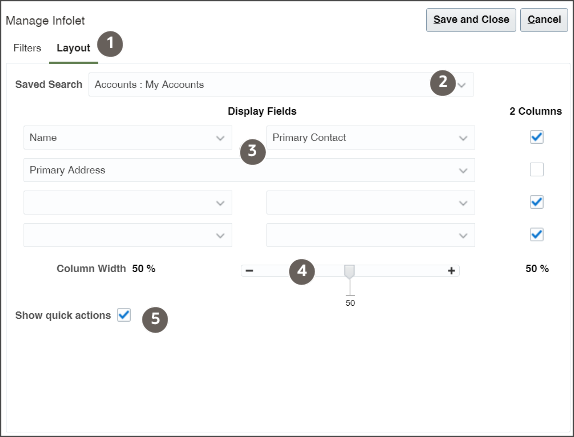
In the Manage Infolet window, select the Layout tab (callout 1 in the screenshot).
-
Select the saved search you want to configure (callout 2).
-
Add the fields you want to display (callout 3). Be sure to always display the Name field: it provides the link that salespeople use to drill down into the record.
-
Set and adjust the two-column table widths in percentage terms by sliding your mouse along the Column Width ruler.
-
Keep the Show quick actions option selected to display the actions for each record (callout 5).
-
Make the changes that you want to the attribute and select another attribute to edit, if required.
Tip:A default attribute is used for drilling down to the detail page of the object. For example, for Opportunity, the Name is the default value. If dynamic choice list fields are added to Workspace infolets, then the drill-down capability is automatically enabled.
This table shows the field names and associated attribute names that you can select for drill-down for each of the Workspace infolets:
Workspace Infolet
Default Value
Attribute
My Accounts
Name
Primary Contact
Primary Address
My Appointments
Subject
Primary Contact Address
My Contacts
Name
Primary Account
My Opportunities
Name
Amount
Close Date
Sales Stage
My Leads
Lead Name
Rank
My Tasks
Subject
Primary Contact
Type
Due Date
-
Click Save and Close when you have finished making the changes.
-
Verify your changes and publish the sandbox.
Specify Filters
Selecting available Workspace saved-search filters allows for a more dynamic, effective, and targeted view of the records that salespeople want to update and take immediate action on. All of the Workspace saved searches associated with the specified object appear as filters for your Workspace infolet. Filtering reduces the number of searches required to view any outstanding items that might require attention. You can choose to select or hide predefined filters that you want to make available on Workspace infolets.
You can select filters to include or not include, rearrange filters, and add custom filters. You can multiselect and double-click filters in the Available list to move them to the Selected list. You must select at least one filter for the Workspace infolet filter list.
To access a different set of data, create a new saved search in Workspace and then expose the relevant saved search in the Workspace Infolets UI.
Predefined saved searches are available for selection. However, any custom saved searches that you create must include Record Set values selected for either any records that you own or for records where you're on the team. In addition, when saving your saved search, you must select the Run Automatically check box to run the search automatically when your saved search is loaded.
This table shows the filters that you can select for each of the Workspace infolets.
|
Workspace Infolet |
Filter |
|---|---|
|
My Accounts |
|
|
My Appointments |
|
|
My Contacts |
|
|
My Leads |
|
|
My Opportunities |
|
|
My Tasks |
|
Here's how to specify the filters on a Workspace infolet:
-
Ensure that you're working in an active sandbox.
-
Navigate to the Workspace infolet that you want to modify.
-
From the Workspace infolet that you want to specify, for example, My Opportunities, select Configure from the Actions menu.
The My Opportunities Workspace infolet page is displayed with the predefined saved search filters selected.
-
From the Filters tab, select the filters that you want to display.
-
Click Save and Close when you have finished making the changes.
-
Verify your changes and publish the sandbox.