Match Data in Oracle Sales
This section describes matching just company data or matching both company and contact data. (To match contacts in Sales, you first must match company data.)
DaaS provides the Sales and Service template type, as well as the following mappings:
-
CXCompanyExport
-
CXContactExport
-
CXCompanyMatch
-
CXContactMatch
Mappings created with the Sales and Service template type create a ZIP file, which contains the
individual CSV files for import. See DaaS Files for Import Management in Sales. Download and extract the
ZIP file to a local folder, and then import each CSV file. The Account.csv
file (the parent file) must be imported first, before the child files.
-
From Sales, export the records that require matching into a CSV file. Use the provided match export map that specifies which attributes you are exporting, and specify the filter criteria that the application uses to select the records for export.
-
Match your data. Compare the file from Sales with the records in DaaS to see if there is a record match. When a record matches, DaaS replaces the record in the file.
-
Import the CXV match files into Sales by creating import activities.
-
Confirm the company information that you imported is now in Sales.
To match contacts, you must perform all the tasks for companies first, and then contacts. The following table describes the flow of tasks to match first company data, followed by contact data. There are two flows for performing matching for both companies and contacts.
|
Option 1: Match Companies First, then Contacts |
Option 2: Match Companies and Contacts Together |
|---|---|
|
This column describes the flow of the tasks to match first company data, followed by contact data: |
Alternatively, this column describes the flow of tasks to match company data and contact data together: |
|
1. Export the company records. |
1. Export the company records. 2. Export the contact records. |
|
2. Match your company data. |
3. Match your company data. 4. Match your contact data. |
|
3. Import first the account file, then the child files, into Sales by creating import activities. |
5. Import first the account file, then the child files, into Sales by creating import activities. 6. Import the contact file into Sales by creating an import activity. |
|
4. Confirm that the company information you imported is now in Sales. See Verify the Import of Data into Sales. 5. Export the records for contacts. 6. Match contact data. See Find Matching Records in DaaS. 7. Import the files into Sales by creating import activities. See Find Matching Records in DaaS. 8. Confirm that the contact information you imported is now in Sales. |
7. Confirm that the company information you imported is now in Sales. 8. Confirm that the contact information you imported is now in Sales. |
Export Data for Matching
In Sales, export the records that you want to match in DaaS to a CSV file. When setting up the export job, you must select the attributes that you want to export and the filter criteria that determine what records are exported. When you export for the first time, the choices you make are saved automatically as a map. You can reuse the same map on subsequent export jobs.
To export company and contact data from Sales:
-
From the Navigator, click Tools > Export Management.
-
On the Manage Export page, click the Create Export Activity button.
-
On the Enter Export Options page, provide values for each field as shown in the following table:
Field
Description
Name
Name of the import. Object
Select Account for companies. Select Contact for contacts.
File Name
Browse and select a text file in CSV format. Provide a file name within 40 characters. Language Independent Header Exports to DaaS should select this option to export the column headers (under Advanced Options). -
Click Next. The Map Fields page shows the export objects and account attributes.
-
Select a mapping under the Export Mapping drop-down list. If you're reusing an import mapping, then both the source and target columns are already populated.
-
Click Next. On the Review and Submit page, review the export activity configuration. Attributes that can be used for matching in DaaS are listed. All child attributes for accounts can be exported in a single file.
-
Click Submit to queue the export.
Find Matching Records in DaaS
To search and export company information:
-
In DaaS, navigate to the Match and Export page.
-
Use the following parameters to specify how you want matching done:
Parameter
Description
Job Name
Enter a unique name for the match export job. (This field is optional. If you don't enter a job name, then the service automatically generates one for you.)
Job Description
Enter a description for the match export job. (This field is optional.)
Data
Select Company or Contact to narrow the matching you want to perform.
File
Click Browse to locate the export file that you downloaded from Sales in Export Data for Matching.
Match Confidence
This value specifies the accuracy threshold of the matching process. Select a value between 1 and 100, where 100 represents a match confidence of 100 percent. The default is 70.
Note: The Match Score attribute returns the match confidence setting. Because D&B scores in the range of 1–10 (instead of 1–100), this attribute transmits the D&B raw match score in the range of 1-10 in match results. For example, if you set the Match Confidence field to 50 here, then the Match Score attribute returns a value of 5 in the output file.
Match Limit
Specify the maximum number of records to return.
The default is 1.
Note that if you set this to a number greater than 1, then you could get multiple records in the CSV file. To avoid errors importing into Sales, you should review the file and save only the 1 file you want before import.
Mapping
Select a mapping from the list. You can select a default mapping for most import jobs into Sales.
To add the data using Import Management in Sales, select CXCompanyExport or CXContactExport.
Default mappings set by the administrator cannot be edited or deleted. If you need different attributes in the mapping, you can create a new map based on a default map to edit the attributes: click Create Mapping, and from the Template Type list select Sales and Service.
You can create new mapping by clicking Create Mapping then selecting Sales and Service from the Template Type list.
Click Save & Select to use your edited or new mapping.
Filters Select to filter companies, based on internal Dun & Bradstreet (D&B) definitions. In Business: Select to include companies of all sizes and revenues that are currently operating.
-
Enterprise: Select to match companies with over 100 employees OR revenues over 100 million US$.
-
Medium: Select to match companies with between 50 and 100 employees OR revenues between 10 and 100 million US$.
-
Small: Select to match companies with less than 50 employees OR revenues less than 10 million US$.
Marketable Indicator: Select to include companies of all sizes and revenues that are currently operating.
-
Out of Business: Select to match companies that are not operating or inactive.
-
Delisted: Select to display companies that should not be contacted for direct marketing per General Data Protection Regulation (GDPR). If you select this filter, then companies and contacts that have indicated that they do not want to be contacted will appear in search results, and if those records marked Delisted are selected, they will be matched, synced, or exported. Companies and contacts marked as Delisted should not be included in marketing campaigns. It's important to note that company hierarchies contain Delisted records, regardless of this setting, to ensure that the hierarchy does not break.
-
Defunct: Select to match companies whose original company DUNS number is no longer tracked by D&B. When you search for some defunct companies (for example, a company that was acquired), the service returns the defunct company record along with the new DUNS number. The value in the New DUNS attribute is the DUNS number of the new legal entity after a merger or the DUNS number of the acquired company after an acquisition. D&B also defines a DUNS number as “defunct” in other scenarios, such as when it is a duplicate DUNS number of another record, or when a branch report becomes a separate entity.
-
-
Click Export, and you're taken to the Jobs page to view the job status.
-
When the job completes, click the number on Match Exports to review the matched data file. See Viewing the Status of Match Export Jobs and Analyzing the Log File for Failed or Rejected Records.
Import Match Export Data into Sales
To import the matched company or contact data that you downloaded from DaaS back into Sales, create an import activity. Enter basic data about the file to set up the import activity, specifying how the columns in your import file map to the attributes in the application, scheduling the import activity, and activating it.
To import the files into Sales:
Account.csv file (the parent file) must be imported first, before the child files (Address.csv, Classification.csv, AdditionalIdentifier.csv, AdditionalName.csv).-
From the Navigator, click Tools > Import Management.
-
On the Manage Imports page, click the Create Import Activity button.
-
On the Enter Import Options page, provide values for each field as shown in the following table:
Field
Description
Name
Name of the import. Object
Select Account for companies. Select Contact for contacts.
File Name
Browse and select a text file in CSV format. Provide a file name within 40 characters. Note: If your source file has more than 50,000 records, then you must manually split the file into several smaller files with less than 50,000 records each. The file import page only permits 50,000 records for each import job. Alternatively, you can use the External Cloud Data Loader Client, which can accept files with more than 50,000 records. See the My Oracle Support (support.oracle.com) document External Data Loader Client. Enable High Volume Import DaaS imports should select this option (under Advanced Options). -
Click Next. The Map Fields page shows the first row of the data from your source file. By default, the application tries to automatically map each of the source file columns to the appropriate target object attribute. If some of the columns in your file couldn't be mapped, then drag the target attribute onto the Attribute Name column under the Source File region.
The data in unmapped columns aren't imported.
-
Select a predefined mapping from the list of available mappings under the Import Mapping drop-down list. If you're reusing an import mapping, then both the source and target columns are already populated.
Leave the Attribute Name field blank for any column that you don't want to import.
-
Click Validate Data to check the field mapping.
-
Click Next. On the Review and Submit page, review the import activity configuration. If you didn't run the prevalidation on the Map Fields page, then you get a notification message to run the validation process.
-
Click Validate Data to check the data in your source file. Validation errors, if any, are displayed on the Mapping Validation screen. If you get warnings about unmapped columns, then you can ignore these columns, and proceed to submit the import job.
-
Click Submit to queue the import. Repeat this for all CSV import files.
Verify the Import of Data into Sales
To verify that the company or contact data from DaaS was imported successfully into Sales:
-
On the Manage Customers link. The Manage Customer page displays.
-
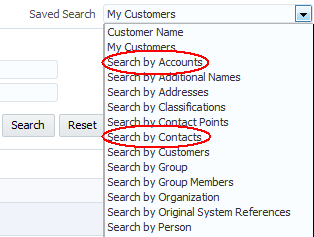
On the Manage Customers page, from the Saved Search list, select Search by Accounts for companies or Search by Contacts for contacts.
-
In the Unique Party Name field, enter the name of one of the companies (or the last name of one of the contacts) in the file that you imported, and then click Search.

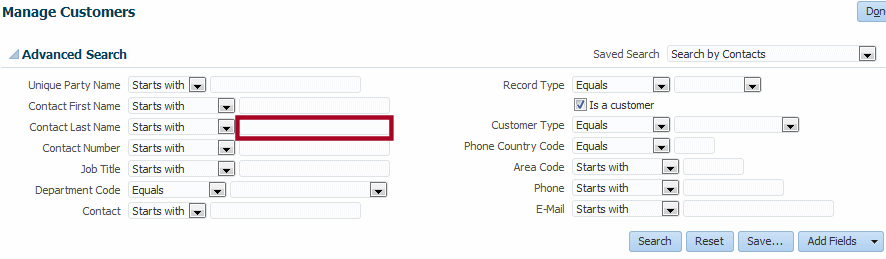
-
In the Search Results table, click the company name to see the details of the imported data. For contacts, click the company name associated with the contact name that you entered to see the imported data.
-
Verify that fields match the information for the company or contact in the file. For example, confirm that the DUNS numbers match.
Note: When submitting a match request using DaaS, the DUNS number for company records is not included or shown in the matched output file. When submitting a match request using Sales, the DUNS number is delivered as part of the matched record and is rendered in the Sales interface.